Chapter 4. System Preferences
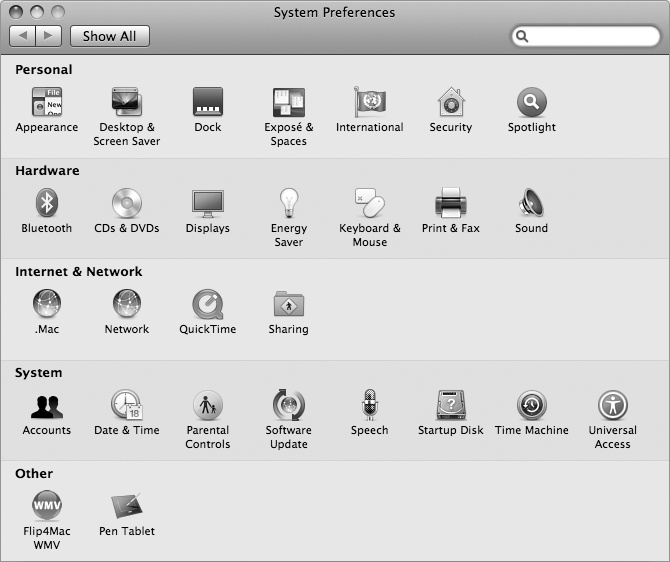
Before Mac OS X came along, you’d have to fumble through the Control Panels to set up your Mac, but now, Apple has made all these “panels” self-contained in the System Preferences application. When you want to set up your Mac just for you, System Preferences is the application you’re looking for. To launch the System Preferences application, simply click on its icon in the Dock (it’s the one that looks like a silver window with three gears inside), and the window shown in Figure 4-1 appears.
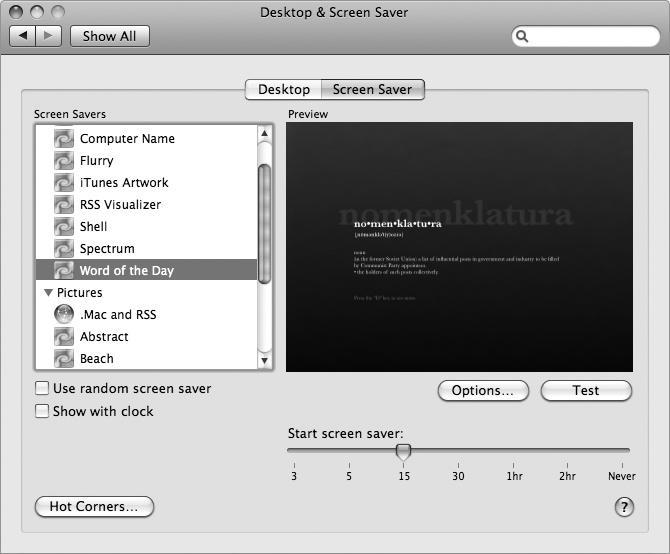
System Preferences is home to a series of preference panels you use for configuring your Mac. For example, if you wanted to select Mac OS X Leopard’s new Word of the Day screensaver, you would launch System Preferences by clicking its icon in the Dock, and then click Desktop & Screen Saver. This opens the preference panel shown in Figure 4-2. It has two tabbed “panes,” aptly named Desktop and Screen Saver. To change the settings for your screensaver, click the tab for the Screen Saver pane, then select a screensaver from the list on the lefthand side of the window.
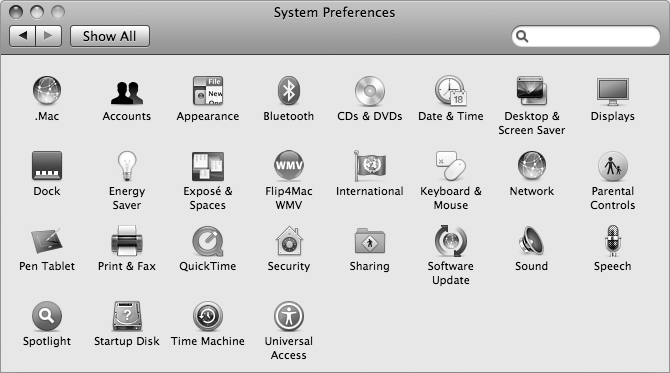
As you may have noticed in Figure 4-1, the System Preferences are separated into four categories: Personal, Hardware, Internet & Network, and System. When you click one of the icons, the window changes to reflect that particular panel’s settings. To go back to the main view, click the Show All button (View → Show All Preferences, or use the keyboard shortcut, ![]() -L). You can also select View → Organize Alphabetically; this menu option changes the view of the System Preferences window to that shown in Figure 4-3.
-L). You can also select View → Organize Alphabetically; this menu option changes the view of the System Preferences window to that shown in Figure 4-3.
When you’ve completed setting your Mac’s preferences, you can quit System Preferences by selecting System Preferences → Quit (![]() -Q), or by simply closing the System Preferences window using Window → Close (
-Q), or by simply closing the System Preferences window using Window → Close (![]() -W).
-W).
Note
Some of the System Preferences panels require administrator privileges. If you attempt to change a setting and are asked for a password, try using the password you used to log in to the computer. If that doesn’t work, contact your system administrator for assistance.
Searching for Preferences
If you take a close look at System Preferences’ toolbar (along the top of the window), you’ll notice a Search field. While the thought of having a Search field in System Preferences might seem odd, it really comes in handy for those times when you have an idea of what it is you want to do, but aren’t quite sure which System Preferences panel will do the trick. When you find yourself stuck like that, the Search field quickly comes to the rescue.
To search within System Preferences, either click in the Search field in the toolbar, or use the standard Mac keyboard shortcut for “find,” which is ![]() -F. For example, if you’re a former Windows user who is new to the Mac, you might not be familiar with the Mac lingo. So, when you go to System Preferences and want to set a new desktop image, you might still be thinking of “wallpaper.” To help find what you’re looking for, start typing “wallpaper” in System Preferences’ Search field, as shown in Figure 4-4.
-F. For example, if you’re a former Windows user who is new to the Mac, you might not be familiar with the Mac lingo. So, when you go to System Preferences and want to set a new desktop image, you might still be thinking of “wallpaper.” To help find what you’re looking for, start typing “wallpaper” in System Preferences’ Search field, as shown in Figure 4-4.
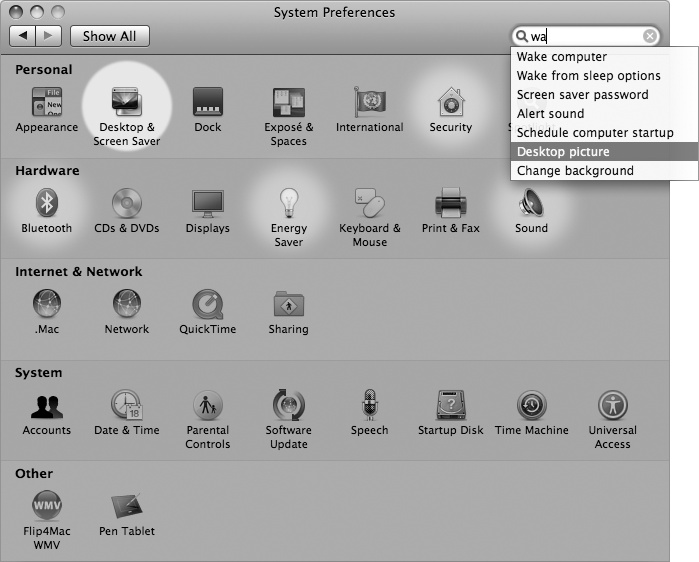
In this case, since you’re looking for “wallpaper,” you’ll see that “Desktop picture” shows up as one of the options in System Preferences’ search results. To open this panel, simply move your mouse down and click on “Desktop picture.” The circle of light (a spotlight—cute, huh?) flashes twice on the Desktop & Screen Saver panel, which opens it up in the window.
Tip
You can also use the arrow keys to highlight items in System Preferences’ search results. This can be somewhat entertaining, as pressing the Down or Up arrow keys focuses the Spotlight on the corresponding panel, giving you a Christmas tree-like effect as the glow moves around the window. Go on, give it a try—you know you want to.
System Preferences Overview
The next four sections provide an overview of the controls found in the System Preferences.
Personal
These items control the general look and feel of the Aqua interface.
- Appearance
When selected, this panel lets you specify the colors used for buttons and menu items, the location of scrollbar arrows (top and bottom, or together), and how a click in the scrollbar is interpreted (scroll down one page or scroll to that location in the document). Here, you can specify the number of recent items to be remembered and listed in the
 → Recent Items menu for applications and documents, as well as determine which font-smoothing style and size is best for your type of display.
- Dashboard & Exposé
This preference panel lets you configure the settings for Dashboard and Exposé’s Hot Corners.
- Desktop & Screen Saver
This panel has two panes, one you can use to set the background image for your desktop, and the other to select your screensaver. The Desktop pane lets you choose the pattern, image, or color of your desktop. If you click on the checkbox next to “Change picture” at the bottom of the window, the desktop picture changes automatically based on the timing you select in the pull-down menu.
The Screen Saver pane lets you select one of Mac OS X’s default screensaver modules. Here, you can set the amount of time your system must be inactive before the screensaver kicks in, require a password to turn the screensaver off, and specify Hot Corners for enabling or disabling the screensaver. For example, you could set the upper-right corner of your display to start the screensaver and the lower-right corner to prevent the screensaver from turning on if your mouse is located there.
Tip
If you have a .Mac account, you can also choose from the .Mac Screen Effects or subscribe to another .Mac member’s public slide show. To do this, click on the Configure button and enter the member’s username (for example, chuckdude).
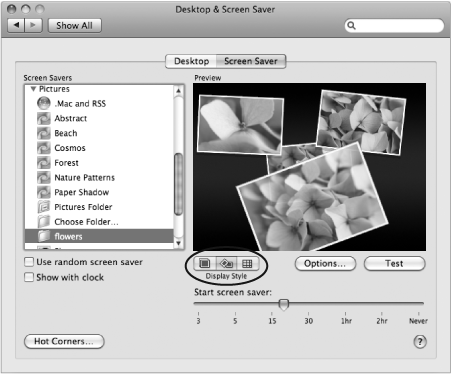
A new addition to the Screen Saver panel in Mac OS X Leopard is the ability to set the Display Style for how Pictures are displayed in Screen Saver mode. The three new options are Slideshow, Collage, and Mosaic, which you can specify by clicking one of the three buttons along the bottom of the Preview window, as shown in Figure 4-5.
Figure 4-5. Leopard’s new Display Style lets you specify how your photos are displayed when used as a screensaverThe new Mosaic screensaver creates a mosaic of one image using other images from your iPhoto Library.
Tip
You can only select the Mosaic Display Style if you have an iPhoto Library to choose images from.
- Dock
This is one of the ways you can configure your Dock (another is by going to
→ Dock → Dock Preferences). See "The Dock" in Chapter 3 for more details.- International
This is used to set the languages supported by your system. The language you specify during the installation process will be the default. Also found here are controls to format the date, time, numbers, and currency, as well as the keyboard layout to be used for a country and its language.
If you select more than one language in the tabbed Input Menu pane, a menu extra appears in the menu bar showing flags of the countries whose languages are supported on your system.
Tip
Earlier versions of Mac OS X let you use
 -Space to toggle between keyboard languages in the Input Menu. However, Leopard uses -Space to open and close Spotlight’s Search field. If you want to set a keyboard shortcut for the Input Menu so you can switch from U.S. English to Canadian English (trust me, it’s an option), use the Keyboard Shortcuts pane in the Keyboard & Mouse preference pane.
- Security
Leopard’s Security panel has undergone some revisions, bringing together the different panels that allow you to keep your Mac—and all the data on it—safe and secure. When you open the Security panel, you’ll notice three tabs—General, FileVault, and Firewall (which used to be in the Sharing panel in earlier versions of Mac OS X):
- General
The General pane lets you set basic security features for your Mac, including requiring a password to wake your Mac from Screen Saver or Sleep mode, and options to disable automatic login, to require a password to access each System Preferences panel, and to automatically log off if your account has been inactive for a specified amount of time. If you have a MacBook or MacBook Pro with an infrared remote, there’s also an option to disable the IR sensor, which could make your Mac vulnerable to other X10 devices.
- FileVault
This tab lets you set up a FileVault for your Home folder by encrypting its contents. FileVault uses Kerberos authentication to encrypt and decrypt files automatically. To enable FileVault, you’ll need to set the master password, and then click the “Turn on FileVault” button. After entering your login password (not the master password you’ve just set), you can turn on FileVault protection. All of the files in your Home folder are encrypted with your login password. This protects your files from being accessed by other users on your computer, or from someone who might boot your Mac into Target mode (see Table 2-1 in Chapter 2) with malicious intent. When FileVault finishes encrypting your files, you are required to log back in, after which you’ll notice that the icon for your Home folder in the Finder has changed from a friendly-looking house to one that looks like an imposing metallic safe.
- Firewall
As noted earlier, the Firewall panel used to be located in the Sharing panel in earlier versions of Mac OS X. In Leopard, the Firewall settings have been simplified to make it easier for the average user to set up her firewall and protect her Mac.
- Spotlight
This panel gives you added control when you’re using Spotlight. Use the Search Results pane to configure the order in which Spotlight displays its results. You can uncheck items you don’t want displayed in the search results, or you can drag them around in the list. For example, if you want the contacts in your Address Book to appear first, simply click on Contacts and drag it to the top of the list; the other items move down in the chain. If there are any folders or disks you don’t want Spotlight to index (such as Mail’s Junk mailbox), use the Privacy pane.
The two checkboxes at the bottom (and their corresponding pop-up menus) let you configure the keyboard shortcuts used to open Spotlight’s Search field in the menu bar (set to
-Space by default) as well as the Spotlight window (set to Option--Space by default).
Hardware
These panels are used to control the settings for the devices connected to your computer:
- Bluetooth
This panel allows you to configure the settings for using Bluetooth to pair your Mac with Bluetooth devices, such as a mouse, keyboard, mobile phone (such as the iPhone), printer, headset, or some other Bluetooth device. This item appears only if you have a Bluetooth-enabled Mac (such as the MacBook Pro, MacBook, iMac, or Mac mini), or if you are using a USB dongle that adds Bluetooth capabilities to an older Mac.
- CDs & DVDs
The items in the CDs & DVDs panel all share the same basic interface: a pull-down menu that lets you choose what the Mac does when it mounts various kinds of discs. You can choose to have it simply open the new media volume as a Finder window, launch an appropriate application (such as iTunes for music CDs and Disk Utility for blank discs), run a script, or prompt you to take some other action.
- Displays
This panel lets you set your monitor’s resolution and color depth (256, thousands, or millions of colors). It also has an option to include a monitor menu extra in the menu bar, as well as a slider control to set your monitor’s brightness. If you have more than one monitor connected to your system, clicking on the Detect Displays button allows you to specify settings for each display.
Tip
If you use a CRT display, the Displays panel also offers a Rotate pop-up menu, which lets you rotate the display (clockwise) 90 degrees at a time. For example, select 180 and watch your display flip upside-down. Of course, this makes it a little more difficult to use your mouse, but it sure looks goofy. (The Rotate feature is not available on laptop computers, such as the MacBook or MacBook Pro.)
- Energy Saver
This panel is used to set the autosleep settings for your computer. Here, you can specify the amount of time your system must be idle before Energy Saver puts your monitor, hard drive, or the entire system to sleep.
PowerBook and iBook users will also see two pull-down menus at the top of this panel. The first pull-down menu, Settings for, gives you options for controlling the Energy Saver settings for when you’re plugged in (Power Adapter) or when you’re operating on battery (Battery). The second, Optimization, lets you either select from four preset options or specify custom settings.
- Ink
This item appears only if you have a graphics tablet (such as a Wacom tablet) connected to your system. Ink controls how handwritten text is handled in InkPad. The Gestures tab includes pen strokes for invoking commands such as Undo, Cut, Copy, Paste, insert a space or carriage return (Vertical Space), and more.
- Keyboard & Mouse
This panel contains the following four panes:
- Keyboard
This pane controls the repeat rate, or the rate at which a key repeats when you depress it and hold it down. You can specify the speed of the repeat (from slow to fast) and the delay between the time the key is first depressed until the repeat option kicks in (from long to short). If you select the Off option for Delay Until Repeat, the repeat feature will be disabled entirely.
- Mouse (or Trackpad, if you have a MacBook Pro or MacBook)
This pane lets you specify the mouse’s Tracking Speed as well as the delay between double-clicks. If you are using an MacBook or MacBook Pro, the Mouse preferences panel will have an additional section for setting the controls for your Trackpad.
One cool feature to try out if you have a MacBook or MacBook Pro is the “Zoom while holding” option, which lets you specify a special key to invoke the feature. By default, this is set to the Control key. If you hold down the Control key and place two fingers on the trackpad, you can quickly zoom in or out by sliding your fingers up or down. This is a great shortcut to remember when you’re giving a presentation and someone asks you to zoom in on something.
- Bluetooth
This pane lets you configure the settings for Apple’s Bluetooth keyboard and mouse, if you have them. The Mouse and Keyboard sections have indicators to show the battery level for each device.
- Keyboard Shortcuts
This pane lists the various keyboard shortcuts you can use on your Mac. You can also add, remove, or change the shortcuts to suit your needs.
At the bottom of this window are two radio buttons for controlling Full Keyboard Access, one of the many accessibility features built into Mac OS X Leopard. Full Keyboard Access is always on in Mac OS X Leopard, which means anyone can use his keyboard to perform all the functions of the mouse, without ever having to use the mouse—you use the keys on your keyboard instead. Full Keyboard Access lets you use the Tab key to set the keyboard focus to either “Text boxes and lists only” or “All controls” (the default setting). For example, with “Text boxes and lists only” selected, you use the Tab key to move among the Full Keyboard Access key combinations listed in Table 4-1.
Table 4-1. Full Keyboard Access’s key combinationsFunction keys
Description
Control-F1
Enable/disable keyboard access.
Control-F2
Control the menu bar.
Control-F3
Control the Dock.
Control-F4
Activate the window or the first window behind it.
Control-F5
Control an application’s toolbar.
Control-F6
Control an application’s utility window (or palette).
Control-F7
Highlight either text input fields and lists, or any window control (used for windows and dialogs).
Control-F8
Move the focus to the status menus at the right side of the menu bar.
Esc
Return control to the mouse, disabling the Control-Fx key combination.
Spacebar
Perform the function of a mouse click.
Tip
If you are using a MacBook or MacBook Pro, you need to use Control plus the fn key, along with the Function or Letter key for keyboard access, to perform the commands in Table 4-1; for example, Control-fn-F2 to access menus, or Control-fn-F3 to switch to the Dock. The fn key is at the bottom-left corner of your keyboard, to the left of the Control key (and below the Shift key).
- Print & Fax
This panel is used to configure printers and set up your Mac to accept faxes. To add a printer or fax to your Mac, simply click the Add (+) button, and in the window that appears, select the item you wish to add to your Mac from the window’s toolbar. From the Faxing pane, you can opt to have incoming faxes sent directly to your default printer.
- Sound
This panel offers three panes: one for configuring the Sound Effects for Alert sounds, one for sound Output (e.g., speakers), and one for sound Input (e.g., microphone). The Sound Effects pane has an option for including a volume control slider in the menu bar.
Internet & Network
The following panels are used to control your Mac’s settings for connecting to other computers:
- .Mac
This panel has four tabbed panes: Account, Sync, iDisk, and Back To My Mac, which allow you to configure the settings for your .Mac account, see how much space is available on your iDisk, or set up Leopard’s .Mac Sync features.
The Back To My Mac feature, new to Leopard, lets you access files and services on your Mac from another Mac that has Back To My Mac enabled. Of course, those other Macs must be yours for this to work, but Back To My Mac opens the door for letting you access files on your Mac at home from your Mac at work.
- Network
This panel lets you configure your settings for AirPort, Ethernet, Bluetooth, and FireWire networking, including enabling/disabling AppleTalk. For details on how to configure these settings, see Chapter 6.
- QuickTime
This panel lets you configure QuickTime’s settings for playing back movies and music. If you’ve purchased a license for QuickTime Pro, enter the registration number in the Registration Code field so you’ll have full access to QuickTime’s features.
- Sharing
This panel lets you set the name of your computer and your Bonjour name. The lower portion of the Sharing panel lets you enable and disable different services, such as File Sharing, Screen Sharing, and Printer Sharing (among others). To enable a service, simply click the On checkbox next to a service, and then configure its settings to the right.
System
The items in the System panel allow you to configure a variety of settings for your computer:
- Accounts
As the name implies, this panel is used to add and remove users, and to make changes to their identities and passwords.
Tip
If you have administrator privileges, you can also specify Parental Controls for a non-administrator’s account for doing things such as removing items from the Dock, using the System Preferences, changing passwords, burning CDs or DVDs, and even restricting which applications and utilities are available to the user. For more information, see the section "Parental Controls" in Chapter 2.
- Date & Time
This panel is used to set the date, time, and time zone for your system, specify a network time server, and specify how (or whether) the date and time appear in the menu bar.
Warning
Want more space in your menu bar? Turn off the menu bar clock by unchecking the box next to “Show the date and time” in the Date & Time → Clock preference pane in System Preferences. Since you have the Dashboard at your disposal, whenever you need to know what time it is, just hit F12, look at the Dashboard’s World Clock Widget, and then hit F12 again to make the clock (and all the other Widgets you have open) go away.
- Parental Controls
One of the greatest improvements made to System Preferences in Leopard is the new suite of Parental Controls, which lets a system administrator (or parent) control how other users can use the system. To better protect your children from unsavory types on the Internet, you can control whom they can Instant Message (IM) with, whom they can email, and even which web sites they can visit using Safari. You can also protect them from any profane words in the Dictionary.
Furthermore, parents can restrict the hours their children can use the Mac. For example, you can set the number of hours your kids may use the Mac on weekdays and weekends, and even set limits that restrict them from using the Mac after and before a certain hour. For example, you can cut off their access to the computer after 9 p.m., and set it so they can’t use the Mac before 8 a.m. when you’re likely to be awake.
Tip
Of course, Parental Controls aren’t just a feature for parents. If you’re a system administrator in an office, you can enforce Parental Controls to prevent employees from accessing certain web sites, such as YouTube or other sites that you know will use a significant amount of bandwidth.
- Software Update
This panel is used to check for updates to your Mac OS X system and other Apple applications, such as the iLife or iWork applications. You can check for updates manually (i.e., when you want to, or when you learn of an available update) or automatically (daily, weekly, or monthly). When an update is found, you are prompted to specify which updates will be downloaded and installed on your system.
If you enable the “Download important updates in the background” checkbox, Software Update automatically downloads and installs important updates, such as Security Updates.
- Speech
This panel is used to turn on and configure speech recognition, specify a default voice for applications that speak text, and specify whether items in the user interface (such as alert messages or the text in menus) will be spoken.
- Startup Disk
This panel is used to specify the hard drive or partition that your Mac uses to boot into Mac OS X. With Leopard, you can also specify a Network Startup disk if your computer is configured or set up via NetBoot from Mac OS X Server. Leopard’s Startup Disk panel also features a Target Disk Mode button, which, when clicked, restarts your Mac and allows you to mount its hard drive as a FireWire drive on another Mac.
- Time Machine
This panel lets you turn Time Machine on or off, and allows you to specify a drive that you can back up your system to.
- Universal Access
This panel provides support for people with disabilities. It features two panes for people who have problems seeing or hearing, and two more panes for those who find it difficult to use a keyboard or mouse. The Universal Access panel also lets you turn VoiceOver on or off, and includes a button that opens the VoiceOver Utility (/Applications/Utilities).
Tip
One thing you’ll notice quickly is that all the text labels for the user interface elements in the Universal Access panel are spoken using the voice you’ve specified in the Speech panel.
To quit the System Preferences application, you can use either ![]() -Q or
-Q or ![]() -W. (Yes, closing the System Preferences window also quits the application.)
-W. (Yes, closing the System Preferences window also quits the application.)
Get Mac OS X Leopard Pocket Guide now with the O’Reilly learning platform.
O’Reilly members experience books, live events, courses curated by job role, and more from O’Reilly and nearly 200 top publishers.

