Creating an Account
To create a new account, start by unlocking the Accounts panel. That is, click the little padlock at lower-left, and fill in your own account name and password.
Now you can click the + button beneath the list of accounts. The little panel shown in Figure 12-3 appears.
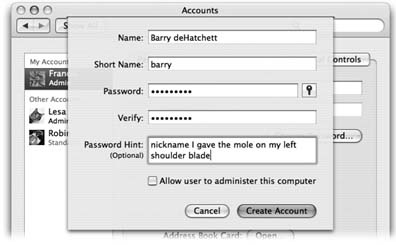
Figure 12-3. Mac OS X offers a long list of options for each account, as described in the following pages. None of it is difficult. Some of it, in fact, is kind of fun. But it all starts with this no-nonsense panel.
Phase 1: Name, Password, and Status
In this starter sheet, you fill in the most critical information about the new account holder.
Name. If it's just the family, this could be Chris or Robin. If it's a corporation or school, you probably want to use both first and last names.
Short Name. You'll quickly discover the value of having a short name—an abbreviation of your actual name—particularly if your name is, say, Alexandra Stephanopoulos.
When you sign into your Mac in person, you can use either your long or short name. But when you access this Mac by dialing into it or connecting from across the network (as described in the next chapter), use the short version.
As soon as you tab into this field, the Mac proposes a short name for you. You can replace the suggestion with whatever you like. Technically, it doesn't even have to be shorter than the "long" name, but spaces and most punctuation marks ...
Get Mac OS X: The Missing Manual, Tiger Edition now with the O’Reilly learning platform.
O’Reilly members experience books, live events, courses curated by job role, and more from O’Reilly and nearly 200 top publishers.

