As described in the sidebar on Sidebar 4.2, Mac OS X is like the renaissance operating system: it’s a polyglot, capable of running three different kinds of software: Cocoa (written from scratch for Mac OS X), Carbon (an older program that’s been updated for Mac OS X), and Classic (Mac OS 9 programs that are still Mac OS 9 programs).
Although somewhat unknown to those who are new to the Mac with OS X, Classic programs (older, Mac OS 9-compatible ones) are likely to be part of most longtime Mac fans’ lives for a while yet to come. Therefore, it’s well worth familiarizing yourself with Classic, the Mac OS 9 simulator that opens up automatically whenever you try to launch a Mac OS 9 program.
Do you have an aging printer that works great in Classic programs but doesn’t work in Mac OS X programs?
Your first resort should be to contact the printer company or, at the very least, to search the Web to see if some enterprising programmer has adapted a printer driver to work with your Mac. That should include a stop at http://gimp-print.sourceforge.net, where you’ll find Gimp-Print, a collection of hundreds of Mac OS X printer drivers for older printers. Although Gimp-Print is included in Mac OS X 10.3, it’s still worth a visit to their site to see if any updated drivers have been released.
If you’re still having no luck, and you need to print on that old printer only occasionally, here’s a method of last resort. In a Mac OS X program, save the document as a PDF file (File → Print → Save as PDF). Next, open the document in a Classic program that can read PDF files, like Adobe Acrobat—look in your Applications (Mac OS 9) folder for the Classic version. Now print away.
If you’re accustomed to the old Mac OS 9 days—where you’d use the
menu to launch control panels and programs—you might not know how to access your control panels from Mac OS X. You could, of course, switch to a Mac OS 9 program every time you need to bring up the old
menu, but that’s a huge waste of time.
Luckily, there’s a much quicker way. Open the System Folder, which is the folder that contains your copy of Mac OS 9. (Don’t confuse it with the folder called simply System—the one that bears an X—which is the Mac OS X operating system.)
Once this window is open, drag the Control Panels folder and the Apple Menu Items folder onto the right side of your Dock. From now on, you can access these programs without switching to Mac OS 9 first (Figure 4-26).
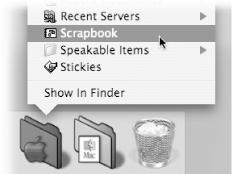
Figure 4-26. Once you’ve installed the Mac OS 9 Control Panels and Apple Menu Items folders on your Dock, Control-click them (or click and hold on them) for direct access to their contents. To make the folders stand out, feel free to paste custom icons on them (see Section 2.1.16).
Tip
If you’d still like to visit the Mac OS 9
menu from the Mac OS X menu bar, turn on the Classic menulet: open System Preferences → Classic and turn on “Show Classic status in menu bar.” Now you can just visit Classic menulet → Apple Menu Items to see a replica of your Mac OS 9
menu without ever launching Mac OS 9.
If you regularly use both the Classic and Mac OS X versions of Internet Explorer, you’ve probably encountered—and despised—the efficiency-defying task of synchronizing the browsers’ bookmarks by hand. Fortunately, it’s possible to trick your system into updating both sets of bookmarks automatically, along with your browsers’ history files and whatever Web sites you’ve captured on the Scrapbook panel of Internet Explorer. Here’s how:
Rescue your Favorites from Mac OS 9.
Before you create one set of files for both operating systems, save anything important from your Mac OS 9 Internet Explorer setup, as you’ll be replacing these files.
In the Mac OS X version of Internet Explorer, choose File → Open File. Navigate to the System Folder → Preferences → Explorer folder.
Open the document inside called Favorites.html (see Figure 4-27).
Figure 4-27. This sneaky little file contains a concise list of all your Mac OS 9 Favorites (bookmarks). It’s inside your System Folder → Preferences → Explorer folder.
Once you’ve opened this list,
-click one of your links inside it to open the corresponding Web page in a new window. Press
-D to add it to your Mac OS X bookmarks file and then press
-W to close that Web site window. Repeat with the next link in the old Favorites file. Continue until you’re certain you’ve saved all your critical bookmarks in the Mac OS X version of Internet Explorer. (Behind the scenes, they’re being saved in Mac OS X’s own Explorer folder.)
Rescue your Scrapbooked Web sites from Mac OS 9.
If you’ve never captured a snapshot of a Web page by using the Scrapbook tab at the left side of the Internet Explorer window, then skip this step.
Otherwise, switch to the Finder and open two side-by-side windows. In → the first, open System Folder → Preferences → → > Explorer → Internet Scrapbook. In the second, open your Home → Library → Preferences → Explorer → Internet Scrapbook folder. You should now see a list of everything you’ve added to Internet Explorer’s Scrapbook panel in both Mac OS 9 (the first window) and Mac OS X (the second window). Copy any Web pages that you want to save from the Mac OS 9 folder to the Mac OS X folder. (Leave the windows open.)
Now that you’ve saved your critical bookmarks and Internet Scrapbook items, it’s time to make sure you’ll never have to do it again.
In the two Finder windows you’ve already opened, move up one level in both (that is, click inside each window and press
-up arrow) so that you’re in the Explorer folder in each window.
In the Mac OS 9 Explorer folder, move Downloads.html, Favorites.html, and the Internet Scrapbook folder to your desktop (or somewhere else) for safekeeping. Leave the windows open.
Technically, you could delete these files now. But putting them on the desktop insures that if anything goes wrong, you’ll be able to move them back and return the Classic version of Internet Explorer to its original state.
In the Mac OS X Explorer folder, select Favorites.html, History.html, and Downloads.html. (The best way to select them all at once is to
-click each.)
While holding
-Option, drag the highlighted icons into the Mac OS 9 Explorer folder, as shown in Figure 4-28.
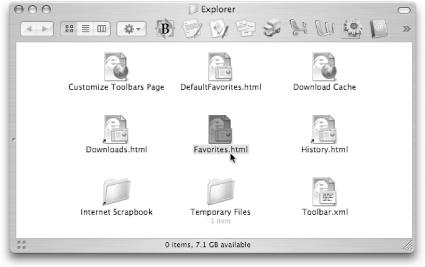

Figure 4-28.
![]() -Option-dragging icons creates aliases of them. In this case, aliases are created in the Mac OS 9 Explorer folder. When you drag, the cursor becomes a shortcut arrow, as seen here, indicating that you’re creating aliases, not copies.
-Option-dragging icons creates aliases of them. In this case, aliases are created in the Mac OS 9 Explorer folder. When you drag, the cursor becomes a shortcut arrow, as seen here, indicating that you’re creating aliases, not copies.
That’s all there is to it. If you open the Classic version of Internet Explorer, you’ll find that your bookmarks, history, and scrapbook now match their Mac OS X counterparts.
Even better, any changes you make in the Classic version of Internet Explorer also appear in the Mac OS X version. (Once you’re confident that everything works, simply delete the files you moved in step 4.)
Tip
Best of all, this technique works with many other programs that have both Classic and Mac OS X incarnations (Eudora, GraphicConverter, and so on). You may have to decipher which files they can share, though; Web sites like (http://www.macintouch.com) are good places to find such information.
Mac OS X duplicates many of the functions of the Classic System Folder—and in a far superior way. Turning off as many Mac OS 9 extensions as possible, therefore, turns your Classic environment into a much smoother and more stable experience and dramatically accelerates its startup process.
The key to controlling which extensions load is to press and hold the Space bar just after the Classic progress bar begins filling up, as shown in Figure 4-29. Release the Space bar only after the Extensions Manager window appears.
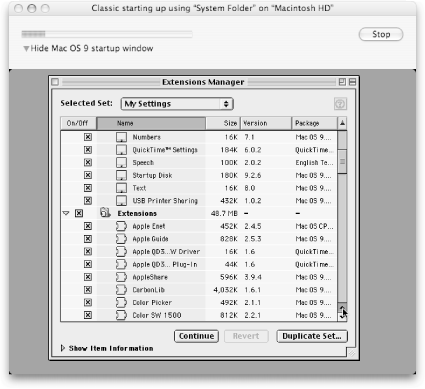
Figure 4-29. Pressing the Space bar while Classic is starting up opens Extensions Manager, just like when you press Space while starting up a Mac OS 9 computer. (If you’ve bought Conflict Catcher—a commercial replacement for Extensions Manager with many more features—you’ll see its screen appear here instead.)
To set up your winnowed-down extension set, click Duplicate Set in the lower-right corner of the window. In the dialog box that appears, type a name for the set you’re about to create (such as Classic Speedy Startup), and then click OK.
Now you’re ready to start paring down the extensions and control panels that delay Classic’s startup process and make it so prone to crashes. Depending on what functions you need to use in Classic, you might consider turning off the extensions and control panels in these function categories (by clicking their checkboxes so the X no longer appears):
Control Panels. Many of Mac OS 9’s control panel functions are superseded by new panels in Mac OS X’s System Preferences. Changing your mouse speed using Mac OS 9’s Mouse control panel, for example, doesn’t have much meaning if you’ve already set your mouse speed in Mac OS X.
Therefore, you should turn off the following control panels immediately since they don’t work in Classic: Control Strip, Energy Saver, File Sharing, Infrared, Location Manager, Modem, Monitors, Mouse, Multiple Users, Password Security, PowerBook SCSI Disk Mode, Remote Access, Software Update, TCP/IP, Trackpad, and Web Sharing.
Note
The following Mac OS 9 control panels work, albeit with limited functions, within Classic: Appearance, AppleTalk, Date & Time (for menu bar clock control only), General Controls (some commands, like Show Desktop, are dimmed), Keyboard (duplicated functions are dimmed), Memory (Disk Cache only), Monitors, and Sound (for alert sounds only).
Internet. If you do all your Internet dialing from within Mac OS X, you likely have little need for the equivalent functions in the Classic environment. If that’s the case, you can safely turn off DialAssist, Internet, Location Manager Extension, Apple Modem Tool, Internet V.90 Modem (and other modem names, such as PowerBook Modem), the LDAP extensions, NBP Plugin, NetSprocketLib, Remote Only, and ShareWay IP Personal Bgnd, in addition to the control panels listed above. You may as well turn off the Software Update extensions, too, since they rely on Internet access.
Networking, Multiuser features. If you won’t be connecting to other computers on your network from within Classic, turn off AppleTalk, the AirPort extensions, Keychain Access, IrDA Tool and IrDALib, Apple Enet, Apple Enet DLPI Support, AppleShare, EnetShimLib, File Sharing Extension, File Sharing Library, Multi-User Startup, OpenTpt Remote Access, Network Setup Extension, and SLPPlugin.
Printing. If you don’t plan to print from within Classic programs, you can turn off anything containing the words Print, Printer, Printing, or ColorSync, as well as the extensions bearing specific printer names (Color SW 1500, Color SW 2500, LaserWriter, and so on).
DVD. The old, Mac OS 9-style DVD Player program doesn’t even work in Classic. Turn off everything containing “DVD” in its name.
CD burning. Here again, Mac OS X does a far better job of burning CDs than Mac OS 9. For example, Mac OS X can even burn data DVDs, which hold a delightful 4.7 GB per disc. By all means, turn off the Disc Burner Extension.
Video games. A few video games require the OpenGL, QuickDraw 3D, NVIDIA, and ATI extensions. If you’re a gamer, you’ll experience the best game play by restarting your Mac in Mac OS 9, rather than trying to play Mac OS 9 games in the Classic mode. If you agree, turn off all extensions that contain the words QuickDraw 3D, OpenGL, NVIDIA, and ATI.
FireWire. Even if you have a digital camcorder for use with iMovie, you may as well turn off the FireWire extensions, as the Mac OS X version of iMovie is better than the Mac OS 9 version. Leave the FireWire extensions on only if you have FireWire gadgets like external hard drives that you want to access from within Mac OS 9.
Once your pruning session is complete, click Continue. You should find that the Classic mode now starts up dramatically faster than before.
Note
These are only suggestions. If, after turning off some of these extensions and control panels, you find that certain familiar Mac OS 9 functions are no longer available, exit Classic, restart it with the Space bar pressed, and experiment with restoring some of the things you turned off. And if you don’t have time to fiddle with individual extension settings, you can always turn on the entire Apple-authorized original set again. To do so, just choose Mac OS 9 All (or Mac OS 9.2.2 All, or whatever) from the Selected Set pop-up menu.
Similarly, note that the commercial program Conflict Catcher can switch extension sets automatically, depending on whether the System Folder is being used for Classic mode or an actual restart.
You can’t go totally hog-wild turning off System Folder elements. Classic expects to find certain System Folder items when it launches. If you turn them off, an error message will explain that “Some Classic-specific resources need to be added to or updated in your System Folder on [Disk Name].” If you click OK, Mac OS X copies them into the Mac OS 9 System Folder. Here’s a list, current as of Mac OS 9.2.2:
Control Panels: General, Startup Disk
Extensions: Apple Guide, CarbonLib, Classic RAVE, Open Transport, Open Transport ASLM Modules
Loose in the System Folder: Classic Support, Classic Support UI, ProxyApp
The Classic simulation mode is a perfectly satisfactory substitute for a true Mac OS 9 computer—most of the time. Occasionally, though, some people encounter tasks that don’t work except on a true, Mac OS 9-booted computer—as opposed to a sissified Mac OS 9 simulator. Certain older scanners, for example, work only on a machine that is actually running Mac OS 9; ditto with certain Mac games.
If you find yourself in that situation, consider creating two copies of Mac OS 9:
A Classic copy. Use this System Folder only as the basis for running the Classic simulator. In this one, turn off a huge number of the extensions, control panels, and drivers that typically clog the arteries of the System Folder. The result is a much faster Classic startup and a much more stable Classic emulator.
A full copy. Use the second System Folder for starting up the machine when necessary.
This trick, alas, comes with two very specific hardware requirements:
A pre-2003 Macintosh that can be restarted in Mac OS 9. (Mac models introduced in 2003 and later can only start up in Mac OS X.)
A second hard drive (an iPod, for example) or hard drive partition.
You can create a Classic-only version of Mac OS 9 by copying your hard drive’s System Folder to the new drive or partition. When you need to use your “real” version of Mac OS 9, just choose it in the Classic panel of System Preferences, and then restart the Mac.
Here are some general guidelines to streamline a Classic-only System Folder:
To create a Classic-only version that will load quickly and run solidly, trash items like shareware and freeware extensions and control panels that provide features you don’t absolutely need. You can toss, for example, things that modify sounds, create themes, and install items in your menu bar.
Turn off all of the extensions and control panels for features that Mac OS X already handles, as described in the previous hint.
To conserve disk space, empty the Preferences folder in the System Folder that you’ll use for Classic purposes.
Then, open the System Folder you’ll use for restarting the computer. Open its Preferences folder, press
-A to highlight all the files inside, and then
-Option-drag them to the Classic-only System Folder → Preferences folder.
In short, you’ve just eliminated the need to maintain duplicate sets of preferences. You really only have one set of preference files, but thanks to the aliases, they’re mirrored automatically in the second System Folder.
Once you have two Mac OS 9 folders, you can now tell the Mac what to do with them. Here’s how:
Choose the System Folder for Classic use. Open System Preferences → Classic. On the Start/Stop tab, click the icon for the System Folder that will represent your Classic copy. You’ll only have to do this step once.
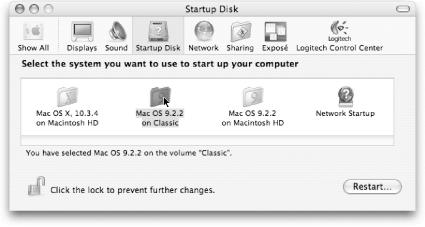
Designate the System Folder for startup purposes. You’ll perform this step only when you want to restart the Mac in Mac OS 9 (Figure 4-30).
This time, open System Preferences → Startup Disk. Click the icon for the System Folder that you want to act as the “start me up” operating system. Then restart the Mac.
As companies write more programs for Mac OS X and Mac OS 9 fades in utility, you may wonder if you need the older system lingering around, taking up hard drive space. Well, you don’t. Instead, you can run Classic from a simulated drive known as a disk image, much like the .dmg files that often serve as “digital wrappers” for software you download from the Web.
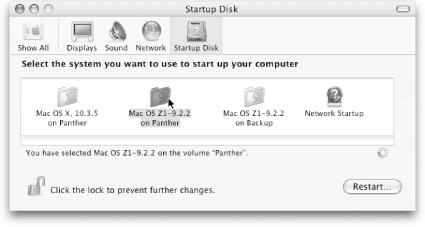
Figure 4-30. When you want to restart your machine in Mac OS 9, you’ll need to select your “full” copy of Classic as the boot disk, as seen here.
Why encapsulate your Classic System Folder in a disk image? Let us count the ways:
It’s hidden from view until you need it.
It’s preserved in its virginal, perfectly operational condition. You can’t accidentally delete something from, or save something into, your System Folder.
You can compress it to save disk space.
You can copy it from Mac to Mac, confident that all copies will be identical.
If you want to forge ahead, bear in mind that you need at least 500 MB of drive space to hold the disk image. You also need a tolerance for Terminal (Section P.3.5.3).
Make sure that Classic is not running. Then open Disk Copy (in Applications Utilities), and choose Images New Blank Image.
Disk Copy asks you to name the disk image you’re about to create.
Set up the name, size, and characteristics of the disk image.
Name it whatever you like—something like “Classic Disk Image” would suffice.
Set the size to 500 MB. Or, if you have an existing Mac OS 9 folder that you intend to drag to the new disk image, you can use Get Info to find its size (highlight its icon and then press
-I); then set the size in Disk Copy to something slightly larger than that.
Make sure the format is “read/write disk image.”
Click OK.
Disk Copy creates the new image, which is basically a file on your hard drive of the size you specified. This process takes a few minutes. After it’s done, quit Disk Utility.
Once your disk image has been created, Mac OS X should automatically mount it.
Mounting a disk means bringing its icon onto the desktop, as shown in Figure 4-31. If, for some reason, your disk image was not mounted, just double-click its icon on the desktop to fix the situation.
Put Mac OS 9 onto the new disk image.
You can either install Mac OS 9 from your original CDs onto the simulated disk, or drag your existing Mac OS 9 System Folder onto the image.
If you drag, you create a copy of Mac OS 9 as you’ve customized it. If you install from the CDs, you create a factory-fresh copy.
The customized version will probably be more useful to you, but the factory version will be much smaller and cleaner. It’ll also be free from the various bits that accumulate in the System Folder over the years.
Open Terminal.
It’s in your Applications → Utilities folder. Position its window so that you can see it and the Finder window that contains the new Mac OS 9 folder you just created.
At the prompt in Terminal, type sudo bless -folder and then press the Space bar to leave a space at the end of the line.
The “bless” command tells the Mac that the folder you’re about to specify is a legitimate, working Mac OS 9 System Folder. (Type man bless and then press Enter if you’d like more information on the command.)
In the Finder, drag the newly created System Folder from the disk image directly into the Terminal window.
That’s a shortcut for telling Terminal which file you intend to operate on. You see something like this:
sudo bless -folder /Volumes/Classic/System\ Folder
Type -folder9 and another space. Drag the exact same System Folder icon from the Finder into Terminal again.
You’ve just built a command that looks like this:
sudo bless -folder /Volumes/Classic/System\ Folder -folder9 /Volumes/Classic/System\
 Folder
Type -bootBlocks.
Make sure you make the second B uppercase.
The entire command should now look like this (with just one space instead of the line break shown here):
sudo bless -folder /Volumes/Classic/System\ Folder -folder9
/Volumes/Classic/System\ Folder -bootBlocks
The name of the disk image you created takes the place of “Classic” in the example above, but the remainder of the command should look the same. If everything seems right, press Enter. Enter your administrator password if asked.
If you did everything right, Terminal executes your command without complaint. Quit Terminal.
Open System Preferences → Startup Disk.
You’re going to use this application to trick the Classic preference panel into searching for working Mac OS 9 System Folders again.
Select the Classic folder you just created.
Figure 4-32 shows the effect.
Quit System Preferences.
You must quit and reopen System Preferences to make it recognize the new Startup Disk.
Open System Preferences again. Click Classic, then the Start/Stop tab.
The search indicator spins as Mac OS X looks for new disks containing Mac OS 9 System Folders.
Figure 4-32. Select the Mac OS 9 system that’s on the Classic disk image you just created. You won’t actually restart your computer by booting from the disk image (it wouldn’t work, anyway). By selecting it as the startup disk, however, you force the Classic preferences panel to search for new Classic disks the next time you launch it.
Find your new Mac OS 9 System Folder (the one on the disk image) in the list, and select it.
Now Mac OS X will use your new folder for Classic mode.
Still in System Preferences, click Startup Disk. Click the icon of the System Folder that you want to start up the Mac the next time it starts.
That would probably be Mac OS X.
Return to the Classic preference panel and click Start.
If you installed Mac OS 9 using the original CDs, a dialog box opens asking if you wish to add the necessary resources for Classic to run; click Yes. (If you made a copy by dragging your existing folder, there’s no warning.)
Use your old Mac OS 9 programs in Classic as usual.
When you’re done, stop Classic from its System Preferences panel first, and then click the Show All icon (or switch to any other preference panel) to avoid a warning about your disk selection.
Once Classic has stopped, you can drag the Classic disk image icon to the Trash to remove it from sight, or just press the Eject key on your keyboard.

The next time you need to run a Classic program—SimpleText, say—just double-click the SimpleText icon as usual. The Finder will mount your disk image (that is, turn it into a virtual disk on the screen) and then start Classic from it, all without your intervention.
Classic takes a bit longer to open this way than it does when launched directly from your hard drive. But look on the bright side: you now have a Classic that’s completely gone when you’re not using it. Meanwhile, you can boast to your friends that you “run Classic off a disk image, just like VirtualPC.” They’ll either be awed or disturbed by your geek prowess.
Get Mac OS X Power Hound, Second Edition now with the O’Reilly learning platform.
O’Reilly members experience books, live events, courses curated by job role, and more from O’Reilly and nearly 200 top publishers.

