Here are some of the advantages offered by Cocoa programs. It’s worth reading—not to make you drool about a future when all Mac programs will fall into this category, but to help clear up any confusion you may have about why certain features seem to be present only occasionally.
Note
The following features appear in almost all Cocoa programs. That’s not to say that you’ll never see these features in Carbonized programs; the occasional Carbon program may offer one of these features or another. That’s because programmers have to do quite a bit of work to bring them into Carbon applications— and almost none to include them in Cocoa ones.
The Mac has always been the designer’s preferred computer, and Mac OS X only strengthens its position. For one thing, Mac OS X comes with about 100 absolutely beautiful fonts that Apple licensed from commercial type companies—about $1,000 worth, according to Apple.
When you use a Carbon program, you usually access these fonts the same way as always: using a Font menu. But when you use a Cocoa program, you get the Fonts panel, which makes it far easier to organize, search, and use your font collection. Chapter 13 describes fonts, and the Font panel, in more detail.
You may remember from Chapter 1 that the title bar of every Finder window harbors
a secret pop-up menu. When you ![]() -click it, you’re shown a little folder ladder that
delineates your current position in your folder hierarchy. You may also remember
that the tiny icon just to the left of the window’s name is actually a handle that you
can drag to move a folder into a different window.
-click it, you’re shown a little folder ladder that
delineates your current position in your folder hierarchy. You may also remember
that the tiny icon just to the left of the window’s name is actually a handle that you
can drag to move a folder into a different window.
In Cocoa programs, you get the same features in document windows, as shown in Figure 4-16. (This feature is available in many Carbonized programs, but it isn’t a sure thing.) By dragging the tiny document icon next to the document’s name, you can perform these two interesting stunts:
Drag to the desktop. By dragging this icon to the desktop, or onto a folder or disk icon, you create an instant alias of the document you’re working on. This is a useful feature when, for example, you’re about to knock off for the night, and you want easy access to whatever you’ve been working on when you return the next day.
Drag to the Dock. By dragging this title-bar icon onto the Dock icon of an appropriate program, you open your document in that other program. For example, if you’re in TextEdit working on a memo, and you decide that you’ll need the full strength of Microsoft Word to dress it up, you can drag its title-bar icon directly onto the Word icon in the Dock. Word then launches and opens up the TextEdit document, ready for editing.
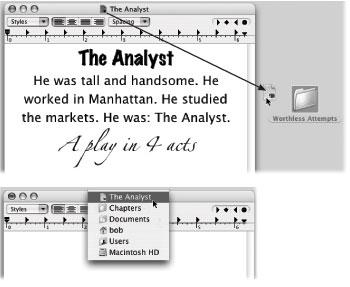
Figure 4-16. Top: By dragging the document-
window proxy icon, you
can create an alias of your
document on the desktop or
anywhere else.
Bottom: If you ![]() -click the
name of the document in
its title bar, you get to see
exactly where this document
sits on your hard drive.
(Choosing the name of one
of these folders opens that
folder and switches you to
the Finder.)
-click the
name of the document in
its title bar, you get to see
exactly where this document
sits on your hard drive.
(Choosing the name of one
of these folders opens that
folder and switches you to
the Finder.)
Unfortunately, you can’t drag an open document directly into the Trash—a technique that could come in handy for writers who struggle with first drafts.
Apple has always dreamed of a software architecture that would let you mix and match features from different programs—using the AppleWorks spelling checker in Microsoft Word, the drawing tools of PowerPoint in your email program, and so on. (Remember Apple’s OpenDoc software project? Neither does anybody else.)
In Mac OS X, Apple’s dream has finally become a reality. Nestled in the Application menu of almost every Mac OS X program is a command called Services. Its submenu lists several functions that technically belong to other programs, as described below (Figure 4-17).
Unfortunately, these commands are dimmed when you use most Carbonized programs (like AppleWorks, Microsoft Office, and Internet Explorer). They become available only when you use Cocoa programs like iChat, TextEdit, Mail, OmniWeb—and the Finder. (Yes, the Finder is a Carbon program. But remember that programmers can add Cocoa features to their older, Carbonized programs; it just takes a lot of work.)
Here’s a rundown of what they do.
Note
Not all of these Services work in all programs—even Cocoa programs. Implementing them is left to programmers’ discretion. In these early days of Mac OS X, a little unpredictability along these lines is par for the course.
The three commands listed in this submenu work only in one situation: When you’ve highlighted some text that precisely matches the name and folder path of any icon, such as ~/Documents/Marge.jpg). (Details on path notation in Section 1.2.2)
At that point, you can choose any of these commands from the Services→Finder submenu:
Open. Opens the icon. This command, in effect, lets you open any file on your hard drive, from within any Cocoa program, without having to switch to the Finder. For example, you could keep a list of your favorite files and programs in a TextEdit document, ready for opening without having to leave the program.
Reveal. Takes you to the Finder, where the specified icon is highlighted and its enclosing folder opened into a window.
Show Info. Switches to the Finder, where the Get Info window for the specified file opens, for your inspection pleasure.
If what you’ve highlighted isn’t the name and path of a document, you’ll get only an error message.
Grab is a screen-capture program in your Applications→Utilities folder. You use it to turn what you see onscreen into graphics files. It’s especially handy when writing computer books or training manuals.
The Grab service, in theory, lets you take your software snapshot from within any Cocoa application, without having to go find and launch Grab separately. Unfortunately, it’s available only in programs that can accept pasted graphics. You’ll find details on Grab’s submenu commands (Screen, Selection, Timed Screen) in Section 9.25.14.
This option, new in Panther, lets you import a digital photo from a scanner or digital camera, if one is attached and ready to roll. Like Grab, it works only in Cocoa programs that accept pasted graphics, and like Image Capture (on which it’s based), it can operate only Webcammable digital cameras and compatible scanners (see Section 9.10).
This handy command springs to life only after you’ve highlighted some text in a Cocoa program—or a file in the Finder.
Send Selection. In one step, the Mail Text command launches the Mail program and pastes the highlighted text into the body of a new, outgoing email message. You’re saved the trouble of copying, launching Mail, creating a new message, and pasting. You might use this feature when, for example, you find something interesting on a Web page, and you’d like to email it to someone.
Send To. This command is useful only if you’ve highlighted an email address in a text document. This command, too, switches to Mail and creates a new, outgoing message—but this time, Mac OS X pastes the text you’ve highlighted into the “To:” field.
This command copies whatever text you’ve got highlighted, switches to your Stickies
program (Section 9.22), creates a new sticky note, and pastes your selected material in
it. If you’re the kind of person who keeps your life—lists, passwords, favorite URLs,
to do list, notes, and so on—in Stickies, this one can save you considerable hassle. No
wonder Apple endowed it with its own keyboard shortcut: Shift-![]() -Y.
-Y.
When you highlight a Web address in any program, choosing this command fires up your Web browser and takes you to the indicated page.
For AppleScript fans only.
Get Result of AppleScript. This command processes whatever text you’ve highlighted as an AppleScript—and then replaces the selected text by the result of your script.
Make New AppleScript. This item works just like Make New Sticky Note, except that it copies your text into Script Editor rather than Stickies.
Run as AppleScript. This one runs a selected blot of text as if it were an AppleScript, much like Get Result of AppleScript. The only difference: It doesn’t replace the selected text with the result of your script.
None of these Script Editor services do any error checking. If you forget a quotation mark in your script, it simply won’t run.
Tip
If you know how to use the do shell script command, you can run Unix commands directly from your service-enabled programs (see Chapters 7 and 15).
Never let it be said that inspiration is dead in the post-tech-bubble era. This unassuming command, new in Panther, adds a powerful research assistant to every program where you can type. Highlight a phrase— Picasso, electric curtains, Yankees game—and hit this command. In seconds, you’re online, in your Web browser, facing a list of Web pages from a Google search for that topic. It’s a dictionary, thesaurus, news service, and stock ticker all in one.
The gang at Apple loves this one, too. They blessed it with its own keyboard shortcut:
Shift-![]() -L (for lookup).
-L (for lookup).
Bluetooth is a short-range, wireless, cable-elimination technology. It’s great for tossing files between two Macs (or a Mac and a Windows laptop, for that matter), on the fly, on a plane, without any cables or setup. (Your Mac must have a Bluetooth transmitter, of course. All current PowerBooks do, for example.)
If you’ve highlighted the path of a file (see the tip below), this command grabs the file and hands it off to Bluetooth File Exchange, which begins the process of transmitting it to a nearby Bluetooth computer. (Section 6.2.6 describes this ritual.)
As detailed in Chapter 14, Mac OS X doesn’t just display text onscreen—it can actually read it out loud.
Start Speaking Text. Start by highlighting some text in a Cocoa program. Then choose this command, and presto: The Mac actually reads the text out loud, using the character voice you’ve chosen in System Preferences (Section 14.5).
Stop Speaking. This command makes the Mac shut up.
Talk about intriguing: When you choose this command after highlighting some text, the Mac analyzes the sentences you’ve highlighted and, after a moment, launches Summary Service. This little program, which you probably never even knew you had, displays a greatly shortened version of the original text. Figure 4-17 offers details.
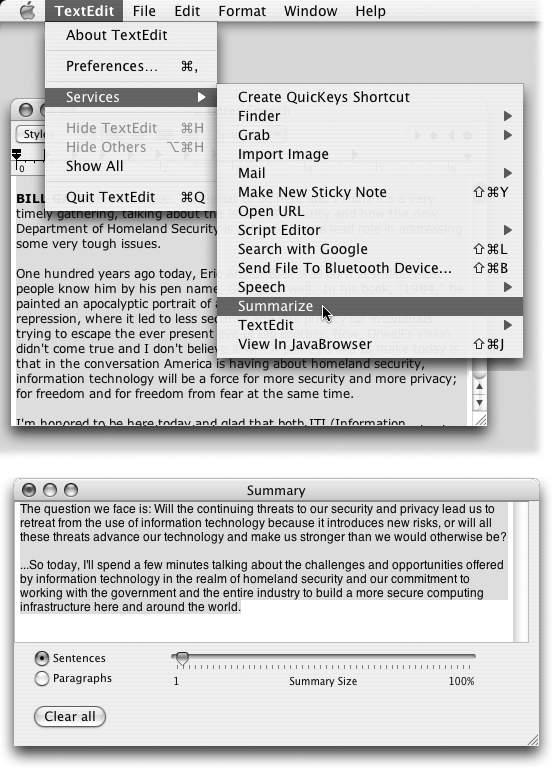
Figure 4-17. Use the Summarize command to create a one-paragraph summary (bottom) of a longer passage (top). Once the summary appears in the Summary Service program, you can make the summary more or less concise by dragging the Summary Size slider. You can also ask it to display the most statistically relevant paragraphs instead of sentences, just by clicking the appropriate radio button at the lower left. (Note: Bear in mind that Summary Service doesn’t actually do any creative rewriting; even Mac OS X can’t come up with something coherent if the original wasn’t. Instead, Summary Service chooses the most statistically significant sentences to include in the summary.)
This pair of commands also requires you to first highlight some text.
New Window Containing Selection. If you’ve highlighted some blob of text—on a Web page, say—this command automatically launches TextEdit, creates a new untitled document, and pastes the highlighted text.
Open Selected File. This command works only if you’ve highlighted some text that matches the name and folder path of a TextEdit document (including its folder path, like ~/Documents/essay.txt). If so, you can choose Services→TextEdit→ Open Selected File to find and open that document in TextEdit. (If what you’ve highlighted isn’t the name of a document, you’ll get only an error message.)
Although these are the commands that come built into a fresh installation of Mac OS X, that’s not the end of the versatility. The real beauty of Services is that as new, clever applications come along, they can add their own commands to this menu for your data-manipulation pleasure.
Tip
InstantLinks, a piece of $5 shareware from Subsume Technologies, offers a useful look ahead to the future of Services. It adds to your Services menu commands that send your highlighted text to various services on the Web.
For example, you can choose Dictionary Lookup (looks up the selected text in an online dictionary), Map Location (looks up the selected address at MapQuest.com—great when somebody emails you an invitation), Open URL, Search Web, and Thesaurus Lookup. You can download it from the “Missing CD” page of http://www.missingmanuals.com .
The toolbar is an increasingly common sight at the top of modern application windows. In any thoughtfully written program, the Customize Toolbar command lets you determine how you want this toolbar to show up—with icons, icons with text labels beneath them, with text labels alone to save window space, and so on.
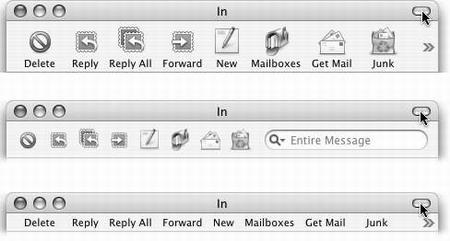
Figure 4-18. By ![]() -clicking the toolbar button repeatedly,
you can cycle among various
toolbar styles. This technique works in
most toolbar-equipped Cocoa programs
(and even the Finder, although it’s technically
a Carbonized program). In Mail,
for example, you can cycle between six
different toolbar styles: with icons and
labels (large and small); with icons only
(large and small); and with text labels
only (large and small).
-clicking the toolbar button repeatedly,
you can cycle among various
toolbar styles. This technique works in
most toolbar-equipped Cocoa programs
(and even the Finder, although it’s technically
a Carbonized program). In Mail,
for example, you can cycle between six
different toolbar styles: with icons and
labels (large and small); with icons only
(large and small); and with text labels
only (large and small).
But in many Cocoa programs—including OmniWeb, Mail, Address Book, and
XCode—there’s a much faster way to switch among these toolbar styles: Just ![]() -click
the white button shown in Figure 4.18.
-click
the white button shown in Figure 4.18.
For the most part, it’s possible to ignore the Unix that beats within the heart of Mac OS X. But every now and then, a refreshing reminder pokes its head up through the fields of brushed metal—and here’s one of them.
Although you’ll never see it mentioned in the user manuals for Cocoa applications (if there even were such thing as user manuals anymore), all of them respond to certain keystrokes left over from the NeXT operating system (Mac OS X’s ancestor). If you’re a card-carrying number of KIAFTMA (the Keyboard Is Always Faster Than the Mouse Association), you’ll love these additional keyboard navigation strokes:
Control-A. Moves your insertion point to the beginning of the paragraph. (Mnemonic: A = beginning of the Alphabet.)
Control-E. Deposits your insertion point at the end of the paragraph. (Mnemonic: E = End.)
Control-D. Forward delete (deletes the letter to the right of the insertion point).
Control-K. Instantly deletes all text from the insertion point to the right end of the line. (Mnemonic: K = Kills the rest of the line.)
Control-O. Inserts a paragraph break, much like Return, but leaves the insertion point where it was, above the break. This is the ideal trick for breaking a paragraph in half when you’ve just thought of a better ending for the first part.
Control-T. Moves the insertion point one letter to the right—and along with it, drags whichever letter was to its left. (Mnemonic: T = Transpose letters.)
Option-Delete. Deletes the entire word to the left of the insertion point. When you’re typing along in a hurry, and you discover that you’ve just made a typo, this is the keystroke you want. It’s much faster to nuke the previous word and retype it than to fiddle around with the mouse and the insertion point just to fix one letter.
Four additional keystrokes duplicate the functions of the arrow keys. Still, as long as you’ve got your pinky on that Control key...
Control-B, Control-F. Moves the insertion point one character to the left or right, just like the left and right arrow keys. (Mnemonic: Back, Forward).
Control-N, Control-P. Moves the insertion point one row down or up, like the down and up arrow keys. (Mnemonic: Next, Previous).
As hinted in Chapter 1, the ![]() key unlocks a slick trick in Cocoa programs: It lets
you operate the buttons and controls of an inactive, background window without
bringing it to the front. You can operate a background window’s resize box, buttons,
pop-up menus, and scroll bars, all while another window is in front of it. In fact, you
can even drag through text in a background window—and then drag-and-drop it into
the foreground window. (Freaky!)
key unlocks a slick trick in Cocoa programs: It lets
you operate the buttons and controls of an inactive, background window without
bringing it to the front. You can operate a background window’s resize box, buttons,
pop-up menus, and scroll bars, all while another window is in front of it. In fact, you
can even drag through text in a background window—and then drag-and-drop it into
the foreground window. (Freaky!)
In every case, the secret is simply to keep ![]() pressed as you click or drag.
pressed as you click or drag.
Get Mac OS X: The Missing Manual, Panther Edition now with the O’Reilly learning platform.
O’Reilly members experience books, live events, courses curated by job role, and more from O’Reilly and nearly 200 top publishers.

