Windows in Mac OS X have an entirely different set of controls than those from earlier versions of the Mac OS. Controls for closing, minimizing, and zooming a window to a larger size are all grouped together at the left edge of a window’s title bar, and the dialog windows, alerts, and sheets have changed as well.
This section introduces you to the basic features and types of windows you’ll encounter while using Mac OS X.
Each window has a set of common controls, as shown in Figure 1-29.

The controls are listed as follows:
Close button (red)
Minimize button (yellow)
Zoom button (green)
Proxy icon
Filename
Toolbar button (not available on all windows)
Scrollbars and scroll arrows
Resize window control
The top part of the window is known as the titlebar. The titlebar is home to the three colored window control buttons used for closing (red), minimizing (yellow), and zooming (green) the window. Mousing over the buttons changes their state to be either an X, a minus sign (-), or a plus sign (+), respectively. These are visual cues of the function the button performs.
With some applications, you’ll notice that the red
Close window button has a dark-colored dot in its center. This means
that the document you’re working on has
unsaved changes; if you save the
document (File→Save, or ![]() -S), the dot goes away.
-S), the dot goes away.
A window’s titlebar runs across the top edge and, as
its name implies, features the title or name of that window. Window
names are usually unique within a single application. For example,
word processor windows are named for the documents they represent,
while web browser windows take their titles from the
<title></title> tag in the HTML web
pages they display.
Tip
In earlier versions of the Mac OS, double-clicking the titlebar invoked the windowshade feature. Everything below the titlebar would hide, leaving just a floating titlebar, which you could leave in place or drag around as needed. If you double-click on the titlebar of a window in Mac OS X, the window minimized to the Dock.
The only Mac OS X application that still retains the windowshade
feature is Stickies
(found in /Applications). However, if you miss
this feature, you can download a third-party application called
WindowShade X (http://www.unsanity.com).
Titlebars are a window’s simplest control. You can move a window around just by dragging its titlebar, and double-clicking the titlebar minimizes the window to the Dock. Beyond this built-in functionality, however, the titlebar is home to several other controls, such as the close, minimize, and maximize window buttons, the proxy icon, and in certain circumstances, a toolbar button.
A window’s titlebar gains a couple of special properties if it represents something in the filesystem:
- Path view and selection
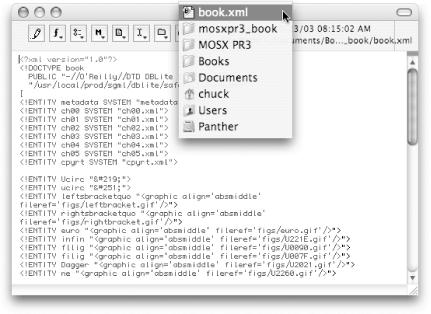
Command-click the window’s title (the actual text in the middle of the titlebar) to produce a pop-up menu showing the object’s path (as seen in Figure 1-30), with one menu row for each enclosing folder or disk. Selecting any of these folders or disks opens that object’s window in the Finder.
The final item in this pop-up menu is always a disk icon (most often that of a hard disk, or a disk partition); selecting it opens a Finder view of that disk’s root. See Section 1.7.3 for more about disk icons in the Finder.
- Proxy icon
Any window that represents a file, folder, or disk gets a miniature version of its Finder icon to the left of its title in the titlebar, as seen in Figure 1-29; this is its
proxy icon. (New document windows don’t get a proxy icon until the first time they are saved.) While this can be useful for visually determining a document’s file type, it’s more than a mere label.You can click and drag this icon and get the same effect as if you were dragging its “real” Finder icon around. Hence, you can drop its icon into another document window, onto another application’s icon, place it in the Dock, and so on. In all cases, you’ll receive the same effect as if you performed the same action from the Finder.
Tip
The one exception to this rule is that you can’t drag an open document window’s proxy icon to the Trash.
Modifier keys for moving, copying, and making aliases all apply when dragging a proxy icon, as detailed in Section 2.10 in Chapter 2.
Some nondocument windows put proxy icons to other clever uses. Internet Explorer, for example, uses an @-shaped proxy icon in the titlebar of web pages. Dragging it is equivalent to dragging the page’s URL string, letting you quickly paste it into an email message or drop it on the Desktop as a “Web Internet Location” document.
If the window is not in sync with its document (i.e., it contains unsaved changes), the proxy icon is grayed out and untouchable. Saving the document returns it to its opaque and interactive state.
Some applications assign a toolbar to its windows, giving you quick access to various commands. As seen in Figure 1-31, the System Preferences window has a toolbar, which you can use to hold the preference panels you use frequently.
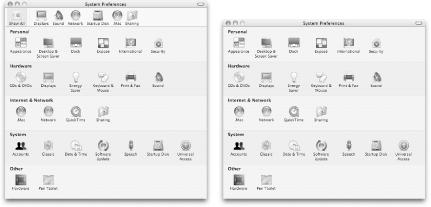
Windows with toolbars have a transparent button on the right side of their titlebars, as shown in Figure 1-31. If you click on the toolbar button, the toolbar disappears; click on it again, and the toolbar reappears.
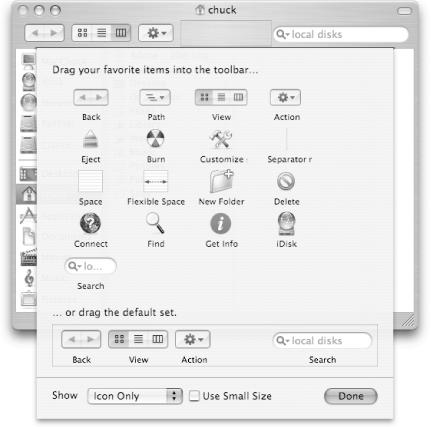
Most applications that use toolbars make them customizable by way of a “Customize Toolbar...” option in their View menu. Selecting this summons a sheet that contains a palette of all the buttons you can place in that particular window’s toolbar (including a predefined default set, at the bottom) as well as options to control their appearance and organize them into groups. You can now make the toolbar look just how you want. Figure 1-32 shows the Finder’s Customize Toolbar window.
You can also customize a
toolbar
to some extent without using this dialog. If you hold down the
Command key (![]() ), you can drag toolbar icons left or
right to rearrange them, or drag and drop them from the toolbar to
make them go away in a puff of smoke. (You can add them back again
later by visiting the Customize Toolbar... sheet.) Some applications,
such as System Preferences and the Finder, let you drag icons on and
off the toolbar.
), you can drag toolbar icons left or
right to rearrange them, or drag and drop them from the toolbar to
make them go away in a puff of smoke. (You can add them back again
later by visiting the Customize Toolbar... sheet.) Some applications,
such as System Preferences and the Finder, let you drag icons on and
off the toolbar.
When using Mac OS X, there are a variety of windows you’ll encounter. Everything ranging from your standard Finder window (discussed in Chapter 2) to document windows, palettes, dialogs, alerts, sheets, and drawers. These include all the buttons and controls that help give the Mac interface its ease-of-use reputation.
Dialogs are a common sight in any GUI. When an application requires you to make a decision or otherwise needs your attention, it interrupts its activities to display a special window. Thereafter, it won’t let you perform any other activities within that application until you give it due attention, whether that involves making a choice, or merely acknowledging or dismissing the dialog.
A common example of a dialog window (or dialog
box), is what you see when you select File→Open
(![]() -O) in any document-editing application, as shown in
Figure 1-33.
-O) in any document-editing application, as shown in
Figure 1-33.
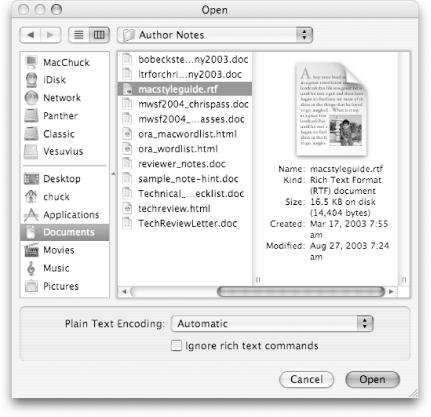
Open dialogs in Mac OS X Panther now offer many of the features of the Finder window, including:
The Finder’s Sidebar to the left for navigating through drives and folders; all of the items in the Finder’s Sidebar are available in the Sidebars of Open and Save dialogs in Mac OS X Panther.
Back and Forward buttons to go up or down through folders.
View buttons, to change the view from Column View (the default) to List View.
When you locate the file you wish to open, either select the file and
hit the Open button, or dismiss the dialog by clicking on the Cancel
button (or using the ![]() -. keyboard shortcut).
-. keyboard shortcut).
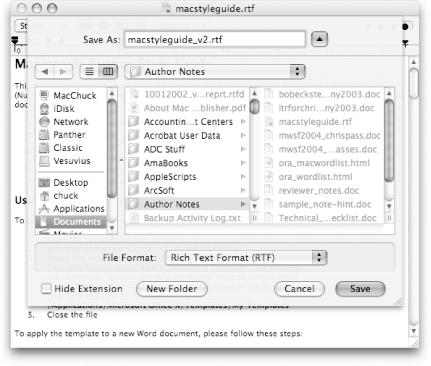
A sheet is a special kind of dialog that flops out from beneath the window’s titlebar, partially covering its view (see Figure 1-34). As with the Open window, the Save (and Save As) sheets incorporates Finder features to help you navigate through the filesystem and select a location to save files.
A window loses most of its interactivity when displaying a sheet; the sheet requires your input on some decision (even if it’s just to dismiss the sheet through its Cancel button), although you can still use window controls to move, resize, and minimize the window. However, you can continue using other windows, even those belonging to that application.
The sheet you’ll see most often is the Save sheet; look for it when you first save a new document to disk or whenever you choose Save As... from an application’s File menu. When you try to close a document window that contains unsaved changes, the sheet shown in Figure 1-35 appears.

This sheet offers three possible options:
Save, which is the default as noted by its blue color. If you click on the Save button (or hit the Return key), this sheet is replaced with a Save sheet so you can save the file.
Cancel, which dismisses the sheet and returns you to the document window.
Don’t Save, which closes the document window without saving the file or any changes you’ve made.
Whenever you see a sheet similar to the one shown in Figure 1-35, you can hit the Return key to invoke the
button that has the focus (meaning, the colored
button), or use ![]() -. to invoke the Cancel button and
-. to invoke the Cancel button and
![]() -D to invoke the Don’t Save button.
-D to invoke the Don’t Save button.
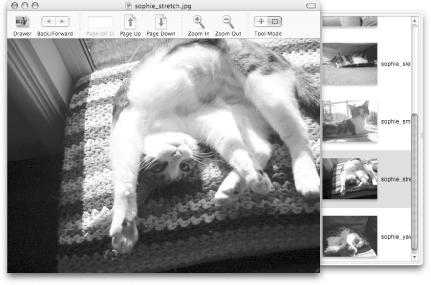
Windows can choose to hide parts of themselves in
drawers,
which slide out from the left or right side of a window. Drawers
contain information and controls secondary to the
window’s main function. One such application that
uses drawers is
Preview. For example, if you
select a bunch of JPEG images in the Finder and hit ![]() -O
(short for File→Open), all the images will open in a single Preview
window, and the individual images are displayed in the drawer, as
shown in Figure 1-36. If you open a multipage PDF
document in Preview, each page of the document is represented in
Preview’s drawer.
-O
(short for File→Open), all the images will open in a single Preview
window, and the individual images are displayed in the drawer, as
shown in Figure 1-36. If you open a multipage PDF
document in Preview, each page of the document is represented in
Preview’s drawer.
Other applications that make great use of drawers include Mail, iCal, and Backup’s QuickPicks drawer. (Backup is only available to .Mac members; use it to back up data to an iDisk, CD/DVD, or an external drive.)
As with sheets, a drawer remains attached to its window, even if you move or resize the parent window. You can change the width of a drawer by clicking and dragging on one of its edges. (You can also close it entirely by dragging it to the window’s edge, but usually it or its window provides faster ways to close it.)
Unlike previous versions of the Mac OS, Aqua windows can interleave freely. This means that windows belonging to a given application don’t insist on sticking together as they did in earlier versions of the Mac OS. Bringing one window of an application into focus won’t automatically pop all other windows of that application to the top of the stack. This can prove useful when working with two applications side by side. You can arrange the windows so you can see the contents of both without having to wrestle with any other open windows belonging to either application.
Tip
If you do want to bring all of an application’s windows to the top of the window stack, just click once on that application’s icon in the Dock.
Mac OS X windows follow the usual behavior of forming into a single stack, with one window at a time possessing focus and ready for user interaction. Subtle visual cues are used, however, to make the top window visually distinct, giving it an opaque titlebar with red, yellow, and green control buttons (see Section 1.8.1 earlier in this chapter), as well as a drop shadow.
Most of the time, you bring a window into focus by clicking on it, which makes it snap to the top of the stack. You can also call it forth by selecting a window from an application’s Dock menu (accessed by Control-clicking on the Dock icon) or choosing it from its application’s Window menu, if the application offers one.
Tip
You can use ![]() -
-` to
cycle
through all of the application’s open windows.
(That’s the
“backtick” key, located in the
upper-left of your keyboard, just below the Escape key.)
You can interact with a window in the background by holding down the
Command key (![]() ); when you move the mouse over any of the
window’s controls, that control temporarily receives
the focus. You can always move, resize, or scroll it by
); when you move the mouse over any of the
window’s controls, that control temporarily receives
the focus. You can always move, resize, or scroll it by
![]() - dragging its various controls; if it uses standard
Cocoa interface widgets, you can even press buttons and select text
without losing focus from the top window! Similarly, you can also
access the close, minimize, and zoom window control buttons by just
mousing over them; no keypress required.
- dragging its various controls; if it uses standard
Cocoa interface widgets, you can even press buttons and select text
without losing focus from the top window! Similarly, you can also
access the close, minimize, and zoom window control buttons by just
mousing over them; no keypress required.
Get Mac OS X Panther in a Nutshell, 2nd Edition now with the O’Reilly learning platform.
O’Reilly members experience books, live events, courses curated by job role, and more from O’Reilly and nearly 200 top publishers.

