One of Mac OS X’s most visually distinctive features is its Dock, a highly customizable strip of icons found (by default) along the bottom of the screen. Even if you choose to temporarily hide or change its location, the Dock remains active and always available.
As Figure 1-22 shows, the Dock can contain many different kinds of icons, several of which are described in the list that follows.

The Finder icon
Application icons
An active application
An inactive application
The Divider
Folders that have been placed in the Dock
A Quick Link
Minimized windows
The Trash icon
The icons found in the Dock allow you to quickly launch and maneuver among applications, as well as provide shortcuts to frequently used folders and documents. These icons also sometimes act as applications in their own right. The Dock is the new home of the Trash, which used to reside at the lower-right corner of the Desktop in earlier versions of the Mac OS.
Application icons live to the left of the Dock’s divider bar. Each represents an application, either one that is currently running or one that’s idle but “docked” (meaning that you’ve chosen to let its icon have a permanent home on the Dock).
To launch an application whose icon is in the Dock, just click on the icon. If an application’s icon doesn’t reside in the Dock, you can launch an application (or open a file) by locating it in the Finder and performing one of the actions in the following list.
When you launch an application, its icon bounces in the Dock to let you know the program is loading. After the application has launched and is ready to use, a black triangle appears beneath its icon to let you know that the application is active. (The Finder will always have a black triangle under its icon because it’s always available.) When you quit the application, the black triangle disappears, as will the application’s Dock icon if it hasn’t been selected to stay in the Dock.
When you have more than one application running, you can bring another application forward by clicking once on that application’s Dock icon. That application and all of its open windows will come to the foreground.
When a background application needs your attention, its Dock icon will bounce frantically. To see the application, bring it to the foreground by clicking on its Dock icon.
The Dock gives you two ways to permanently add application icons:
You can drag any application’s icon onto the Dock from the Finder. The original icon will stay where it is, and the Dock creates a pointer to it, much like an alias.
If you are running an application that doesn’t normally have an icon in the Dock, Control-click on the application icon to reveal its Dock menu. Select “Keep In Dock” from the menu to make the icon stay there after the application quits, as described in the next section.
To remove an item from the Dock, simply drag an inactive application’s icon off the Dock and release the mouse button. The icon will disappear in a puff of smoke. This has no effect on the actual application; it simply removes the application’s icon from the Dock.
You can also remove an active application from the Dock by dragging it off, although the effect is less obvious because it will snap back into place (since all active applications’ icons must appear on the Dock). However, the system will remember your action, and quietly remove the icon from the Dock once the application quits (unless, of course, you change your mind by choosing “Keep In Dock” from its Dock menu).
Every active application icon has a Dock menu, which you can call up by either Control-clicking the icon or clicking on the icon and holding the mouse button down. An application’s Dock menu is attached to the icon, as shown in Figure 1-23.
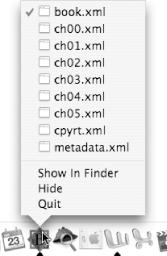
Dock menus contain, as commands, the titles of all the windows an application has open, each marked with a little “window” symbol. Select one to bring it forth, along with its parent application. The top window will have a checkmark next to it; there is no distinction for minimized windows.
Tip
Classic applications have only a basic Dock menu without the window list. Instead, a Classic application’s Dock menu gives you only the options of Show in Finder and Quit (or Force Quit).
Every application’s Dock menu typically contains at least a couple other commands, including:
- Quit
Quits the application, even if it’s not in the foreground. The application reacts as if you had selected Quit from its application menu or used the keyboard shortcut
 -Q
to quit the application.
-Q
to quit the application.If you hold down the Option key while looking at an application’s Dock menu, Quit changes to Force Quit; selecting this option instantly kills that application.
The Finder’s icon lacks a Quit or Force Quit option. (In fact, all it has is a list of open Finder windows and a Hide option to hide all open Finder windows.) If you need to restart the Finder for some odd reason, do so by selecting
 →Force
Quit (Option--Escape). Then select the Finder and click
on the Relaunch button, as described earlier.
→Force
Quit (Option--Escape). Then select the Finder and click
on the Relaunch button, as described earlier.- Show In Finder
Opens a Finder window, showing the location of the application on your system.
- Keep In Dock
This option appears only for icons whose applications aren’t permanently docked. Normally, the icon of an undocked application vanishes once that application exits. Select this option to give the application a permanent home in the Dock, where it will remain as an inactive application icon once its corresponding program has quit.
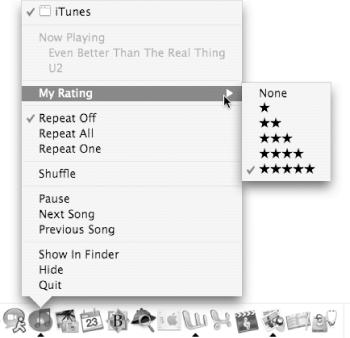
Beyond these basic selections, an application can put whatever it likes in its Dock menu. Among the standard Apple suite, for example, iTunes is notable for cramming a basic audio control panel in its Dock menu, including information about the song that’s currently playing, as shown in Figure 1-24.
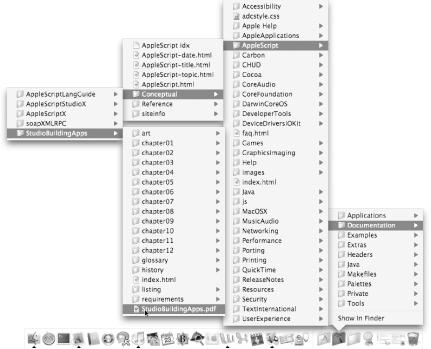
Beyond applications, documents, folders, and disks can also be placed in the Dock to the right of the divider, as shown in Figure 1-25. Clicking on a document in the Dock opens the file using the appropriate application; disks and folders will open a new Finder window bearing their contents. If you click on a folder in the Dock and hold down the mouse button, its contents are revealed in a Dock menu, allowing you to select from its contents.
One folder you might consider placing in the Dock is your Home folder, which gives you rapid access to everything stored within. To add your Home folder to the Dock, follow these steps:
Open a Finder window by clicking on its Dock icon.
Click on the Home icon in the Finder’s Sidebar.
Drag your Home folder’s proxy icon (the little house in the window’s titlebar) into the Dock and drop it on the right side of the divider. (Proxy icons are covered later in this chapter in “Document Windows.”) Your home folder’s icon now appears in the Dock.
As Figure 1-26 shows, you can now Control-click (or click and hold) on this icon at any time to see your entire Home folder represented as a hierarchical Dock menu. Selecting any file or application opens it, just as if it had been double-clicked from within the Finder.
You can follow these basic steps to add other folders to your Dock, depending on which ones you need access to more often.
There are a number of ways to minimize a window, including:
When a window is minimized, a miniaturized version of the window is placed in the Dock immediately to the left of the Trash icon, as shown earlier in Figure 1-22. (The most recently minimized window appears in the Dock next to the Trash icon.) There’s not much you can do with minimized windows except click on them, which opens the window and places it at the top of the window stack. If you Hide an application that has minimized windows, those windows will fade away but will return when the application is made active again.
Minimized windows feature a tiny icon of the application to which they belong. This makes it easy to tell at a glance which windows belong to which application.
As mentioned earlier, the Finder is located on the far-left edge of the Dock. Unlike other applications, the Finder’s icon cannot be removed from the Dock. (The same applies to the Trash icon.) The Finder also has a limited Dock menu, which displays only the Finder’s current window list. Chapter 2 covers the Finder in detail.
In its basic form, the Dock’s divider bar is used to segregate application icons to the left, (quick links, folders, minimized windows, etc.) and the Trash to the right. However, if you place the mouse pointer over the divider bar, you’ll see that the pointer changes shape, providing you with the ability to:
- Resize the Dock
If you click-drag the divider up or down, you can make the Dock larger or smaller.
- Access the Dock’s context menu
If you Control-click on the divider, as shown in Figure 1-27, you’ll see a boiled-down, textual version of the Dock’s preference panel (see Chapter 4) pop up as a contextual menu.
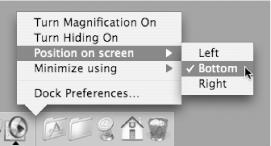
These are just shortcuts to things you do in the Dock’s preferences panel, detailed in Chapter 4.
The Trash icon is one of the few remnants of the original Mac desktop metaphor that still looks like what it does. Like the Finder icon on the Dock’s opposite end, the Trash icon is a permanent fixture in the Dock, ignoring any of your attempts to drag it elsewhere.
The Trash serves many functions, all having to do with removing stuff from your filesystem. You can mark files for deletion in one of the following ways:
To see the contents of the Trash, click on the Trash icon to open a
Trash window with the Finder. To rescue an item from the Trash,
simply drag its icon from the Trash to the Desktop or to another
location in a Finder window. If you move a file to the Trash and
decide that you don’t want to delete it, you can
select the file and hit ![]() -Z (Undo) to move the file back
to its original location in the filesystem. However, this works only
with the most recently trashed item. If you trash a second item and
decide that you want to move the first trashed item back, the Undo
command won’t help you out.
-Z (Undo) to move the file back
to its original location in the filesystem. However, this works only
with the most recently trashed item. If you trash a second item and
decide that you want to move the first trashed item back, the Undo
command won’t help you out.
Tip
The Trash icon acts as a graphical frontend to the .Trash
folder in your Home directory. As with all
“dotfiles” (a file or folder whose
name begins with a period, or dot), you
can’t normally see the .Trash
file in the Finder, but you can access it with the
Terminal.
You can’t open files that have been trashed. If you
can’t remember what the item contains and want to
look at it before you empty the Trash, drag the item out of the Trash
and onto the Desktop (or anywhere else in the filesystem). Once
you’re sure this is the file you want to dump,
select the file and press ![]() -Delete to move it back into
the Trash.
-Delete to move it back into
the Trash.
To permanently erase files, you must
empty the trash. The Trash’s
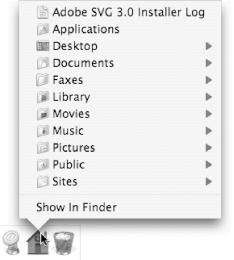
Dock menu provides an Empty Trash option, seen in Figure 1-28, which deletes all the files and folders
contains. In the Finder, you can also hit Shift-![]() -Delete
to accomplish the same thing.
-Delete
to accomplish the same thing.

One of the many new features added to Mac OS X Panther is the Secure Empty Trash option, which can be accessed only from the Finder’s application menu (Finder→Secure Empty Trash). If you select Secure Empty Trash, the system deletes the file, and then overwrites the location where the file was located on the filesystem a number of times, making it next to impossible to ever recover that file.
Tip
In the background, the Secure Empty Trash option invokes the
srm command to delete the files in the
~/.Trash directory.
You should use the Secure Empty Trash option judiciously, because the chances of recovering a file deleted from the filesystem using this option is practically nil. It takes a little longer to delete files using Secure Empty Trash, but the added security is well worth the wait if you’re working with sensitive data.
If you drag a disk image (CD, DVD, USB or
FireWire drive, or a mounted disk image file) to the Trash, the Trash
icon changes to an Eject icon. However, rather than retaining the
disk image in the Trash, the disk is ejected, or unmounted, from the
system. You can also unmount or eject disks while in the Finder by
selecting their icons and hitting ![]() -E.
-E.
Table 1-2 contains a listing of keyboard shortcuts for use with the Dock and when clicking on an application’s Dock icon.
Table 1-2. Dock shortcuts
|
Keyboard shortcut |
Description |
|---|---|
|
Quickly toggle the Dock’s state between visible and hidden. | |
|
Force docked icons to stay put when dragging other icons onto them. | |
|
Opens a Finder window to the application’s location in the filesystem. This is similar to Control-clicking a Dock icon to and selecting Show In Finder from its context menu. | |
|
Control-click |
Opens an application’s Dock menu. |
|
Control-Option-click |
If you press the Option key while Control-clicking an icon in the Dock, the Quit option is toggled to Force Quit, and the Hide option toggles to Hide Others; this wn’t work with Classic applications (i.e., it works only with native Mac OS X applications). |
|
Option-click |
Hide the foreground application before bringing this application forward; Option-clicking the same application icon again brings the previous application forward. |
|
Hides the windows of all other open applications and switches (if necessary) to the clicked application; similar to selecting Hide Others from an application menu. |
Get Mac OS X Panther in a Nutshell, 2nd Edition now with the O’Reilly learning platform.
O’Reilly members experience books, live events, courses curated by job role, and more from O’Reilly and nearly 200 top publishers.

