Regardless of which application you use, Mac OS X’s menu bar is always located across the top of the screen. This is different from Microsoft Windows or Linux GNOME or KDE desktop environments, where the menu bar is attached to each individual window. There are some standard items you’ll always find in the menu bar, but as you switch from application to application, you’ll notice that the menu names and some of their options change according to which application is active. Figure 1-2 shows the menu bar as it appears when the Finder is active.
As Figure 1-2 shows, these menus and items can be found in the menu bar:
The Apple menu (see Section 1.4.3)
The Application menu (see Section 1.4.4)
A default set of application menus (see Section 1.4.5)
Menu extras (see Section 1.4.6)
The Accounts menu (see Section 1.4.7)
All menus in Mac OS X work the same way: click once on a word or symbol in the menu bar, and the appropriate menu pops down beneath it. The menu closes when you select something by scrolling down and letting go of the mouse button, select a different menu in the menu bar, or click somewhere outside the menu.
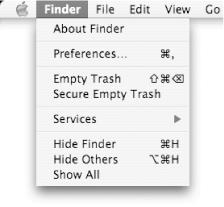
Each menu contains a set of commands for the application, as shown in Figure 1-3s example of the Finder’s File menu. Menus can also contain submenus that lead to other commands, and special commands that have an ellipsis (...) after them, which typically require more information from the user before they can do anything.
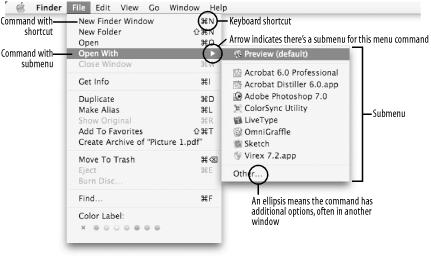
Figure 1-3. The Finder’s File menu has regular commands, commands with submenus, and special commands, such as Find..., followed by an ellipsis.
Every row that’s not a submenu heading is a command. When you move the mouse over a command, the command is highlighted with a colored bar (the color of which is set in System Preferences→Appearance→Appearance). The command is selected and invoked when you let go of the mouse button.
Tip
If you have invoked a command in error, most applications offer the
Edit→Undo option (![]() -Z) as a way of undoing the last
command or action performed.
-Z) as a way of undoing the last
command or action performed.
Commands that end in an ellipsis (...) require more information from the user before they can do anything. Typically, these menu items summon a dialog box requiring the user to do something else. For example, if you select File→Find..., the Find window appears, giving you options to search for a particular file. If you decide that you don’t want to search for a file (or if you’ve selected the wrong menu item), you can click on the Cancel button to close the window.
Most menu commands have
keyboard shortcuts (also known as
key bindings). The
keyboard shortcuts, if available, are on the right edge of the menu
and act as an alternate way to invoke a menu command without using
the mouse. The most commonly used keyboard shortcut is
![]() -Q, used to quit an application.
-Q, used to quit an application.
Bindings for common commands, such as
![]() -Q, are the same across all applications (with the
exception of the Finder, which you cannot quit). This is in
accordance with Apple’s
Aqua Human Interface
Guidelines, more commonly known as “the
HIG.” The HIG specifies the default key bindings for
standard menu options and should be the interface design Bible of
every Macintosh developer.
-Q, are the same across all applications (with the
exception of the Finder, which you cannot quit). This is in
accordance with Apple’s
Aqua Human Interface
Guidelines, more commonly known as “the
HIG.” The HIG specifies the default key bindings for
standard menu options and should be the interface design Bible of
every Macintosh developer.
Tip
If you’ve installed the Xcode Tools on your system,
a copy of the HIG can be found in
/Developer/Documentation/UserExperience/Conceptual/AquaHIGuidelines
in both HTML and PDF form. The HIG can also be accessed
online at http://developer.apple.com.
Submenus appear as menu choices with little gray triangles at the right edge of the menu. When you move the mouse over a submenu heading, another menu appears to the right, as seen earlier in Figure 1-3. Submenus can contain additional menu items or even more submenus.
Many objects in Mac OS X offer contextual menus, which are special lists of commands and submenus that appear only when you Control-click (or right-click) on the item. When you’re in the Finder (or on the Desktop) and you hold the Control key down over an object, the mouse pointer’s shape changes to include an image of a menu, as shown in Figure 1-4. If you Control-click on an object, a context menu appears, giving you various options to select from, as shown in Figure 1-5.
Figure 1-4. When the mouse is hovering over an object, the pointer changes to include a menu image if you hold down the Control key
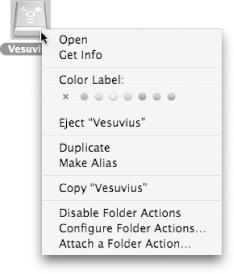
Figure 1-5. The context menu for a FireWire drive is revealed by Control-clicking on the drive’s Desktop icon
Context menus are also available within applications as well. For example, if you Control-click on a hypertext link in Safari, a context menu appears giving you various options to select from, such as copying the URL to the clipboard or the ability to quickly bookmark a link without viewing the page (see Figure 1-6).

The
Apple menu,
shown in Figure 1-7, is displayed as a blue
Apple symbol (![]() ), and is always
the left-most item in the menu bar.
), and is always
the left-most item in the menu bar.
If you’ve used an earlier version of the Mac OS, you’ll notice that the Apple menu is now completely different. You can no longer store aliases for files, folders, or applications there. Its new purpose is to provide you with information about your system, and to give you quick access to system preferences, network locations, and recently used files and applications, as well as a means to log out, put your system to sleep, or shut down.
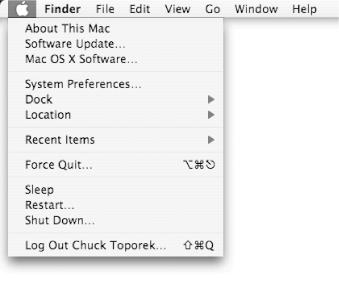
The following items can be found in the Apple menu.
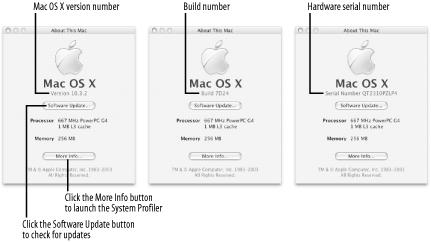
- About This Mac
This window, shown in Figure 1-8, provides you with useful information about your Mac. Here you’ll find details about the version of Mac OS X you’re running, how much memory your machine has, and the speed and type of processor in your computer. Clicking on the More Info button launches the System Profiler application (
/Applications/Utilities), which reveals specific details about your hardware, as well as its devices, applications, and extensions. The System Profiler is covered in Chapter 5.Tip
In earlier versions of the Mac OS, the About box would change depending on which application was active. For information about the application, you now have to use the application menu (located to the right of the Apple menu) and select the About option.
When you first select
 →About This Mac, the window shown
on the left side of Figure 1-8 shows you the currently installed
version number of Mac OS X. However, if you want to find out which
build of Mac OS X you’re using, click on the version
number, and that text will change to show the
versions’ build number (center image). For example,
the system depicted in Figure 1-8 is running Build
7D24. Click the build number, and you’ll see the
serial number for your machine.
→About This Mac, the window shown
on the left side of Figure 1-8 shows you the currently installed
version number of Mac OS X. However, if you want to find out which
build of Mac OS X you’re using, click on the version
number, and that text will change to show the
versions’ build number (center image). For example,
the system depicted in Figure 1-8 is running Build
7D24. Click the build number, and you’ll see the
serial number for your machine.The About This Mac window features two buttons:
- Software Update
When clicked, this button launches the Software Update application (
/System/Library/CoreServices) without the need to use its panel in System Preferences.- More Info
When clicked, this button launches the System Profiler (
/Applications/Utilities), which you can use to find out more information about your Mac and the software it’s running.
The information in the About This Mac window can come in handy when you’re on the phone with Apple’s customer support, trying to troubleshoot a problem.
- Software Update
This launches the Software Update application and checks for updates for Mac OS X and other Apple software installed on your system. For more information about using Software Update, see Chapter 5, System Preferences.
- Mac OS X Software
Selecting this option takes you to Apple’s Mac OS X page (http://www.apple.com/downloads/macosx) in your default web browser.
- System Preferences
This menu option launches the System Preferences panel. (You can also launch System Preferences by clicking on the light switch icon in the Dock, or by locating and double-clicking on its icon in the Finder. System Preferences allow you to configure the settings on your computer and includes panels for setting your screen saver or configuring your network connection. You will learn about System Preferences in greater detail in Chapter 4.
- Dock
This menu offers a quick way to change settings for the Dock (see Section 1.7).
- Location
This allows you to quickly change locations for connecting to a network and/or the Internet. This is similar to the Location Manager Control Panel from earlier versions of the Mac OS.
- Recent Items
This menu option combines the Recent Applications and Recent Documents options from Mac OS 9’s Apple menu into one convenient menu. The Clear Menu option allows you to reset the recent items from the menu, giving you a clean slate to work from.
- Force Quit
This window lets you force-quit any running Aqua application. See Section 1.4.3.1, later in this chapter.
- Sleep
Just as its name implies, this menu item will instantly put your Mac into sleep mode. Selecting this option will result in your screen going dark; the hard drive on your system will spin down and go into energy saver mode. This is different from the settings you dictate in the Energy Saver preference pane (see Chapter 4 for more on auto-sleep functionality).
To “wake” your computer from sleep mode, simply press any key, or click the mouse if you have a desktop system. However, clicking the mouse on an iBook or PowerBook as an attempt to wake your system from sleep mode is useless; it won’t do anything. Instead, you need to press one of the keys on the keyboard (or the Power-On button) to revive your laptop. Opening a sleeping and closed Mac laptop will also wake it up.
Tip
Sleep, Restart, Shutdown, and Log Out have moved from Mac OS
9’s Special menu into Mac OS X’s
Apple menu. If you’re looking for a menu option for
the Empty Trash option, you need to be in the Finder (FinderEmpty
Trash or Shift-![]() -Delete).
-Delete).
- Restart
Selecting this option opens a window (shown in Figure 1-9) to restart your Mac. If any applications are running, they will be automatically shut down, and you will be prompted to save changes for any files that were open.

Tip
System administrators can remove the Restart and Shut Down items from the Apple menu, as described in Chapter 4.
- Shutdown
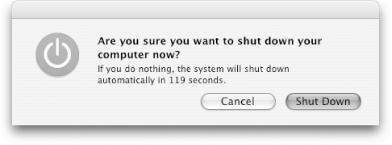
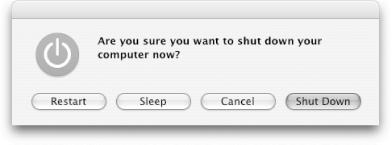
Selecting this option pops up a window (shown in Figure 1-10) for shutting down your Mac. You can also shut down by pressing the Power-On button, which opens the dialog box shown in Figure 1-11 with the options for restarting, shutting down, or putting your Mac to sleep.
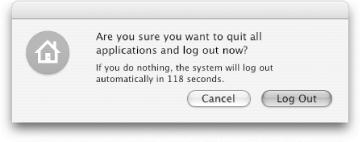
- Log Out
This option pops open the window shown in Figure 1-12 to log out of your system. This window takes you back to a login screen. The keyboard shortcut for the Log Out menu option is Shift-
 -Q.
-Q.
If you hold down the
Option key while selecting the Apple
menu, you will see that the ellipsis have disappeared from the
Restart, Shut Down, and Log Out items. Selecting one of these menu
items while holding down the Option key causes that action to take
effect immediately, without prompting you first. For example, if you
hold down the Option key and select ![]() Shut Down, your Mac
will shut down as it normally would, except you
won’t see one of the Shut Down windows shown earlier
in Figure 1-10 or Figure 1-11; your
Mac will shutdown immediately.
Shut Down, your Mac
will shut down as it normally would, except you
won’t see one of the Shut Down windows shown earlier
in Figure 1-10 or Figure 1-11; your
Mac will shutdown immediately.
Thanks to Mac OS X’s protected memory, you don’t have to restart the entire system if an application crashes or freezes. If an application freezes for some reason, you can force it to quit without affecting the other applications you’re running.
Tip
In Mac OS 9 and earlier, force-quitting an application tended to throw the whole system off-kilter, prompting users to save all their work and restart the machine before continuing. Mac OS X’s protected memory scheme makes force-quitting a lot safer, affecting nothing but the application itself. Veteran Mac users trained to be hesitant about force-quitting can now do so with impunity with Mac OS X.
However, force-quitting a Classic application can spell trouble to any other Classic applications running at the same time, due to the Classic environment’s emulation of Mac OS 9’s unprotected memory handling. See Chapter 3.
To force-quit a stuck application, you can either select
![]() →Force Quit, or use the keyboard shortcut
Option-
→Force Quit, or use the keyboard shortcut
Option-![]() -Escape to open the Force Quit window, shown in
Figure 1-13
-Escape to open the Force Quit window, shown in
Figure 1-13
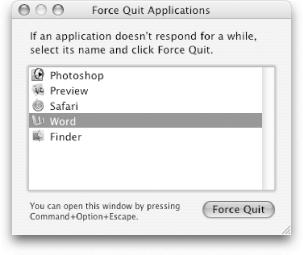
You then follow these steps:
Select the application name in the Force Quit Applications window.
Click on the Force Quit button.
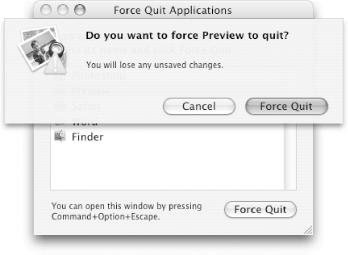
A warning sheet, shown in Figure 1-14, appears, which alerts you that force-quitting the application will cause you to lose any unsaved changes.
If you’re sure you want to quit the application, click on the Force Quit button; otherwise, click on the Cancel button (or hit
-.).
Once you’ve forced the application to quit, use the
keyboard shortcut ![]() -W to close the Force Quit
Applications window. (This keyboard shortcut didn’t
work in earlier versions of Mac OS X.)
-W to close the Force Quit
Applications window. (This keyboard shortcut didn’t
work in earlier versions of Mac OS X.)
In addition to using the Force Quit window, there are two other ways you can force an application to quit:
If you Option-click on the Dock icon for a running application, you can select Force Quit from the contextual menu.
Use Shift-Option-
-Escape to immediately force the
application you’re using to quit. This is
particularly handy because it’s often the
application you’re working in that gets a brain
freeze.
Be careful with these options, because neither questions you before the application is forced to quit. Any unsaved changes will be lost.
Unlike applications, you cannot force-quit the Finder by Control-clicking on its icon in the Dock. You can only restart the Finder. When you select the Finder in the Force Quit Applications window, the Force Quit button changes to Relaunch as shown in Figure 1-15; click that button to restart the Finder.

Figure 1-15. Select the Finder item in the list, and then click on the Relaunch button to restart the Finder
Once you’ve forced the Finder to restart, use the
keyboard shortcut ![]() -W to close the Force Quit
Applications window.
-W to close the Force Quit
Applications window.
Immediately to the right of the Apple menu in the menu bar is the Application menu, shown in Figure 1-16. As the Apple menu holds commands relevant to the whole system, the Application menu, which is rendered in boldface and named after the active application, holds commands relevant to the active application itself and not any of its windows or documents.
The following are some typical Application menu commands:
- About “Application Name”
Displays a small window that typically features the application’s name, icon, version number, authors, copyright information, web links, and whatever else the developers felt appropriate.
- Preferences...
Calls up the application’s preferences window. The standard keyboard shortcut to open an application’s preference window is
-, (Command-comma).- Services
Brings up the Services submenu, covered later in “Services.”
- Hide “Application Name”
Makes the application and all its windows (including minimized windows on the Dock) invisible, and brings the next active application to the foreground. Clicking this application’s Dock icon (or bringing forth any of its individual windows through its Dock menu) reveals it once again. The standard keyboard shortcut for hiding an application is
-H.- Hide Others
Hides all running Aqua applications besides the current one. The standard keyboard shortcut to hide other applications is Option-
-H.- Show All
Reveals all hidden applications.
- Quit “Application Name”
Quits the application. The standard keyboard shortcut to quit an application is
-Q.When selected, every open window belonging to that application receives the signal to close. Windows with unsaved changes will alert the user with a dialog sheet (as seen in Figure 1-35). Hitting Cancel (or
-.) on any
of these sheets dismisses that sheet and keeps the window open,
canceling the application’s Quit request.The one exception to this rule is the Finder. The Finder lacks a Quit option in its application menu because the Finder is constantly running. However, if the Finder is frozen or otherwise acting up, you can force it to relaunch as described earlier.
In addition to the Application menu, each application (including the Finder) has at least four additional menus in the menu bar:
File
Edit
Window
Help
The following list touches on the common menu commands found in many Mac OS X applications:
- File
This menu contains commands for working with documents on disk:
- New (-N)
Opens a new, empty document window.
- Open... (-O)
Summons a dialog box for selecting a document from the filesystem. Once selected, its content appears in a new window.
- Open Recent
Contains the names of the last few documents this application worked with. Selecting one quickly opens it into a new window.
- Close (-W)
Asks to close the foremost window; this is equivalent to hitting the window’s red titlebar button. Some menus also offer Close All (Shift-
-W), which is equivalent to
Option-clicking the window’s Close button.- Save (-S)
If the foremost window represents an existing file (i.e., its titlebar has a real title and a proxy icon), it resynchs its contents with the file, writing all changes made since the last save. Otherwise, it presents the user with a sheet for creating a new file.
- Save As... (Shift--S)
Presents the user with a file-creation sheet, regardless of whether the window already has a file associated with it. After saving, the system reassociates the window with this new file, though the previous one continues to exist in the state in which it was last saved.
- Page Setup... (Shift--P)
This command sets up how the window presents its contents to a printing device.
- Print... (-P)
Prepares a document for printing. Chapter 9 covers document printing in more detail.
- New (
- Edit
The Edit menu almost always holds the all-important clipboard controls and text-editing commands:
- Undo action (-Z)
This handy command undoes the last action you performed in this application, be it typing, moving stuff around, drawing a circle, and just about anything else. (This is within limits; it can’t, for example, unsend an emotional email you find yourself suddenly regretting.) If you invoke this command repeatedly, you can undo a whole sequence of actions.
- Redo action (Shift--Z)
This command is simply the antidote of Undo, restoring the last thing you undid, should you change your mind (or go one step too far while performing a multiple Undo). Note that this command is available only immediately after you perform an Undo.
- Cut (-X)
Copies the selected text or images onto the system’s clipboard and then deletes it from the window.
- Copy (-C)
Copies the selected text or images onto the system’s clipboard, leaving it in place in the window.
- Paste (-V)
Tries to copy the current clipboard contents to the cursor’s current position in the window.
- Select All (-A)
Selects all text or objects in the window.
- Find, Spelling
These submenus usually hold some standard interfaces for finding text and using the system’s built-in spellchecker.
- Special Characters
This option opens the Character Palette, used for finding and inserting special characters into documents, email messages, etc.
- Undo action (
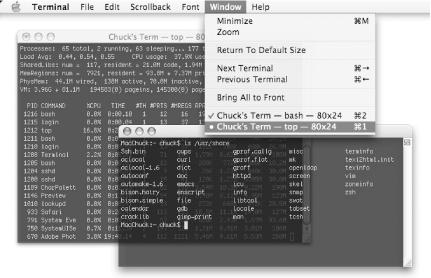
- Window
Like the application’s Dock menu, the Window menu usually holds a list of all the windows currently open; selecting one brings it into focus. The menu also often holds the Minimize Window option (
-M), which, when selected, minimizes the window to the
Dock. You can also minimize a window by clicking on the yellow button
in the window’s titlebar or by double-clicking on
the titlebar. To bring the window back into focus, simply click on
its icon in the Dock.Some applications also assign keyboard shortcuts to open windows. For example, the Terminal application assigns a Command-
numberkeyboard shortcut for each open Terminal window (see Figure 1-17). This allows you to quickly switch back and forth between windows when you need to.
- Help
This menu varies greatly among applications. Some offer just a single command, Application Help (
-?), which usually displays
the application’s documentation in Help Center or
your web browser. Other applications fill this menu with commands
that let you browse various pieces of documentation and
tutorials.
Mac OS X programs and services can place menu extras on the right side of the menu bar. Like the Apple menu, these little symbols remain constant on the menu bar, regardless of which application you’re using.
Menu extras’ appearance typically reflects their function, and they often carry menus loaded with commands, just like the other menus. Figure 1-18 shows the Bluetooth menu extra.
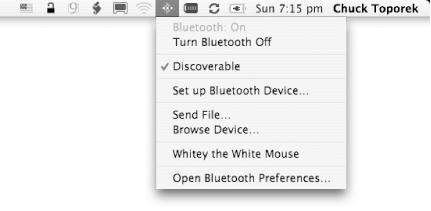
The
Bluetooth menu extra can be added to the
menu bar from the Bluetooth preference panel (System
Preferences→BluetoothSettingsselect the checkbox next to
“Show Bluetooth status in menu
bar”). The Bluetooth menu extra mimics many of the
functions of the Bluetooth preference panel, shows you which
Bluetooth devices are within range, and offers quick ways to launch
the Bluetooth Setup Assistant or the Bluetooth File Exchange
utilities (/Applications/Utilities).
You can move the menu extras to a different location in the menu bar by Command-clicking the icon and dragging it left or right. As you move the menu extra around, the other menu extras will move out of the way to make room for the menu extra you’re moving. When you let go of the mouse button, the menu extra will take its new place in the menu bar. To remove a menu extra from the menu bar, Command-click on the icon, drag it off the menu bar, and release the mouse button.
Tip
For reference, executables for most of the standard menu extras can
be found in /System/Library/CoreServices/Menu Extras
as folders with .menu extensions.
As we cover various Mac OS X applications and preference panes throughout this book, we’ll note those that offer menu extras.
One of the many new features added to Mac OS X Panther is something called Fast User Switching. This lets you have multiple users logged into the same system without having to log out.
If your Mac has more than one user account (set up via System Preferences→Accounts), you can turn on Fast User Switching, as well as specify which user is automatically logged in when the system starts up. When you enable Fast User Switching, the Accounts menu appears at the far right corner of the menu bar. This menu, shown in Figure 1-19, lists the user accounts on your Mac.
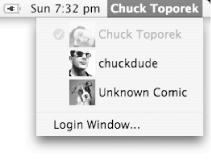
To switch to another user account, simply click on the bolded name of the currently logged in user, and select another user account name from the Accounts menu. A login window will appear, prompting you for that user’s password. If your Mac supports Quartz Extreme (and has enough RAM), your display will rotate with a 3D cube effect to the other user’s Desktop. You will be required to enter a password each time you switch user accounts from the Accounts menu. See Chapter 10 for more on Fast User Switching.
Get Mac OS X Panther in a Nutshell, 2nd Edition now with the O’Reilly learning platform.
O’Reilly members experience books, live events, courses curated by job role, and more from O’Reilly and nearly 200 top publishers.

