Every so often it takes a little know-how to empty the Trash or eject a CD; learn when and how.
There are times, rare as they may be, when OS X goes a little haywire and simply won’t spit out a CD or DVD, unmount a disk image, or empty the Trash. Often things have a way of sorting themselves with a little patience, with a Finder restart, by logging out and back in, or (heaven forbid) by rebooting your Mac. Sometimes, however, that stuck CD/DVD or image doesn’t budge or the Trash simply refuses to empty.
It does the heart good to do some occasional housekeeping. One such activity is emptying the Trash folder to free up more disk space for your Mac. This is usually as simple as Finder → Empty Trash . . . or
-Shift-Delete. Every so often, though, a file or folder refuses to leave.
First a little background on the mystical Trash can. Every file you delete is moved into a folder called .Trash in your home directory:
% ls -al
total 48
drwxr-xr-x 20 weimengl staff 680 Dec 14 12:35 .
drwxrwxr-t 8 root wheel 272 Dec 10 09:30 ..
drwx------ 6 weimengl staff 204 Dec 14 12:55 .Trash
...
To dip into the Trash, simply open a Terminal [Hack #48] window, navigate to the .Trash directory, and list files:
%cd .Trash%ls -al
Emptying the Trash is nothing more than deleting all the contents of your .Trash folder.
Despite having been placed into the Trash, a file may still be in use by an application (see Figure 1-17).
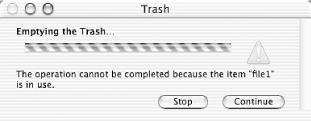
The remedy is to guess which application is using it and close the file or shut down the application if you’re no longer using it. Try emptying the Trash again and, assuming that was the problem, it should empty without incident.
If you aren’t able to figure out what application is
using the file and have shut down just about anything you can find,
launch the Terminal and use the
fstat
(file status) command to ascertain
which is the offending program:
% fstat .Trash/file1
USER     CMD         PID   FD INUM   MODE       SZ|DV R/W MOUNT NAME
weimengl LaunchCFMA  2070   30 347708 -rw-r--r--  31974 rw  / .Trash/file1
Notice the
PID
(process ID) of the application holding the file hostage.
Let’s see what application that corresponds to by
using the ps
(process status) command. The
-p 2070 argument specifies the process ID, and
-w displays the first 132 characters of the
process name rather than just as much as can fit on one Terminal
line.
% ps -wp 2070
PID  TT STAT       TIME COMMAND
2070 ?? S      23:47.77 /Applications/Microsoft Office X/Microsoft Word /
Applications/Microsoft Office X/Microsoft Word -psn_0_18
There we are! It’s Microsoft Word. Get it to release the file and try emptying the Trash again.
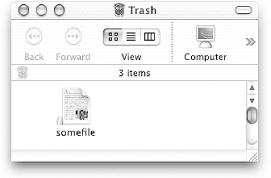
Another problem that crops up occasionally is locked files [Hack #7] in the Trash. While you shouldn’t be able to put a locked file into the Trash in the first place, sometimes one sneaks by. Look in your Trash folder via the Finder and see if the offending file is locked (the icon is overlaid by a small lock), as shown in Figure 1-18.
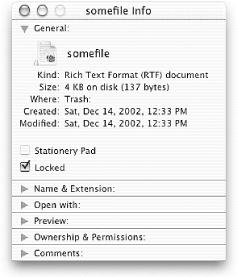
To unlock the file, select File → Get Info or press
-I for the File Info inspector (see Figure 1-19). If the Locked checkbox is checked, click it to unlock the file.
If the file refuses to unlock, try one of the techniques covered in [Hack #7].
Another possibility is that a file in your Trash may not belong to you. You’ll need to alter the permissions or take ownership [Hack #49] of the file before you’re able to empty it from the Trash.
It’s still there and refusing to budge? Try simply removing the offending file(s) using the rm [Hack #48] command, like so:
% rm ~/.Trash/file1If that has no effect, or if OS X complains about
something else, force it with the
-f
option:
% rm -f ~/.Trash/file1If there’s a whole hierarchy of folders and files
causing you trouble, you can recursively delete all the files in your
Trash using sudo
to get around permissions issues, -i to ask for
confirmation before deleting each, and -r to
recurse through the hierarchy:
% sudo rm -ri ~/.Trash/*
remove /Users/weimengl/.Trash/file1? y
Warning
Be forewarned! Most books on Unix will warn you
of the disastrous outcome if you are not careful with the rm -r
combination, and I’m
going to say it again. Imagine the effects of inadvertantly adding a
space like so: sudo rm -rf
~/. Trash; you’d remove all the contents of
your home directory. Before deleting anything, think twice before you
hit the Return key.
-E and dragged that mounted disk image to the Trash until you’re blue in the face, but still it won’t disappear. No complaints, no errors, nothing; it simply ignores your every attempt to eject it.
This is usually one of those situations best cleaned up by a logging out and back in, relaunching the Finder, or rebooting. It’s safer and less likely to mangle the data on the disk image if you avoid resorting to brute force tactics.
CD/DVD loading and unloading on all recent Macintoshes are done through the operating system rather than the physical eject buttons you usually find on other systems. Windows users are often caught looking nervously about for the CD eject button — I have to admit I’ve done so myself. What to do if that CD/DVD gets stuck?
Your first course of action is to pull out your handy-dandy paper
clip, the tool of choice for the Mac generation. Oh, you
don’t have one? Shame on you! All right, so
there’s actually another way to do it that will
work, just so long as there’s nothing physically
wrong with the drive that’s keeping it from ejecting
your CD/DVD. Launch the
Terminal and use the
df command to find the
filesystem ID of your CD/DVD:
% df -l
Filesystem   512-blocks     Used    Avail Capacity Mounted on
/dev/disk0s9  120091280 31348032 88231248      26% /
fdesc                 2        2        0     100% /dev
/dev/disk1s1s2   614256   478912   135344      77% /Volumes/A CD
In my case, the CD is mounted as disk1s1s2. To
eject the CD, use the
disktool
utility, handing it the
filesystem ID:
% disktool -e disk1s1s2
disk1s1s2 device will attempt to be ejected ...
***Notifications Complete for type 1
***Disk Unmounted('disk1')
***Disk Unmounted('disk1s1s1')
***Disk Unmounted('disk1s1')
***Responding yes to unmount - disk1s1s2
***Disk Unmounted('disk1s1s2')
***Responding yes to eject - disk1
***Responding yes to eject - disk1s1s1
***Responding yes to eject - disk1s1s2
***Responding yes to eject - disk1s1
***Disk Ejected('disk1')
***Disk Ejected('disk1s1s1')
***Disk Ejected('disk1s1s2')
Your CD/DVD should pop right out.
—Wei-Meng Lee and Rael Dornfest
Get Mac OS X Hacks now with the O’Reilly learning platform.
O’Reilly members experience books, live events, courses curated by job role, and more from O’Reilly and nearly 200 top publishers.

