For years, the least satisfying part of using a computer was saving a newly typed document. When you used File→Save, a dialog box appeared, in which you were supposed to type a name for, and specify the file format for, the new file you were saving.
To the beginner, these specifications are confusing and unnatural. They bear no resemblance to any real-world process. Nobody asks you to name cookies you’ve just baked, or what file format you’d like them to assume as they come out of the oven.
But it gets worse. In the Save dialog box, you’re also asked where you want the new document stored on your hard drive. Filing a document away in a folder does have a real-world equivalent; that’s why it’s so easy to understand the folder icons on the Mac desktop. Unfortunately, compared with the Finder’s self-explanatory folder display, the old Save dialog box’s presentation of your hard drive’s contents was about as friendly as a tax form, as Figure 4-10 illustrates. All of these factors conspired to make the old Save dialog box—and its sibling, the Open File dialog box—among the most challenging parts of the Mac operating system (and Windows, too).
All of this explanation is necessary to understand why Apple, and specifically Steve Jobs in his stage presentations, gets so excited about the way Mac OS X’s Save and Open dialog boxes work.
To give it a try, launch any included Mac OS X program that has a Save or Export command—TextEdit, for example. (Not all programs from other software companies have yet updated their Save dialog boxes.) Type a couple of words and then choose File→Save. The Save sheet appears.
Note
In Mac OS X, a quick glance at the Close button in the upper-left corner of a document window tells you whether it’s been saved (see Figure 4-10). When a small dot appears in the red button, it means you’ve made changes to the document that you haven’t yet saved (time to press
-S!). The dot disappears as soon as you save your work.
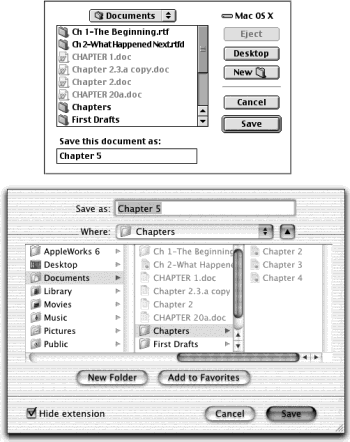
Figure 4-10. Top: The old Save dialog box, an inevitable part of computing, displays a list of the folders on your hard drive—but where are you? What folder is this one inside of? Bottom: In Mac OS X, you can see a familiar column display that matches the Finder, making it much easier to figure out what you’re doing and how you got here.
In the days of antique operating systems like Mac OS 9 and Windows, the Save dialog box appeared dead center on the screen, where it commandeered your entire operation. You weren’t allowed to switch to any other program—or do anything else—until you clicked Save or Cancel to close the dialog box. Moreover, because it seemed stuck to your screen rather than to a particular document, you couldn’t actually tell which document you were saving—a real problem when you quit out of a program that had three unsaved documents open. All of this struck Mac OS X’s designers as user-hostile and unnecessarily rigid.
In most Mac OS X programs, there’s no mystery regarding which document you’re saving, because a little Save dialog box called a sheet slides directly out of the document’s title bar (see Figure 4-11). Now there’s no mistaking which document you’re saving.
Better still, you can think of this little Save box as a sticky note attached to the document. It will stay there, neatly attached and waiting, even if you switch to another program, another document within the same program, the desktop, or wherever. When you finally return to the document, the Save sheet will still be there, waiting for you to type a file name and save the document.
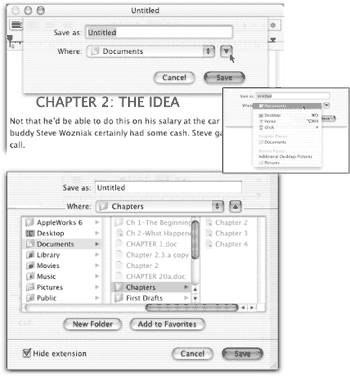
Figure 4-11. Top: The new Save dialog box, or sheet, initially appears in a compact view. Inset: To spare you from navigating your hard drive every time you save a file, your most recently accessed folders are listed in the Where pop-up menu. Bottom: If you want to choose a different folder, create a new folder, or designate a Favorite folder, click the Column-view triangle to open this Finder-like navigation view.
Of course, you, O savvy reader, have probably never saved a document into some deeply nested folder by accident, never to see it again. But millions of novices (and even a few experts) have fallen into this trap.
When the Save sheet appears, however, a pop-up menu shows you precisely where Mac OS X proposes putting your newly created document: in the Documents folder of your own Home folder. For many people, this is an excellent suggestion. If you keep everything in your Documents folder, it will be extremely easy to find, and you’ll be able to back up your work just by dragging a single folder (the Documents folder) to a backup disk.
But the Where pop-up menu gives you direct access to some other places you might want to save a newly created file. They include:
Desktop. Just type a name for the file, choose Desktop from this pop-up menu, and then click Save. (You can also simply press
-D.)
You’ve just ensured that your file won’t fall accidentally into some random folder. Instead, the newly minted document will be waiting for you on the desktop when you quit your program or close its window. From there, you can drag it manually into any folder you like.
Home. Choosing this item from the pop-up menu (or pressing Shift-
-H) takes you directly to your Home folder, which is described in Section 2.1.
iDisk. If you’ve signed up for Apple’s .Mac service (Section 18.8), you can save documents directly onto your Internet-based iDisk hard drive just by choosing this command. (Actually, you can’t save icons into your iDisk window—you must save them into a folder within your iDisk. That’s why the submenu of this iDisk command lists the various folders on your iDisk, as described in Chapter 18.)
When you do so, your Mac will dial and connect to the Internet (if you’re not already online) and pull your iDisk onto the screen so that you can save your new document there. All of this takes a considerable amount of time, even if you have a high-speed connection like a cable modem or DSL.
Favorite Places. This part of the pop-up list is a duplicate of the Favorites menu in the Finder, which is described in Chapter 2. Its purpose is to list the disks, servers, folders, and other items you use frequently, so that you don’t need to burrow through your folders every time you want access.
Recent Places. This part of the menu lists folders and disks you’ve accessed recently. Once again, the idea is to provide quick access to the folder locations on your hard drive that matter to you—without excessive navigation.
When you save a file, the options in the Where pop-up menu have you covered 90 percent of the time. Most people work with a limited set of folders for active documents.
But when you want to save a new document into a new folder, or when you want to navigate to a folder that isn’t listed in the Where pop-up menu, all is not lost. Click the large black triangle shown in Figure 4-11.
After a moment, a familiar scene appears: a compact version of a Finder-window column view, as described in Section 1.6.
Note
Your first instinct should be to widen this window, making more columns available. Do so by carefully dragging the lower-right corner of the dialog box. Mac OS X will remember the size you like for this Save sheet independently in each program.
Now, using many of the same techniques described in Section 1.6, you can navigate your entire Mac system. For example, press the right and left arrow keys to navigate the columns, or the up and down arrow keys to highlight the disk and folder names within a column. Once you’ve highlighted a column, you can also type to select the first letters of disk or folder names.
Highlight the name of the folder in which you want to save your newly created document, or use these options:
New Folder. Click this button to create a new folder inside whatever folder is highlighted in the column view. You’ll be asked to type the new name for the folder. After you’ve done so, click Create (or press Enter). The new folder appears in the rightmost panel of the column view. You can now proceed with saving your new document into it, if you like.
Note
The keystroke
-N no longer triggers the New Folder button. Remember that in Mac OS X, the Save sheet is nothing more than an attachment to your document window. Keystrokes like
-N go right “past” the sheet to the program you’re using. In Microsoft Word or TextEdit, for example, pressing
-N produces a new, untitled Word or TextEdit document, which appears right in front of the Save sheet.
Add to Favorites. In addition to the methods described in Section 2.6, the Save sheet provides a quick way to add a particular folder to your list of Favorites. Just highlight the folder in the column view and then click Add to Favorites. The favorite folder appears instantly in the Where pop-up menu—in the Favorites section, of course.
The point is that the next time you save a new document, you won’t even have to bother with the column view. You’ll be able to jump quickly to the favorite folder you’ve just specified.
The next time you save a new document, the Save sheet will reappear in whatever condition you left it. That is, if you used column view the last time, it will still be in column view. At any time, you can collapse it into simplified view, shown at top in Figure 4-11, by again clicking the fat black triangle to the right of the Where pop-up menu.
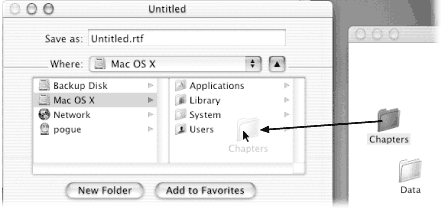
Whether you’re using the mini-sheet or the column view, you can drag the icon of any folder or disk from your desktop directly into the Save or Open sheet, as shown in Figure 4-12. Mac OS X instantly displays the contents of that folder or disk.
This shortcut can save you time when you want to save a file into, or open a file from, a deeply nested folder that’s already visible in the Finder. This feature is totally undocumented—but well worth learning.
Although it’s by no means universal, the Save dialog box in many programs offers a pop-up menu of file formats below the Save As box. Use this menu when preparing a document for use by somebody else—somebody whose computer doesn’t have the same software. For example, if you’ve used a graphics program to prepare a photograph for use on the Web, this menu is where you specify JPEG format (the standard Web format for photos).
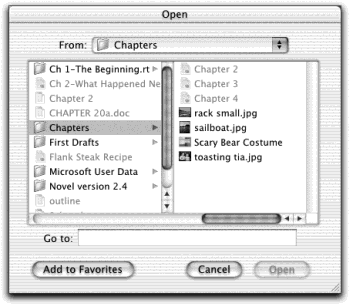
The dialog box that appears when you choose File→Open is almost identical to the Save File sheet, except that it offers both the pop-up menu of frequently used folders (now labeled From instead of Where) and the column view (see Figure 4-13). Because you encounter it only when you’re opening an existing file, this dialog box lacks the New Folder button, Save button, file name field, and so on.
Most of the other Save File dialog box controls, however, are equally useful here. Once again, you can begin your navigation by seeing what’s on the desktop (press
-D) or in your Home folder (press Shift-
-H). Once again, you can open a folder or disk by double-clicking its name in the column-view list, or navigate the list by pressing the arrow keys. (Unfortunately, typing to highlight folder and disk names in the columns doesn’t work here.) And once again, you can drag a folder or disk off your desktop directly into the dialog box to specify where you want to look.
When you’ve finally located the file you want to open, do so by double-clicking it or highlighting it (which you can do from the keyboard), and then pressing Return, Enter, or
-O.
In general, most people don’t encounter the Open File dialog box nearly as often as the Save File dialog box. That’s because the Mac offers many more convenient ways to open a file—double-clicking its icon in the Finder, choosing its name from the
→Recent Items command, and so on—but only a single way to save a new file.
Note
Instead of using the column view to specify a folder, you can also use the Go To box at the bottom of the Open sheet. That is, you can type a folder path (such as ~/pictures or ~/pi and a Tab) right into the blank. And if you have no idea what these codes refer to, see the box in The Go to Folder Command.
Get Mac OS X: The Missing Manual, Second Edition now with the O’Reilly learning platform.
O’Reilly members experience books, live events, courses curated by job role, and more from O’Reilly and nearly 200 top publishers.

