Chapter 4. Communicating Securely
In a wired network, physical security is complicated but manageable. You can restrict physical access to routers, switches, and network hardware. You can provide a complex authentication mechanism for proving that users are who they say they are. You can set up Virtual LANs or Virtual Private Networks for even more security. Even if an attacker were to plug into your wireless network, it would be difficult to penetrate further with these kinds of security measures in place.
The wireless network world is not nearly this secure. In fact, it’s not secure at all. Disassembling your network packets and transmitting them wirelessly means that anyone within reach can see them. A wily attacker could join or passively monitor your network from a mile away with a high-gain antenna, and you would never see him.
The Pitfalls of WEP
The IEEE specifications for 802.11a/b/g all provide a form of encryption called Wired Equivalent Privacy (WEP). WEP operates at the Media Access Control (MAC) layer, or the Data Link layer, between the Physical Layer (radio waves) and the Network Layer (TCP). WEP encryption is based on the RC4 algorithm from RSA Data Security and employs a 40-bit encryption key.
Anyone who knows the secret key (unless you’re the only user on the network, this key is shared, so it’s not all that secret) can participate in a WEP network. Secret keys are generally either plaintext words or somewhat longer combinations of hexadecimal numbers.
There are two major problems with WEP:
Encryption is handled at the Data Link layer, so if you connect to a WEP network with your notebook, the communication between your notebook and the access point is encrypted. All packets are decrypted at the access point and sent from there in the clear.
Other computers that also have the secret key for this WEP network can read all packets sent to and from your computer. The secret key is a “shared” key, which means that all devices that encrypt packets must use the same key. Some access points use a passphrase to generate the WEP key, making the key even easier to deduce. Once you are connected to a WEP network, you can do all the packet sniffing you want with a tool like Ethereal.
A team of cryptographers from the University of California at Berkeley, as well as several other groups (see the references at the end of this section), have identified weaknesses in the way that WEP keys are generated and used, effectively making the number of bits in the key immaterial. Even though many manufacturers have added extra bits to the key length, up to 152 bits, the longer key length provides minimal protection, because WEP is not a well-designed cryptographic system.
With all of these problems, why is WEP still supported by wireless equipment manufacturers? Until recently, there had not been another standard for wireless encryption. You could have run a Virtual Private Network (VPN) on top of your wireless network, but this would have presented its own set of challenges, and it is not practical for home or even small-business users. The Wi-Fi Alliance announced a standard called Wireless Protected Access (WPA) in mid-2002. WPA is based on a draft of the IEEE 802.11i specification, which will probably be ratified in mid-2004. We cover WPA a bit later in the chapter.
So why would you want to use WEP on your wireless network at all? Consider it a first line of defense. While it is definitely possible to crack its keys and gain access to a WEP network, someone who is looking for free wireless access will choose an open network when given the choice. However, if you are worried about an attacker specifically targeting your network, you must take stronger measures.
Consider not using WEP at all. There are other alternatives that provide stronger encryption and authentication, and we cover those in this chapter. However, if you want an easy out-of-the-box setup, WEP is your ticket. To keep your WEP network as secure as possible, keep these guidelines in mind:
Make your secret key difficult to crack. Once a hacker has captured enough frames from your encrypted network, he needs to run a tool to guess your secret key. This is no different from a hacker running
crackagainst a password database. The more complex your key, the less likely a standard dictionary attack will crack it. Choose a long, complex key that utilizes nonalphanumeric characters. If you can, use hexadecimal strings. Use the longest key that your hardware will support. If you have access points and clients that support 128-bit WEP, by all means use it. However, some implementations of WEP have weaknesses that allow attackers to recover the key even without mounting a dictionary attack.Change your secret key often. WEP key attacks rely on two methods: a dictionary attack or the collection of large amounts of frames data in order to deduce the secret key. Obviously, you provide less of a chance for an attacker to break your key when you change it often. However, this option becomes more cumbersome with larger networks, giving you the classic key-distribution problem.
Use WEP in combination with other security measures. If your network uses equipment from a single manufacturer, you may be able to take advantage of nonstandard security features. Cisco and Proxim, for example, support rapid WEP key rotation and dynamic rekeying. If all of your clients can take advantage of these features, use them. You should also consider whether the various IP tunneling or VPN solutions will fit into your network infrastructure.
Several security measures that come standard with many access points are almost useless in protecting your wireless network:
- Disabling SSID broadcast
This creates a “hidden” network by causing the access point to suppress the broadcast of SSID information. In order to join a network with SSID broadcast disabled, the client must manually enter the SSID.
Premise: if you don’t know the SSID, you can’t join the network.
Reality: Kismet and other wireless network scanners can easily pick up the SSID by monitoring traffic from clients of the “hidden” network.
- MAC address filtering
Most access points allow you to set up a list of allowed network cards by entering their MAC address. If the access point sees a MAC address that is not on the list, it will not allow that device to associate.
Premise: only authorized network cards can join the network.
Reality: Kismet and other wireless scanners can easily pick up MAC addresses by monitoring client traffic on the wireless network. Spoofing a MAC address is very easy under Linux and other operating systems, allowing easy access to the network. Also, wireless network cards can easily be stolen. The MAC address filter only authenticates a device, so anyone can use it.
- IP address filtering
Similar to MAC address filtering, this technique allows you to set up a list of allowed IP addresses that can send TCP/IP traffic on the network. Other machines may be allowed to associate with the access point, but they would not be able to participate in any TCP/IP network.
Premise: only known IP addresses are allowed to communicate on the network.
Reality: any network sniffer or analyzer, such as Ethereal or tcpdump, can easily find IP addresses in use on any given network. Spoofing IP addresses is even easier than spoofing MAC addresses.
References
As mentioned previously, several groups have identified weaknesses in the way that WEP keys are generated and used. To learn more, consult the following sources:
Your 802.11 Wireless Network has No Clothes (http://www.cs.umd.edu/~waa/wireless.pdf) by Arbaugh, Shankar, and Wan. University of Maryland, March 30, 2001.
Weaknesses in the Key Scheduling Algorithm of RC4 (http://www.crypto.com/papers/others/rc4_ksaproc.ps) by Fluhrer, Mantin, and Shamir. July 25, 2001.
Using the Fluhrer, Mantin, and Shamir Attack to Break WEP (http://www.cs.rice.edu/~astubble/wep). AT&T Labs Technical Report by Stubblefield, Ioannidis, and Rubin. August 21, 2001.
Security of the WEP Algorithm (http://www.isaac.cs.berkeley.edu/isaac/wep-faq.html) by Borisov, Goldberg, and Wagner, UC Berkeley. April 1, 2001.
WEP with Linux
Back in Chapter 2, we covered the use of schemes to set up multiple wireless networks on your PC with the ability to switch between them as needed. Here again is a sample /etc/pcmcia/wireless.opts that contains schemes for two networks and includes the use of a WEP key:
case "$ADDRESS" in

home,0,*,*)
    INFO="Home wireless setup"
    ESSID="home"
    MODE="managed"
    CHANNEL="11"
    RATE="auto"
    ;;
yourjob,0,*,*)
    INFO="Work wireless setup"
    ESSID="BigCorp"
    MODE="managed"
    CHANNEL="4"
    RATE="auto"
    KEY="s:bigsecret"
esac
Use cardctl yourjob to switch to the WEP-enabled
scheme.
The corresponding
iwconfig
command to configure a WEP
key is iwconfig
enc or
iwconfig key. This command accepts several
parameters:
-
iwconfig eth1 key [on|off] onandoffenable and disable encryption, respectively.-
iwconfig eth1 key 0a12fc132 Secret keys can be entered as hex strings with or without separating dashes.
-
iwconfig eth1 key s:supersecret ASCII secret keys can be entered in the form of s:secretkey.
-
iwconfig eth1 key s:supersecret [2] An index of keys can be generated by appending an index number in brackets ([ ]) to the key when it is entered.
-
iwconfig eth1 key [2] You can change secret keys by passing the index number of the key as an option.
-
iwconfig eth1 key [open|restricted] Two operating modes are available:
openaccepts nonencrypted traffic, andrestrictedaccepts only encrypted packets.
The Future Is 802.11i
The future solution from the IEEE to provide real wireless security and a strong cryptographic system is the proposed 802.11i standard. The IEEE Task Group responsible for this standard maintains a web page at http://grouper.ieee.org/groups/802/11/Reports/tgi_update.htm. As of December 2003, draft 7 of this proposal has been sent to a “sponsor ballot,” and the results are not yet available. The word on the street is that 802.11i will become a ratified standard sometime in mid-2004.
The final standard of 802.11i will likely address the following:
- Use of 802.1x for authentication
802.1x is a specification framework for mutual authentication between a client and an access point. 802.1x may also use a backend authentication server such as RADIUS and take advantage of one of the Extensible Authentication Protocol (EAP) variations. 802.1x uses a new key for each session, so it resolves the issue of a single static WEP key.
- Use of the Temporal Key Integrity Protocol (TKIP)
TKIP uses 128-bit dynamic keys that are changed at random times. Because of the constantly changing keys, intruders would be hard pressed to collect enough radio frames to compromise the keys.
- Use of the Advanced Encryption Standard (AES)
The full implementation of 802.11i will utilize AES encryption to make a very strong cryptographic system. However, using AES requires significant computational horsepower. Current models of access points will not be able to handle AES due to limited processors. Expect new models that are “802.11i ready” to arrive on the market in 2004.
WPA: a Subset of 802.11i
Work on 802.11i began in 2001 after the weaknesses in WEP were made public by several teams of researchers. However, as with any standards body, the IEEE does not always work as fast as some people would like.
In mid-2002, the Wi-Fi Alliance, an industry consortium, proposed a subset of 802.11i, based on draft 3 from the IEEE working group, and called it Wireless Protected Access (WPA). The upcoming full IEEE implementation is also being referred to as WPA v2.
WPA, as a subset of the 802.11i proposed standard, incorporates two major features:
Use of 802.1x for authentication
Use of the Temporal Key Integrity Protocol (TKIP)
Chipsets supporting WPA began to become available in 2003. As of this writing, many access points either support WPA out of the box or have firmware updates available that include WPA.
WPA is not only an encryption mechanism but also includes 802.1x authentication, so support is required on the client for the authentication mechanism. As of this writing, your options are very limited regarding WPA support in Linux.
A few vendors have released updated firmware for older radio cards with WPA support; Apple AirPort cards, the Linksys WPC-11, and the Dell TrueMobile 1150 all have updates available.
Tip
The Dell 1150 card is a rebranded Orinoco card; Agere has drivers on its web site listed “for evaluation only” that include this same update. However, Proxim, the new owner of the Orinoco brand, has nothing on its web site about WPA for older cards.
All of this is interesting but not immediately useful, however, because you can’t use any of these cards under Linux and take advantage of the WPA code in the cards. Why? Because their associated Linux drivers do not support WPA. As of early 2004, you have two options if you want to use WPA under Linux, which we discuss below. In order to take advantage of these methods, you should understand how 802.1x works.
802.1x Authentication
802.1x was originally designed for wired Ethernet networks. It is a port-based authentication mechanism; when a client is authenticated, traffic is allowed to flow from the Ethernet port of the client through the authenticating device and out into the secured network.
In a wireless network, the principle is the same. Your notebook client is required to authenticate to the access point. If authentication does not occur, wireless frames are not allowed to be sent through the access point to the wired network.
802.1x authenticates users via a four-part process:
The Supplicant (the client that wants to access a network resource) connects to the Authenticator (whose resource is needed).
The Authenticator asks for credentials from the Supplicant and passes the credentials to the Authenticating Server.
The Authenticating Server authenticates the Supplicant on behalf of the Authenticator.
If the Supplicant is authenticated, access is then granted.
Note that before the authentication is performed, all the communications go through an uncontrolled port. After authentication, the controlled port is used.
For the Authenticating Server to authenticate the Supplicant, the Extensible Authentication Protocol (EAP) is used. EAP supports multiple authentication mechanisms and was originally developed for PPP.
There are many variants of EAP. Here are some that you may come across in wireless security literature:
- EAP-MD5
EAP-MD5 uses the challenge/response method to allow a server to authenticate a user by requesting a username and password. EAP-MD5 does not provide mutual authentication and is vulnerable to an offline dictionary attack.
- EAP-Transport Layer Security (EAP-TLS)
EAP-TLS is based on X.509 (an ITU standard specifying the contents of a digital certificate) certificates. It is currently the most commonly used EAP type for securing wireless networks. However, EAP-TLS requires the use of Public Key Infrastructure (PKI), which is not feasible to be implemented on small networks.
- Protected EAP (PEAP)
To counter the complexity of using EAP-TLS, PEAP was proposed as an alternative. PEAP uses a server-side certificate to allow the authentication of the server. It creates an EAP-TLS tunnel and then uses other authentication methods over the tunnel. EAP methods such as MD5, MS-CHAP, and MS-CHAP v2 are supported. PEAP was proposed as an IETF standard by Microsoft, Cisco, and RSA.
- EAP Tunneled TLS (EAP-TTLS)
EAP-TTLS is similar to PEAP. It creates a tunnel between the user and the RADIUS server. It supports EAP methods such as MD5, MS-CHAP, and MS-CHAP v2.
- Lightweight EAP (LEAP)
LEAP is Cisco’s proprietary version of EAP, which works mostly with Cisco’s wireless cards, RADIUS servers, and access points.
- Microsoft Challenge-Handshake Authentication Protocol Version 2 (MS-CHAP v2)
Originally designed by Microsoft as a PPP authentication protocol, MSCHAP v2 is a password-based, challenge-response, mutual authentication protocol that uses the Message Digest 4 (MD4) and Data Encryption Standard (DES) algorithms to encrypt responses. MS-CHAP v2 is now an EAP type in Windows XP.
In the wireless world, suppose a notebook PC needs to connect to an access point. The notebook PC is the Supplicant, and the access point is the Authenticator. The access point, as the Authenticator, maintains a list of users and passwords and acts as the Authenticating Server. For small networks, this is not an issue; for large networks, however, this is an additional overhead in maintenance and a potential security risk, because it means that users must have another account and password.
In this case, the access point is told to refer to an external RADIUS server. RADIUS was developed by Livingston (now part of Lucent) for use in large dial-up modem pools, and is widely used by ISPs as the authentication mechanism for PPP and PPPoE users. The protocol is now defined by RFCs 2058, 2138, and 2139.
A RADIUS server maintains the user and password list, and performs authentication on behalf of the access point. The RADIUS server in this scenario is the Authenticating Server. Frequently, a RADIUS server is merely a method to transform authentication from some other source—for example, NIS, LDAP, or Kerberos authentication from a corporate network, which is then used by the RADIUS server to authenticate clients.
WPA on Linux
As of this writing, if you want to use WPA and/or 802.1x as a client on Linux, you have two options:
Obtain the WLAN Driver Loader from Linuxant. This is a compatibility wrapper that allows you to use the standard Windows NDIS drivers that ship with wireless network cards. The advantage to this is that you can use a wide array of WiFi cards that currently do not have open source drivers available.
Use a Prism-based Wi-Fi card with the latest HostAP CVS code. The newest versions of HostAP contain a WPA Supplicant in software that allows you to connect to WPA-protected networks.
If you want to use your Linux box as a WPA Authenticator, you’re currently out of luck. The HostAP development team is working towards a full implementation of a WPA Authenticator. Right now, however, the hostapd daemon acts as an 802.1x Authenticator and authenticates against a RADIUS database.
Windows XP and Mac OS X both include support for 802.1x Supplicants. There is an open source implementation available for Linux called Xsupplicant, which is located at http://www.open1x.org.
A last option is to use your Linux box as the RADIUS server (Authenticating Server), and use an inexpensive access point as the WPA Authenticator. You can then use any WPA Supplicant to connect to the access points, and the backend authentication is handled by Linux/RADIUS.
WLAN Driver Loader
The Linuxant WLAN Driver Loader is a compatibility wrapper that allows the use of Windows NDIS wireless network drivers under Linux. Open source purists have issues with this software, because parts of it are released only in binary form, and after 30 days you must pay $20 for a permanent license. If you’re completely opposed to anything Windows-related, keep in mind that this solution requires you to run Windows binary drivers, so this option may not be for you.
However, at this point in time, Linuxant is the only game in town if you need access to WPA-protected networks from a Linux box and you don’t have a Prism-based wireless card. More to the point, the WLAN Driver Loader software allows you to use WiFi cards that do not have any open source drivers, including cards with chipsets from Broadcom and Texas Instruments. For many of the popular 802.11g cards, this may be your only option in Linux.
Tip
A completely open source project to provide NDIS driver loading for Linux is located at http://ndiswrapper.sourceforge.net. As of this writing, support for radio chipsets is limited and there is no support for WPA.
You can obtain the software from the
Linuxant web site at http://www.linuxant.com/driverloader/wlan/full/downloads.php.
Linuxant provides RPM packages for Fedora, Red Hat, Mandrake, SuSE,
and Turbolinux, and has built them for various architectures. Debian
users can download a driverloader.deb package
for installation with dpkg. For other systems, or
if you wish to compile the driver, the source code can be downloaded
as well.
In order to use the WLAN Driver Loader with WPA-PSK (personal) authentication, Linuxant provides a wpa_supplicant daemon that is also available in its downloads section. If you need to have WPA-EAP authentication, the Xsupplicant from http://open1x.org is required in addition to the wpa_supplicant from Linuxant. We cover installation of both supplicants next.
To compile the Driver Loader software from source,
extract the package and change into the newly created directory. A
single make command compiles and installs:
$tar -xzf driverloader-version.tar.gz$cd driverloader-version$make install
By default, WLAN Driver Loader starts up a localhost web-based
configuration tool on port 18020. You can access it by pointing a web
browser to http://127.0.0.1:18020
and logging in as root. You can also configure the software from a
shell by executing the dldrconfig command.
If you wish to disable the web configurator for security reasons, use
dldrconfig --webconf=off. To reenable it, use
dldrconfig --webconf=127.0.0.1:18020. Note that
this command enables you to choose an alternate port for web-based
configuration.
The dldrconfig
command can also be used to change
certain configuration options or recompile (generic packages only)
the kernel modules after installation or kernel upgrades. Run
dldrconfig --help for usage information.
If necessary, the device drivers can be unloaded using the
dldrstop
command.
Figure 4-1 shows the screen that you will see when you point a web browser at the localhost address created by the WLAN Driver Loader installation.
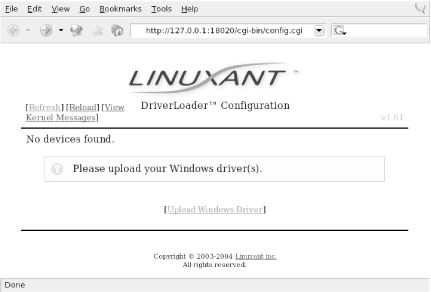
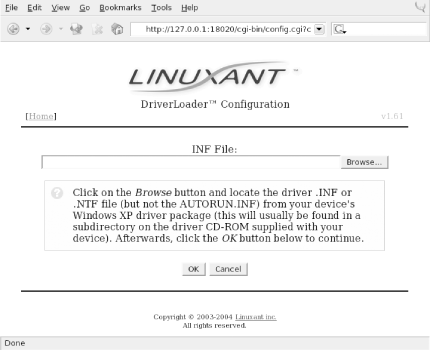
As shown, the first thing you must do is provide the DriverLoader with Windows NDIS drivers for the device you want to use. Click on the Upload Windows Driver link, and you will be presented with another screen, shown in Figure 4-2, that allows you to browse the local filesystem for an .INF or .NTF file that comes in the Windows driver package for your wireless card.
In our example, we used a Linksys WPC55AG PC Card. We downloaded the
latest driver in ZIP format from the Linksys web site at http://www.linksys.com/download. The file we
obtained was wpc55ag_driver_utility_v1.2.zip,
which we extracted using the unzip command. This
created three subdirectories: Drivers,
image, and utility. In the
Drivers subdirectory, we found two
ar5211.sys files and a
net5211.inf file, which are exactly what we
needed to continue. Obviously, this procedure will vary for each
different wireless card. Linuxant maintains a list of wireless cards
known to work with WLAN Driver Loader and links to
downloads of the associated Windows drivers. This list can be found
at http://www.linuxant.com/driverloader/drivers.php.
Using the browse function in Figure 4-2, we found the Drivers directory and selected net5211.inf. The program quickly prompted us that the ar5211.sys file would be required and asked us to locate it. Once we clicked OK, the driver file loaded, and we were presented with the screen in Figure 4-3.
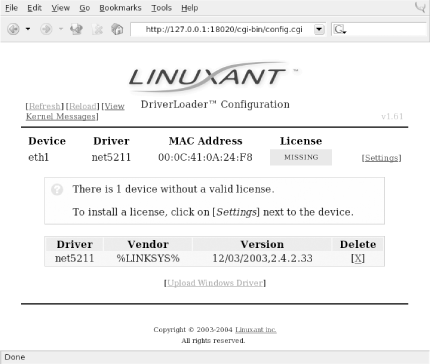
As we mentioned, the Linuxant software is proprietary. Permanent licenses can be purchased from Linuxant, and you can also obtain a 30-day license for trial purposes from the Linuxant web site at http://www.linuxant.com/store. In order to get a license, you must fill out a registration form, wait for an email from Linuxant with a verification code, and enter that code. Once entered, you can generate a license. In order to do this, Linuxant requires the MAC address from your wireless card. You can obtain this either from the web interface or by running:
# dldrconfig -info
Linuxant DriverLoader for Wireless LAN devices, version 1.61

Web configurator: listening on 127.0.0.1:18020

Wireless interface name: eth1
        MAC address    : 00:0C:41:0A:24:F8
        Device instance: PCI-0000:05:00.0-168c:0013-1737:0017
        Device driver    : net5211
        License owner    : unknown
        License key    : none
        License status    : MISSING
Enter the MAC address into the form on the Linuxant web site, and
after a few seconds, you will be presented with a 30-day-trial
license key, a 12-character hexadecimal string that needs to be
entered either in the web configurator or by executing
dldrconfig --license. You’ll be
asked to enter the email address you used to register with Linuxant
along with the license key, as shown in Figure 4-4.
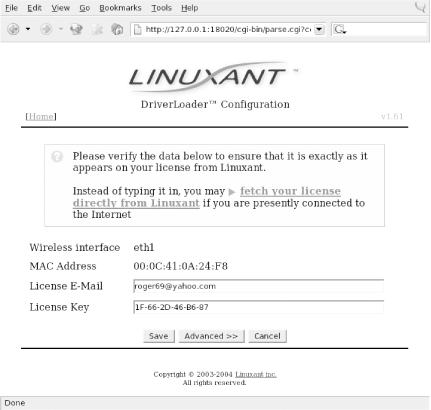
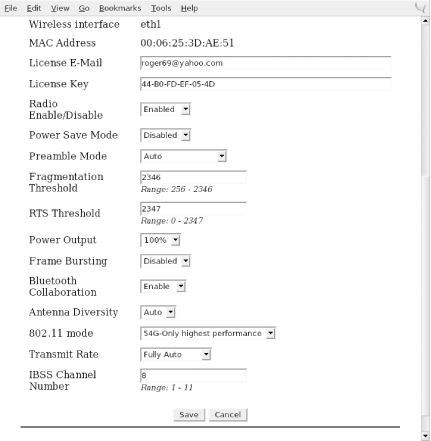
Once you’ve entered the license information, you’ll be returned to the main web screen, but this time it should show that your driver is loaded. You can perform additional configuration on the card by clicking on Settings and then selecting Advanced. Here you’ll see the license information and any other configuration options that are supported by the NDIS driver for your card. A sample screen is shown in Figure 4-5.
After having made any changes in the Advanced configuration, exit the web-based configuration. Your wireless card should now be active. In this example, you can see that our Linksys WPC55AG wireless card has been assigned to eth1:
# iwconfig
lo        no wireless extensions.

eth0      no wireless extensions.

eth1      IEEE 802.11g  ESSID:"whitecottage-wpa"  Nickname:"unknown"
          Mode:Managed  Frequency:2.447GHz  Access Point: 00:0C:41:D4:71:AB
          Bit Rate=54Mb/s   Tx-Power=8 dBm
          RTS thr:off   Fragment thr:off
          Encryption key:off
          Power Management:off
          Link Quality:1/1  Signal level:-38 dBm  Noise level:-83 dBm
          Rx invalid nwid:0  Rx invalid crypt:0  Rx invalid frag:0
          Tx excessive retries:0  Invalid misc:0   Missed beacon:0
As you can see from the ESSID, we are connected to a WPA-protected network. To authenticate, see Section 4.4.3 later in this chapter. The next section describes how to connect to a WPA network with a Prism-based card and the HostAP driver without using the WLAN Driver Loader.
HostAP
Jouni Malinen, the developer behind the HostAP project, has developed a package called wpa_supplicant. In this section, we discuss how you can use a Prism-based wireless card, the HostAP driver, and the wpa_supplicant to connect your Linux box to a WPA-protected network.
In order to use the wpa_supplicant in conjunction with HostAP, you must have a Prism-based Wi-Fi card with station firmware Version 1.7 or later. The latest version of firmware as of this writing is 1.8.0, although Version 1.7.4 is more widely available and works as well. The most complete collection of Prism firmware is located at http://www.red-bean.com/~proski/firmware
To update your Prism card firmware, refer to the excellent tutorial at http://linux.junsun.net/intersil-prism. If you have questions or problems with the firmware update process, we recommend that you check there first. However, we do go over the basics of updating your firmware later in this section. To determine whether you need to update the firmware.
Build and install the hostap utilities (see Section 4.4.2.2 later in this chapter).
Use the
hostap_diag wlan0command to determine the current version of your Prism firmware. Alternatively, usedmesg | grep wlan0. hostap_diag returns output similar to the following:NICID: id=0x8013 v1.0.0 (PRISM II (2.5) Mini-PCI (SST parallel flash)) PRIID: id=0x0015 v1.1.0 STAID: id=0x001f v1.4.9 (station firmware)
You should be concerned with the Station Firmware version, which must be at least Version 1.7.0. Chances are that your card is below that version, and you will need to upgrade the firmware. Take note of the NICID in the output of dmesg or hostap_diag. This is the ID of your Prism card and there are many different IDs. Some IDs have only certain firmware versions available. To determine the software that is required for your card, consult the tutorial at http://linux.junsun.net/intersil-prism.
Once you’ve determined which firmware you need, you can build hostap and its utilities, and then update the firmware, as described in the following sections.
Building hostap from CVS
While you don’t necessarily need the CVS version of the HostAP code to update your Prism firmware, you will need it to use the wpa_supplicant features and to obtain the wpa_supplicant code.
You can obtain the CVS development snapshot from the HostAP web pages at http://hostap.epitest.fi. Select the link for development branch in the section titled “CVS snapshot of the driver source code.” You must have the development branch of the code to get the WPA features.
Once you’ve downloaded the compressed file, extract it and change to the newly created directory:
#tar xzvf hostap.tar.gz#cd hostap
You must edit the file
drivers/modules/hostap_config.h and make sure
these two items are uncommented: #define PRISM2_DOWNLOAD_SUPPORT and #define
PRISM2_NON_VOLATILE_DOWNLOAD. In the CVS version,
the first #define statement is already uncommented.
Once you have edited this file, go back to the hostap directory and build the software:
#make#make install
To load the new HostAP drivers, stop and restart the PCMCIA services:
# /etc/init.d/pcmcia restartBuilding the hostap tools
In the hostap source directory is a subfolder containing the hostap utilities. Building them is easy:
#cd utils#make
There is no make install command, so if you want
the tools installed outside of the utils
directory, you must move them yourself. Our examples merely run the
utilities out of the directory where they are compiled.
Updating the firmware
Copy the version of firmware files that you need for your prism card
into the utils directory. The utility that
manages the firmware upgrade is prism2_srec. This
utility not only updates the station
firmware
of your card, but also the
primary firmware
. Updating the primary firmware is
beyond the scope of your needs, so focus simply on updating the
station firmware.
Station firmware is always provided in the format
s[
platform
][
version
].hex.
The tutorial web pages at http://linux.junsun.net/intersil-prism give
you information on determining your platform. Make sure that you are
using the station firmware file and no other file. You could render
your card useless if you were to update it with the wrong firmware
(the faint of heart may want to consider updating their card using a
Windows-based updater from the manufacturer, which is likely to be
the only supported technique).
First, do a test run in verbose mode:
# ./prism2_srec -v wlan0 s1010701.hexThe -v argument specifies verbose mode, and because we have not called the tool with any other options, it simply tests the firmware against the card. If at the end of the output you see OK, you can proceed to the next step. If you see anything else at the end of the output, do not proceed. You will know that the firmware is not compatible with your card if you see output like:
NICID was not found from the list of supported platforms. Incompatible update data
Assuming that your test run returned an OK, you can proceed to the next step, and write the firmware to the flash on the Prism card. First, if you use a laptop, make sure it has a fully charged battery and is plugged into the wall outlet. If your computer is a desktop, be sure that it is plugged into a UPS. (If the power fails during this step, your Wi-Fi card will be useless.)
# ./prism2_srec -v -f wlan0 s1010701.hexThe process takes about 30 seconds, and you should make sure that the card is not removed during the update. Once finished, you should see output that shows the new firmware versions on the card and that should be returned to a shell prompt:
Components after download:
  NICID: 0x8003 v1.0.0
  PRIID: 0x0015 v0.3.0
  STAID: 0x001f v1.7.1
#
The card driver is unloaded after the firmware update, so you should remove the card and reinsert it to reload the driver.
Authenticating with wpa_supplicant
The supplicant software is included in the CVS releases of HostAP 0.2.x source, so you have already downloaded it when you installed the CVS version of HostAP in the previous section. Linuxant also provides the source for wpa_supplicant in the downloads section of its web site, but as of this writing, the version included with HostAP 0.2.x source is more current. We recommend obtaining the HostAP source to build wpa_supplicant even if you plan on using it with the WLAN Driver Loader.
Operating wpa_supplicant with either HostAP or the WLAN Driver Loader doesn’t require a different setup. You must make sure that the wireless card that you intend to use with WLAN Driver Loader supports WPA in both the card firmware and the Windows NDIS driver. See the sidebar Bleeding-Edge Warning for details on how some WPA-enabled cards may not work.
The only difference between running wpa_supplicant with HostAP and WLAN Driver Loader is what interface you call from the shell. HostAP interfaces are always wlanX, typically wlan0. For all of the cards we tried with WLAN Driver Loader, the interface came up as eth1.
In the hostap source directory is a subfolder that contains the wpa_supplicant. Building it from source is easy:
#cd wpa_supplicant#make
Again, there is no make install, so you must copy
the generated executables to where you want them: wpa_supplicant and
wpa_passphrase, and the configuration file
wpa_supplicant.conf.
According to the README file included with the source, wpa_supplicant is designed to run as a background daemon. A frontend program that provides a user interface is planned but is not yet available.
On currently available access points, there are two possible operating modes for WPA:
- WPA-PSK (pre-shared key)
Also called “WPA-Personal” by the Wi-Fi Alliance; this somewhat resembles WEP in that it allows you to use an identical key (a pre-shared key) on both the access point and the client. The access point, acting as the WPA Authenticator, uses this pre-shared key to generate a master session key.
- WPA-EAP
Also called “WPA-Enterprise” by the Wi-Fi Alliance; this relies on an external authentication server, most likely RADIUS, and the EAP used by 802.1x. The master session key is generated by the Authentication Server and then passed to the access point, which authenticates the client with that key.
In both cases, WPA implements a 4-Way Key Handshake and Group Key Handshake, which generates and exchanges data encryption keys between the Authenticator (access point) and Supplicant (client). The only difference between the two methods is where the master session key is generated.
You want to start wpa_supplicant as a daemon, give it the path to the configuration file, and specify the wireless interface. In most cases, you can use the line shown in Example 4-1.
#/path/to/wpa_supplicant -Bw -c/path/to/wpa_supplicant.conf -iwlan0
This makes the process fork into the background and wait for the wlan0 interface, so you can insert this command into an appropriate place in your startup environment. WPA handshakes must be complete before data frames can be exchanged, so wpa_supplicant must be started before a DHCP client, for instance.
wpa_supplicant must be running when using a WPA-protected wireless
network, so it should be started from system startup scripts using
the command shown in Example 4-1, or it can be
called from the pcmcia-cs scripts if you are using
a PC card.
To enable WPA support using the pcmcia-cs scripts,
add these lines to /etc/pcmcia/wireless.opts:
MODE="Managed"
WPA="y"
Add the following code to the end of the start
action handler in /etc/pcmcia/wireless:
if [ $WPA = "y" -a -x /usr/local/bin/wpa_supplicant ]; then
    /usr/local/bin/wpa_supplicant -Bw -c/etc/wpa_supplicant.conf \
        -i$DEVICE
fi
Finally, add the following code to the end of the
stop action handler in
/etc/pcmcia/wireless:
if [ $WPA = "y" -a -x /usr/local/bin/wpa_supplicant ]; then
    killall wpa_supplicant
fi
The combined effect of these changes make cardmgr start up wpa_supplicant when the card is plugged in. wpa_supplicant waits until the interface is set up, and then negotiates keys with the access point.
The example wpa_supplicant.conf file can be used to generate a configuration for your environment. The file needs at least two mandatory parameters, and it has several options depending on how your network is configured. The general file format should be as in the example below. Empty lines and lines starting with # are ignored.
network={
        ssid="locked-down"
        psk="s00pers3cr3t"
        key_mgmt=WPA-PSK
        pairwise=CCMP TKIP
        group=CCMP TKIP
}
Here is a list of the possible fields in the configuration file:
-
ssid= A mandatory field that can be either an ASCII string in quotes or a hex string.
-
bssid= Optional, only needed if your network uses a BSSID.
-
key_mgmt= A list of accepted key management protocols. Options are
WPA-PSK,WPA-EAP, andNONE. If not set, this defaults toWPA-PSK WPA-EAP.-
pairwise= A list of accepted pairwise (unicast) ciphers for WPA. Options are
CCMP(AES encryption),TKIP, orNONE. If not set, this defaults toCCMP TKIP.-
group= A list of accepted group (broadcast/multicast) ciphers for WPA. Options are
CCMP,TKIP,WEP104, andWEP40. If not set, this defaults toCCMP TKIP WEP104 WEP40.-
psk= A mandatory field when using WPA-PSK. This field can be entered as 64 hex digits or as an ASCII passphrase. The ASCII passphrase must be at least 8 characters in length and can be a maximum of 63 characters.
In our example configuration, we are connecting to a WPA-PSK network, and we have chosen to put the ASCII passphrase in the text configuration file. If you want more protection, the included tool wpa_passphrase can be used to generate 256-bit keys from an ASCII passphrase. This tool uses a fair amount of CPU time, so it should be used only when the passphrase has actually changed.
If you don’t have WPA set up on your access point, see Section 4.4.3.2, which provides information on setting up a Linksys access point for WPA.
wpa_supplicant has an experimental interface for integrating with Xsupplicant. This allows you to connect to a WPA-EAP network by having Xsupplicant manage the 802.1x and EAP authentication. In order for this to work properly, Xsupplicant must be modified to send the master session key to wpa_supplicant after successful EAP authentication.
The latest wpa_supplicant code includes an xsupplicant.patch that can be used to patch the source code for Xsupplicant. However, this patch has been merged into the Xupplicant CVS code, so we recommend you check out CVS code instead of dealing with the separate patch.
Xsupplicant
The folks at the Open1x project build the Xsupplicant software, available at http://www.open1x.org. The latest stable release is Version 0.8b. However, for our purposes, we need the CVS code, which you can check out from the SourceForge CVS server using the following commands (press Enter when prompted for a password):
#cvs -d:pserver:anonymous@cvs.sourceforge.net:/cvsroot/open1x login#cvs -d:pserver:anonymous@cvs.sourceforge.net:/cvsroot/open1x co \xsupplicant
These commands check out the CVS code and deposit it in a newly created xsupplicant directory.
Xsupplicant requires that Openssl 0.9.7 or greater be installed.
Mandrake, Fedora, and Red Hat users can install the
openssl package, Debian users can run
apt-get install openssl, and the source can be
downloaded from http://www.openssl.org. Most distributions
already have this package installed by default, but you may need to
upgrade it to ensure that you have the version required.
In order to get the CVS code running, you must install the automake1.7 and autoconf2.5 packages (or more recent compatible versions). Once these are installed, compiling from source is straightforward:
#cd xsupplicant#./configure#make#make install
This installs xsupplicant and some related tools
in /usr/local/bin. However, the CVS
make install does not install a
config file, so you must copy the sample
etc/xsupplicant.conf to
/etc/1x/1x.conf (this is the default location of
the conf file).
Edit the 1x.conf file. Many of the defaults can be left in place, but you must change a few particulars starting with the identity, then moving on to the EAP type. Although the sample configuration file gives you a starting point for each type of EAP, we’ll use EAP-MD5 because it’s easy to implement and doesn’t require us to generate a certificate. After that, you need to configure the phase2 authentication type and chap:
- identity =
What Xsupplicant responds with when presented with an EAP ID Request. This is typically the username, and because this can be an arbitrary string, you should enclose it with a <BEGIN ID> and <END ID>.
- eap-md5
In this section, you must enter a username and password.
- phase2_type
Here you must specify the type of phase2 authentication. The default is chap, which we use for our example.
- chap
In this section, you must enter a username and password.
If you’re uncomfortable entering confidential
information into clear text files, Xsupplicant can be called from the
command line with switches that allow you to enter your username and
password with the -u and -p
options. However, these options allow anyone who can execute a
ps command on your system to see your password.
Xsupplicant can be used both to authenticate your Linux machine to an 802.1x server as well as in combination with wpa_supplicant to connect to WPA networks.
In either case, Xsupplicant must be activated after the interface is brought up so it can transmit authentication information; Xsupplicant is unlike wpa_supplicant, which must complete the WPA handshakes before any data can be transmitted.
After you have entered all of the correct information into the 1x.conf file, call Xsupplicant from the command line:
# xsupplicant -i wlan0 -DThis command line puts Xsupplicant into daemon mode after it receives the password. Put the 1x.conf file in the default location so you don’t need to specify the location of the conf file. This command allows you to authenticate against any 802.11x server.
To use Xsupplicant in combination with wpa_supplicant to connect to a WPA-EAP network, you must change a few things:
The -W switch tells Xsupplicant that it must
communicate the master session key that it obtains from the
802.11X/EAP server back to wpa_supplicant.
Xsupplicant also comes with some example ifup and
ifdown scripts in the tools
directory of the source tarball. We suggest that you use these
scripts instead of the normal distribution scripts when you wish to
bring up or down an interface that uses 802.1x
authentication.
Example WPA setup on a Linksys access point
All of our testing with WPA-PSK and WPA-EAP was done using a Linksys WRT54G Wireless Router. With Version 2.0 and above of firmware, the WRT54G is capable of both WPA methods as well as TKIP and AES encryption.
Figure 4-6 shows the configuration necessary for a WPA-PSK setup.
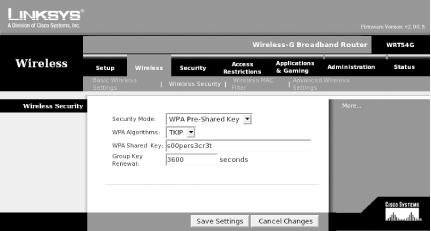
Figure 4-7 shows configuration for a WPA RADIUS setup.
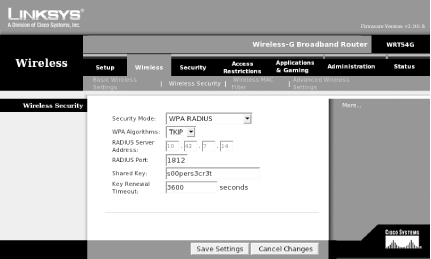
WPA RADIUS setup details
In order to make this work, we set up a Mandrake 9.2 system as a
dedicated RADIUS server. For a RADIUS server, we installed the
freeradius
packages and their dependencies with
urpmi freeradius. RedHat, Fedora, and Debian users
should be able to install the freeradius
packages similarly on their systems. We did not attempt to compile
the source code for our testing, but it can be downloaded from
http://www.freeradius.org.
FreeRadius supports a wide variety of database backends, including LDAP, MySQL, and others. This was major overkill for our purposes. In order to run FreeRadius, we had to edit two files:
- /etc/raddb/users
We didn’t use any backend database for users, so we simply added several test users to this file. A sample user entry is shown here:
"roger" Auth-Type := Local, User-Password = = "useless" Reply-Message = "Hello, %u"- /etc/raddb/clients.conf
For each client of the RADIUS server, you can define an entry with a shared secret. This isn’t particularly secure, because RADIUS shared secrets are sent in the open with no encryption (for this reason, you should use a wired link on a physically secured network between the RADIUS server and access point). If this shared secret were compromised, it would not compromise the integrity of the 802.1x-protected communication. However, an attacker with knowledge of the secret and physical access to your network could replace either the RADIUS server or access point. We defined an entry for our Linksys WRT54G and made sure that we entered the same shared secret here as we did in the Linksys setup:
client 10.42.7.14 {
        secret          = s00pers3cr3t
        shortname       = wrt54g
        nastype         = other
}
Once we edited these files, we started FreeRadius manually with debugging enabled so we could watch for any problems:
# /usr/sbin/radiusd -xAt this point, we were able to use the combination of Xsupplicant and wpa_supplicant described earlier in the chapter to establish a WPA link with the WRT54G, and authenticate through to the RADIUS server.
Get Linux Unwired now with the O’Reilly learning platform.
O’Reilly members experience books, live events, courses curated by job role, and more from O’Reilly and nearly 200 top publishers.

