Deploying a Lift application to production means little more than packaging it and ensuring you set the run mode to production. The recipes in this chapter show how to do this for various hosted services.
You can also install and run a container such as Tomcat or Jetty on your own servers. Containers were introduced in Running your application. This brings with it the need to understand how to install, configure, start, stop, and manage each container, and how to integrate it with load balancers or other frontends. These are large topics, and you can find out more from such sources as:
- The deployment section of the Lift wiki.
- Timothy Perrett, Lift in Action, Chapter 15, “Deployment and Scaling,” Manning Publications, Co.
- Jason Brittain and Ian F. Darwin, Tomcat: The Definitive Guide, O’Reilly Media, Inc.
- Tanuj Khare, Apache Tomcat 7 Essentials, Packt Publishing.
The Lift wiki includes a page on Tomcat configuration options relevant to Lift.
You have an account with the CloudBees PaaS hosting environment, and you want to deploy your Lift application there.
Use the SBT package command to produce a WAR file that can be deployed
to CloudBees, and then use the CloudBees SDK to configure and deploy your
application.
From within the CloudBees “Grand Central” console, create a new application under your account. In what follows, we’ll assume your account is called myaccount and your application is called myapp.
For the best performance, you will want to ensure the Lift run mode is set to “production.” Do this from the CloudBees SDK command line:
$bees config:set -a myaccount/myapp run.mode=production
This will set the run mode to production for your CloudBees applications
identified as myaccount/myapp. Omitting the -a will set it for your
whole CloudBees account.
CloudBees will remember this setting, so you only need to do it once.
You can then deploy:
$sbt package ...[info]Packaging /Users/richard/myapp/target/scala-2.9.1/myapp.war... ...$bees app:deploy -a myaccount/myapp ./target/scala-2.9.1/myapp.war
This will send your WAR file to CloudBees and deploy it. You’ll see the location (URL) of your application output from the bees app:deploy command when it completes.
If you change a configuration setting, you will need to restart the application for the setting
to take effect. Deploying the application will do this, otherwise, run the bees app:restart command:
$ bees app:restart -a myaccount/myappIf you are deploying an application to multiple CloudBees instances, be aware that, by default, CloudBees will round robin requests to each instance. If you use any of Lift’s state features, you’ll want to enable session affinity (sticky sessions):
$bees app:update -a myaccount/myappstickySession=true
If you are using Comet, it’ll work fine, but the CloudBees default is to enable request buffering. This allows CloudBees to do smart things, such as rerouting requests in a cluster if one machine does not respond. A consequence of request buffering is that long-polling Comet requests will time out more often. To turn this feature off, run the following:
$bees app:update -a myaccount/myappdisableProxyBuffering=true
As with the run mode setting, CloudBees will remember these settings, so you only need to set them once.
Finally, you may want to increase the permanent generation memory setting of the JVM. By default, an application has 64 MB assigned for the PermGen. To increase this to 128 MB, run the bees app:update command:
$bees app:update -a myaccount/myappjvmPermSize=128
The commands bees app:info and bees config:list will report back the settings for your application.
If you are using a SQL database in your application, you’ll want to configure src/main/webapp/WEB-INF/cloudbees-web.xml. For example:
<?xml version="1.0"?><cloudbees-web-appxmlns="http://www.cloudbees.com/xml/webapp/1"><appid>myaccount/myapp</appid><resourcename="jdbc/mydb"auth="Container"type="javax.sql.DataSource"><paramname="username"value="dbuser"/><paramname="password"value="dbpassword"/><paramname="url"value="jdbc:cloudbees://mydb"/><!-- For these connections settings, see:http://commons.apache.org/dbcp/configuration.html--><paramname="maxActive"value="10"/><paramname="maxIdle"value="2"/><paramname="maxWait"value="15000"/><paramname="removeAbandoned"value="true"/><paramname="removeAbandonedTimeout"value="300"/><paramname="logAbandoned"value="true"/><!-- Avoid idle timeouts --><paramname="validationQuery"value="SELECT 1"/><paramname="testOnBorrow"value="true"/></resource></cloudbees-web-app>
This is a JNDI database configuration, defining a connection to a
CloudBees database called mydb. This will be used by Lift if the JNDI
name is referenced in Boot.scala:
DefaultConnectionIdentifier.jndiName="jdbc/mydb"if(!DB.jndiJdbcConnAvailable_?){// set up alternative local database connection here}
Because the JNDI setting is only defined in cloudbees-web.xml, it will only be available in a CloudBees environment. This means you can develop against a different database locally and use your CloudBees database when deploying.
Generally, you don’t need to know about your deployed instance’s public host name and port number. Requests to your application URL are routed to a specific instance by CloudBees. However there are situations, especially when you have multiple instances, where you do need to find this out. For example, if you want to receive messages from Amazon’s Simple Notification Service (SNS), then each instance will need to give a direct URL to SNS when the application boots.
CloudBees has provided documentation on how to do this. To get the public hostname, you need to make an HTTP request to http://instance-data/latest/meta-data/public-hostname. For example:
importio.SourcevalbeesPublicHostname:Box[String]=tryo{Source.fromURL("http://instance-data/latest/meta-data/public-hostname").getLines().toStream.head}
This will return a Full hostname on the CloudBees environment, but when running locally will fail and return a Failure. For example:
Failure(instance-data,Full(java.net.UnknownHostException:instance-data),Empty)
The port number can be found from the name of a file in the .genapps/ports folder of your application deployment:
valbeesPort:Option[Int]={valportsDir=newFile(System.getenv("PWD"),".genapp/ports")for{files<-Option(portsDir.list)port<-files.flatMap(asInt).headOption}yieldport}
The java.io.File list method returns a list of filenames in a directory, but will return null if the directory doesn’t exist or if there are any IO errors. For this reason, we wrap it in Option to convert null values to None.
Running locally, this will return a None, but on CloudBees, you’ll see a Full[Int] port number.
You might put these two values together as follows:
importjava.net.InetAddressvalhostAndPort:String=(beesPublicHostnameopenOrInetAddress.getLocalHost.getHostAddress)+":"+(beesPortgetOrElse8080).toString
Running locally, hostAndPort might be 192.168.1.60:8080 and running on CloudBees, it would be something like ec2-204-236-222-252.compute-1.amazonaws.com:8520.
Currently the default JVM provided by CloudBees is JDK 7, but you can select 6, 7, and 8.
To change the default Java Virtual Machine, use the bees config:set command:
$bees config:set -a myaccount/myapp -Rjava_version=1.8
Excluding the application identifier -a myaccount/myapp from the command will set the JVM as the default for all applications in the account. The bees config:set command will update the configuration, but not take effect until the application has been updated or restarted.
The JVM can also be changed when an application is deployed or updated via the following commands:
$bees app:deploy -a myaccount/myapp sample.war -Rjava_version=1.6$bees app:update -a myaccount/myapp -Rjava_version=1.7
To confirm which JVM an application is currently running, use the
bees config:list command, which will display the Java version:
$bees config:list -a myaccount/myapp Runtime Parameters:java_version=1.6
CloudBees offers several containers: Tomcat 6.0.32 (the default), Tomcat 7, JBoss 7.02, JBoss 7.1, and GlassFish 3.
To change containers, the application will need to be redeployed, as CloudBees uses different file configurations for the various containers. Hence we use the bees app:deploy command. The following example updates to Tomcat 7:
$ bees app:deploy -t tomcat7 -a myaccount/myapp sample.warThe JVM and container commands can be run as a single bees app:deploy, as follows:
$bees app:deploy -t tomcat -a myaccount/myapp sample.war -Rjava_version=1.6
This would deploy sample.war to the myapp application on myaccount with Tomcat 6.0.32 and JDK 6.
To determine which container an application is deployed to, use the command bees app:info:
$bees app:info -a myaccount/myapp Application : myaccount/myapp Title : myapp Created : Wed Mar 20 11:02:40 EST 2013 Status : active URL : myapp.myaccount.cloudbees.net clusterSize : 1 container : java_free containerType : tomcat idleTimeout : 21600 maxMemory : 256 proxyBuffering :falsesecurityMode : PUBLIC serverPool : stax-global(Stax Global Pool)
ClickStart applications are templates to quickly get an application and automated build up and running at CloudBees. The Lift ClickStart creates a private Git source repository at CloudBees that contains a Lift 2.4 application, provisions a MySQL database, creates a Maven-based Jenkins build, and deploys the application. All you need to do is provide a name for the application (without whitespace).
To access the Git source repository created for you, you’ll need to upload an SSH public key. You can do this in the “My Keys” section of your account settings on the CloudBees website.
The build that’s created for you will automatically build and deploy your application to CloudBees when you push changes to your Git repository.
If all of that’s a good match to the technologies and services you want to use, ClickStart is a great way to deploy your application. Alternatively, it gives you a starting point from which you can modify elements; or you could fork the CloudBees Lift template and create your own.
The CloudBees SDK provides command-line tools for configuring and controlling applications.
The CloudBees developer portal contains a “Resources” section that provides details of the CloudBees services. In it, you’ll find details on PermGen settings, JVM selection, and servlet containers.
Create a new Tomcat 7 environment, use SBT to package your Lift application as a WAR file, and then deploy the application to your environment.
To create a new environment, visit the AWS console, navigate to Elastic Beanstalk, and select “Apache Tomcat 7” as your environment. This will create and launch a default Beanstalk application. This may take a few minutes, but will eventually report “Successfully running version Sample Application.” You’ll be shown the URL of the application (something like http://default-environment-nsdmixm7ja.elasticbeanstalk.com), and visiting the URL you’re given will show the running default Amazon application.
Prepare your WAR file by running:
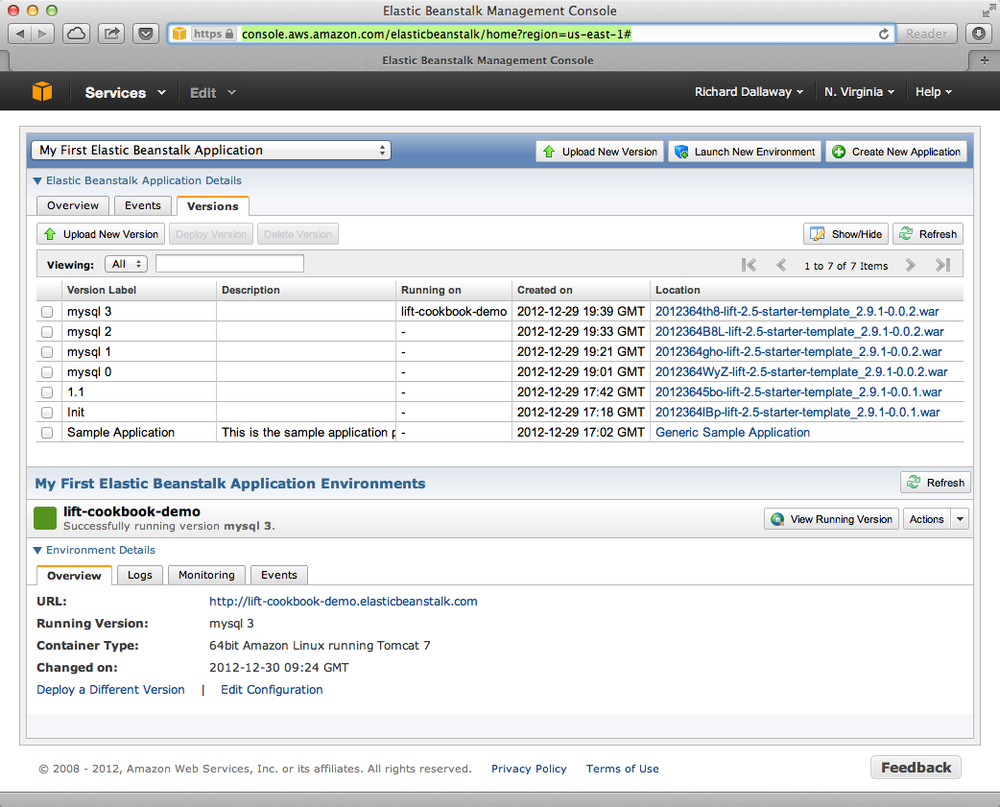
$ sbt packageThis will write a WAR file into the target folder. To deploy this WAR file from the AWS Beanstalk web console (see Figure 10-1), select the “Versions” tab under the “Elastic Beanstalk Application Details” and click the “Upload new version” button. You’ll be given a dialog where you give a version label and use the “Choose file” button to select the WAR file you just built. You can either upload and deploy in one step, or upload first and then select the version in the console and hit the “Deploy” button.
The Beanstalk console will show “Environment updating…”, and after some minutes, it’ll report “Successfully running.” Your Lift application is now deployed and running on Beanstalk.
A final step is to enable Lift’s production run mode. From the environment in the AWS Beanstalk web console, follow the “Edit Configuration” link. A dialog will appear, and under the “Container” tab, add -Drun.mode=production to the “JVM Command Line Options” and hit “Apply Changes” to redeploy your application.
Elastic Beanstalk provides a prebuilt stack of software and infrastructure, in this case: Linux, Tomcat 7, a 64 bit “t1.micro” EC2 instance, load balancing, and an S3 bucket. That’s the environment and it has reasonable default settings. Beanstalk also provides an easy way to deploy your Lift application. As we’ve seen in this recipe, you upload an application (WAR file) to Beanstalk and deploy it to the environment.
As with many cloud providers, keep in mind that you want to avoid local file storage. The reason for this is to allow instances to be terminated or restarted without data loss. With your Beanstalk application, you do have a filesystem and you can write to it, but it is lost if the image is restarted. You can get persistent local file storage—for example, using Amazon Elastic Block Storage—but you’re fighting against the nature of the platform.
Logfiles are written to the local filesystem. To access them, from the AWS console, navigate to your environment, into the “Logs” tab, and hit the “Snapshot” button. This will take a copy of the logs and store them in an S3 bucket, and give you a link to the file contents. This is a single file showing the content of a variety of logfiles, and catalina.out will be the one showing any output from your Lift application. If you want to try to keep these logfiles around, you can configure the environment to rotate the logs to S3 every hour from the “Container” tab under “Edit Configuration.”
The Lift application WAR files are stored in the same S3 bucket that the logs are stored in. From the AWS console, you’ll find it under the S3 page listed with a name like “elasticbeanstalk-us-east-1-5989673916964.” You’ll note that the AWS uploads makes your WAR filename unique by adding a prefix to each filename. If you need to be able to tell the difference between these files in S3, one good approach is to bump the version value in your build.sbt file. This version number is included in the WAR filename.
Beanstalks enables autoscaling by default. That is, it launches a single instance of your Lift application, but if the load increases above a threshold, up to four instances may be running.
If you’re making use of Lift’s state features, you’ll need to enable sticky sessions from the “Load Balancer” tab of the environment configuration. It’s a checkbox named “Enable Session Stickiness”—it’s easy to miss, but that tab does scroll to show more options if you don’t see it the first time.
There’s nothing unusual you have to do to use Lift and a database from Beanstalk. However, Beanstalk does try to make it easy for you to work with Amazon’s Relational Database Service (RDS). Either when creating your Beanstalk environment, or from the configuration options later, you can add an RDS instance, which can be an Oracle, SQL-Server, or MySQL database.
The MySQL option will create a MySQL InnoDB database. The database will be accessible from Beanstalk, but not from elsewhere on the Internet. To change that, modify the security groups for the RDS instance from the AWS web console. For example, you might permit access from your IP address.
When your application launches with an associated RDS instance, the JVM system properties include settings for the database name, host, port, user, and password. You could pull them together like this in Boot.scala:
Class.forName("com.mysql.jdbc.Driver")valconnection=for{host<-Box!!System.getProperty("RDS_HOSTNAME")port<-Box!!System.getProperty("RDS_PORT")db<-Box!!System.getProperty("RDS_DB_NAME")user<-Box!!System.getProperty("RDS_USERNAME")pass<-Box!!System.getProperty("RDS_PASSWORD")}yieldDriverManager.getConnection("jdbc:mysql://%s:%s/%s"format(host,port,db),user,pass)
That would give you a Box[Connection] that, if Full, you could use in a SquerylRecord.initWithSquerylSession call, for example (see Chapter 7).
Alternatively, you might want to guarantee a connection by supplying defaults for all the values with something like this:
Class.forName("com.mysql.jdbc.Driver")valconnection={valhost=System.getProperty("RDS_HOSTNAME","localhost")valport=System.getProperty("RDS_PORT","3306")valdb=System.getProperty("RDS_DB_NAME","db")valuser=System.getProperty("RDS_USERNAME","sa")valpass=System.getProperty("RDS_PASSWORD","")DriverManager.getConnection("jdbc:mysql://%s:%s/%s"format(host,port,db),user,pass)}
Amazon provided a walkthrough with screenshots, showing how to create a Beanstalk application.
Elastic Beanstalk, by van Vliet et al. (O’Reilly) goes into the details of the Beanstalk infrastructure, how to work with Eclipse, enabling continuous integration, and how to hack the instance (for example, to use Nginx as a frontend to Beanstalk).
The Amazon documentation for “Configuring Databases with AWS Elastic Beanstalk” describes the RDS settings in more detail.
Package your Lift application as a WAR file and use the Heroku deploy plugin to send and run your application. This will give you an application running under Tomcat 7. Anyone can use this method to deploy an application, but Heroku provides support only for Enterprise Java customers.
This recipe walks through the process in three stages: one-time setup; deployment of the WAR; and configuration of your Lift application for production performance.
If you’ve not already done so, download and install the Heroku command-line tools (“Toolbelt”) and log in using your Heroku credentials and upload an SSH key:
$ heroku login
Enter your Heroku credentials.
Email: you@example.org
Password (typing will be hidden):
Found the following SSH public keys:
1) github.pub
2) id_rsa.pub
Which would you like to use with your Heroku account? 2
Uploading SSH public key ~/.ssh/id_rsa.pub... done
Authentication successful.
Install the deploy plugin:
$ heroku plugins:install https://github.com/heroku/heroku-deploy
Installing heroku-deploy... done
With that one-time setup complete, you can create an application on Heroku. Here we’ve not specified a name, so we are given a random name of “glacial-waters-6292” that we will use throughout this recipe:
$ heroku create
Creating glacial-waters-6292... done, stack is cedar
http://glacial-waters-6292.herokuapp.com/ |
git@heroku.com:glacial-waters-6292.git
Before deploying, we set the Lift run mode to production. This is done via the config:set command. First check the current settings for JAVA_OPTS and then modify the options by adding -Drun.mode=production:
$ heroku config:get JAVA_OPTS --app glacial-waters-6292
-Xmx384m -Xss512k -XX:+UseCompressedOops

$ heroku config:set JAVA_OPTS="-Drun.mode=production -Xmx384m -Xss512k
  -XX:+UseCompressedOops" --app glacial-waters-6292
We can deploy to Heroku by packaging the application as a WAR file and then running the Heroku deploy:war command:
$sbt package ....[info]Packaging target/scala-2.9.1/myapp-0.0.1.war ... ....$heroku deploy:war --war target/scala-2.9.1/myapp-0.0.1.war --app glacial-waters-6292 Uploading target/scala-2.9.1/myapp-0.0.1.war............done Deploying to glacial-waters-6292.........done Created release v6
Your Lift application is now running on Heroku.
There are a few important comments regarding Lift applications on Heroku. First, note that there’s no support for session affinity. This means if you deploy to multiple dynos (Heroku terminology for instances), there is no coordination over which requests go to which servers. As a consequence, you won’t be able to make use of Lift’s stateful features and will want to turn them off (Running Stateless describes how to do that).
Second, if you are using Lift Comet features, there’s an adjustment to make in Boot.scala to work a little better in the Heroku environment:
LiftRules.cometRequestTimeout=Full(25)
This setting controls how long Lift waits before testing a Comet connection. We’re replacing the Lift default of 120 seconds with 25 seconds, because Heroku terminates connections after 30 seconds. Although Lift recovers from this, the user experience may be to see a delay when interacting with a page.
A third important point to note is that the dyno will be restarted every day. Additionally, if you are only running one web dyno, it will be idled after an hour of inactivity. You can see this happening by tailing your application log:
$heroku logs -t --app glacial-waters-6292 ... 2012-12-31T11:31:39+00:00 heroku[web.1]: Idling 2012-12-31T11:31:41+00:00 heroku[web.1]: Stopping all processes with SIGTERM 2012-12-31T11:31:43+00:00 heroku[web.1]: Process exited with status 143 2012-12-31T11:31:43+00:00 heroku[web.1]: State changed from up to down
Anyone visiting your Lift application will cause Heroku to unidle your application.
Note, though, that the application was stopped with a SIGTERM. This is a Unix signal sent to a process, the JVM in this case, to request it to stop. Unfortunately, the Tomcat application on Heroku does not use this signal to request Lift to shut down. This may be of little consequence to you, but if you do have external resources you want to release to other actions to take at shutdown, you need to register a shutdown hook with the JVM.
For example, you might add this to Boot.scala if you’re running on Heroku:
Runtime.getRuntime().addShutdownHook(newThread{overridedefrun(){println("Shutdown hook being called")// Do useful clean up here}})
Do not count on being able to do much during shutdown. Heroku allows around 10 seconds before killing the JVM after issuing the SIGTERM.
Possibly a more general approach is to perform cleanup using Lift’s unload hooks (see Run Code When Lift Shuts Down) and then arrange the hooks to be called when Heroku sends the signal to terminate:
Runtime.getRuntime().addShutdownHook(newThread{overridedefrun(){LiftRules.unloadHooks.toList.foreach{f=>tryo{f()}}}})
This handling of SIGTERM may be a surprise, but if we look at how the application is running on Heroku, things become clearer. The dyno is an allocation of resources (512 MB of memory) and allows an arbitrary command to run. The command being run is a Java process starting a “webapp runner” package. You can see this in two ways. First, if you shell to your dyno, you’ll see a WAR file as well as a JAR file:
$heroku run bash --app glacial-waters-6292 Running`bash`attached to terminal... up, run.8802 ~$ls Procfile myapp-0.0.1.war webapp-runner-7.0.29.3.jar
Second, by looking at the processes executing:
$ heroku ps --app glacial-waters-6292
=== web: `${PRE_JAVA}java ${JAVA_OPTS} -jar webapp-runner-7.0.29.3.jar
 --port ${PORT} ${WEBAPP_RUNNER_OPTS} myapp-0.0.1.war`
web.1: up 2013/01/01 22:37:35 (~ 31s ago)
Here we see a Java process executing a JAR file called webapp-runner-7.0.29.3.jar that is passed our WAR file as an argument. This is not identical to the Tomcat catalina.sh script you may be more familiar with, but instead is this launcher process. As it does not register a handler to deal with SIGTERM, we will have to if we need to release any resources during shutdown.
All of this means that if you want to launch a Lift application in a different way, you can. You’d need to wrap an appropriate container (Jetty or Tomcat, for example), and provide a main method for Heroku to call. This is sometimes called containerless deployment.
If you are not a Heroku Enterprise Java customer, and you’re uncomfortable with the unsupported nature of the deploy:war plugin, you now know what you need to do to run in a supported way: provide a main method that launches your application and listen for connections. The “See Also” section gives pointers for how to do this.
Heroku makes no restrictions on which databases you can connect to from your Lift application, but they try to make it easy to use their PostgreSQL service by attaching a free database to applications you create.
You can find out if you have a database by running the pg command:
$heroku pg --app glacial-waters-6292===HEROKU_POSTGRESQL_BLACK_URL(DATABASE_URL)Plan: Dev Status: available Connections: 0 PG Version: 9.1.6 Created: 2012-12-31 10:02 UTC Data Size: 5.9 MB Tables: 0 Rows: 0/10000(In compliance)Fork/Follow: Unsupported
The URL of the database is provided to your Lift application as the DATABASE_URL environment variable. It will have a value of something like this:
postgres://gghetjutddgr:RNC_lINakkk899HHYEFUppwG@ec2-54-243-230-119.compute-1.
 amazonaws.com:5432/d44nsahps11hda
This URL contains a username, password, host, and database name, but needs to be manipulated to be used by JDBC. To do so, you might include the following in Boot.scala:
Box!!System.getenv("DATABASE_URL")match{caseFull(url)=>initHerokuDb(url)case_=>// configure local database perhaps}definitHerokuDb(dbInfo:String){Class.forName("org.postgresql.Driver")// Extract credentials from Heroku database URL:valdbUri=newURI(dbInfo)valArray(user,pass)=dbUri.getUserInfo.split(":")// Construct JDBC connection string from the URI:defconnection=DriverManager.getConnection("jdbc:postgresql://"+dbUri.getHost+':'+dbUri.getPort+dbUri.getPath,user,pass)SquerylRecord.initWithSquerylSession(Session.create(connection,newPostgreSqlAdapter))}
Here we are testing for the presence of the DATABASE_URL environment variable, which would indicate that we are in the Heroku environment. We can then extract out the connection information to use in Session.create. We would additionally need to complete the usual addAround configuration described in Configuring Squeryl and Record.
For it to run, build.sbt needs the appropriate dependencies for Record and PostgreSQL:
..."postgresql"%"postgresql"%"9.1-901.jdbc4","net.liftweb"%%"lift-record"%liftVersion,"net.liftweb"%%"lift-squeryl-record"%liftVersion,...
With this in place, your Lift application can make use of the Heroku database. You can also access the database from the shell, for example:
$ pg:psql --app glacial-waters-6292
psql (9.1.4, server 9.1.6)
SSL connection (cipher: DHE-RSA-AES256-SHA, bits: 256)
Type "help" for help.

d44nsahps11hda=> \d
No relations found.
d44nsahps11hda=> \q
$
To access via a JDBC tool outside of the Heroku environment, you’ll need to include parameters to force SSL. For example:
jdbc:postgresql://ec2-54-243-230-119.compute-1.amazonaws.com:5432/d44nsahps11hda?username=gghetjutddgr&password=RNC_lINakkk899HHYEFUppwG&ssl=true&sslfactory=org.postgresql.ssl.NonValidatingFactory
The Scala and Java articles at Heroku, and Dynos and the Dyno Manager, are useful to learn more of the details described in this recipe.
The JVM shutdown hooks are described in the JDK documentation.
Heroku’s guide to containerless deployment makes use of Maven to package your application. There is also a template SBT project from Matthew Henderson that includes a JettyLauncher class.
Request Timeout describes how Heroku deals with Comet long polling.
You use Lift’s Comet support, and want to run across multiple servers for increased redundancy or to handle increased load.
Use the publish/subscribe (pubsub) model to connect each server to a topic and route Comet messages out to the topic where it can be broadcast to all servers that are part of your application.
There are a variety of technologies you can use to accomplish this, such as databases, message systems, and actor systems. For this recipe, we will use the RabbitMQ message service, but there are examples using CouchDB and Amazon’s Simple Notification Service in the “See Also” section.
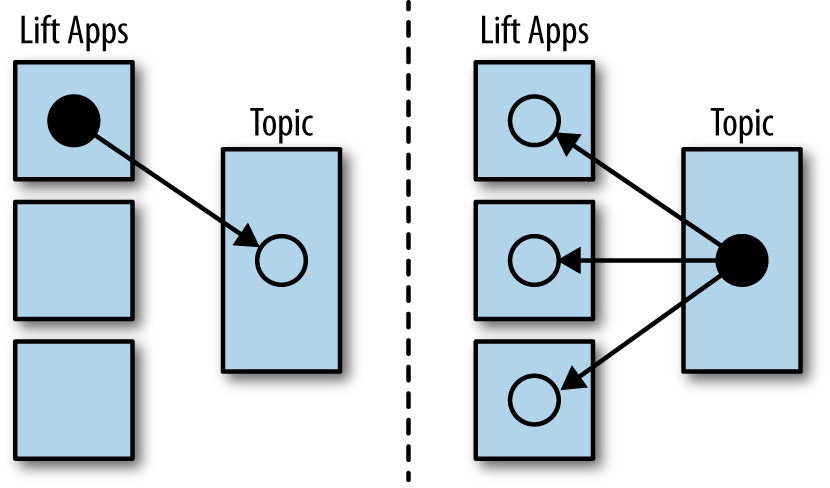
Regardless of the technology, the principle is illustrated in Figure 10-2. A Comet event originating on one Lift application is sent to a service for redistribution. It is the responsibility of this service (labeled “topic” in the figure) to ensure all the participating Lift applications receive the event.
The first step is to download and install RabbitMQ. Then start the server:
$ ./sbin/rabbitmq-server -detatched
This command will produce various messages as it starts but will eventually say: “broker running.”
The Lift application we’ll use to demonstrate the pubsub pattern is the real-time chat application, described in Simply Lift.
The first modification is to include the Lift module to talk to RabbitMQ. This is a one-line addition to the libraryDependencies in build.sbt:
"net.liftmodules"%%"amqp_2.5"%"1.3"
AMQP stands for Advanced Message Queuing Protocol, a protocol that RabbitMQ talks. The AMQP module provides abstract actors to send and receive messages, and we will implement these actors as RemoteSend and RemoteReceiver:
packagecode.cometimportnet.liftmodules.amqp._importcom.rabbitmq.client._objectRabbit{valfactory=newConnectionFactory{importConnectionFactory._setHost("127.0.0.1")setPort(DEFAULT_AMQP_PORT)}valexchange="lift.chat"valrouting=""valdurable=truevalautoAck=falseobjectRemoteSendextendsAMQPSender[String](factory,exchange,routing){defconfigure(channel:Channel)=channel.exchangeDeclare(exchange,"fanout",durable)}objectRemoteReceiverextendsAMQPDispatcher[String](factory){defconfigure(channel:Channel)={channel.exchangeDeclare(exchange,"fanout",durable)valqueueName=channel.queueDeclare().getQueue()channel.queueBind(queueName,exchange,routing)channel.basicConsume(queueName,autoAck,newSerializedConsumer(channel,this))}}}
This code is establishing RemoteSend and RemoteReceiver actors that serialise String values via RabbitMQ. This code is explored in the “Discussion” section next.
To make use of this and route Comet messages over RabbitMQ, we need to make two changes. In Boot.scala, we need to start listening for messages from RabbitMQ:
RemoteReceiver!AMQPAddListener(ChatServer)
This is attaching the ChatServer as a listener for AMQP messages from the RemoteReceiver.
The final change is to the ChatServer itself. The regular behaviour of the ChatServer is to receive a String message from a client and update all the screens attached to the Comet server:
overridedeflowPriority={cases:String=>msgs:+=s;updateListeners()}
The change to route messages over RabbitMQ is to redirect any String from clients to RabbitMQ, and handle any AMQP messages from RabbitMQ and update all clients:
overridedeflowPriority={caseAMQPMessage(s:String)=>msgs:+=s;updateListeners()cases:String=>RemoteSend!AMQPMessage(s)}
This change means all our Comet chat messages go out to RabbitMQ where they are distributed to all the instances of our Lift application, and all the instances receive the messages back as AMQPMessage instances and update chat clients as normal.
To run more than one instance of your Lift application locally, you’ll want to start SBT as normal, and then in another Terminal, start again but on a different port number:
$ sbt
...
> set port in container.Configuration := 9090
[info] Reapplying settings...
[info] Set current project to RabbitMQ Chat (in build file:rabbitmq_chat/)
> container:start
You can then visit one application at http://127.0.0.1:8080 and another at http://127.0.0.1:9090.
In the example code, you can see that AMQPSender[T] and AMQPDispatcher[T] take care of most of the work for us, and we provide some configuration. In the case of RemoteSend we’re configuring the AMQPSender to work with String messages and to work with an exchange called lift.chat. In RabbitMQ, the exchange is the entity we send messages to, and the exchange has the responsibility for passing on the message. In this case, the exchange is a fanout (a simple kind of topic) where each subscriber receives a copy of any messages sent to the exchange. This is clearly what we want to get our chat messages sent to all connected Lift instances of the chat application.
The RemoteReceiver is also configured to receive String messages, although the configuration is a little longer. Here, as well as indicating the exchange to be used, we declare a temporary queue for our Lift instance. The queue is the place where RabbitMQ sends messages, and what we’re saying here is that each receiver has its own queue. The fanout exchange will ensure any message sent to the exchange is placed into every queue. The queue has a random name assigned by RabbitMQ and is destroyed when we disconnect from it.
The final part of the RemoteReceiver is to specify how we consume messages. The default behaviour of RemoteSend is to serialise objects, so we mirror that in the receiver by using the SerializedConsumer class provided by the AMQP module.
To see the behaviour of RabbitMQ, it’s useful to install the management web console. From the directory where you installed RabbitMQ:
$ ./sbin/rabbitmq-plugins enable rabbitmq_management
Visit the administrative web interface at http://127.0.0.1:15672/ and log in. The default username and password is “guest.”
Needing to have RabbitMQ (or other types of pubsub solutions) running during development may be inconvenient. In that case, you can simply not initialise the service in Boot.scala:
if(Props.productionMode)RemoteReceiver!AMQPAddListener(ChatServer)
And in the chat server, send only to local clients:
overridedeflowPriority={caseAMQPMessage(s:String)=>msgs:+=s;updateListeners()cases:String=>if(Props.productionMode)RemoteSend!AMQPMessage(s)else{msgs:+=s;updateListeners()}}
Note that Props.productionMode is true for the run modes of Production, Staging, and Pilot.
The Lift Chat example is described in Simply Lift. The source code used in this recipe is on GitHub.
Source for the Lift AMQP module can be found on GitHub.
If you want to learn more about RabbitMQ, take a look at the tutorials or Alvaro Videla and Jason J.W. Williams’s RabbitMQ in Action: Distributed Messaging for Everyone (Manning Publications Co.).
Diego Medina has implemented a distributed Comet solution using CouchDB, and has described it in a blog post.
Amazon’s Simple Notification Service (SNS) is a fanout facility so it can also be used to implement this pattern. You can find a Lift module for SNS on GitHub.
Get Lift Cookbook now with the O’Reilly learning platform.
O’Reilly members experience books, live events, courses curated by job role, and more from O’Reilly and nearly 200 top publishers.

