This chapter looks at how to process form data with Lift: submitting forms, working with form elements. The end result of a form submission can be records being updated in a database, so you may also find Chapter 7 or Chapter 8 useful, as they discuss relational databases and MongoDB, respectively.
To the extent that form processing is passing data to a server, there are also recipes in Chapter 5 that are relevant to form processing.
You’ll find many of the examples from this chapter as source code at https://github.com/LiftCookbook/cookbook_forms.
Extract form values with S.param, process the values, and produce some output.
For example, we can show a form, process an input value, and give a message back as a notice. The template is a regular HTML form, with the addition of a snippet:
<formdata-lift="Plain"action="/plain"method="post"><inputtype="text"name="name"placeholder="What's your name?"><inputtype="submit"value="Go"></form>
In the snippet, we can pick out the value of the field name with S.param("name"):
packagecode.snippetimportnet.liftweb.common.Fullimportnet.liftweb.http.Simportnet.liftweb.util.PassThruobjectPlain{defrender=S.param("name")match{caseFull(name)=>S.notice("Hello "+name)S.redirectTo("/plain")case_=>PassThru}}
The first time through this snippet, there will be no parameter, so we just pass back the form unchanged to the browser, which is what PassThru is doing. You can then enter a value into the name field and submit the form. This will result in Lift processing the template again, but this time, with a value for the name input. The result will be your browser redirected to a page with a message set for display.
Manually plucking parameters from a request isn’t making the best use of Lift, but sometimes you need to do it, and S.param is the way you can process request parameters.
The result of S.param is a Box[String], and in the previous example, we pattern match on this value. With more than one parameter, you’ve probably seen S.param used in this way:
defrender={for{name<-S.param("name")pet<-S.param("petName")}{S.notice("Hello %s and %s".format(name,pet))S.redirectTo("/plain")}PassThru}
If both name and petName are provided, the body of the for will be evaluated.
Related functions on S include:
-
S.params(name) -
Produces a
List[String]for all the request parameters with the given name -
S.post_?andS.get_? - Tells you if the request was a GET or POST
-
S.getRequestHeader(name) -
Gives the
Box[String]for a header in the request with the given name -
S.request -
Accesses the
Box[Req], which gives you access to further HTTP-specific information about the request
As an example of using S.request, we could produce a List[String] for the values of all request parameters that have name somewhere in their parameter name:
valnames=for{req<-S.request.toListparamName<-req.paramNamesifparamName.toLowerCasecontains"name"value<-S.param(paramName)}yieldvalue
Note that by opening up S.request we can access all the parameter names via the paramNames function on Req.
Screen or Wizard provide alternatives for form processing, but sometimes you just want to pull values from a request, as demonstrated in this recipe.
Simply Lift covers a variety of ways of processing forms.
Mark your form as an Ajax form with data-lift="form.ajax" and supply a
function to run on the server when the form is submitted.
Here’s an example of a form that will collect our name and submit it via Ajax to the server:
<formdata-lift="form.ajax"><divdata-lift="EchoForm"><inputtype="text"name="name"placeholder="What's your name?"><inputtype="submit"></div></form><divid="result">Your name will be echoed here</div>
The following snippet will echo back the name via Ajax:
packagecode.snippetimportnet.liftweb.util.Helpers._importnet.liftweb.http.SHtml.{text,ajaxSubmit}importnet.liftweb.http.js.JsCmdimportnet.liftweb.http.js.JsCmds.SetHtmlimportxml.TextobjectEchoFormextends{defrender={varname=""defprocess():JsCmd=SetHtml("result",Text(name))"@name"#>text(name,s=>name=s)&"type=submit"#>ajaxSubmit("Click Me",process)}}
The render method is binding the name input field to a function that will assign whatever the user enters to the variable name. Note you’ll more typically see s => name = s written in the shorter form of name = _.
When the button is pressed, the process function is called, which will return the
value of the name back to the element in the HTML with an ID of result.
The data-lift="form.ajax" part of this recipe ensures that Lift adds the Ajax processing mechanics to the form. This means the <form> element in the output will end up as something like this:
<formid="F2203365740CJME2G"action="javascript://"onsubmit="liftAjax.lift_ajaxHandler(jQuery('#'+"F2203365740CJME2G").serialize(),null, null, "javascript");return false;">...</form>
In other words, when the form is asked to submit, Lift will serialise the form via Ajax. This means you don’t necessarily need the submit button at all. In this example with a single text field, if you omit the submit button you can trigger serialisation by pressing Return. This will trigger the s => name = s function, which was bound in our regular data-lift="EchoForm" snippet. In other words, the value name will be assigned even without a submit button.
Adding in a submit button gives us a way to perform actions once all the field’s functions have been executed.
Notice that Lift’s approach is to serialise the form to the server, execute the functions associated with the fields, execute the submit function (if any), then return a JavaScript result to the client. The default serialisation process is to use jQuery’s serialization method on the form. This serialises fields except submit buttons and file uploads.
The SHtml.ajaxSubmit function generates a <input type="submit"> element for the page. You may prefer to use a styled button for submit. For example, with Twitter Bootstrap, a button with an icon would require the following markup:
<buttonid="submit"class="btn btn-primary btn-large"><iclass="icon-white icon-ok"></i>Submit</button>
Pressing a <button> inside a form triggers the submit. However, if you bound that button with SHtml.ajaxSubmit, the content, and therefore the styling, would be lost.
To fix this, you can assign a function to a hidden field. This function will be called when the form is submitted just like any other field. The only part of our snippet that changes is the CSS selector binding:
importnet.liftweb.http.SHtml.hidden"@name"#>text(name,s=>name=s)&"button *+"#>hidden(process)
The *+ replacement rule means append a value to the child node of the button. This will include a hidden field in the form, something like this:
<inputtype="hidden"name="F11202029628285OIEC2"value="true">
When the form is submitted, the hidden field is submitted, and like any field, Lift will call the function associated with it: process, in this case.
The effect is something like ajaxSubmit, but not exactly the same. In this instance, we’re appending a hidden field after the <button>, but you could place it anywhere on the form you find convenient. However, there’s one complication: when is process called? Is it before the name has been assigned or after? That depends on the order in which the fields are rendered. That’s to say, in your HTML template, placing the button before the text field (and therefore moving the hidden field’s position in this example), the process function is called before the name has been set.
There are a couple of ways around that. Either, ensure your hidden fields used in this way appear late in your form, or make sure the function is called late with a formGroup:
importnet.liftweb.http.SHtml.hiddenimportnet.liftweb.http.S"@name"#>text(name,s=>name=s)&"button *+"#>S.formGroup(1000){hidden(process)}
The formGroup addition manipulates the function identifier to ensure it sorts later, resulting in the function process being called later than fields in the default group (0).
Note
Lift 2.6 and 3.0 may contain ajaxOnSubmit, which will give the reliability of ajaxSubmit and the flexibility of the hidden-field approach. If you want to try it in Lift 2.5,
Antonio Salazar Cardozo has created a helper you can include in your project.
Function order is discussed in the Lift Cool Tips wiki page.
For more details about the form serialisation process, take a look at the jQuery documentation.
Ajax File Upload describes Ajax file uploads.
Make use of Lift’s jlift.js JavaScript library and JsonHandler class.
As an example, we can create a “motto server” that will accept an institution name and the institution’s motto and perform some action on these values. We’re just going to echo the name and motto back to the client.
Consider this HTML, which is not in a form, but includes jlift.js:
<html><head><title>JSON Form</title></head><bodydata-lift-content-id="main"><divid="main"data-lift="surround?with=default;at=content"><h1>Json Form example</h1><!-- Required for JSON forms processing --><scriptsrc="/classpath/jlift.js"data-lift="tail"></script><divdata-lift="JsonForm"><scriptid="jsonScript"data-lift="tail"></script><divid="jsonForm"><labelfor="name">Institution<inputid="name"type="text"name="name"value="Royal Society"/></label><labelfor="motto">Motto<inputid="motto"type="text"name="motto"value="Nullius in verba"/></label><inputtype="submit"value="Send"/></div><divid="result">Result will appear here.</div></div></div></body></html>
This HTML presents the user with two fields, a name and a motto, wrapped in a <div> called jsonForm. There’s also a placeholder for some results, and you’ll notice a jsonScript placeholder for some JavaScript code. The jsonForm will be manipulated to ensure it is sent via Ajax, and the jsonScript will be replaced with Lift’s code to perform the serialisation. This happens in the snippet code:
packagecode.snippetimportscala.xml.{Text,NodeSeq}importnet.liftweb.util.Helpers._importnet.liftweb.util.JsonCmdimportnet.liftweb.http.SHtml.jsonFormimportnet.liftweb.http.JsonHandlerimportnet.liftweb.http.js.JsCmdimportnet.liftweb.http.js.JsCmds.{SetHtml,Script}objectJsonForm{defrender="#jsonForm"#>((ns:NodeSeq)=>jsonForm(MottoServer,ns))&"#jsonScript"#>Script(MottoServer.jsCmd)objectMottoServerextendsJsonHandler{defapply(in:Any):JsCmd=inmatch{caseJsonCmd("processForm",target,params:Map[String,String],all)=>valname=params.getOrElse("name","No Name")valmotto=params.getOrElse("motto","No Motto")SetHtml("result",Text("The motto of %s is %s".format(name,motto)))}}}
Like many snippets, this Scala code contains a render method that binds to elements on the page. Specifically, jsonForm is being replaced with SHtml.jsonForm, which will take a NodeSeq (which are the input fields), and turns it into a form that will submit the values as JSON. The submission will be to our MottoServer code.
The jsonScript element is bound to JavaScript that will perform the transmission and encoding of the values to the server.
If you click the “Send” button and observe the network traffic, you’ll see the following sent to the server:
{"command":"processForm","params":{"name":"Royal Society","motto":"Nullius in verba"}}
This is the value of the all parameter in the JsonCmd being pattern matched against in MottoServer.apply. Lift has taken care of the plumbing to make this happen.
The result of the pattern match in the example is to pick out the two field values and send back JavaScript to update the results <div> with:
“The motto of the Royal Society is Nullius in verba.”
The JsonHandler class and the SHtml.jsonForm method are together performing a lot of work for us. The jsonForm method is arranging for form fields to be encoded as JSON and sent, via Ajax, to our MottoServer as a JsonCmd. In fact, it’s a JsonCmd with a default command name of "processForm".
Our MottoServer class is looking for (matching on) this JsonCmd, extracting the values of the form fields, and echoing these back to the client as a JsCmd that updates a <div> on the page.
The MottoServer.jsCmd part is generating the JavaScript required to deliver the form fields to the server. As we will see later, this is providing a general purpose function we can use to send different JSON values and commands to the server.
Notice also, from the network traffic, that the form fields sent are serialised with the names they are given on the page. There are no “F…” values sent that map to function calls on the server. A consequence of this is that any fields dynamically added to the page will also be serialised to the server, where they can be picked up in the MottoServer.
The script jlift.js is providing the plumbing to make much of this happen.
Before going on, convince yourself that we’re generating JavaScript on the server side (MottoServer.jsCmd), which is executed on the client side when the form is submitted, to deliver results to the server.
In the previous example, we match on a JsonCmd with a command name of "processForm". You may be wondering what other commands can be supplied, or what the meaning of the target value is.
To demonstrate how you can implement other commands, we can add two additional buttons. These buttons will just convert the motto to upper- or lowercase. The server-side render method changes as follows:
defrender="#jsonForm"#>((ns:NodeSeq)=>jsonForm(MottoServer,ns))&"#jsonScript"#>Script(MottoServer.jsCmd&Function("changeCase",List("direction"),MottoServer.call("processCase",JsVar("direction"),JsRaw("$('#motto').val()"))))
The JsonForm is unchanged. We still include MottoServer.jsCmd, and we still want to wrap the fields and submit them as before. What we’ve added
is an extra JavaScript function called changeCase, which takes one argument called direction and as a body calls the MottoServer with various parameters. When it is rendered on the page, it would appear as something like this:
functionchangeCase(direction){F299202CYGIL({'command':"processCase",'target':direction,'params':$('#motto').val()});}
The F299202CYGIL function (or similar name) is generated by Lift as part of MottoServer.jsCmd, and it is responsible for delivering data
to the server. The data it is delivering, in this case, is a JSON structure consisting of a different command (processCase), a target of whatever
the JavaScript value direction evaluates to, and a parameter that is the result of the jQuery expression for the value
of the #motto form field.
When is the changeCase function called? That’s up to us, and one very simple way to call the function would be by this addition to the HTML:
<buttononclick="javascript:changeCase('upper')">Upper case the Motto</button><buttononclick="javascript:changeCase('lower')">Lower case the Motto</button>
When either of these buttons are pressed, the result will be a JSON value sent to the server with the command of processCase and the direction and params set accordingly. All that is left is to modify our MottoServer to pick up this JsonCmd on the server:
objectMottoServerextendsJsonHandler{defapply(in:Any):JsCmd=inmatch{caseJsonCmd("processForm",target,params:Map[String,String],all)=>valname=params.getOrElse("name","No Name")valmotto=params.getOrElse("motto","No Motto")SetHtml("result",Text("The motto of %s is %s".format(name,motto)))caseJsonCmd("processCase",direction,motto:String,all)=>valupdate=if(direction=="upper")motto.toUpperCaseelsemotto.toLowerCaseSetValById("motto",update)}}
The first JsonCmd is unchanged. The second matches on the parameters sent and results in updating the form fields with an upper- or lowercase version of the motto.
The Lift demo site contains further examples of JsonHandler.
If you want to process JSON via REST, take a look at the stateless JSON examples.
Lift in Action, section 9.1.4 discusses “Using JSON forms with AJAX,” as does section 10.4 of Exploring Lift.
Use a standard Lift SHtml.text input field and attach a JavaScript date picker to it. In this example, we will use the jQuery UI date picker.
Our form will include an input field called birthday to be used as a date picker, and also the jQuery UI JavaScript and CSS:
<!DOCTYPE html><head><metacontent="text/html; charset=UTF-8"http-equiv="content-type"/><title>jQuery Date Picker</title></head><bodydata-lift-content-id="main"><divid="main"data-lift="surround?with=default;at=content"><h3>When's your birthday?</h3><linkdata-lift="head"type="text/css"rel="stylesheet"href="//cdnjs.cloudflare.com/ajax/libs/jqueryui/1.10.2/css/smoothness/jquery-ui-1.10.2.custom.min.css"></link><scriptdata-lift="tail"src="//cdnjs.cloudflare.com/ajax/libs/jqueryui/1.10.2/jquery-ui.min.js"></script><divdata-lift="JqDatePicker?form=post"><inputtype="text"id="birthday"><inputtype="submit"value="Submit"></div></div></body></html>
This would normally produce a regular text input field, but we can change that by adding JavaScript to attach the date picker to the input field. You could do this in the template, but in this example, we’re enhancing the text field as part of the snippet code:
packagecode.snippetimportjava.util.Dateimportjava.text.SimpleDateFormatimportnet.liftweb.util.Helpers._importnet.liftweb.http.{S,SHtml}importnet.liftweb.http.js.JsCmds.Runimportnet.liftweb.common.LoggableclassJqDatePickerextendsLoggable{valdateFormat=newSimpleDateFormat("yyyy-MM-dd")valdefault=(dateFormatformatnow)deflogDate(s:String):Unit={valdate:Date=tryo(dateFormatparses)getOrElsenowlogger.info("Birthday: "+date)}defrender={S.appendJs(enhance)"#birthday"#>SHtml.text(default,logDate)}valenhance=Run("$('#birthday').datepicker({dateFormat: 'yy-mm-dd'});")}
Notice in render we are binding a regular SHtml.text field to the element with the ID of birthday, but also appending JavaScript to the page. JavaScript selects the birthday input field and attaches a configured date picker to it.
When the field is submitted, the logDate method is called with the value of the text field. We parse the text into a java.util.Date object. The tryo Lift helper will catch any ParseException and return a Box[Date], which we open, or default to the current date if a bad date is supplied.
Running this code and submitting the form will produce a log message such as:
INFO code.snippet.DatePicker - Birthday: Sun Apr 21 00:00:00 BST 2013
The approach outlined in this recipe can be used with other date picker libraries. The key point is to configure the date picker to submit a date in a format you can parse when the value is submitted to the server. This is the “wire format” of the date, and does not have to necessarily be the same format the user sees in the browser, depending on the browser or the JavaScript library being used.
The HTML5 specification includes support for a variety of date input types: datetime, datetime-local, date, month, time, and week. For example:
<inputtype="date"name="birthday"value="2013-04-21">
This type of input field will submit a date in yyyy-mm-dd format, which our snippet would be able to process.
As more browsers implement these types, it will become possible to depend on them. However, you can default to the HTML5 browser-native date pickers today and fall back to a JavaScript library as required. The difference is shown in Figure 3-1.
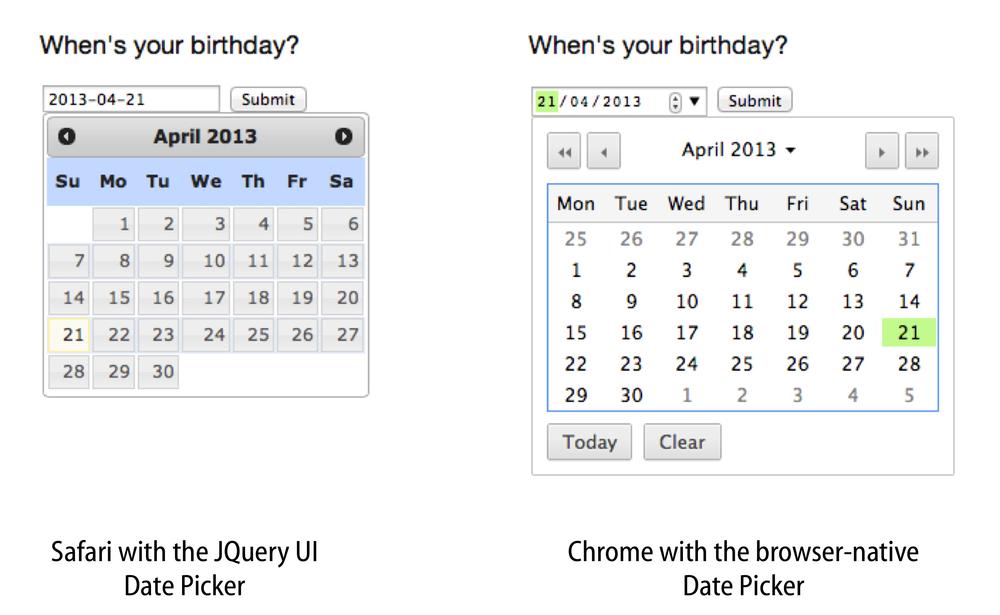
Figure 3-1. An input field with the jQuery UI date picker attached, compared to the browser-native date picker in Chrome
To detect whether the browser supports type="date" inputs, we can use the Modernizr library. This is an additional script in our template:
<scriptdata-lift="tail"src="//cdnjs.cloudflare.com/ajax/libs/modernizr/2.6.2/modernizr.min.js"></script>
We will use this in our snippet. In fact, there are two changes we need to make to the snippet:
-
Add the
type="date"attribute to the input field. -
Modify the JavaScript to only attach the jQuery UI date picker in browsers that don’t support the
type="date"input.
In code, that becomes:
defrender={S.appendJs(enhance)"#birthday"#>SHtml.text(default,logDate,("type"->"date"))}valenhance=Run("""|if (!Modernizr.inputtypes.date) {| $('input[type=date]').datepicker({dateFormat: 'yy-mm-dd'});|}""".stripMargin)
The "type" -> "date" parameter on SHtml.text is setting the attribute type to the value date on the resulting <input> field.
When this snippet runs, and the page is rendered, the jQuery UI date picker will be attached to input fields of type="date" only if the browser doesn’t support that type already.
Dive into HTML5 describes how to detect browser features.
The jQuery UI API documentation lists the various configuration options for the date picker.
The HTML5 date input types submit dates in RFC 3339 format.
You want to provide an autocomplete widget, to give users suggestions as they type into a text field.
Use a JavaScript autocomplete widget, for example, the jQuery UI autocomplete via the AutoComplete class from the Lift widgets module.
Start by adding the Lift widgets module to your build.sbt:
libraryDependencies+="net.liftmodules"%%"widgets_2.5"%"1.3"
To enable the autocomplete widget, initialise it in Boot.scala:
importnet.liftmodules.widgets.autocomplete.AutoCompleteAutoComplete.init()
We can create a regular form snippet:
<formdata-lift="ProgrammingLanguages?form=post"><inputid="autocomplete"><inputtype="submit"></form>
Connect the AutoComplete class to the element with the ID of autocomplete:
packagecode.snippetimportnet.liftweb.util.Helpers._importnet.liftweb.common.Loggableimportnet.liftmodules.widgets.autocomplete.AutoCompleteclassProgrammingLanguagesextendsLoggable{vallanguages=List("C","C++","Clojure","CoffeeScript","Java","JavaScript","POP-11","Prolog","Python","Processing","Scala","Scheme","Smalltalk","SuperCollider")defrender={valdefault=""defsuggest(value:String,limit:Int)=languages.filter(_.toLowerCase.startsWith(value))defsubmit(value:String):Unit=logger.info("Value submitted: "+value)"#autocomplete"#>AutoComplete(default,suggest,submit)}}
The last line of this snippet shows the binding of the AutoComplete class, which takes:
- A default value to show
-
A function that will produce suggestions from the text value entered—the result is a
Seq[String]of suggestions - A function to call when the form is submitted
Running this code renders as shown in Figure 3-2.
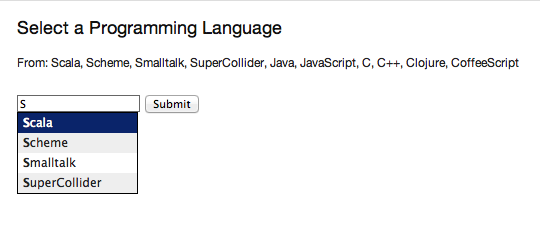
When the form is submitted, the submit function will be passed the selected value. The submit function is simply logging this value:
INFO code.snippet.ProgrammingLanguages - Value submitted: Scala
The autocomplete widget uses jQuery autocomplete. This can be seen by examining the NodeSeq produced by the AutoComplete.apply method:
<span><head><linktype="text/css"rel="stylesheet"href="/classpath/autocomplete/jquery.autocomplete.css"></link><scripttype="text/javascript"src="/classpath/autocomplete/jquery.autocomplete.js"></script><scripttype="text/javascript">// <![CDATA[jQuery(document).ready(function(){vardata="/ajax_request?F846528841915S2RBI0=foo";jQuery("#F846528841916S3QZ0V").autocomplete(data,{minChars:0,matchContains:true}).result(function(event,dt,formatted){jQuery("#F846528841917CF4ZGL").val(formatted);});});;// ]]></script></head><inputtype="text"value=""id="F846528841916S3QZ0V"></input><inputname="F846528841917CF4ZGL"type="hidden"value=""id="F846528841917CF4ZGL"></input></span>
This chunk of markup is generated from the AutoComplete(default, suggest, submit) call. What’s happening here is that the jQuery UI autocomplete JavaScript and CSS, which is bundled with the Lift widgets module, is being included on the page. Recall from Adding to the Head of a Page that Lift will merge the <head> part of this markup into the <head> of the final HTML page.
When the page loads, the jQuery UI autocomplete function is bound to the input field, and configured with a URL, which will deliver the user’s input to our suggest function. All suggest needs to do is return a Seq[String] of values for the jQuery autocomplete code to display to the user.
One peculiarity of the AutoComplete widget is that if you type in a new value—one not suggested—and press submit, it is not sent to the server. That is, you need to click on one of the suggestions to select it. If that’s not the behaviour you want, you can adjust it.
Inside the render method, we can modify the behaviour by adding JavaScript to the page:
importnet.liftweb.http.Simportnet.liftweb.http.js.JsCmds.RunS.appendJs(Run("""|$('#autocomplete input[type=text]').bind('blur',function() {| $(this).next().val($(this).val());|});""".stripMargin))
With this in place, when the input field loses focus—for example, when the submit button is pressed—the value of the input field is stored as the value to be sent to the server.
Looking at the way the widget module builds autocomplete functionality may give you an insight into how you can incorporate other JavaScript autocomplete libraries into your Lift application. The idea is to include the JavaScript library, connect it to an element on the page, and then arrange for the server to be called to generate suggestions. Of course, if you only have a few items for the user to pick from, you could just include those items on the page, rather than making a round trip to the server.
As an example of server-generated suggestions, we can look at the Typeahead component that is included in Twitter Bootstrap.
To incorporate Typeahead, the template needs to change to include the library and mark the input field in the way Typeahead expects:
<linkdata-lift="head"rel="stylesheet"href="//netdna.bootstrapcdn.com/twitter-bootstrap/2.3.1/css/bootstrap-combined.min.css"><scriptdata-lift="tail"src="//netdna.bootstrapcdn.com/twitter-bootstrap/2.3.1/js/bootstrap.min.js"></script><formdata-lift="ProgrammingLanguagesTypeAhead"><scriptid="js"></script><inputid="autocomplete"type="text"data-provide="typeahead"autocomplete="off"><inputtype="submit"></form>
We’ve included a placeholder with an ID of js for the JavaScript that will call back to the server. We’ll get to that in a moment.
The way Typeahead works is that we attach it to our input field and tell it to call a JavaScript function when it needs to make suggestions. That JavaScript function is going to be called askServer, and it is given two arguments: the input the user has typed so far (query), and a JavaScript function to call when the suggestions are available (callback). The Lift snippet needs to use the query value and then call the JavaScript callback function with whatever suggestions are made.
A snippet to implement this would be as follows:
packagecode.snippetimportnet.liftweb.util.Helpers._importnet.liftweb.common.{Full,Empty,Loggable}importnet.liftweb.http._importnet.liftweb.http.js.JsCmds._importnet.liftweb.http.js.JsCmds.Runimportnet.liftweb.http.js.JE.JsVarimportnet.liftweb.json.JsonAST._importnet.liftweb.json.DefaultFormatsclassProgrammingLanguagesTypeAheadextendsLoggable{vallanguages=List("C","C++","Clojure","CoffeeScript","Java","JavaScript","POP-11","Prolog","Python","Processing","Scala","Scheme","Smalltalk","SuperCollider")defrender={implicitvalformats=DefaultFormatsdefsuggest(value:JValue):JValue={logger.info("Making suggestion for: "+value)valmatches=for{q<-value.extractOpt[String].map(_.toLowerCase).toListlang<-languages.filter(_.toLowerCasestartsWithq)}yieldJString(lang)JArray(matches)}valcallbackContext=newJsonContext(Full("callback"),Empty)valrunSuggestion=SHtml.jsonCall(JsVar("query"),callbackContext,suggest_)S.appendJs(Run("""|$('#autocomplete').typeahead({| source: askServer|});""".stripMargin))"#js *"#>Function("askServer","query"::"callback"::Nil,Run(runSuggestion.toJsCmd))&"#autocomplete"#>SHtml.text("",s=>logger.info("Submitted: "+s))}}
Working from the bottom of the snippet, we bind a regular Lift SHtml.text input to the autocomplete field. This will receive the selected value when the form is submitted. We also bind the JavaScript placeholder to a JavaScript function definition called askServer. This is the function that Typeahead will call when it wants suggestions.
The JavaScript function we’re defining takes two arguments: the query and callback. The body of askServer causes it to run something called runSuggestion, which is a jsonCall to the server, with the value of the query.
The suggestions are made by the suggest function, which expects to be able to find a String in the passed in JSON value. It uses this value to find matches in the list of languages. These are returned as a JArray of JString, which is treated as JSON data back on the client.
What does the client do with the data? It calls the callback function with the suggestions, which results in the display updating. We specify its callback via JsonContext, which is a class that lets us specify a custom function to call on success of the request to the server.
It may help to understand this by looking at the JavaScript generated in the HTML page for askServer:
<scriptid="js">functionaskServer(query,callback){liftAjax.lift_ajaxHandler('F268944843717UZB5J0='+encodeURIComponent(JSON.stringify(query)),callback,null,"json")}</script>
As the user types into the text field, Typeahead calls askServer with the input supplied. Lift’s Ajax support arranges for that value, query, to be serialised to our suggest function on the server, and for the results to be passed to callback. At that point, Typeahead takes over again and displays the suggestions.
Typing Scala to the text field and pressing submit will produce a sequence like this on the server:
INFO  c.s.ProgrammingLanguagesTypeAhead - Making suggestion for: JString(Sc)
INFO  c.s.ProgrammingLanguagesTypeAhead - Making suggestion for: JString(Sca)
INFO  c.s.ProgrammingLanguagesTypeAhead - Making suggestion for: JString(Sca)
INFO  c.s.ProgrammingLanguagesTypeAhead - Making suggestion for: JString(Scal)
INFO  c.s.ProgrammingLanguagesTypeAhead - Making suggestion for: JString(Scala)
INFO  c.s.ProgrammingLanguagesTypeAhead - Submitted: Scala
Trigger Server-Side Code from a Button describes jsonCall.
The behaviour of the widget module with respect to new values is described in a ticket on the module’s GitHub page. Enhancing modules is one route to get involved with Lift, and Chapter 11 describes other ways to contribute.
The jQuery UI Autocomplete documentation describes how to configure the widget. The version included with the Lift widgets module is version 1.0.2.
The Typeahead widget is part of Twitter Bootstrap.
Use SHtml.radioElem to present the options as radio buttons.
To illustrate this, let’s create a form to allow a user to indicate his gender:
objectBirthGenderextendsEnumeration{typeBirthGender=ValuevalMale=Value("Male")valFemale=Value("Female")valNotSpecified=Value("Rather Not Say")}
We’re using an enumeration, but it could be any class. The toString of the class will be used as the label shown to the user.
To present these options and handle the selection of an option, we use this enumeration in a snippet:
packagecode.snippetimportnet.liftweb.common._importnet.liftweb.util.Helpers._importnet.liftweb.http.SHtmlimportnet.liftweb.http.SHtml.ChoiceHolderobjectRadioextendsLoggable{importBirthGender._valoptions:Seq[BirthGender]=BirthGender.values.toSeqvaldefault:Box[BirthGender]=Emptyvalradio:ChoiceHolder[BirthGender]=SHtml.radioElem(options,default){selected=>logger.info("Choice: "+selected)}defrender=".options"#>radio.toForm}
Rather than generate the radio buttons in one expression on the render method, we’ve pulled out the intermediate values to show their types. The radio.toForm call is generating the radio buttons, and we’re binding them to the CSS selector .option in the following template:
<divdata-lift="Radio?form=post"><spanclass="options"><inputtype="radio">Option 1</input><inputtype="radio">Option 2</input></span><inputtype="submit"value="Submit"></div>
The class="options" span will be replaced with the radio buttons from the code, and when the form is submitted, the function supplied to SHtml.radioElem will be called, resulting in the selected value being logged. For example, if no radio button is selected:
INFO code.snippet.Radio - Choice: Empty
or if the third button was selected:
INFO code.snippet.Radio - Choice: Full(Rather Not Say)
Many of the Lift SHtml methods return a NodeSeq, which can be directly bound into our HTML. However, radioElem is different in that it gives us a ChoiceHolder[T], and to generate a NodeSeq from that, we’re calling toForm. This has implications for how you customise radio buttons, as we’ll see later.
The radioElem method expects three parameters:
SHtml.radioElem(options,default){selected=>logger.info("Choice: "+selected)}
The first is the set of options to show, as a Seq[T]. The second is the value to be preselected, as a Box[T]. In the example, we have no preselected value, which is represented as Empty. Finally, there’s the function to run when the form is submitted, of type Box[T] => Any.
Note that even if the user selects no value, your function will be called, and it will be passed the value Empty.
To understand a little more of what’s happening, take a look at the default HTML produced by radioElem:
<span><inputvalue="F317293945993CDMQZ"type="radio"name="F317293946030HYAFP"><inputname="F317293946030HYAFP"type="hidden"value="F317293946022HCGEG">Male<br></span><span><inputvalue="F31729394600RIE253"type="radio"name="F317293946030HYAFP">Female<br></span><span><inputvalue="F317293946011OMEMM"type="radio"name="F317293946030HYAFP">Rather Not Say<br></span>
Notice that:
- All the input fields have the same randomly generated name.
- The input fields have randomly generated values.
- There’s a hidden field added to the first item.
This might be a surprise if you were just expecting something like this:
<inputtype="radio"name="gender"value="Male">Male<br><inputtype="radio"name="gender"value="Female">Female<br><inputtype="radio"name="gender"value="NotSpecified">Rather Not Say<br>
By using random values, Lift has helped us by protecting against a range of form-based attacks, such as submitting values we’re not expected, or setting values on fields we don’t want set.
Each of the random radio button values is associated, on the server, with a BirthGender value from our options sequence. When the form is submitted, Lift picks out the selected value (if any), looks up the corresponding BirthGender value, and calls our function.
The hidden field ensures that the function will be called even if no radio button is selected. This is because the browser will at least submit the hidden field, and this is enough to trigger the server-side function.
The default HTML wraps each radio button in a <span> and separates them with a <br>. Let’s change that to make it work well with the Twitter Bootstrap framework, and put each choice in a <label> and give it a class.
To customise the HTML, you need to understand that the ChoiceHolder is a container for a sequence of items. Each item is a ChoiceItem:
finalcaseclassChoiceItem[T](key:T,xhtml:NodeSeq)
The key in our example is a BirthGender instance, and the xhtml is the radio button input field (plus the hidden field for the first option). With this knowledge, we can write a helper to generate a NodeSeq in the style we want:
importscala.xml.NodeSeqimportnet.liftweb.http.SHtml.ChoiceItemobjectLabelStyle{defhtmlize[T](item:ChoiceItem[T]):NodeSeq=<labelclass="radio">{item.xhtml}{item.key.toString}</label>deftoForm[T](holder:ChoiceHolder[T]):NodeSeq=holder.items.flatMap(htmlize)}
The htmlize method produces a <label> element with the class we want, and it contains the radio input (item.xhtml) and the text of the label (item.key.toString). The toForm is applying the htmlize function to all the choices.
We can apply this in our snippet:
defrender=".options"#>LabelStyle.toForm(radio)
and the result would be the following:
<labelclass="radio"><inputvalue="F234668654428LWW305"type="radio"name="F234668654432WS5LWK"><inputname="F234668654432WS5LWK"type="hidden"value="F234668654431KYJB3S">Male</label><labelclass="radio"><inputvalue="F234668654429MB5RF3"type="radio"name="F234668654432WS5LWK">Female</label><labelclass="radio"><inputvalue="F234668654430YULGC1"type="radio"name="F234668654432WS5LWK">Rather Not Say</label>
The toForm method could be wrapping the choices in some other HTML, such as a <ul>. But in this case, it’s not: it’s just applying htmlize to each ChoiceItem. As a consequence of this, we could make LabelStyle the default across our Lift application:
ChoiceHolder.htmlize=c=>LabelStyle.htmlize(c)
This works because toForm on ChoiceHolder defers to ChoiceHolder.htmlize, and ChoiceHolder.htmlize is a variable you can assign to.
If you want to work directly with String values for options, you can use SHtml.radio. Although it too produces a ChoiceHolder, it differs from radioElem in that it uses the same String as both the label and the value. The function associated with each option is called only if a value is selected by the user.
An SHtml.radio version of our example would look like this:
SHtml.radio("Male"::"Female"::"Rather Not Say"::Nil,Empty,selected=>logger.info("Choice: "+selected))
This is a similar structure to radioElem: there’s a list of options, a default, a function to call, and it produces a ChoiceHolder[String]. When a form is submitted, our function is passed the String value of the selected option. If no radio buttons are selected, the function is not called.
Create a CSS selector transform to add the disabled attribute, and apply it to your checkbox transform.
For example, suppose you have a simple checkbox:
classLikes{varlikeTurtles=falsedefrender="#like"#>SHtml.checkbox(likeTurtles,likeTurtles=_)}
and a corresponding template:
<!DOCTYPE html><head><metacontent="text/html; charset=UTF-8"http-equiv="content-type"/><title>Disable Checkboxes</title></head><bodydata-lift-content-id="main"><divid="main"data-lift="surround?with=default;at=content"><div>Select the things you like:</div><formdata-lift="Likes"><labelfor="like">Do you like turtles?</label><inputid="like"type="checkbox"></form></div></body></html>
Further, suppose you want to disable it roughly 50% of the time. We could do that
by adjusting the NodeSeq generated from SHtml.checkbox:
packagecode.snippetimportnet.liftweb.util.Helpers._importnet.liftweb.util.PassThruimportnet.liftweb.http.SHtmlclassLikes{varlikesTurtles=falsedefdisable=if(math.random>0.5d)"* [disabled]"#>"disabled"elsePassThrudefrender="#like"#>disable(SHtml.checkbox(likesTurtles,likesTurtles=_))}
When the checkbox is rendered, it will be disabled roughly half the time.
The disable method returns a NodeSeq => NodeSeq function, meaning
when we apply it, we need to give it a
NodeSeq, which is exactly what SHtml.checkbox provides.
The [disabled] part of the CSS selector is selecting the disabled
attribute and replacing it with the value on the right of the #>,
which is “disabled” in this example.
What this combination means is that half the time the disabled attribute
will be set on the checkbox, and half the time the checkbox NodeSeq
will be left untouched because PassThru does not change the NodeSeq.
Returning Snippet Markup Unchanged describes the PassThru function.
Use SHtml.multiSelect(options, default, selection). Here’s an example where a user can select up to three options:
packagecode.snippetimportnet.liftweb.util.Helpers._importnet.liftweb.http.SHtmlimportnet.liftweb.common.LoggableclassMultiSelectextendsLoggable{caseclassItem(id:String,name:String)valinventory=Item("a","Coffee")::Item("b","Milk")::Item("c","Sugar")::Nilvaloptions:List[(String,String)]=inventory.map(i=>(i.id->i.name))valdefault=inventory.head.id::Nildefrender={defselection(ids:List[String]):Unit={logger.info("Selected: "+ids)}"#opts *"#>SHtml.multiSelect(options,default,selection)}}
In this example, the user is being presented with a list of three items, with the first one selected, as shown in Figure 3-3. When the form is submitted, the selection function is called, with a list of the selected option values.
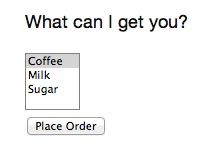
The template to go with the snippet could be:
<divdata-lift="MultiSelect?form=post"><p>What can I get you?</p><divid="opts">options go here</div><inputtype="submit"value="Place Order"></div>
This will render as something like:
<formaction="/"method="post"><div><p>What can I get you?</p><divid="opts"><selectname="F25749422319ALP1BW"multiple="true"><optionvalue="a"selected="selected">Coffee</option><optionvalue="b">Milk</option><optionvalue="c">Sugar</option></select></div><inputvalue="Place Order"type="submit"></form>
Recall that an HTML select consists of a set of options, each of which
has a value and a name. To reflect this, the previous example takes our
inventory of objects and turns it into a list of string
pairs, called options.
The function given to SHtml.multiSelect will receive the values (IDs), not
the names, of the options. That is, if you ran the code, and
selected “Coffee” and “Milk,” the function would see List("a", "b").
Be aware that if no options are selected, your handling function is not called. This is described in issue 1139.
One way to work around this is to add a hidden function to reset the list. For example, we could modify the previous code to be a stateful snippet and remember the values we selected:
packagecode.snippetimportnet.liftweb.util.Helpers._importnet.liftweb.http.{StatefulSnippet,SHtml}importnet.liftweb.common.LoggableclassMultiSelectStatefulextendsStatefulSnippetwithLoggable{defdispatch={case_=>render}caseclassItem(id:String,name:String)valinventory=Item("a","Coffee")::Item("b","Milk")::Item("c","Sugar")::Nil
valoptions:List[(String,String)]=inventory.map(i=>(i.id->i.name))varcurrent=inventory.head.id::Nildefrender={deflogSelected()=logger.info("Values selected: "+current)"#opts *"#>(SHtml.hidden(()=>current=Nil)++SHtml.multiSelect(options,current,current=_))&"type=submit"#>SHtml.onSubmitUnit(logSelected)}}
The template is unchanged, and the snippet has been modified to introduce a current value and a hidden function to reset the value. We’ve bound the submit button to simply log the selected values when the form is submitted.
Each time the form is submitted the current list of IDs is set to
whatever you have selected in the browser. But note that we have started
with a hidden function that resets current to the empty list. This means
that if the receiving function in multiSelect is never called, because nothing is selected, the value stored in current would reflect this and be Nil.
That may be useful, depending on what behaviour you need in your application.
If you don’t want to work in terms of String values for an option, you
can use multiSelectObj. In this variation, the list of options still
provides a text name, but the value is in terms of a class. Likewise,
the list of default values will be a list of class instances.
The only changes to the code are to produce a List[(Item,String)] for the options, and use an Item as a default:
valoptions:List[(Item,String)]=inventory.map(i=>(i->i.name))valdefault=inventory.head::Nil
The call to generate the multiselect from this data is similar, but
note our selection function now receives a list of Item:
defrender={defselection(items:List[Item]):Unit={logger.info("Selected: "+items)}"#opts *"#>SHtml.multiSelectObj(options,default,selection)}
You can use multiSelectObj with enumerations:
packagecode.snippetimportnet.liftweb.util.Helpers._importnet.liftweb.http.SHtmlimportnet.liftweb.common.LoggableclassMultiSelectEnumextendsLoggable{objectItemextendsEnumeration{typeItem=ValuevalCoffee,Milk,Sugar=Value}importItem._valoptions:List[(Item,String)]=Item.values.toList.map(i=>(i->i.toString))valdefault=Item.Coffee::Nildefrender={defselection(items:List[Item]):Unit={logger.info("Selected: "+items)}"#opts *"#>SHtml.multiSelectObj(options,default,selection)}}
The enumeration version works in the same way as the type-safe version.
The “Submit styling” discussion in Ajax Form Processing discusses the use of hidden fields as function calls.
Call Server When Select Option Changes describes how to trigger a server-side action when a selection changes in the browser.
Chapter 6 of Exploring Lift, “Forms in Lift,” discusses multiselect and other types of form elements.
Use a FileParamHolder in your snippet, and extract file information from it when the form is submitted.
Start with a form that is marked as multipart=true:
<html><head><title>File Upload</title><scriptid="jquery"src="/classpath/jquery.js"type="text/javascript"></script><scriptid="json"src="/classpath/json.js"type="text/javascript"></script></head><body><formdata-lift="FileUploadSnippet?form=post;multipart=true"><labelfor="file">Select a file:<inputid="file"></input></label><inputtype="submit"value="Submit"></input></form></body></html>
We bind the file input to SHtml.fileUpload and the submit button to a function to process the uploaded file:
packagecode.snippetimportnet.liftweb.util.Helpers._importnet.liftweb.http.SHtml._importnet.liftweb.http.FileParamHolderimportnet.liftweb.common.{Loggable,Full,Empty,Box}classFileUploadSnippetextendsLoggable{defrender={varupload:Box[FileParamHolder]=EmptydefprocessForm()=uploadmatch{caseFull(FileParamHolder(_,mimeType,fileName,file))=>logger.info("%s of type %s is %d bytes long"format(fileName,mimeType,file.length))case_=>logger.warn("No file?")}"#file"#>fileUpload(f=>upload=Full(f))&"type=submit"#>onSubmitUnit(processForm)}}
The fileUpload binding ensures that the file is assigned to the upload variable. This allows us to access the Array[Byte] of the file in the processForm method when the form is submitted.
HTTP includes an encoding type of multipart/form-data that was introduced to support binary data uploads. The ?form=post;multipart=true parameters in the template mark the form with this encoding, and the HTML generated will look
like this:
<formenctype="multipart/form-data"method="post"action="/fileupload">
When the browser submits the form, Lift detects the multipart/form-data encoding and extracts any files from the request. These are available as uploadedFiles on a Req object, for example:
valfiles:List[FileParamHolder]=S.request.map(_.uploadedFiles)openOrNil
However, as we’re dealing with a form with a single upload field, it’s easier to use SHtml.fileUpload to bind the input to our upload variable. Lift arranges for the function f => upload = Full(f) to be called when a file is selected and uploaded via this field. If the file is zero length, the function is not called.
The default behaviour for Lift is to read the file into memory and present it as a FileParamHolder. In this recipe, we’re pattern matching on the fields of the FileParamHolder and simply printing out what we know about the file. We’re ignoring the first parameter, which will be Lift’s generated name for the field, but capturing the mime type, original filename, and the raw data that was in the file.
You probably don’t want to use this method for very large files. In fact, LiftRules provides a number of size restrictions that you can control:
-
LiftRules.maxMimeFileSize - The maximum size of any single file uploaded (7 MB by default)
-
LiftRules.maxMimeSize - The maximum size of the multipart upload in total (8 MB by default)
Why two settings? Because when the form is submitted, there may be a number of fields on the form. For example, in the recipe, the value of the submit button is sent as one of the parts, and the file is sent as another. Hence, you might want to limit file size, but allow for some field values, or multiple files, to be submitted.
If you hit the size limit, an exception will be thrown from the underlying file upload library. You can catch the exception, as described in Catch Any Exception:
LiftRules.exceptionHandler.prepend{case(_,_,x:FileUploadIOException)=>ResponseWithReason(BadResponse(),"Unable to process file. Too large?")}
Be aware that the container (Jetty, Tomcat) or any web server (Apache, Nginx) may also have limits on file upload sizes.
Uploading a file into memory may be fine for some situations, but you may want to upload larger items to disk and then process them in Lift as a stream. Lift supports this via the following setting:
LiftRules.handleMimeFile=OnDiskFileParamHolder.apply
The handleMimeFile variable expects to be given a function that takes a field name, mime type, filename, and InputStream and returns a FileParamHolder. The default implementation of this is the InMemFileParamHolder, but changing to OnDiskFileParamHolder means Lift will write the file to disk first. You can of course implement your own handler in addition to using OnDiskFileParamHolder or InMemFileParamHolder.
With OnDiskFileParamHolder, the file will be written to a temporary location (System.getProperty("java.io.tmpdir")), but it’s up to you to remove it when you’re done with the file. For example, our snippet could change to:
defprocessForm()=uploadmatch{caseFull(content:OnDiskFileParamHolder)=>logger.info("File: "+content.localFile.getAbsolutePath)valin:InputStream=content.fileStream// ...do something with the stream here...valwasDeleted_?=content.localFile.delete()case_=>logger.warn("No file?")}
Be aware that OnDiskFileParamHolder implements FileParamHolder, so would match the original FileParamHolder pattern used in the recipe. However, if you access the file field of OnDiskFileParamHolder, you’ll bring the file into memory, which would defeat the point of storing it on disk to process it as a stream.
If you want to monitor the progress of the upload on the server side, you can. There’s a hook in LiftRules that is called as the upload is running:
defprogressPrinter(bytesRead:Long,contentLength:Long,fieldIndex:Int){println("Read %d of %d for %d"format(bytesRead,contentLength,fieldIndex))}LiftRules.progressListener=progressPrinter
This is the progress of the whole multipart upload, not just the file being uploaded. In particular, the contentLength may not be known (in which case, it will be -1), but if it is known, it is the size of the complete multipart upload. In the example in this recipe, that would include the size of the file, but also the submit button value. This also explains the fieldIndex, which is a counter as to which part is being processed. It will take on the values of 0 and 1 for the two parts in this example.
The HTTP file upload mechanics are described in RFC 1867, Form-based File Upload in HTML.
Accept Binary Data in a REST Service discusses file upload in the context of a REST service.
See Ajax File Upload for an example of an Ajax file upload through integration with a JavaScript library, providing progress indicators and drag-and-drop support.
Get Lift Cookbook now with the O’Reilly learning platform.
O’Reilly members experience books, live events, courses curated by job role, and more from O’Reilly and nearly 200 top publishers.

