This chapter introduces SQL Server 2005 and SQL Server 2005’s Management Studio and its basic workings. You will learn how to create a database, view the objects and default tables in a database, use a query editor, activate the database in different ways, and create tables in the database using a load script. The load script is available at http://www.cs.uwf.edu/~sbagui. The load script will create the Student_course database for you. This database will be used throughout the rest of the book to learn SQL. At this point, you may want to copy the load script, SQLServer2005_load.sql, to your working directory on your computer, before you start working on the next section. Right-click on the script on the web site, select Save Target As, and save it to your working directory.
In this chapter, you will also learn how to view and modify table definitions; delete a table and a database; type, parse, execute and save a query; display the results in different forms; stop execution of a query; and print the query and results. The final section of this chapter discusses customizing SQL Server 2005’s settings.
To start Microsoft SQL Server 2005 and open up SQL Server 2005’s Management Studio, follow these steps:
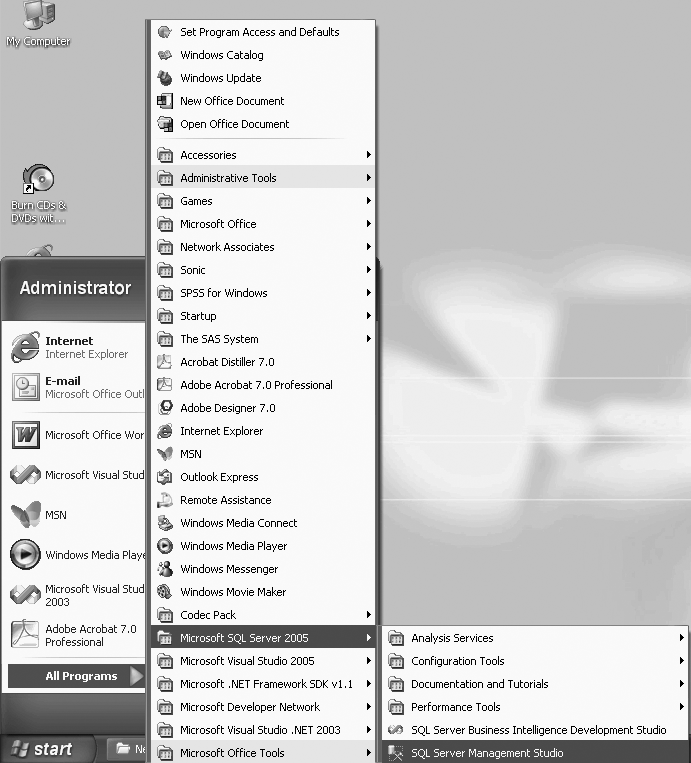
From the Start menu, go to All Programs, select Microsoft SQL Server 2005, and then SQL Server Management Studio (as shown in the Figure 1-1).
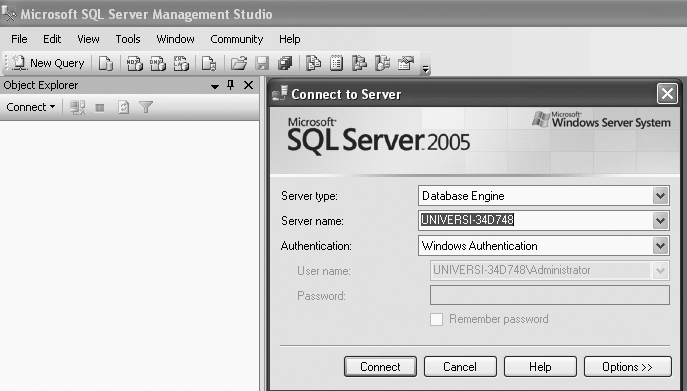
You will get the screen shown in Figure 1-2. This screen allows you to connect to Microsoft SQL Server 2005. If the server type and server name are different from the defaults that came up, enter the appropriate server type and server name, and select Windows Authentication. Then, click Connect.
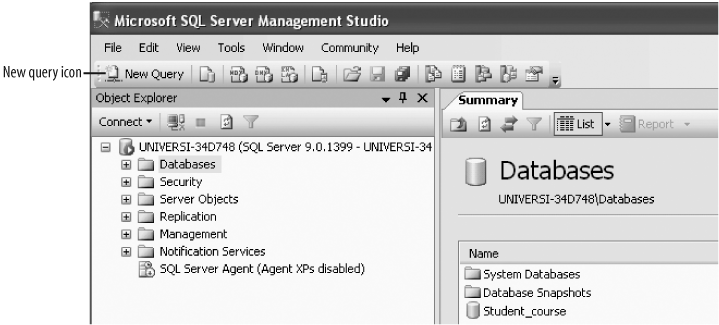
Once connected to the server that you typed in, you will get the Microsoft SQL Server Management Studio screen (Figure 1-3) that we will be using throughout the rest of the book.
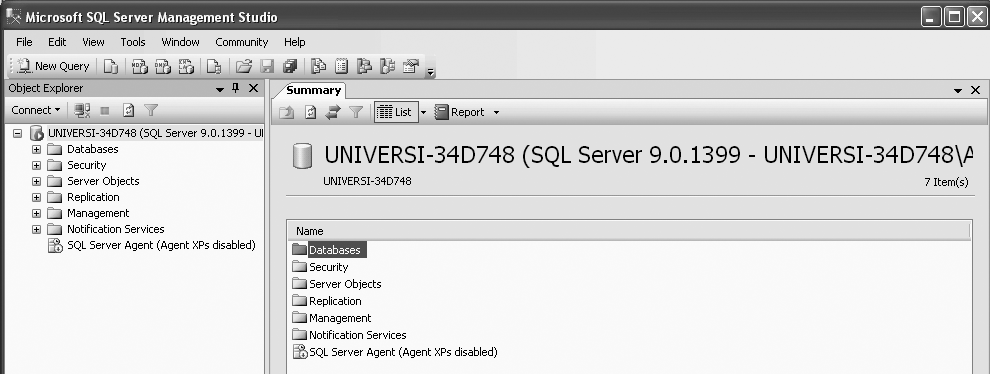
The Microsoft SQL Server Management Studio screen contains the Object Explorer on the left portion of the screen and, to start with, a Summary tab on the right portion of the screen. The Object Explorer provides a hierarchical view of objects. For example, you can navigate through a database, table, column, or other types of objects, as we will soon show you.
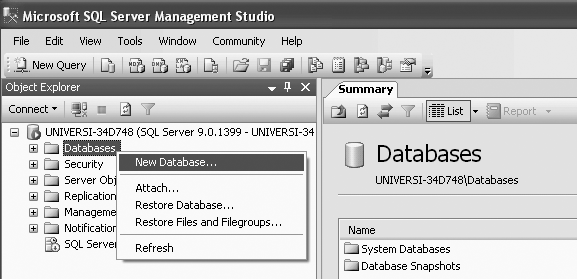
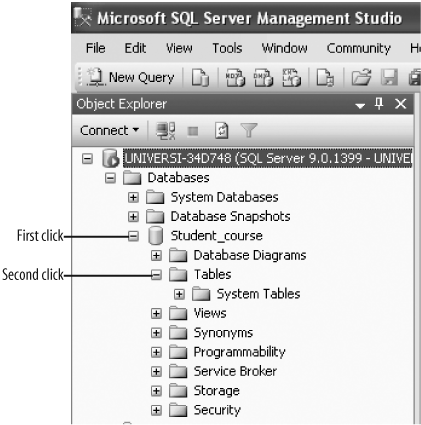
Before we begin to work with Microsoft SQL Server 2005, we will create a database. To create a database, as shown in Figure 1-4, right click on Databases in the Object Explorer and select New Database... from the context menu.
You will get the New Database dialog box,
as shown in Figure 1-5. We will create a database called Student_course.
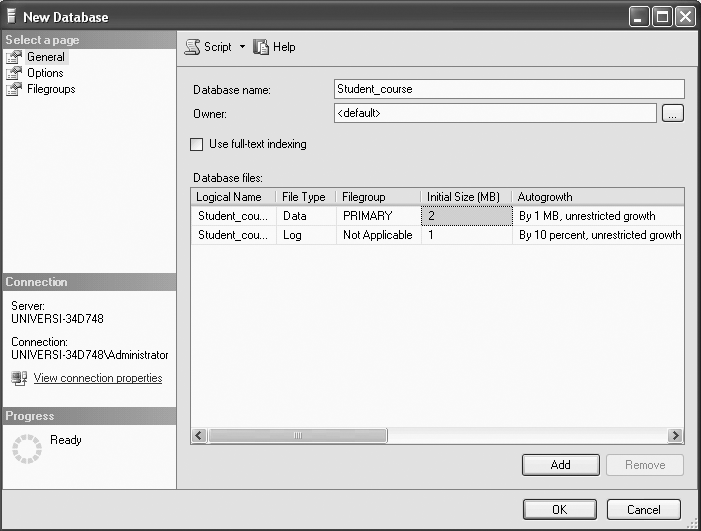
Type in your database name as Student_course. You may leave the Owner as <default
> for now, as shown in Figure 1-5. Click OK. You will get the screen shown in Figure 1-6.
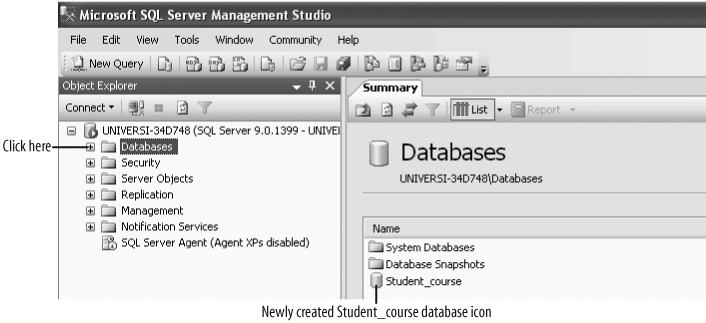
The Student_course database has now been created. Note the newly created Student_course database icon under the Summary tab on the righthand side of the screen below Databases (see Figure 1-6).
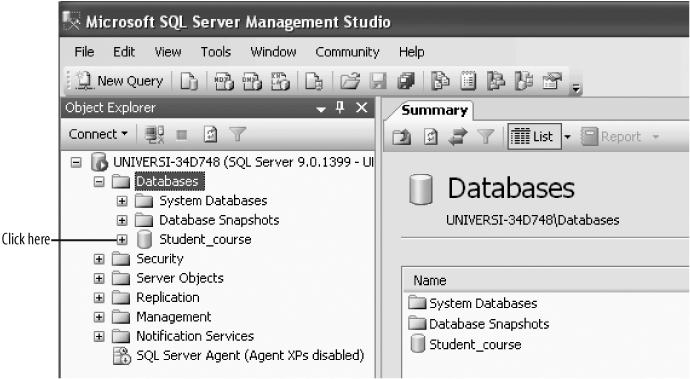
In order to view the Student_course database under the Object Explorer (on the left side of your screen) right away, you may have to first right-click on the Databases node and then select Refresh.
Then, as shown in Figure 1-6, you may now expand the Databases node by clicking on the + sign beside Databases under the Object Explorer, and you also will see the Student_course database node under and Databases (under the Object Explorer on the left portion of your screen), as shown in Figure 1-7.
A SQL Server database is a collection of many objects, such as tables, views, and synonyms, defined to support activities performed with data.
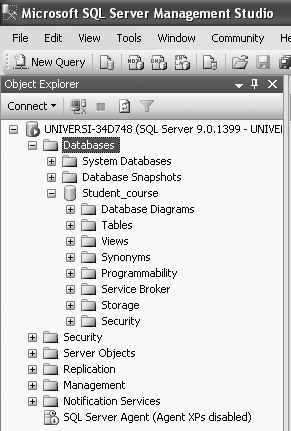
From Figure 1-7, expand the Student_course database node by clicking on the + sign beside the Student_course node, and you will get the screen shown in Figure 1-8, which shows the default objects that are in the Student_course database.
A database is a collection of related tables. So far we have created the Student_course database, but we have not created any tables.
To view the default tables in the Student_course database, expand the Tables node (as shown in Figure 1-9), and the only default table in the Student_course database, System Tables, will be displayed.
At this point you may click on the - sign beside the Tables node, and then on the - sign beside the Student_course node to close those up, and you will get back to Figure 1-7.
SQL Server 2005 comes with some default System databases--master, model, msdb, and tempdb. To view these default database nodes, expand the Database node and then System Databases node, as shown in Figure 1-10, and you will be able to see the default System databases.
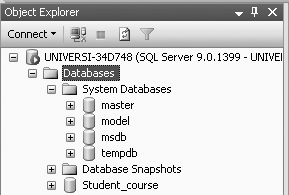
master
is a database composed of system tables that keeps track of server installation as a whole and all other databases that are subsequently created. The SQL Server Management Studio query window defaults to the master database context. Any queries executed from the query window will execute in the master database unless you change the context.
model
is a template database. Every time a new database is created, SQL Server makes a copy of the model database
(and all of the objects in it) to form the basis of the new database. If you want all your new databases to inherit certain properties, you could include these properties and objects in your model database.
msdb
is a database that contains the metadata and database objects used by the SQL Server agent that performs scheduled activities such as backups and replication tasks.
tempdb
is a temporary database or workspace recreated every time SQL Server is restarted. tempdb is used for temporary tables created by users and to hold intermediate results created internally by SQL Server during query processing and sorting.
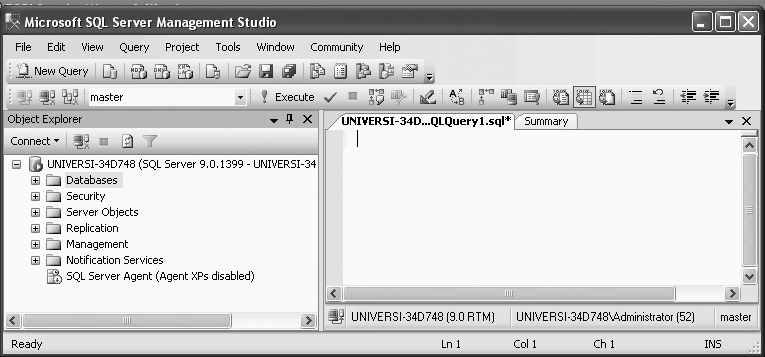
The most important thing you do in SQL Server 2005, or in any other database for that matter, is query the database. Queries in SQL Server 2005 are typed in the query editor. The query editor can be opened in two ways, as discussed in the following subsections: (a) by right-clicking, and (b) by using the New Query button.
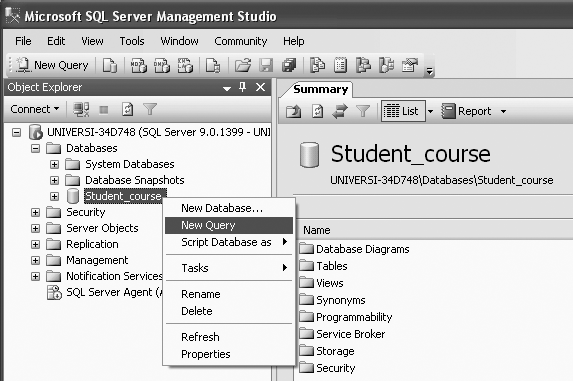
Select the Student_course database and right-click, as shown in Figure 1-11. Select New Query.
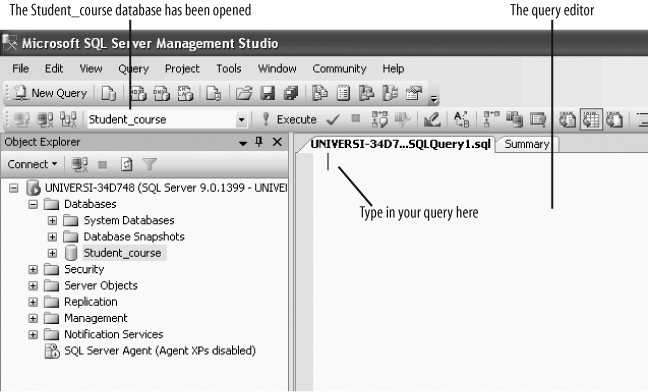
Figure 1-12 shows the query editor, which can be used to create queries and other SQL scripts and execute them against SQL Server databases.
The first query will be called SQLQuery1.sql by default. Later we will show you how to change the name of the query when saving it.
If the query editor is opened in this way, the Student_course database automatically becomes the database against which the queries are executed, because you initially selected Student_course and then right-clicked. If we want to work in our Student_course database, we have to make sure that the Student_course database is active. If the Student_course database is not active, we have to activate it—we show you how to do this in different ways in the following sections.
You can also open the query editor by selecting the New Query button from the top menu (leftmost icon), as shown in Figure 1-13.
If you used the New Query icon from Figure 1-13 (without selecting the Student_course database), you will get Figure 1-14. Here, note that the Student_course database is not the active database; master is the active database, because SQL Server 2005 defaults to master.
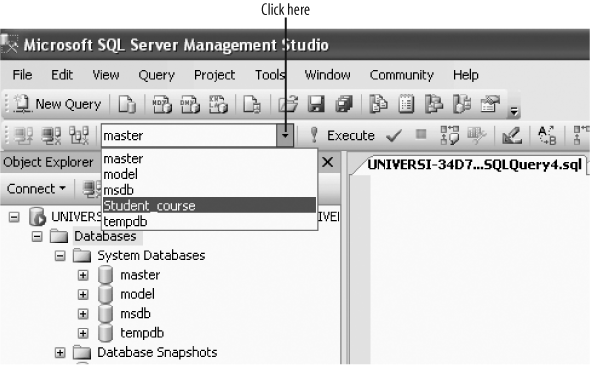
But we want to use the Student_course database that we just created, so we have to activate the Student_course database. Click on the drop-down icon of the Combo box beside master and select Student_course, as shown in Figure 1-15. This step activates or opens the Student_course database.
You can also activate or open the Student_course database by typing in the following in the query editor (as shown in Figure 1-16):
USE Student_course
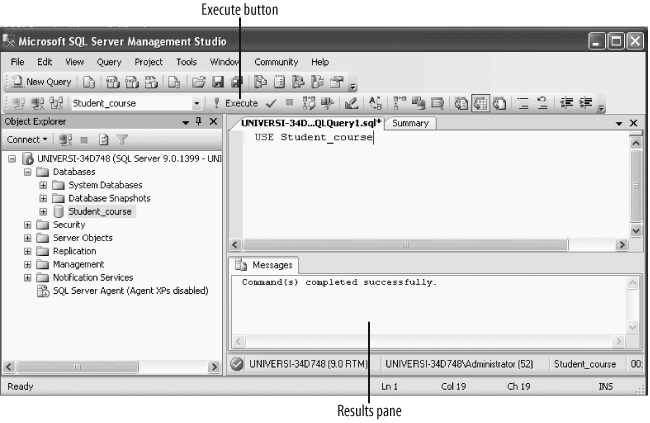
Then, click the Execute button (it is on the menu bar above the query editor screen). You will get the following message in the results pane (as shown in Figure 1-16):
Command(s) completed successfully
A table is used to store data in a database, and, a database is typically composed of many tables.
After the Student_course database is opened or activated, you need to create tables in the Student_course database and insert data into the tables. To do this, run (execute) the load script, SQLServer2005_load.sql, that you downloaded and saved to your working directory.
Go to the directory where you saved the load script, SQLServer2005_load.sql. Double-click SQLServer2005_load.sql. Then, select the whole script and copy it. This script will be pasted into SQL Server 2005’s query editor. Open SQL Server 2005’s query editor as shown in Figure 1-12. Make sure that the Student_course database is active. Paste the load script into the query editor, as shown in the Figure 1-17.
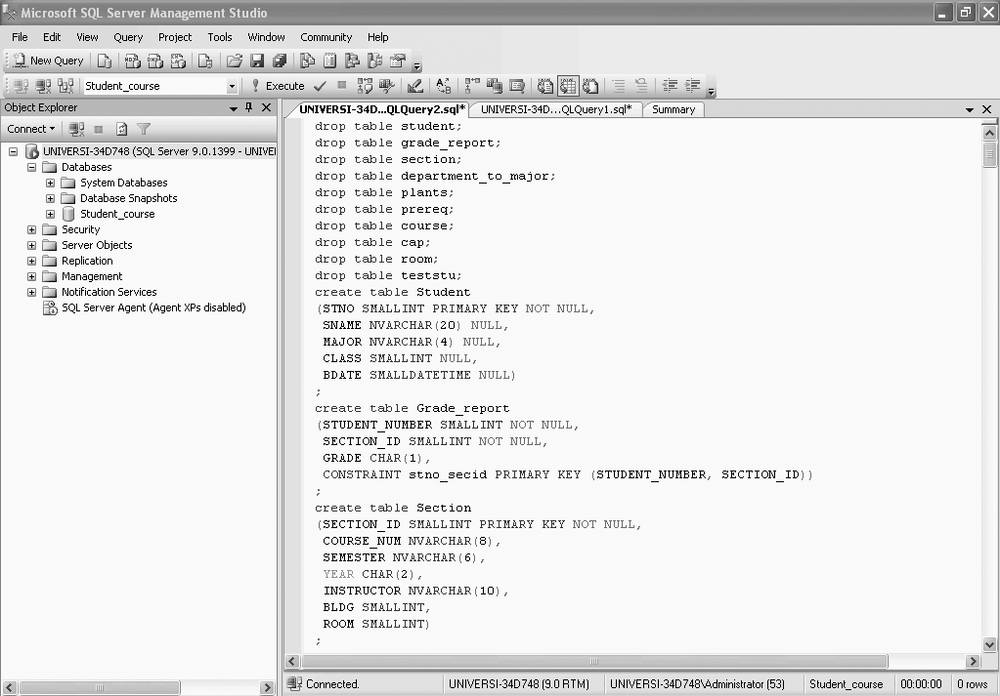
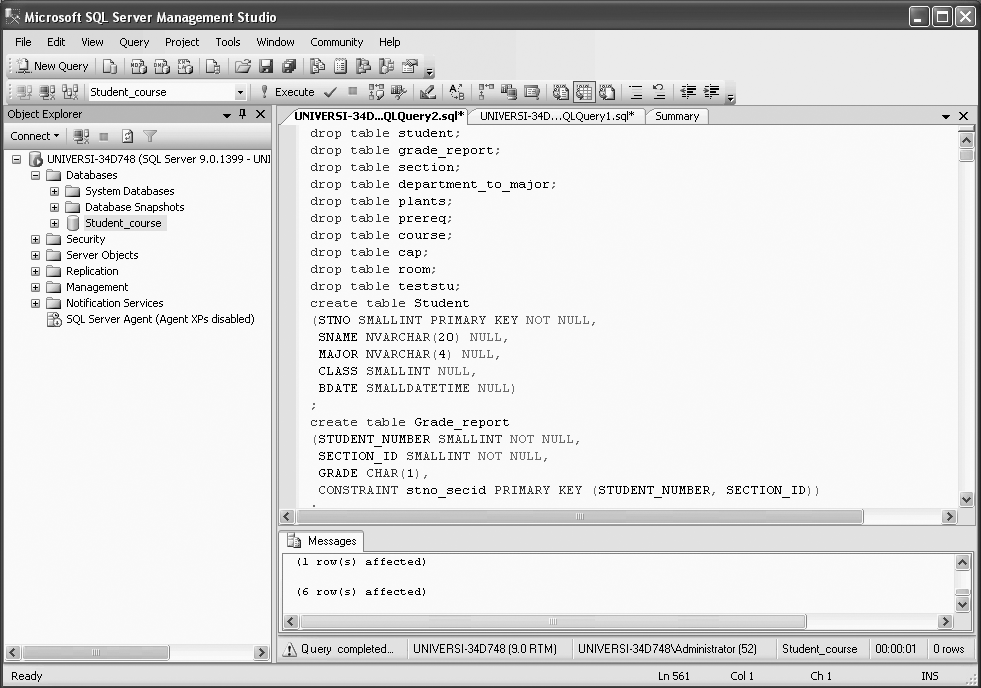
Once the script has been pasted into the query editor, execute this script by clicking the Execute button or the F5 shortcut key. This script takes only a few seconds to execute. You will get the results shown in Figure 1-18--on the bottom part of the screen under the Messages tab.
This script creates the tables Cap, Course, Department_to_major, Dependent, Grade_report, Plants, Prereq, Room, Section, Student, and teststu, in the Student_course database and inserts data into them. The tables in the Student_course database are laid out in Appendix A. We also present the T-SQL for the load script in Appendix B.
To view the tables that were created by the load script, expand the Student_course node and then expand the Tables node. You will get the screen shown in Figure 1-19. Every table shows up as a node under Student_course.
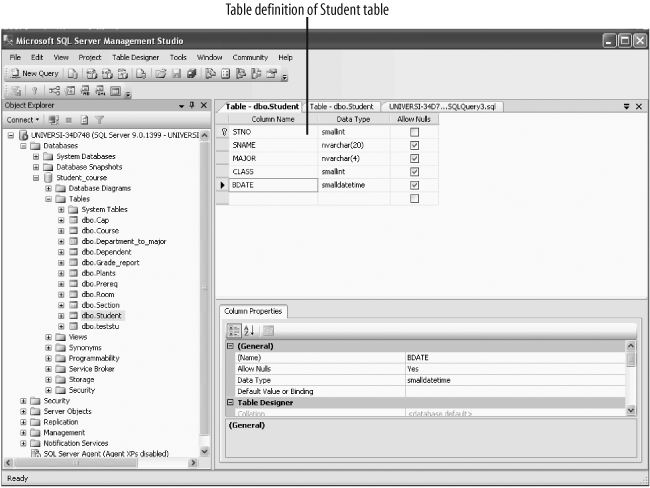
Every table in SQL Server 2005 has a table definition. The table definition gives us information about a table such as the column names in the table, the data types of the columns in the table and whether the columns allow null (missing) values.
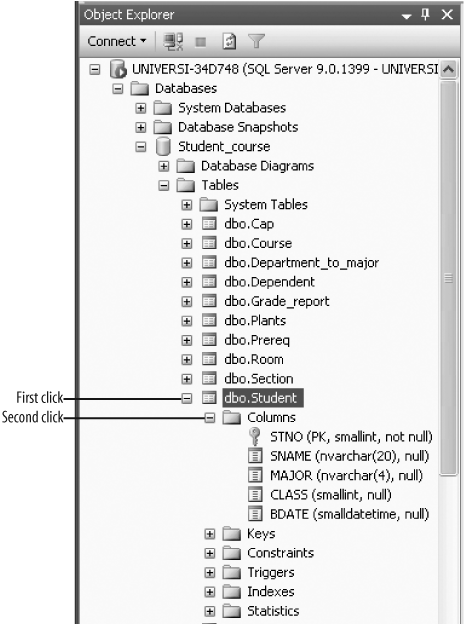
To view the definition of the Student table for example, expand the Student node by clicking on the + sign beside it, and then expand the Columns node, by clicking on the + sign beside it, as shown in Figure 1-20. You will be able to view the columns
in the Student table. The columns in the Student table are stno, sname, major, class, and bdate.

If you wish to modify any of the column specifications—for example, if you want to insert or delete columns, rename a column, change the data type of a column, or allow or disallow null fields—you need to modify the table definition. The table definition can be modified by modifying the column definition or by modifying the table definition.
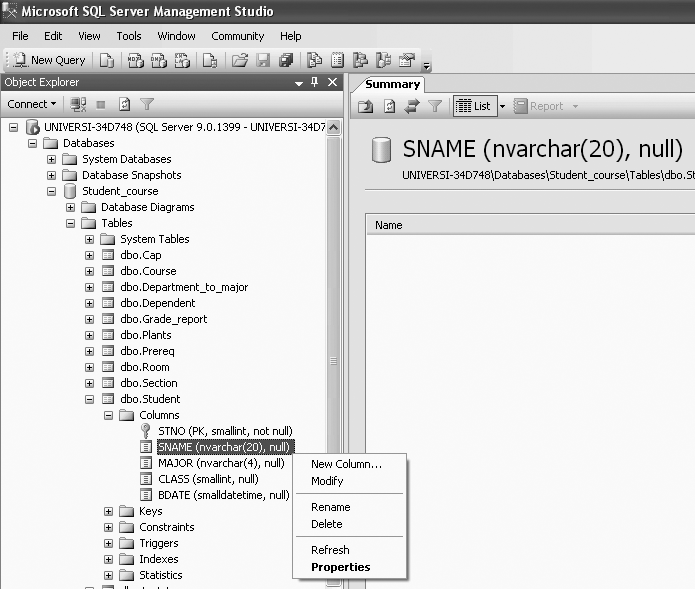
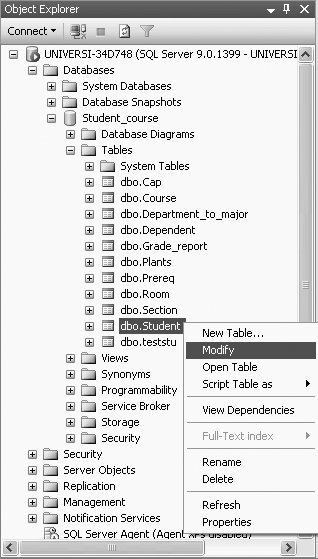
To modify the column definition, right-click the column that you wish to modify. For example, if you wish to modify the column definition of the SNAME field of the Student table, as seen in Figure 1-20, right-click the SNAME field of the Student table (as shown in Figure 1-21), and select one of the following options—New Column, Modify, Rename, Delete, Refresh or Properties.
Another way to view or modify the table definition is to right-click the table—for example, Student--and then select Modify, as shown in Figure 1-22.
The table definition of the Student table is now displayed, as shown in Figure 1-23.
You can delete or insert columns from here, change the data types, allow or disallow null values, and more. Once you have finished making your changes (or just viewing the table definition, if that is what you intended to do), you can close this window. You will be asked if you wish to save the changes and you may select Yes or No, depending on whether you made changes to the table definition and you want to save the changes.
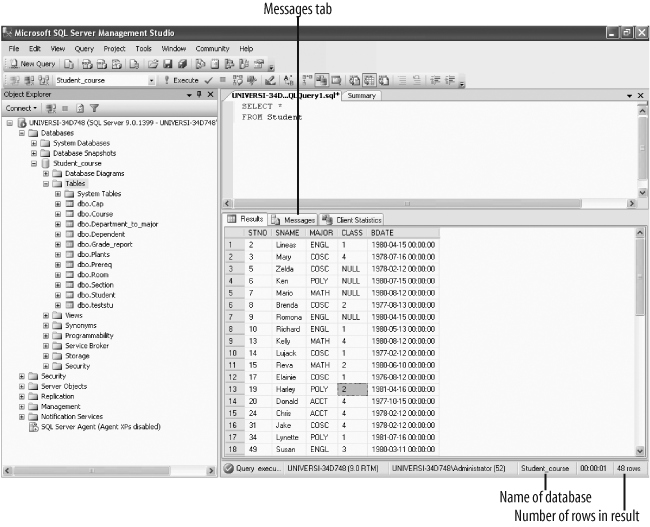
To view the data in a table, right click on the table, as shown in Figure 1-22, and select Open Table. For example, to view the data of the Student table, right-click on the Student table, and select Open Table. This will show all 48 rows of the Student table, of which we show the first 14 rows here:
    STNO   SNAME     MAJOR   CLASS  BDATE
    -----  -------   ------  -----  ----------------------
    2      Lineas    ENGL    1      4/15/1980 12:00:00 AM
    3      Mary      COSC    4      7/16/1978 12:00:00 AM
    8      Brenda    COSC    2      8/13/1977 12:00:00 AM
    10     Richard   ENGL    1      5/13/1980 12:00:00 AM
    13     Kelly     MATH    4      8/12/1980 12:00:00 AM
    14     Lujack    COSC    1      2/12/1977 12:00:00 AM
    15     Reva      MATH    2      6/10/1980 12:00:00 AM
    17     Elainie   COSC    1      8/12/1976 12:00:00 AM
    19     Harley    POLY    2      4/16/1981 12:00:00 AM
    20     Donald    ACCT    4      10/15/1977 12:00:00 AM
    24     Chris     ACCT    4      2/12/1978 12:00:00 AM
    34     Lynette   POLY    1      7/16/1981 12:00:00 AM
    49     Susan     ENGL    3      3/11/1980 12:00:00 AM
    62     Monica    MATH    3      10/14/1980 12:00:00 AM

    .
    .
    .
This screen also allows you to insert data, make changes to the data, and save this changed data.
To delete a table, right-click on the table that you wish to delete (as shown in Figure 1-22), and then select Delete. Deleting a table will delete the table, table definition, and all of the data in the table.
Warning
Once you delete a table, there will be no way to get the table or its data back except by restoring from a backup. Be very careful that you indeed intend to permanently dispose of data before selecting Delete.
Do not delete any tables right now. We provide this information for later reference, should you have to delete tables.
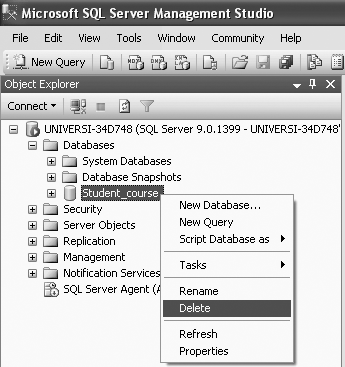
To delete a database, right-click on the database that you would like to delete, and select Delete, as shown in Figure 1-24.
Like every computer language, a SQL query or statement is used to give instructions to the computer. A query is a request for data stored in SQL Server. The computer analyzes each instruction and interprets it. If the instruction is “understandable” to the computer, the computer produces a result. If the computer cannot figure out what the instruction means, it displays an error message.
In this book, we focus on Transact-SQL (T-SQL), SQL Server’s variant of SQL. In SQL Server 2005, the SQL query is typed in the query editor screen, as shown in Figure 1-12. But, before you type in your query, make sure the database that you wish to work with is active or open. To type in or work on the queries in this book, the Student_course database should be active or open.
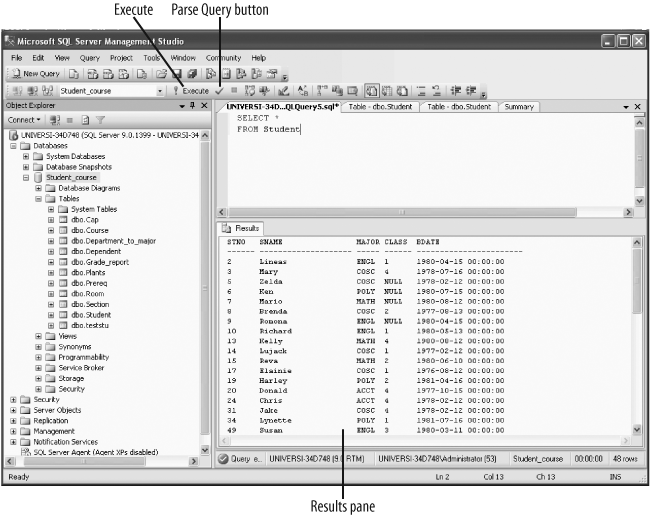
Right click on Student_course and then select New Query. Type the following SQL query in the resulting screen:
    USE Student
    SELECT *
    FROM Student
USE Student opens the Student_course database, as shown in Figure 1-12. SELECT is the SQL keyword that means “select data” or “retrieve the following data from the database.” The * is interpreted to mean “show all columns in the result.” FROM is the keyword that names the source of the data, and Student is the name of a table. So this is a simple SQL query that tells SQL Server to display all the rows and columns (all the data) in the Student table.
Before you execute your query, you may parse your query. The Parse Query button is shown in Figure 1-25. By parsing the query you can make sure that your query is correctly written, before you execute your query.
To execute a query, click the Execute button, shown in Figure 1-25. If there are no errors in the query, the Execute button will execute (run) the query and the results will show on the results pane (bottom partition) of the screen.
The automatic color coding of SQL code in the query editor will help you type in your SQL query correctly. It will help you prevent and resolve errors. If you are using the default color codes, for example, and you type in a keyword that is not displayed in blue, the keyword is probably misspelled. If your code is displayed in red, you might have omitted a closing quotation mark for a character string.
To save a query, while the query is on the query editor screen, from the top menu, select File and Save SQLQuery1.sql As.... A dialog box will open up and you will be able to type the name under which you want to save your query, and you will also be able to navigate to the directory to which you want to save your query.
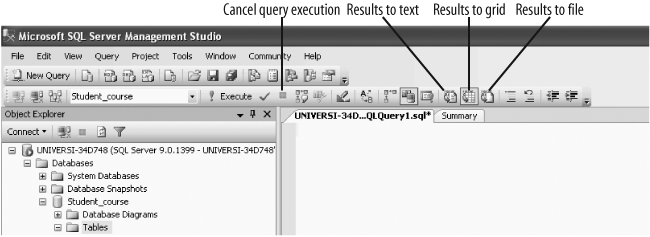
Results in SQL Server 2005 are displayed in the Results pane. The Results pane is shown in Figure 1-25. SQL queries can be executed to view results in grid form or text form, or the results can be saved to a file, as discussed in the following subsections.
The grid form displays the results in spreadsheet-like grids. To execute a query and view query results in grid form, first click the “Results to grid” icon (this icon is shown in Figure 1-26) and then click the Execute button.
You will now get the results in grid form, as shown in Figure 1-27.
On Figure 1-27, on the bottom panel of the screen, the name of the database and the number of rows in the result set are displayed.
To execute a query and view query results in text form, click on the “Results to text” icon (shown in Figure 1-26) and then click the Execute button. You will now get the results in text form, as shown in Figure 1-25. Viewing the output in text form may make it easier for you to copy and paste the output into a word processor, from where you can print the output easily. Figure 1-25 also displays, on the bottom panel of the screen, the name of the database and the number of rows in the result set.
To save your query results to a file, from Figure 1-26, select Results to File icon (this icon is shown in Figure 1-26), and then click the Execute button. The Save Results window will come up and you will be able to select the appropriate directory and enter the appropriate filename and save the results to file for later use. The Results to File option produces output formatted for Crystal Reports. Crystal Reports is the best-selling database reporting tool and is included with SQL Server. It is beyond our scope to discuss Crystal Reports here.
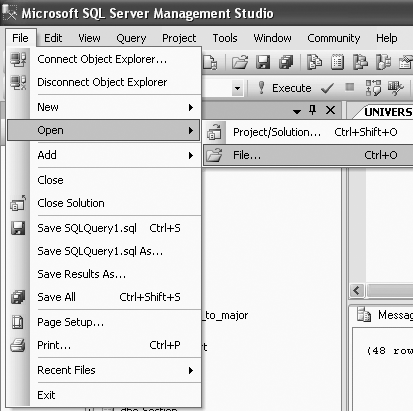
To open this Crystal Report (the saved file), select File from the top menu, Open, and then File (as shown in Figure 1-28). Then, navigate to the directory where you saved your file, select your file, and your results will be displayed on the screen.
If you want to stop the execution of a long-running query, you may click on the Cancel Query Execution button (shown in Figure 1-26), or you may press Alt-Break.
To view error messages, click on the Message tab (shown in Figure 1-27). This displays the messages (as well as error messages) of the SQL query output.
Once the SQL query is on the query editor screen, you can print the query by selecting File->Print from the top menu.
To print the results, the query should be executed in the Results in Text mode. Then, when the results are displayed in the bottom window partition (the results pane), place your cursor in the results pane by clicking anywhere in the results pane (see Figure 1-25 for the results pane), and then select File → Print from the top menu.
When the results are saved to file, they can, of course, be retrieved and printed from the file.
You can customize some options in SQL Server 2005 by selecting Tools → Options from the top menu. You will get the following tabs: Environment, Source Control, Text Editor, Query Execution, Query Results, Designers.
The Environment tab has the General, Fonts and Colors, Keyboards and Help options. Among other options, the General tab allows you to change the default start-up window options of SQL Server 2005. The Fonts and Colors option allows you to change, among other things, an items foreground and background color. The Keyboard option allows you to change keyboarding options like Shortcuts.
The Source Control tab specifies the source control plug-in to use with Microsoft SQL Server Management Studio and allows changes to plug-in specific options.
The Text Editor tab allows you to change the default editor and change other language and text options.
The Query Execution tab allows you to change the default ROWCOUNT options, TEXTSIZE options, execution time-out length, and other settings.
In this chapter, we have shown you how to start Microsoft SQL Server 2005 and SQL Server 2005’s Management Studio. We have also shown you how to create the Student_course database that we will be using throughout the rest of this book. In addition, we have demonstrated how to work with tables. We have shown you how to type, parse, execute and save a simple query. In the process, we have also familiarized you with the main screens and workings of SQL Server 2005’s Management Studio. Towards the end of the chapter, we showed you how to change (or customize) some of SQL Server 2005’s default settings to suit your needs.
If I want to see what fields a table is made of, and what the sizes of the fields are, what option do I have to look for?
What is a query?
A SQL query is typed in the _________ .
What is the purpose of the
modeldatabase?What is the purpose of the
masterdatabase?What is the purpose of the
tempdbdatabase?What is the purpose of the
USEcommand?If you delete a table in the database, will the data in the table be deleted too?
What is the Parse Query button used for? How does this help you?
Tables are created in a ____________________ in SQL Server 2005.
The tables available in the Student_course database are shown in Appendix A.
The
Student_coursedatabase contains the following tables:Student,Dependent,Grade_report,Section,Department,Course,Prereq,Room,Cap,Plants.View the table definition of each of these tables.
View the data of each of these tables. Save your results to a file and print them out.
Write a SQL query to view all the columns and rows in the
Studenttable. (Hint: To retrieve all columns, useSELECT *in your query; the*means “all columns”). Save and execute the query. Save the results to a file and print out the results.
Get Learning SQL on SQL Server 2005 now with the O’Reilly learning platform.
O’Reilly members experience books, live events, courses curated by job role, and more from O’Reilly and nearly 200 top publishers.

