Chapter 4. Pure React
In order to understand how React runs in the browser, we will be working purely with React in this chapter. We will not introduce JSX, or JavaScript as XML, until the next chapter. You may have worked with React in the past without ever looking at the pure React code that is generated when we transpile JSX into React. You can successfully use React without looking at pure React. However, if you take the time to understand what is going on behind the scenes, you will be more efficient, especially when it comes time to debug. That is our goal in this chapter: to look under the hood and understand how React works.
Page Setup
In order to work with React in the browser, we need to include two libraries: React and ReactDOM. React is the library for creating views. ReactDOM is the library used to actually render the UI in the browser.
We also need an HTML element that ReactDOM will use to render the UI. You can see how the scripts and HTML elements are added in Example 4-1. Both libraries are available as scripts from the Facebook CDN.
Example 4-1. HTML document setup with React
<!DOCTYPE html><html><head><metacharset="utf-8"><title>Pure React Samples</title></head><body><!-- Target container --><divid="react-container"></div><!-- React library & ReactDOM--><scriptsrc="https://unpkg.com/react@15.4.2/dist/react.js"></script><scriptsrc="https://unpkg.com/react-dom@15.4.2/dist/react-dom.js"></script><script>// Pure React and JavaScript code</script></body></html>
These are the minimum requirements for working with React in the browser. You can place your JavaScript in a separate file, but it must be loaded somewhere in the page after React has been loaded.
The Virtual DOM
HTML is simply a set of instructions that a browser follows when constructing the document object model, or DOM. The elements that make up an HTML document become DOM elements when the browser loads HTML and renders the user interface.
Let’s say that you have to construct an HTML hierarchy for a recipe. A possible solution for such a task might look something like this:
<sectionid="baked-salmon"><h1>Baked Salmon</h1><ulclass="ingredients"><li>1 lb Salmon</li><li>1 cup Pine Nuts</li><li>2 cups Butter Lettuce</li><li>1 Yellow Squash</li><li>1/2 cup Olive Oil</li><li>3 cloves of Garlic</li></ul><sectionclass="instructions"><h2>Cooking Instructions</h2><p>Preheat the oven to 350 degrees.</p><p>Spread the olive oil around a glass baking dish.</p><p>Add the salmon, garlic, and pine nuts to the dish.</p><p>Bake for 15 minutes.</p><p>Add the yellow squash and put back in the oven for 30 mins.</p><p>Remove from oven and let cool for 15 minutes. Add the lettuce and serve.</p></section></section>
In HTML, elements relate to each other in a hierarchy that resembles a family tree. We could say that the root element has three children: a heading, an unordered list of ingredients, and a section for the instructions.
Traditionally, websites have consisted of independent HTML pages. When the user navigated these pages, the browser would request and load different HTML documents. The invention of AJAX brought us the single-page application, or SPA. Since browsers could request and load tiny bits of data using AJAX, entire web applications could now run out of a single page and rely on JavaScript to update the user interface.
In an SPA, the browser initially loads one HTML document. As users navigate through the site, they actually stay on the same page. JavaScript destroys and creates a new user interface as the user interacts with the application. It may feel as though you are jumping from page to page, but you are actually still on the same HTML page and JavaScript is doing the heavy lifting.
The DOM API is a collection of objects that JavaScript can use to interact with the browser to modify the DOM. If you have used document.createElement or document.appendChild, you have worked with the DOM API. Updating or changing rendered DOM elements in JavaScript is relatively easy.2 However, the process of inserting new elements is painfully slow.3 This means if web developers are meticulous about how they make changes to UI, they can improve the performance of their applications.
Managing DOM changes with JavaScript efficiently can become very complicated and time-consuming. From a coding perspective, it is easier to clear all the children of a particular element and reconstruct them than it would be to leave those child elements in place and attempt to efficiently update them.4 The problem is that we may not have the time or the advanced knowledge of JavaScript to work efficiently with the DOM API every time we build a new application. The solution is React.
React is a library that is designed to update the browser DOM for us. We no longer have to be concerned with the complexities associated with building performant SPAs because React can do that for us. With React, we do not interact with the DOM API directly. Instead, we interact with a virtual DOM, or set of instructions that React will use to construct the UI and interact with the browser.5
The virtual DOM is made up of React elements, which conceptually seem similar to HTML elements, but are actually JavaScript objects. It is much faster to work directly with JavaScript objects than it is to work with the DOM API. We make changes to a JavaScript object, the virtual DOM, and React renders those changes for us using the DOM API as efficiently as possible.
React Elements
The browser DOM is made up of DOM elements. Similarly, the React DOM is made up of React elements. DOM elements and React elements may look the same, but they are actually quite different. A React element is a description of what the actual DOM element should look like. In other words, React elements are the instructions for how the browser DOM should be created.
We can create a React element to represent an h1 using React.createElement:
React.createElement("h1",null,"Baked Salmon")
The first argument defines the type of element that we wish to create. In this case, we want to create a heading-one element. The third argument represents the element’s children, any nodes that are inserted between the opening and closing tag. The second argument represents the element’s properties. This h1 currently does not have any properties.
During rendering, React will convert this element to an actual DOM element:
<h1>Baked Salmon</h1>
When an element has attributes, they can be described with properties. Here is a sample of an HTML h1 tag that has id and data-type attributes:
React.createElement("h1",{id:"recipe-0",'data-type':"title"},"Baked Salmon")<h1data-reactrootid="recipe-0"data-type="title">BakedSalmon</h1>
The properties are similarly applied to the new DOM element: the properties are added to the tag as attributes, and the child text is added as text within the element. You’ll also notice data-reactroot, which identifies that this is the root element of your React component (Figure 4-1).

Figure 4-1. Relationship between createElement and the DOM element
data-reactroot
data-reactroot will always appear as an attribute of the root element of your React component. Prior to version 15, React IDs were added to each node that was a part of your component. This helped with rendering and keeping track of which elements needed to be updated. Now, there is only an attribute added to the root, and rendering is kept track of based on the hierarchy of elements.
So, a React element is just a JavaScript literal that tells React how to construct the DOM element. Example 4-2 shows the element that createElement call actually creates.
Example 4-2. Logging the title element
{$$typeof:Symbol(React.element),"type":"h1","key":null,"ref":null,"props":{"children":"Baked Salmon"},"_owner":null,"_store":{}}
This is a React element. There are fields that are used by React: _owner, _store, $$typeof. The key and ref fields are important to React elements, but we’ll introduce those later, in Chapter 5. For now, let’s take a closer look at the type and props fields in Example 4-2.
The type property of the React element tells React what type of HTML or SVG element to create. The props property represents the data and child elements required to construct a DOM element. The children property is for displaying other nested elements as text.
A Note on Creating Elements
We are taking a peek at the object that React.createElement returns. There is never a case where you would create elements by hand-typing literals that look like this. You must always create React elements with the React.createElement function or factories, which are discussed at the end of this chapter.
ReactDOM
ReactDOM contains the tools necessary to render React elements in the browser. ReactDOM is where we will find the render method as well as the renderToString and renderToStaticMarkup methods that are used on the server. These will be discussed in greater detail in Chapter 12. All the tools necessary to generate HTML from the virtual DOM are found in this library.
We can render a React element, including its children, to the DOM with ReactDOM.render. The element that we wish to render is passed as the first argument and the second argument is the target node, where we should render the element:
vardish=React.createElement("h1",null,"Baked Salmon")ReactDOM.render(dish,document.getElementById('react-container'))
Rendering the title element to the DOM would add a heading-one element to the div with the id of react-container, which we would already have defined in our HTML. In Example 4-3, we build this div inside the body tag.
Example 4-3. React added the h1 element to the target: react-container
<body><divid="react-container"><h1>Baked Salmon</h1></div></body>
All of the DOM rendering functionality in React has been moved to ReactDOM because we can use React to build native applications as well. The browser is just one target for React.
That’s all you need to do. You create an element, and then you render it to the DOM. In the next section, we’ll get an understanding of how to use props.children.
Children
ReactDOM allows you to render a single element to the DOM.6 React tags this as data-reactroot. All other React elements are composed into a single element using nesting.
React renders child elements using props.children. In the previous section, we rendered a text element as a child of the h1 element, and thus props.children was set to "Baked Salmon". We could render other React elements as children too, creating a tree of elements. This is why we use the term component tree. The tree has one root component from which many branches grow.
Let’s consider the unordered list that contains ingredients in Example 4-4.
Example 4-4. Ingredients list
<ul><li>1 lb Salmon</li><li>1 cup Pine Nuts</li><li>2 cups Butter Lettuce</li><li>1 Yellow Squash</li><li>1/2 cup Olive Oil</li><li>3 cloves of Garlic</li></ul>
In this sample, the unordered list is the root element, and it has six children. We can represent this ul and its children with React.createElement (Example 4-5).
Example 4-5. Unordered list as React elements
React.createElement("ul",null,React.createElement("li",null,"1 lb Salmon"),React.createElement("li",null,"1 cup Pine Nuts"),React.createElement("li",null,"2 cups Butter Lettuce"),React.createElement("li",null,"1 Yellow Squash"),React.createElement("li",null,"1/2 cup Olive Oil"),React.createElement("li",null,"3 cloves of Garlic"))
Every additional argument sent to the createElement function is another child element. React creates an array of these child elements and sets the value of props.children to that array.
If we were to inspect the resulting React element, we would see each list item represented by a React element and added to an array called props.children. Let’s do that now (Example 4-6).
Example 4-6. Resulting React element
{"type":"ul","props":{"children":[{"type":"li","props":{"children":"1 lb Salmon"}…},{"type":"li","props":{"children":"1 cup Pine Nuts"}…},{"type":"li","props":{"children":"2 cups Butter Lettuce"}…},{"type":"li","props":{"children":"1 Yellow Squash"}…},{"type":"li","props":{"children":"1/2 cup Olive Oil"}…},{"type":"li","props":{"children":"3 cloves of Garlic"}…}]...}}
We can now see that each list item is a child. Earlier in this chapter, we introduced HTML for an entire recipe rooted in a section element. To create this using React, we’ll use a series of createElement calls, as in Example 4-7.
Example 4-7. React Element tree
React.createElement("section",{id:"baked-salmon"},React.createElement("h1",null,"Baked Salmon"),React.createElement("ul",{"className":"ingredients"},React.createElement("li",null,"1 lb Salmon"),React.createElement("li",null,"1 cup Pine Nuts"),React.createElement("li",null,"2 cups Butter Lettuce"),React.createElement("li",null,"1 Yellow Squash"),React.createElement("li",null,"1/2 cup Olive Oil"),React.createElement("li",null,"3 cloves of Garlic")),React.createElement("section",{"className":"instructions"},React.createElement("h2",null,"Cooking Instructions"),React.createElement("p",null,"Preheat the oven to 350 degrees."),React.createElement("p",null,"Spread the olive oil around a glass baking dish."),React.createElement("p",null,"Add the salmon, garlic, and pine..."),React.createElement("p",null,"Bake for 15 minutes."),React.createElement("p",null,"Add the yellow squash and put..."),React.createElement("p",null,"Remove from oven and let cool for 15 ....")))
className in React
Any element that has an HTML class attribute is using className for that property instead of class. Since class is a reserved word in JavaScript, we have to use className to define the class attribute of an HTML element.
This sample is what pure React looks like. Pure React is ultimately what runs in the browser. The virtual DOM is a tree of React elements all stemming from a single root element. React elements are the instructions that React will use to build a UI in the browser.
Constructing Elements with Data
The major advantage of using React is its ability to separate data from UI elements. Since React is just JavaScript, we can add JavaScript logic to help us build the React component tree. For example, ingredients can be stored in an array, and we can map that array to the React elements.
Let’s go back and think about the unordered list in Example 4-8 for a moment.
Example 4-8. Unordered list
React.createElement("ul",{"className":"ingredients"},React.createElement("li",null,"1 lb Salmon"),React.createElement("li",null,"1 cup Pine Nuts"),React.createElement("li",null,"2 cups Butter Lettuce"),React.createElement("li",null,"1 Yellow Squash"),React.createElement("li",null,"1/2 cup Olive Oil"),React.createElement("li",null,"3 cloves of Garlic"));
The data used in this list of ingredients can be easily represented using a JavaScript array (Example 4-9).
Example 4-9. items array
varitems=["1 lb Salmon","1 cup Pine Nuts","2 cups Butter Lettuce","1 Yellow Squash","1/2 cup Olive Oil","3 cloves of Garlic"]
We could construct a virtual DOM around this data using the Array.map function, as in Example 4-10.
Example 4-10. Mapping an array to li elements
React.createElement("ul",{className:"ingredients"},items.map(ingredient=>React.createElement("li",null,ingredient)))
This syntax creates a React element for each ingredient in the array. Each string is displayed in the list item’s children as text. The value for each ingredient is displayed as the list item.
When running this code, you’ll see a console error, as shown in Figure 4-2.

Figure 4-2. Console warning
When we build a list of child elements by iterating through an array, React likes each of those elements to have a key property. The key property is used by React to help it update the DOM efficiently. We will be discussing keys and why we need them in Chapter 5, but for now you can make this warning go away by adding a unique key property to each of the list item elements (Example 4-11). We can use the array index for each ingredient as that unique value.
Example 4-11. Adding a key property
React.createElement("ul",{className:"ingredients"},items.map((ingredient,i)=>React.createElement("li",{key:i},ingredient))
React Components
Every user interface is made up of parts. The recipe example we’ll use here has a few recipes, each made up of parts (Figure 4-3).
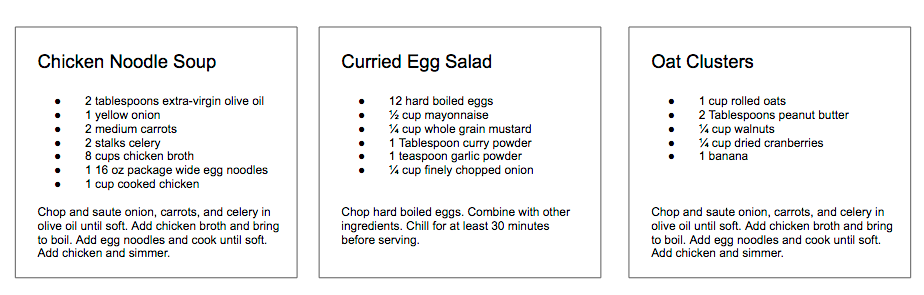
Figure 4-3. Recipes app
In React, we describe each of these parts as a component. Components allow us to reuse the same DOM structure for different recipes or different sets of data.
When considering a user interface that you want to build with React, look for opportunities to break down your elements into reusable pieces. For example, the recipes in Figure 4-4 each have a title, ingredients list, and instructions. All are part of a larger recipe or app component. We could create a component for each of the highlighted parts: ingredients, instructions, and so on.
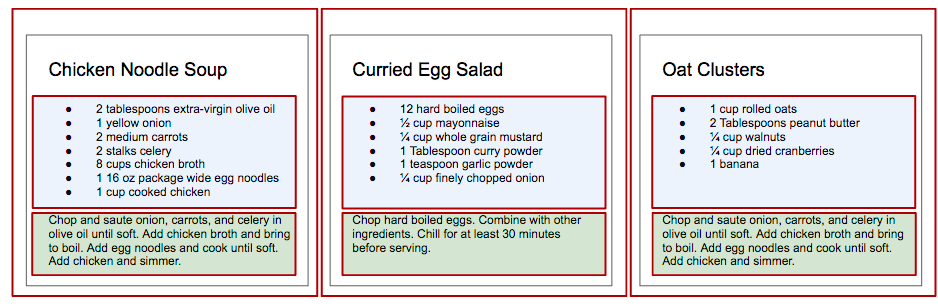
Figure 4-4. Each component is outlined: App, IngredientsList, Instructions
Think about how scalable this is. If we want to display one recipe, our component structure will support this. If we want to display 10,000 recipes, we’ll just create new instances of that component.
Let’s investigate the three different ways to create components: createClass, ES6 classes, and stateless functional components.
createClass
When React was first introduced in 2013, there was only one way to create a component: the createClass function.
New methods of creating components have emerged, but createClass is still used widely in React projects. The React team has indicated, however, that createClass may be deprecated in the future.
Let’s consider the list of ingredients that are included in each recipe. As shown in Example 4-12, we can create a React component using React.createClass that returns a single unordered list element that contains a child list item for each ingredient in an array.
Example 4-12. Ingredients list as a React component
constIngredientsList=React.createClass({displayName:"IngredientsList",render(){returnReact.createElement("ul",{"className":"ingredients"},React.createElement("li",null,"1 lb Salmon"),React.createElement("li",null,"1 cup Pine Nuts"),React.createElement("li",null,"2 cups Butter Lettuce"),React.createElement("li",null,"1 Yellow Squash"),React.createElement("li",null,"1/2 cup Olive Oil"),React.createElement("li",null,"3 cloves of Garlic"))}})constlist=React.createElement(IngredientsList,null,null)ReactDOM.render(list,document.getElementById('react-container'))
Components allow us to use data to build a reusable UI. In the render function, we can use the this keyword to refer to the component instance, and properties can be accessed on that instance with this.props.
Here, we have created an element using our component and named it IngredientsList:
<IngredientsList><ulclassName="ingredients"><li>1 lb Salmon</li><li>1 cup Pine Nuts</li><li>2 cups Butter Lettuce</li><li>1 Yellow Squash</li><li>1/2 cup Olive Oil</li><li>3 cloves of Garlic</li></ul></IngredientsList>
Data can be passed to React components as properties. We can create a reusable list of ingredients by passing that data to the list as an array:
constIngredientsList=React.createClass({displayName:"IngredientsList",render(){returnReact.createElement("ul",{className:"ingredients"},this.props.items.map((ingredient,i)=>React.createElement("li",{key:i},ingredient)))}})constitems=["1 lb Salmon","1 cup Pine Nuts","2 cups Butter Lettuce","1 Yellow Squash","1/2 cup Olive Oil","3 cloves of Garlic"]ReactDOM.render(React.createElement(IngredientsList,{items},null),document.getElementById('react-container'))
Now, let’s look at ReactDOM. The data property items is an array with six ingredients. Because we made the li tags using a loop, we were able to add a unique key using the index of the loop:
<IngredientsListitems=[...]><ulclassName="ingredients"><likey="0">1 lb Salmon</li><likey="1">1 cup Pine Nuts</li><likey="2">2 cups Butter Lettuce</li><likey="3">1 Yellow Squash</li><likey="4">1/2 cup Olive Oil</li><likey="5">3 cloves of Garlic</li></ul></IngredientsList>
The components are objects. They can be used to encapsulate code just like classes. We can create a method that renders a single list item and use that to build out the list (Example 4-13).
Example 4-13. With a custom method
constIngredientsList=React.createClass({displayName:"IngredientsList",renderListItem(ingredient,i){returnReact.createElement("li",{key:i},ingredient)},render(){returnReact.createElement("ul",{className:"ingredients"},this.props.items.map(this.renderListItem))}})
This is also the idea of views in MVC languages. Everything that is associated with the UI for IngredientsList is encapsulated into one component; everything we need is right there.
Now we can create a React element using our component and pass it to the list of elements as a property. Notice that the element’s type is now a string—it’s the component class directly.
Component Classes as Types
When rendering HTML or SVG elements, we use strings. When creating elements with components, we use the component class directly. This is why IngredientsList is not surrounded in quotation marks; we are passing the class to createElement because it is a component. React will create an instance of our component with this class and manage it for us.
Using the IngredientsList component with this data would render the following unordered list to the DOM:
<uldata-react-rootclass="ingredients"><li>1 lb Salmon</li><li>1 cup Pine Nuts</li><li>2 cups Butter Lettuce</li><li>1 Yellow Squash</li><li>1/2 cup Olive Oil</li><li>3 cloves of Garlic</li></ul>
ES6 Classes
As discussed in Chapter 2, one of the key features included in the ES6 spec are classes. React.Component is an abstract class that we can use to build new React components. We can create custom components through inheritance by extending this class with ES6 syntax. We can create IngredientsList using the same syntax (Example 4-14).
Example 4-14. IngredientsList as an ES6 class
classIngredientsListextendsReact.Component{renderListItem(ingredient,i){returnReact.createElement("li",{key:i},ingredient)}render(){returnReact.createElement("ul",{className:"ingredients"},this.props.items.map(this.renderListItem))}}
Stateless Functional Components
Stateless functional components are functions, not objects; therefore, they do not have a “this” scope. Because they are simple, pure functions, we’ll use them as much as possible in our applications. There may come a point where the stateless functional component isn’t robust enough and we must fall back to using class or createClass, but in general the more you can use these, the better.
Stateless functional components are functions that take in properties and return a DOM element. Stateless functional components are a good way to practice the rules of functional programming. You should strive to make each stateless functional component a pure function. They should take in props and return a DOM element without causing side effects. This encourages simplicity and makes the codebase extremely testable.
Stateless functional components will keep your application architecture simple, and the React team promises some performance gains by using them. If you need to encapsulate functionality or have a this scope, however, you can’t use them.
In Example 4-15, we combine the functionality of renderListItem and render into a single function.
Example 4-15. Creating a stateless functional component
constIngredientsList=props=>React.createElement("ul",{className:"ingredients"},props.items.map((ingredient,i)=>React.createElement("li",{key:i},ingredient)))
We would render this component with ReactDOM.render, the exact same way we render components created with createClass or ES6 class syntax. This is just a function. The function collects data through the props arguments and returns an unordered list for each item that is sent to the props data.
One way we can improve this stateless functional component is through destructuring the properties argument (Example 4-16). Using ES6 destructuring syntax, we can scope the list property directly to this function, reducing the repetitive dot syntax. Now we’d use the IngredientsList the same way we render component classes.
Example 4-16. Destructuring the properties argument
constIngredientsList=({items})=>React.createElement("ul",{className:"ingredients"},items.map((ingredient,i)=>React.createElement("li",{key:i},ingredient)))
const with Stateless Functional Components
Each of these stateless functional components uses const instead of var when creating a component. This is a common practice but not a requirement. const declares this function as a constant and prevents us from redefining that variable later.
Aside from being slightly cleaner syntax, Facebook has hinted that in the future, stateless functional components might be faster than createClass or ES6 class syntax.
DOM Rendering
Since we are able to pass data to our components as props, we can separate our application’s data from the logic that is used to create the UI. This gives us an isolated set of data that is much easier to work with and manipulate than the document object model. When we change any of the values in this isolated dataset, we change the state of our application.
Imagine storing all of the data in your application in a single JavaScript object. Every time you made a change to this object, you could send it to a component as props and rerender the UI. This means that ReactDOM.render is going to be doing a lot of heavy lifting.
In order for React to work in a reasonable amount of time, ReactDOM.render has to work smart, and it does. Instead of emptying and reconstructing the entire DOM, ReactDOM.render leaves the current DOM in place and only applies the minimal amount of changes required to mutate the DOM.
Let’s say we had an app that displayed the mood of our five team members using either a smiley face or a frowny face. We can represent the mood of all five individuals in a single JavaScript array:
["smile","smile","frown","smile","frown"];
This array of data may be used to construct a UI that looks something like this:

If something breaks and the team has to work all weekend, we can reflect the team’s new mood simply by changing the data in this array, producing the result shown in the image that follows:
["frown","frown","frown","frown","frown"];

How many changes do we have to make to the first array to make it look like the second array of all frowns?
["smile","smile","frown","smile","frown"];["frown","frown","frown","frown","frown"];
We would need to change the first, second, and fourth values from a smile to a frown.
Therefore, we can say that it would take three mutations to change the first array of data to match the second.
Now consider how we can update the DOM to reflect these changes. One inefficient solution to applying these changes to the UI is to erase the entire DOM and rebuild it, as in Example 4-17.
Example 4-17. Start with the current list
<ul><liclass="smile">smile</li><liclass="smile">smile</li><liclass="frown">frown</li><liclass="smile">smile</li><liclass="frown">frown</li></ul>
This involves the following steps:
-
Empty the current data:
<ul></ul> -
Begin looping through data and build the first list item:
<ul><liclass="frown">frown</li></ul> -
Build and add the second list item:
<ul><liclass="frown">frown</li><liclass="frown">frown</li></ul> -
Build and append the third list item:
<ul><liclass="frown">frown</li><liclass="frown">frown</li><liclass="frown">frown</li></ul> -
Build and append the fourth list item:
<ul><liclass="frown">frown</li><liclass="frown">frown</li><liclass="frown">frown</li><liclass="frown">frown</li></ul> -
Build and append the fifth list item:
<ul><liclass="frown">frown</li><liclass="frown">frown</li><liclass="frown">frown</li><liclass="frown">frown</li><liclass="frown">frown</li></ul>
If we change the UI by erasing and rebuilding the DOM, we are creating and inserting five new DOM elements. Inserting an element into the DOM is one of the most costly DOM API operations—it’s slow. In contrast, updating DOM elements that are already in place performs much more quickly than inserting new ones.
ReactDOM.render makes changes by leaving the current DOM in place and simply updating the DOM elements that need to be updated. In our example, there are only three mutations, so ReactDOM.render only needs to update three DOM elements (see Figure 4-5).
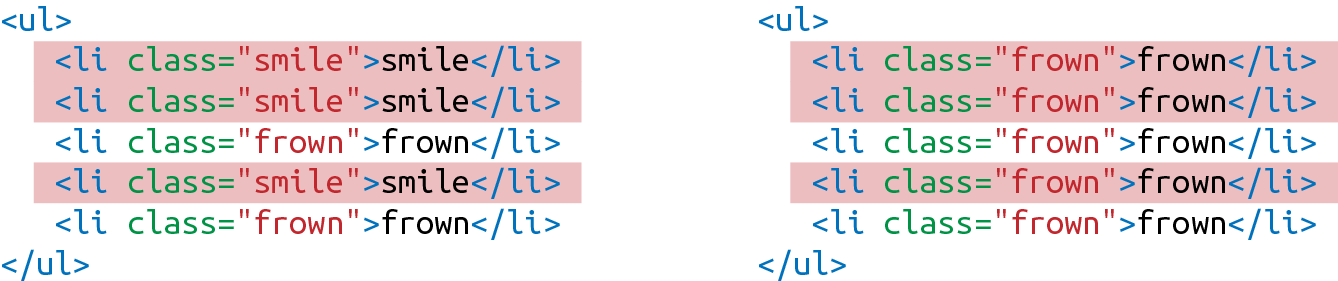
Figure 4-5. Three DOM elements are updated
If new DOM elements need to be inserted, ReactDOM will insert them, but it tries to keep DOM insertions (the most costly operation) to a minimum.
This smart DOM rendering is necessary for React to work in a reasonable amount of time because our application state changes a lot. Every time we change that state, we are going to rely on ReactDOM.render to efficiently rerender the UI.
Factories
So far, the only way we have created elements has been with React.createElement. Another way to create a React element is to use factories. A factory is a special object that can be used to abstract away the details of instantiating objects. In React, we use factories to help us create React element instances.
React has built-in factories for all commonly supported HTML and SVG DOM elements, and you can use the React.createFactory function to build your own factories around specific components.
For example, consider our h1 element from earlier in this chapter:
<h1>BakedSalmon</h1>
Instead of using createElement, we can create a React element with a built-in factory (Example 4-18).
Example 4-18. Using createFactory to create an h1
React.DOM.h1(null,"Baked Salmon")
In this case, the first argument is for the properties and the second argument is for the children. We can also use DOM factories to build an unordered list, as in Example 4-19.
Example 4-19. Building an unordered list with DOM factories
React.DOM.ul({"className":"ingredients"},React.DOM.li(null,"1 lb Salmon"),React.DOM.li(null,"1 cup Pine Nuts"),React.DOM.li(null,"2 cups Butter Lettuce"),React.DOM.li(null,"1 Yellow Squash"),React.DOM.li(null,"1/2 cup Olive Oil"),React.DOM.li(null,"3 cloves of Garlic"))
In this case, the first argument is for the properties, where we define the className. Additional arguments are elements that will be added to the children array of the unordered list. We can also separate out the ingredient data and improve the preceding definition using factories (Example 4-20).
Example 4-20. Using map with factories
varitems=["1 lb Salmon","1 cup Pine Nuts","2 cups Butter Lettuce","1 Yellow Squash","1/2 cup Olive Oil","3 cloves of Garlic"]varlist=React.DOM.ul({className:"ingredients"},items.map((ingredient,key)=>React.DOM.li({key},ingredient)))ReactDOM.render(list,document.getElementById('react-container'))
Using Factories with Components
If you would like to simplify your code by calling components as functions, you need to explicitly create a factory (Example 4-21).
Example 4-21. Creating a factory with IngredientsList
const{render}=ReactDOM;constIngredientsList=({list})=>React.createElement('ul',null,list.map((ingredient,i)=>React.createElement('li',{key:i},ingredient)))constIngredients=React.createFactory(IngredientsList)constlist=["1 lb Salmon","1 cup Pine Nuts","2 cups Butter Lettuce","1 Yellow Squash","1/2 cup Olive Oil","3 cloves of Garlic"]render(Ingredients({list}),document.getElementById('react-container'))
In this example, we can quickly render a React element with the Ingredients factory. Ingredients is a function that takes in properties and children as arguments just like the DOM factories.
If you are not working with JSX, you may find using factories preferable to numerous React.createElement calls. However, the easiest and most common way to define React elements is with JSX tags. If you use JSX with React, chances are you will never use a factory.
Throughout this chapter, we’ve used createElement and createFactory to build React components. In Chapter 5, we’ll take a look at how to simplify component creation by using JSX.
1 Ben Alpert, “React v0.14”, React blog, October 7, 2015.
2 Lindsey Simon, “Minimizing Browser Reflow”.
3 Steven Luscher, “Building User Interfaces with Facebook’s React”, Super VanJS 2013.
4 Mark Wilton-Jones, “Efficient JavaScript”, Dev.Opera, November 2, 2006.
5 React Docs, “Refs and the DOM”.
Get Learning React now with the O’Reilly learning platform.
O’Reilly members experience books, live events, courses curated by job role, and more from O’Reilly and nearly 200 top publishers.

