Chapter 4. Application Configuration
Due to the trend of system architectures increasingly moving to cloud infrastructure, modern applications need the ability to incorporate configurations from one or many sources to accommodate the cloud’s ephemeral nature. Ratpack provides a modern, easy-to-use system and semantic API for consuming and working with configuration details. Application and server configuration can be derived from files within the project, inside a library, or from the filesystem, system properties, and environment variables. In every respect, Ratpack empowers developers to follow the principles outlined by the Twelve Factor App. Regardless of your deployment infrastructure, Ratpack’s configuration system is ready and able to support your application’s needs.
The configuration system allows you to take configuration from one or many sources and map it to typed model objects. Those model objects are then able to be used throughout your application. The use of the serverConfig method on the application definition provides the means for specifying the sources to your configuration. Consider a Groovy application that derives its database connection information from configuration. Example 4-1 outlines an application with a DatabaseConfig class that holds the properties necessary for specifying the connection details.
Example 4-1. Application with DatabaseConfig
importstaticratpack.groovy.Groovy.ratpackimportstaticgroovy.json.JsonOutput.toJsonclassDatabaseConfig{Stringhost="localhost"Stringuser="root"StringpasswordStringdb="myDB"}ratpack{serverConfig{json"dbconfig.json"require("/database",DatabaseConfig)}handlers{get("config"){DatabaseConfigconfig->rendertoJson(config)}}}

The
DatabaseConfigclass properties are set with reasonable defaults. These will be overridden with explicitly defined values during the configuration mapping.
Here, we introduce the use of the
serverConfigblock, wherein we can specify sources of configuration and map the configuration onto our configuration model.
The semantic API in the
serverConfigblock gives us appropriately named methods for consuming configuration in different formats (in this case, JSON).
After we specify the source of the configuration, we use the
requiremethod to map the/databaseconfiguration path to our model object. After being hydrated by the configuration system, theDatabaseConfigclass will become usable throughout our application.
To demonstrate configuration, we provide a
getendpoint on/configthat gets a hold of the mappedDatabaseConfigobject, and we render it back to the caller.
Remembering the simplest project structure for a Ratpack Groovy application, if we place this example into the src/ratpack/Ratpack.groovy file, run the project, and access the /config endpoint (Figure 4-1), we will find that we are met with a block of JSON that corresponds perfectly to the default properties on the DatabaseConfig class.
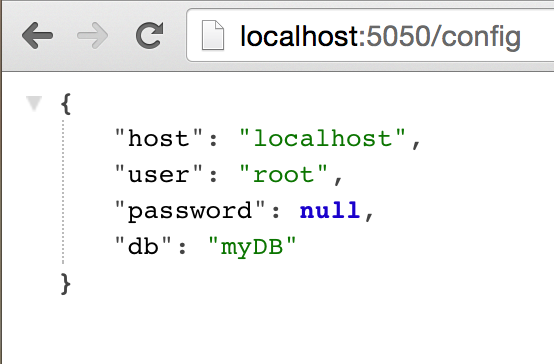
Figure 4-1. DatabaseConfig JSON output
Next, let’s take a look at adding the dbconfig.json file into the project. Consider the project structure shown in Example 4-2.
Example 4-2. Project structure
.
├── build.gradle
└── src
    └── ratpack
        ├── dbconfig.json
        └── Ratpack.groovy
Because our application specifies that we want to map the /database configuration path to our model, we must ensure that the directives in the dbconfig.json file are specified under that structure. The text shown in Example 4-3 shows the form of this file.
Example 4-3. The dbconfig.json file
{"database":{"host":"mysql001.dev.company.com","user":"ratpack","password":"l3arn!ngR@tpack"}}
Note here that we are structuring the properties that will be mapped onto the
DatabaseConfigclass under thedatabasekey, as the application is expecting.
Reloading configuration takes place during the server initialization, so you will want to restart the process to get the configuration from dbconfig.json properly initialized. Once the application is restarted, if we again load the /config endpoint (Figure 4-2), we will now see that the DatabaseConfig model is properly hydrated.
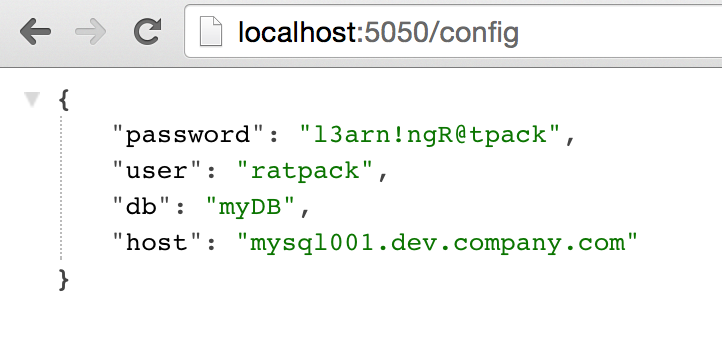
Figure 4-2. Configured DatabaseConfig JSON
At this point, it is important to note that Ratpack takes a highly cautious approach to loading files. When you specify a string referencing a file to the configuration system, it resolves that file relative to the project’s base directory. In this case, the base directory is defined as the src/ratpack root (where the Ratpack.groovy script is homed). Even if we were to change the string path to /etc/dbconfig.json, it would attempt to resolve that file from src/ratpack/etc/dbconfig.json. This is done as a means of protection and security to remove the possibility of files being unsafely or erroneously loaded from outside the project.
When you are building an application for deployment, however, it may be your intention to load files from the filesystem, so in that case you must explicitly specify that you wish to do so. This is accomplished by specifying a java.nio.file.Path reference instead of a string. We can reimagine our example, this time loading the dbconfig.json file from the /etc directory instead, as shown in Example 4-4.
Example 4-4. Loading dbconfig.json from outside the project
importstaticratpack.groovy.Groovy.ratpackimportstaticgroovy.json.JsonOutput.toJsonimportjava.nio.file.PathsclassDatabaseConfig{Stringhost="localhost"Stringuser="root"StringpasswordStringdb="myDB"}ratpack{serverConfig{jsonPaths.get("/etc/dbconfig.json")require("/database",DatabaseConfig)}handlers{get("config"){DatabaseConfigconfig->rendertoJson(config)}}}
Here, we use the
Pathshelper class to reference our configuration file from the filesystem path /etc/dbconfig.json.
We are not restricted to loading configuration from within the project or off the filesystem. As noted in the introductory section, we can also load configuration files from libraries or other classpath dependencies. To load configuration from the classpath, we must provide a java.net.URL reference to the file we wish to load. For this, we can make use of the Class#getResource method to get a handle on our config. To illustrate this, if we were to say that our dbconfig.json file comes from the /config folder of a JAR file that is on the project’s classpath, we can load it as shown in Example 4-5.
Example 4-5. Loading dbconfig.json from classpath
importstaticratpack.groovy.Groovy.ratpackimportstaticgroovy.json.JsonOutput.toJsonclassDatabaseConfig{Stringhost="localhost"Stringuser="root"StringpasswordStringdb="myDB"}ratpack{serverConfig{jsonClass.getResource("/config/dbconfig.json")require("/database",DatabaseConfig)}handlers{get("config"){DatabaseConfigconfig->rendertoJson(config)}}}
We are now calling the
Class#getResourcemethod. Note that we can shorten this togetResource, as Groovy scripts implicitly provide us with the static methods onClass.
Ratpack’s configuration system also acts with the ability to overlay configurations, where later references win the mapping. We may have the requirement to load the dbconfig.json file from our project, then from the classpath, and finally from the filesystem. In doing so, we can allow more specific configurations to take precedence, which would thereby accommodate different deployment environments. It is intuitive to follow the calls that perform the loading of these configuration files, as shown in Example 4-6.
Example 4-6. Overlaying dbconfig.json configurations
importstaticratpack.groovy.Groovy.ratpackimportstaticgroovy.json.JsonOutput.toJsonimportjava.nio.file.PathsclassDatabaseConfig{Stringhost="localhost"Stringuser="root"StringpasswordStringdb="myDB"}ratpack{serverConfig{json"dbconfig.json"jsonClass.getResource("/config/dbconfig.json")jsonPaths.get("/etc/dbconfig.json")require("/database",DatabaseConfig)}handlers{get("config"){DatabaseConfigconfig->rendertoJson(config)}}}
We start by loading the dbconfig.json from our project, which lives in the src/ratpack directory.
Then we can overlay the classpath configuration.
And finally, we incorporate configuration that comes from the /etc/dbconfig.json file.
Inspecting what each of the respective dbconfig.json files look like will help paint the picture of how overlaying works. We start with the dbconfig.json file we worked with earlier in Example 4-3 and overlay the /config/dbconfig.json from the classpath; this file may have contents like those shown in Example 4-7.
Example 4-7. Classpath dbconfig.json contents
{"database":{"user":"app-user"}}
The only value the classpath’s dbconfig.json file provides is the
userproperty.
The user property from the classpath takes precedence over the same value from our project’s dbconfig.json file. At this point, the configuration model looks like the JSON depicted in Example 4-8.
Example 4-8. Project and classpath merged dbconfig.json
{"database":{"host":"mysql001.dev.company.com","user":"app-user","password":"l3arn!ngR@tpack"}}
Here,
app-useris favored over the previous value ofratpack.
Next, we bring in the /etc/dbconfig.json from the filesystem. Let’s consider that its contents look like those in Example 4-9.
Example 4-9. Filesystem dbconfig.json
{"database":{"host":"ratpack-mysql-0441.prod.internal","password":"kcapt@Rgn!nra3l"}}
The filesystem dbconfig.json overrides the database hostname.
It also specifies a new password for the database user.
Now the three dbconfig.json configurations have been merged, and we end with the configuration representation that is depicted in Example 4-10.
Example 4-10. Fully merged dbconfig.json
{"database":{"host":"ratpack-mysql-0441.prod.internal","user":"app-user","password":"kcapt@Rgn!nra3l"}}
The
hostvalue was last specified in the /etc/dbconfig.json file, so it wins in the final representation.The
uservalue was captured from the classpath’s /config/dbconfig.json, so it is favored here.passwordalso came in from the filesystem, though if it had not been specified, thepasswordfield from our project’s dbconfig.json would be shown here.
Ratpack’s ability to overlay configuration sources means that your application can support a robust runtime environment, where configuration directives are able to be specified at different layers of responsibility, and merged into a cohesive representation.
Configuration files in JSON format are not the only possibility. There are matching methods on serverConfig for working with YAML and Java properties files. Furthermore, these different file types can be used together when building the final configuration representation. If the application’s requirement was to begin by loading the dbconfig.json file from within the project, followed by loading a dbconfig.yml file from the /etc directory of the filesystem, we could realize an application structure like the one shown in Example 4-11.
Example 4-11. Mixing JSON and YAML configuration files
importstaticratpack.groovy.Groovy.ratpackimportstaticgroovy.json.JsonOutput.toJsonimportjava.nio.file.PathsclassDatabaseConfig{Stringhost="localhost"Stringuser="root"StringpasswordStringdb="myDB"}ratpack{serverConfig{json"dbconfig.json"yamlPaths.get("/etc/dbconfig.yml")require("/database",DatabaseConfig)}handlers{get("config"){DatabaseConfigconfig->rendertoJson(config)}}}
Here, we load the dbconfig.json file from our project.
Now we use the
yamlmethod to load the /etc/dbconfig.yml file.
If the /etc/dbconfig.yml file has contents like those depicted in Example 4-12, then we can begin to realize how the merged configuration will be represented.
Example 4-12. The dbconfig.yml file
database:host:ratpack-mysql-0441.prod.internal
Because the /etc/dbconfig.yml file was loaded last, its properties get the highest order of precendence, meaning that the fully merged configuration will look like the JSON structure shown in Example 4-13.
Example 4-13. Merged config with JSON and YAML
{"database":{"host":"ratpack-mysql-0441.prod.internal","user":"ratpack","password":"l3arn!ngR@tpack"}}
As you can see, the
hostis favored from the YAML file, while all other properties are inherited from the project’s dbconfig.yml.
Java properties files are equally as easy to incorporate with the configuration system. If we expand the example (Example 4-14), we might say that now our requirements are that dbconfig.json is first loaded from the project, next a /config/dbconfig.properties file is loaded from the classpath, and finally /etc/dbconfig.yml is loaded from the filesystem. When loading Java properties files, we make use of the props method in the serverConfig block.
Example 4-14. Overlaying JSON, properties, and YAML files
importstaticratpack.groovy.Groovy.ratpackimportstaticgroovy.json.JsonOutput.toJsonimportjava.nio.file.PathsclassDatabaseConfig{Stringhost="localhost"Stringuser="root"StringpasswordStringdb="myDB"}ratpack{serverConfig{json"dbconfig.json"propsClass.getResource("/config/dbconfig.properties")yamlPaths.get("/etc/dbconfig.yml")require("/database",DatabaseConfig)}handlers{get("config"){DatabaseConfigconfig->rendertoJson(config)}}}
Again, the project’s dbconfig.json file is loaded.
Next, the /config/dbconfig.properties file is loaded from the classpath.
And finally, the /etc/dbconfig.yml file is loaded from the filesystem.
The classpath resource file /config/dbconfig.properties may specify contents like those shown in Example 4-15.
Example 4-15. The dbconfig.properties file
database.user=app-user
Here, we specify the configuration path,
/database, using dot-notation, and we override theuservalue for the configuration.
Given this additional configuration source, the final configuration will look like the one shown in Example 4-16.
Example 4-16. Fully merged configuration from JSON, properties, and YAML files
{"database":{"host":"ratpack-mysql-0441.prod.internal","user":"app-user","password":"l3arn!ngR@tpack"}}
The
hostvalue is brought in from the /etc/dbconfig.yml file.useris specified in the /config/dbconfig.properties classpath file.And the
passwordvalue comes from our project’s dbconfig.json.
Configuring with Environment Variables and System Properties
Modern Java web applications—especially those designed to run on cloud infrastructure—need the ability to derive configuration from the system environment, in the form of environment variables and Java system properties. In support of that effort, Ratpack provides conventions by which directives can be specified by those sources, and incorporated into your application. If we revisit the example application, we can see how easy it is to allow these sources to participate in the configuration system. The code in Example 4-17 shows the use of the env and sysProps methods in the serverConfig block.
Example 4-17. Environment variables and system properties configuration
importstaticratpack.groovy.Groovy.ratpackimportstaticgroovy.json.JsonOutput.toJsonclassDatabaseConfig{Stringhost="localhost"Stringuser="root"StringpasswordStringdb="myDB"}ratpack{serverConfig{json"dbconfig.json"env()sysProps()require("/database",DatabaseConfig)}handlers{get("config"){DatabaseConfigconfig->rendertoJson(config)}}}
This method call is all that is necessary to include configuration from environment variables.
It is similarly easy to include configuration from system properties.
When including configuration from these sources, it is important that you follow the key naming conventions when defining directives. By default, environment variables that are prefixed with RATPACK_ will be captured as eligible configurations. Likewise, when specifying Java system properties, the property needs to be prefixed with ratpack. to be included. Prefixes to both of these methods can be overridden according to your application’s requirements by supplying the prefix string to the respective methods.
Configuring with Environment Variables
To better illustrate defining configuration with environment variables, consider a scenario where we want to specify the host property of the DatabaseConfig in the form of an environment variable. On our system, the RATPACK_DATABASE__HOST environmental variable must be exported prior to running the application. The console output in Example 4-18 shows how we go about doing this.
Example 4-18. Setting environment variables for the project
$ export RATPACK_DATABASE__HOST=ratpack-mysql001.prod.internal$ ./gradlew run:compileJava UP-TO-DATE :compileGroovy UP-TO-DATE :processResources UP-TO-DATE :classes UP-TO-DATE :configureRun :run SLF4J: Failed to load class "org.slf4j.impl.StaticLoggerBinder". SLF4J: Defaulting to no-operation (NOP) logger implementation SLF4J: See http://www.slf4j.org/codes.html#StaticLoggerBinder for further details. WARNING: No slf4j logging binding found for Ratpack, there will be no logging output. WARNING: Please add an slf4j binding, such as slf4j-log4j2, to the classpath. WARNING: More info may be found here: http://ratpack.io/manual/current/logging.html Ratpack started (development) for http://localhost:5050 > Building 83% > :run
Here, we issue the
exportcommand with our environment variable.Next, we run the project, and the variable will be available to our application’s process.
If we again access our /config handler from a browser (Figure 4-3), we will now see that the database host specified by our environment variable is favored over the one specified in our project’s dbconfig.json file.
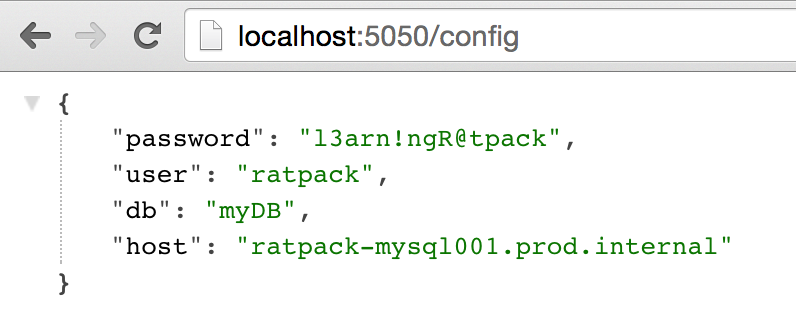
Figure 4-3. Configuration JSON with environment config
Note
An important caveat with environment variable configuration is that depth must be denoted by a double underscore. Note in the environment variable’s key, RATPACK_DATABASE__HOST, between the DATABASE and HOST parts, there are two underscores, which translates to the equivalent property reference of database.host.
Most modern cloud platforms provide references to databases and even passwords in the form of system environment variables. Furthermore, with the rising use of containerized runtimes, like those built with Docker, injecting configuration through environment variables is quickly becoming the preferred mechanism for deployments. It is a good idea to start building your application with the mindset that at some point you will need the ability to pull configuration from environment variables. Even if you do not immediately need it, it is inconsequential to application startup performance to simply add the env() method to your serverConfig block.
Configuration with System Properties
Before we demonstrate using Java system properties, we must first make a small change to our project’s build.gradle file. Gradle does not implicitly pass system properties on to the run task, so we must tell it that we want those properties passed on to our application. We can make this change by configuring the run task in our build script, as shown in Example 4-19.
Example 4-19. Configuring Gradle run task
buildscript{repositories{jcenter()}dependencies{classpath'io.ratpack:ratpack-gradle:1.3.3'}}applyplugin:'io.ratpack.ratpack-groovy'repositories{jcenter()}run{systemPropertiesSystem.getProperties()}
Within the closure that configured the
runtask, we simply pass all of the system properties from the Gradle process on to our application.
Let’s again demonstrate overriding the database host field, this time with system properties. The console output in Example 4-20 shows the passing of the ratpack.database.host value on to the run task, and thus our application.
Example 4-20. Setting system property configuration
$ ./gradlew -Dratpack.database.host=mysql004.dev.company.com run:compileJava UP-TO-DATE :compileGroovy UP-TO-DATE :processResources :classes :configureRun :run SLF4J: Failed to load class "org.slf4j.impl.StaticLoggerBinder". SLF4J: Defaulting to no-operation (NOP) logger implementation SLF4J: See http://www.slf4j.org/codes.html#StaticLoggerBinder for further details. WARNING: No slf4j logging binding found for Ratpack, there will be no logging output. WARNING: Please add an slf4j binding, such as slf4j-log4j2, to the classpath. Ratpack started (development) for http://localhost:5050 WARNING: More info may be found here: http://ratpack.io/manual/current/logging.html > Building 83% > :run
Here, we use the
-Dratpack.database.host=mysql004.dev.company.comargument to set the database host value.
Again accessing our application’s /config endpoint (Figure 4-4) will now show the database host from the system property.

Figure 4-4. Configuration JSON from system properties
Like environment variables, system properties can act as a way to configure your application according to the system environment. To that end, it is also advisable to start out building your application with the intent to support configuration from system properties.
Nested Configuration Models
It may be desirable for your application’s configuration model to be a complex structure with nested object types. If you consider the application depicted in Example 4-21, you can see that the ApplicationConfig class holds properties for the DatabaseConfig type that we used earlier, and now also has a LandingPageConfig type as well.
Example 4-21. Mapping configuration to nested models
importstaticratpack.groovy.Groovy.ratpackimportstaticgroovy.json.JsonOutput.toJsonclassDatabaseConfig{Stringhost="localhost"Stringuser="root"StringpasswordStringdb="myDB"}classLandingPageConfig{StringwelcomeMessage="Welcome to Ratpack!"StringanalyticsKey="ua-12345678"}classApplicationConfig{DatabaseConfigdatabase=newDatabaseConfig()LandingPageConfiglanding=newLandingPageConfig()}ratpack{serverConfig{json"dbconfig.json"env()sysProps()require("",ApplicationConfig)}handlers{get("config"){ApplicationConfigconfig->rendertoJson(config)}}}
Here, we specify the
ApplicationConfigclass withdatabaseandlandingfields that correspond to theDatabaseConfigandLandingPageConfigclasses, respectively.Because we want to map all configuration onto the top-level
ApplicationConfigclass, we specify an empty string as the configuration path here.
Without making any changes to our project’s dbconfig.json file from earlier, if we start this application, we will find that the file’s configuration is properly mapped to the DatabaseConfig within the ApplicationConfig (see Figure 4-5).
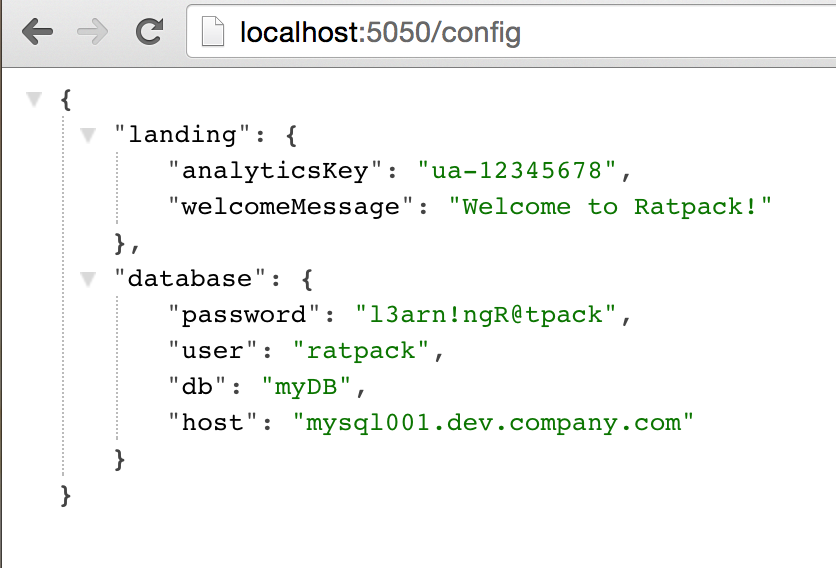
Figure 4-5. ApplicationConfig JSON output
If we add a new configuration file to our project for the LandingPageConfig, then we can demonstrate instituting configuration for it as well. The YAML configuration shown in Example 4-22 shows explicit configuration for the LandingPageConfig properties.
Example 4-22. The landingpage.yml file
landing:analyticsKey:"ua-abcdefgh"
We place this file into our src/ratpack directory and modify our Ratpack.groovy to include this configuration, as shown in Example 4-23.
Example 4-23. Application with landingpage.yml config included
importstaticratpack.groovy.Groovy.ratpackimportstaticgroovy.json.JsonOutput.toJsonclassDatabaseConfig{Stringhost="localhost"Stringuser="root"StringpasswordStringdb="myDB"}classLandingPageConfig{StringwelcomeMessage="Welcome to Ratpack!"StringanalyticsKey="ua-12345678"}classApplicationConfig{DatabaseConfigdatabaseLandingPageConfiglanding}ratpack{serverConfig{json"dbconfig.json"yaml"landingpage.yml"env()sysProps()require("",ApplicationConfig)}handlers{get("config"){ApplicationConfigconfig->rendertoJson(config)}}}
We incorporate the landingpage.yml configuration, which has the configured value for the
analyticsKeyproperty.
If we run this application, we see that the configuration (Figure 4-6) from landingpage.yml was indeed properly mapped onto our configuration.
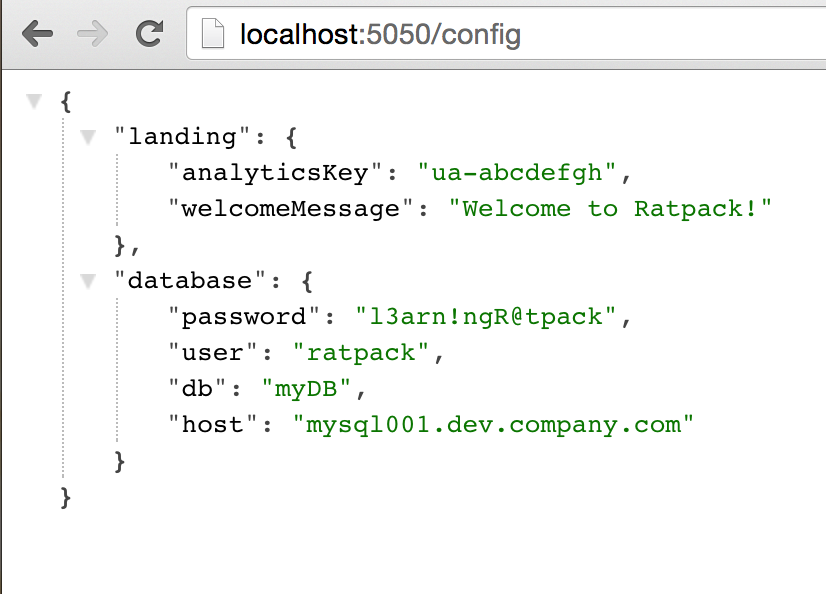
Figure 4-6. ApplicationConfig JSON output
An important thing to make note of at this point is that within both the dbconfig.json and landingpage.yml files, the configuration directives were placed within the objects database and landing, respectively. The names of these values matter, as they correspond to the field names of the corresponding model on the ApplicationConfig class. That is to say that if within the landingpage.yml file we changed the landing key to something different, the configuration system would not know how to map that onto the ApplicationConfig model.
Nesting configuration models does not stop at just a single depth. Configuration models of varying complexity and nested object depth can be described in declarative configurations and mapped to the corresponding object structure in your application.
Custom Configuration Source
Ratpack’s configuration system is designed to be completely extensible. While most use cases are satisfied with its helper methods for loading JSON, YAML, Java properties, environment variables, and Java system properties, there still may be a time when your application needs to load its configuration from a nonstandard source. For example, your project’s requirements may dictate that a centralized configuration server needs to be used to hydrate the application configuration. Or, you may just want your application to have more granular control over how configuration is loaded into the system.
To facilitate custom configuration sources, Ratpack provides the ratpack.config.ConfigSource interface, which you can apply to the configuration system via the add method on the serverConfig block. Let’s demonstrate this with an adaptation to the prior examples that introduces a CustomConfigSource that is responsible for explicitly setting the host and analyticsKey properties on the DatabaseConfig and LandingPageConfig classes. Consider the code shown in Example 4-24 to get an understanding of how we accomplish this.
Example 4-24. Customizing configuration mapping
packageappimportcom.fasterxml.jackson.databind.ObjectMapperimportcom.fasterxml.jackson.databind.node.ObjectNodeimportratpack.config.ConfigSourceimportratpack.file.FileSystemBindingclassCustomConfigSourceimplementsConfigSource{@OverrideObjectNodeloadConfigData(ObjectMapperobjectMapper,FileSystemBindingfileSystemBinding)throwsException{ObjectNodenode=objectMapper.createObjectNode()DatabaseConfigdatabaseConfig=newDatabaseConfig(host:"my-database-host.dev.company.com")LandingPageConfiglandingPageConfig=newLandingPageConfig(analyticsKey:"ua-learningratpack")node.set("database",objectMapper.valueToTree(databaseConfig))node.set("landing",objectMapper.valueToTree(landingPageConfig))node}}
Our class must implement the
ratpack.config.ConfigSourceinterface.This interface defines a
loadConfigDatamethod, which provides us a JacksonObjectMapperand theFileSystemBindingthat corresponds to the project’s base directory. Behind the scenes of Ratpack’s configuration system, Jackson is utilized to perform the mapping of configuration data. From theloadConfigDatamethod, we must return a JacksonObjectNode, which holds the property mappings and will be incorporated into the configuration loading process.We use the
ObjectMapperto create theObjectNodethat we will return.Here, we demonstrate constructing the
DatabaseConfigobject and explicitly overriding itshostfield.We do the same here for the
analyticsKeyon theLandingPageConfigobject.
Here we set the
databasevalue on theObjectNodeto a tree of ourDatabaseConfigobject.
We do the same here for the
landingvalue and theLandingPageConfig.
Finally, we return the fully hydrated
ObjectNode.
This example is intentionally contrived for the sake of simplicity and to demonstrate capabilities. Real-world implementations will need to do more intelligent work, but this demonstration should serve as a good foundation of understanding.
We need to modify our Ratpack.groovy class to incorporate the CustomConfigSource into the configuration system. Before we do that, however, let’s take a quick look at the project’s new structure. For the purposes of this demonstration, the configuration classes have been moved out of the Ratpack.groovy file and into the project’s source tree structure. There is also where we will find the CustomConfigSource. The project structure is depicted in Example 4-25.
Example 4-25. Revised project structure for CustomConfigSource
.
├── build.gradle
└── src
    ├── main
    │   └── groovy
    │       └── app
    │           ├── ApplicationConfig.groovy
    │           ├── CustomConfigSource.groovy
    │           ├── DatabaseConfig.groovy
    │           └── LandingPageConfig.groovy
    └── ratpack
        ├── dbconfig.json
        ├── landingpage.yml
        └── Ratpack.groovy
Next, see how the updated Ratpack.groovy script now looks, with the addition of the CustomConfigSource and accounting for the use of the project structure, as shown in Example 4-26.
Example 4-26. Updated Ratpack.groovy file
importstaticratpack.groovy.Groovy.ratpackimportstaticgroovy.json.JsonOutput.toJsonimportapp.*ratpack{serverConfig{json"dbconfig.json"yaml"landingpage.yml"addnewCustomConfigSource()env()sysProps()require("",ApplicationConfig)}handlers{get("config"){ApplicationConfigconfig->rendertoJson(config)}}}
Our configuration models and the
CustomConfigSourcenow live in theapppackage, so we import those resources here.Here, we add the
CustomConfigSourceinto the mix. You will realize from what you know by now that thehostandanalyticsKeyvalues will be favored from those we set in theCustomConfigSource, as it is further down the chain than our JSON and YAML configuration files.
If we run this application and again hit the /config endpoint, we will see that indeed the configuration (see Figure 4-7) specified by the CustomConfigSource is applied to the rendered ApplicationConfig model.
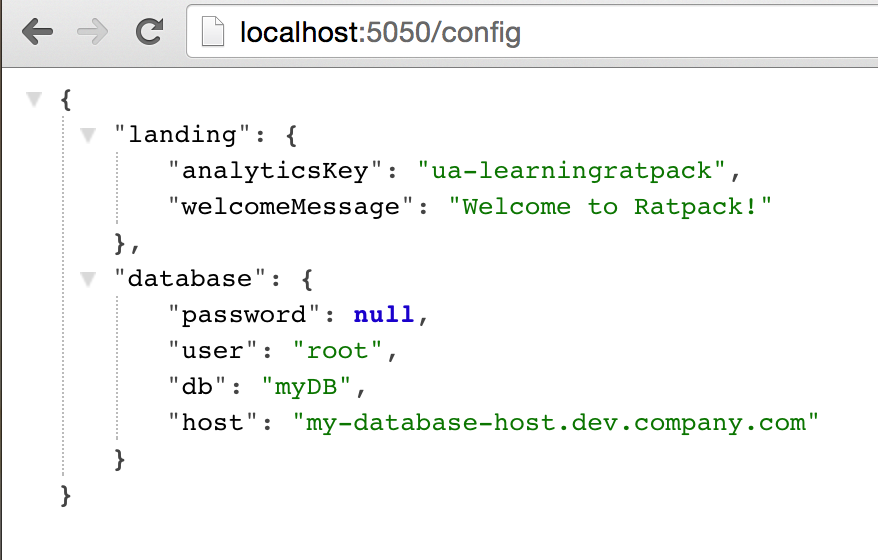
Figure 4-7. ApplicationConfig JSON output
Being able to extend the configuration system for your application’s specific needs serves as another example of how Ratpack helps guide you when needing to do things that are beyond the framework’s core capability.
Setting Server Configuration
Ratpack’s underlying web server has a corresponding configuration model object in the ratpack.server.ServerConfig object. Ratpack will automatically map Java system properties and environment variables over top of the default configurations. To that extent, you can override server-level configuration, like the server’s port, by providing the corresponding runtime values. Table 4-1 shows a description of ServerConfig fields and their corresponding Java system property and environment variable keys to override the default values.
| Field | Description | System Property | Environment Variable |
|---|---|---|---|
port |
The port that the Ratpack server binds to. Default: 5050. Example overrides to port 8080 |
-Dratpack.port=8080 |
RATPACK_PORT=8080 |
development |
Whether Ratpack runs in development mode or not. Default: true. Example overrides to false |
-Dratpack.development=false |
|
RATPACK_DEVELOPMENT=false |
threads |
The number of request-taking threads that Ratpack uses. Default: 2 * number of CPUs available to the Java runtime. Example overrides to a static 4 |
|
-Dratpack.threads=4 |
RATPACK_THREADS=4 |
maxContentLength |
|
The max number of bytes a request body can be. Default: 1048576 (1MB). Example overrides to 2MB |
-Dratpack.maxContentLength=2097152 |
RATPACK_MAX_CONTENT_LENGTH=2097152 |
|
connectTimeoutMillis |
The connection timeout of a request in milliseconds. Default: indefinite. Example overrides to 1 second |
-Dratpack.connectTimeoutMillis=1000 |
RATPACK_CONNECT_TIMEOUT_MILLIS=1000 |
maxMessagesPerRead |
The maximum number of bytes per read, as defined by the SO_RCVBUF a socket options. Default is unlimited. Example overrides to 1KB |
-Dratpack.maxMessagesPerRead=1000 |
|
RATPACK_MAX_MESSAGES_PER_READ=1000 |
writeSpinCount |
The maximum number of loops before a write operation returns zero. Default is writing until all the bytes have been written. Example overrides to 100 |
|
-DwriteSpinCount=100 |
RATPACK_WRITE_SPIN_COUNT=1000 |
requireClientSslAuth |
|
Specifies whether to require HTTP client SSL authorization. An SSLContext must be specified. Default: false. Example overrides to true |
-DrequireClientSslAuth=true |
RATPACK_REQUIRE_CLIENT_SSL_AUTH=true |
|
Many of the configuration values specified by the ServerConfig object can be tuned to improve performance depending on the runtime environment. The most commonly modified properties are the port, development, and threads values. In a cloud-based runtime environment, like Heroku, the application’s server port may need to be mapped according to some value provided by the system environment. In a production environment, it is valuable to set the development property to a false value. The threads server config value can be tuned according to a server’s environment to provide better performance. Some virtualization infrastructures, for example, will advertise more or fewer CPUs than actually exist on the host, so this property can be tuned to align an application more appropriately with the underlying system.
Chapter Summary
This chapter has exposed you to Ratpack’s concise fixtures for working with configuration. From project and library to external and environment configuration sources, all the way through to demonstrating a custom ConfigSource implementation, and tuning framework-level settings, you now have a comprehensive understanding of how Ratpack’s configuration system works and how you can leverage it in your projects.
Get Learning Ratpack now with the O’Reilly learning platform.
O’Reilly members experience books, live events, courses curated by job role, and more from O’Reilly and nearly 200 top publishers.

