Chapter 1. Overview
What Is OpenCV?
OpenCV [OpenCV] is an open source (see http://opensource.org) computer vision library available from http://opencv.org. In 1999 Gary Bradski [Bradski], working at Intel Corporation, launched OpenCV with the hopes of accelerating computer vision and artificial intelligence by providing a solid infrastructure for everyone working in the field. The library is written in C and C++ and runs under Linux, Windows, and Mac OS X. There is active development on interfaces for Python, Java, MATLAB, and other languages, including porting the library to Android and iOS for mobile applications. OpenCV has received much of its support over the years from Intel and Google, but especially from Itseez [Itseez] (recently acquired by Intel), which did the bulk of the early development work. Finally, Arraiy [Arraiy] has joined in to maintain the always open and free OpenCV.org [OpenCV].
OpenCV was designed for computational efficiency and with a strong focus on real-time applications. It is written in optimized C++ and can take advantage of multicore processors. If you desire further automatic optimization on Intel architectures [Intel], you can buy Intel’s Integrated Performance Primitives (IPP) libraries [IPP], which consist of low-level optimized routines in many different algorithmic areas. OpenCV automatically uses the appropriate IPP library at runtime if that library is installed. Starting with OpenCV 3.0, Intel granted the OpenCV team and OpenCV community a free-of-charge subset of IPP (nicknamed IPPICV), which is built into and accelerates OpenCV by default.
One of OpenCV’s goals is to provide a simple-to-use computer vision infrastructure that helps people build fairly sophisticated vision applications quickly. The OpenCV library contains over 500 functions that span many areas in vision, including factory product inspection, medical imaging, security, user interface, camera calibration, stereo vision, and robotics. Because computer vision and machine learning often go hand-in-hand, OpenCV also contains a full, general-purpose Machine Learning library (ML module). This sublibrary is focused on statistical pattern recognition and clustering. The ML module is highly useful for the vision tasks that are at the core of OpenCV’s mission, but it is general enough to be used for any machine learning problem.
Who Uses OpenCV?
Most computer scientists and practical programmers are aware of some facet of computer vision’s role, but few people are aware of all the ways in which computer vision is used. For example, most people are somewhat aware of its use in surveillance, and many also know that it is increasingly being used for images and video on the Web. A few have seen some use of computer vision in game interfaces. Yet fewer people realize that most aerial and street-map images (such as in Google’s Street View) make heavy use of camera calibration and image stitching techniques. Some are aware of niche applications in safety monitoring, unmanned flying vehicles, or biomedical analysis. But few are aware how pervasive machine vision has become in manufacturing: virtually everything that is mass-produced has been automatically inspected at some point using computer vision.
The open source license for OpenCV has been structured such that you can build a commercial product using all or part of OpenCV. You are under no obligation to open-source your product or to return improvements to the public domain, though we hope you will. In part because of these liberal licensing terms, there is a large user community that includes people from major companies (IBM, Microsoft, Intel, SONY, Siemens, and Google, to name only a few) and research centers (such as Stanford, MIT, CMU, Cambridge, and INRIA). There is a Yahoo Groups forum where users can post questions and discussion; it has almost 50,000 members. OpenCV is popular around the world, with large user communities in China, Japan, Russia, Europe, and Israel.
Since its alpha release in January 1999, OpenCV has been used in many applications, products, and research efforts. These applications include stitching images together in satellite and web maps, image scan alignment, medical image noise reduction, object analysis, security and intrusion detection systems, automatic monitoring and safety systems, manufacturing inspection systems, camera calibration, military applications, and unmanned aerial, ground, and underwater vehicles. It has even been used in sound and music recognition, where vision recognition techniques are applied to sound spectrogram images. OpenCV was a key part of the vision system in the robot from Stanford, “Stanley,” which won the $2M DARPA Grand Challenge desert robot race [Thrun06].
What Is Computer Vision?
Computer vision1 is the transformation of data from a still or video camera into either a decision or a new representation. All such transformations are done to achieve some particular goal. The input data may include some contextual information such as “the camera is mounted in a car” or “laser range finder indicates an object is 1 meter away.” The decision might be “there is a person in this scene” or “there are 14 tumor cells on this slide.” A new representation might mean turning a color image into a grayscale image or removing camera motion from an image sequence.
Because we are such visual creatures, it is easy to be fooled into thinking that computer vision tasks are easy. How hard can it be to find, say, a car when you are staring at it in an image? Your initial intuitions can be quite misleading. The human brain divides the vision signal into many channels that stream different kinds of information into your brain. Your brain has an attention system that identifies, in a task-dependent way, important parts of an image to examine while suppressing examination of other areas. There is massive feedback in the visual stream that is, as yet, little understood. There are widespread associative inputs from muscle control sensors and all of the other senses that allow the brain to draw on cross-associations made from years of living in the world. The feedback loops in the brain go back to all stages of processing, including the hardware sensors themselves (the eyes), which mechanically control lighting via the iris and tune the reception on the surface of the retina.
In a machine vision system, however, a computer receives a grid of numbers from the camera or from disk, and that’s it. For the most part, there’s no built-in pattern recognition, no automatic control of focus and aperture, no cross-associations with years of experience. For the most part, vision systems are still fairly naïve. Figure 1-1 shows a picture of an automobile. In that picture we see a side mirror on the driver’s side of the car. What the computer “sees” is just a grid of numbers. Any given number within that grid has a rather large noise component and so by itself gives us little information, but this grid of numbers is all the computer “sees.” Our task, then, becomes to turn this noisy grid of numbers into the perception “side mirror.” Figure 1-2 gives some more insight into why computer vision is so hard.
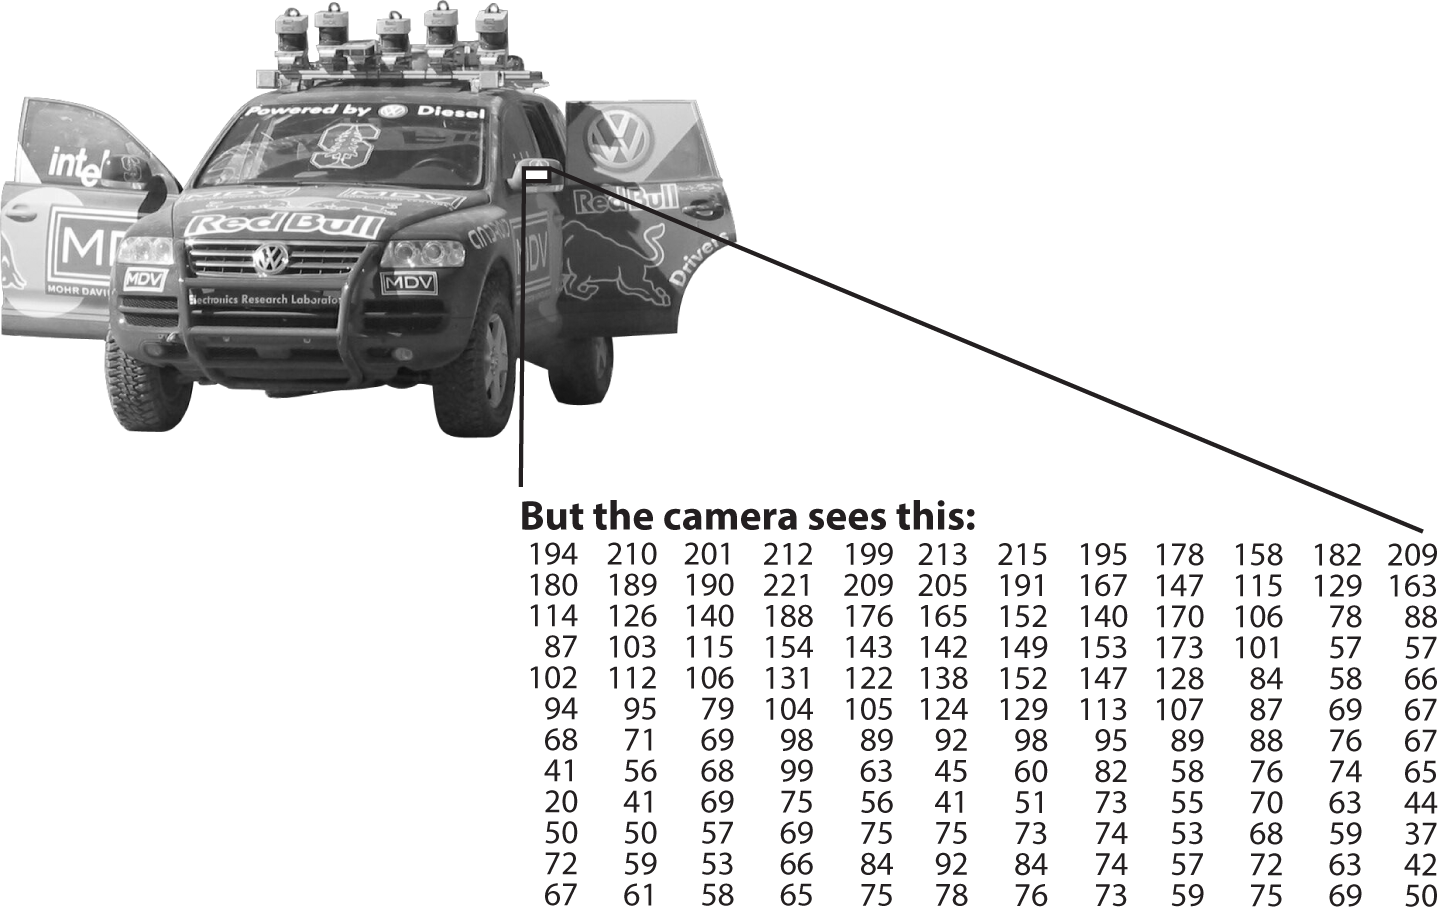
Figure 1-1. To a computer, the car’s side mirror is just a grid of numbers
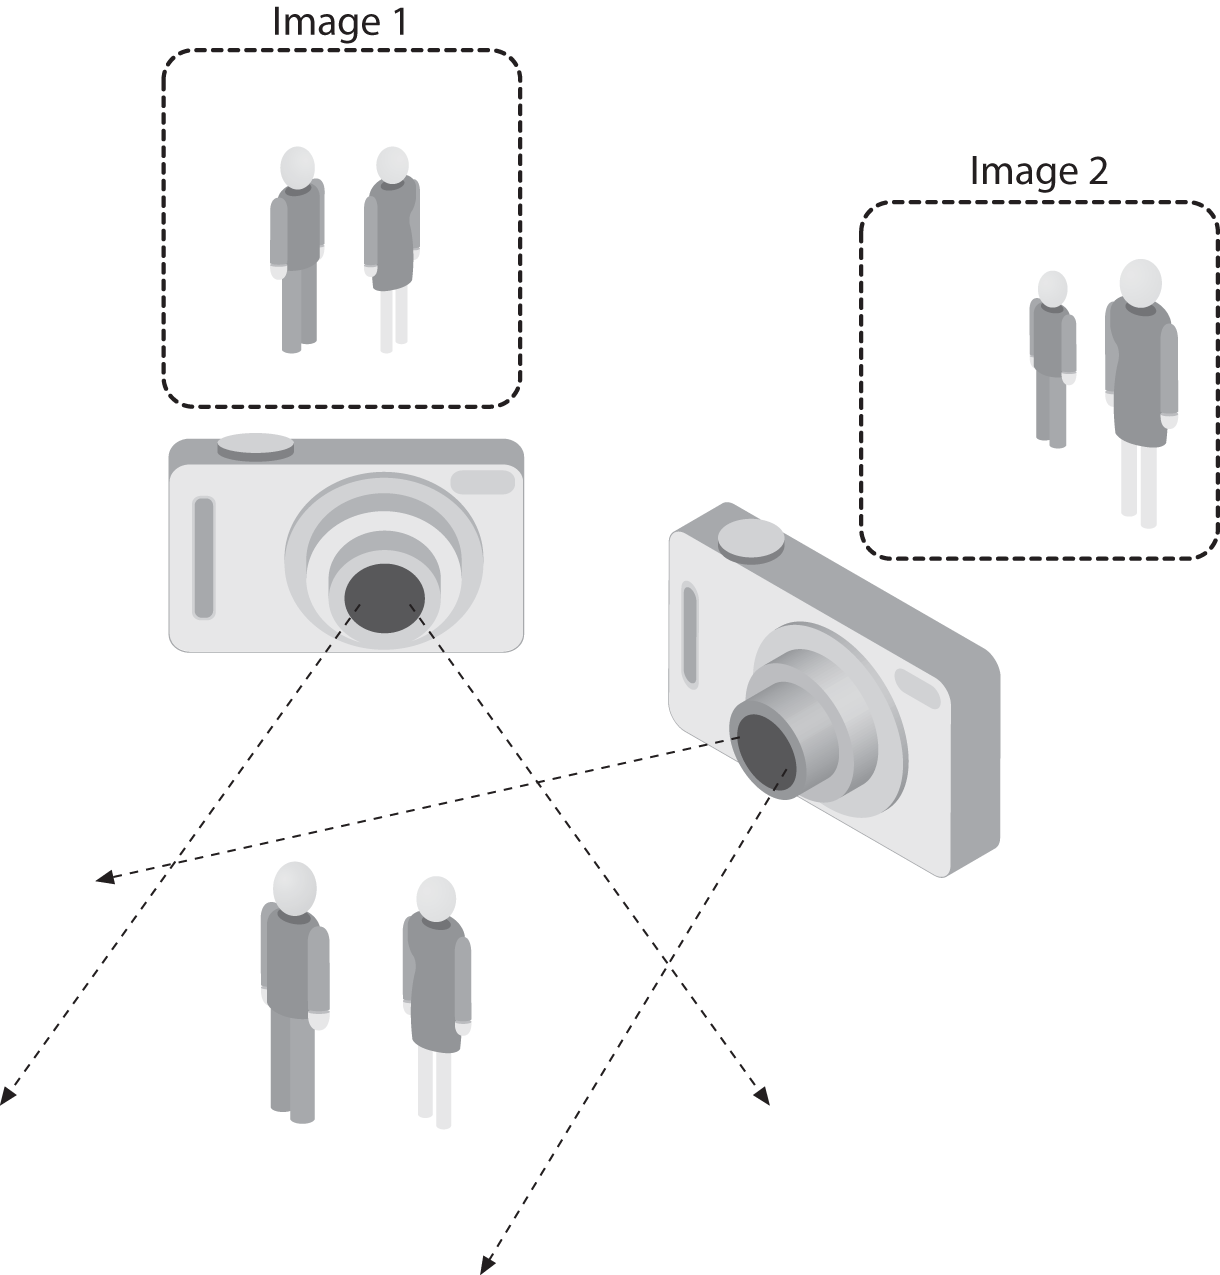
Figure 1-2. The ill-posed nature of vision: the 2D appearance of objects can change radically with viewpoint
In fact, the problem, as we have posed it thus far, is worse than hard: it is formally impossible to solve. Given a two-dimensional (2D) view of a 3D world, there is no unique way to reconstruct the 3D signal. Formally, such an ill-posed problem has no unique or definitive solution. The same 2D image could represent any of an infinite combination of 3D scenes, even if the data were perfect. However, as already mentioned, the data is corrupted by noise and distortions. Such corruption stems from variations in the world (weather, lighting, reflections, movements), imperfections in the lens and mechanical setup, finite integration time on the sensor (motion blur), electrical noise in the sensor or other electronics, and compression artifacts after image capture. Given these daunting challenges, how can we make any progress?
In the design of a practical system, additional contextual knowledge can often be used to work around the limitations imposed on us by visual sensors. Consider the example of a mobile robot that must find and pick up staplers in a building. The robot might use the facts that a desk is an object found inside offices and that staplers are mostly found on desks. This gives an implicit size reference; staplers must be able to fit on desks. It also helps to eliminate falsely “recognizing” staplers in impossible places (e.g., on the ceiling or a window). The robot can safely ignore a 200-foot advertising blimp shaped like a stapler because the blimp lacks the prerequisite wood-grained background of a desk. In contrast, with tasks such as image retrieval, all stapler images in a database may be of real staplers, and so large sizes and other unusual configurations may have been implicitly precluded by the assumptions of those who took the photographs; that is, the photographer perhaps took pictures only of real, normal-sized staplers. People also tend to center objects when taking pictures and tend to put them in characteristic orientations. Thus, there is often quite a bit of unintentional implicit information within photos taken by people.
Contextual information can also be modeled explicitly with machine learning techniques. Hidden variables such as size, orientation to gravity, and so on can then be correlated with their values in a labeled training set. Alternatively, one may attempt to measure hidden bias variables by using additional sensors. The use of a laser range finder to measure depth allows us to accurately measure the size of an object.
The next problem facing computer vision is noise. We typically deal with noise by using statistical methods. For example, it may be impossible to detect an edge in an image merely by comparing a point to its immediate neighbors. But if we look at the statistics over a local region, edge detection becomes much easier. A real edge should appear as a string of such immediate neighbor responses over a local region, each of whose orientation is consistent with its neighbors. It is also possible to compensate for noise by taking statistics over time. Still other techniques account for noise or distortions by building explicit models learned directly from the available data. For example, because lens distortions are well understood, one need only learn the parameters for a simple polynomial model in order to describe—and thus correct almost completely—such distortions.
The actions or decisions that computer vision attempts to make based on camera data are performed in the context of a specific purpose or task. We may want to remove noise or damage from an image so that our security system will issue an alert if someone tries to climb a fence or because we need a monitoring system that counts how many people cross through an area in an amusement park. Vision software for robots that wander through office buildings will employ different strategies than vision software for stationary security cameras because the two systems have significantly different contexts and objectives. As a general rule, the more constrained a computer vision context is, the more we can rely on those constraints to simplify the problem and the more reliable our final solution will be.
OpenCV is aimed at providing the basic tools needed to solve computer vision problems. In some cases, high-level functionalities in the library will be sufficient to solve the more complex problems in computer vision. Even when this is not the case, the basic components in the library are complete enough to enable creation of a complete solution of your own to almost any computer vision problem. In the latter case, there are several tried-and-true methods of using the library; all of them start with solving the problem using as many available library components as possible. Typically, after you’ve developed this first-draft solution, you can see where the solution has weaknesses and then fix those weaknesses using your own code and cleverness (better known as “solve the problem you actually have, not the one you imagine”). You can then use your draft solution as a benchmark to assess the improvements you have made. From that point, you can tackle whatever weaknesses remain by exploiting the context of the larger system in which your solution is embedded.
The Origin of OpenCV
OpenCV grew out of an Intel research initiative to advance CPU-intensive applications. Toward this end, Intel launched many projects, including real-time ray tracing and 3D display walls. One of the authors, Gary Bradski [Bradski], working for Intel at that time, was visiting universities and noticed that some top university groups, such as the MIT Media Lab, had well-developed and internally open computer vision infrastructures—code that was passed from student to student and that gave each new student a valuable head start in developing his or her own vision application. Instead of reinventing the basic functions from scratch, a new student could begin by building on top of what came before.
Thus, OpenCV was conceived as a way to make computer vision infrastructure universally available. With the aid of Intel’s Performance Library Team,2 OpenCV started with a core of implemented code and algorithmic specifications being sent to members of Intel’s Russian library team. This is the “where” of OpenCV: it started in Intel’s research lab with collaboration from the Software Performance Libraries group and implementation and optimization expertise in Russia.
Chief among the Russian team members was Vadim Pisarevsky, who managed, coded, and optimized much of OpenCV and who is still at the center of much of the OpenCV effort. Along with him, Victor Eruhimov helped develop the early infrastructure, and Valery Kuriakin managed the Russian lab and greatly supported the effort. There were several goals for OpenCV at the outset:
-
Advance vision research by providing not only open but also optimized code for basic vision infrastructure. No more reinventing the wheel.
-
Disseminate vision knowledge by providing a common infrastructure that developers could build on, so that code would be more readily readable and transferable.
-
Advance vision-based commercial applications by making portable, performance-optimized code available for free—with a license that did not require commercial applications to be open or free themselves.
Those goals constitute the “why” of OpenCV. Enabling computer vision applications would increase the need for fast processors. Driving upgrades to faster processors would generate more income for Intel than selling some extra software. Perhaps that is why this open and free code arose from a hardware vendor rather than a software company. Sometimes, there is more room to be innovative at software within a hardware company.
In any open source effort, it’s important to reach a critical mass at which the project becomes self-sustaining. There have now been approximately 11 million downloads of OpenCV, and this number is growing by an average of 160,000 downloads a month. OpenCV receives many user contributions, and central development has largely moved outside of Intel.3 OpenCV’s timeline is shown in Figure 1-3. Along the way, OpenCV was affected by the dot-com boom and bust and also by numerous changes of management and direction. During these fluctuations, there were times when OpenCV had no one at Intel working on it at all. However, with the advent of multicore processors and the many new applications of computer vision, OpenCV’s value began to rise. Similarly, rapid growth in the field of robotics has driven much use and development of the library. After becoming an open source library, OpenCV spent several years under active development at Willow Garage, and now is supported by the OpenCV foundation. Today, OpenCV is actively being developed by the foundation as well as by several public and private institutions. For more information on the future of OpenCV, see Chapter 23.
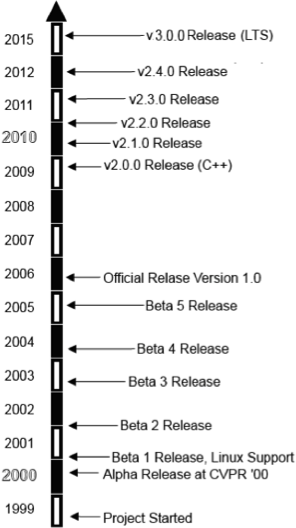
Figure 1-3. OpenCV timeline
OpenCV Block Diagram
OpenCV is built in layers. At the top is the OS under which OpenCV operates. Next comes the language bindings and sample applications. Below that is the contributed code in opencv_contrib, which contains mostly higher-level functionality. After that is the core of OpenCV, and at the bottom are the various hardware optimizations in the hardware acceleration layer (HAL). Figure 1-4 shows this organization.
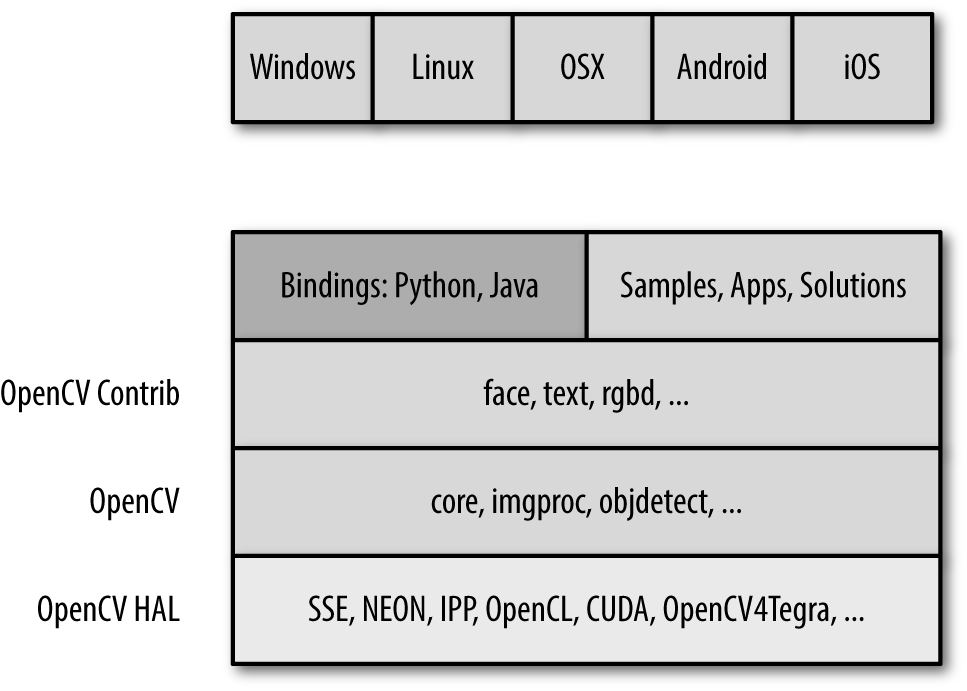
Figure 1-4. Block diagram of OpenCV with supported operating systems
Speeding Up OpenCV with IPP
If available on Intel processors, OpenCV exploits a royalty-free subset of Intel’s Integrated Performance Primitives (IPP) library, IPP 8.x (IPPICV). IPPICV can be linked into OpenCV at compile stage and if so, it replaces the corresponding low-level optimized C code (in cmake WITH_IPP=ON/OFF, ON by default). The improvement in speed from using IPP can be substantial. Figure 1-5 shows the relative speedup when IPP is used.
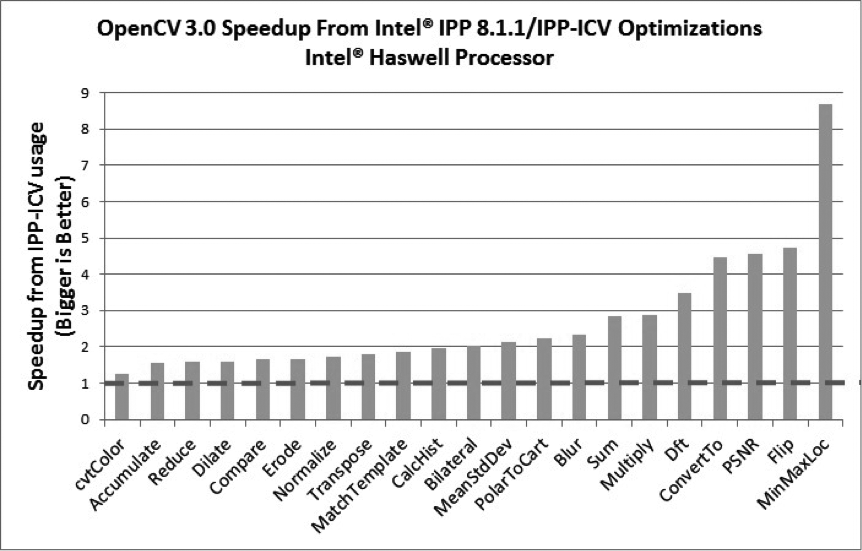
Figure 1-5. Relative speedup when OpenCV uses IPPICV on an Intel Haswell Processor
Who Owns OpenCV?
Although Gary Bradski started OpenCV at Intel, the library is and always was intended to promote commercial and research use; that is its mission. It is therefore open and free, and the code itself may be used or embedded (in whole or in part) in other applications, whether commercial or research. It does not force your application code to be open or free. It does not require that you return improvements back to the library—but we hope that you will.
Downloading and Installing OpenCV
From the main OpenCV site, you can download the complete source code for the latest release, as well as many recent releases. The downloads themselves are found at the downloads page. However, the most up-to-date version is always found on GitHub, where the active development branch is stored. For more recent, higher-level functionality, you can also download and build opencv_contrib [opencv_contrib] (https://github.com/opencv/opencv_contrib).
Installation
In modern times, OpenCV uses Git as its development version control system, and CMake to build.4 In many cases, you will not need to worry about building, as compiled libraries exist for many environments. However, as you become a more advanced user, you will inevitably want to be able to recompile the libraries with specific options tailored to your application.
Windows
At http://opencv.org/downloads.html, you will see a link to download the latest version of OpenCV for Windows. This link will download an executable file, which is a self-extracting archive with prebuilt OpenCV binaries for various versions of Visual Studio. You are now almost ready to start using OpenCV.5
The one additional detail is that you will want to add an OPENCV_DIR environment variable to make it easier to tell your compiler where to find the OpenCV binaries. You can set this by going to a command prompt and typing:6
setx -m OPENCV_DIR D:\OpenCV\Build\x64\vc10
If you want to link OpenCV statically, this is all you will need. If you want to use OpenCV dynamic link libraries (DLLs), then you will also need to tell your system where to find the binary library. To do this, simply add %OPENCV_DIR%\bin to your library path. (For example, in Windows 10, right-click on your computer icon, select Properties, and then click on Advanced System Settings. Finally, select Environment Variables and add the OpenCV binary path to the Path variable.)
OpenCV 3 comes with IPP linked in, so you get the performance advantage of more or less modern x86 and x64 CPUs.
You can also build OpenCV from a source tarball as follows:
-
Run the CMake GUI.
-
Specify paths to the OpenCV source tree and the build directory (they must be different!).
-
Press Configure twice (choose the appropriate Visual Studio generator, or MinGW makefiles if you use MinGW), and then press Generate.
-
Open the generated solution within Visual Studio, and build it. In the case of MinGW, use the Linux instructions that follow.
Linux
Prebuilt binaries for Linux are not included with the Linux version of OpenCV owing to the large variety of versions of GCC and GLIBC in different distributions (SuSE, Debian, Ubuntu, etc.). In many cases, however, your distribution will include OpenCV. If your distribution doesn’t offer OpenCV, you will have to build it from sources. As with the Windows installation, you can start at http://opencv.org/downloads.html, but in this case the link will send you to SourceForge, where you can select the tarball for the current OpenCV source code bundle.
To build the libraries and demos, you’ll need GTK+ 2.x or higher, including headers. You’ll also need gcc and the essential development packages, cmake and libtbb (Intel thread building blocks), and optionally zlib, libpng, libjpeg, libtiff, and libjasper with development files (i.e., the versions with -dev at the end of their package names). You’ll need Python 2.6 or later with headers installed (developer package), as well as NumPy in order to make Python bindings work. You will also need libavcodec and the other libav* libraries (including headers) from ffmpeg.
For the latter, install libav/ffmpeg packages supplied with your distribution or download ffmpeg from http://www.ffmpeg.org. The ffmpeg library has a Lesser General Public License (LGPL), but some of its components have the stricter General Public License (GPL). To use it with non-GPL software (such as OpenCV), build and use a shared ffmpg library:
$> ./configure --enable-shared
$> make
$> sudo make install
(When you link an LGPL library dynamically, you are not obliged to use GPL license for your code.) You will end up with /usr/local/lib/libavcodec.so.*, /usr/local/lib/libavformat.so.*, /usr/local/lib/libavutil.so.*, and include files under various /usr/local/include/libav* paths.
To actually build the library, you will need to unpack the .tar.gz file and go into the created source directory, and do the following:
mkdir release
cd release
cmake -D CMAKE_BUILD_TYPE=RELEASE -D CMAKE_INSTALL_PREFIX=/usr/local ..
make
sudo make install #  optional
The first and second commands create a new subdirectory and move you into it. The third command tells CMake how to configure your build. The example options we give are probably the right ones to get you started, but other options allow you to enable various options, determine what examples are built, add Python support, add CUDA GPU support, and more. By default, OpenCV’s cmake configuration script attempts to find and use as many third-party libraries as possible. For example, if it finds CUDA SDK, it will enable GPU-accelerated OpenCV functionality. The last two commands actually build the library and install the results into the proper places. Note that you do not need to install OpenCV in order to use it in your CMake-based projects; you just need to specify the path to generate OpenCVConfig.cmake. In the preceding case, the file will be placed in the release directory. If you decided to run sudo make install instead, OpenCVConfig.cmake would be placed in /usr/local/share/OpenCV.
Just like in the Windows case, the Linux build of OpenCV will automatically take advantage of IPP once it’s installed. Starting from OpenCV 3.0, OpenCV’s cmake configuration script will automatically download and link a free subset of IPP (IPPICV). To explicitly disable IPP if you do not want it, pass the -D WITH_IPP=OFF option to CMake.
Mac OS X
Installation on OS X is very similar to Linux, except that OS X comes with its own development environment, Xcode, which includes almost everything you’ll need except for CMake; you do not need GTK+, TBB, libjpeg, ffmpeg, and so on:
-
By default, Cocoa is used instead of GTK+.
-
By default, QTKit is used instead of ffmpeg.
-
Grand Dispatch Central (GDC) is used instead of TBB and OpenMP.
The installation steps are then exactly the same. You may want to pass the -G Xcode option to CMake to generate an Xcode project for OpenCV (and for your applications) in order to build and debug the code conveniently within Xcode.
Getting the Latest OpenCV via Git
OpenCV is under active development, and bugs are often fixed rapidly when bug reports contain accurate descriptions and code that demonstrates the bug. However, official OpenCV releases occur only once or twice a year. If you are seriously developing a project or product, you will probably want code fixes and updates as soon as they become available. To get these, you will need to access OpenCV’s Git repository on GitHub.
This isn’t the place for a tutorial in Git usage. If you’ve worked with other open source projects, then you’re probably familiar with it already. If you haven’t, check out Version Control with Git by Jon Loeliger (O’Reilly). A command-line Git client is available for Linux, OS X, and most UNIX-like systems. For Windows users, we recommend TortoiseGit; for OS X the SourceTree app may suit you.
On Windows, if you want the latest OpenCV from the Git repository, you’ll need to access the directory at https://github.com/opencv/opencv.git.
On Linux, you can just use the following command:
git clone https://github.com/opencv/opencv.git
More OpenCV Documentation
The primary documentation for OpenCV is the HTML documentation available at http://opencv.org. In addition to this, there are in-depth tutorials on many subjects at http://docs.opencv.org/2.4.13/doc/tutorials/tutorials.html, and an OpenCV wiki (currently located at https://github.com/opencv/opencv/wiki).
Supplied Documentation
OpenCV 2.x comes with a complete reference manual and a bunch of tutorials, all in PDF format; check opencv/doc. Starting from OpenCV 3.x, there is no offline documentation anymore.
Online Documentation and the Wiki
As we just mentioned, there is extensive documentation as well as a wiki available at http://opencv.org. The documentation there is divided into several major components:
- Reference
- This section contains the functions, their arguments, and some information on how to use them.
- Tutorials
- There is a large collection of tutorials; these tell you how to accomplish various things. There are tutorials for basic subjects, like how to install OpenCV or create OpenCV projects on various platforms, and more advanced topics like background subtraction of object detection.
- Quick Start
- This is a tightly curated subset of the tutorials, containing just ones that help you get up and running on specific platforms.
- Cheat Sheet
- This is actually a single .pdf file that contains a truly excellent compressed reference to almost the entire library. Thank Vadim Pisarevsky for this excellent reference as you pin these two beautiful pages to your cubicle wall.
- Wiki
- The wiki contains everything you could possibly want and more. This is where you’ll find the roadmap, as well as news, open issues, bugs tracking, and countless deeper topics like how to become a contributor to OpenCV.
- Q&A
- This is a vast archive of literally thousands of questions people have asked and answered. You can go there to ask questions of the OpenCV community, or to help others by answering their questions.
All of these are accessible under the Documentation button on the OpenCV.org homepage. Of all of those great resources, one warrants a little more discussion here—the Reference. The Reference is divided into several sections, each of which pertains to a module in the library. The exact module list has evolved over time, but the modules are the primary organizational structure in the library. Every function in the library is part of one module. Here are the current modules:
core- The “core” is the section of the library that contains all of the basic object types and their basic operations.
imgproc- The image processing module contains basic transformations on images, including filters and similar convolutional operators.
highgui(split toimgcodecs,videoio, andhighguiin OpenCV 3.0)- This module contains user interface functions that can be used to display images or take simple user input. It can be thought of as a very lightweight window UI toolkit.
video- The video library contains the functions you need to read and write video streams.
calib3d- This module contains implementations of algorithms you will need to calibrate single cameras as well as stereo or multicamera arrays.
features2d- This module contains algorithms for detecting, describing, and matching keypoint features.
objdetect- This module contains algorithms for detecting specific objects, such as faces or pedestrians. You can train the detectors to detect other objects as well.
ml- The Machine Learning library is actually an entire library in itself, and contains a wide array of machine learning algorithms implemented in such a way as to work with the natural data structures of OpenCV.
flann- FLANN stands for “Fast Library for Approximate Nearest Neighbors.” This library contains methods you will not likely use directly, but which are used by other functions in other modules for doing nearest neighbor searches in large data sets.
gpu(split to multiplecuda*modules in OpenCV 3.0)- The GPU library contains implementations of most of the rest of the library functions optimized for operation on CUDA GPUs. There are also some functions that are implemented only for GPU operation. Some of these provide excellent results but require computational resources sufficiently high that implementation on non-GPU hardware would provide little utility.
photo- This is a relatively new module that contains tools useful for computational photography.
stitching- This entire module implements a sophisticated image stitching pipeline. This is new functionality in the library, but, like the photo module, it is an area where future growth is expected.
nonfree(moved to opencv_contrib/xfeatures2d in OpenCV 3.0)- OpenCV contains some implementations of algorithms that are patented or otherwise burdened by usage restrictions (e.g., the SIFT algorithm). Those algorithms are segregated into their own module to indicate that you will need to do some kind of special work in order to use them in a commercial product.
contrib(melted into a few opencv_contrib modules in OpenCV 3.0)- This module contains new things that have yet to be integrated into the whole of the library.
legacy(disappeared in OpenCV 3.0)- This module contains old things that have yet to be banished from the library altogether.
ocl(disappeared in OpenCV 3.0; replaced with T-API technology)- This is a newer module that could be considered analogous to the GPU module, except that it implements the Khronos OpenCL standard for open parallel programming. Though much less featured than the GPU module at this time, the
oclmodule aims to provide implementations that can run on any GPU or other Khronos-capable parallel device. (This is in contrast to thegpumodule, which explicitly makes use of the NVidia CUDA toolkit and so will work only on NVidia GPU devices.)
Despite the ever-increasing quality of this online documentation, one task that is not within its scope is to provide a proper understanding of the algorithms implemented or of the exact meaning of the parameters these algorithms require. This book aims to provide this information, as well as a more in-depth understanding of all of the basic building blocks of the library.
OpenCV Contribution Repository
In OpenCV 3.0, the previously monolithic library has been split into two parts: mature opencv and the current state of the art in larger vision functionality at opencv_contrib [opencv_contrib]. The former is maintained by the core OpenCV team and contains (mostly) stable code, whereas the latter is less mature, is maintained and developed mostly by the community, may have parts under non-OpenCV license, and may include patented algorithms.
Here are some of the modules available in the opencv_contrib repository (see Appendix B for a full list at the time of this writing):
Dnn- Deep neural networks
face- Face recognition
text- Text detection and recognition; may optionally use open source OCR Tesseract as backend
rgbd- Processing RGB + depth maps, obtained with Kinect and other depth sensors (or simply computed with stereo correspondence algorithms)
bioinspired- Biologically inspired vision
ximgproc,xphoto- Advanced image processing and computational photography algorithms
tracking- Modern object-tracking algorithms
Downloading and Building Contributed Modules
On Linux and OS X, you can just use the following command to download opencv_contrib:
git clone https://github.com/opencv/opencv_contrib.git
On Windows, feed this address to TortoiseGit or another such client. Then you need to reconfigure OpenCV with CMake:
cmake –D CMAKE_BUILD_TYPE=Release \
  –D OPENCV_EXTRA_MODULES_PATH=../../opencv_contrib/modules ..
and rebuild it as usual. The built contributed modules will be put into the same directory as regular OpenCV binaries, and you may use them without any extra steps.
Portability
OpenCV was designed to be portable. It was originally written to compile by any compliant C++ compiler. This meant that the C and C++ code had to be fairly standard in order to make cross-platform support easier. Table 1-1 shows the platforms on which OpenCV is known to run. Support for Intel and AMD 32-bit and 64-bit architectures (x86, x64) is the most mature, and the ARM support is rapidly improving too. Among operating systems, OpenCV fully supports Windows, Linux, OS X, Android, and iOS.
If an architecture or OS doesn’t appear in Table 1-1, this doesn’t mean there are no OpenCV ports to it. OpenCV has been ported to almost every commercial system, from Amazon Cloud and 40-core Intel Xeon Phi to Raspberry Pi and robotic dogs.
| x86/x64 | ARM | Other: MIPs, PPC | |
|---|---|---|---|
| Windows | SIMD, IPP, Parallel, I/O | SIMD, Parallel (3.0), I/O | N/A |
| Linux | SIMD, IPP, Parallel,a I/O | SIMD, Parallel,a I/O | Parallel,a I/O* |
| Android | SIMD, IPP (3.0), Parallel,b I/O | SIMD, Parallel,b I/O | MIPS—basic support |
| OS X/iOS | SIMD, IPP (3.0), Parallel, I/O | SIMD, Parallel, I/O | N/A |
| Other: BSD, QNX, ... | SIMD | SIMD | |
a Parallelization in Linux is done via a third-party library or by enabling OpenMP. b Parallelization in Android is done via Intel TBB. | |||
Here is the legend for Table 1-1:
- SIMD
- Vector instructions are used to gain the speed: SSE on x86/x64, NEON on ARM.
- IPP
- Intel IPP is available. Starting from 3.0, there is free specialized IPP subset (IPPICV).
- Parallel
- Some standard or third-party threading framework is used to distribute processing across multiple cores.
- I/O
- Some standard or third-party API can be used to grab or write video.
Summary
In this chapter we went over OpenCV’s [OpenCV] history from its founding by Gary Bradski [Bradski] at Intel in 1999 to its current state of support by Arraiy [Arraiy]. We covered the motivation for OpenCV and some of its content. We discussed how the core library, OpenCV, has been separated from newer functionality in opencv_contrib (see Appendix B) along with an extensive set of links to the OpenCV-related content online. This chapter also covered how to download and install OpenCV, together with its performance and portability.
Exercises
-
Download and install the latest release of OpenCV. Compile it in debug and release mode.
-
Download and build the latest trunk version of OpenCV using Git.
-
Describe at least three ambiguous aspects of converting 3D inputs into a 2D representation. How would you overcome these ambiguities?
1 Computer vision is a vast field. This book will give you a basic grounding in the field, but we also recommend texts by Trucco [Trucco98] for a simple introduction, Forsyth [Forsyth03] as a comprehensive reference, and Hartley [Hartley06] and Faugeras [Faugeras93] for a discussion of how 3D vision really works.
2 Shinn Lee was of key help.
3 As of this writing, Willow Garage, a robotics research institute and incubator, is actively supporting general OpenCV maintenance and new development in the area of robotics applications.
4 In olden times, OpenCV developers used Subversion for version control and automake to build. Those days, however, are long gone.
5 It is important to know that, although the Windows distribution contains binary libraries for release builds, it does not contain the debug builds of these libraries. It is therefore likely that, before developing with OpenCV, you will want to open the solution file and build these libraries yourself.
6 Of course, the exact path will vary depending on your installation; for example, if you are installing on a 32-bit machine, then the path will include x86 instead of x64.
Get Learning OpenCV 3 now with the O’Reilly learning platform.
O’Reilly members experience books, live events, courses curated by job role, and more from O’Reilly and nearly 200 top publishers.

