Digital signatures provide a way to authenticate documents and other data. They solve one of the Internet’s biggest problems: given that you’ve received a message from Ms. X, how do you know that the message really came from Ms. X and not an imposter? Just as important for Java, let’s say that you’ve downloaded a great new applet written by your favorite author, Jonathan Knudsen, and you’d like to grant it some additional privileges, so that it can do something cool for you. You trust that this particular author wouldn’t intentionally distribute something harmful. But how do you know that the author really is who he says he is? And what if you downloaded the applet from a third-party location, like an archive? How can you be sure that someone hasn’t modified the applet since the author wrote it? With Java’s default security manager, such an applet can’t do anything serious, but when we’re talking about configuring your browser to grant additional privileges to applets coming from trusted sites, you would be in for trouble—if it weren’t for digital signatures.
Like their inky analogs, digital signatures associate a name with an item in a way that is difficult to forge. In reality, a digital signature is much more difficult to forge than a traditional signature. Furthermore, digital signatures provide another benefit: they allow you to authenticate a document, proving that it hasn’t been altered in transit. In other words, you know who the sender is, and that the data you received is exactly what the sender sent. Some malicious person can’t clip out a digital signature, modify the original document (or applet), and attach the old signature to the result. And he can’t generate a new signature—at least, he can’t generate a signature claiming that the document came from its original sender. (He could, of course, attach his own signature—but that would be like signing the stick up note you hand to the bank teller.)
Digital signatures are based on public-key cryptography, which is beyond the scope of this book. However, the basics are important and interesting.[54] In a public-key system, there are two pieces of information: a public key and a private one. They have a special, asymmetric relationship, such that a message encrypted with one key can only be decrypted with the other key. Furthermore, if you know only one key, it is very difficult to compute the other. Therefore, if I give you my public key, you can use it to create an encrypted message that only I can read. No one else, including you, has enough information to go through the process of decrypting the encoded message, so it’s safe to send it over untrusted networks. Furthermore, I can (and probably will) give my public key to anyone in the world, since the public key only lets people send me messages; it doesn’t let them read my messages.
Digital signatures are based on the reverse process. If I encrypt something with my private key, anyone can use my public key to read the message. That may not sound very useful, since I already said that I’d give my public key away to anyone who wants it. But in this case, we’re not trying to keep the message secret, we’re trying to prove that I’m the only one who could have sent the message. And that’s exactly what we’ve done. No one else has my private key, so no one else can send a message that can be decrypted with my public key. Therefore, only the real me could have sent the message.
We’ve simplified the process in one crucial way. Encrypting a large message with complex algorithms takes a long time, even with fast computers. And some public key algorithms just aren’t suitable for encrypting large amounts of data for other reasons, as well. For digital signatures, then, we don’t usually encrypt the entire message. First, we use a standard algorithm to create a “hash” or “message digest.” To produce the signature, we then encrypt the (relatively small) message digest with the private key. The recipient can then decrypt the signature with the public key and check whether the resulting message digest matches the message he received. If it does, the recipient knows that the message hasn’t been altered and that the sender is who he claims to be.
Digital signatures can be used to authenticate Java class files and other types of data sent over the network. The author of an object signs the data with his or her digital signature, and we use the author’s public key to authenticate that signature after we retrieve it. We don’t have to communicate with anyone in order to verify the authenticity of the data. We don’t even have to make sure that the communications by which we received the data are secure. We simply check the signature after the data arrives. If it is valid, we know that we have the authentic data and that it has not been tampered with . . . or do we?
Well, there is a larger problem that digital signatures alone don’t solve: verifying identity. If the signature checks out, we know that only the person (or entity) that published the public key could have sent the data. But how do we know that the public key really belongs to whomever we think it does? How do we associate an identity with that public key in the first place? We’ve made it more difficult to counterfeit a message, but it’s not impossible. A forger could conceivably create a counterfeit Java class, sign it with his own private key, and try to trick you into believing that his public key is that of the real author or the trusted web site. In this case, you’ll download the bad applet, then use the wrong public key to verify the applet, and be tricked into thinking that there’s nothing wrong. This is where certificates and certificate authorities come into play.
A certificate is a document that lists a name and a public key. By a name, we mean some real world information describing a person or entity. For example, a certificate might contain your full name and address, or the name of a company and the location of its headquarters. We’ll consider the combination of a name and a public key in this way to make up an identity. If we have valid information for a particular identity, we can verify data that the identity has signed.
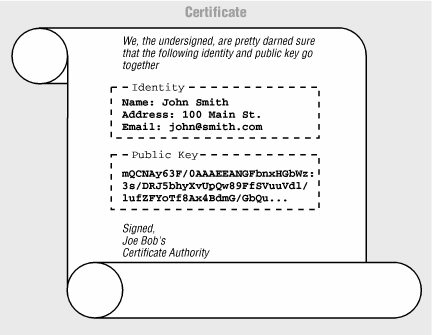
A certificate is signed with the digital signature of a certificate authority—the entity that issued the certificate. The certificate is, in effect, a proclamation by the certificate authority that the identity listed is valid—in other words, that the listed public key really does belong to the entity named. If we decide to trust the certificate authority, we can then believe the identities contained in the certificates it issues are valid. The certificate acts as a sort of electronic ID card, backed up by the credentials of the certificate authority. Of course, we no longer issue certificates on fancy vellum scrolls, as shown in Figure 20.2; the format for modern certificates is described by a standard called X.509.
This is all well and good, but the original problem remains: in order to verify the authenticity of a certificate, we need to verify its signature. Now, to do that, we need to know the certificate authority’s public key; rather than solving the problem, we simply seem to have shifted the problem to a new front. If a counterfeiter could substitute her public key for the public key of one entity, she might be able to do the same for the certificate authority. But shifting the problem helps quite a bit. We have reduced the number of public keys that we need to know from an unlimited number (all of the identities we might ever encounter) to a very small number: one for each certificate authority. We have chained our trust of the identity to the trust of the certificate authority’s identity. Chaining can be allowed to extend further, to an arbitrary depth, allowing certificate authorities to back up lower certificate authorities, and so on. At some point, of course, the chain has to stop, and that usually happens with a “self-signed” or certificate authority certificate; that is, a certificate that is issued by the certificate authority for itself, containing its own public key. “What good is that?” you might ask.
As for the authenticity of the top-level certificate authorities themselves, we will have to rely on very strong, well-known certificates that we have acquired by very secure or perhaps very tangible means. Web browsers, like Netscape Navigator and Microsoft Internet Explorer, come with CA certificates for several popular certificate authorities. Netscape Navigator and MSIE are, for example, shipped with a CA certificate for Verisign (http://www.verisign.com), so that you can safely verify any certificates signed by Verisign, wherever you encounter them. So, if all is working, we’ve reduced the problem to just that of your getting your copy of the web browser software securely the first time. As far as maintenance goes, browsers like Netscape Navigator let you download new CA certificates dynamically, using secure transports.
Certificates are presented to your web browser for verification when you encounter signed objects (signed JAR files). They are also issued by web servers when you make a secure connection using the HTTPS (HTTP Secure Socket Layer) protocol. Browsers like HotJava, Netscape, and Internet Explorer may save these certificates encountered from third-party locations, so that you can assign privileges or attributes to those identities and so that they can be recognized again. We’ll call these certificates site certificates—though they may belong to any third party, like a person or an organization. For example, you might declare that objects signed by a certain site are allowed to write local files. The browser then saves that site’s certificate, marking it with the privileges (writing local files) that it should grant.
Finally, you, the user, can have your own identity and your own certificates to validate your identity. Browsers like Netscape Navigator store user certificates that can be used to identify you to third parties. A user certificate is associated with a private key—the private key that goes with the public key in the certificate. When you use a private key to sign an object, the corresponding certificate is shipped as part of the signature. Remember, the recipient needs the public key in your certificate to validate your signature. The certificate says on whose authority the recipient should trust that public key.
So, where do you get private keys, public keys, and certificates validating your public keys? Well, as for the keys, you generate those yourself. No other party should ever have access to your private key, much less generate it for you. After you generate a public and private key pair, you send your public key to the certificate authority to request that they certify you. The CA can make you jump through whatever hoops are necessary; when they are satisfied that you are who you say you are, they grant you a certificate.
In Netscape
Navigator, this entire process can be accomplished by the user,
within the browser, using the KEYGEN extension to HTML. You can then
use Netscape tools to sign JAR files, send secure email, etc. HotJava
is not quite as slick. The SDK supplies a utility called
keytool for managing keys and certificates.
Another utility, jarsigner, is used for signing
JAR files. We’ll
discuss these utilities in
detail in the next section.
keytool is a utility for managing a database of
identities. With it, you can generate or import key pairs and
certificates. You can
then use these keys and certificates to sign JAR files.
For a variety of reasons, including antiquated
cryptography export
control laws in the U.S. and patents on various cryptographic
algorithms, Sun was forced to separate the security API itself from
the packages that actually implement encryption algorithms.[55]
The packages that implement cryptography are called
“provider” packages; Sun’s security provider
package comes with the SDK by default. Other packages can be
installed to provide additional or alternate implementations of the
cryptographic algorithms. By default,
keytool uses
the implementations found in Sun’s provider package, though it
can use other packages if any are available.
The user interface to keytool is awkward.
It’s a good bet that someone will implement a key management
utility with a more friendly graphical interface; maybe it will be
built into a future version of HotJava. Therefore, we won’t
spend a great deal of time discussing the details of
keytool; it’s more important to understand
the concepts.
Before the debut of the Java Plug-in, Netscape and Microsoft both invented their own code-signing schemes. As a result, signed applets in the SDK 1.1 world were a disaster—there were three different ways to sign and deploy code, one each for Netscape Navigator, Sun’s HotJava, and Microsoft’s Internet Explorer. Unless you knew in advance that you had only one kind of browser worry about, you were pretty much out of luck.
The Plug-in levels the field for signed applets, because the packaging and deployment strategy is the same for Navigator and Internet Explorer.
Before we dive into the muck, let’s take a look at an example, just to prove that you can actually sign objects with the current releases of the SDK and the Java Plug-in. In the process of discussing the example, we’ll point out some things that are lacking.
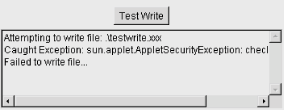
Use your browser to navigate to http://www.oreilly.com/catalog/learnjava/TestWrite/Unsigned.html. You’ll see the applet shown in Figure 20.3. When you push the button, this applet attempts to write a harmless file on the local host. Give it a try. The applet should fail with a security exception and display a message.
At this point, load a web page that displays the same
applet:
http://www.oreilly.com/catalog/learnjava/TestWrite/Signed.html.
The only difference is that I’ve wrapped the applet in a JAR
file that I have signed, with a key and certificate that I generated
using keytool. When it loads the applet’s
JAR file, the Java Plug-in also retrieves the signature. However,
nothing has changed for the applet just yet. When you click the
button, you still get a security exception when the applet tries to
write a file.
But now that an identity is associated with the applet, we can do more. You can download my certificate from http://www.oreilly.com/catalog/learnjava/TestWrite/Jonathan.cer. Enabling the signed applet to write a file takes two steps. First, you’ll have to import this certificate file into a keystore , which is simply a collection of keys and certificates. The second step is to create a policy file that tells the Java Plug-in that this applet is allowed to write a file.
To import the certificate file, use the
keytool utility that
comes with the SDK. For this example, we’ll create an entirely
new keystore. The following command imports the
Jonathan.cer certificate file and puts it in a
keystore called client.keystore. If the keystore
file doesn’t exist, it will be created.
C:\>keytool -import -file Jonathan.cer -alias Jonathan-keystore client.keystore -storepass buendia
The -alias option tells keytool
what alias to use for the imported
certificate. This is just a name you can use to refer to the keys in
the certificate. The integrity of the keystore is protected using a
password,
specified with the -storepass option. Whenever you
access the keystore, you’ll need to supply the same password to
verify that the keystore hasn’t been tampered with.
After you type this command, keytool prints out
some information about the certificate you are about to import. Then
it asks if this certificate should be
trusted. This is an
important question, as anyone can generate this kind of self-signed
certificate. (I’ve decided to be my own certificate authority
of one, for now.)
Owner: CN=Jonathan Knudsen
Issuer: CN=Jonathan Knudsen
Serial number: 3804d2c1
Valid from: Wed Oct 13 14:43:13 EDT 1999 until:
  Tue Jan 11 13:43:13 EST 2000
Certificate fingerprints:
    MD5:  A6:56:C2:52:2B:20:69:26:67:A2:0B:78:D3:3C:AC:45
    SHA1: A3:AF:41:93:73:1F:48:EE:6E:F5:8B:93:66:3E:73:F5:99:5D:54:AF
Trust this certificate? [no]:  yes
Certificate was added to keystore

C:\>
What can we do? We might simply get a certificate signed by a more popular authority than myself. But you would still have to register the CA’s certificate somehow, following this same process.
For now, you can verify this certificate by hand. We’ll do this
not only to get through this example, but because it presents a
useful analogy to the process of certification. The SHA1
“thumbprint” that keytool displays
should match this:
A3:AF:41:93:73:1F:48:EE:6E:F5:8B:93:66:3E:73:F5:99:5D:54:AF
If everything looks good, you can type “yes” to accept this certificate. By doing so, you are saying that you accept my identity, and believe that I have in fact signed certificates that match this thumbprint. You have effectively chained your trust to this printed page rather than an online certificate authority. You can be reasonably sure that no one has gone to the effort of issuing counterfeit O’Reilly books.
You are now ready to assign greater privileges to this applet. For
example, you can allow it to write files. To grant privileges in this
way, you need to create a security policy. Use the SDK’s
policytool utility
(which we introduced in Chapter 3). Start the
utility from a command line:
C:\> policytoolThe policytool interface isn’t pretty, but
it gets the job done. When you first run
policytool, you may get a message that it
can’t find the default policy file. Just click OK. (If you don’t get this message,
choose New from the File menu to start with a clean slate.)
Our eventual goal is to tell the Plug-in that any applet we have
signed is allowed to write a file on your computer. The policy file
needs to reference the certificate in the keystore we just created.
The first thing we need to do, therefore, is tell
policytool where to find the keystore. Select the
Change KeyStore option from the
Edit method. Type the URL of the
keystore file you just created. (On a Windows system, it looks
something like this: file:/c:/SignTest/client.keystore.) You can
leave the keystore type blank. Then click OK.
Now that we’re pointed at the right keystore, we need to add a
permission for file writing. Click on the Add
Policy Entry button. In the window that comes up, leave
the CodeBase field blank. Fill in the SignedBy field with
Jonathan. This means that we’re setting a
policy for all code signed by Jonathan. (Remember,
Jonathan is the alias we used for the certificate
when it was imported to the keystore.)
To give code signed by Jonathan permission to write files, click on the Add Permission button. In the next dialog, choose FilePermission from the top combo box. In the second combo box, choose <<ALL FILES>>. In the third combo box, choose write. Finally, click on OK to finish creating the permission. Then click on Done to finish creating the policy.
Having set this up, you now need to save the policy file. Choose
Save from the File menu; save this policy file as
client.policy. You can exit the
policytool utility now.
The last thing you need to do is tell the Java Plug-in to use the
policy file we’ve just so laboriously created. To do this, use
a text editor to edit the
java.security
file. This file is found underneath the
installation directory for the
JRE, in the
lib/security subdirectory. (If you have both the
SDK and the JRE installed, you will actually have two copies of this
file in different locations. For example, you might have one JRE
installed in C:\sdk1.3\jre and another in
C:\Program Files\JavaSoft\JRE. Make sure you
edit the java.security file that is used by the
Plug-in, which is probably the one that’s not in the SDK
installation directory.)
Once you’ve found the right java.security
file, you need to find the section that contains entries for
policy.url. Add a line to reference the policy
file we just created, like this:
policy.url.3=file:/c:/SignTest/client.policy
Finally, you’re ready to test the signed applet. (You may need to restart your browser.) Navigate to the signed applet page. When you press the button, the file is written successfully.
So, how did we create this certificate and sign the JAR file? Let’s move on.
The SDK
supports
keystores that hold identities along with
their public keys, private keys, and certificates. It includes a
utility called keytool that manages keystores. You
just saw how Jonathan’s certificate could be contained in a
keystore. The identities in keystores are visible to Java.
We’ll discuss what that means in a bit, but for the most part,
we’ll only use this database as a repository while we create
and work with our identity locally.
An identity can
be a person, an organization, or perhaps a logical part of an
organization. Before it can be used, an identity must have a public
key and at least one certificate validating its public key.
keytool refers to entities in the local database
by IDs or aliases. These names are arbitrary and are not used outside
of the keystore and any policy files that reference it. Identities
that have a private key stored locally in the keystore, along with
their public key, can be used to sign JAR files. These identities are
also called
signers
.
The default location for a keystore is the file
.keystore in the user’s home directory. On
a single user system, the Java installation directory is used instead
of the user’s home directory.[56]
The default keystore location is used by keytool
unless you specify another keystore with the
-keystore option.
If you are going to maintain any private keys in a keystore (if you will have any signers), you must take special care to keep the keystore file safe (and not publicly readable). Private keys must be kept private.
We can create a new entry in the
default keystore, complete with a key pair, with the following
keytool command:
C:\>keytool -genkey -alias Jonathan -keyalg DSA -keysize 1024 -dname "CN=JonathanKnudsen, OU=Technical Publications, O=O'Reilly & Associates, C=US" -keypass gianni-storepass buendia
There are a lot of options to explain. The most important one is
-genkey, which tells keytool to
create a new key pair for this entry. A key pair enables this entry
to sign code. The -alias options supplies an alias
for this entry, Jonathan. The -keyalg argument,
DSA, is the algorithm for which we are going to generate the keys.
The current release of Java only supports one:
DSA, the Digital
Signature Algorithm, which is a U.S. government standard for signing.
The -keysize argument is the key length in bits.
For most algorithms, larger key sizes provide stronger encryption.
DSA supports keys of either 512 or 1024 bits. You should use the
latter, unless you have a specific reason to do otherwise.
keytool generates the keys and places them in the
default keystore. Private keys are specially protected using the
-keypass option. To retrieve Jonathan’s
private key, you will have to know the correct key password. The
integrity of the keystore as a whole is protected by the
-storepass option. You need to supply the same
keystore password to retrieve data from this keystore later.
Once we’ve created a keystore entry, we can display it with the command:
C:\> keytool -list -alias Jonathan -storepass
buendia
To see more detail, add the -v option (for
“verbose”):
C:\> keytool -list -alias Jonathan -v
-storepass buendia
Or we can list the entire contents of the database:
C:\> keytool -list -storepass buendia
Now that we have keys, we want a
certificate in which to wrap our public key for distribution.
Ideally, at this point, we’d send a public key to a trusted
certificate authority and receive a certificate in return.
keytool
can generate such a request, called a Certificate Signing Request
(CSR). To generate a signing request for the entry we just created,
you would do this:
C:\> keytool -csr -alias Jonathan -file Jonathan.csr -keypass firenze -storepass buendiaYou need to specify the alias for the entry you want, a filename
where the CSR will be written, and the password for the private key.
Once you’ve generated the CSR file, you can send it off to your
favorite Certificate Authority. Once they’ve performed some
identity checks on you, and once you pay them, they will send a
certificate back to you. Suppose they send it back in a file called
Jonathan.x509. You can use
keytool to import this certificate as follows:
C:\> keytool -import -alias Jonathan -file Jonathan.x509 -keypass firenze -storepass buendiaTo demonstrate the features of keytool, we will
serve as our own authority (as we did in the example) and use our own
self-signed certificate. It turns out that keytool
already did this for us when we created keys! A self-signed
certificate already exists in the keystore; all we have to do is
export it as follows:
C:\> keytool -export -alias Jonathan -file Jonathan.cer -storepass buendiaIf we have a
signer keystore entry, initialized
with its private and public keys, we are ready to sign JAR files.
This is accomplished using another command-line utility,
jarsigner. All we need to do is specify which
keystore entry should do the signing, which JAR needs to be signed,
and the keystore password.
C:\> jarsigner -storepass buendia testwrite.jar JonathanIf we now list the archive, we will see that jarsigner has
added two files to the META-INF directory:
JONATHAN.SF and
JONATHAN.DSA. JONATHAN.SF
is the signature file—it is like the manifest file for this
particular signature. It lists the objects that were signed and the
signature
algorithms.
JONATHAN.DSA is the actual binary signature.
We’ve covered a lot of territory in the past few pages. Here’s a summary of what we can and can’t do. We can:
Use
keytoolto create a keystore entry, including public and private keys.Use
keytoolto create a self-signed certificate, or import a certificate that has been issued by a certificate authority.Use
jarsignerto sign a JAR file.Tell the Java Plug-in (by hand) what certificates it should trust and what permissions to grant to each identity.
Unfortunately, we can’t do any of this automatically. We
can’t just tell the Plug-in, “I trust John Doe” and
have it try to look up a verifiable certificate for John Doe.
Furthermore, we are personally responsible for the security of our
keystores. It’s important that private keys remain private; but
anyone who walks up to my computer can use keytool
to retrieve information about any identity that I have issued. The
keystore password provides some protection, but it won’t foil a
determined attacker. The
fundamental problem, keeping
secrets
secret,
will always be difficult.
[54] See Bruce Schneier’s encyclopedic Applied Cryptography (John Wiley & Sons) or Jonathan Knudsen’s Java Cryptography (O’Reilly & Associates).
[55] See the JCE (Java Cryptography Extension), which is available to U.S. and Canadian citizens from http://java.sun.com/products/jce.
[56] Beware if you
have both the SDK and HotJava installed in separate locations on a
single user system, such as a PC running Windows. You will have to
inform HotJava where to find the SDK package using the
JDK_HOME environment variable.
Get Learning Java now with the O’Reilly learning platform.
O’Reilly members experience books, live events, courses curated by job role, and more from O’Reilly and nearly 200 top publishers.

