JScrollPane
is
such a handy component that you may not
ever need to use scrollbars by themselves. In fact, if you ever do
find yourself using a scrollbar by itself, chances are you really
want to use another component called a slider.
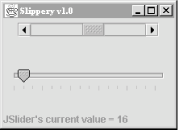
There’s not much point in describing the appearance and functionality of scrollbars and sliders. Instead, let’s jump right in with an example that includes both components. Figure 14.9 shows a simple example with both a scrollbar and a slider.
Here is the source code for this example:
//file: Slippery.java
import java.awt.*;
import java.awt.event.*;
import javax.swing.*;
import javax.swing.event.*;

public class Slippery extends JFrame {

  public Slippery( ) {
    super("Slippery v1.0");
    setSize(220, 160);
    setLocation(200, 200);

    Container content = getContentPane( );

    JPanel main = new JPanel(new GridLayout(2, 1));
    JPanel scrollBarPanel = new JPanel( );
    final JScrollBar scrollBar =
        new JScrollBar(JScrollBar.HORIZONTAL, 0, 48, 0, 255);
    int height = scrollBar.getPreferredSize( ).height;
    scrollBar.setPreferredSize(new Dimension(175, height));
    scrollBarPanel.add(scrollBar);
    main.add(scrollBarPanel);

    JPanel sliderPanel = new JPanel( );
    final JSlider slider =
        new JSlider(JSlider.HORIZONTAL, 0, 255, 128);
    slider.setMajorTickSpacing(48);
    slider.setMinorTickSpacing(16);
    slider.setPaintTicks(true);
    sliderPanel.add(slider);
    main.add(sliderPanel);

    content.add(main, BorderLayout.CENTER);

    final JLabel statusLabel =
        new JLabel("Welcome to Slippery v1.0");
    content.add(statusLabel, BorderLayout.SOUTH);

    // wire up the event handlers
    scrollBar.addAdjustmentListener(new AdjustmentListener( ) {
      public void adjustmentValueChanged(AdjustmentEvent e) {
        statusLabel.setText("JScrollBar's current value = "
                            + scrollBar.getValue( ));
      }
    });

    slider.addChangeListener(new ChangeListener( ) {
      public void stateChanged(ChangeEvent e) {
        statusLabel.setText("JSlider's current value = "
                            + slider.getValue( ));
      }
    });
  }

  public static void main(String[] args) {
    JFrame f = new Slippery( );
    f.addWindowListener(new WindowAdapter( ) {
      public void windowClosing(WindowEvent e) { System.exit(0); }
    });
    f.setVisible(true);
  }
}
All we’ve really done here is added a
JScrollBar
and a JSlider to our
main window. If the user adjusts either of these components, the
current value of the component is displayed in a
JLabel at the bottom of the window.
The JScrollBar and JSlider are
both created by specifying an orientation, either HORIZONTALor VERTICAL. You can also specify the
minimum and maximum values for the components, as well as the initial
value. The JScrollBar supports one additional
parameter, the
extent
. The extent simply refers to what
range of values is represented by the slider within the scroll bar.
For example, in a scrollbar that runs from 0 to 255, an extent of 128 means that the slider will be half the width of the scrollable area of the scrollbar.
JSlider supports the idea of
tick marks, which are lines drawn at
certain values along the slider’s length.
Major tick marks are slightly larger than
minor tick marks. To draw tick marks, just
specify an interval for major and minor tick marks, and then paint
the tick marks:
slider.setMajorTickSpacing(48);
    slider.setMinorTickSpacing(16);
    slider.setPaintTicks(true);
JSlider also supports
labeling the ticks with text strings,
using the setLabel-Table( ) method.
Responding to events from the two components is straightforward. The
JScrollBar sends out
AdjustmentEvents every time something happens; the
JSlider fires off ChangeEvents
when its value changes. In our simple example, we display the new
value of the changed component in the JLabel at
the bottom of the
window.
Get Learning Java now with the O’Reilly learning platform.
O’Reilly members experience books, live events, courses curated by job role, and more from O’Reilly and nearly 200 top publishers.

