Now that you have a feel for how beans look from the user’s perspective, let’s build some. In this section, we will become the Magic Beans Company. We will create some beans, package them for distribution, and use them in NetBeans to build a very simple application. (The complete JAR file, along with all the example code for this chapter, is online at http://oreil.ly/Learn_Java_4E.)
The first thing we’ll remind you of is that absolutely anything can be a bean. Even the following class is a bean, albeit an invisible one:
publicclassTrivialimplementsjava.io.Serializable{}
Of course, this bean isn’t very useful: it doesn’t have any
properties, and it doesn’t do anything. But it’s a bean nonetheless, and
we can drag it into NetBeans as long as we package it correctly. If we
modify this class to extend JComponent,
we suddenly have a graphical bean that be seen in the layout, with lots of
standard Swing properties, such as size and color information:
publicclassTrivialComponentextendsJComponent{}
Next, let’s look at a bean that’s a bit more useful.
We created a nifty Dial
component in Chapter 18. What would it take to
turn it into a bean? Surprise: it is already a bean! The Dial has a number of properties that it
exposes in the way prescribed by JavaBeans. A get method retrieves the
value of a property; for example, getValue() retrieves the dial’s current value.
Likewise, a set method, setValue(),
modifies the dial’s value. The dial has two other properties, which also
have get and set methods: minimum and
maximum. This is all the Dial needs to inform a tool such as NetBeans
what properties it has and how to work with them. Because Dial is a JComponent, it also has all the standard Swing
properties, such as color and size. The JComponent provides the set and get methods
for all its properties.
To use our Dial, we’ll put it
in a Java package named magicbeans
and store it in a JAR file that can be loaded by NetBeans. The source code,
which can be found online, includes
an Ant build file (see Chapter 15) that
compiles the code and creates the final JAR file.
If you were starting from scratch, it would go like this: first,
create a directory called magicbeans to hold our beans, add a
package statement to the source files
Dial.java, DialEvent.java, and
DialListener.java (from Chapter 18), put the source files into the
magicbeans directory, and compile them (using the
command javac magicBeans/Dial.java) to create class
files.
Next, we need to create a manifest file that tells NetBeans which of the classes in the JAR file are beans and which are support files or unrelated. At this point, we have only one bean, Dial.class, so create the following file, called magicBeans.manifest:
Name:magicbeans/Dial.classJava-Bean:True
The Name: label identifies the
class file as it will appear in the JAR: magicbeans/Dial.class. Specifications
appearing after an item’s Name: line
and before an empty line apply to that item. (See Chapter 3 for more details.) We have added the
attribute Java-Bean: True, which
flags this class as a bean to tools that read the manifest. We will add
an entry like this for each bean in our package. We don’t need to flag
support classes (such as DialEvent
and DialListener) as beans because we
won’t want to manipulate them directly with NetBeans; in fact, we don’t
need to mention them in the manifest at all.
To create the JAR file, including our manifest information, enter this command:
%jar-cvmfmagicbeans.manifestmagicbeans.jarmagicbeans/*.class
If you loaded the precompiled examples as instructed earlier, then
you already have the Dial bean loaded into NetBeans. The
version supplied in the precompiled magicbeans.jar file
has additional packaging that allows it to appear with a spiffy icon in
the palette, as we’ll discuss a bit later. (If you haven’t loaded the
example JAR, you can import the one we just created by selecting Palette
→ Swing/AWT Components dialog from the Tools menu, as described earlier
in this chapter.) If you want to replace the Dial bean on your palette, you can remove it
by right-clicking on the icon and selecting Delete before importing the
new JAR. (Actually, NetBeans 7.2 should reload the JAR automatically if
you overwrite it.)
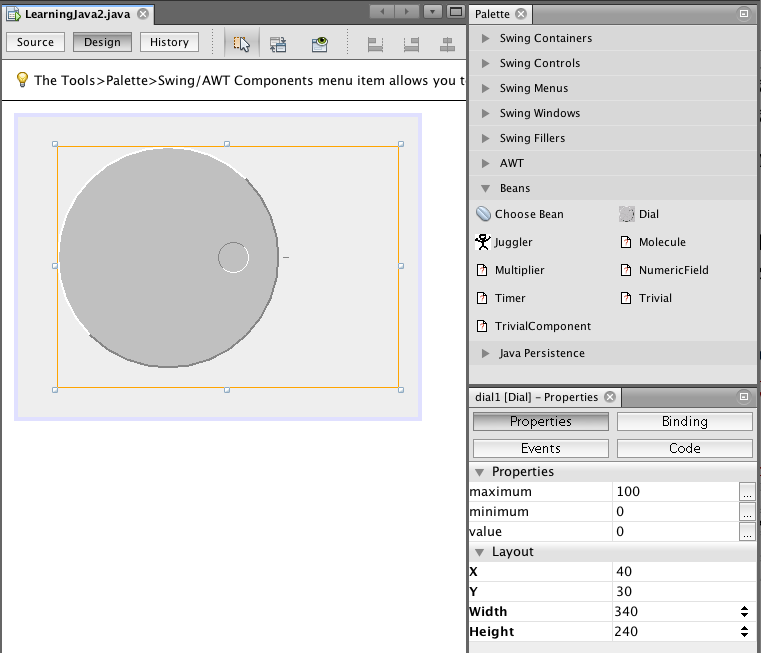
You should now have an entry for Dial in the bean palette. Drop an instance of
the Dial bean into a new JFrame Form
file in NetBeans.
As Figure 22-7 shows, the Dial’s properties—maximum, minimum, and
value—appear in the Properties pane and can be modified by NetBeans. If
you just created the Dial JAR
following our minimal instructions, you’ll see these properties along
with all the Swing properties inherited from the JComponent class. The figure shows the
Dial bean as it appears later in this
chapter (with the supplied packaging), after we’ve learned about the
BeanInfo class. We’re almost
there.
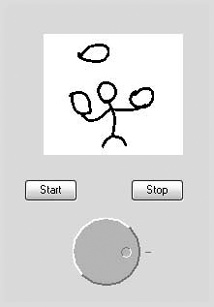
Now we’re ready to put the Dial
to use. Reopen the Juggler file that
we created in the first section of this chapter. Add an instance of our
new magic Dial bean to the scenario,
as shown in Figure 22-8.
Bind the value property of the
Dial to the animationRate of the Juggler. Use the Connection Wizard, as before,
selecting the Dial and then the
Juggler. Select the DialEvent source and bind the animationRate property, selecting the Dial’s value as the property source. When you
complete the hookup, you should be able to vary the speed of the juggler
by turning the dial. Try changing the maximum and minimum values of the
dial to change the range.
We said earlier that tools such as NetBeans found out about a bean’s properties by looking at its get and set methods. The easiest way to make properties visible is to follow these simple design patterns:
The last method is optional and is used only for properties with Boolean values. (You could use the get method for Boolean values as well.)
The appropriate set and get methods for these features of our bean
are already in the Dial class, either
methods that we added or methods inherited from the java.awt.Component and javax.swing.JComponent classes:
// inherited from ComponentpublicColorgetForeground()publicvoidsetForeground(Colorc)publicColorgetBackground()publicvoidsetBackground(Colorc)publicFontgetFont()publicvoidsetFont(Fontf)// many others from Component and JComponent// part of the Dial itselfpublicintgetValue()publicvoidsetValue(intv)publicintgetMinimum()publicvoidsetMinimum(intm)publicintgetMaximum()publicvoidsetMaximum(intm)
JavaBeans allows read and write-only properties, which are implemented simply by leaving out the get or set method.
NetBeans uses the Reflection API to find out about the Dial bean’s methods; it then uses these naming
conventions to learn what properties are available. When we use the
properties editor to change a value, NetBeans dynamically invokes the
correct set method to change the value.
If you look further at the JComponent class, you’ll notice that other
methods match the design pattern. For example, what about the setCursor() and getCursor() pair? NetBeans doesn’t know how to
display or edit a cursor, and we didn’t supply an editor, so it ignores
those properties in the properties sheet.
NetBeans automatically pulls the property’s name from the name of
its accessor methods; it then lowercases the name for display on the
properties sheet. For example, the font property is derived from getFont. Later, we’ll show how to provide a
BeanInfo class that overrides the way
these properties are displayed, which allows you to provide your own
friendly property names. Again, if you used the Dial bean from our precompiled example JAR,
you’ll see only our three Dial
properties. The JComponent properties
are hidden by our packaging a BeanInfo class that determines the properties
we wish to show.
NetBeans automatically recognizes JavaBeans getter and setter method patterns in classes. In the source code view, select the Source menu Insert Code option and choose Getter and Setter to automatically generate getter and setter methods for fields in your class. This can save you a bit of typing if you need to add a lot of properties.
Get Learning Java, 4th Edition now with the O’Reilly learning platform.
O’Reilly members experience books, live events, courses curated by job role, and more from O’Reilly and nearly 200 top publishers.

