Chapter 1. Event Handling
In JavaScript, an event is the result of an action that can be detected by JavaScriptâfor example, the user clicking a button or the page load completing. Events are the heart of pretty much all web applications. Event handling, as you can probably tell by the name, is how we handle these events.
jQuery provides a suite of functions to make event handling considerably easier than in JavaScript alone. While this is nice, it can add overhead and remove control from you, the developer. For this reason, it is important to know how you can handle events without jQuery in pure JavaScript. In this chapter, Iâll be covering that as well as a few other topics that can help your jQuery knowledge, such as more about what events actually are and how they work.
Internet Explorer 8 and below does event handling completely differently than any other browser, and completely independently from any standards. If youâre writing an application that needs to support 99% of the market share and you cannot use jQuery, then you will need to write for these older browsersâeven IE6 still has an over 5% market share at the time of writing. This chapter will cover event handling in Internet Explorer as well as in other browsers.
Listening for Events
Events in jQuery
The best way to explain events is probably by using an example, and the best example (as Iâm assuming that you know jQuery) is to show an extract of jQuery code that works with events. The following code turns the anchor element with ID foo red when it is clicked, and then prevents the link from being followed by calling e.preventDefault():
$('a#foo').click(function(e){$(this).css('color','red');e.preventDefault();});
Events in JavaScript
Following is the same code, but in pure JavaScript. It will not work in IE8 and below, which we will cover in the next section:
varfoo=document.getElementById('foo');foo.addEventListener('click',function(e){this.style.color='red';e.preventDefault();});
The .addEventListener function accepts three arguments. The first is the event type, and the second is the callback to be called when the event is fired. The third argument allows you to specify whether the event should be capturing or bubbling (i.e., the order in which it should propagate in; Iâll explain this later), but as IE8 and below donât support that, it isnât commonly used. The callback is sent the event as an argument, which contains a lot of informationâsuch as the x and y positions of the mouse when it clicked the element, and information on elements such as the current element and the element from which the event was fired (they can be different if the event has propagated). It also has some useful methods such as .preventDefault() and .stopPropagation(). The callback is called with the element as the context, so the element can be referred to using this. Unlike with jQuery, the return value doesnât do anything at all.
.preventDefault() stops the default action from happening. For example, if we had a link to some website with ID foo (<a href="http://example.com" id="foo">Click here!</a>) and we ran the previous code, clicking the link would not go to that website, as the call to e.preventDefault() would prevent it (following the link is the default action).
In jQuery, you can also return false to prevent the default action. However, this also stops the event from propagating (we will cover event propagation later), which is generally undesired.
Events in Internet Explorer 8
Internet Explorer 9 introduced support for .addEventListener, and so can use the preceding code. However, earlier IE versions donât support it, so we have to use another function, .attachEvent. It only supports bubbling events, and you canât refer to the element using this; you have to use either e.target or e.srcElement (although it is easier to just save the element from earlier). It also doesnât support e.preventDefault(); we have to set e.returnValue to false instead. Following is the same code from the previous two examples, but for Internet Explorer 8:
varfoo=document.getElementById('foo');foo.attachEvent('onclick',function(e){// Either:foo.style.color='red';// Or:((e.target)?e.target:e.srcElement).style.color='red';e.returnValue=false;});
Writing a Wrapper Function
jQuery makes it very easy to bind events to objects in every browser, but it isnât always necessary to load the entire jQuery library just to use the event handling functions, which can be replicated fairly easily. Iâll give you some code, and then I will explain how it works:
functionaddEventListener(element,event,handler){if(element.addEventListener){element.addEventListener(event,handler);}elseif(element.attachEvent){element.attachEvent('on'+event,function(e){e.preventDefault=function(){e.returnValue=false;};handler.call(element,e);});}}
We can then call it using the following code (in any browser):
varfoo=document.getElementById('foo');addEventListener(foo,'click',function(e){this.style.color='red';e.preventDefault();});
The addEventListener function first checks whether the element has the .addEvent Listener method, and if so, then it calls it normally. If it doesnât exist, the function checks whether the .attachEvent method exists, and if so, then it calls function as the handler. When the anonymous function is called, it calls the actual handler using .call, which allows us to specify the scope to be used as the first argument, meaning that we can refer to the element using this.
To enable us to use the e.preventDefault() function in Internet Explorer, Iâm adding that function to the event, and when it is called, Iâm setting e.returnValue to false. We could also do this the other way around using the following, but I wonât be keeping this code as we develop this function throughout the chapter because it isnât standard-conforming like e.preventDefault():
functionaddEventListener(element,event,handler){if(element.addEventListener){element.addEventListener(event,function(e){handler.call(this,e);if(e.returnValue===false){e.preventDefault();}});}elseif(element.attachEvent){element.attachEvent('on'+event,function(e){handler.call(element,e);});}}
That can be called as follows in any browser:
varfoo=document.getElementById('foo');addEventListener(foo,'click',function(e){this.style.color='red';e.returnValue=false;});
We can also replicate jQueryâs return false behavior by checking the return value of the event handler:
functionaddEventListener(element,event,handler){if(element.addEventListener){element.addEventListener(event,function(e){if(handler.call(this,e)===false){e.preventDefault();}});}}elseif(element.attachEvent){element.attachEvent('on'+event,function(e){if(handler.call(element,e)===false){e.returnValue=false;}});}}
That can be called as follows in any browser:
varfoo=document.getElementById('foo');addEventListener(foo,'click',function(e){this.style.color='red';returnfalse;});
A lot of websites and web-based applications have completely dropped support for Internet Explorer versions earlier than 9, so they do not need to use a wrapper function or .attachEvent, and can just use .addEventListener. This reduces development and testing time, and therefore costs lessâbut it does remove support for a substantial chunk of the browser market.
Iâm not going to cover this in any more detail than a brief mention here, but before DOM 3 was specified, events were attached to elements inline. You may have seen something like the following code before:
<ahref="#"onclick="this.style.color = 'red'">Click to turn red!</a>
That code is pretty ugly, right? Not only is it very tricky to read, it is also very difficult to maintain. Inline JavaScript and CSS is now frowned upon for those reasons, and JavaScript and CSS should always be kept in external files. It isnât commonly used anymore, so I wonât be mentioning it again.
Adding Event Handlers to Multiple Elements
Sometimes it may be useful to add event listeners to multiple elements. There are two different ways to do this: either we can cycle through the elements and add the event handler to each one, or we can add the event handler to a common parent of the elements, and wait for it to bubble upâsee the section Event Propagation. The second method is generally preferred because it uses fewer resources, but if there are only a few elements, it can be overkill. The first method is more commonly used.
jQuery does both methods automatically. We can do the first method like this:
$('.bar').click(callback);
And the second like this:
$(document).on('click','.bar',callback);
JavaScript does not do this automatically. Attempting to call .addEventListener or .attachEvent on a list of elements will throw an error because it isnât defined, and calling the previously defined addEventListener function just wonât do anything, as it wonât be able to find either method. In order to attach an event to multiple elements, we have to loop through them:
varbars=document.getElementsByClassName('bar');for(vari=0;i<bars.length;i++){addEventListener(bars[i],'click',callback);}
document.getElementsByClassName returns a NodeList, not an array. One main difference between the two is that NodeLists update live, meaning that changes to the DOM also change the NodeList:
varparagraphs=document.getElementsByTagName('p');console.log(paragraphs.length);// 3// Create a new paragraph element and append it to the bodyconsole.log(paragraphs.length);// 4
Occasionally, this can result in an infinite loop in the page: say you have a function that loops through all paragraph elements, and then copies them to the end of a page. This will also copy them to the end of the NodeList, meaning that they will also be copied to the end of the page again, and again, and againâ¦
There are two ways to avoid this. The first is to cache the length of the NodeList:
varparagraphs=document.getElementsByTagName('p');for(vari=0,len=paragraphs.length;i<len;i++){document.body.appendChild(paragraphs[i].clone(true));}
This means that if the original length of the NodeList were three, then it would only clone three elements before stopping. The second approach would be to turn the NodeList into an array:
varparagraphs=document.getElementsByTagName('p');paragraphs=Array.prototype.slice.call(paragraphs);for(vari=0;i<paragraphs.length;i++){document.body.appendChild(paragraphs[i].clone(true));}
We did this by calling the Array.slice method directly on the NodeList, causing it to treat it like an array. We can call other array methods on the NodeList using the same method; in the following example, we loop through all elements with a data-number attribute and return an array containing all of them:
varelements=document.querySelectorAll('[data-number]');varnumbers=Array.prototype.map.call(elements,function(element){returnNumber(element.dataset.number);// Get the data-number attribute});console.log(numbers);// [3, 6, 2, 5.6]
Of course, it is easier to just use jQuery:
varnumbers=$('[data-number]').map(function(){return$(this).data('number');});console.log(numbers);// [3, 6, 2, 5.6]
jQueryâs $.fn.data function automatically converts number strings to actual numbers. If you donât want this behavior, you should use $.fn.attr.
Event Propagation
When an event is fired on an element, it isnât just fired for the specific element, it is also fired for all parent elements of that element. This can be pretty useful for setting an event listener on multiple elements at the same time without having to loop through them one by one:
document.addEventListener('click',function(e){varelement=e.srcElement;if(element.tagName==='A'){varurl=getAnchorURL(element);if(isEvil(url)){e.preventDefault();// Inform user that they clicked an "evil" link}}});
That code would add a listener for all clicks on anything in the document. When an element with tagName âAâ (an anchor element) is clicked, it checks whether the URL is âevilâ (e.g., linking to a dangerous site), and if so, it calls e.preventDefault(), preventing the user from following the link. We have to use e.srcElement instead of this, as this would refer to the document because that is what the event is being fired on.
jQueryâs .on method has this behavior built in. There is an optional second parameter that allows you to specify a selector. If the selector matches the source element (e.srcElement), then the event listener is fired. In effect, the following code does the same thing as the previous:
$(document).on('click','a',function(){varelement=e.srcElement,url=getAnchorURL(element);if(isEvil(url)){e.preventDefault();// Inform user that they clicked an "evil" link}});
The action of events being fired on the parent elements is called event propagation. The order in which they are fired is called the event order. There are two possible event orders that they can be fired in: bubbling and capturing.
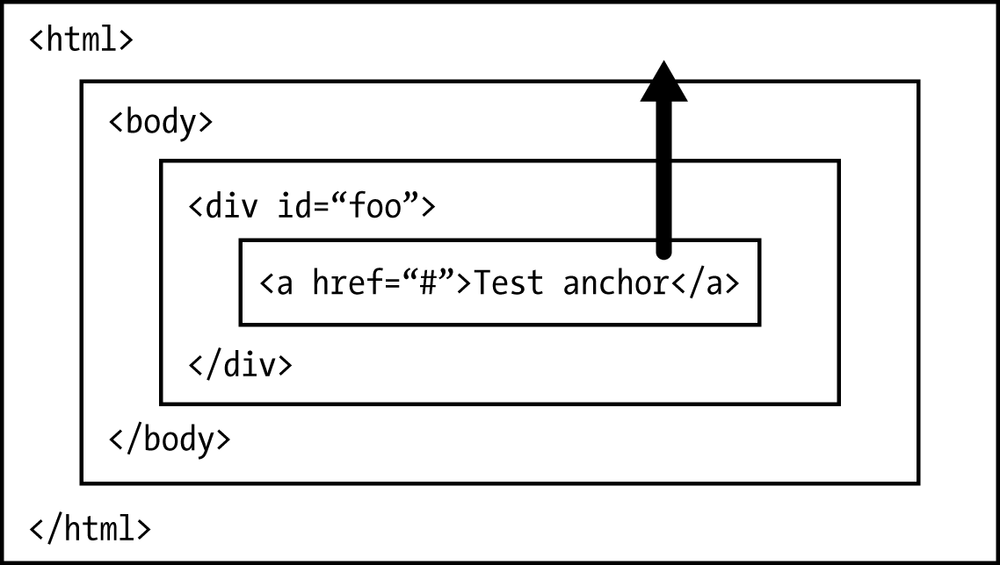
When an event bubbles, it is fired first on the element itself, and then all of its parents respectively; see Figure 1-1 for a graphical visualization. I find this event order to generally be the most useful.
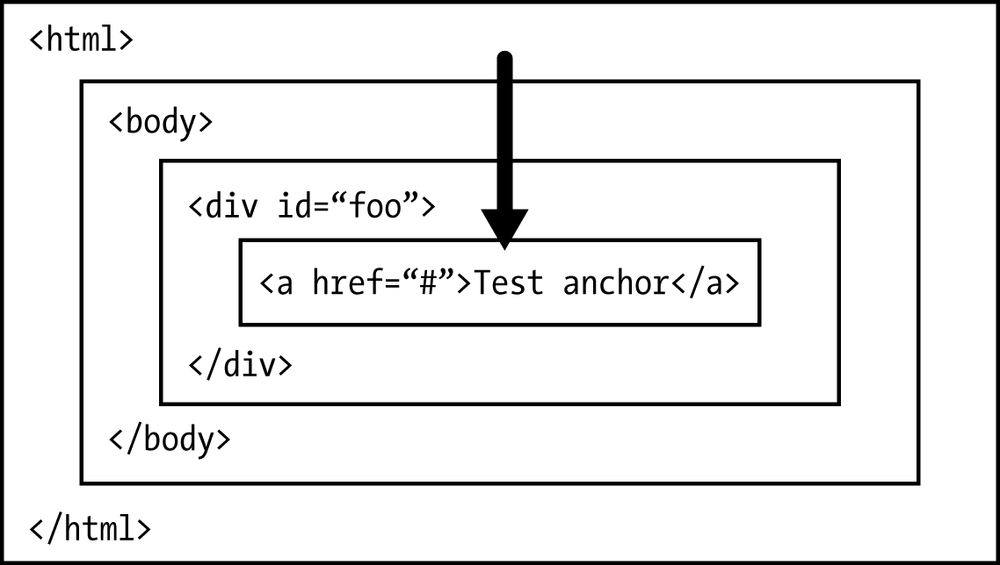
When an event âcaptures,â it is fired first on the document body, and then works its way down the tree to the element itselfâsee Figure 1-2.
Both methods can be useful. addEventListener has a third parameter that allows you to specify the order in which you want the event to propagate: true or unspecified for bubbling, or false for capturing. attachEvent doesnât support capturing event listeners at all, and so Internet Explorer 8 and below only supports bubbling events.
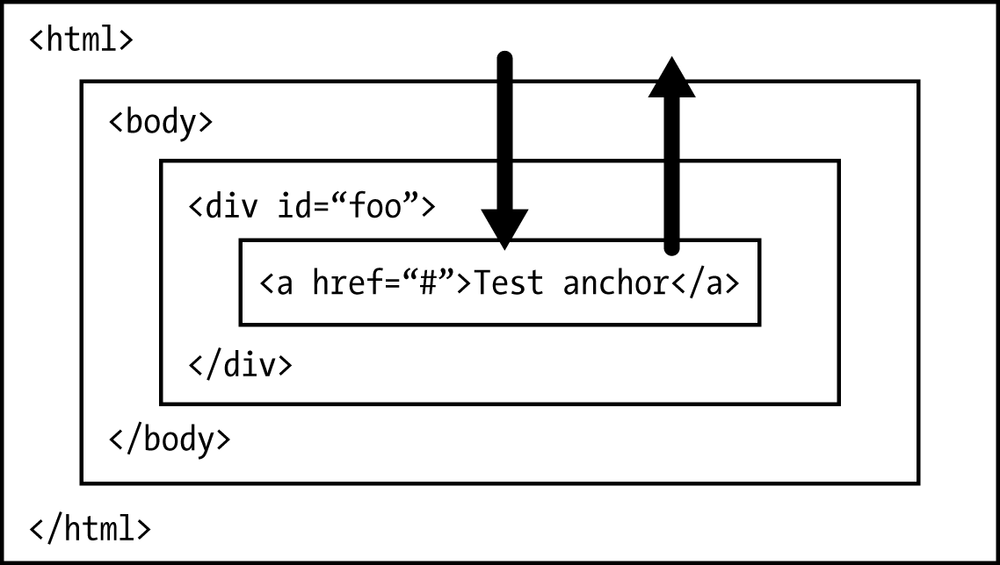
Going back to our original code sample to stop evil links from being clicked, we can see that it should probably be a capturing event listener rather than a bubbling event listener, as capturing event listeners are called first (see Figure 1-3). This means that if we call e.stopPropagation(), any event listeners added to the element itself wonât be called, so the link has a lower chance of being followed. Our new code, using capturing event propagation, is as follows:
document.addEventListener('click',function(e){varelement=e.srcElement;if(element.tagName==='A'){varurl=getAnchorURL(element);if(isEvil(url)){e.preventDefault();e.stopPropagation();// Inform user that they clicked an "evil" link}}},false);
So which are fired first, bubbling or captured event listeners? Does the event start at the element, bubble up, and then capture back down again, or does it start at the document? The WC3 specifies that events should capture down from the document, and then bubble back up again, which you can see in Figure 1-3.
So, say we have the following document:
<!DOCTYPE html><html><body><divid="foo"><ahref="#">Test anchor</a></div></body></html>
If we click on the anchor, the events will be fired in the following order:
- On the document (capturing)
- On the body (capturing)
-
On
div#foo(capturing) - On the anchor (capturing)
- On the anchor (bubbling)
-
On
div#foo(bubbling) - On the body (bubbling)
- On the document (bubbling)
Internet Explorerâs .attachEvent
.attachEvent has a couple more problems besides not supporting capturing events. With .addEventListener, the listener is called with this referring to the element on which the listener was fired (for example, the document or the body, not necessarily the anchor). The event also has a .currentTarget property containing the element. With .attachEvent, this refers to the window object and .currentTarget is undefined with no equivalent property, so if the same event listener is assigned to multiple elements we have no way of determining which element the event is being fired.
It also doesnât have the e.stopPropagation() method, and instead has a .cancelBubble property that must be set to true to cancel propagation. The equivalent of the code sample that I have been using throughout this section would be:
varelements=document.getElementsByTagName('a');for(vari=0;i<elements.length;i++){(function(element){element.attachEvent('onclick',function(e){varurl=getAnchorURL(element);if(isEvil(url)){e.returnValue=false;e.cancelBubble=true;// Inform user that they clicked an "evil" link}});})(elements[i]);}
Weâll add a fake e.stopPropagation method to our addEventListener function so that we can use it in our event listeners without having to test whether it exists:
functionaddEventListener(element,event,handler){if(element.addEventListener){element.addEventListener(event,handler);}elseif(element.attachEvent){element.attachEvent('on'+event,function(e){e.preventDefault=function(){e.returnValue=false;};e.stopPropagation=function(){e.cancelBubble=true;};handler.call(element,e);});}}
Triggering Events
To trigger an event in jQuery, we can simply use the .trigger method on the element, which will simulate the event being triggered. It doesnât, however, actually trigger a JavaScript eventâit just cycles through all events set by .on (or any of the aliases, such as .click) and calls them. This means that it will only trigger event handlers set by jQuery, and any event handlers set using addEventListener will be ignored. There is no way to trigger events set using JavaScript using only jQuery.
To trigger events the way jQuery does it, we would have to have an array of events to which addEventListener adds whenever it is called, and then when .trigger is called, weâd have to cycle through them, executing the events that match the event type and element. Then, it would get slightly more complicated, as we would have to go up the tree, calling the event listeners for each parent element until something stops propagation or we hit the <html> element. This isnât that difficult, though, as every element has a .parentElement property that returns an elementâs parent. Itâll only return the one element, so we donât need to worry about cycling through them, as it will not return a NodeList.
Weâre going to focus on the other method of triggering events, as we want it to work with event handlers added with pure JavaScript. Itâs a lot trickier than the way jQuery does itâagain, IE does it differentlyâbut it is the only way that works when event listeners have been added via the standard JavaScript APIs (.addEventListener).
First, we create the event using document.createEvent, and then we dispatch it using the dispatchEvent method on the element. Sounds simple, right? It isnât. Iâll give you a generic solution, but there are many different types of events, and for each to work correctly, the methods called and arguments given to them need to be slightly different. Here is the generic solution:
varelement=document.getElementById('foo');varevent=document.createEvent('UIEvents');event.initUIEvent('click',true,true,window,1);varreturned=element.dispatchEvent(event);
returned is set to the return value of any event handlers triggered. This can be useful for replicating jQueryâs functionality where the developer can return false to prevent the default action:
varelement=document.getElementById('foo');element.addEventListener('click',function(){returnfalse;});varelement=document.getElementById('foo');varevent=document.createEvent('UIEvents');event.initUIEvent('click',true,true,window,1);varreturned=element.dispatchEvent(event);if(returned===false){event.preventDefault();}
That code should successfully call any event handlers, but it doesnât set any of the often useful properties like the x and y positions of the mouse; if you want them, you will have to set them by modifying the event object:
varevent=document.createEvent('UIEvents');event.initUIEvent('click',true,true,window,1);event.x=100;event.y=50;varreturned=element.dispatchEvent(event);
The event automatically bubbles, so there is no need to simulate that like you would have to with the other method.
Triggering Events in Internet Explorer 8
Syntax-wise, triggering events in Internet Explorer is fairly similar to triggering events in other browsers, but it uses different functions. The following code fires the click event on the element with ID foo:
varelement=document.getElementById('foo');element.fireEvent('onclick');
element.fireEvent has an optional second parameter: the event. It can be used like so:
varelement=document.getElementById('foo');varevent=document.createEventObject();event.button=1;element.fireEvent('onclick',event);
Again, if you want properties like the x and y positions of the mouse, youâll have to add them yourself. event.button = 1 tells the event that it is a left click.
Itâs a lot less generic, and you canât usually just change the name of the function without weird side effectsâyou would have to customize the code more for behavior like mouseover events.
Writing a Wrapper Function to Trigger Events
Writing a wrapper function for triggering events without a massive switch statement is difficult, and a tad hacky. I would usually recommend either having a function for each type of event you want to fire, or doing it how jQuery does it and storing an object of events that have been set. Iâve written the following wrapper function, but I wouldnât really recommend using it; it is just to show you how you can use a single function to fire events in all browsers:
functiontriggerEvent(element,event){if(element.dispatchEvent){varevt=document.createEvent('UIEvents');evt.initUIEvent(event,true,true,window,1);element.dispatchEvent(evt);}elseif(element.fireEvent){// Internet Explorer supportvarevt=document.createEventObject();evt.button=1;element.fireEvent('on'+event,evt);}elseif(element['on'+event]){element['on'+event].call();}}
The last statement is to demonstrate how this function can work for older browsers that still use DOM 2. If the event has been initiated via the onclick attribute and the browser doesnât support either .dispatchEvent or .fireEvent, then you can manually run the code using .call().
Tip
To trigger events on multiple elements, you can use the same method that we used to add event handlers to multiple elements: loop through them.
Removing Event Handlers
To remove an event in jQuery, we can just use the .off method on the element:
functionclickHandler(){}$('#foo').click(clickHandler);// Either:$('#foo').off('click',clickHandler);// Or:$('#foo').off('click');
The difference between the two calls to .off is that the first removes only the handler specified as the second argument, while the second removes all click handlers. Calling .off with no arguments would remove all event handlers of every type from that element (at least, ones set with jQuery). Note that you have to pass the exact function that you set, or the handler wonât be removed. The following code, for example, will not remove the event handler:
// Does not work:$('#foo').click(function(){});$('#foo').off('click',function(){});
To remove an event handler in JavaScript, use JavaScriptâs .removeEventListener method. It doesnât work in Internet Explorer 8:
varfoo=document.getElementById('foo');functionclickHandler(){}addEventListener(foo,'click',clickHandler);foo.removeEventListener('click',clickHandler);
If we neglect to provide the last argument to .removeEventListener, then an error will be thrown. If you want to remove all event listeners of a certain event, you have to keep a record of them as you add them, and loop through them, removing them one by one (wrapper functions are very useful for this).
Removing Event Handlers in Internet Explorer 8
To remove event handlers in Internet Explorer, we have to use the .detachEvent function. Itâs fairly similar to .removeEventHandler:
varfoo=document.getElementById('foo');functionclickHandler(){}addEventListener(foo,'click',clickHandler);foo.detachEvent('onclick',clickHandler);
Writing a Wrapper Function to Remove Events
As shown previously with triggering events, here I have written another basic wrapper functionâbut in this case, to remove events in all browsers:
functionremoveEventListener(element,event,handler){if(element.removeEventListener){element.removeEventListener(event,handler);}elseif(element.detachEvent){element.detachEvent('on'+event,handler);}}
Unfortunately, this wonât be able to remove events set via addEventListener in Internet Explorer, as that function gives element.attachEvent a different callback than the one given to addEventListener. We can work around this by modifying addEventListener to store the old callbacks and new callbacks in an object or array, which we can then loop through in removeEventListener to find the new callback.
As noted, we could use either an object or array: in an object, we would somehow turn the original function into the key (if we just use the function as the key, then functions with the same code will override each other because they will be converted to strings) and store the functions by those keys. Then when we go to remove the event listener, we will turn the function back into the key using the same method, and then the generated callback will be grabbed and removed. To use an array, we would simply push the original function and the new function to an array and cycle through the array to find the event listener when we go to remove it. For the sake of simplicity, Iâll use an array in the following examples.
Our new addEventListener:
varlisteners=[];functionaddEventListener(element,event,handler){if(element.addEventListener){element.addEventListener(event,handler);}elseif(element.attachEvent){varnewHandler=function(e){e.preventDefault=function(){e.returnValue=false;};e.stopPropagation=function(){e.cancelBubble=true;};handler.call(element,e);};element.attachEvent('on'+event,newHandler);listeners.push([handler,newHandler]);}}
And the updated removeEventListener with support for Internet Explorer 8 and below:
functionremoveEventListener(element,event,handler){if(element.removeEventListener){element.removeEventListener(event,handler);}elseif(element.detachEvent){event='on'+event;for(vari=0;i<listeners.length;i++){if(listeners[i][0]===handler){element.detachEvent(event,listeners[i][1]);break;}}}}
Adding a âOnce Onlyâ Event Listener
jQueryâs .one method adds an event listener that will only be called once; once we call the event listener the first time, it will be removed and thus will not be called again. To do this in pure JavaScript, store a copy of the function in an object and then, in the event handler itself, call removeEventListener.
Summary
This chapter has shown how you can use .addEventListener (and .attachEvent in
Internet Explorer 8 and below) to add event handlers, and how you can use removeEventListener (and detachEvent in Internet Explorer 8 and below) to remove them. It has explained the basic concepts of triggering events, as well as how events propagate.
Get Learning from jQuery now with the O’Reilly learning platform.
O’Reilly members experience books, live events, courses curated by job role, and more from O’Reilly and nearly 200 top publishers.

