So far, you’ve seen how to make functional web pages with clever and useful controls. You know how to change the appearance of the page in response to user selections, and how to use AJAX to enhance the performance of your application. But the applications you’ve made so far have been limited in what they can actually do. In this chapter, we add the most frequently sought-after functionality: the ability to retrieve, display, change, and store data.
Think about the web sites you visit most often, and you’ll find that almost all of them have one thing in common—they interact with persistent data. Persistent data is data that survives a single session; data that you expect will be there the next time you visit. In fact, it may even be data that can have significant financial consequences.
Shopping sites have databases to track their inventories and customer transactions. News sites keep databases with articles and photos in them, perhaps referenced by topic and date. Search engines use unimaginably large (and wicked-fast) databases.
Nearly every real-world commercial web application must be able to perform the four essential "CRUD” interactions with a database: Create, Read, Update, and Delete.
Fortunately, ASP.NET provides controls that make it easy and fast to perform these essential activities. We will demonstrate these interactions with SQL Server Express Edition (or its big brother, SQL Server) but they work equally well—or nearly so—with Microsoft Access and most commercial databases. In theory, you can interact with virtually any collection of data or with XML files, but that is an advanced topic we won’t go into here.
Along the way, we’ll show you enough about database interactions that even if you’ve never used a relational database, such as SQL Server Express, you’ll have little trouble working with one through your web application.
To see how to interact with a database, you’ll begin by creating a web application that you can use to display information about the AdventureWorks database. You’ll start out by simply retrieving and displaying a selection of data. These exercises will teach you how to connect your controls to a database, to retrieve, filter, and sort the data, and then use the myriad options for presenting it attractively.
As you may remember, AdventureWorks is a free database from Microsoft that represents a fictional company that sells outdoor and extreme sports gear. The database tracks products, inventory, customers, transactions, and suppliers.
Tip
See Appendix A for instructions on installing this sample database if you have not already done so.
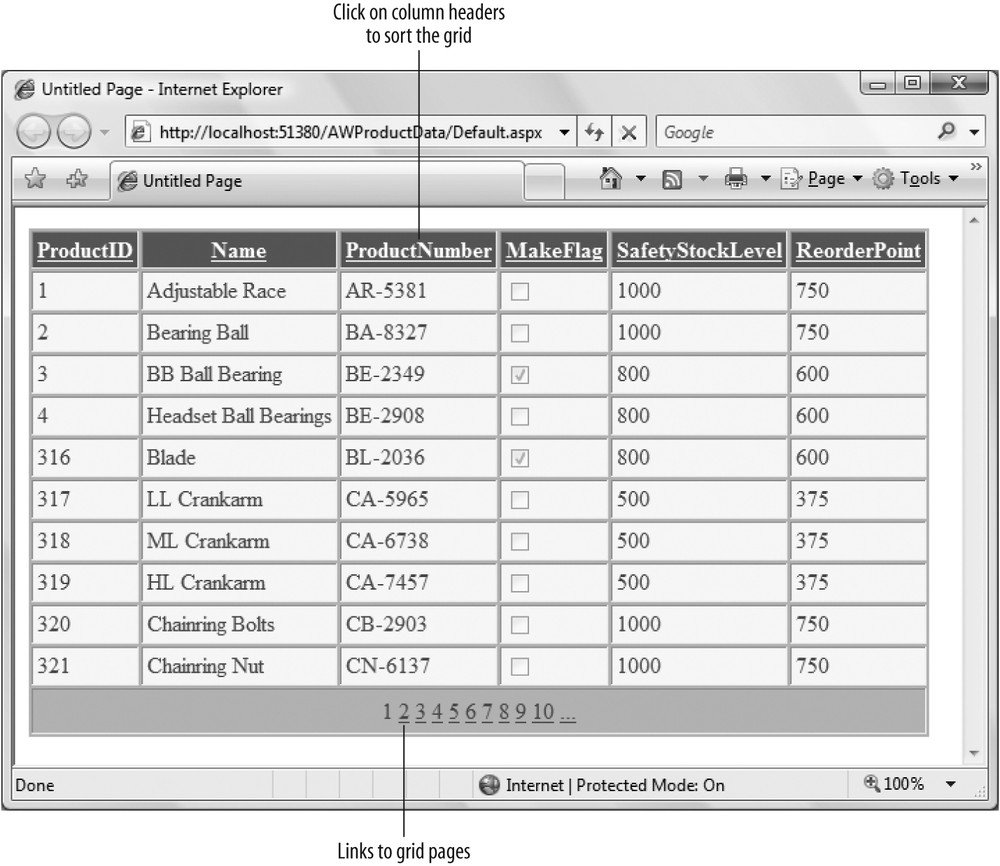
ASP.NET includes a number of controls specifically designed for displaying data. We’ll focus on the GridView control, but other data controls include the ListView, DataList, Repeater, DetailsView, and FormView. The GridView control displays columns and rows of data and allows sorting and paging. It is by far the most popular data display control, and is ideal for understanding how data display controls interact with data-retrieval controls and code. The GridView control allows the user to click on a column header to sort the data. GridViews also let you present just a small subset of the data at one time, called a page, with links for easy access to other pages—this process is called “paging” through data. You can do these, and for numerous other data manipulations, with very little programming. A GridView with data from the AdventureWorks database is shown in Figure 4-1.
The other data controls mentioned here are used in scenarios where a straight, tabular display of data is not what you are looking for.
The DetailsView control is used for displaying the data one record at a time. The FormView is used to for displaying a single record in a master/detail relationship. The ListView (which is new in version 3.5 of the .NET Framework), DataList and Repeater controls offer the maximum flexibility for displaying data. These three controls have no inherent look of their own, but require that you, the developer, construct templates that describe how the data will appear.
The ListView, in particular, offers all the features of the GridView, including paging, sorting, data update, and so on, with unlimited display flexibility. You can use it to display repeating data in a nontabular format or to group records according to some criteria.
For complete coverage of these other data controls, see our more advanced book, Programming ASP.NET, Fourth Edition (O’Reilly).
Database information is stored in memory as tables (just as it is retrieved from a relational database). Tables consist of rows and columns that match nicely to the GridView control.
You could write code to pick out each piece of data you want and write it into the appropriate row or column of the data control, but that’s time-consuming and error-prone. It’s more efficient and safer to bind the control directly to the underlying data.
Tip
In the early days of Graphical User Interface (GUI) programming, binding was a bit of a “trick”—great for simple programs, but useless for commercial applications because the minute you wanted to do anything out of the ordinary, the binding would become a strait-jacket. Microsoft has solved that in ASP.NET by exposing events on the data controls that allow you to insert custom code at every stage of the retrieval and binding of the data to the control.
Binding is most often used with the larger data controls such as GridView and ListView, but you can also bind many other controls, such as DropDownList, ListBox, CheckBoxList, and RadioButtonList. All of these controls have a DataSource property that identifies the source to which the control is bound. For example, you might keep a list of all your customers’ names in a database. Binding that data to a ListBox can be a convenient way to allow a customer service representative to quickly pick a customer rather than typing in a name that might otherwise be difficult to spell.
To see how all this works, you’ll build the GridView from Figure 4-1. Once you have it up and running, you’ll add some features to it, including the ability to use the grid to update the database with new data. Later in the chapter, you will also build an example using the ListView control.
To begin, create a new web site named AWProductData.
Drag the all-important ScriptManager control from the AJAX Extensions section of the Toolbox onto your page. Next, open the Data tab of the Toolbox. You’ll find two types of objects: display controls, which are designed to present data, and DataSource controls, which are designed to manage interacting with data, as shown in Figure 4-2.
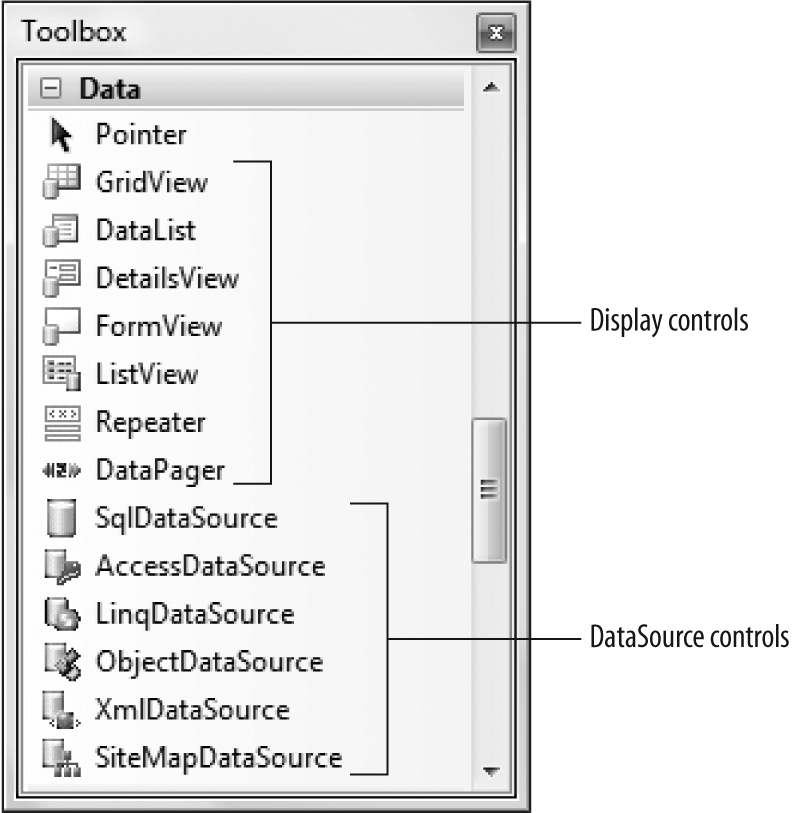
By default, the Data controls are arranged in the Toolbox so the display controls are on top, and the DataSource controls are below (You can drag them into any order you like or arrange them alphabetically by right-clicking on any control and selecting Sort Items Alphabetically.) There is a DataSource control for use with Microsoft SQL Server or SQL Server Express, one for Microsoft Access, one for using LINQ (Language Integrated Query, which is covered at the end of this chapter), one for any type of Object, one for use with SiteMaps (for binding to menu controls—more on this in Chapter 6), and one for XML documents as a data source.
Because the AdventureWorks database is a SQL Server database, you’ll use the SqlDataSource control, whether you are using SQL Server or SQL Server Express. This control will allow you to access the AdventureWorks database, but first you need to direct the control where to find it.
Switch to Design view and drag the SqlDataSource control from the Toolbox directly onto the design surface. A Smart Tag will open, as seen in Figure 4-3.
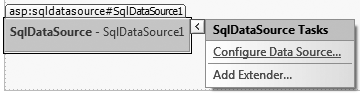
Figure 4-3. A Smart Tag opens when you drag the SqlDataSource control onto your page, allowing you to configure the data source.
When you click on Configure Data Source, you invoke a wizard that will walk you through the steps of configuring your data source—hooking up the control to the underlying data table(s).
The first step is to create (or choose) a data connection as seen in Figure 4-4.
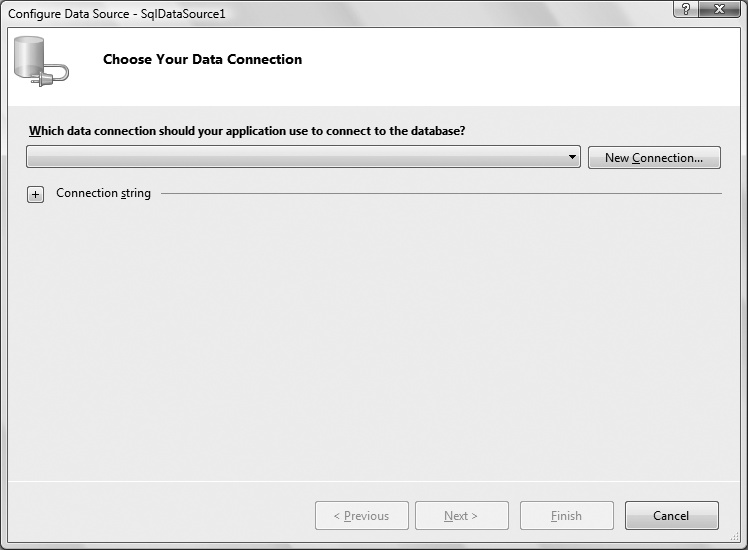
Figure 4-4. To configure your DataSource control, you need to provide it with a data connection. You can choose a preexisting connection from the list (if you have previously created any for this web site), or create a new data connection by clicking the New Connection button.
Any data connections that you’ve made before, for this web site or any other, will appear in the drop-down list. Most likely, though, you haven’t created any data connections yet, so the list will be empty. To make a new connection, click the New Connection… button to get the Add connection dialog shown in Figure 4-5.

Figure 4-5. The Add Connection dialog is where you specify a new connection for your data source. Select the server, the logon credentials, and finally the database you want to use.
Following the steps in Figure 4-5, prepare your connection to the database:
Select your server from the Server Name drop-down menu. If it is not there, type the name of the server. Typically, if you are using SQLExpress, the name will be “.\SqlExpress” (dot, slash, then SqlExpress), and if you are using SQL Server, it will be the name of your computer, or it will be (local)—including the parentheses.
Select the option, “Select or enter a database name:”.
Choose the AdventureWorks database in the database name drop-down.
Click the Test Connection button to verify that it all works.
This dialog box constructs a connection string, which provides the information necessary to connect to a database.
Click OK to complete the connection string and return to the Configure Data Source Wizard. Click the plus mark next to “Connection string” to see the connection string you’ve just created, as shown in Figure 4-6. The segment IntegratedSecurity=True was created when you chose Windows Authentication rather than SQL Server Authentication.
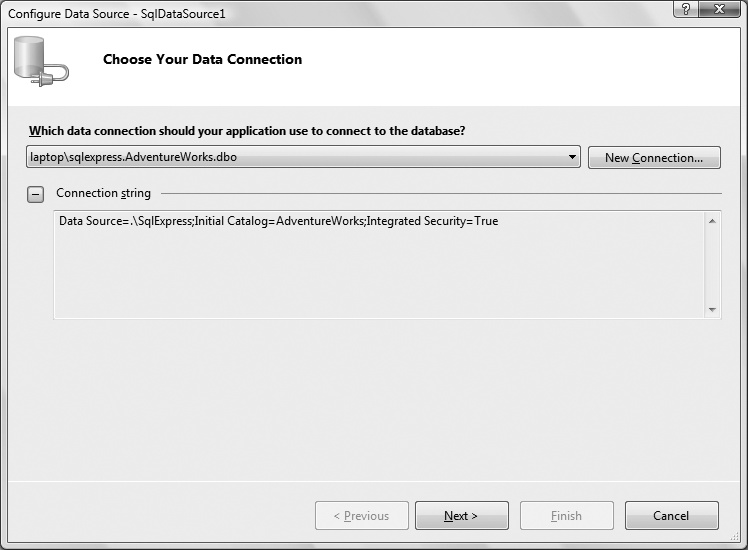
Figure 4-6. Click the plus sign to view the connection string you just created. This is what gives your control access to the database.
Tip
In Figure 4-6, the Wizard displays an expanded data connection in the drop-down menu, consisting of the name of the server (in this case, the local machine, laptop, concatenated with sqlexpress, followed by the name of the database and database owner). You don’t need to enter this information yourself; it is created for you.
When you click Next, the wizard will ask if you’d like to save this connection string in the “application configuration file.” The configuration file is an XML file that stores various settings for the web site. In an ASP.NET web site, the application configuration file is web.config, and saving the connection string there is an excellent idea; that way, all the pages of your web site will be able to use the connection. Make sure that the checkbox is checked, and give the string a name you can easily remember. The Wizard will make a suggestion for the name of the connection string, as shown in Figure 4-7.
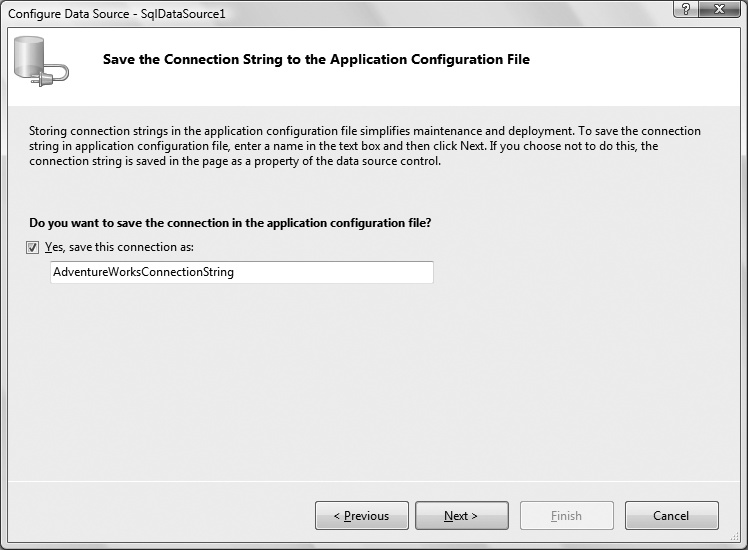
Figure 4-7. It’s a good idea to save the connection string in the application’s web.config file, so you can use it again with other controls.
This will cause the following lines to be written to the web.config file:
<connectionStrings>
   <add name="AdventureWorksConnectionString"
       connectionString="Data Source=.\SqlExpress;
          Initial Catalog=AdventureWorks;Integrated Security=True"
          providerName="System.Data.SqlClient"/>
</connectionStrings>
The Wizard next prompts you to configure the SELECT statement. The SELECT statement is the SQL code the control uses to retrieve the exact subset of data you are looking for from the database. Fortunately, if you are not fluent in SQL, the Wizard will help you build the statement.
Starting with the radio buttons at the top of the dialog box, select “Specify columns from a table or view.” (You would select the other button if you had a custom SQL statement prepared, as you’ll see shortly.)
Selecting that radio button displays the table drop-down menu. Here, you are presented with the various tables that represent the different sets of data in the database. For this exercise, choose the Product table. The various columns from the Product table will be displayed, as shown in Figure 4-8.
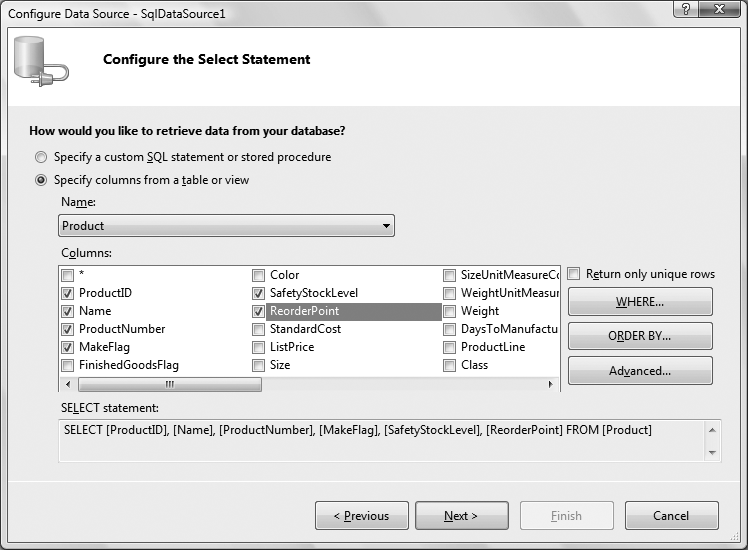
Figure 4-8. To configure the SELECT statement, specify the table and columns within it you want to retrieve, and the Wizard builds the proper SQL statement for you… more or less.
Simply check the columns you want retrieved, and they’ll be added to the SELECT statement. The choices you make will be displayed in the text box at the bottom of the dialog. For this exercise, select the ProductID, Name, ProductNumber, MakeFlag, SafetyStockLevel, and ReorderPoint columns (you may have to scroll to the right to see them all). You could narrow the set of data with the WHERE button, or specify the sort order in which to retrieve the data with the ORDER BY button. For the moment, you can ignore them both.
When you’ve completed the table setup, click Next to move to the last page of the Wizard, and then click the Test Query button. The test fails, as shown in Figure 4-9.
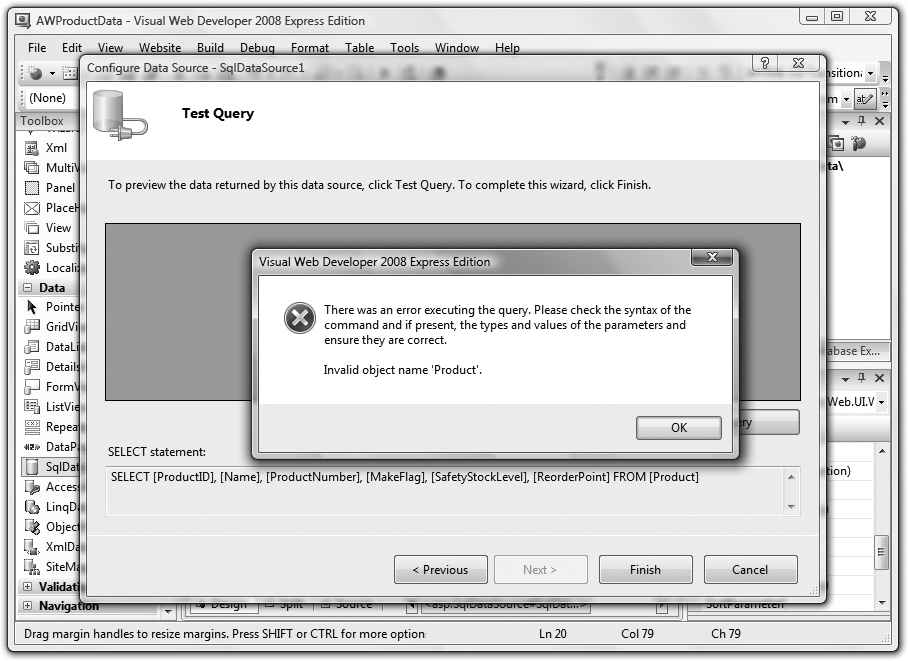
Figure 4-9. The Wizard let you down; the query test failed and you’re looking at this error message because this database requires a schema name in front of the table names.
In this instance, the Wizard falls on its face. It turns out that the AdventureWorks database prefixes a schema name in front of each table name and the Wizard is unprepared for that. It generates a SELECT statement without schema names, as you saw in Figure 4-8.
Schema in this context refers to an optional name used for organizing the tables in a large database. For example, in the AdventureWorks database, all the tables relating to the HR department have the schema name HumanResources prefixed to every table name, separated by a period, such as HumanResources.EmployeeAddress. Other schemas in the AdventureWorks database include Person, Production, Purchasing, and Sales.
As mentioned, a schema name is optional in SQL. In our experience, they are rarely used, and in fact, the Wizard is unaware of them. However, the AdventureWorks database (which ships as part of Microsoft SQL Server) does use them, the Wizard becomes confused and flies off to Kansas leaving you on your own.
Tip
The square brackets surrounding each field and table name in the generated SELECT statement are not required, but are used to guarantee that there will be no problems if the name includes any space characters (usually a very bad idea in any case). We often remove them from the finished statement to enhance readability.
Think of this as proof that people are not yet entirely replaceable by automation. Hit the Previous button to go back one step and fix the SELECT statement manually. Click the radio button captioned “Specify a custom SQL statement or stored procedure,” and then click Next. In the SQL Statement box, shown in Figure 4-10, type in:
SELECT ProductID, Name, ProductNumber, MakeFlag, SafetyStockLevel, ReorderPoint
FROM Production.Product

Figure 4-10. The SQL statement editing dialog, after adding the schema name to the table name, and removing all the extraneous square brackets.
As you can see, this is nearly the same SELECT statement that you built with the Wizard in Figure 4-8, except the Product table now has the required schema (Production) in front of it. We’ve also left out the square brackets on the columns, as mentioned in the note above.
Click Next to proceed to the next page of the Wizard, and then click Test Query. This time, you should get the results shown in Figure 4-11.
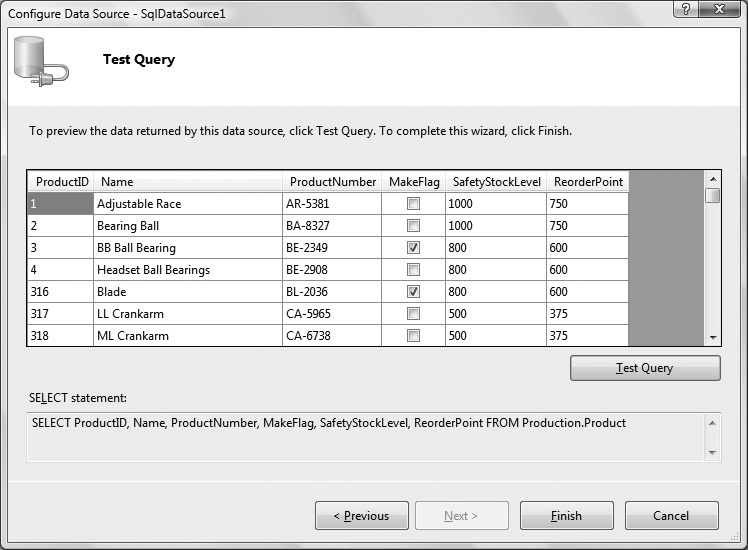
Figure 4-11. When you test the SELECT statement this time, you’ll see the results you were looking for.
Behold—the triumph of 3 billion years of random mutation and natural selection over 50 years of automation!
Click Finish to save your work. It may not look like much, but you’ve just enabled your application to access the AdventureWorks database, meaning all that data is now under your control.
Now that the DataSource control is providing the data you want, you need a way to display it. From the Data section of the Toolbox, drag a GridView control onto the page. The GridView control recognizes automatically that a SqlDataSource is on the page.
Tip
If you had dragged the GridView onto the page first, it would have given you the opportunity to create a SqlDataSource rather than assuming you’d like to use one already in existence. It pretty much amounts to the same thing.
Click on the Smart Tag of the GridView (if it is not already open). Click the drop-down menu next to “Choose Data Source” and select the DataSource control you just created, as shown in Figure 4-12.
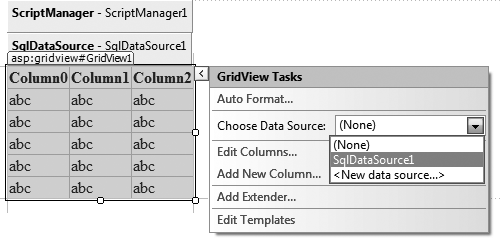
Once the data source is set, the data grid is redrawn, with a column for each field returned by the data source. The column headers are filled in for you based on the column names in the table that the data source represents.
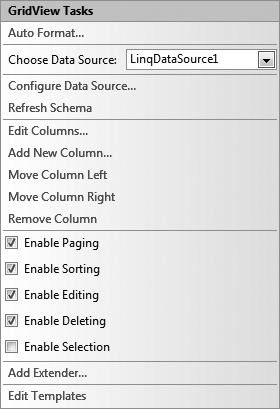
Open the Smart Tag again and check “Enable Paging,” which allows the grid to show a limited number of entries on each page and provide links to the other pages providing access to all the data. Also check “Enable Sorting,” which allows the user to sort the grid by clicking on a column header.
Set the page to be the start page for the application (right-click the page in the Solution Explorer and select “Set As Start Page”) and then run the application. Figure 4-13 demonstrates how the screen should appear.
Notice that the MakeFlag column (which is a Boolean value of some obscure use to the AdventureWorks business model) is shown as a checkbox. Also note that the column headers are shown as links. Click on one of them now—you see that the grid is sorted by that column. Also notice that at the bottom of the grid are links to page through more data, 10 rows at a time. Click on some of those, too, to see the various pages.
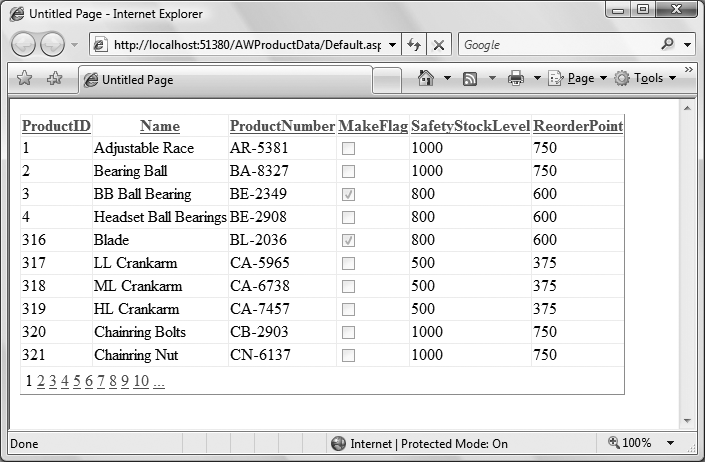
Figure 4-13. With the GridView in place and connected to the data source, you can see the data you asked for. Notice the clickable headings and the paging links.
Each time you click on one of the columns or one of the page numbers, the entire page is posted back to the server, and you’ll encounter a noticeable delay and flicker. You know how to fix that!
Close the browser and return to Design view. Drag an UpdatePanel control onto the page from the AJAX Extensions section of the Toolbox. Drag the SqlDataSource and GridView controls already on the page into the UpdatePanel.
Run the application again. Notice there are no visible postbacks when you page or sort, and consequently, no flicker.
Switch to Source view and look at the markup code that was generated for the GridView. It should appear as highlighted in Example 4-1.
Example 4-1. The GridView auto-generates a lot of control source code for you; you don’t have to write any of this
<%@ Page Language="VB" AutoEventWireup="false" CodeFile="Default.aspx.vb"
      Inherits="_Default" %>
<!DOCTYPE html PUBLIC "-//W3C//DTD XHTML 1.0 Transitional//EN"
      "http://www.w3.org/TR/xhtml1/DTD/xhtml1-transitional.dtd">
<html xmlns="http://www.w3.org/1999/xhtml">
<head runat="server">
   <title>Untitled Page</title>
</head>
<body>
   <form id="form1" runat="server">
   <asp:ScriptManager ID="ScriptManager1" runat="server">
   </asp:ScriptManager>
   <div>
      <asp:UpdatePanel ID="UpdatePanel1" runat="server">
         <ContentTemplate>
            <asp:SqlDataSource ID="SqlDataSource1" runat="server"
               ConnectionString="<%$ ConnectionStrings:AdventureWorksConnectionString %>"
               SelectCommand="SELECT ProductID, Name, ProductNumber, MakeFlag,
                   SafetyStockLevel, ReorderPoint
               FROM Production.Product"></asp:SqlDataSource>
            <asp:GridView ID="GridView1" runat="server" AllowPaging="True"
               AllowSorting="True" AutoGenerateColumns="False"
               DataKeyNames="ProductID" DataSourceID="SqlDataSource1">
               <Columns>
                  <asp:BoundField DataField="ProductID" HeaderText="ProductID"
                     InsertVisible="False"
                     ReadOnly="True" SortExpression="ProductID" />
                  <asp:BoundField DataField="Name" HeaderText="Name"
                     SortExpression="Name" />
                  <asp:BoundField DataField="ProductNumber"
                     HeaderText="ProductNumber" SortExpression="ProductNumber" />
                  <asp:CheckBoxField DataField="MakeFlag"
                     HeaderText="MakeFlag" SortExpression="MakeFlag" />
                  <asp:BoundField DataField="SafetyStockLevel"
                     HeaderText="SafetyStockLevel" SortExpression="SafetyStockLevel" />
                  <asp:BoundField DataField="ReorderPoint"
                     HeaderText="ReorderPoint" SortExpression="ReorderPoint" />
               </Columns>
            </asp:GridView>
         </ContentTemplate>
      </asp:UpdatePanel>
   </div>
   </form>
</body>
</html>
The IDE has done a lot of work for you. It has examined the data source and created a BoundField for each column in the data. Further, it has set the HeaderText to the name of the column in the database, represented by the DataField attribute. It has set the AllowPaging and AllowSorting properties to true. In addition, it has also set the SortExpression property to the name of the field. Finally, you’ll notice on the declaration of the GridView that it has set AutoGenerateColumns to False.
If you were creating the GridView by hand, and if you wanted to let the grid create all the columns directly from the retrieved data, you could simplify the code by setting AutoGenerateColumns to True. (If AutoGenerateColumns is set to True, and you also include explicitly bound columns, then you will display duplicate data.)
To see this at work, create a second GridView by dragging another GridView control from the Toolbox inside the UpdatePanel, below the first. In the Smart Tag, set the Data Source to the same source as that of the first, SqlDataSource1. Click on the “Enable Paging” and “Enable Sorting” checkboxes.
Now go to Source view. If necessary, delete the <columns> collection from the new grid, GridView2. Change AutoGenerateColumns to the default value: True. The declaration for this second GridView should look something like the following:
<asp:GridView ID="GridView2" runat="server"
        AllowPaging="True" AllowSorting="True"
        DataSourceID="SqlDataSource1" >
</asp:GridView>
Run the page. Both grids behave identically and are visually indistinguishable. So why does the IDE create the more complex version? When you turn off AutoGenerateColumns, the IDE gives you much greater control over the presentation of your data. For example, you can set the headings on the columns (such as changing ProductNumber to Product No.). You can change the order of the columns or remove columns you don’t need, and you can add new columns with controls for manipulating the rows.
You can make these changes by manually coding the HTML in the Source view, or by switching to Design view and clicking the Smart Tag for the GridView and choosing Edit Columns. Do that now for GridView1, and you’ll see the Fields dialog box, as shown in Figure 4-14.
This dialog box is divided into three main areas: the list of available fields, the list of selected fields (with buttons to remove fields or reorder the list), and the properties window on the right. When you click on a selected field (such as ProductID), you can set the way that field will be displayed in the data grid (such as changing the header to ID).
While you’re examining what you can do with the GridView, let’s make it look a little nicer. First, delete or comment out the second (simpler) grid (GridView2) you just created a few moments ago. Second, open the Smart Tag on the original grid. Click AutoFormat and choose one of the formatting options. Of course, you can format it by hand, but why work so hard for a simple example? We’ll choose “Brown Sugar” because it shows up well in the printed book. Run the application. The output should appear as in Figure 4-15.

At this point, the SqlDataSource you’ve created has only a SELECT statement to extract data from the database:
SelectCommand="SELECT ProductID, Name, ProductNumber,
   MakeFlag, SafetyStockLevel, ReorderPoint
   FROM Production.Product" >
That’s fine, if all you want to do is display the data in the database. To take the next step, though, you probably want to be able to add new data, edit existing data, and even delete data.
You can do all that just as easily as you did the SELECT statement, by asking your data source control to generate the remaining Create, Retrieve, Update, and Delete statements (fondly known as CRUD statements), using a wizard to make your work easier.
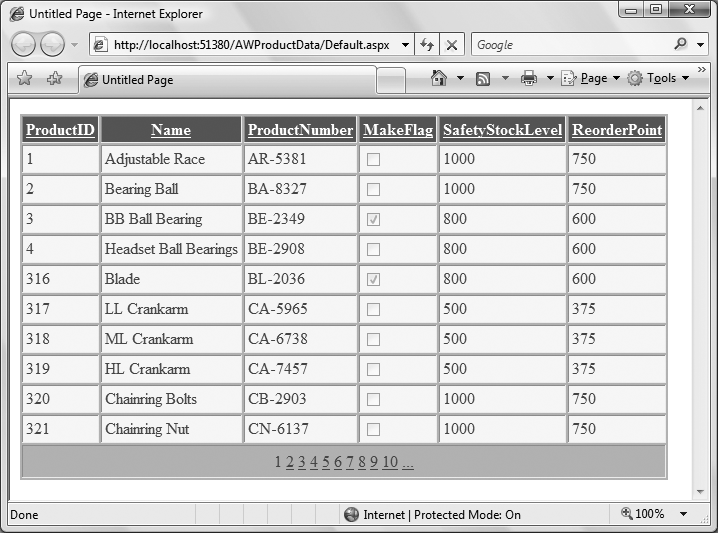
Figure 4-15. The AutoFormat option in the GridView’s Smart Tag lets you choose the formatting option that best fits your site, and applies it automatically.
To see this in action, switch to Design view, click on the Smart Tag for the SqlDataSource, and choose Configure Data Source. The Configure Data Source Wizard opens, displaying your current connection string. Click Next; the Configure Select Statement dialog box is displayed, as shown earlier in Figure 4-8.
Recall the previous time you used the Configure Data Source Wizard—it did not correctly identify the table in the autogenerated SELECT statement, omitting the schema name. You worked around that by specifying your own SQL statement. Because the SELECT statement you needed was relatively simple to type in, that was not a problem.
However, there is a lot of typing involved for all the CRUD statements. So for the rest of these statements, you will use the Wizard to generate the SQL code, and then just fix the table names.
Make sure the “Specify columns from a table or view” radio button is selected, and the Product table is selected. Check the columns you want returned by the SELECT statement (ProductID, Name, ProductNumber, MakeFlag, SafetyStockLevel, ReorderPoint). This will create a new SELECT statement.
Click the Advanced button to open the Advanced SQL Generation Options dialog box. Select the “Generate INSERT, UPDATE, and DELETE statements” checkbox, as shown in Figure 4-16.
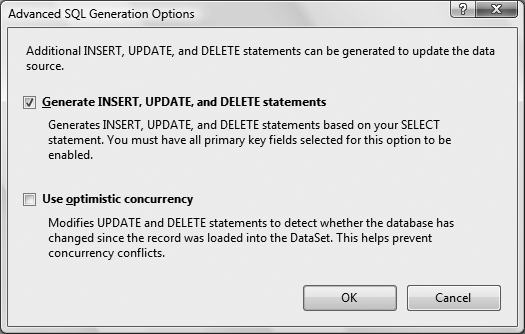
Figure 4-16. You’ll use the Advanced SQL Options dialog box to automatically create the SQL statements to add, edit, and delete data from your data source.
Clicking this checkbox instructs the Wizard to create the remaining CRUD statements, and also enables the second checkbox, “Use optimistic concurrency.” This is a feature that helps safeguard your data in case another user makes a change to the database at the same time you do. Leave this option unchecked for now and click OK. When you return to the Wizard, click Next, and then Finish. You may be asked to update your grid, which unfortunately will wipe out all your customization, but the good news is that you are now bound to a data source control that provides all four CRUD methods.
Open the Smart Tag on the GridView control again, and reapply the look and feel you want. Also—and this is important—select the checkboxes “Enable Editing” and “Enable Deleting.”
Switch to Source view. The SqlDataSource markup will appear similar to Example 4-2, with the new SQL commands added. You’ll still need to modify the table names, or else you’ll get the error you saw earlier (see Figure 4-9). Add the schema name [Production] to each of the four statements highlighted in Example 4-2. (You can use Visual Studio’s Quick Find feature (Ctrl + F) to quickly locate each instance of [Product] in your code.)
Example 4-2. After you update the properties of the SqlDataSource control with CRUD statements, it should look like this
<asp:SqlDataSource ID="SqlDataSource1" runat="server"
    ConnectionString="<%$ ConnectionStrings:AdventureWorksConnectionString %>"
    SelectCommand=" SELECT [ProductID], [Name], [ProductNumber],
                   [MakeFlag], [SafetyStockLevel], [ReorderPoint]
                   FROM [Production].[Product]"
    DeleteCommand="DELETE FROM [Production].[Product]
                   WHERE [ProductID] = @ProductID"
    InsertCommand="INSERT INTO [Production].[Product] ([Name],
                   [ProductNumber],
                   [MakeFlag], [SafetyStockLevel], [ReorderPoint])
                   VALUES (@Name, @ProductNumber, @MakeFlag,
                   @SafetyStockLevel,
                   @ReorderPoint)"
    UpdateCommand="UPDATE [Production].[Product] SET [Name] = @Name,
                   [ProductNumber] = @ProductNumber,
                   [MakeFlag] = @MakeFlag,
                   [SafetyStockLevel] = @SafetyStockLevel,
                   [ReorderPoint] = @ReorderPoint
                   WHERE [ProductID] = @ProductID" >
    <DeleteParameters>
        <asp:Parameter Name="ProductID" Type="Int32" />
    </DeleteParameters>
    <UpdateParameters>
        <asp:Parameter Name="Name" Type="String" />
        <asp:Parameter Name="ProductNumber" Type="String" />
        <asp:Parameter Name="MakeFlag" Type="Boolean" />
        <asp:Parameter Name="SafetyStockLevel" Type="Int16" />
        <asp:Parameter Name="ReorderPoint" Type="Int16" />
        <asp:Parameter Name="ProductID" Type="Int32" />
    </UpdateParameters>
    <InsertParameters>
        <asp:Parameter Name="Name" Type="String" />
        <asp:Parameter Name="ProductNumber" Type="String" />
        <asp:Parameter Name="MakeFlag" Type="Boolean" />
        <asp:Parameter Name="SafetyStockLevel" Type="Int16" />
        <asp:Parameter Name="ReorderPoint" Type="Int16" />
    </InsertParameters>
</asp:SqlDataSource>
Switch back to Design view and notice the Edit and Delete buttons on each row. They are the result of checking the Enable Editing and Enable Deleting checkboxes.
Taking apart the code in Example 4-2, on the first line is the declaration for the SqlDataSource (and its corresponding closing tag at the bottom). After the ID, the obligatory runat="server", and the ConnectionString attribute, you see four attributes: the SelectCommand (which was there previously), and the new DeleteCommand, InsertCommand, and UpdateCommand.
Warning
If you run this web site and click on the Delete button to delete a row from the Product table, you will get the following error, raised by the database:
Sys.WebForms.PageRequestManagerServerErrorException:
The DELETE statement conflicted with the REFERENCE
constraint"FK_ProductInventory_Product_ProductID".
The conflict occurred in database "AdventureWorks",
table "Production.ProductInventory",
column 'ProductID'.
The statement has been terminated.
This error is caused by a constraint on the data, enforced by the database, which prevents the deletion of a record that is referenced elsewhere in the database. In other words, the product you are trying to delete is referenced in the ProductInventory table. If you were to delete that record from the Product table, there would be orphan records left behind in the ProductInventory table, which is a violation of the business rules of this database.
In a real-world application, the way to handle this would be to write some custom SQL code, called a stored procedure, which would first delete all the child records from the ProductInventory table, then delete the record from the Product table. The SqlDataSource control would then be configured to use that stored procedure for the Delete command, rather than the SQL statement it is currently configured to use. Unfortunately, stored procedures are beyond the scope of this book. However, our more advanced book, Programming ASP.NET, Fourth Edition, does cover this sort of situation.
The DeleteCommand takes a single parameter (@ProductID), which is specified in the DeleteParameters element:
<Delete Parameters>
    <asp:Parameter Name="ProductID" Type="Int32" />
</DeleteParameters>e
The UpdateCommand control requires more parameters, one for each column you’ll be updating, as well as a parameter for ProductID (to make sure the correct record is updated). Similarly, the InsertCommand takes parameters for each column for the new record. All of these parameters are within the definition of the SqlDataSource.
Now that your SqlDataSource object is ready to go, you only have to set up your GridView control. In Design view, click on the GridView Smart Tag. Verify that the checkboxes to enable editing and deleting are selected, as shown in Figure 4-17.
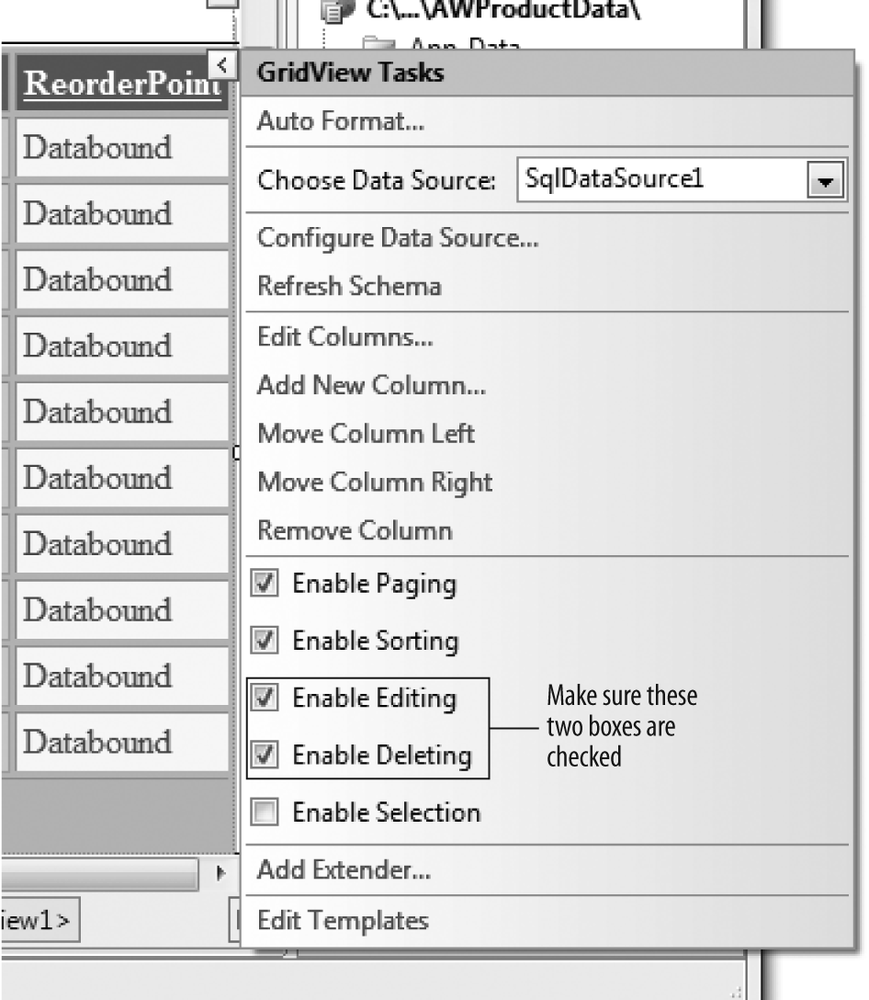
Figure 4-17. Select the Smart Tag on the GridView, and check the boxes to enable editing and deleting.
If you prefer to have buttons for Edit and Delete, rather than links, click on the Smart Tag and select “Edit Columns.…” When the Fields dialog box opens, click the Command Field entry in the Selected Fields area (on the lower left). This brings up the Command Field Properties in the right-hand window. In the Appearance section of the Fields editor, choose ButtonType and then change Link to Button in the drop-down menu next to ButtonType, as shown in Figure 4-18.
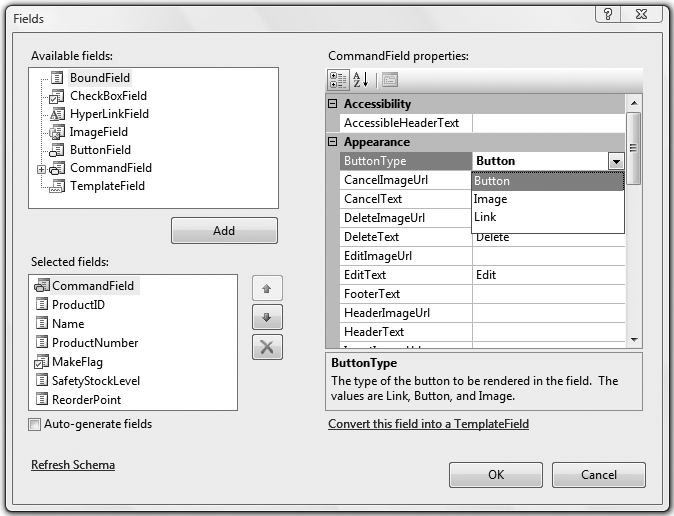
Figure 4-18. Click the Smart Tag of the GridView, then click Edit Columns to get this Fields dialog box, where you can select and edit the columns in the GridView. Here, the CommandField button type is being changed.
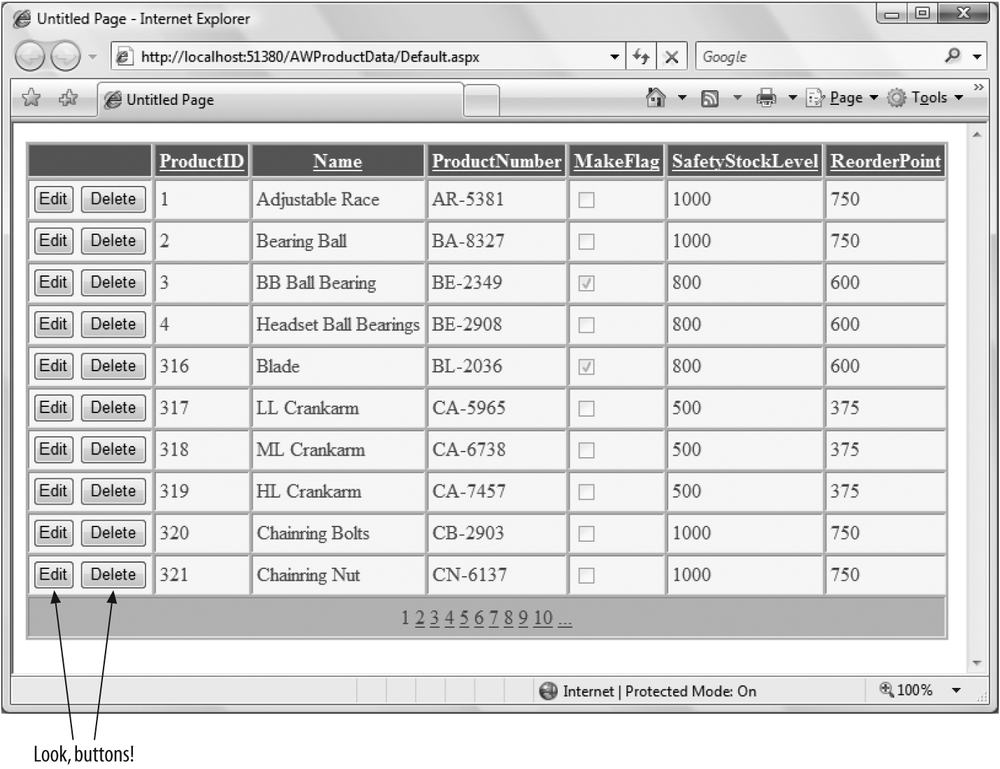
The result is that the commands (Edit and Delete) are shown as buttons, as shown in Figure 4-19.
Start the application. The product database information is loaded into your GridView. When you click the Edit button, the data grid automatically enters edit mode. You’ll notice that the text fields you can edit change to text boxes and checkboxes, as appropriate, and the command buttons change from Edit and Delete to Update and Cancel. Make a small change to one field, as shown in Figure 4-20.
When you click the Update button for that row, the grid and the database are both updated, which you can confirm by opening the table in the database, as shown in Figure 4-21.
To open the database table, stop the application first. Then, on the right side of the IDE, click the Database Explorer tab (it is called Server Explorer in VS). Expand the AdventureWorks node, and then expand the Tables node. Scroll down until you find the Product (Production) table (in the IDE, the schema name is displayed in parentheses after the table name—go figure), then right-click it, and select “Show Table Data.” This will show you the contents of the table from within the IDE.
Suppose you would like to modify the grid so the contents of the Name column are red when the MakeFlag column is checked, that is, when its value is True. In addition, you want all the ProductNumbers that begin with the letters CA to display in green. You can do this by handling the RowDataBound event. As the GridView is populated with data, each row of data is bound to the GridView individually, and the RowDataBound event is fired once for each row.
To modify the GridView, switch to Design view, click the GridView, click the lightning bolt in the Properties window, and double-click in the method name column (currently blank) to the right of the RowDataBound event. The IDE will create an event handler named GridView1_RowDataBound( ) and then place you in the code-behind file within the skeleton of that method, ready for you to start typing code.

Figure 4-20. When you click Edit on a row, that row enters edit mode. Any fields that can be edited change to text boxes and checkboxes.
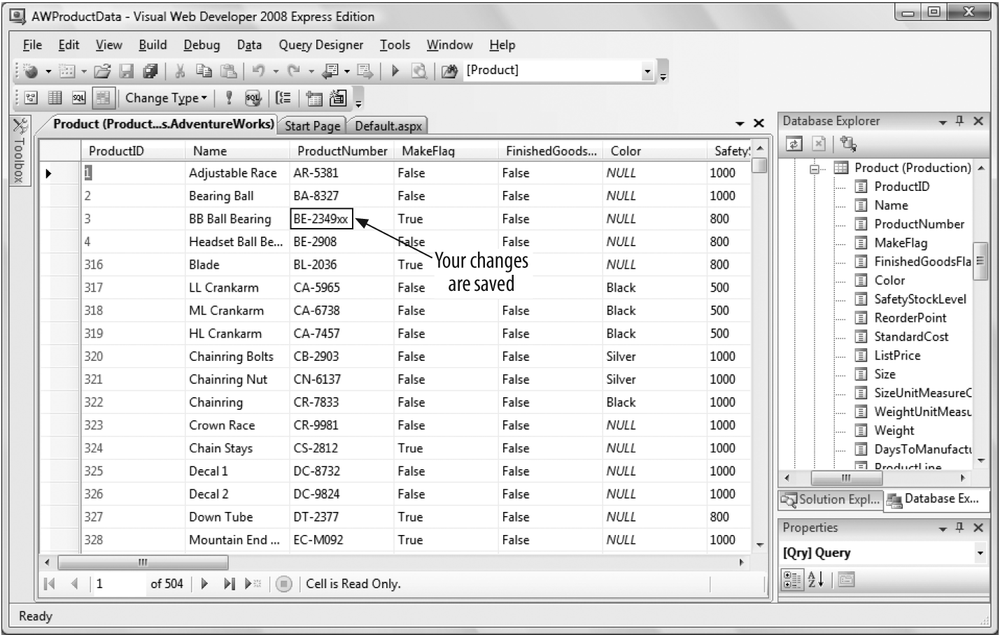
Figure 4-21. If you view the table in the database after editing it in the GridView, you’ll see that the changes have been saved.
The second argument to this method is of type GridViewRowEventArgs. This object has useful information about the row that is being data bound, which is accessible through the Row property of the event argument.
Enter the code shown in Example 4-3.
Example 4-3. The handler for the RowDataBound event lets you extract individual cells and work with them
Protected Sub GridView1_RowDataBound(ByVal sender As Object, _
              ByVal e As System.Web.UI.WebControls.GridViewRowEventArgs) _
              Handles GridView1.RowDataBound
   If e.Row.RowType = DataControlRowType.DataRow Then
      Dim cellProductNumber As TableCell = e.Row.Cells(3) ' ProductNumber column
      If cellProductNumber.Text.Substring(0, 2) = "CA" Then
          cellProductNumber.ForeColor = Drawing.Color.Green
      End If

      Dim cellMakeFlag As TableCell = e.Row.Cells(4) ' MakeFlag column
      Dim cb As CheckBox = CType(cellMakeFlag.Controls(0), CheckBox)
      If cb.Checked Then
          e.Row.Cells(2).ForeColor = Drawing.Color.Red
      End If
   End If
End Sub
The first If statement (highlighted in Example 4-3) tests if the type of Row passed in as a parameter—in other words, the row that was bound and triggered this event—is a DataRow (rather than a header, footer, or something else).
Once you know you are dealing with a DataRow, you can extract the cell(s) you want to examine from that row. Here, we will look at two cells: the ProductNumber cell is the fourth cell in the row, at offset (index) 3, and the MakeFlag cell is the fifth cell in, at offset 4. (Remember, all indexes are zero-based.)
To access the ProductNumber cell, you define a new variable, cellProductNumber, defined as a TableCell with the As keyword, and set it equal to the cell at offset 3 in the row, like this:
Dim cellProductNumber As TableCell = e.Row.Cells(3)
Once you have the cell as a variable, you want to get the text contained in the cell to compare to your known value. You do that by accessing the Text property of cellProductNumber, and then using the Substring( ) function.
The Substring() function, as you might guess from its name, extracts a smaller string from a larger one. This is a pretty simple function to work with. First, you call the function on a string, and you give it two numbers as parameters: the index of the start of the substring, and the length of the substring. As with all other indexes, the first character in the string is position zero. You want the first two characters from the Text string, so the starting index is 0, and the length of the substring is 2. Therefore, to get the first two characters from your string, you use the function Substring(0,2). Once you have that substring, you can use a simple If statement to compare it to the string you want to match, “CA”:
If cellProductNumber.Text.Substring(0, 2) = "CA" Then
It there is a match, you want to set the ForeColor property of the cell to green, which you can do using the Drawing.Color.Green property:
cellProductNumber.ForeColor = Drawing.Color.Green
In the case of the MakeFlag field, it is somewhat more complicated. It’s easy enough to isolate the cell that contains the checkbox—it’s at index 4—and then assign that value to a new variable called cellMakeFlag:
Dim cellMakeFlag As TableCell = e.Row.Cells(4)
This is the same technique you used to isolate the ProductNumber cell. In this case, though, the Text property of this cell will always be empty. However, the cell does contain a CheckBox control, which is the only control in the cell. Instead of reading the text in the cell, you want to read the value of the Checked property of that CheckBox control. Each cell has a collection of all the controls contained in the cell, called Controls, which has a zero-based index. Because the checkbox you want is the only control in the collection, you know it’s at cellMakeFlag.Controls(0). Next, you define a new variable, cb, which you define as a CheckBox. Then, you use the CType function on the control you just isolated, to convert the control to a CheckBox. This works because we know it is a CheckBox:
Dim cb As CheckBox = CType(cellMakeFlag.Controls(0), CheckBox)
Then, you test the Checked property of the CheckBox:
If cb.Checked Then
If the box is checked, cb.Checked will evaluate to true. If it is checked, you want to set the ForeColor property of the third cell in the row (offset 2), the ProductName column:
e.Row.Cells(2).ForeColor = Drawing.Color.Red
You set the color of the cell the same way you did for ProductNumber, but notice this time you’re not changing the color of the checkbox cell itself—you’re changing a different cell in the table.
Run the web site. It will look identical to Figure 4-19 (shown earlier in this chapter), except the product names for which the MakeFlag field is checked will display in red, and some of the product numbers will display in green, although you may need to page through the data to find them. (Neither of these changes will be obvious in the printed book, so we will forego a figure showing the color changes.)
Often you need to select a row from the grid and extract data from that row. This is easy to do using the SelectedIndexChanged event of the GridView.
To see how this works, drag a Label control from the Standard section of the Tool-box onto the Design view, below the grid, but within the UpdatePanel control. Change the Text property of this Label to Name. Then, drag a TextBox control next to the Label. Change its ID property to txtName and set its ReadOnly property to True. You now have a place to display the name of the selected item from the grid.
Click on the Smart Tag of the GridView and check the “Enable Selection” checkbox. This will cause a Select button to display in the first column of the grid, next to the Edit and Delete buttons already there, as shown in Figure 4-22.
Now all you need to do is set up the event handler to respond to the Select buttons. Double-click on the Select button in the first row of the grid. This will open up the code-behind file with the skeleton of the SelectedIndexChanged already created for you, ready to accept your custom code. Enter the highlighted code from the following snippet:
Protected Sub GridView1_SelectedIndexChanged(ByVal sender As Object, _
      ByVal e As System.EventArgs) _
      Handles GridView1.SelectedIndexChanged
   If GridView1.SelectedRow.RowType = DataControlRowType.DataRow Then
      Dim cellName As TableCell = GridView1.SelectedRow.Cells(2) ' Name column
      txtName.Text = cellName.Text
   End If
End Sub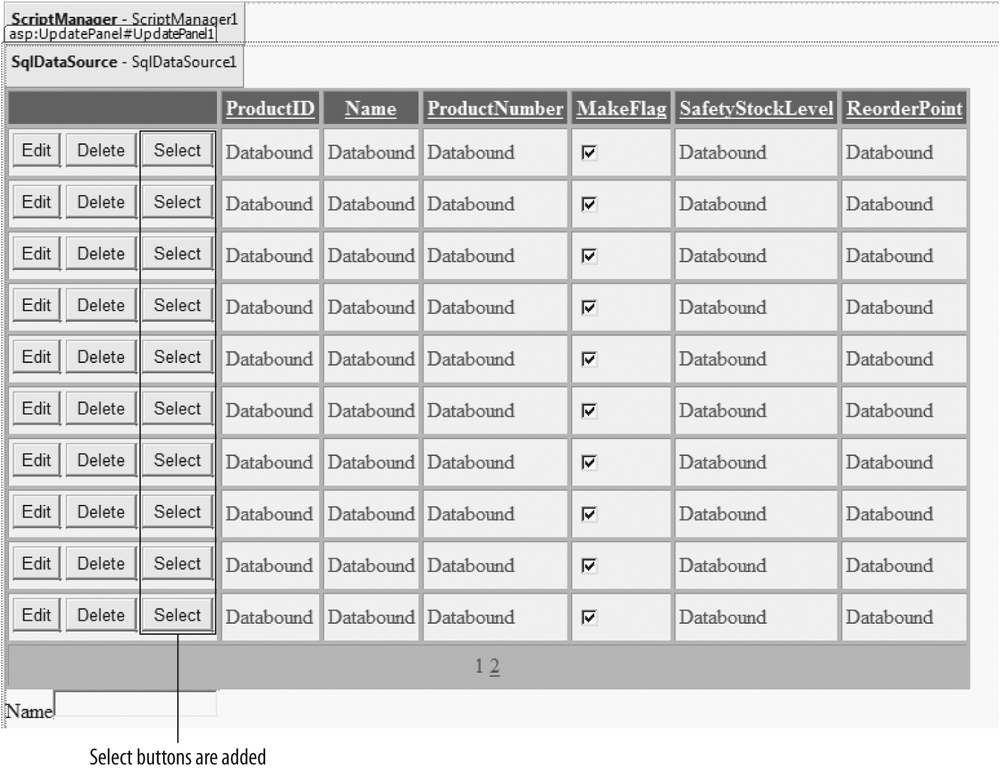
Figure 4-22. Clicking Enable Selection in the Smart Tag causes Select buttons to appear in a GridView.
This code first tests to determine if the selected row is a DataRow (as opposed to a HeaderRow or a FooterRow). If it is a DataRow, it creates a variable of type TableCell, to which you assign the third cell in the selected row (because of zero-based indexing, the third item will have an index value of 2). Then the Text property of the TextBox is set equal to the Text property of that cell.
Run the app and click on one of the Select buttons. The name from the selected row appears in the TextBox.
Sometimes you do not want to display all the records in a table. For example, you might want to have users select a product from your grid and display the order details for that product somewhere else on the current page. To do this, you’ll need a way to select a product as well as a way to pass the ID of the selected product to the second grid. The Select buttons are already in place from the previous example, so all you need to do now is pass the ID of the selected product to the second grid.
To keep your examples clear, copy the previous example, AWProductData to a new web site, AWProductDataOrderDetails.
Tip
See Appendix B for details about copying a web site.
You need to create a second GridView, which will be used to display the order details. From the Toolbox, drag the second GridView onto the page below the first, after the Label and TextBox, and inside the pre-existing UpdatePanel. Open the Smart Tag for the GridView. In the Choose Data Source field of the Smart Tag, select <New Data Source> this time instead of using an existing DataSource control. The Data Source Configuration Wizard appears, but with a new screen this time, shown in Figure 4-23. Select the Database option, and name the data source AdventureWorksOrderDetails.
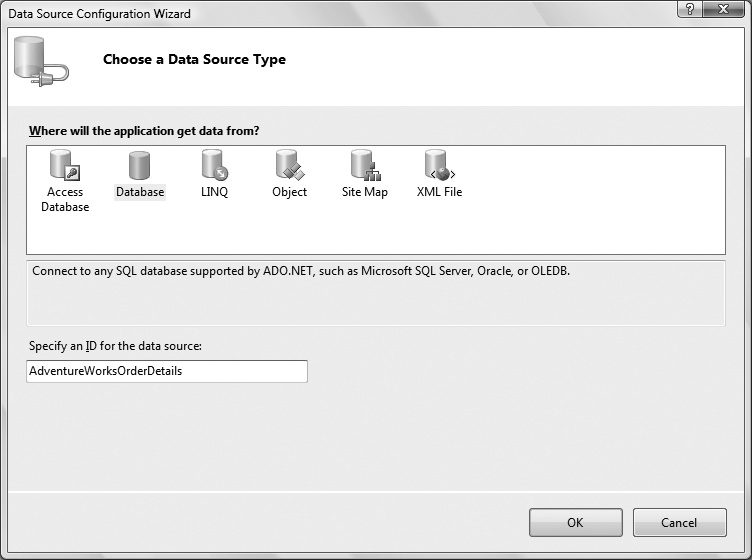
Figure 4-23. You’re creating a new data source control this time, instead of using one you’ve already placed on the page. Select Database as the type, and name it AdventureWorksOrderDetails.
Click OK, and you’ll see the connection string screen from Figure 4-4; use the existing connection string. Choose the SalesOrderDetail table, select the columns SalesOrderID, CarrierTrackingNumber, OrderQty, UnitPrice, UnitPriceDiscount, and LineTotal, and then click the WHERE button, as shown in Figure 4-24.
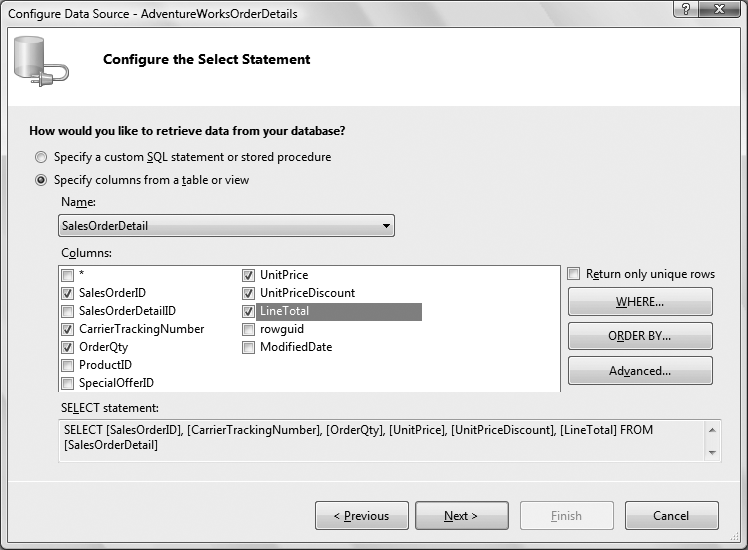
Figure 4-24. Configuring the SalesOrderDetail table SELECT statement is similar to the way you set up the first DataSource, but this time, you’ll add a WHERE clause.
A WHERE clause is a SQL language construct used to narrow the set of data returned by the SELECT statement. In other words, you’re saying, “Get me all the records from this table, where this condition is true.” The condition could be defined any number of ways—where the amount in inventory is less than 10, where the customer name is “Smith,” or where the copyright date is after 1985. It all depends on the types of information you have stored in your tables, and what you need for this circumstance.
When you click the WHERE button, the Add WHERE Clause dialog opens, which you can see in Figure 4-25. First, you pick the column you want to match on; in this case, ProductID. Next, pick the appropriate operator for your condition statement. Your choices include (among others): equal to, less than/greater than, like, and contains. For this exercise, use the default (=).
The third drop-down lets you pick the source for the ProductID—that is, where you will get the term you want to match on. You can pick from any one of several objects in the menu, or choose None if you’ll be providing a source manually. In this case, you’ll obtain the source of the ProductID from the first GridView, so choose Control.
When you choose Control, the Parameter properties panel of the dialog wakes up. You are asked to provide the ID of the Control containing the target parameter. Select GridView1. Once you’ve made all your choices, the screen will resemble Figure 4-25.
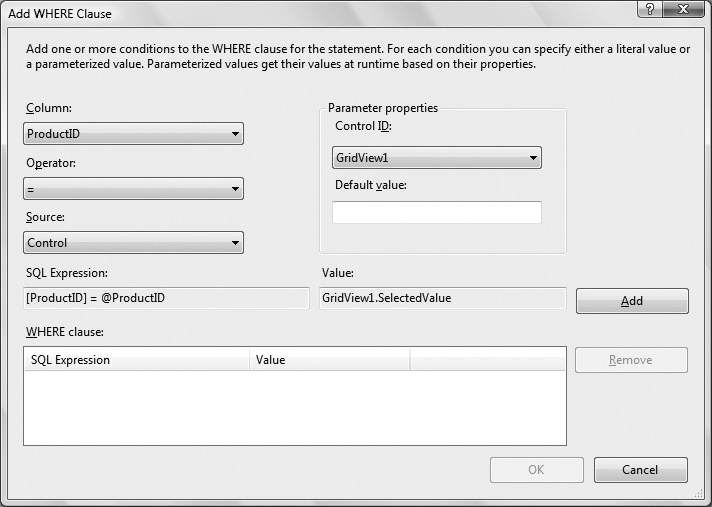
Figure 4-25. Add a WHERE clause to your SELECT statement with the Add WHERE Clause dialog. You select the column, the operator, and the source here.
Click Add. When you do, the upper portion of the dialog returns to its initial (blank) state, and the WHERE clause is added to the WHERE Clause window. You could add additional WHERE clauses at this point, to further restrict the data, but that is not necessary for this example.
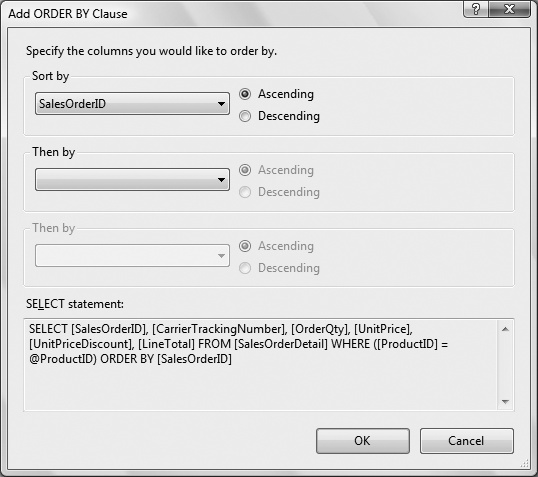
Click OK to return to the ConfigureData Source dialog box. While you are at it, sort the results by the SalesOrderID column by clicking on the ORDER BY button. The Add ORDER BY Clause dialog with the SalesOrderID column selected is shown in Figure 4-26. The ORDER BY clause is another SQL construct, and this one does just what its name implies—it sorts the results using the specified field for the sort order.
Click OK, then Next, then Finish, and the Configure Data Source Wizard is finished.
Switch to Source view and again fix the name of the tables in the SQL statements that were auto-generated. This time, you’ll need to add [Sales] in front of the [SalesOrderDetail] item because this data is from the Sales table. The markup for the second GridView and its associated SqlDataSource is shown in Example 4-4, with the corrected table name highlighted. Also highlighted are the results of the WHERE and ORDER BY buttons from the Configure Data Source Wizard.
Example 4-4. Visual Studio supplies the select parameters for you, but you still need to fix the schema in the second GridView
<asp:GridView ID="GridView2" runat="server"
   DataSourceID="AdventureWorksOrderDetails">
</asp:GridView>
<asp:SqlDataSource ID="AdventureWorksOrderDetails" runat="server"
   ConnectionString="<%$ ConnectionStrings:AdventureWorksConnectionString %>"
   SelectCommand="SELECT [SalesOrderID], [CarrierTrackingNumber], [OrderQty],
      [UnitPrice], [UnitPriceDiscount], [LineTotal]
      FROM [Sales].[SalesOrderDetail]
      WHERE ([ProductID] = @ProductID)
      ORDER BY [SalesOrderID]">
   <Select Parameters>
      <asp:ControlParameter
         ControlID="GridView1"
         Name="ProductID"
         PropertyName="SelectedValue"
         Type="Int32" />
   </Select Parameters>
</asp:SqlDataSource>
The SELECT statement now has a WHERE clause that includes a parameterized value (@ProductID). In addition, within the definition of the SqlDataSource control is a definition of the SelectParameters. This includes one parameter of type ControlParameter, which is a parameter that knows how to get its value from a control (in our example, GridView1). In addition, a second property, PropertyName, tells it which property in the GridView to check. A third property, Type, tells it that the type of the value it is getting is of type Int32, so it can properly pass that parameter to the SELECT statement.
You may now reformat your grid and edit the columns as you did for the first grid, and then try out your new page, which should look something like Figure 4-27.
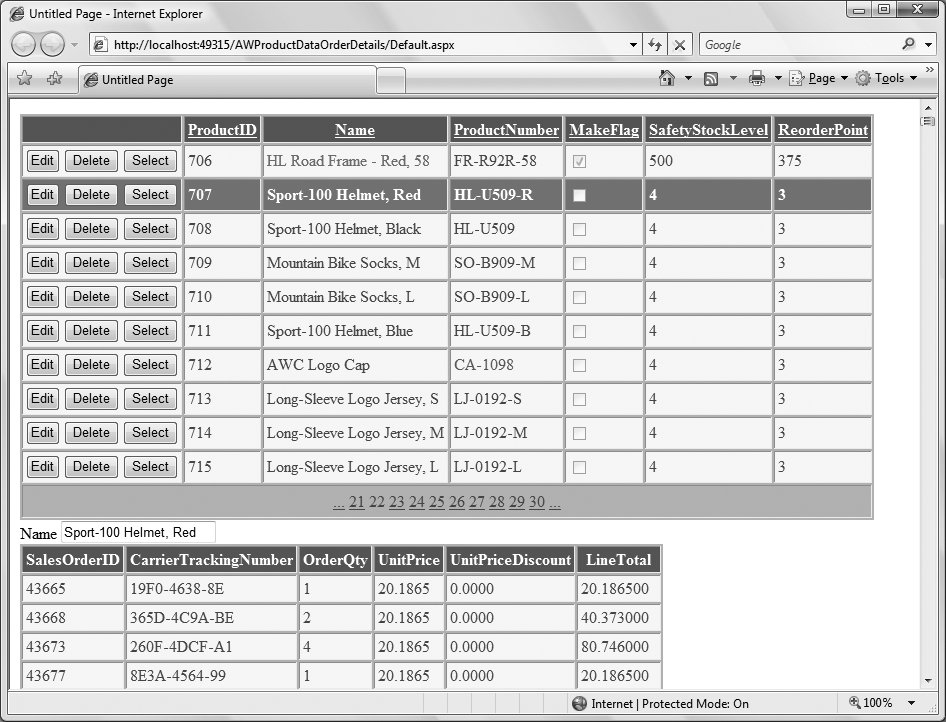
Figure 4-27. When you select a product in the first grid, the order details appear below in the second grid.
Warning
The AdventureWorks database has no order details for any of the entries with ProductIDs below 707. The first entry with details is on Code-Behind Files of the grid, so be sure to move to Code-Behind Files (or later) to see product details (or click the ProductID header to see the products in descending order). If you select a product that does not have any order details, the second grid will not appear.
As we mentioned earlier, most relational databases use some variant of SQL to retrieve and manipulate data. Much of the business logic of the application is contained within this SQL code—either as SQL statements passed to the database by your web app for execution, or as calls to stored procedures on the database server. A stored procedure is a predefined set of instructions that you can call from somewhere else in your code. Because you can dynamically build the SQL statements and pass parameters at runtime, this is a very powerful and flexible paradigm.
However, it has its shortcomings. The first is the headache of maintaining the code. In almost any typically complex web site, you probably want to implement most, if not all, of the database logic in stored procedures. This means that, at best, you will have source code in two separate locations—the file system where all your markup, code behind, and associated files live, and the database itself, where the stored procedures are. Even assuming that you have a suitable system in place for source code management (which in itself is the topic of many books), before you can implement features or fix bugs, you (the developer) must first determine if that piece of logic is handled on the file system or in the database.
A second, subtle but more important shortcoming has to do with what is referred to as the impedance mismatch between the object-oriented nature of .NET projects versus the table-oriented nature of relational data. In other words, in an object-oriented environment such as .NET, you work with instances of classes called objects. These classes may have properties, which describe the object, and methods, which define actions of the object. On the other hand, databases are constructed of tables, which contain rows and columns.
For example, you might have a class called Dog, with the properties of Breed, Color, and Weight. It also might have methods to create a new Dog, retrieve or modify a preexisting Dog, and save a Dog to the database. So your code might create an instance of a Dog, called coco, set some properties, and save the Dog to the database with code similar to the following:
Dim coco As Dog = New Dog()
coco.Breed = "Black Lab"
coco.Color = Drawing.Color.Black
coco.Weight = 52
coco.Save()
The Save() method would have to handle the not-so-trivial chore of converting the object into data that the database can save. Typically, this means the object itself would be represented by a row in a table, and the properties would be represented by columns within that row. Likewise, when retrieving data from the database, that data must be converted to the appropriate objects and properties for your program to work with it.
To address these issues, the .NET Framework 3.5 introduces a new language capability called LINQ, which stands for Language Integrated Query. LINQ is now part of all .NET 3.5 languages, including VB.NET and C#. It integrates query capability directly into the language as a first class feature, just like .NET languages include features such as data types, events, and conditional logic. Using LINQ, you can now interact with your data in a truly object-oriented fashion, writing code in VB or C# rather than in SQL.
Tip
To accomplish LINQ, several new language features have been added, such as type inference, anonymous types, and lambda expressions, which we are not going to cover in this book. LINQ is a big topic—it merits its own books, as well as chapters in several other books, including Programming .NET 3.5 by Jesse Liberty and Alex Horovitz, Programming C# 3.0, Fifth Edition, by Jesse Liberty and Donald Xie, and Programming Visual Basic 2008 by Tim Patrick, all published by O’Reilly.
To go along with LINQ, VS 2008 and VWD 2008 provide some significant new tools, including the Object Relational Designer and the LinqDataSource control.
LINQ is an advanced topic for developers, and the classes it employs are well beyond anything we use elsewhere in this book. In that sense, our discussion here goes against the “minimal coding” promise that we made at the beginning of this book. There’s no other way to discuss LINQ except in terms of the classes it creates, however. In addition, we feel that LINQ is an interesting technology that addresses a couple of problems, but it’s not yet developed enough to be useful at the beginner level. We’re including it here because it’s a major part of ASP.NET 3.5 that you should know about, but we don’t think you’re likely to use it much in its current version.
LINQ works with an object model, a set of classes mapped to your database. You can create those classes manually by typing in a lot of code (IntelliSense will help), or you can let the IDE do most of the heavy lifting by using the Object Relational Designer. The Object Relational Designer, or O/R Designer, is a visual tool that performs two crucial tasks.
First, it creates the classes, or entities, that represent a database. Each table is mapped to its own class. Within that class, there will be property for each column in the table.
The properties are strongly typed. In other words, the data type of each property matches the data type of the corresponding column in the database table. This is important because it provides one of the big benefits of working with LINQ. Suppose the table has a column called ProductID, which is an integer (that would be an int in Transact SQL). The corresponding property in VB would of type Integer. This would be reflected by IntelliSense anywhere it was appropriate to use this property, and if you attempted to assign, say, a string to this property, the IDE would immediately flag this as invalid code and it would not build.
The other important task performed by the O/R Designer is to create a DataContext, which is an object used to send and receive data between your entities and the database. In other words, the DataContext is the bridge between the LINQ object model and the actual database. This will all become clear in a moment when we show you an example.
Just as ASP.NET provides a SqlDataSource control to provide easy access to data using SQL commands, it also provides a LinqDataSource control to provide similar access using LINQ. Once you have created your object model and DataContext with the O/R Designer, the LinqDataSource control can use that to be a binding source to other controls, such as a GridView.
To see this in action, create a new web site. Call it LinqDataSource. Select the Website → Add new Item… menu command. When the Add New Item dialog box comes up, select the LINQ to SQL Classes template. The default name will be DataClasses.dbml. Change this to AdventureWorks.dbml, and click the Add button. You will immediately be presented with the warning dialog box shown in Figure 4-28. Click Yes to accept this recommendation. (We will explain this in a moment.)
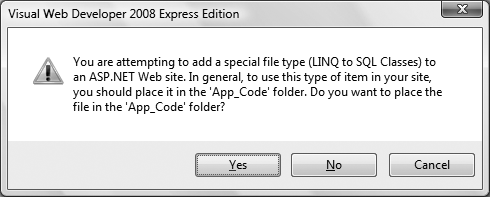
Figure 4-28. When you create a LINQ to SQL Classes file, you are prompted to place it in a special folder. Click Yes to accept this recommendation.
After the IDE cooks for a bit, you will see in the Solution Explorer a new folder called App_Code as part of the web site. Within this folder will be a file called AdventureWorks.dbml with a plus sign next to it. Clicking on that plus sign expands it out to show two associated files also in the App_Code folder, AdventureWorks.dbml.layout and AdventureWorks.designer.vb, as shown in Figure 4-29.
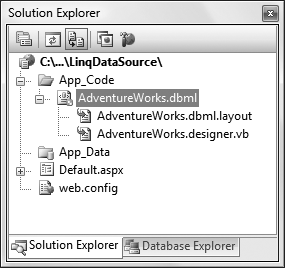
Figure 4-29. After you add a LINQ to SQL Classes file, three new files will appear in an App_Code fold.
The design surface of the IDE will now be showing the Object Relational Designer, which contains two panes side by side. Clicking anywhere within the O/R Designer will show the properties of the AdventureWorksDataContext (whew! that’s a mouthful) in the Properties window. The IDE will now look something like that shown in Figure 4-30.
A lot has just happened here, so let’s look at this a bit more carefully.
First, when you added the new item to the web site, the name of the template was “LINQ To SQL Classes”. Notice it is plural, which might seem to be a typo. Remember, however, that the O/R Designer maps each individual database table to its own class. So, in the typical case, there will be multiple classes contained in this single item. Those classes will all be created for you in the file AdventureWorks.designer.vb.
Open this file in the IDE by double-clicking it in the Solution Explorer. A lengthy comment at the top reminds you that this file is auto-generated and warns against making any changes. At this point, the file contains just a small amount of boilerplate code, as you have not yet added any tables to the O/R Designer. The key point to notice here is that this source code declares a class called AdventureWorksDataContext, which inherits from System.Data.Linq.DataContext:
Partial Public Class AdventureWorksDataContext
    Inherits System.Data.Linq.DataContext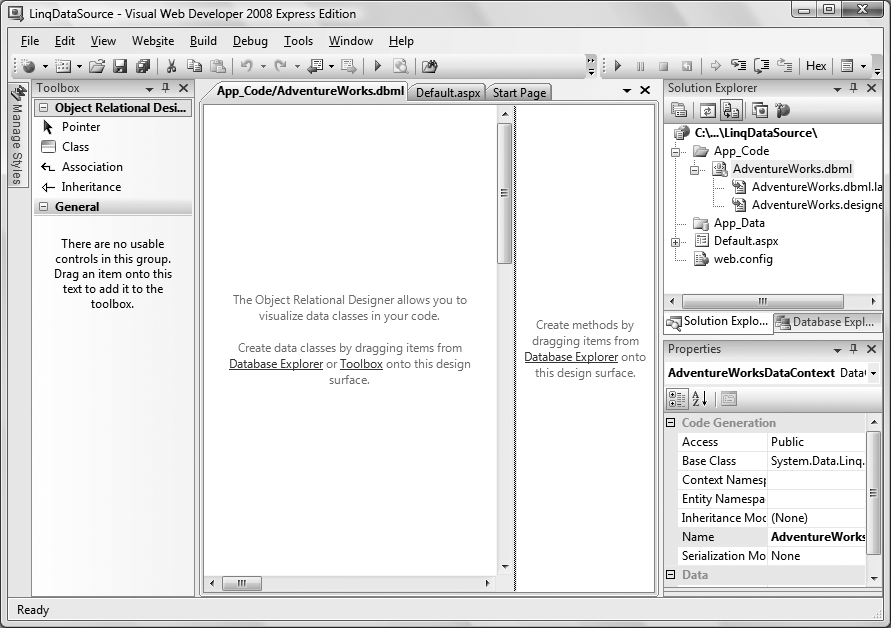
Remember, the DataContext is the bridge between the object model, or classes, and the database. The class name is created automatically from the name you gave to the “LINQ to SQL Classes” item you added to the web site, concatenated with DataContext. Close this file when you’ve finished looking at it.
In Figure 4-30, the AdventureWorks.dbml file is selected in the Solution Explorer, which displays the O/R Designer on the design surface. The Properties window shows the properties of this object model. This reflects details of the class declaration in the above code snippet.
The next question you might ask is “Why put these files into the special folder called App_Code?”. For any class to be available to a .NET application, the class must be compiled into a dll, or dynamic link library, and properly referenced by the application. Fortunately, the .NET Framework and VS/VWD makes it easy to accomplish this by accommodating two special folder names within the project. The first special folder name is bin. Any pre-compiled dll files contained within the bin folder are automatically referenced by the application. The second special folder is the aforementioned App_Code folder. Any class source code files, typically with an extension of .vb (for an app written with VB.NET; the equivalent extension for a C# app is .cs) in the App_Code folder will automatically be compiled and referenced when the application is built.
Along the left side of Figure 4-30, the Toolbox contains controls available to use in the O/R Designer. You can create your own classes by dragging the Class control onto the design surface. You can add properties to that class by right-clicking the class and selecting Add → Property. You can also create relationships between classes with the Association and Inheritance controls. We will not be using these controls in this book, although they can be very useful in more advanced scenarios.
With the O/R Designer open, you are ready to start building your object model from the database. Open the Database Explorer (Server Explorer in Visual Studio). You should already have a Data Connection to the AdventureWorks database from the previous examples in this chapter. If not, right-click on Data Connections and click Add Connection .… Follow the steps outlined in Figure 4-5 to create the connection.
Expand the connection to the AdventureWorks database by clicking on the plus sign next to it. Then, expand the list of tables by clicking the plus sign next to Tables. Scroll down to find the Product table and drag that table onto the left pane of the O/R Designer. The screen should like something like Figure 4-31.
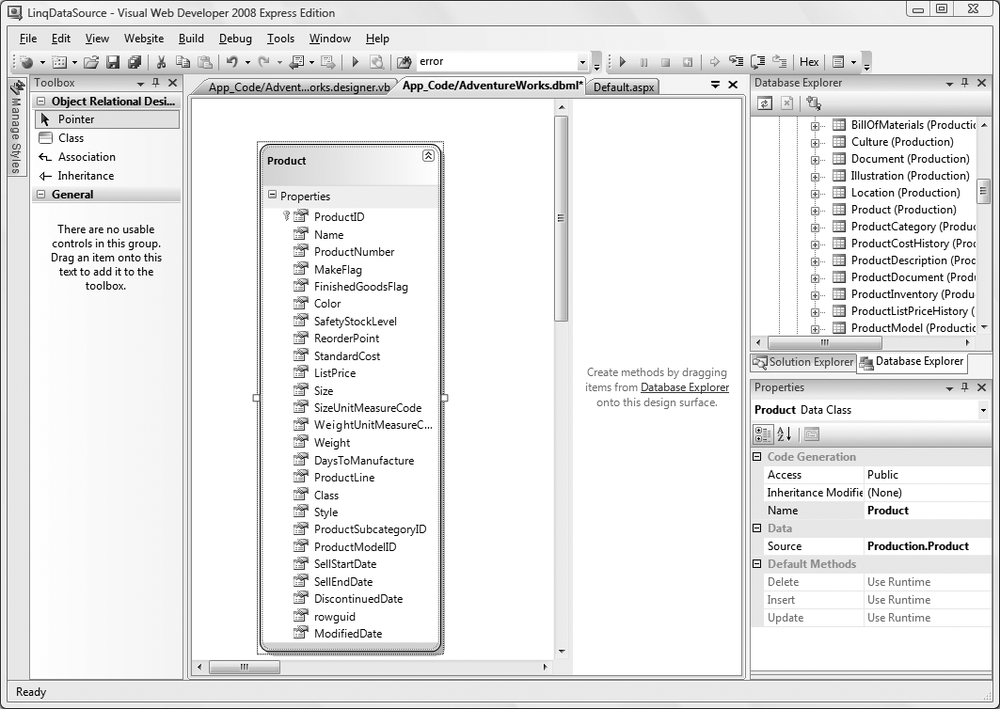
Figure 4-31. Drag a table from the Database Explorer onto the O/R Designer to create a class representing that table.
While you’re at it, drag a few more tables onto the O/R Designer so you can get a better idea of how the tool creates the classes. Drag the ProductInventory and Location tables from the Database Explorer onto the design surface. Once they are on the surface, you can drag them around with the mouse to reposition them for better viewing. The design surface will now look similar to Figure 4-32.
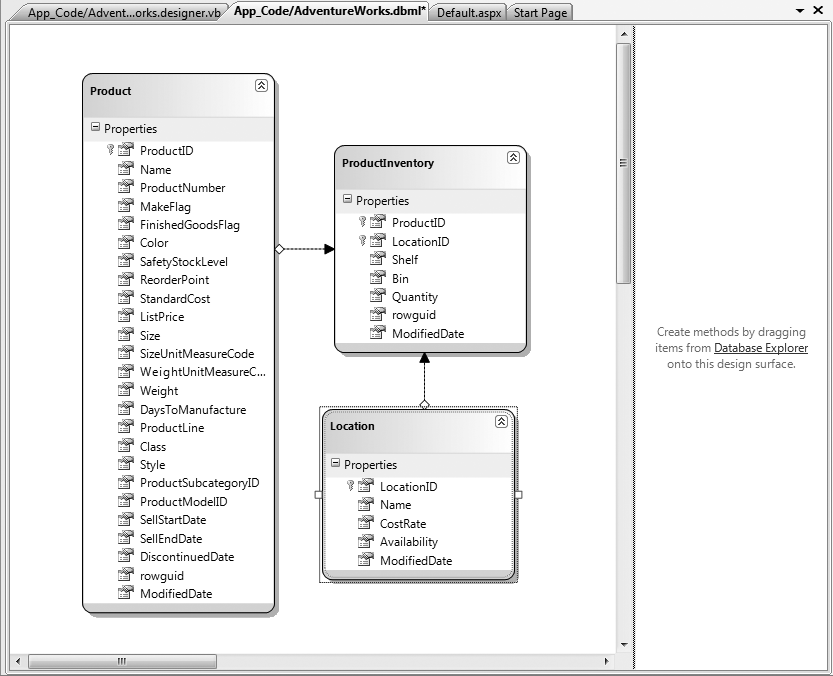
Figure 4-32. After you drag multiple tables onto the O/R Designer from the Database Server, you can see the relationships between the tables.
Because the database defined relationships between these tables, those relationships are reflected in the visual data model. More importantly, those relationships are now reflected in the underlying classes created by the tool.
We are not going to go into great detail about the underlying files, but it is very instructive to see how they are constructed. The .dbml file is an XML file which contains the structure of the tables in the O/R Designer. Normally, double-clicking this file opens up the visual designer, as shown in Figures Figure 4-31 and Figure 4-32. To see the actual XML code, close the visual designer, right-click on the .dbml file, select Open With…, and select XML Editor. You will see that the XML defines a <Table> element for each table. Within each <Table> element are a number of <Column> elements. Also, if there are any relationships with other tables, they are also defined within the <Table> element as <Association> elements.
The .layout file is used by the tool to keep track of the visual location and other design aspects of each table on the design surface. It does not have any real bearing on the object model or its underlying classes.
The .vb file contains the real meat. We looked at this file briefly above to see that it included the class declaration. If you open it now, having added tables with relationships, you will see there is a lot more to it. There is a lot of boilerplate code, which makes it easy to get lost, but essentially, this file defines three classes associated within the AdventureWorksDataContext class, one for each of the tables. Within each of these classes, there is a public property for each column in the table. You can see that each property has the same data type as the corresponding column in the table.
Save all these files and close them.
Now that you have an object model created, let’s use it with a LinqDataSource control to display data in a GridView. Switch to Design view of Default.aspx. Drag two controls onto the page from the Data section of the Toolbox—a LinqDataSource and a GridView.
Select the LinqDataSource control, click on the Smart Tag, and select Configure Data Source.… This will bring up the Configure Data Source wizard, which is very similar to the wizard you saw earlier in this chapter used for configuring a SqlDataSource control. The first step in the wizard asks you to specify the context object, as shown in Figure 4-33.
All the available DataContext objects are available to choose from in the drop-down. In this case, there is only one, the AdventureWorksDataContext you created above, so click Next.
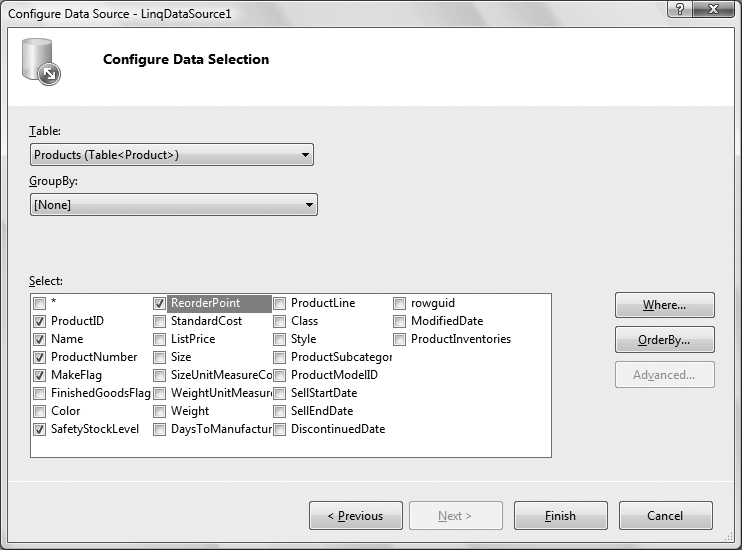
The next step asks you to select the table and fields, as shown in Figure 4-34.
Just as you did with the SqlDataSource back in Figure 4-8, select the Products table and the ProductID, Name, ProductNumber, MakeFlag, SafetyStockLevel and ReorderPoint columns. Then, click the Finish button.
Next, select the GridView, click on the Smart Tag, and then Choose Data Source. You will see that one of the available data sources is LinqDataSource1, the LinqDataSource control you just configured. Select that.
Immediately, the GridView will redraw in Design view to show the columns you have configured the data source to return.
While the Smart Tag is open, check the Enable Paging and Enable Sorting checkboxes, then run the page. You will see something identical to Figure 4-13, with paging and sorting fully implemented, except it is based on the LinqDataSource rather than the SqlDataSource.
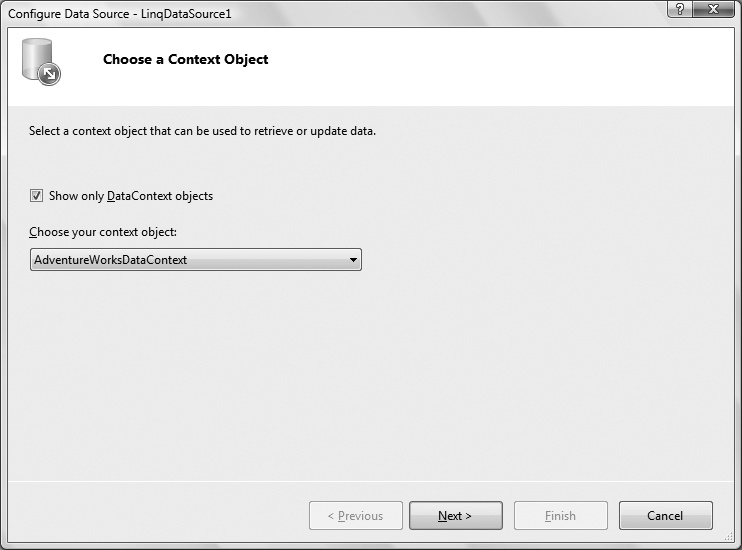
Figure 4-33. The first step in the Configure Data Source wizard for a LinqDataSource asks you to select a DataContext object.
So, what is the difference between the two data sources, as the end result in these examples is identical? As we mentioned above, LINQ is a language feature that allows you to construct database queries directly in your language of choice, rather than using SQL. Back in Example 4-1, you saw the markup generated by the SqlDataSource control. It included a ConnectionString and a SelectCommand. The latter consists of this SQL statement:
SELECT ProductID, Name, ProductNumber, MakeFlag, SafetyStockLevel, ReorderPoint
FROM Production.Product
If you look at Default.aspx in Source view, you will see the following markup for the LinqDataSource control:
<asp:LinqDataSource ID="LinqDataSource1" runat="server"
      ContextTypeName="AdventureWorksDataContext"
      Select="new (ProductID, Name, ProductNumber, MakeFlag, SafetyStockLevel,
              ReorderPoint)"
      TableName="Products">
</asp:LinqDataSource>
Instead of a ConnectionString attribute pointing to a database, it has a ContextTypeName attribute specifying the DataContext class you created with the O/R Designer. Instead of a SelectCommand attribute with a SQL statement, it has a Select attribute with a LINQ statement for selecting properties from the table class specified in the TableName attribute.
Just to reiterate the point that LINQ is a language feature, you could omit the LinqDataSource control from the page entirely and just construct your query directly in the VB code-behind.
To see this, add another GridView control to the page, which will be called GridView2. Do not choose a data source for this second GridView. Open the code-behind for the page and create a Page_Load method by selecting (Page Events) from the Class Name drop-down at the upper left of the editing surface and Load from the right drop-down. Then enter the highlighted code from Example 4-5.
Example 4-5. Page_Load for databinding a GridView using LINQ statements
Protected Sub Page_Load(ByVal sender As Object, _ ByVal e As System.EventArgs) Handles Me.LoadIf Not IsPostBack thenDim dataContext As New AdventureWorksDataContext()Dim products = From p In dataContext.Products _Order By p.Name _Select p.ProductID, p.Name, p.ProductNumber, p.MakeFlag, _p.SafetyStockLevel, p.ReorderPointGridView2.DataSource = productsGridView2.DataBind()End IfEnd Sub
Now when you run the page, you see that both grids display the same data. However, the second grid displays the columns in a different order, and it does not have paging and sorting enabled. You can fix the order of the columns by changing the markup for GridView2 to set the AutoGenerateColumns attribute to False (the default is True) and add the same BoundField column declarations, as shown in the highlighted code in Example 4-6.
Example 4-6. Markup for Default.aspx with two GridView controls, one populated from a LinqDataSource and one from the code-behind
<%@ Page Language="VB" AutoEventWireup="false" CodeFile="Default.aspx.vb"
   Inherits="_Default" %>

<!DOCTYPE html PUBLIC "-//W3C//DTD XHTML 1.0 Transitional//EN" "http://www.w3.org/TR/
xhtml1/DTD/xhtml1-transitional.dtd">
<html xmlns="http://www.w3.org/1999/xhtml">
<head runat="server">
   <title>Untitled Page</title>
</head>
<body>
   <form id="form1" runat="server">
   <div>
      <asp:LinqDataSource ID="LinqDataSource1" runat="server"
         ContextTypeName="AdventureWorksDataContext"
         Select="new (ProductID, Name, ProductNumber, MakeFlag, SafetyStockLevel,
               ReorderPoint)"
         TableName="Products">
      </asp:LinqDataSource>
   </div>
   <asp:GridView ID="GridView1" runat="server" AllowPaging="True" AllowSorting="True"
      AutoGenerateColumns="False" DataSourceID="LinqDataSource1">
      <Columns>
         <asp:BoundField DataField="ProductID" HeaderText="ProductID"
            ReadOnly="True" SortExpression="ProductID" />
         <asp:BoundField DataField="Name" HeaderText="Name" ReadOnly="True"
            SortExpression="Name" />
         <asp:BoundField DataField="ProductNumber" HeaderText="ProductNumber"
            ReadOnly="True" SortExpression="ProductNumber" />
         <asp:CheckBoxField DataField="MakeFlag" HeaderText="MakeFlag"
            ReadOnly="True" SortExpression="MakeFlag" />
         <asp:BoundField DataField="SafetyStockLevel" HeaderText="SafetyStockLevel"
            ReadOnly="True" SortExpression="SafetyStockLevel" />
         <asp:BoundField DataField="ReorderPoint" HeaderText="ReorderPoint"
            ReadOnly="True" SortExpression="ReorderPoint" />
      </Columns>
   </asp:GridView>
   <asp:GridView ID="GridView2" runat="server" AutoGenerateColumns="False">
      <Columns>
         <asp:BoundField DataField="ProductID" HeaderText="ProductID"
            ReadOnly="True" />
         <asp:BoundField DataField="Name" HeaderText="Name" ReadOnly="True" />
         <asp:BoundField DataField="ProductNumber" HeaderText="ProductNumber"
            ReadOnly="True" />
         <asp:CheckBoxField DataField="MakeFlag" HeaderText="MakeFlag"
            ReadOnly="True" />
         <asp:BoundField DataField="SafetyStockLevel" HeaderText="SafetyStockLevel"
            ReadOnly="True" />
         <asp:BoundField DataField="ReorderPoint" HeaderText="ReorderPoint"
            ReadOnly="True" />
      </Columns>
   </asp:GridView>
   </form>
</body>
</html>
Notice that GridView2 does not have paging and sorting enabled, and the BoundColumns do not have a SortExpression specified. You could set the AllowPaging and AllowSorting attributes and include the SortExpressions in the Column declarations. If you did that, GridView2 would appear to support paging and sorting, but an error would result when you tried to actually page or sort the grid. This is because the LinqDataSource automatically handles those chores for you. If you are binding directly from your code-behind without benefit of the LinqDataSource control, then you must write your own code to handle the paging and sorting events. This is not terribly difficult, but it is a bit beyond the scope of this book.
The LinqDataSource control can also work with the GridView to easily allow for editing of your data, as long as the data source is configured to return all the columns of the table. The GridView does not have to display all the columns, but the LinqDataSource must select all the columns.
To see this, create a new web site called LinqDataSourceEditing. Just as you did in the previous example, add a LINQ to SQL Classes item to the web site and call it AdventureWorks. Allow it to be placed in the App_Code folder. Open the Database Explorer (Server Explorer in VS) and drag the Product table onto the left side of the O/R Designer.
Then, open the page, Default.aspx, in Source or Design view, and drag a LinqDataSource control and a GridView control onto the page from the Data section of the Toolbox. In Design view, open the Smart Tag of the LinqDataSource control and click on Configure Data Source.… As before, verify that AdventureWorksDataContext is chosen and click Next.
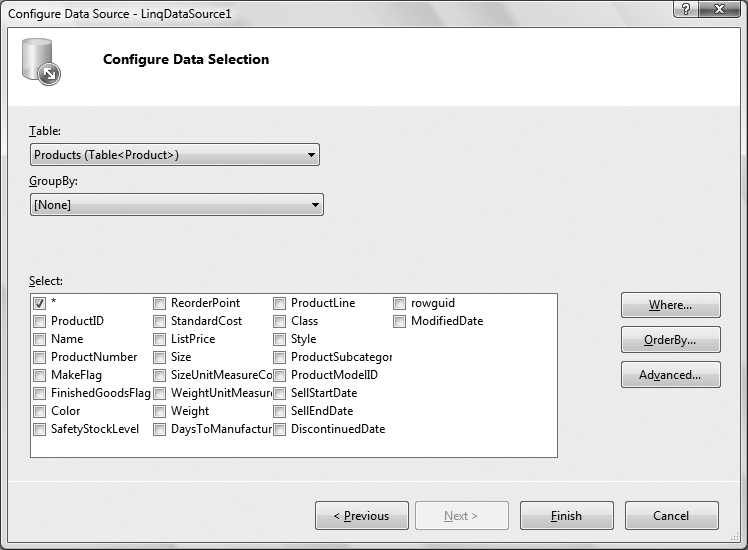
By default, the only table available, Products, should already be selected and the first column checkbox with an asterisk in it (to select all the fields) should be checked, as shown in Figure 4-35.
Warning
If no tables or fields are visible in the dialog, Cancel the dialog and click Build → Build Website to build the web site. Then try again.
Click on the Advanced button to get the options shown in Figure 4-36.
Check all three checkboxes, then click OK, and then Finish. The Smart Tag for the control will now show checkboxes, all checked, for enabling Deletes, Inserts, and Updates, as shown in Figure 4-37.
If you look at the declaration for the LinqDataSource control in Source view, you will see the code in Example 4-7.
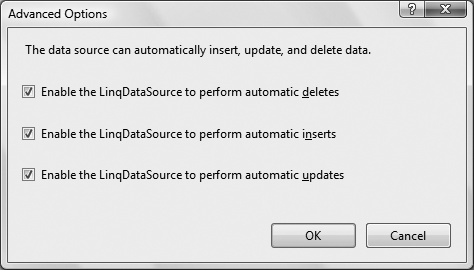
Figure 4-36. When configuring the LinqDataSource, clicking on the Advanced button allows you to configure advanced options.
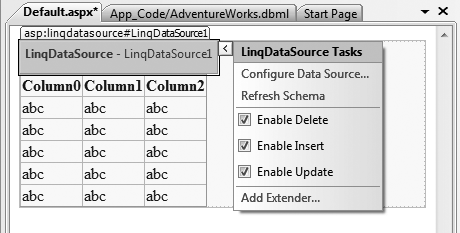
Example 4-7. Declaration for a LinqDataSource which enables editing
<asp:LinqDataSource ID="LinqDataSource1" runat="server"
   ContextTypeName="AdventureWorksDataContext" EnableDelete="True"
   EnableInsert="True" EnableUpdate="True" TableName="Products">
</asp:LinqDataSource>
If you compare this with the equivalent declaration in Example 4-6, you will see that not only does this have attributes to enable Deletes, Inserts, and Updates, but it does not have a Select attribute returning specific columns, so all the columns are returned from the database.
Now, click on the Smart Tag for the GridView. Choose the DataSource to be LinqDataSource1. The GridView will immediately redraw with every column in the table, which is more than we want to display.
There are two ways to trim the unwanted fields. The UI way is to click on Edit Columns in the Smart Tag, to get the Fields editor, which you saw back in Figure 4-14. You can delete the unwanted fields by selecting them, one at a time, from the list box in the lower left corner of the dialog and clicking the red X button.
The easy way to get rid of the unwanted fields is to switch into Source view and just delete the undesired BoundField declarations from within the Columns element. So do that, removing all the BoundField declarations except for the ProductID, Name, ProductNumber, MakeFlag, SafetyStockLevel, and ReorderPoint columns, so that it will match the previous example.
Now, one last step: go back to the Smart Tag for the GridView. It will now have two new checkboxes in addition to the checkboxes you saw previously—Enable Editing and Enable Deleting. Check those, as shown in Figure 4-38.
Run the web site. You will get a grid that is functionally equivalent to that shown back in Figure 4-19, which you created with a SqlDataSource. The difference in appearance is only because we formatted that earlier grid and did not bother to do so with this latest example.
Warning
Just as you saw with the SqlDataSource example earlier in the chapter, if you try to delete a record from the Products table, you will get a database error caused by the fact that there are other tables with dependencies on the Products table. If you were allowed to delete products, it would leave orphan records in other tables. To deal with this, you would construct custom queries that first deleted the dependent records, then delete the product record. However, this is beyond the scope of this book.
Dynamic Data is a new feature of ASP.NET 3.5, introduced in Service Pack 1. It allows you to create a fully functional website implementing the four CRUD operations—Create, Read, Update, and Delete—with very little effort and virtually no handcoding. Depending on the requirements of the site you are building, this may save a lot of development effort.
The most obvious benefit of Dynamic Data is that it makes it easy and very fast to create a web site that lets users display and edit data, as seen in the example in this section. But Dynamic Data is more fundamentally about linking the presentation layer (how users view and work with data in web pages) with the data model (how the data is managed and stored).
In data-based applications, the database defines the type of data that can be store—for example, it defines whether a column consists of text, numbers, or dates, and it defines information such as how many characters a column value can contain. In addition, it defines how the data in one table relates to data in another table (that is, what relationships the tables have).
In most web sites that work with data, much of this information about the data has to be duplicated in the web site code. What data should be displayed in this page? How should the data be formatted? How can users edit this data? How should user input be validated? How does the data in a page work with related data in another page? These are all questions that web developers traditionally have to think about and to solve in web page after web page, and all by adding controls or code by hand to each individual page. The database already understands the data that it contains, yet the same information must be recoded in the web application by the web site developer.
To eliminate this type of redundancy, Dynamic Data makes the presentation layer “smart.” Web pages can infer information about the data from the data layer at runtime—that is, dynamically. The result is the behavior that you see in this section. For example, web pages can automatically display data appropriately. Boolean data (true/false) is automatically displayed by using a check box, foreign keys are automatically displayed so that they link to related tables, and so on. Similarly, when a web page lets users edit or insert data, Dynamic Data infers the appropriate validation tests, based directly on what the database allows. This ability to infer information and behavior from the data is sometimes referred to as scaffolding, and pages that can take advantage of this behavior are sometimes referred to as scaffolded pages.
Because every application is different, Dynamic Data is built so that you can customize its built-in behavior. And if that isn’t sufficient, you can extend Dynamic Data to include new ways of interacting with data. Dynamic Data is a new feature of ASP.NET (in fact, it is still being developed), so the full potential of the feature has not yet been explored. But it has great promise, as we show you here.
This feature builds on the Object Relational Designer that you saw with LINQ, and the object model (data model) that it creates for you. It combines the object model with the extensive use of templates to produce fully editable pages representing any or all of the tables in your database, including all of the relationships between the tables.
Templates are controls or pages that define how users can interact with data. Field templates are used to define the look and behavior of individual data types from the data model. For example, a Text field template defines how string data is displayed; a TextEdit field template defines how users can edit and insert string data. Additional field templates are available for Boolean data, date/time data, and so on, and for displaying and working with foreign keys. Page templates define how sets of data (or tables) are displayed. There are page templates for simply listing data, for displaying master/detail data, for presenting editable data, and so on. Dynamic Data uses these templates automatically to display whatever data you are working with.
Dynamic Data is a big and complex topic, especially when you begin to customize how things are presented. We will present here a very simple example just to give you a feel for what is possible.
In VS/VWD, create a new web site. In the New Web Site dialog box, select the Dynamic Data Web Site template. Call the new web site DynamicAdventureWorks.
In the Solution Explorer, you will see a folder in the web site called DynamicData, which contains four subfolders that contain the templates. These are shown, somewhat expanded, in Figure 4-39.
Re-create the object model used in the two previous LINQ examples, adding the Product, ProductInventory, and Location tables to the object model. Recall from the discussion above that the O/R Designer will create a class called AdventureWorksDataContext. You will refer to this class in a moment.
Now comes the only coding you must do. Among the other files created for you by the IDE when creating a Dynamic Data web site is one called global.asax in the main folder of the web site. Double-click on this file in the Solution Explorer to open that file in the editor.
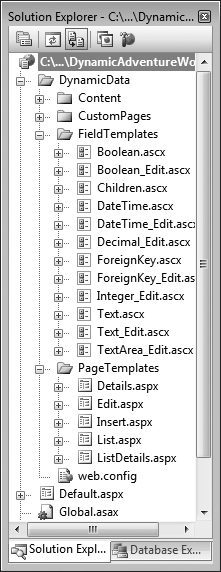
Figure 4-39. A Dynamic Data web site has a folder called DynamicData which contains all the templates.
The first method in global.asax is called RegisterRoutes, which initially looks like Example 4-8.
Example 4-8. The original global.asax before, you make any edits
Public Shared Sub RegisterRoutes(ByVal routes As RouteCollection)
    Dim model As New MetaModel
    '                     IMPORTANT: DATA MODEL REGISTRATION
    ' Uncomment this line to register LINQ to SQL classes or an ADO.NET Entity Data
    ' model for ASP.NET Dynamic Data. Set ScaffoldAllTables = true only if you are sure
    ' that you want all tables in the data model to support a scaffold (i.e. templates)
    ' view. To control scaffolding for individual tables, create a partial class for
    ' the table and apply the [Scaffold(true)] attribute to the partial class.
    ' Note: Make sure that you change "YourDataContextType" to the name of the data
    ' context class in your application.
    ' model.RegisterContext(GetType(YourDataContextType), New ContextConfiguration() _
         With {.ScaffoldAllTables = False})
    ' The following statement supports separate-page mode, where the List, Detail, Insert,
    ' and Update tasks are performed by using separate pages. To enable this mode,
    ' uncomment the following route definition, and comment out the route definitions
    ' in the combined-page mode section that follows.
    routes.Add(New DynamicDataRoute("{table}/{action}.aspx") With { _
        .Constraints = New RouteValueDictionary(New With {.Action = _
        "List|Details|Edit|Insert"}), _
        .Model = model})

    ' The following statements support combined-page mode, where the List, Detail, Insert,
    ' and Update tasks are performed by using the same page. To enable this mode,
    ' uncomment the following routes and comment out the route definition in the
    ' separate-page mode section above.
    'routes.Add(New DynamicDataRoute("{table}/ListDetails.aspx") With { _
    '    .Action = PageAction.List, _
    '    .ViewName = "ListDetails", _
    '    .Model = model})
    'routes.Add(New DynamicDataRoute("{table}/ListDetails.aspx") With { _
    '    .Action = PageAction.Details, _
    '    .ViewName = "ListDetails", _
    '    .Model = model})
End Sub
You are going to modify one line in global.asax, the highlighted line in Example 4-8. In the original, this is actually a single, long commented line, but you are going to uncomment it in a moment, so we inserted a line continuation character to prepare it to wrap for readability.
Uncomment this highlighted line and make two edits. First, replace YourDataContextType with AdventureWorksDataContext. Second, change the value of ScaffoldAllTables from False to True. (Scaffolding is disabled by default because it adds some overhead to the web site, so you only want to enable it when you want to use Dynamic Data with all pages in the web site.) The line should now look like the following:
model.RegisterContext(GetType(AdventureWorksDataContext), _
    New ContextConfiguration() With {.ScaffoldAllTables = True})
That’s it. In Solution Explorer, right-click Default.aspx, and then click View in Browser. You will get a page like that shown in Figure 4-40.
There are links for each of the tables you put in your object model. Clicking on any of these links brings up the data for that table, as shown in Figure 4-41.
Each page automatically includes a huge amount of functionality. Drop-downs at the top of the page allow you to filter the records displayed. You can click on any column heading to sort the table by that column. The first column includes links for editing, deleting, or selecting the row. Clicking on the Edit link allows you to edit the row with appropriate controls for the type of data (a TextBox for text data, for example, or a CheckBox for a Boolean data), and then either accept or cancel the edits. The Delete link deletes the row, and the Details link displays details about the row on a separate page. Also, not visible in this figure, the bottom of the grid has links for paging through the data. Links are also provided to rows in related tables, although they are also not shown in this figure.
All of this is totally customizable and extendable by editing the template files in the DynamicData folder.
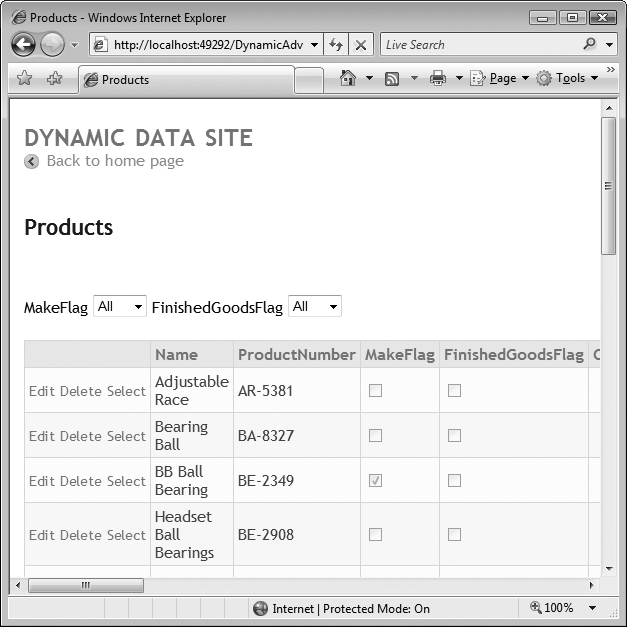
The complete markup for the Default.aspx file in the AWProductData site is shown in Example 4-9, with the code-behind shown directly after in Example 4-10.
Example 4-9. Default.aspx for AWProductData
<%@ Page Language="VB" AutoEventWireup="false" CodeFile="Default.aspx.vb"
      Inherits="_Default" %>
<!DOCTYPE html PUBLIC "-//W3C//DTD XHTML 1.0 Transitional//EN"
      "http://www.w3.org/TR/xhtml1/DTD/xhtml1-transitional.dtd">
<html xmlns="http://www.w3.org/1999/xhtml">
<head runat="server">
   <title>Untitled Page</title>
</head>
<body>
   <form id="form1" runat="server">
   <asp:ScriptManager ID="ScriptManager1" runat="server">
   </asp:ScriptManager>
   <div>
      <asp:UpdatePanel ID="UpdatePanel1" runat="server">
         <ContentTemplate>
            <asp:SqlData Source ID="SqlDataSource1" runat="server"
               ConnectionString="<%$ ConnectionStrings:AdventureWorksConnectionString %>"

               SelectCommand="SELECT [ProductID], [Name], [ProductNumber], [MakeFlag],
                  [SafetyStockLevel], [ReorderPoint] FROM [Production].[Product]"
               DeleteCommand="DELETE FROM [Production].[Product]
                  WHERE [ProductID] = @ProductID"
              InsertCommand="INSERT INTO [Production].[Product] ([Name], [ProductNumber],
                  [MakeFlag], [SafetyStockLevel], [ReorderPoint])
                  VALUES (@Name, @ProductNumber, @MakeFlag, @SafetyStockLevel,
                  @ReorderPoint)"
               UpdateCommand="UPDATE [Production].[Product] SET [Name] = @Name,
                  [ProductNumber] = @ProductNumber, [MakeFlag] = @MakeFlag,
                  [SafetyStockLevel] = @SafetyStockLevel, [ReorderPoint] = @ReorderPoint
                  WHERE [ProductID] = @ProductID" >
               <DeleteParameters>
                  <asp:Parameter Name="ProductID" Type="Int32" />
               </DeleteParameters>
               <UpdateParameters>
                  <asp:Parameter Name="Name" Type="String" />
                  <asp:Parameter Name="ProductNumber" Type="String" />
                  <asp:Parameter Name="MakeFlag" Type="Boolean" />
                  <asp:Parameter Name="SafetyStockLevel" Type="Int16" />
                  <asp:Parameter Name="ReorderPoint" Type="Int16" />
                  <asp:Parameter Name="ProductID" Type="Int32" />
               </UpdateParameters>
               <InsertParameters>
                  <asp:Parameter Name="Name" Type="String" />
                  <asp:Parameter Name="ProductNumber" Type="String" />
                  <asp:Parameter Name="MakeFlag" Type="Boolean" />
                  <asp:Parameter Name="SafetyStockLevel" Type="Int16" />
                  <asp:Parameter Name="ReorderPoint" Type="Int16" />
               </InsertParameters>
            </asp:SqlDataSource>
            <asp:GridView ID="GridView1" runat="server" AllowPaging="True"
               AllowSorting="True" AutoGenerateColumns="False"
               DataKeyNames="ProductID" DataSourceID="SqlDataSource1"
               BackColor="#DEBA84" BorderColor="#DEBA84" BorderStyle="None"
               BorderWidth="1px" CellPadding="3" CellSpacing="2">
               <FooterStyle BackColor="#F7DFB5" ForeColor="#8C4510" />
               <RowStyle BackColor="#FFF7E7" ForeColor="#8C4510" />
               <Columns>
                  <asp:CommandField ShowDeleteButton="True" ShowEditButton="True"

                     ButtonType="Button" ShowSelectButton="True" />
                  <asp:BoundField DataField="ProductID" HeaderText="ProductID"
                     InsertVisible="False"
                     ReadOnly="True" SortExpression="ProductID" />
                  <asp:BoundField DataField="Name" HeaderText="Name"
                     SortExpression="Name" />
                  <asp:BoundField DataField="ProductNumber"
                     HeaderText="ProductNumber" SortExpression="ProductNumber" />
                  <asp:CheckBoxField DataField="MakeFlag"
                     HeaderText="MakeFlag" SortExpression="MakeFlag" />
                  <asp:BoundField DataField="SafetyStockLevel"
                     HeaderText="SafetyStockLevel" SortExpression="SafetyStockLevel" />
                  <asp:BoundField DataField="ReorderPoint"
                     HeaderText="ReorderPoint" SortExpression="ReorderPoint" />
               </Columns>
               <PagerStyle ForeColor="#8C4510" HorizontalAlign="Center" />
               <SelectedRowStyle BackColor="#738A9C" Font-Bold="True" ForeColor="White" />
               <HeaderStyle BackColor="#A55129" Font-Bold="True" ForeColor="White" />
            </asp:GridView>
            <asp:Label ID="Label1" runat="server" Text="Name"></asp:Label>
            <asp:TextBox ID="txtName" runat="server" ReadOnly="True"></asp:TextBox>
         </ContentTemplate>
      </asp:UpdatePanel>
   </div>
   </form>
</body>
</html>
Example 4-10. Default.aspx.vb for AWProductData
Partial Class _Default
    Inherits System.Web.UI.Page

Protected Sub GridView1_RowDataBound(ByVal sender As Object, _
            ByVal e As System.Web.UI.WebControls.GridViewRowEventArgs) _
            Handles GridView1.RowDataBound
   If e.Row.RowType = DataControlRowType.DataRow Then
      Dim cellProductNumber As TableCell = e.Row.Cells(3) ' ProductNumber column
      If cellProductNumber.Text.Substring(0, 2) = "CA" Then
          cellProductNumber.ForeColor = Drawing.Color.Green
      End If

      Dim cellMakeFlag As TableCell = e.Row.Cells(4) ' MakeFlag column
      Dim cb As CheckBox = CType(cellMakeFlag.Controls(0), CheckBox)
      If cb.Checked Then
          e.Row.Cells(2).ForeColor = Drawing.Color.Red
      End If
   End If

End Sub

Protected Sub GridView1_SelectedIndexChanged(ByVal sender As Object, _
      ByVal e As System.EventArgs) _
      Handles GridView1.SelectedIndexChanged
   If GridView1.SelectedRow.RowType = DataControlRowType.DataRow Then
      Dim cellName As TableCell = GridView1.SelectedRow.Cells(2) ' Name column
      txtName.Text = cellName.Text
   End If
End Sub
End Class
The complete markup for the Default.aspx file in the AWProductDataOrderDetails site is shown in Example 4-11, and the code-behind is shown in Example 4-12.
Example 4-11. Default.aspx for AWProductDataOrderDetails
<%@ Page Language="VB" AutoEventWireup="false" CodeFile="Default.aspx.vb" Inherits="_
Default" %>

<!DOCTYPE html PUBLIC "-//W3C//DTD XHTML 1.0 Transitional//EN"
      "http://www.w3.org/TR/xhtml1/DTD/xhtml1-transitional.dtd">
<html xmlns="http://www.w3.org/1999/xhtml">
<head runat="server">
   <title>Untitled Page</title>
</head>
<body>
   <form id="form1" runat="server">
   <asp:ScriptManager ID="ScriptManager1" runat="server">
   </asp:ScriptManager>
   <div>
      <asp:UpdatePanel ID="UpdatePanel1" runat="server">
         <ContentTemplate>
            <asp:SqlData Source ID="SqlDataSource1" runat="server"
               ConnectionString="<%$ ConnectionStrings:AdventureWorksConnectionString %>"
               SelectCommand="SELECT [ProductID], [Name], [ProductNumber], [MakeFlag],
                  [SafetyStockLevel], [ReorderPoint] FROM [Production].[Product]"
               DeleteCommand="DELETE FROM [Production].[Product]
                  WHERE [ProductID] = @ProductID"
               InsertCommand="INSERT INTO [Production].[Product] ([Name],
                  [ProductNumber], [MakeFlag], [SafetyStockLevel], [ReorderPoint])
                  VALUES (@Name, @ProductNumber, @MakeFlag, @SafetyStockLevel,
                  @ReorderPoint)"
               UpdateCommand="UPDATE [Production].[Product] SET [Name] = @Name,
                  [ProductNumber] = @ProductNumber, [MakeFlag] = @MakeFlag,
                  [SafetyStockLevel] = @SafetyStockLevel, [ReorderPoint] = @ReorderPoint
                  WHERE [ProductID] = @ProductID">
               <DeleteParameters>
                  <asp:Parameter Name="ProductID" Type="Int32" />
               </DeleteParameters>
               <UpdateParameters>
                  <asp:Parameter Name="Name" Type="String" />
                  <asp:Parameter Name="ProductNumber" Type="String" />
                  <asp:Parameter Name="MakeFlag" Type="Boolean" />
                  <asp:Parameter Name="SafetyStockLevel" Type="Int16" />
                  <asp:Parameter Name="ReorderPoint" Type="Int16" />
                  <asp:Parameter Name="ProductID" Type="Int32" />
               </UpdateParameters>
               <InsertParameters>
                  <asp:Parameter Name="Name" Type="String" />
                  <asp:Parameter Name="ProductNumber" Type="String" />
                  <asp:Parameter Name="MakeFlag" Type="Boolean" />
                  <asp:Parameter Name="SafetyStockLevel" Type="Int16" />
                  <asp:Parameter Name="ReorderPoint" Type="Int16" />
               </InsertParameters>
            </asp:SqlData Source>
            <asp:GridView ID="GridView1" runat="server"
               AllowPaging="True" AllowSorting="True"
               AutoGenerateColumns="False"
               DataKeyNames="ProductID" DataSourceID="SqlDataSource1"
               BackColor="#DEBA84" BorderColor="#DEBA84" BorderStyle="None"
               BorderWidth="1px" CellPadding="3" CellSpacing="2">
               <FooterStyle BackColor="#F7DFB5" ForeColor="#8C4510" />
               <RowStyle BackColor="#FFF7E7" ForeColor="#8C4510" />
               <Columns>
                  <asp:CommandField ShowDeleteButton="True" ShowEditButton="True"
                     ButtonType="Button" ShowSelectButton="True" />
                  <asp:BoundField DataField="ProductID" HeaderText="ProductID"
                     InsertVisible="False"
                     ReadOnly="True" SortExpression="ProductID" />
                  <asp:BoundField DataField="Name" HeaderText="Name"
                     SortExpression="Name" />
                  <asp:BoundField DataField="ProductNumber" HeaderText="ProductNumber"
                     SortExpression="ProductNumber" />
                  <asp:CheckBoxField DataField="MakeFlag" HeaderText="MakeFlag"
                     SortExpression="MakeFlag" />
                  <asp:BoundField DataField="SafetyStockLevel"
                     HeaderText="SafetyStockLevel" SortExpression="SafetyStockLevel" />
                  <asp:BoundField DataField="ReorderPoint" HeaderText="ReorderPoint"
                     SortExpression="ReorderPoint" />
               </Columns>
               <PagerStyle ForeColor="#8C4510" HorizontalAlign="Center" />
               <SelectedRowStyle BackColor="#738A9C" Font-Bold="True" ForeColor="White" />
               <HeaderStyle BackColor="#A55129" Font-Bold="True" ForeColor="White" />
            </asp:GridView>
            <asp:Label ID="Label1" runat="server" Text="Name"></asp:Label>
            <asp:TextBox ID="txtName" runat="server" ReadOnly="True"></asp:TextBox>
            <br />
            <asp:GridView ID="GridView2" runat="server"
               Data SourceID="AdventureWorksOrderDetails"
               BackColor="#DEBA84" BorderColor="#DEBA84" BorderStyle="None"
               BorderWidth="1px"
               CellPadding="3" CellSpacing="2">
               <FooterStyle BackColor="#F7DFB5" ForeColor="#8C4510" />
               <RowStyle BackColor="#FFF7E7" ForeColor="#8C4510" />
               <PagerStyle ForeColor="#8C4510" HorizontalAlign="Center" />
               <SelectedRowStyle BackColor="#738A9C" Font-Bold="True" ForeColor="White" />
               <HeaderStyle BackColor="#A55129" Font-Bold="True" ForeColor="White" />
            </asp:GridView>
            <asp:SqlDataSource ID="AdventureWorksOrderDetails" runat="server"
               ConnectionString="<%$ ConnectionStrings:AdventureWorksConnectionString %>"
               SelectCommand="SELECT [SalesOrderID], [CarrierTrackingNumber], [OrderQty],
                  [UnitPrice], [UnitPriceDiscount], [LineTotal]
                  FROM [Sales].[SalesOrderDetail]
                  WHERE ([ProductID] = @ProductID)
                  ORDER BY [SalesOrderID]">
               <SelectParameters>
                  <asp:ControlParameter ControlID="GridView1" Name="ProductID"
                     PropertyName="SelectedValue" Type="Int32" />
               </SelectParameters>
            </asp:SqlDataSource>
         </ContentTemplate>
      </asp:UpdatePanel>
   </div>
   </form>
</body>
</html>
Example 4-12. Default.aspx.vb for AWProductDataOrderDetails
Partial Class _Default
    Inherits System.Web.UI.Page

Protected Sub GridView1_RowDataBound(ByVal sender As Object, _
            ByVal e As System.Web.UI.WebControls.GridViewRowEventArgs) _
            Handles GridView1.RowDataBound
   If e.Row.RowType = DataControlRowType.DataRow Then
      Dim cellProductNumber As TableCell = e.Row.Cells(3) ' ProductNumber column
      If cellProductNumber.Text.Substring(0, 2) = "CA" Then
          cellProductNumber.ForeColor = Drawing.Color.Green
      End If

      Dim cellMakeFlag As TableCell = e.Row.Cells(4) ' MakeFlag column
      Dim cb As CheckBox = CType(cellMakeFlag.Controls(0), CheckBox)
      If cb.Checked Then
          e.Row.Cells(2).ForeColor = Drawing.Color.Red
      End If
   End If

End Sub

Protected Sub GridView1_SelectedIndexChanged(ByVal sender As Object, _
      ByVal e As System.EventArgs) _
      Handles GridView1.SelectedIndexChanged
   If GridView1.SelectedRow.RowType = DataControlRowType.DataRow Then
      Dim cellName As TableCell = GridView1.SelectedRow.Cells(2) ' Name column
      txtName.Text = cellName.Text
   End If
End Sub
End ClassMost useful web sites make use of a database. ASP.NET provides controls that make it easy to connect to a database, and retrieve and edit data.
The
GridViewis the most commonly used control for displaying data, although there are others. TheGridViewcan sort data, and present it in pages, for easy reading.Data controls need to be bound to a data source to display data. To do that, you provide a
DataSourcecontrol, which connects to the database and retrieves the data.You configure a
DataSourcecontrol using a wizard that allows you to set a connection string, and then helps you construct a SQL query for retrieving data, or you can enter your own custom query.You create a new connection with the Add Connection dialog, and then you can save it in your web.config file for future use.
The SQL
SELECTstatement allows you to specify which columns of data you want to retrieve, and from which table. The Wizard can configure this statement for you automatically.The SQL
INSERT, UPDATE, andDELETEstatements allow you to add, edit, and remove data, respectively. The Wizard can also generate these statements for you automatically, and you can easily add buttons to perform these functions in yourGridView.Optimistic concurrency is a technique that protects your data by only changing the database if no one else has changed it since you read the data. Again, the Wizard can enable optimistic concurrency for you.
The
WHERESQL clause filters the data you retrieve by specifying a condition for the data. A row will only be retrieved if that condition is true.You can create event handlers for the
GridView, which enables you to take action on rows as they’re bound, and also allows you to take action on rows as they’re selected.You can provide parameters to the
SELECTquery, which enables you to display data in aGridViewbased on the value of another control, even anotherGridView.Language Integrated Query (LINQ) is a new language capability that allows you to keep all of your code in one place, instead of separating it between the database and the page, and also allows you to treat data in databases as code objects that you can manipulate with object-oriented languages.
LINQ maps the database to a set of classes. The easiest way to accomplish that mapping in VS/VWD is with the Object Relational Designer.
The
DataContextis an object that transfers data between the object model and the database itself.The
LinqDataSourcecontrol provides access to LINQ, just as theSqlDataSourcedoes for a SQL database.Adding a LINQ to SQL Classes item to your site adds a .dbml file to the App_Code folder for your site, which holds the structures you create in the O/R designer.
The .dbml file is associated with a .vb or .cs file that contains the actual data classes.
You configure the
LinqDataSourcecontrol much the same as you would theSqlDataSourcecontrol using the Configure Data Source wizard.Behind the scenes, the
LinqDataSourcecontrol uses theContextTypeNameattribute to connect to theDataContextclass, and theSelectattribute to specify properties to be selected from the table named in theTableNameattribute.You can also use the
LinqDataSourceto edit the data in aGridView, but to do that, theLinqDataSourcemust select all the columns of the table, even if they’re not displayed in theGridView.Dynamic Data, a feature of ASP.NET 3.5 Service Pack 1, links the presentation of data with the way that data is stored and managed.
With Dynamic Data, web pages can determine, at runtime, the appropriate presentation for data stored in the database, a technique called scaffolding.
Dynamic Data builds on the Object Model created by LINQ.
Dynamic Data makes use of templates: field templates define the behavior of individual data types; page templates define the behavior of entire sets of data. You can customize these templates to fit your needs.
Adding the ability to access a database is arguably the most powerful improvement you can make to your site. It’s easy see how accessing a database would make the Order Form site from previous chapters that much more useful. Even the best order form, though, can’t retrieve the right data if users don’t give it valid input—if they enter a four-digit zip code, for example, or an improperly formatted credit card number. The whole thing would work much more smoothly if there was a way to check that the user’s responses are valid before you spend the time accessing the database. The good news is that ASP.NET provides such a way, called validation, and that’s what you’ll learn about in the next chapter.
What type of control do you need to retrieve data from the database?
What is the name of the process for allowing a control, such as a
GridView, to extract data from the retrieved tables and format it properly?What is a connection string?
What are the four elements of CRUD?
How do you attach a data source to a
GridView?If your table has many rows, what should you do in the
GridViewto make it easier to read?How can you enable users to change the contents of the database from your
GridView?How can you take an action based on the data in a row, as the table is loaded?
If you’re using a using a
LinqDataSourcecontrol connected to aGridView, and you want users to be able to edit the data in the database, how do you need to configure the data that theLinqDataSourceretrieves?What are templates, in terms of Dynamic Data?
Exercise 4-1. We’ll start out easy, letting you create your own GridView. Create a new web site called Exercise 4-1. Add to it a GridView control that shows records from the Product table with a Weight greater than 100. The GridView should list the Product ID, Product Name, Product Number, Color, and List Price. The user should be able to update and delete records, sort by rows, and page through the content. Use the Professional formatting scheme to give it some style. The result should look like Figure 4-42.
Exercise 4-2. This one is a little trickier, but it lets you see how users could interact with the data in a GridView. Copy the web site from Exercise 4-1 to a new web site, called Exercise 4-2. Add the ability to select rows in your GridView. Add two labels and two read-only textboxes below the GridView to show the selected item’s Product Name and color. The result should look like Figure 4-43.
Exercise 4-3. Now it’s time to combine what you’ve learned from previous chapters with the new stuff, and throw a little AJAX into the mix as well. Create a new web site called Exercise 4-3. This site should have a radio button that gives readers the opportunity to select whether they want to see data from the Employee table or the Customer table. Use two Panel controls. The Employee panel should have a GridView showing the EmployeeID, ManagerID, and Title. The Customer panel should have a GridView showing the Customer ID, Account Number, and Customer Type. The table that the reader chooses should appear dynamically in a new panel; the other one should be invisible. The result should look like Figure 4-44.

Exercise 4-4. Ready for a bit of a challenge? Sure you are. You’re going to see how to retrieve data based on multiple customer selections—like you would in a shopping site. Create a new web site called Exercise 4-4. This site should have three dropdown menus:
A Category drop-down list that lists the product categories from the
ProductCategorytableA Subcategory drop-down list that lists the subcategories of the Category listed in the first drop-down, by using the
ProductSubcategorytableA Color drop-down list that lists the available product colors from the
Productdrop-down list
In addition, there should be a Submit button that users click. Below all of this is a GridView that displays the Products (from the Product table) that match the chosen subcategory and color. (You don’t need to match the category—all that control does is dictate the contents of the Subcategory table.) The GridView should display the ProductID, Name, Product number, and the color, just so you can tell it’s working. (Hint: You can use the DISTINCT SQL statement to avoid duplication in the grid.) It should look like Figure 4-45. Note that many of the possible combinations in the drop-down lists won’t produce any results in the grid. You can test your solution with the choices shown in Figure 4-45.
Get Learning ASP.NET 3.5, 2nd Edition now with the O’Reilly learning platform.
O’Reilly members experience books, live events, courses curated by job role, and more from O’Reilly and nearly 200 top publishers.

