Chapter 4. The Display List
Jump Right In
The Sum of Its Parts
Adding and Removing Children
Managing Object Names, Positions, and Data Types
Changing the Display List Hierarchy
A Dynamic Navigation Bar
What’s Next?
One of the most dramatic changes introduced by ActionScript 3.0, particularly for designers accustomed to prior versions of ActionScript, is the way in which visual elements are added to an application at runtime. In prior versions of ActionScript, a separate approach was used to add most kinds of visual assets at runtime, requiring varied syntax. Management of those assets—particularly depth management—and creating and destroying objects, were also fairly restrictive and could be relatively involved, depending on what you were trying to accomplish.
ActionScript 3.0 brings with it an entirely new way of handling visual assets. It’s called the display list. It’s a hierarchical list of all visual elements in your file. It includes common objects such as movie clips, but also objects such as shapes and sprites that either didn’t previously exist or could not be created programmatically.
The biggest difference between the ActionScript 3.0 display list display techniques used in prior versions of ActionScript is that the display list can’t have any gaps. If the display list contains 10 display objects (such as 10 movie clips), you can’t add a new display object to position 20. Furthermore, if something is removed from the display list, any display objects at a higher position will all drop down to fill in the gap.
That is, if display objects a, b, and c were added to the display list in that order, a would be at the bottom of the list (and, therefore, at the bottom of the SWF’s visual stacking order), and c would be at the top of the list. Their positions in the display list would be 0, 1, and 2, respectively. Objects with higher indices are above objects with lower indices in the visual stacking order of the SWF. If b were removed, c would drop down and the new display list would be a, c. This makes working with the display list much easier because you don’t have to worry about any empty positions in the list.
In this chapter, we’ll look at the following topics:
Jump Right In. Say hello to the world using three separate display objects.
The Sum of Its Parts. Understanding the display list means understanding its parts. In addition to knowing the kinds of objects that can be part of the display list, it’s also important to grasp the simple difference between display objects and display object containers—objects that can contain other display objects.
Adding and Removing Children. The best part of the display list is how easy and consistent it is to add objects to, and remove objects from, the list.
Managing Object Names, Positions, and Data Types. In addition to adding and removing display objects, you will need to manipulate existing members of the display list. You will likely need to find an object, either by name or position in the list, or even identify an object’s data type as a particular kind of display object.
Changing the Display List Hierarchy. It’s also much easier than ever before to manage asset depths (z-order, or the visual stacking order controlled by ActionScript rather than timeline layers), and to change the familial relationship of assets. Moving a child from one parent to another is a breeze.
A Dynamic Navigation Bar. As a quick demonstration of using the display list, we’ll show you how to dynamically generate a very simple navigation bar.
Jump Right In
Adapting the Hello World! examples of previous chapters, this exercise focuses on the display list and the very useful technique of relative positioning. It creates three text fields and positions them horizontally adjacent to each other, using only the display list for references to the fields. As in prior chapters, this script is provided up front just to get you started and give you a little experience with the material you’ll be covering. The code used in these examples is designed to focus on the chapter at hand while presenting as little unfamiliar territory as possible. Content will be further explained in this chapter as well as later in the book. This script can be found in the hello_world_display_list.fla source file.
1vari:int; 2varparts:Array= ["Hello","World","!"]; 3 4for(i = 0; i < 3; i++) { 5vartxtFld:TextField=new TextField(); 6 txtFld.text= parts[i]; 7 txtFld.autoSize=TextFieldAutoSize.LEFT; 8if(i > 0) { 9 txtFld.x=getChildAt(i-1).x+getChildAt(i-1).width; 10 } 11addChild(txtFld); 12 }
Lines 1 and 2 create an integer counter and an array with three strings. Line 4 defines a for loop that executes three times. Lines 5 and 6 create and populate a text field, using each string from the array, consecutively. As the value of i increases with each iteration, the next string in the array is used. Line 7 uses the autoSize property to automatically adjust the size of the field to the minimum required to display the text, anchoring the resizing process to the upper-left corner.
Note
By default, text fields are 100 pixels wide and 100 pixels tall. The autoSize property can resize a field to match its contents, based on the left, center, or right edges of the field.
Line 8 ensures that the first field exists because i is incremented after the first iteration of the loop. If the first field has already been added to the display list, line 9 positions the remaining fields relative to the prior field’s position and width. The power of the display list allows us to do this without any instance names or preexisting object references because we can get a child from the any position in the list. For example, the second time through the loop, line 9 positions the new field based on the position and width of the display object at position 0 in the display list (i equals 1, so i – 1 equals 0 in the getChildAt() method). Finally, line 11 adds each field to the display list so the user can see it.
If you want to see the boundaries of the three separate text fields, you can add the following bold line of code to your file:
1 txtFld.autoSize=TextFieldAutoSize.LEFT; 2 txtFld.border=true; 3if(i > 0) { 4 txtFld.x=getChildAt(i-1).x+getChildAt(i-1).width; 5 }
The Sum of Its Parts
If you think about the display list by considering what you see in any given application, you’re halfway home. In addition to contributing to the structure of the new event model, discussed in Chapter 3, the display list is responsible for maintaining the visual assets in your file. You will use the display list to create and destroy visual assets, and manage how they interrelate.
Let’s take a look at the contents of the display list of a simple file. Figure 4-1 shows that this file has a shape, a text element, and a movie clip, and inside the movie clip is a bitmap. You can see this example in the sample_display_list.fla source file.
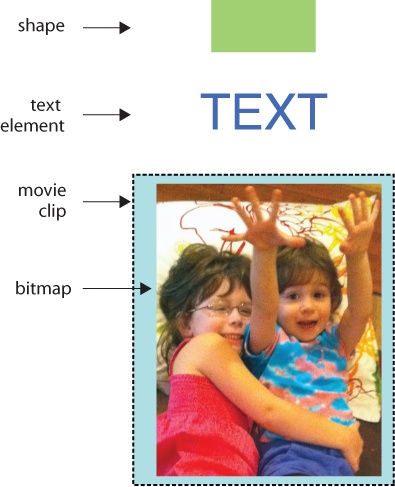
Figure 4-2 shows the display list of the same structure.
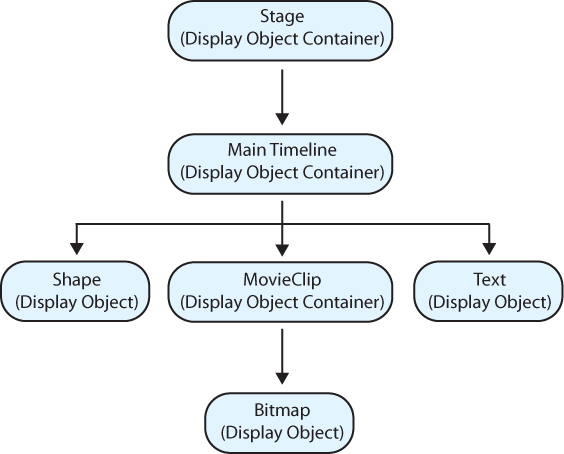
At the top of the list is the stage. Although you can access the stage from many objects in the display list, it’s easiest to think of the stage as the foundation on which everything is built. It also helps to think of the stage as the ultimate container within which all your visual assets reside at runtime. The container analogy is central to this discussion. The stage contains everything.
Next is the main timeline, which can also be referenced using the root property. (See the sidebar _root versus root for more information.) An FLA file has a main timeline within which all other assets are contained. Because of event propagation, it is common to use the main timeline as a location to add event listeners when writing scripts in the timeline. In that context, the main timeline is typically referenced using the this identifier, as in “this object being currently referenced within the context of the script.” (For more information about event listeners and event propagation, see Chapter 3. For more information about this, see Chapter 2.)
Below the main timeline in the display list hierarchy are all the visual assets in the file. Included in our sample display list are the aforementioned shape, text, and movie clip assets, and inside the movie clip is the bitmap.
You may notice in Figure 4-2 that everything is subtitled as a display object or display object container. This is key to understanding and working with the display list effectively. It probably follows that everything in the display list is a display object. However, some display objects can contain other elements and therefore are also display object containers.
For example, a shape is a display object, as are bitmaps and videos. However, none of these items can have children, so the display list lineage ends there. That is, it doesn’t make sense for a bitmap to have a nested object. A movie clip can have children, however, so it is also a display object container.
Display List Classes
In just a moment, we’ll walk through a typical ActionScript display list that demonstrates the distinction between display objects and display object containers. First, however, take a look at the individual classes that contribute to the display list, as shown in Figure 4-3.
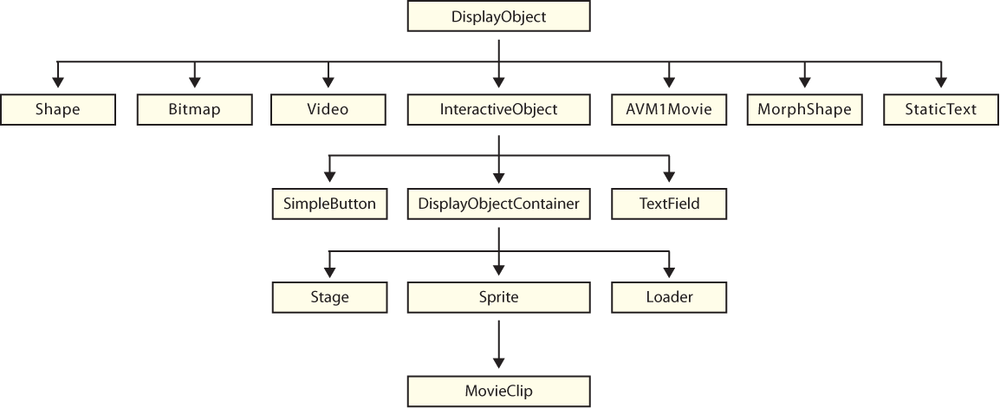
We discussed classes in Chapter 1, and we’ll be using them extensively as you delve deeper into the book. In this context, however, just think of these classes as blueprints for objects that can be part of the display list. As you look through Figure 4-3, for instance, you’ll recognize Shape, Bitmap, Video, and so on.
Note however, that, unlike Figure 4-2, this is not a depiction of an average display list. For example, it is possible for shapes, bitmaps, videos, and static text, among other items, to exist inside movie clips. Figure 4-3 merely shows all the possible object types that can be a part of any display list, and displays the hierarchical relationship among display list classes. Here is a quick description of the classes in Figure 4-3, rearranged slightly for clarity of discussion:
DisplayObjectAnything that can exist in the display list is a display object, and more specialized classes are derived from this class.
ShapeThis is a rectangle, ellipse, line, or other shape created with drawing tools. New to ActionScript 3.0, you can now create these at runtime.
BitmapThis is an ActionScript bitmap created at runtime using the
BitmapDataclass.Note
When using ActionScript to refer to an image that has been manually added to the stage, such as when dragging it to the stage from the library, ActionScript will see the object as a
Shape. However, you can still create aBitmapobject from an imported image using theBitmapDataclass.VideoThis is a video display object, the minimum required to play a video, rather than using a video component for this task. This can also now be created dynamically at runtime.
InteractiveObjectThis class includes any display object the user can interact with using the mouse or keyboard. You can’t create an instance of this class. Instead, you work with its descendants.
Skipping a bit, temporarily, and moving down a level:
SimpleButtonThis class is used to manipulate buttons created in the Flash Professional interface, so you don’t have to rely solely on movie clips. Introduced in ActionScript 3.0, this class also allows you to create a button with code. You can assign display objects to properties of a
SimpleButtoninstance to serve as the button’s up, over, down, and hit states, and the instance will swap these states automatically as well as automatically show the finger cursor state, when responding to mouse interaction. This class is different from theButtonclass, which is used with Flash Professional’s Button component.TextFieldThis class includes dynamic and input text fields. Both are controllable from ActionScript and input fields can also be edited by the user.
DisplayObjectContainerThis class is similar to
DisplayObjectin that it refers to multiple display object types. The difference here, however, is that this object can contain children. All display object containers are display objects, but display only objects that can have children are display object containers. For example, a video is a display object, but it cannot have children. A movie clip is a display object, and it can have children, so it’s also a display object container. Typically, you will work directly with this class when traversing the display list, looking for children or ancestors. Usually, you will manipulate one or more of its descendant classes.
There are four kinds of display object containers:
StageRemember, the stage itself is part of the display list. Any interactive object can reference the stage, which is a display object container itself.
SpriteNew to ActionScript 3.0, a sprite is simply a movie clip without a timeline. Many ActionScript manipulations typically performed using movie clips require only one frame. So the size and administrative overhead of the timeline is unnecessary. As you become more accustomed to ActionScript 3.0, and begin to consider optimization more frequently, you may find yourself using sprites more often.
LoaderThis class is used to load external assets destined for the display list, including images and other SWFs.
MovieClipThis refers to the movie clip symbol you might create using drawing tools in Flash Professional. They can also be created with ActionScript.
We left three items from the second tier for last, as you will probably use these classes least often:
AVM1MovieThis class is for working with loaded SWFs created using ActionScript 1.0 or 2.0. AVM1, (which stands for ActionScript Virtual Machine 1) is reserved for SWFs that use ActionScript 1.0 and/or ActionScript 2.0, while AVM2 is used for SWFs that use ActionScript 3.0. Because Flash Player uses two discrete code bases, these virtual machines are not compatible. The
AVM1Movieclass provides a way of manipulating display properties of legacy SWFs, but does not facilitate communication between ActionScript 3.0 and older SWFs. This must be accomplished by other means, such as aLocalConnection. We will discuss this approach in Chapter 13.MorphShapeandStaticTextThese two classes represent a shape tween and a static text element, respectively. You can’t create a shape tween, or do very much with the text in a static text element, with ActionScript. However, they are part of the display classes because they inherit properties, methods, and events from their
DisplayObjectparent class. This makes it possible to rotate a static text element, for example.
Once you begin using the display list frequently, you will quickly become enamored with its power, flexibility, and simplicity. We will show you how to perform several common display list tasks in this chapter but, if you take one thing away from this initial discussion, it should be a basic understanding of display object versus display object container. To demonstrate this effectively, let’s look at a short segment of code that traces display list content to the output window.
Displaying the Display List
It’s sometimes useful, especially when you’re creating many display objects with potentially complicated nested objects, to walk through the display list and analyze its contents. The trace_display_list.fla file from the companion source code, will trace the contents of any display object that you pass into it, and indent each child and successive grandchild to help convey its position in the display list hierarchy.
This function introduces our first display list property and method—numChildren and getChildAt(), respectively—both used for retrieving information. As the name implies, numChildren returns the number of children within the object being analyzed. If, for example, there is one movie clip in the main timeline, and that movie clip contains two nested buttons, the main timeline has one child and the movie clip has two children. Grandchildren are not considered in this property.
The getChildAt() method retrieves a reference to a display object in the desired scope. For example, myMovieClip.getChildAt(0) will return the first child of the myMovieClip object, while getChildAt(1) will return the second display object of the current scope.
This source file also makes practical use of some of the skills we’ve discussed, such as sending arguments into (and returning a value from) a function, default argument values, and using a for loop, among others. Here’s the code:
1functionshowChildren(dispObj:*, indentLevel:int=0):void{ 2for(vari:int= 0; i < dispObj.numChildren; i++) { 3varobj:DisplayObject= dispObj.getChildAt(i); 4trace(padIndent(indentLevel), obj.name, obj); 5if(objis DisplayObjectContainer) { 6 showChildren(obj, indentLevel + 1); 7 } 8 } 9 } 10 11functionpadIndent(indents:int):String{ 12varindent:String="";13for(vari:Number= 0; i < indents; i++) { 14 indent +=" ";15 } 16returnindent; 17 } 18 19 showChildren(stage);
Lines 1 through 9 define the function showChildren(), which has two parameters. The first receives the display object you want to inspect. This parameter uses a special value for its data type. Specifying an asterisk as a data type means the type will not be checked. This makes the function more flexible and is required in this case because you may pass different data types into the function: DisplayObject or DisplayObjectContainer (a display object that can contain children).
Note
You can also omit a data type to prevent the compiler from testing an object’s type. However, using an asterisk is considered a best practice because it reminds you, and others who may read your code, that preventing type checking was intentional.
The second parameter is used by the function itself, and its value will ultimately indent each level of child objects, formatting the output to show the hierarchical relationships in the file. Here is a sample output of a file that contains two movie clips. We’ll walk through another example after we discuss the code.
root1 [object MainTimeline]
    myMovieClip [object MovieClip]
    myMovieClip [object MovieClip]
Note that the second parameter of the showChildren() function has a default value of 0, so you don’t have to pass anything into the function for this parameter to work. Line 19 shows the syntax for calling the function and passes in the stage for analysis, but no second argument. Therefore, the default value of the argument will be used. In this example, the function will trace the contents of all children of the stage.
Lines 2 through 8 of the function define a for loop, which will loop until there are no more children in the display object passed to the function. The number of loops is determined by the aforementioned numChildren property. Each time through the loop, line 3 populates the obj variable with the next child in the display list using the getChildAt() method. This determines the child object at the display list index indicated by the loop counter (i). The first time through the loop, when i is 0, the first child will be returned—equivalent to getChildAt(0). The second time, when i is 1, the second child will be returned, and so on.
Once a display object reference is obtained, line 4 traces the object name and the reference itself, as arguments 2 and 3 of the trace() statement. The latter is handy because the type of object will also be displayed. For example, if the object is a movie clip called logo, the output will say “logo [object MovieClip].” But line 4 also does something else. The first item in the trace() is a function call to padIndent() and passes one argument to the function: the level of indent desired. The first time showChildren() is called, the initial value of this argument is 0, which comes from the default value of the indentLevel parameter. You’ll soon see that this value can change as the function continues and progressive indents are needed for successive children. But first, let’s jump down to look at how padIndent() works, in lines 11 through 17.
The padIndent() function begins by initializing a local variable as an empty string in line 12. It then enters a loop in lines 13 through 15 that adds four spaces to this variable. The indent level desired determines the number of loops. Once the loop is completed, this string of empty spaces is returned to the showChildren() from line 16, so the spaces can be added to the beginning of every trace. The end result is that, for each level of indent, these accumulated spaces push the output to the right, resulting in an outline format.
Note
Remember that variables that are declared inside a function are local to that function only and have no value elsewhere. See the Functions section in Chapter 2 for more about local variables.
Note
An advantage to using spaces for the indent in this context is that you can replace them with other characters to create tab leaders—visual indicators that draw the eye across to the farthest indent. The period (.) character is commonly used for this purpose.
Lines 5 through 7 are what make this function powerful. Line 5 checks to see whether the display object currently being analyzed is also a display object container. It does so by using the is operator, which checks the data type of the object in question, and comparing it against the DisplayObjectContainer type. If the object is a container, the function calls itself again, in line 6. When doing so, it passes in that current object, and increments the indent level so any children found will be further indented during the trace.
This idea of a function calling itself is called recursion. It may seem redundant, but it can be very useful. In this case, it’s the most efficient way for the showChildren() function to continue introspecting every display object it finds, no matter how deeply nested. The result is a complete walkthrough of all display objects, no matter how many children each may have.
The showChildren() function in action
Take a look at the function in action. Figure 4-4 shows a sample file that will be analyzed. The rectangle and circle movie clips, with their instance names, are indicated in the figure. Within each rectangle, a shape is used to create the fill and stroke appearance. Inside each circle, a shape again provides the fill and stroke and a static text element is added to display the word “child.”
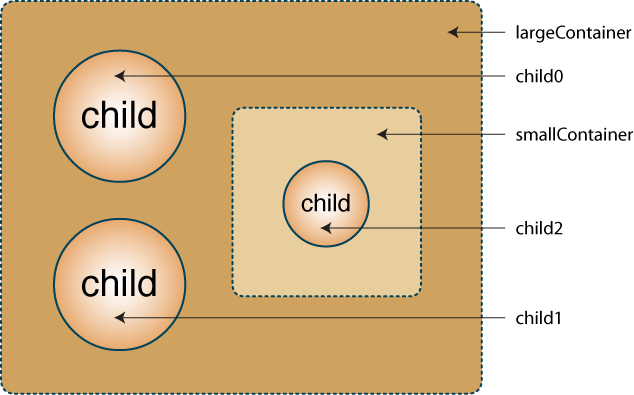
When the function runs, the following is traced to the output window, showing all children of the stage. Note that whenever a display object has no name, “instance” is combined with an incrementing integer to create a unique name.
root1 [object MainTimeline]
     largeContainer [object MovieClip]
         instance1 [object Shape]
         smallContainer [object MovieClip]
             instance2 [object Shape]
             child2 [object MovieClip]
                 instance3 [object Shape]
                 instance4 [object StaticText]
         child0 [object MovieClip]
             instance5 [object Shape]
             instance6 [object StaticText]
         child1 [object MovieClip]
             instance7 [object Shape]
             instance8 [object StaticText]
Adding and Removing Children
The previous section described the parts of the display list and how to analyze an existing list. But you’ll also need to know how to add to, and remove from, the display list at runtime. In previous versions of ActionScript, you needed to rely on varying methods to add items to the stage. For example, you needed to use separate methods for creating a movie clip, placing a library movie clip on stage, or duplicating a movie clip. Using the ActionScript 3.0 display list, you need only one approach to create a movie clip: new MovieClip(). Even adding a precreated movie clip from the library is consistent with this syntax, as you’ll soon see.
Using addChild()
Adding a display object to the display list requires just two simple steps. The first is to create the object—in this case, an empty movie clip (a movie clip created dynamically, but without content). Commonly, this reference to this object is stored in a variable.
varmc:MovieClip=new MovieClip();
This creates the movie clip but does not display it. To display the movie clip, you must add it to the display list using the addChild() method:
addChild(mc);Without any additional syntax, this adds a child to the current scope of the script. That is, if you typed this into a frame script in the main timeline, it would add the movie clip to the main timeline. You can also add a child to another display object container. So, if you instead wanted to add the mc movie clip nested inside another movie clip called navBar, you would change the second step to:
Note
Remember, you can’t add children to display objects like shapes, videos, text elements, and so on, because they are not display object containers.
navBar.addChild(mc);We’ve been adding movie clips to the display list in our examples, but it’s just as straightforward to add other display objects. Two simple examples include creating a sprite and a shape:
varsp:Sprite=new Sprite();addChild(sp);varsh:Shape=new Shape();addChild(sh);
You don’t even have to specify a depth (visible stacking order) because the display list automatically handles that for you. Remember, the display list can’t have any gaps, so the addChild() method always adds the object to the end of the display list no matter how long it is. You never need to know how many items are in the display list to use this method.
Adding Custom Symbol Instances to the Display List
In the previous examples, we created display objects without any visible content. In Chapter 8, we’ll show you how to draw with code so you can create art for these movie clips solely with code. This keeps file size down and allows more dynamic control.
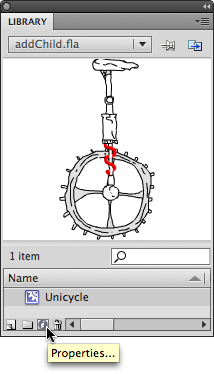
However, you will frequently need custom art in your files, which would be difficult or virtually impossible to create with code. So we’re going to show you how to dynamically add movie clips that already exist to the display list. In this chapter, we’ll focus on adding instances of symbols that exist in your Library, using Flash Professional. In the accompanying source file, add_child_linkage.fla, you will find a unicycle in the library. To add this movie clip to the display list using ActionScript, you must first prepare the library symbol for ActionScript use.
In prior versions of ActionScript, there were two ways of doing this. The first approach was to assign the symbol a linkage identifier name—a name unrelated to symbol and instance names, specifically for use in ActionScript. The second way was to assign your own class to the movie clip so that it could be created when you created an instance of the class.
In ActionScript 3.0, these two approaches are unified into a single linkage class. This name allows you to create runtime instances of the symbol, but also allows you to create a class of the same name that will give the movie clip autonomous behavior. The most important thing to know at this point is that you don’t have to write your own class to control the symbol instance if you don’t want to. Before defining your own class, Flash will automatically create an internal placeholder class for you, so you can use its name to dynamically create the symbol when requested.
Note
This improved approach to dynamically creating custom symbol instances also allows you to add classes easily later on for these instances to use—without having to edit your library. See the “Adding Classes to Pre-Existing Symbols” post at http://www.LearningActionScript3.com for more information.
To prepare a movie clip for ActionScript use, select it in your library, and then click the Symbol Properties button (it looks like an “i” at the bottom of the library) to access the clip’s properties, as shown in Figure 4-5. You can also right-click (Windows) or Ctrl-click (Mac) on the symbol and choose Properties from the pop-up menu.
In the resulting dialog, seen in Figure 4-6, click to enable the Export for ActionScript option (click the Advanced button if this option is not visible), and add a name to the Class field. When naming classes, it’s common practice to begin the name with an uppercase letter. This is a bit different from naming a variable, where you might choose to use a lowercase first letter, so it’s a good idea to get into this practice now. In the provided source file, we’ve already used the class name Unicycle.
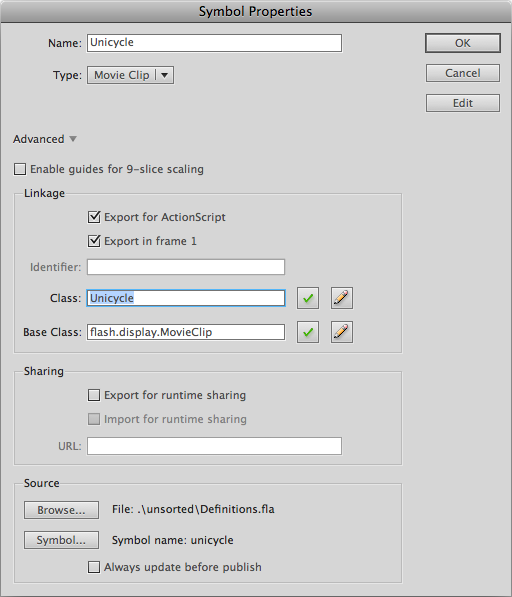
You will also likely notice that Flash adds the MovieClip class (in this case) to the Base Class field for you. A base class is a class from which other classes can be derived. A base class is also sometimes called a parent class because this is a form of inheritance. You’ll learn more about inheritance in Chapter 6, but basically, this makes it possible for your new class to automatically inherit the accessible properties, methods, and events available to the MovieClip class. For example, you can automatically manipulate the x and y coordinates of your new custom movie clip.
Now that you’ve given your movie clip a class name, you can create an instance of that class the same way you created an instance of the generic movie clip class. Instead of writing new MovieClip(), however, you will write new Unicycle() to create the movie clip. The same call of the addChild() method is used to add the newly created unicycle to the display list, as seen in the following code:
varcycle:MovieClip=newUnicycle();addChild(cycle);
Using addChildAt()
The addChild() method adds the display object to the end of the display list, which places the object at the top-most position in the visible stacking order. This makes it very easy to place items on top of all other items. However, it’s also useful to be able to add a child at a specific position in the display list. For example, you may wish to insert an item into the middle of a stack of display objects.
To accomplish this, the addChildAt() method takes as its arguments not only the object to add, but also the position in the display list where you want the object to appear. The following example, found in the add_child_at.fla source file, adds a movie clip with the class name Ball to the start of the display list (position 0) with every mouse click. The effect is that a new ball is added below the previous balls (and positioned down and to the right 10 pixels using additional code), every time the mouse is clicked.
Remember, you can’t add an object to a position greater than the number of items already in the display list because the display list can’t have gaps.
1varinc:int= 0; 2 3stage.addEventListener(MouseEvent.CLICK, onClick,false, 0,true); 4 5functiononClick(evt:MouseEvent):void{ 6varball:MovieClip=newBall(); 7 ball.x= 100 + inc * 10; 8 ball.y= 100 + inc * 10; 9addChildAt(ball, 0); 10 inc++; 11 }
Line 1 creates a variable that will be incremented each time the mouse is clicked. This variable will be used to help position each ball. Line 3 adds an event listener to the stage, listening for a mouse click, so that any mouse click will trigger the listener’s function in lines 5 through 11.
In line 6, a new movie clip is created, using a library symbol with a linkage class of Ball. Lines 7 and 8 manipulate the x and y coordinates, setting x and y to 100 and adding a 10-pixel offset for each ball added. The offset is calculated using the incrementing variable. For example, when the first ball is added, inc is 0 so the additional pixel offset is 0 multiplied by 10 or 0. Then inc is incremented at the end of the function, in line 10. The next mouse click will offset the new ball to 1 multiplied by 10 or 10 pixels. The third click offset will be 2 multiplied by 10 or 20 pixels, and so on. Most importantly, line 9 adds the ball to the display list, but always at position 0, making sure the newest ball is always on the bottom.
Note
It is possible to issue more than one assignment instruction in a single line. For example, this code assigns 100 to both the x and y coordinate of a movie clip:
ball.x= 100; ball.y= 100;
Because both values are 100, the same task can be expressed this way:
ball.x= ball.y= 100;
This is handy for making code shorter for less scrolling, but some may think this form is harder to read or understand. The result is the same, whichever syntax you choose, so use what is most comfortable for you.
Removing Objects from the Display List and from Memory
It’s just as important to know how to remove objects from the display list after they’ve been added. The processes for adding to and removing from the display list are similar. To remove a display object, you can use the removeChild() method, which takes only one argument: a reference to the child that must be removed:
removeChild(ball);You can also remove a display object from a specific position in the display list using removeChildAt(). However, this method will remove any object from the specified position, so, unlike removeChild(), no object reference is needed.
removeChildAt(0);The following example, found in the remove_child_at.fla source file, is the reverse of the addChildAt() script discussed in the prior section. It starts by using a for loop to add 20 balls to the stage, positioning them with the same technique used previously. It then uses the event listener to remove a child with each click.
1for(varinc:int= 0; inc < 20; inc++) { 2varball:MovieClip=newBall(); 3 ball.x= ball.y= 100 + inc * 10; 4addChildAt(ball, 0); 5 } 6 7stage.addEventListener(MouseEvent.CLICK, onClick,false, 0,true); 8 9functiononClick(evt:MouseEvent):void{ 10removeChildAt(0); 11 }
Note
For more information on for loops, please review Chapter 2. For more information on simultaneous assignment, as seen in line 3 of this script, see the note in Using addChildAt().
This script works if something’s in the display list because there is always something at position 0. After removing the last ball, however, a click will result in an error like, “the supplied index is out of bounds” because no object is in position 0.
To avoid this problem, check to see if there are any children in the display object container you are trying to empty. Making sure that the number of children exceeds zero will prevent the aforementioned error from occurring. The following is an updated onClick() function; it replaces lines 9 through 11 used in the previous code with a new conditional, which is shown in bold here. (For more information on conditionals, please review Chapter 2.)
1functiononClick(evt:MouseEvent):void{ 2if(numChildren> 0) { 3removeChildAt(0); 4 } 5 }
The numChildren property, in this scope, references the main timeline. You can check the number of children in any display object container by preceding the property with your object of choice.
Note
If you want to use a for loop to remove all children of a container (such as everything in the display list or all children of a specific movie clip), it is easiest to remove the objects from the bottom, as discussed here. This prevents out of range errors that might be caused by removing objects from a specific position using the loop counter.
For example, this code will cause an error because the display list updates itself to remove gaps and, after children 0 through 4 are removed, there are no longer objects at positions 5 through 9.
for(vari:int= 0; i < 10; i++) {removeChildAt(i); }
Use this approach, instead:
for(vari:int= 0; i < 10; i++) {removeChildAt(0); }
Removing objects from memory
It’s always a good idea to try to keep track of your objects and, when you’re sure you no longer need them, to remove them from memory. This not only uses less memory and helps keep your projects efficient, but can also prevent unexpected errors that come from using old objects or values left in memory.
This is particularly relevant when discussing the display list because removing an object from the display list does not remove it from memory. The following script, found in the remove_child.fla source file, is a simplification of the previous example and will both remove a movie clip from the display list and from memory. Trace outputs are shown here as comments.
1varball:MovieClip =newBall(); 2 ball.x= ball.y= 100; 3addChild(ball); 4 5stage.addEventListener(MouseEvent.CLICK, onClick,false, 0,true); 6 7functiononClick(evt:MouseEvent):void{ 8removeChild(ball); 9trace(ball);//[object Ball]10 11 ball =null; 12trace(ball);//null13 14stage.removeEventListener(MouseEvent.CLICK, onClick); 15 }
Lines 1 through 5 are derived from the previous example, creating and positioning the ball, adding it to the display list, and adding a mouse click listener to the stage. The first line of the function, line 8, removes the ball from the display list. Although it’s no longer displayed, it’s still in memory, as shown by the trace in line 9. Line 11, however, sets the object to null, allowing it to be removed from memory. Line 12 shows that the ball variable is null.
Note
As an added review of best practices, line 14 emphasizes the concept of removing event listeners covered in Chapter 3.
Managing Object Names, Positions, and Data Types
As any display list grows, it will likely become desirable to traverse its contents and work with individual display objects. This may require simple tasks such as identifying a display object by name or position in the list, or even by referencing existing objects as a specific display object type. (For example, you may need to refer to an existing object as a movie clip if you want to use a movie clip method like play()).
Finding Children by Position and by Name
In most of the example scripts in this chapter, references to the display objects already exist and are known to you. However, you will likely need to find children in the display list with little more to go on than their position or name.
Finding a child by position is consistent with adding or removing children at a specific location in the display list. Using the getChildAt() method, you can supply a position in the list and retrieve a reference to that object. For example, you can work with the first child found using this familiar syntax:
vardispObj:DisplayObject=getChildAt(0);
If you don’t know the location of a needed child, you can try to find it by name using its instance name (or value of its name property). Assuming a child had a name of circle, you could store a reference to that child using this syntax:
vardispObj:DisplayObject=getChildByName("circle");
Finally, if you need to know the location of a display object in the display list, but only have its name, you can add the getChildIndex() method to accomplish your goal. The first line of the following snippet retrieves a reference to the desired object, and the second line uses that reference to determine its index in the display list.
vardispObj:DisplayObject=getChildByName("circle");vardoIndex:int=getChildIndex(dispObj);
Clarifying or Changing the Data Type of a Display Object
Note that, in the preceding discussion, we used DisplayObject as the data type when retrieving a reference to a display object—rather than MovieClip, for example. This is because you may not know if a child found in the display list is a movie clip, sprite, shape, and so on.
For example, if you call a function that adds a display object to the display list, what is the data type of that item? Without knowledge of what the function does, you can’t know if the item is a movie clip, text field, or video. Similarly, what if you reference the parent of a display object, without giving the compiler any additional information? The only thing the compiler knows is that the parent is a display object container (because it’s part of the display list and has children).
This can be a problem because the compiler can’t know if a property or method is legal if it doesn’t know the object’s data type. The following creates a movie clip, adds it to the display list, and tells the movie clip’s parent to go to frame 20 and stop:
varmc:MovieClip=new MovieClip();addChild(mc);mc.parent.gotoAndStop(20);
However, the ActionScript compiler doesn’t know if gotoAndStop() is a legal method of mc’s parent because it doesn’t know the parent’s data type. For example, the parent might be a sprite and a sprite doesn’t have a timeline. As such, you can’t very well go to frame 20 of a sprite. If the data type of the parent is unknown to the ActionScript compiler, you will get an error similar to:
Call to a possibly undefined method gotoAndStop through a reference with
 static type flash.display:DisplayObjectContainer.
You can avoid this error by casting the object. Previously discussed in Chapter 2, casting is particularly important when manipulating the display list and warrants another mention. Casting means you are explicitly telling the ActionScript compiler the data type of the object—changing the compiler’s understanding of the data from one type to another. Casting does not actually change data. In our example, to make sure the compiler doesn’t object to the gotoAndStop() method, you must cast the parent from DisplayObjectContainer to MovieClip. You can do this by surrounding the object of unknown type with the desired class name. The following syntax tells the compiler that mc’s parent is of data type MovieClip:
MovieClip(mc.parent).gotoAndStop(20);
Note
Another way to cast an object is by using the as operator. Continuing the example on this page, this syntax will also cast mc’s parent as a movie clip:
varmc2:MovieClip= mc.parent as MovieClip; mc2.gotoAndStop(20);
Although this is more verbose, it has advantages. For example, the <ClassName>() syntax may be confusing because it looks like you are calling a function or instantiating a class. Also, some conversion or creation functions takes precedence over casting and prevents casting from working. For example, Array() will not cast to an array because that syntax is equivalent to new Array(), which creates an array. This means it’s possible to cast an object to Array only using the as operator.
One reason we like to use the <ClassName>() syntax is that the compiler will display an error if the casting is incorrect. The as operator will return null in this case, but not issue an error.
If you need to tell the compiler that a display object is of another type, the syntax is consistent. The following syntax examples tell the compiler that a variable named obj is a text field, and that an item retrieved from the display list is a sprite, respectively:
TextField(obj);Sprite(getChildAt(0));
Note
It’s possible to change the data type of an object implicitly, or even inadvertently. This is called coercion. You will sometimes see this in error messages similar to “Type Coercion failed,” or “Implicit coercion of type X to type Y.” When you see this, you should look in your code for possible data type errors or incompatible operations performed on a specific data type.
Changing the Display List Hierarchy
In addition to improving consistency over previous versions of ActionScript, the display list also makes managing assets much easier. Particularly simplified are: changing the visual stacking order (depth management) and dynamically changing the familial relationship between visual assets (reparenting, or moving a display object from one parent to another).
Depth Management
Adding items to the display list does not require that you specify which level the new child should occupy, because all of that is handled for you automatically. This also makes managing the depths of display objects much easier than ever before.
To begin with, you can simply use the addChild() or addChildAt() methods to alter the order of display list items. As we discussed, adding a child to a display list position below other elements using the addChildAt() method will automatically push the other elements up in the list. But you can also use the addChild() method on an object that already exists in the display list. This step will remove the object from its original position and move it to the top of stack, pushing the other elements down.
For example, consider the following simple code, found in the source file add_child_trace.fla. Lines 1 through 6 use the standard approach of creating and adding movie clips to the display list, with the added step of giving each clip an instance name. Lines 7 and 8 display the results at this point and, as expected, the traces (indicated by comments here) show mc1, or “clip1,” at position 0, and mc2, or “clip2,” at position 1.
1varmc1:MovieClip=new MovieClip(); 2 mc1.name="clip1"; 3addChild(mc1); 4varmc2:MovieClip=new MovieClip(); 5 mc2.name="clip2"; 6addChild(mc2); 7trace(getChildAt(0).name);//clip18trace(getChildAt(1).name);//clip2
However, if you add mc1 to the display list again, it is moved from position 0 to the end of the list, and mc2 gets pushed to position 0. Adding the following lines to the script will demonstrate this process.
9addChild(mc1);10trace(getChildAt(0).name);//clip211trace(getChildAt(1).name);//clip1
This is demonstrated further in the following script, found in the bring_to_top.fla source file (Figure 4-7). This example takes advantage of the event propagation discussed in Chapter 3 to automatically bring any display object that is rolled over with the mouse to the top of the visual stacking order:
1addEventListener(MouseEvent.MOUSE_OVER, onBringToTop, 2false, 0,true); 3 4functiononBringToTop(evt:MouseEvent):void{ 5addChild(MovieClip(evt.target)); 6 }
If adding or moving an item to the top of all others is not specific enough for your needs, there are also direct methods for swapping the depths of objects that are already in the display list. The swapChildren() method will swap the depths of two display objects regardless of where they are in the display list. For example, the following code, found in the swap_children.fla source file, will swap positions between the movie clip at the top of the display list—no matter how many display objects exist—and the movie clip that is clicked—no matter where in the display list that clip may be:
1vargs:MovieClip=newGreenSquare(); 2 gs.x= gs.y= 0; 3addChild(gs); 4varrs:MovieClip=newRedSquare(); 5 rs.x= rs.y= 25; 6addChild(rs); 7varbs:MovieClip=newBlueSquare(); 8 bs.x= bs.y= 50; 9addChild(bs); 10 11addEventListener(MouseEvent.CLICK, onClick,false, 0,true); 12functiononClick(evt:MouseEvent):void{ 13varclickedChild:MovieClip=MovieClip(evt.target); 14vartopChild:MovieClip=MovieClip(getChildAt(numChildren−1)); 15swapChildren(clickedChild, topChild); 16 }
Lines 1 through 9 repeat the same process three times. First, new instances of library symbols, using the GreenSquare, RedSquare, and BlueSquare linkage classes, respectively, are created. (See the Adding Custom Symbol Instances to the Display List section in this chapter for more information.) Next, the x and y coordinates of each instance are set 25 pixels apart. Finally, each instance is added to the display list.
Line 11 creates an event listener that is attached to the main timeline and listens for a mouse click. Any time an object in the main timeline is clicked, the onClick() function is called. Line 13 casts whatever is clicked as a movie clip, line 14 does the same with the last object in the display list, and line 15 swaps those display objects.
Note
This script is written in the main timeline, so that is the script’s scope. By using methods like addChild() and addEventListener() without attaching them to a specific object, the scope of the script is the implied object. Using the this keyword to refer to the current scope is another way to make this clear. Considering line 3 as an example, the syntax is this.addChild(gs). See Chapter 2 for more information.
ActionScript identifies the bottom item in the display list using 0. Therefore, Line 14 can’t use the numChildren property by itself to identify the last item in the display list. For example, if you have three items in the display list, numChildren returns 3, but the indices (positions) of those items are 0, 1, and 2. So, to retrieve the last item in the list, you must use numChildren - 1, which correctly identifies the last item in the list.
You can also swap the contents of any two depths, no matter what’s in them, using the swapChildrenAt() method. This example snippet will swap whichever display objects are in display list positions 0 and 10:
swapChildrenAt(0, 10);Finally, you can move a child to a specific depth using the setChildIndex() method. It requires two arguments: the child you want to move, and its intended depth. The following code adjustment to the swap children example, found in the set_child_index.fla source file, changes line 15 to set the index of the clicked child to 0.
12functiononClick(evt:MouseEvent):void{ 13varclickedChild:MovieClip=MovieClip(evt.target); 14vartopChild:MovieClip=MovieClip(getChildAt(numChildren−1)); 15setChildIndex(clickedChild, 0); 16 }
Reparenting Children
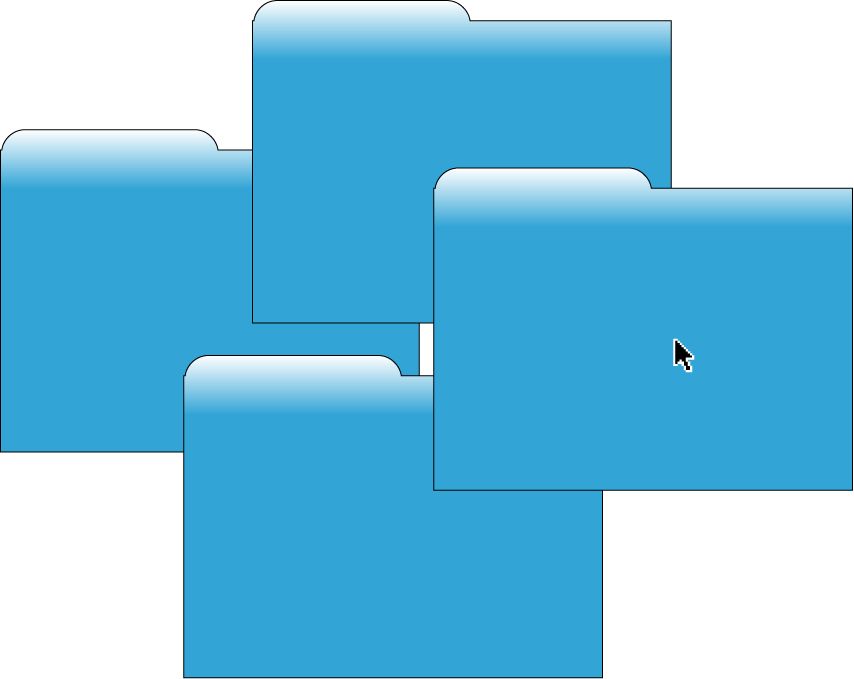
Another task made easy by the display list is moving a child from one parent to another. In the reparenting.fla source file, a moon can be moved to either of two night skies, just by clicking that sky (Figure 4-8). Both skies are also draggable, demonstrating that the moon will automatically move with each sky because it is a child object inside the parent.

This exercise again demonstrates the bubbling of events by attaching both listeners to a parent container once, instead of to each sky. (See Chapter 3 for more information.) However, a side effect of this efficiency is that the moon, as a child of that parent container, will also react to the events. So, it’s possible to add the moon to itself, resulting in an error. To prevent this from happening, line 1 disables mouse interaction with the moon.
In the default layout of the file, the three siblings (moon and two skies) are all on the stage. The first reparenting process is demonstrated in line 2 by adding the moon to the first sky (on the left) as its starting position. Lines 4 and 5 then add two event listeners to the main timeline. Note that the listeners are not attached to a specific object in lines 4 and 5. The this object is the implied responsible party, indicating the current scope, or main timeline. As a result, any child display object that receives a mouse down event will call onDrag() and a child mouse up event will call onDrop().
1 moon.mouseEnabled=false; 2 sky0.addChild(moon); 3 4addEventListener(MouseEvent.MOUSE_DOWN, onDrag,false, 0,true); 5addEventListener(MouseEvent.MOUSE_UP, onDrop,false, 0,true); 6 7functiononDrag(evt:MouseEvent):void{ 8 evt.target.addChild(moon); 9 evt.target.startDrag(); 10 }
Line 8 then adds the moon to the sky that was clicked. This process removes the moon from its previous parent and adds it to the clicked item, reparenting the moon. The last line of the function then enables dragging of the clicked item.
Finally, when the mouse up event is received, the onDrop() function disables dragging.
11functiononDrop(evt:MouseEvent):void{ 12stopDrag(); 13 }
As you can see, by using the addChild() method, you can move a display object from one parent container to another. As a result, the child will inherit basic display attributes from its parent. For example, in addition to the x and y coordinates demonstrated in this file, the child will also be affected by any changes to rotation, scale, or alpha values of the parent.
A Dynamic Navigation Bar
Now it’s time to tie much of this together and create a dynamic navigation bar. This project will create a five-button navigation bar that will be centered on the stage as shown in Figure 4-9. To simulate functionality, each button will trace its name to the Output panel when clicked. Later in the book, you’ll combine additional skills to create a similar navigation bar that will use XML and load external assets.

This script can be found in the dyn_nav_bar.fla source file. Lines 1 and 2 initialize the number of buttons used and the space between each button (in pixels). Line 4 creates a container that will hold not only the buttons, but also background art. The container doesn’t need a timeline, so for efficiency (and practice), a sprite is used rather than a movie clip. Next, line 5 adds the sprite to the display list.
1varbtnNum:int= 5; 2varspacing:Number= 10; 3 4varnavBar:Sprite=new Sprite(); 5addChild(navBar);
Lines 6 through 15 create the buttons. Line 6 types a variable as SimpleButton, which allows you to use (or create) button symbol instances, rather than relying solely on movie clips. The loop defined in line 7 creates five buttons, based on the value of btnNum assigned in line 1.
6varbtn:SimpleButton; 7for(vari:int= 0; i < btnNum; i++) { 8 btn =newBtn(); 9 btn.name="button"+ i; 10 btn.x= spacing + i * (btn.width+ spacing); 11 btn.y= spacing / 2; 12 btn.addEventListener(MouseEvent.CLICK, onTraceName, 13false, 0,true); 14 navBar.addChild(btn); 15 }
Note
The SimpleButton class, used to create custom buttons, is so named because a Button class already existed. The latter is used to create instances of the Button component.
Each time through the loop, a new button is created from a button symbol in the library with the linkage class, Btn (line 8). The button is given a name by combining the string “button” and the loop counter value (line 9). The first button is called button0, the second is called button1, and so on.
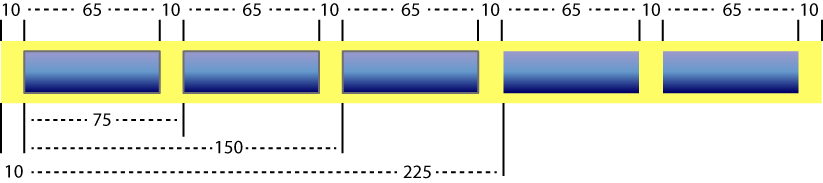
Each button is positioned horizontally (line 10) using the spacing gap set in line 2, plus the width of the button (in this case, 65 pixels) and another spacing gap. Figure 4-10 shows the measurements in use. The first button is positioned only 10 pixels to the right of the container’s edge, while the second button is positioned 85 pixels to the right of the container’s edge. In both cases, the spacing is 10, and the button width (65) plus spacing is 75. So, the first result is 10 plus 0 * (65 + 10), or 10 + 0, or 10. The second result is 10 plus 1 * (65 + 10), or 10 + 75, or 85. This process continues for each button. The vertical position is also set for each button, moving the button down 10 / 2, or 5 pixels.
The last lines in the loop add a mouse click event listener to the button (line 12) that will call the onTraceName() function when the event is received, and add the button to the navBar parent container (line 14).
16varbg:MovieClip=newNavBarBack(); 17 bg.width= spacing + btnNum * (btn.width+ spacing); 18 bg.height= btn.height+ spacing; 19 navBar.addChildAt(bg, 0);
Starting with line 15, a background is added to the navBar. Similar to the calculation used to position each button, its width is set to an initial spacing gap plus the total number of buttons times the sum of the button width and spacing (line 16). It’s height is set to the button height plus spacing (line 17). The background is then added to the navBar at position 0, ensuring that it’s placed behind all the buttons (line 18). The result is, no matter how many buttons you need, or what the button size is, the buttons will be spaced uniformly within the background, both horizontally and vertically.
Finally, the last script block positions the finished navBar and creates the listener function. The bar is centered horizontally by subtracting its width from the stage width, and dividing that value by two for a left and right margin (line 19). It is also positioned vertically at a y coordinate of 20 pixels (line 20). The onTraceName() function (lines 22 through 24) traces the name of each button when the user clicks on it.
20 navBar.x= (stage.stageWidth- navBar.width) / 2; 21 navBar.y= 20; 22 23functiononTraceName(evt:MouseEvent):void{ 24trace(evt.target.name); 25 }
This exercise demonstrates how to create a simulated navigation bar using the display list, when no assets previously existed on the stage. Later in the book, you’ll also learn how to create the buttons and draw the background shape entirely with ActionScript, removing the need to precreate these assets as library symbols. You’ll also learn how to create a class-based version of this system to control the playhead of a movie clip (Chapter 6), and load images or SWFs (Chapter 13).
Note
Push Yourself: A bonus file in this chapter’s source archive expands on this example. It’s called dyn_nav_bar_urls.fla and shows how to load web pages based on this dynamic navigation bar example. It uses information explained in Chapter 13, but if you want to learn more at the same time you put this chapter into practice, give the file a look!
What’s Next?
The display list is among the most important new introductions to ActionScript 3.0. It is worth the effort to explore the properties, methods, and events of the various display list classes—starting with the contents of this chapter, and then delving into the Flash help system, and additional resources, as you gain experience. Experimenting with the display list will show you that it is easy to use and, if you have experience with prior versions of ActionScript, you will soon find that it’s much simpler and more consistent than equivalent methods in ActionScript 1.0 or ActionScript 2.0.
Next, we’ll discuss timeline control. Regardless of whether you are creating lengthy linear animations or single-frame applications, you are likely to require some degree of control over the main timeline or movie clips. ActionScript 3.0 offers a few new features for you to try out.
In the next chapter, we’ll discuss:
Controlling playback of your animations and applications by moving the playhead with ActionScript
Parsing frame label names from timelines and scenes
Changing the frame rate of movie playback for the first time
Get Learning ActionScript 3.0, 2nd Edition now with the O’Reilly learning platform.
O’Reilly members experience books, live events, courses curated by job role, and more from O’Reilly and nearly 200 top publishers.

