Fancy yourself a bit of a music aficionado? Always keeping up to date on the latest sounds and advancements in music creation and engineering? If that’s the case, then this chapter will be right up your alley. The Kinect’s genius shines when integrating a natural user interface into just about every component of our lives. One of the most surprising and impressive implementations of the Kinect’s NUI functionality is the integration and control of digital music components.
Using applications such as Ableton’s Live and Max/MSP, you can transform yourself into a living, breathing dubstep master or a hands-free digital DJ. There’s even a hack that lets you rock out on a virtual keyboard that can placed anywhere! Leave your audiences stunned and amazed as you use nothing more then your own natural gestures to create a symphony of incredible sounds.
In this chapter, you will learn what musical applications are available to use with the Kinect and how to configure and control them to your liking. You’ll learn the basics of how to add customized sounds and how to seamlessly switch between samples based on preset custom gestures.
OSCeleton is a wrapper that allows us to send OpenNI skeletal data in the form of open sound control (OSC) messages from one application to another. It’s a great way to bridge the gap between two applications that serve different purposes. For example, if you want to use OpenNI skeletal joint information and pass that into a Processing sketch using pbox2d, you would take advantage of the OSCeleton wrapper to send that skeletal joint data over OSC. The nice part about OSCeleton is that it works with all programming languages and frameworks that use OSC events.
For this example, we’ll be using OSCeleton with Processing to demonstrate how to run one of the OSCeleton-examples files. This will ensure that OSCeleton is working in the background, passing OpenNI skeletal data over OSC to the pbox2d Processing sketch.
Before you begin, you will need to ensure that OpenNI and Processing are both installed on your Mac OS X machine. Please refer to Use Processing from Chapter 2 along with Install OpenNI, NITE, and SensorKinect for OS X from Chapter 1.
To start off, download the latest version of Sensebloom’s OSCeleton from https://github.com/Sensebloom/OSCeleton/downloads and place it in any directory.
Tip
I always like to place libraries, frameworks, and applications that I know will be primarily used for Kinect-related projects into a Kinect folder in my Home directory. You’ll find it’s much easier to keep track of things, especially if you plan on exploring all the different options the Kinect has to offer.
Extract the osceleton-v1.2.1_OSX.zip file and then open your Terminal application.
Note
The version number may very well change from v1.2.1 to something else by the time you read this. If so, replace the version number just listed with the latest version you just downloaded.
unziposceleton-v1.2.1_OSX.zip
Change the read/write permissions of the file.
chmoda+xosceleton-v1.2.1_OSX
Before we run OSCeleton, we’ll need to download the OSCeleton-examples Processing sketches along with a few Processing libraries.
Download OSCeleton-examples from https://github.com/Sensebloom/OSCeleton-examples.
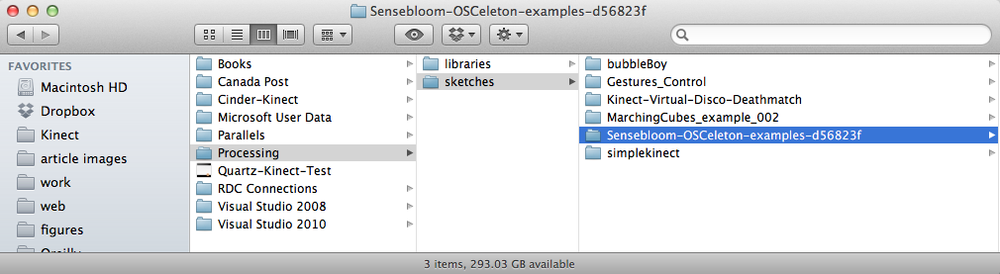
Extract the contents of the .zip file and place the entire directory into your Processing sketches folder, located in ~/Documents/Processing/sketches (see Figure 4-1).
There are two libraries that need to be imported for some of the sample Processing sketches to work properly. Download pbox2d and oscP5 and place the extracted contents of the files into your Processing/libraries directory:
The Stickmanetic example is a little out of date, so we’ll need to perform a few search-and-replace actions to correct some of the code (see Table 4-1). Launch the Stickmanetic.pde example. You should now see all the code in the scripting area, or Processing. To do a search and replace, press Command+F, or go to Edit → Find.
Table 4-1. Search-and-replace code changes for OSCeleton Stickmanetic example
| Search | Replace |
|---|---|
|
|
|
|
|
|
|
|
Once that’s done, plug your Kinect into your Mac. Navigate back to the location of osceleton-v1.2.1_OSX and run the file in a Terminal.
sudo./osceleton-v1.2.1_OSX
Stand a few feet away from the Kinect and perform the Psi pose to calibrate.
Tip
Psi pose is the proper terminology for the "Freeze! Hands in the air!" calibration pose. This initiates skeletal tracking when you’re using OpenNI.
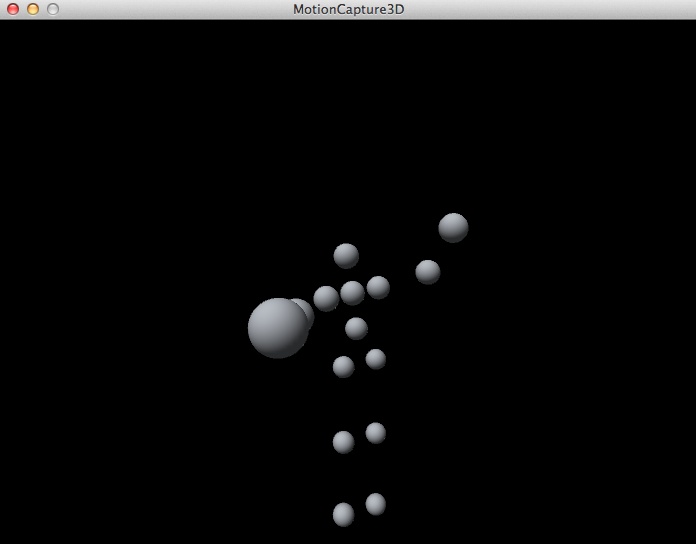
Continue to run OSCeleton in the background and then run the Stickmanetic Processing example. If you feel so inclined, check out the MotionCapture3D.pde example (shown in Figure 4-2) as well.
Congrats, you now have OSC events being passed to Processing using OpenNI skeletal data. We’ll also be using OSCeleton in the next hack, which involves passing OSC events through the Kinectar musical application.
Kinectar was developed as a complete solution for electronic musicians wanting to utilize the power of Microsoft Kinect as a hands-free Musical Instrument Digital Interface (MIDI) controller. It is a highly customizable and configurable toolkit designed for music, dance, and visual performers/artists.
Kinectar is designed to run alongside music production/performance software such as Ableton Live, providing an interface for the user to output MIDI notes, MIDI Control Change (CC), and OSC data in configurations that can change dynamically to suit an evolving performance. It receives joint position information from the Kinect and allows a large amount of advanced conditioning to be performed on the data before it leaves the program, ready for controlling synthesizers, drum machines, DAW functionality, or anything else that can be controlled using MIDI or OSC.
Kinectar doesn’t communicate with the Kinect; it requires a skeleton tracker proxy to feed it the data it uses. At the time of writing, Kinectar is configured to receive information from two different proxies: OSCeleton and Synapse. Both are free, were created by independent developers, and run using the OpenNI framework (thus, they require the OpenNI drivers, PrimeSense NITE middleware, and SensorKinect Module to be installed).
For simplicity’s sake, this installation guide will focus on using OSCeleton; however, you will find full installation notes for Synapse on its website, if that is your preferred method of skeletal tracking (http://synapsekinect.tumblr.com).
The simplest solution to installing the necessary components is to use the Zigfu developer bundle installer. This will install all three required modules so that your chosen Kinect → OSC proxy can communicate with the Kinect.
If you’re using Kinectar on Windows to control a program like Ableton Live, Reason, or any other digital audio workstation (DAW), another program I highly recommend is MIDI Yoke (again, totally free). MIDI Yoke, once installed, will create up to 16 virtual MIDI devices on your computer that allow routing of MIDI messages between different programs. This will allow you to get the most out of Kinectar, since one of its important features is full-duplex control between itself and your chosen DAW via MIDI—the more virtual MIDI devices, the better.
Here’s what you’ll need to install Kinectar for Windows:
- Download and install MIDI Yoke (optional; http://www.midiox.com)
- Download and install Zigfu Development Bundle (http://zigfu.com)
- Download and install Kinectar (http://kinectar.org)
- Download and extract OSCeleton to any chosen folder (https://github.com/Sensebloom/OSCeleton)
Create a batch file for OSCeleton (e.g., osceleton-kinectar.bat) with the following switches/commands:
osceleton.exe-w-rpause
You should now have all the required programs installed to run Kinectar and use all of its features. Here’s what you’ll need to install Kinectar for Mac.
- Download and install Zigfu Development Bundle (http://zigfu.com)
- Download Kinectar (http://kinectar.org)
- Download and extract OSCeleton to any chosen folder (https://github.com/Sensebloom/OSCeleton)
Run OSCeleton from Terminal with the following commands:
sudo./osceleton
Making sure your Kinect is plugged into both your computer and power, run the OSCeleton batch. You should be presented with two windows: the DOS-style text window and the visual window showing the Kinect’s grayscale depth image.
Note
If OSCeleton is not loading at this point, or is showing an error message, you’ve missed a step along the way. Double-check the installation steps and, if necessary, check the OSCeleton website for more information.
Once you have OSCeleton working, launch Kinectar. Perform the lock-post to allow OSCeleton to detect your skeleton (see Figure 4-3). You will see “Calibration complete, start tracking user [x]” (in the OSCeleton text window). Kinectar should then jump to life, with the visual feedback modules reflecting your hand movements.
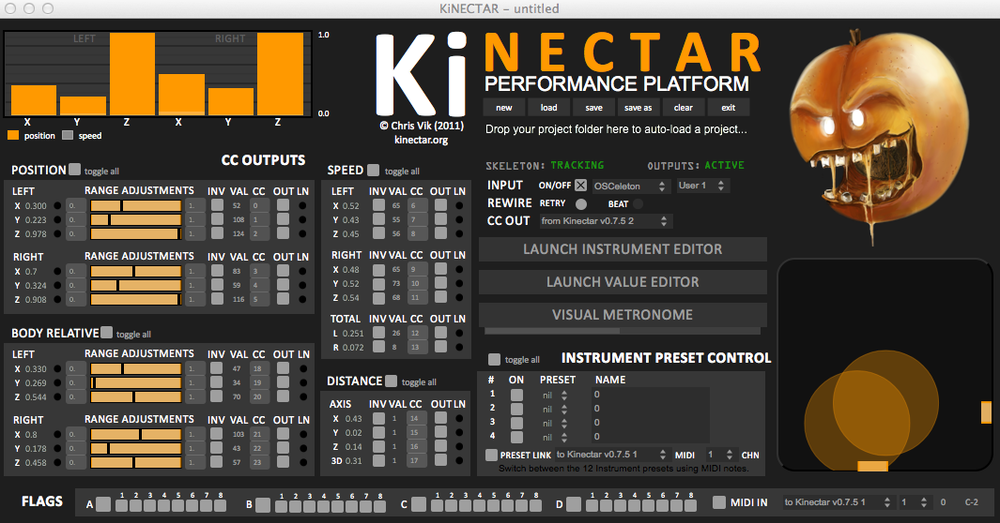
By default, Kinectar selects OSCeleton as its source of OSC input. However, if Kinectar is still not receiving data after a successful OSCeleton calibration, in the Setup section on the main page of Kinectar, make sure the Input box is checked and that OSCeleton is selected in the drop-down menu. At this point, you’ll be looking at what’s called the Tracking Page; however, it’s worth pointing out here that Kinectar is split up into three main areas:
The Tracking Page is the first screen you are presented with after opening Kinectar. It has visual displays representing the incoming and outgoing values, and allows the user to scale and adjust the hand position data, which can then be output as MIDI CC. The data is split up into four main data types:
- Absolute hand positions
- Body-relative hand positions
- Hand speeds
- Distance between hands
- The Instrument Editor is used to build graphical condition statements using flags and/or data conditions (i.e., if the <speed> of <left hand> <x-axis> is equal or greater than 0.5, then true else false) to activate actions. Actions can include outputting single MIDI notes or chords, or turning internal flags on and off to enable the creation of more complex triggers by allowing the sequencing of multiple events.
- The Value Editor section is dedicated to performing basic mathematical functions and scaling using any of the internal values (including raw position data, scaled position data, body-relative position data, speed, and distance). The resultant values can then either be output from Kinect via OSC or MIDI CC, or used to control parameters within Kinectar itself (such as velocity, pitch, or tempo of notes output within the Instrument Editor).
The Instrument Editor implements a method of switching between instrument presets on the fly, called the Preset Control System. This system allows up to 12 presets for each of the 4 instruments within a single project. To save a preset, simply hold Shift and left-click on the small nodes in the bottom-left corner of each instrument. You can recall the preset with a single left-click, or more excitingly, by using incoming MIDI notes, either via a hardware MIDI controller (such as a foot switch device) or sequenced within the DAW containing the musician’s set of music. So, by simply sending a note to Kinectar, you can set up a simple way to automatically change which preset is to be used depending on its position within the piece.
Our goal in this hack is to use Kinectar’s MIDI CC Output section to control specific audio units within Ableton Live via MIDI CC. Although this tutorial assumes the use of both OSCeleton as the proxy and Ableton Live as the audio program, you can easily translate it over to your preferred audio/music application, as most DAWs function in a similar manner when it comes to mapping parameters with MIDI.
Caution
The use of Kinectar assumes you have at least a basic level of knowledge in working with digital audio workstations (DAWs) and MIDI.
Because we’ll be bouncing from one application to another, I’ve preceded each step with the appropriate piece of software or operating system in bold. If you do not see an application in bold, proceed in the application from the previous step. First up, we’ll prepare Kinect for use with Ableton Live.
Open both Kinectar and Live (the order isn’t important). Run OSCeleton (as described in Install OSCeleton) and perform the lock-pose until your body is being tracked. Verify that Kinectar is receiving data with a simple check that the interface is responding to your movements. Set the MIDI CC Output device drop-down menu to a MIDI device on which Live is able to receive.
Tip
Mac users should be able to add communication ports for MIDI by using interapplication communication (IAC). Go to Applications → Utilities → Audio MIDI Setup. Click the Window options in the toolbar and then Show MIDI Window. Ensure that "Device is online" is checked. You can also add a new port and rename it to something more specific if you’d like, such as Kinectar <> Live. Restart Kinectar, and the option should be available under CC OUT.
In Live, check your MIDI preferences by going to the following menu:
- Mac
- Live → Preferences → MIDI
- Windows
- Options → Preferences → MIDI
Ensure that the MIDI device you’ve just selected as the CC Output device in Kinectar has both the Active and Remote buttons selected. This will allow MIDI messages to control parameters directly within the Ableton Live interface. Close the preferences window to return to the main page of Ableton Live.
In Kinectar, within the CC Output section on the left half of the main interface, locate the [position], [left hand], [y] value; this should be the second CC Output parameter from the top of the interface. Turn on the OUT toggle box (On is indicated with an X) toward the end of the parameter strip. This will enable the y position of your left hand to stream out of Kinectar via the MIDI CC Output device previously selected.
Ensure that the apricot is orange, not gray. This is the MIDI "mute" button, which will prevent ALL MIDI and Open Sound Control (OSC) from being output from Kinectar. At the moment, we wish to send MIDI out, so if the apricot is gray, click it to disable the mute function. This function is important to remember.
If all these steps were performed correctly, back in Ableton Live, we should notice a small solid yellow light in the top-right corner of Live’s interface called MIDI indicator. This signifies that Live is receiving MIDI.
Note
MIDI will not stream unless the proxy has a lock on a user. This is because Kinectar uses streaming data to perform its calculations for maximum resolution. If there is no streaming data going in, there will be no streaming data going out.
Now that we have MIDI streaming between programs, we can start mapping CCs (in this case, our hand position) to control parameters in Live. This tutorial can be altered and repeated to map many values from Kinectar to any number of parameters within Live and will commence from where the previous section left off (i.e., with Live, Kinectar, and OSCeleton running, and MIDI currently being streamed into Ableton Live).
Warning
If Kinectar stops responding at any point while building your patch, your proxy has most likely lost the lock on your body. Simply perform the lock-pose again and resume where you left off.
In Kinectar, turn MIDI mute on by clicking the apricot (it will turn from orange to gray).
Tip
This is a necessary step prior to performing any MIDI mapping functions within your DAW, as multiple streaming MIDI values into your DAW will confuse it during the mapping process.
In Live, ensure that the MIDI input indicator in the top-right corner of Live’s interfaces is not lit up yellow, indicating that Kinectar’s MIDI mute is on and there is no streaming data being received by Live. Click on the MIDI map button in the top-right corner of Live’s interface. This will turn MIDI mapping mode on in Live, and parts of the interface will turn blue, indicating that these parameters can be mapped.
Now click the blue interface object you’d like to control with the Kinect. As an example, you can simply click on the master volume fader. You will notice small, white handles around the parameter you’ve selected, meaning it is ready to be mapped by a MIDI controller (i.e., Kinectar).
In Kinectar, pick an axis to use to control the selected parameter in Live. In this tutorial, we’ll again use [position] [left hand] [y]. Click on the LN (or MIDI learn) button at the end of the parameter strip. This is the only feature that overrides the MIDI mute option, and sends a single MIDI value out for use with the MIDI learn feature common in all DAWs and software synths, samplers, etc. You will use this a lot.
In Live, you should now notice that a white box appears in the top-left corner of the master fader (or whichever parameter you’ve decided to map) with the numbers 1/1 or similar. This signifies that the parameter has been mapped to a CC value. The first number is the MIDI channel (1–16), and the second number is the CC number (0–127). Turn MIDI map mode off by clicking the MIDI button again. The interface should return to normal.
In Kinectar, ensure that the OUT toggle box at the end of [position] [left hand] [y] is turned on (with an X in it). Turn off MIDI mute (click apricot so that it turns orange).
In Live, move your left hand up and down (y-axis) and notice the master fader moving with it.
In Kinectar, alter the range needed to move your hand to achieve minimum/maximum CC values by clicking and dragging your mouse pointer over the Range Adjustment slider of the corresponding value you wish to adjust. Similarly, you may make adjustments by clicking on the min or max value and dragging up and down to alter it. By reducing the range of an output, you’re maximizing the efficiency of your movements. Make sure to explore this feature heavily for the best performance results and maximum comfort while using the Kinect as a MIDI controller.
In this tutorial, we’ll go over the steps needed to play a basic drum kit (kick and snare) with Kinectar and Ableton Live. It will introduce the concept of Kinectar’s Instrument Editor for use with event triggering. We’ll start off by opening up Kinectar. You may want to reference Map Parameters in Ableton Live with Kinectar before going forward.
Turn on MIDI mute by clicking the apricot (it will turn from orange to gray).
Warning
This is a necessary step prior to performing any MIDI mapping functions within your DAW, as multiple streaming MIDI values into your DAW will confuse it during the mapping process.
Our first steps will cover how to configure Ableton Live for Kinectar.
In Live, create a new project. While in Session view (press Tab to switch between Arrangement and Session view), open the Live Devices Browser tab on the left side of the screen. Expand the Instruments menu, then expand the Impulse menu and drag Backbeat Room over into the session grid to create an instance of the module.
Make sure the I.O button is selected to show the MIDI From settings on the mixer panel. This button is located in the far right of Ableton Live’s interface, next to the Master channel fader. In the mixer section of the newly created Backbeat channel, locate the MIDI From options and select MIDI Yoke 3 for the device and Ch. 1 for the channel. Then select In under the word Monitor, arming the channel to accept MIDI from Kinectar.
Next up, we’ll configure the Kinectar Instrument Editor.
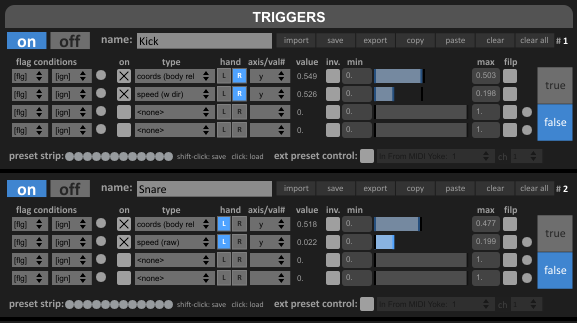
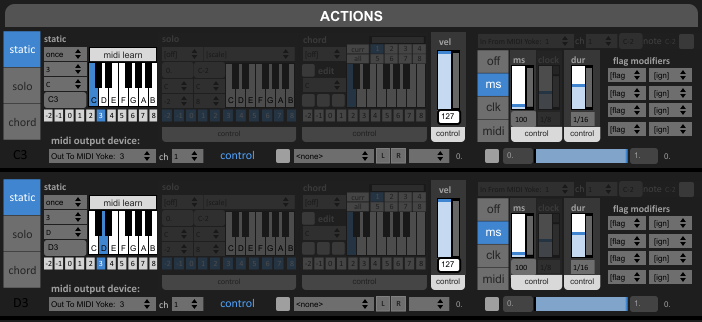
Back in Kinectar's main interface, click Launch Instrument Editor to open the unit. Turn on the first unit of the Instrument Editor by clicking the option in the top-left corner of the unit and name the unit Kick.
Underneath the name, you’ll notice four condition strips. Click the On toggle button on the first condition so that a cross appears in the box. Under Type, select "Coords (body rel.)"; then, select your right hand under the Hand title and select Y as the axis. Move right over the strip, just past the blue bar that shows the min and max selections for the trigger, and drag the Max number box down until it reaches about halfway down, or 0.500.
Tip
You’ve now set up a condition so that if your hand moves half way down your body, you will trigger the event. However, we want to make that trigger a little more robust. You don’t want the kick triggering when you move your hand slowly, so let’s add another trigger event that is related to the speed of your hand.
Still in Kinectar, in the next condition strip down, click the On box to enable the condition. Set its Type to "speed (w dir)." This will then let us set up a trigger that depends not only on the speed of our hand, but also on the direction in which it is moving. Select the same hand as before (right) and choose Y again for the axis.
Now you’ll notice the value of this trigger sitting in the middle (around 0.500) when your hand is at rest. Moving your hand up and down will move the value above and below the 0.500 mark, respectively. The more sharply you move your hand, the further the value will move away from the center.
Next, bring the Max value of the condition down to 0.300 by either clicking and dragging down on the Max value number box, or by highlighting the area between 0.000 and 0.200 with the blue range selection bar in between the min and max number boxes. Now when you test the trigger, it should turn to True only when you strike your hand down at a faster rate—perfect for drums.
Tip
To the right of the Triggers section you’ll see the Actions area. You’ll notice that Static note mode is active. This is perfect for setting up single hit zones for drum triggers.
Just to the right of the blue Static button is a drop-down menu that defaults to Off; this is the trigger mode of the static note output. It allows you to set up how the output is handled by the True/False messages it receives from the triggers.
Remaining in Kinectar, set the Static mode to Once. This means the note will occur only on the upward edge of the trigger becoming True. For more information about the trigger modes for each note mode, hover your mouse over the trigger selection boxes.
Tip
You can select the note to play by clicking on the keyboard in the Static section. Leave this to C for now; it’s safe to assume the kick drum of a sampler will always be triggered by the C note.
The impulse racks in Ableton default to listening to MIDI octave 3, so for our notes to trigger the drums, we have to set that octave in our Instrument Editor. Under the Static mode keyboard, click the number 3 on the octave selection bar, lighting up the number in blue. By default, this is set to the lowest octave, –2.
Finally, just under the octave setting is the "MIDI output device" settings. Change this to the MIDI From device we set earlier in Live, which was "Out to MIDI Yoke 3." Then make sure 1 is selected for the channel.
Tip
Due to the Kinect’s poor detection of quicker movements, there may be some unintended flam triggers (a note being triggered multiple times very quickly). We can remove the chance of this happening by moving our attention to the right of the Instrument where we have the buttons off, ms, clk, and midi. These are the timing modes of the note outputs. To see a description of these modes, hover your mouse over the buttons.
For the moment, we will simply select ms.
Tip
To the right of this setting is the amount of milliseconds required between triggers. The default value is 100 ms, which is perfect for drum triggers. Generally, the unintended flams occur within 50 ms of each other; however, it’s unlikely your hands can move fast enough to trigger notes intentionally more than once every 100 ms, so this setting is perfect for tightening up the sound.
Back in the main screen of Kinectar, click the apricot to disable MIDI mute and allow notes to be output from the Instrument Editor into Ableton Live.
Stand back and strike your hand downward to trigger the kick. You may have to adjust the instrument’s trigger condition ranges slightly (position and speed conditions we set up previously) to get a better feel for the kit.
Turn the MIDI mute on again by clicking the apricot while we build the snare instrument.
Following the same principle, we will quickly set up a trigger and action for the snare drum for our other hand in the Instrument Editor.
Turn on the next Instrument unit and give it the name Snare. Next, turn on the first condition strip, set the type to "Coords (body rel.)," select the opposite hand to what you’re using for your kick, and then set the axis to Y. Adjust the range to the same as the first strip in your kick unit.
Turn on the next condition strip to set up the speed condition, set the type to "speed (w dir)," select the correct hand, and then set Y for the axis, again adjusting the range as with the previous instrument. Set the static trigger mode to Once and then set the note to D, which will be the snare sample.
Still in Kinectar, set the octave again to 3 and change the output device to "Out to MIDI Yoke 3" and the channel as 1. Again turn the timing mode to ms with a value of 100 ms for our safety buffer, and then turn off MIDI mute by clicking the apricot.
Stand up and try your snare drum.
When everything is set up, the Instrument Editor should match what you see for both the Triggers and Actions sections shown in Figure 4-4 and Figure 4-5, respectively. You’ve now set up a basic drum kit with Kinectar. Experiment with different sounds to set up your own gesture-based drum kit using Live and Kinectar.
In this tutorial, we’ll be learning how to create a simple dubstep bassline wobble. You can view an example on YouTube in the video "Dubstep Bassline using Kinect" (http://youtu.be/325AhauQJCU). The parameters we’ll be mapping to our hands to get this sound are: Filter Cutoff, the low frequency oscillator (LFO) amount applied to the Filter Cutoff, and LFO speed. We’ll also be using Kinectar to output the notes necessary to play the melody of the bassline.
I’ll be using MASSIVE by Native Instruments to create the bassline; however, this tutorial can be applied to any synth with an LFO that can be attached to the filter. For simplicity’s sake, I’ll continue the tutorial assuming the use of MASSIVE (see Figure 4-6). The tutorial will also change software frequently from Kinectar to Live to the Synth, so it’s important to pay close attention here.
Warning
It is best to go through Map Parameters in Ableton Live with Kinectar before beginning this tutorial.
In Kinectar, turn on MIDI mute by clicking the apricot (it will turn from orange to gray).
Tip
This is a necessary step prior to performing any MIDI mapping functions within your DAW, as multiple streaming MIDI values into your DAW will confuse it during the mapping process.
In Live, create a new project in Live. While in Session view (press Tab to switch between Arrangement and Session view), open the Plug-in Devices tab on the left side of the screen. Drag over an instance of MASSIVE (or whichever synth you’ll be using) onto the grid to create a new channel for the synth to reside in.
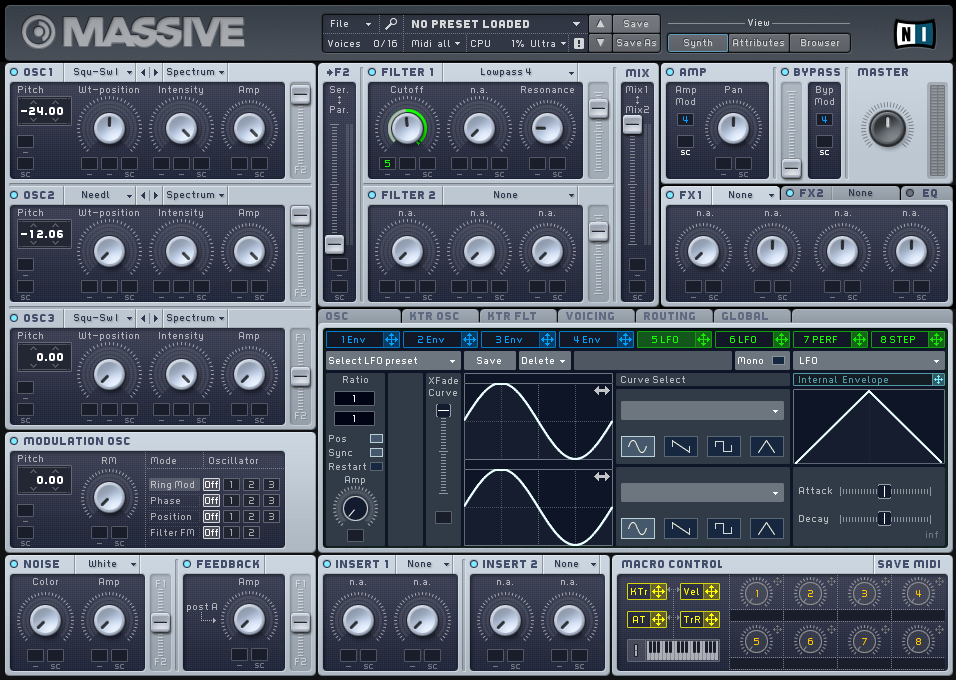
In Synth, with MASSIVE open, we’ll quickly build a bassline patch. With the default preset open (this will load upon instrument creation), starting from the top left, set the OSC1 pitch to –24.00 and the OSC2 pitch to –12.06. Click the box next to OSC2 that says Squ-Sw1 and change the oscillator type to Dirty Needle and turn its Amp setting to 100%. Leave the other oscillators as they are. Locate the filter faders of both OSC1 and OSC2 (you’ll find these faders just to the right of their Amp parameters), and bring the faders both to the top (to where it says F1 in light gray).
Now, to create the filter characteristics that we’ll use to make the wobble, bring your attention to the Filter 1 section in the top-middle section of the synth. Where it says None, click and select Lowpass 4. Bring the Resonance 1/4 of the way up. Now bring the Mix fader to the right of the filter sections all the way up to the top so that the Filter 1 is mixed 100%.
Click the blue tab called 4 Env in the center of MASSIVE. This will change the center section of the synth to reflect the Envelope settings that are set to the Amplitude of the synth. Bring the knob called Level—located to the right of Decay—to 100%.
We’ll create the wobble by first clicking the green tab in the middle called 5 LFO; the middle section of the MASSIVE interface will now show the LFO settings. On the left side of this section, click the Sync button to synchronize the LFO with the tempo of the track. Then ensure that the Restart button is not active. Click and drag the green cross (to the right of the 5 LFO tab) and drop it onto the Cutoff knob on the Filter 1. This will attach the LFO to the filter to give the synth the wobble characteristic.
Still in Synth, click and drag upward on the green 5 that appears under the Cutoff knob so that it applies around 60% of the LFO to the filter, signified by the green circle around the filter knob. In preparation for testing the sound with Kinectar in a later step, move the Filter 1 Cutoff to 50%, and the Amp in the LFO section to 0.
Moving back to Live, locate the MASSIVE device box at the bottom left of the screen. You’ll notice it has three buttons to the left of the title MASSIVE. Click on the Unfold Device Parameters button, which is the gray arrow pointing down in between the on/off and wrench buttons.
The device will now unfold with the message "To add plug-in parameters to this panel, click the Configure button." Follow these instructions and click the Configure button in the top-right corner of the MASSIVE device. This will turn the button green, signifying you are ready to select parameters in the synth to map with Kinectar.
Back in Synth, in MASSIVE, click the following parameters to add them to the mappable parameters section in Live:
- Cutoff in the Filter 1 section (Filter Cutoff)
- Amp in the 5 LFO section (LFO amount applied to the Filter Cutoff)
- The second box down under the word Ratio in the top-left corner of the 5 LFO window; by default, this will be 1 (LFO/wobble speed)
Returning to Live now that we have the parameters we wish to control with Kinectar selected, click again on the green Configure button to get out of Parameter selection mode. Move your attention to the mixer section of Ableton Live’s session view, where you’ve placed the instance of MASSIVE. In the boxes under MIDI From, select "In from MIDI Yoke 2," and 1 for the channel. Then click the In selection under the word Monitor. The synth is now armed to be played by MIDI notes that go through the MIDI Yoke 2 device under channel 1, which is what we’ll now set up Kinectar to do.
In Kinectar, open the Instrument Editor by pressing the Launch Instrument Editor button (Figure 4-7). On the first Instrument unit, click the On button in the top-left corner and give the instrument a name like Bassline. We’ll now set up a condition for the note to be played (e.g., if our hand is above our waist, then the note will be played). Make note of the four condition strips.
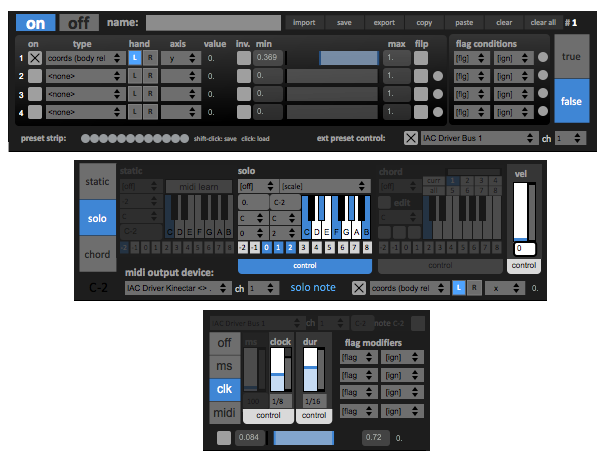
Click the On box on the first condition strip so that it contains an X. Under Type, select the option "Coords (body rel.)"; this means we will use a value of our hand that is relative to our body, so no matter where you are standing, the position of your hand will always be relative to the position of your torso.
Select a hand (I’m left-handed and accordingly choose left, but you may wish to use your right). Select the axis Y, which is our movement up and down. Click and drag upward on the number box under the title min. (You may instead click on the box, type a number, and then press Enter.) For this example, use 0.360. Note that if you’re dragging over the box, the farther to the right of the number box you click, the finer the adjustment.
Tip
Make sure OSCeleton is open and tracking your body by performing the lock-pose.
While still in Kinectar, if you stand back from your computer in front of the Kinect and move your hand up and down near your waist, you’ll notice the blue box displaying TRUE/FALSE, changing states as you trigger the condition. This is what will trigger our notes. Just to the right of the TRUE/FALSE box, the ACTIONS section starts. This is where we’ll set up which notes are output to play the synth.
Click the SOLO note mode button, which will now light up the Solo mode section. In the Solo section that you’ve just enabled, under the word SOLO there is a drop-down box that will read OFF; change this to HOLD. With the hold mode active, the note will play continuously while the condition is true.
Select a few notes to play by simply clicking on the keyboard. The selected notes will turn blue. Under the keyboard, click and drag to highlight the numbers 0, 1, and 2. This selects which octaves the notes will be played over.
Underneath the octave selector is the word CONTROL inside a gray tab. Click this to set the control strip at the bottom of the instrument to adjust which Kinect input we wish to use to control the pitch of our synth. The words SOLO NOTE will appear to the left of the control strip. Click on the gray box to the right to enable its control.
To the right of this box, we will select an input to control the notes we output. In the first box, select "Coords (body rel.)," then choose the same hand you chose earlier for the condition strip. This time, however, use the axis X, which is your lateral hand movement (left and right).
Still in Kinectar, adjust the blue range bar to the right of these selections on the control strip to adjust how far you have to move your hand to reach the highest and lowest note. For the moment, use the range of 0.100 to 0.730. You can adjust this later.
Above this section is the Sync Mode button. By default, OFF will be selected, signified in blue. Change this to CLK. This will synchronize the movement between notes to the tempo of your Ableton Live session.
To the left of the control strip are the "MIDI output device" settings. Set this to the device and channel that we set up in Ableton Live to play the synth—namely, "Out to MIDI Yoke 2" for the device and 1 for the channel.
Back in the main screen of Kinectar, click the apricot to enable MIDI out.
In Live, with Ableton Live in focus, press the spacebar or click the Play button at the top of the screen (Figure 4-8).
Now stand back and move your hand up and down to hear the note triggering, then move your hand left and right to change the note being played. You’re now playing a synth by waving your hand around in the air. Congratulations, and welcome to the future!
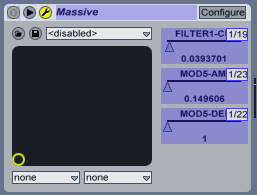
Return to Kinectar and mute the MIDI output of Kinectar by clicking the apricot again. With the MASSIVE channel selected in the mixer of Ableton Live, click the MIDI button in the top-right corner of the Live window to enable MIDI mapping. We’ll now attach outputs from Kinectar to control the three synth parameters: Filter Cutoff, LFO Amp, and LFO Speed.
In Live, with mapping mode on (interface features should be blue), in the MASSIVE device unit (bottom-left corner of Live), click on the FILTER1-CUT parameter. It should now have black handles around the parameter. This parameter is now armed and ready to receive a Learn message from Kinectar.
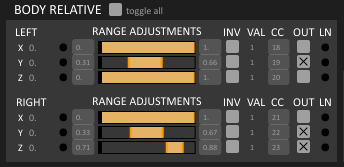
In the main screen of Kinectar, locate the Body Relative section under the title Quick Outputs. Locate the y-axis of the hand you are using to control the pitch; then, on the far right of that section, click the empty OUT box so that it contains a cross, and click the LN button. This will now map the y-axis to the filter cutoff.
In Live, repeat the preceding two steps for the following parameters/inputs:
- Y-axis of the opposite hand to MOD5-DEN
- Z-axis of the opposite hand to MOD5-AMP
Click the MIDI mapping button to turn mapping mode off. The screen should now return to normal.
Now in Kinectar, enable the three body relatives you’ve just mapped by clicking the OUT box next to the LN button. Click the apricot to turn MIDI mute off.
Now step back and work out how your movements are now affecting the synth.
To get better articulations from your movements, you will have to tweak the range adjustments of each of the outputs that are controlling the filter and LFO (Figure 4-9).
Get Kinect Hacks now with the O’Reilly learning platform.
O’Reilly members experience books, live events, courses curated by job role, and more from O’Reilly and nearly 200 top publishers.

