Chapter 4. Full-Screen Worms
A popular aim for games is to be an immersive experience, where the player becomes so enthralled with the game that he or she forgets everyday trivia such as eating and visiting the bathroom. One simple way of encouraging immersion is to make the game window the size of the desktop; a full-screen display hides tiresome text editors, spreadsheets, or database applications requiring urgent attention.
I’ll look at three approaches to creating full-screen games:
An almost full-screen
JFrame(I’ll call this AFS)An undecorated full-screen
JFrame(UFS)Full-screen exclusive mode (FSEM)
FSEM is getting a lot of attention since its introduction in J2SE 1.4 because it has increased frame rates over traditional gaming approaches using repaint events and paintComponent(). However, comparisons between AFS, UFS, and FSEM show their maximum frame rates to be similar. This is due to my use of the animation loop developed in Chapter 2, with its active rendering and high-resolution Java 3D timer. You should read Chapter 2 before continuing.
The examples in this chapter will continue using the WormChase game, first introduced in Chapter 3, so you’d better read that chapter as well. By sticking to a single game throughout this chapter, the timing comparisons more accurately reflect differences in the animation code rather than in the game-specific parts.
The objective is to produce 80 to 85 FPS, which is near the limit of a typical graphics card’s rendering capacity. If the game’s frame rate falls short of this, then the updates per second (UPS) should still stay close to 80 to 85, causing the game to run quickly but without every update being rendered.
An Almost Full-Screen (AFS) Worm
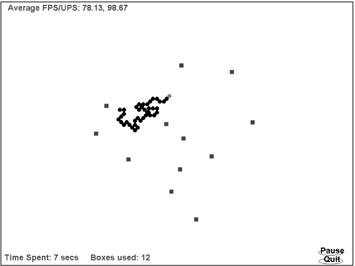
Figure 4-1 shows the WormChase application running inside a JFrame that almost covers the entire screen. The JFrame’s titlebar, including its close box and iconification/de-iconfication buttons are visible, and a border is around the window. The OS desktop controls are visible (in this case, Windows’s task bar at the bottom of the screen).
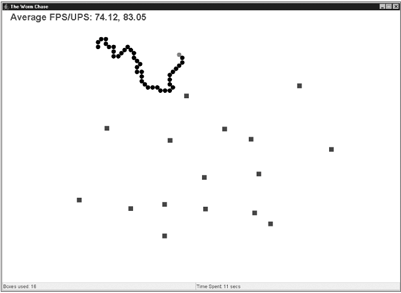
These JFrame and OS components allow the player to control the game (e.g., pause it by iconification) and to switch to other applications in the usual way, without the need for GUI controls inside the game. Also, little code has to be modified to change a windowed game into an AFS version, aside from resizing the canvas.
Though the window can be iconified and switched to the background, it can’t be moved. To be more precise, it can be selected and dragged, but as soon as the mouse button is released, the window snaps back to its original position.
Tip
This is a fun effect, as if the window is attached by a rubber band to the top lefthand corner of the screen.
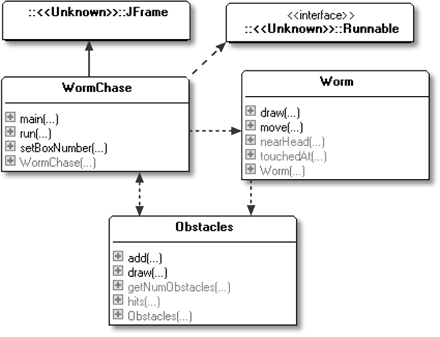
Figure 4-2 gives the class diagrams for the AFS version of WormChase, including the public methods.
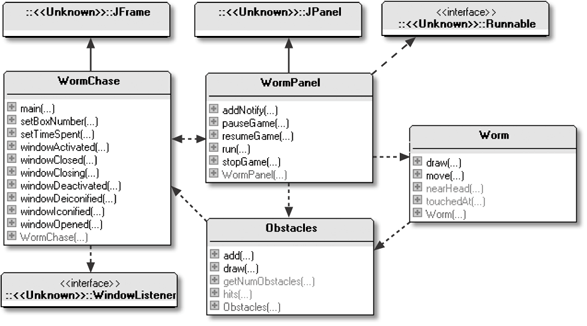
The AFS approach and the windowed application are similar as shown by the class diagrams in Figure 4-2 being identical to those for the windowed WormChase application at the start of Chapter 3. The differences are located in the private methods and the constructor, where the size of the JFrame is calculated and listener code is put in place to keep the window from moving.
WormPanel is almost the same as before, except that WormChase passes it a calculated width and height (in earlier version these were constants in the class). The Worm and Obstacles classes are unaltered from Chapter 3.
The AFS WormChase Class
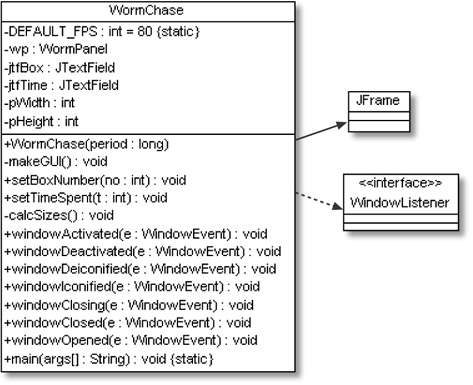
Figure 4-3 gives a class diagram for WormChase showing all its variables and methods.
The constructor has to work hard to obtain correct dimensions for the JPanel. The problem is that the sizes of three distinct kinds of elements must be calculated:
The
JFrame’s insets (e.g., the titlebar and borders)The desktop’s insets (e.g., the taskbar)
The other Swing components in the window (e.g., two text fields)
The insets of a container are the unused areas around its edges (at the top, bottom, left, and right). Typical insets are the container’s border lines and its titlebar. The widths and heights of these elements must be subtracted from the screen’s dimensions to get WormPanel’s width and height. Figure 4-4 shows the insets and GUI elements for WormChase.
The subtraction of the desktop and JFrame inset dimensions from the screen size is standard, but the calculation involving the on-screen positions of the GUI elements depends on the game design. For WormChase, only the heights of the text fields affect WormPanel’s size.
A subtle problem is that the dimensions of the JFrame insets and GUI elements will be unavailable until the game window has been constructed. In that case, how can the panel’s dimensions be calculated if the application has to be created first?
The answer is that the application must be constructed in stages. First, the JFrame and other pieces needed for the size calculations are put together. This fixes their sizes, so the drawing panel’s area can be determined. The sized JPanel is then added to the window to complete it, and the window is made visible. The WormChase constructor utilizes these stages:
    public WormChase(long period)
    { super("The Worm Chase");

      makeGUI();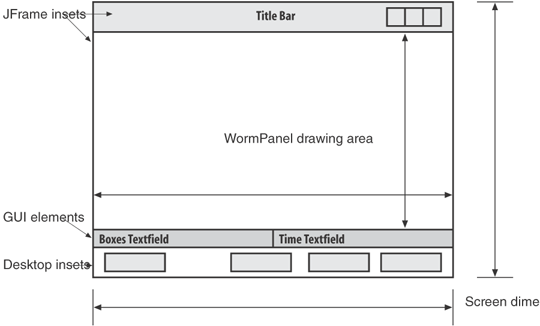
      pack();    // first pack (the GUI doesn't include the JPanel yet)
      setResizable(false);  //so sizes are for nonresizable GUI elems
      calcSizes();
      setResizable(true);    // so panel can be added

      Container c = getContentPane();
      wp = new WormPanel(this, period, pWidth, pHeight);
      c.add(wp, "Center");
      pack();      // second pack, after JPanel added

      addWindowListener( this );

      addComponentListener( new ComponentAdapter() {
        public void componentMoved(ComponentEvent e)
        {  setLocation(0,0);  }
      });

      setResizable(false);
      setVisible(true);
    }  // end of WormChase() constructor
makeGUI() builds the GUI without a drawing area, and the call to pack() makes the JFrame displayable and calculates the component’s sizes. Resizing is turned off since some platforms render insets differently (i.e., with different sizes) when their enclosing window can’t be resized.
calcSizes() initializes two globals, pWidth and pHeight, which are later passed to the WormPanel constructor as the panel’s width and height:
    private void calcSizes()
    {
      GraphicsConfiguration gc = getGraphicsConfiguration();
      Rectangle screenRect = gc.getBounds();  // screen dimensions

      Toolkit tk = Toolkit.getDefaultToolkit();
      Insets desktopInsets = tk.getScreenInsets(gc);

      Insets frameInsets = getInsets();     // only works after pack()

      Dimension tfDim = jtfBox.getPreferredSize();  // textfield size

      pWidth = screenRect.width
                 - (desktopInsets.left + desktopInsets.right)
                 - (frameInsets.left + frameInsets.right);

      pHeight = screenRect.height
                  - (desktopInsets.top + desktopInsets.bottom)
                  - (frameInsets.top + frameInsets.bottom)
                  - tfDim.height;
    }
Tip
If the JFrame’s insets (stored in frameInsets) are requested before a call to pack(), then they will have zero size.
An Insets object has four public variables—top, bottom, left, and right—that hold the thickness of its container’s edges. Only the dimensions for the box’s text field (jtfBox) is retrieved since its height will be the same as the time-used text field. Back in WormChase(), resizing is switched back on so the correctly sized JPanel can be added to the JFrame. Finally, resizing is switched off permanently, and the application is made visible with a call to show().
Stopping Window Movement
Unfortunately, there is no simple way of preventing an application’s window from being dragged around the screen. The best you can do is move it back to its starting position as soon as the user releases the mouse.
The WormChase constructor sets up a component listener with a componentMoved() handler. This method is called whenever a move is completed:
    addComponentListener( new ComponentAdapter() {
      public void componentMoved(ComponentEvent e)
      {  setLocation(0,0);  }
    });
setLocation() positions the JFrame so its top-left corner is at the top left of the screen.
Timings for AFS
Timing results for the AFS WormChase are given in Table 4-1.
|
Requested FPS |
20 |
50 |
80 |
100 |
|
Windows 98 |
20/20 |
49/50 |
75/83 |
86/100 |
|
Windows 2000 |
20/20 |
20/50 |
20/83 |
20/100 |
|
Windows XP (1) |
20/20 |
50/50 |
82/83 |
87/100 |
|
Windows XP (2) |
20/20 |
50/50 |
75/83 |
75/100 |
WormChase on the slow Windows 2000 machine is the worst performer again, as seen in Chapter 3, though its slowness is barely noticeable due to the update rate remaining high.
The Windows 98 and XP boxes produce good frame rates when 80 FPS is requested, which is close to or inside my desired range (80 to 85 FPS). The numbers start to flatten as the FPS request goes higher, indicating that the frames can’t be rendered any faster.
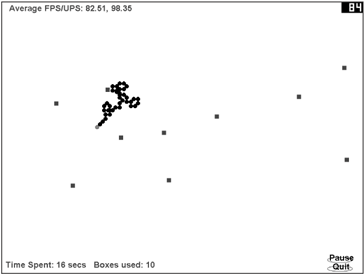
An Undecorated Full-Screen (UFS) Worm
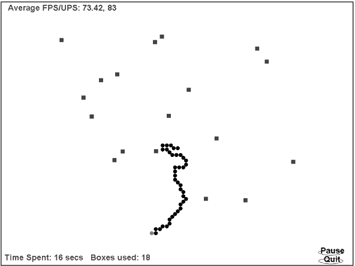
Figure 4-5 shows the UFS version of WormChase, a full-screen JFrame without a titlebar or borders.
The absence of a titlebar means I have to rethink how to pause and resume the application (previously achieved by minimizing/maximizing the window) and how to terminate the game. The solution is to draw Pause and Quit buttons on the canvas at the bottom-right corner. Aside from using the Quit button, ending the game is possible by typing the Esc key, Ctrl-C, the q key, or the End key. Data that were previously displayed in text fields are written to the canvas at the lower-left corner.
Figure 4-6 gives the class diagrams for the UFS version of WormChase, including the public methods.
A comparison with the AFS class diagrams in Figure 4-2 shows a considerable simplification of WormChase and fewer methods in WormPanel.
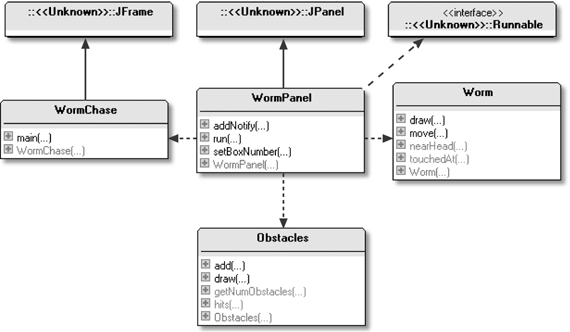
The WormChase class no longer has to be a WindowListener and, therefore, doesn’t contain window handler methods, such as windowClosing(). The pauseGame(), resumeGame(), and stopGame() methods in WormPanel are no longer required. The Worm class is unchanged, and the Obstacles class is altered only so it can call setBoxNumber() in WormPanel; this method was formerly in WormChase and wrote to a text field.
The UFS WormChase Class
With the removal of the WindowListener methods, WormChase hardly does anything. It reads the requested FPS value from the command line, and its constructor creates the WormPanel object:
    public WormChase(long period)
    { super("The Worm Chase");

      Container c = getContentPane();
      c.setLayout( new BorderLayout() );

      WormPanel wp = new WormPanel(this, period);
      c.add(wp, "Center");

      setUndecorated(true);   // no borders or titlebar
      setIgnoreRepaint(true);  // turn off paint events since doing active rendering
      pack();
      setResizable(false);
      setVisible(true);
    }  // end of WormChase() constructor
The titlebars and other insets are switched off by calling setUndecorated(). setIgnoreRepaint() is utilized since no GUI components require paint events; WormPanel uses active rendering and, therefore, doesn’t need paint events.
The simplicity of WormChase indicates that a separate JPanel as a drawing canvas is no longer needed. Moving WormPanel’s functionality into WormChase is straightforward, and I’ll explore that approach as part of the FSEM version of WormChase later in this chapter.
The Game Panel
WormPanel’s constructor sets its size to that of the screen and stores the dimensions in the global variables pWidth and pHeight:
    Toolkit tk = Toolkit.getDefaultToolkit();
    Dimension scrDim = tk.getScreenSize();
    setPreferredSize(scrDim);   // set JPanel size

    pWidth = scrDim.width;      // store dimensions for later
    pHeight = scrDim.height;
The constructor creates two rectangles, pauseArea and quitArea, which represent the screen areas for the Pause and Quit buttons:
    private Rectangle pauseArea, quitArea;  // globals

    // in WormPanel()
    // specify screen areas for the buttons
    pauseArea = new Rectangle(pWidth-100, pHeight-45, 70, 15);
    quitArea  = new Rectangle(pWidth-100, pHeight-20, 70, 15);
The drawing of these buttons is left to gameRender(), which is described in the next section.
Button Behavior
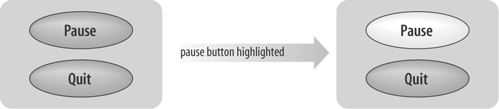
As is common with many games, the Pause and Quit buttons are highlighted when the mouse moves over them. This transition is shown in Figure 4-7 when the mouse passes over the Pause button.
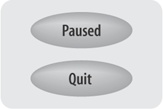
Another useful kind of feedback is to indicate that the game is paused by changing the wording of the Pause button to “Paused,” as in Figure 4-8.
The first step to implementing these behaviors is to record when the cursor is inside the pause or quit screen area. This is done by monitoring mouse movements, started in the constructor for WormPanel:
    addMouseMotionListener( new MouseMotionAdapter() {
      public void mouseMoved(MouseEvent e)
      { testMove(e.getX(), e.getY()); }
    });
testMove() sets two global Booleans (isOverPauseButton and isOverQuitButton) depending on whether the cursor is inside the pause or quit area:
    private void testMove(int x, int y)
    // is (x,y) over the Pause or Quit button?
    {
      if (running) {   // stops problems with a rapid move
                       // after pressing Quit
        isOverPauseButton = pauseArea.contains(x,y) ? true : false;
        isOverQuitButton = quitArea.contains(x,y) ? true : false;
      }
    }
The test of the running Boolean prevents button highlight changes after the player has pressed Quit but before the application exits.
The other aspect of button behavior is to deal with a mouse press on top of a button. This is handled by extending testPress(), which previously only dealt with clicks on or near the worm:
    // in the WormPanel constructor
    addMouseListener( new MouseAdapter() {
      public void mousePressed(MouseEvent e)
      { testPress(e.getX(), e.getY()); }
    });


    private void testPress(int x, int y)
    {
    if (isOverPauseButton)
        isPaused = !isPaused;     // toggle pausing
      else if (isOverQuitButton)
        running = false;
      else {
        if (!isPaused && !gameOver) {
          // was mouse pressed on or near the worm?
         . . .
        }
      }
    }
The highlighted lines in testPress() replace the functionality supported by resumeGame(), pauseGame(), and stopGame() in the earlier windowed versions of WormChase.
Drawing the Game Canvas
The WormPanel canvas contains two elements absent in previous examples:
The time used and boxes information, drawn in the bottom-left corner
The Pause and Quit buttons, drawn in the bottom-right corner
The buttons are drawn in a different way if the cursor is over them, and the wording on the Pause button changes depending on whether the game is paused.
These new features are implemented in gameRender():
    private void gameRender()
    {
      // as before: create the image buffer initially
      // set the background to white
      ...

      // report average FPS and UPS at top left
      dbg.drawString("Average FPS/UPS: " + df.format(averageFPS) +
                        ", " + df.format(averageUPS), 20, 25);

      // report time used and boxes used at bottom left
      dbg.drawString("Time Spent: " + timeSpentInGame + " secs", 10, pHeight-15);
      dbg.drawString("Boxes used: " + boxesUsed, 260, pHeight-15);

      // draw the Pause and Quit "buttons"
      drawButtons(dbg);

      dbg.setColor(Color.black);

      // as before: draw game elements: the obstacles and the worm
      obs.draw(dbg);
      fred.draw(dbg);

      if (gameOver)
        gameOverMessage(dbg);
    }  // end of gameRender()


    private void drawButtons(Graphics g)
    {
      g.setColor(Color.black);

      // draw the Pause "button"
      if (isOverPauseButton)
        g.setColor(Color.green);

      g.drawOval( pauseArea.x, pauseArea.y, pauseArea.width, pauseArea.height);
      if (isPaused)
        g.drawString("Paused", pauseArea.x, pauseArea.y+10);
      else
        g.drawString("Pause", pauseArea.x+5, pauseArea.y+10);

      if (isOverPauseButton)
        g.setColor(Color.black);

      // draw the Quit "button"
      if (isOverQuitButton)
        g.setColor(Color.green);

      g.drawOval(quitArea.x, quitArea.y, quitArea.width, quitArea.height);
      g.drawString("Quit", quitArea.x+15, quitArea.y+10);

      if (isOverQuitButton)
        g.setColor(Color.black);
    }  // drawButtons()
Each button is an oval with a string over it. Highlighting triggers a change in the foreground color, using setColor(). Depending on the value of the isPaused Boolean, “Paused” or “Pause” is drawn.
Exiting the Game
The primary means for terminating the game remains the same as in previous examples: When the running Boolean is true, the animation loop will terminate. Before run() returns, the finishOff() method is called:
    private void finishOff()
    { if (!finishedOff) {
        finishedOff = true;
        printStats();
        System.exit(0);
      }
    }
The finishedOff Boolean is employed to stop a second call to finishOff() from printing the statistics information again.
The other way of calling finishOff() is from a shutdown hook (handler) set up when the JPanel is created:
    Runtime.getRuntime().addShutdownHook(new Thread() {
      public void run()
      { running = false;
        System.out.println("Shutdown hook executed");
        finishOff();
      }
    });
This code is normally called just before the application exits and is superfluous since finishOff() will have been executed. Its real benefit comes if the program terminates unexpectedly. The shutdown hook ensures that the statistics details are still reported in an abnormal exit situation.
This kind of defensive programming is often useful. For example, if the game state must be saved to an external file before the program terminates or if critical resources, such as files or sockets, must be properly closed.
Timings for UFS
Timing results for the UFS WormChase are given in Table 4-2.
|
Requested FPS |
20 |
50 |
80 |
100 |
|
Windows 98 |
20/20 |
48/50 |
70/83 |
70/100 |
|
Windows 2000 |
18/20 |
19/50 |
18/83 |
18/100 |
|
Windows XP (1) |
20/20 |
50/50 |
77/83 |
73/100 |
|
Windows XP (2) |
20/20 |
50/50 |
68/83 |
69/100 |
WormChase on the Windows 2000 machine is the slowest, as usual, with marginally slower FPS values than the AFS version (it produces about 20 FPS). However, the poor performance is hidden by the high UPS number.
The Windows 98 and XP boxes produce reasonable to good frame rates when the requested FPS are 80 but are unable to go much faster. UFS frame rates are about 10 FPS slower than the AFS values at 80 FPS, which may be due to the larger rendering area. The UPS figures are unaffected.
A Full-Screen Exclusive Mode (FSEM) Worm
Full-screen exclusive mode (FSEM) suspends most of Java’s windowing environment, bypassing the Swing and AWT graphics layers to offer almost direct access to the screen. It allows graphics card features, such as page flipping and stereo buffering, to be exploited and permits the screen’s resolution and bit depth to be adjusted.
The graphics hardware acceleration used by FSEM has a disadvantage: it utilizes video memory (VRAM), which may be grabbed back by the OS when, for example, it needs to draw another window, display a screensaver, or change the screen’s resolution. The application’s image buffer, which is stored in the VRAM, will have to be reconstructed from scratch. A related issue is that VRAM is a finite resource, and placing too many images there may cause the OS to start swapping them in and out of memory, causing a slowdown in the rendering.
Aside from FSEM, J2SE 1.4 includes a VolatileImage class to allow images to take advantage of VRAM. Only opaque images and those with transparent areas are accelerated; translucent images can be accelerated as well but only in J2SE 5.0. Many forms of image manipulation can cause the acceleration to be lost.
In practice, direct use of VolatileImage is often not required since most graphical applications, such as those written with Swing, attempt to employ hardware acceleration implicitly. For instance, Swing uses VolatileImage for its double buffering and visuals loaded with getImage() are accelerated if possible, as are images used by the Java 2D API (e.g., those built using createImage()). However, more complex rendering features, such as diagonal lines, curved shapes, and anti-aliasing utilize software rendering at the JVM level.
Another issue with hardware acceleration is that it is principally a Windows feature since DirectDraw is employed by the JVM to access the VRAM. Neither Solaris nor Linux provide a way to directly contact the VRAM.
Tip
A Sun tutorial for FSEM is at http://java.sun.com/docs/books/tutorial/extra/fullscreen/, and the rationale behind the VolatileImage class is described at http://java.sun.com/j2se/1.4/pdf/VolatileImage.pdf.
Figure 4-9 shows a screenshot of the FSEM version of WormChase, which is identical to the UFS interface in Figure 4-5.
Class diagrams showing the public methods for this version of WormChase are shown in Figure 4-10.
The WormChase and WormPanel classes have been combined into a single WormChase class; it now contains the animation loop, which explains its use of the Runnable interface. This approach could be employed in the UFS version of WormChase. The Worm and Obstacles classes are unchanged.
The FSEM WormChase Class
The constructor for WormChase is similar to the constructors for the WormPanel classes of previous sections:
    public WormChase(long period)
    {
      super("Worm Chase");

      this.period = period;
      initFullScreen();   // switch to FSEM

      readyForTermination();

      // create game components
      obs = new Obstacles(this);
      fred = new Worm(pWidth, pHeight, obs);

      addMouseListener( new MouseAdapter() {
        public void mousePressed(MouseEvent e)
        { testPress(e.getX(), e.getY()); }
      });


      addMouseMotionListener( new MouseMotionAdapter() {
        public void mouseMoved(MouseEvent e)
        { testMove(e.getX(), e.getY()); }
      });

      // set up message font
      font = new Font("SansSerif", Font.BOLD, 24);
      metrics = this.getFontMetrics(font);

      // specify screen areas for the buttons
      pauseArea = new Rectangle(pWidth-100, pHeight-45, 70, 15);
      quitArea = new Rectangle(pWidth-100, pHeight-20, 70, 15);

      // initialise timing elements
      fpsStore = new double[NUM_FPS];
      upsStore = new double[NUM_FPS];
      for (int i=0; i < NUM_FPS; i++) {
        fpsStore[i] = 0.0;
        upsStore[i] = 0.0;
      }

      gameStart();  // replaces addNotify()
    }  // end of WormChase()
WormChase() ends with a call to gameStart(), which contains the code formerly in the addNotify() method. As you may recall, addNotify() is called automatically as its component (e.g., a JPanel) and is added to its container (e.g., a JFrame). Since I’m no longer using a JPanel, the game is started directly from WormChase’s constructor.
Setting Up Full-Screen Exclusive Mode
The steps necessary to switch the JFrame to FSEM are contained in initFullScreen():
    // globals used for FSEM tasks
    private GraphicsDevice gd;
    private Graphics gScr;
    private BufferStrategy bufferStrategy;

    private void initFullScreen()
    {
      GraphicsEnvironment ge =
         GraphicsEnvironment.getLocalGraphicsEnvironment();
      gd = ge.getDefaultScreenDevice();

      setUndecorated(true);    // no menu bar, borders, etc.
      setIgnoreRepaint(true);
              // turn off paint events since doing active rendering
      setResizable(false);

      if (!gd.isFullScreenSupported()) {
        System.out.println("Full-screen exclusive mode not supported");
        System.exit(0);
      }
      gd.setFullScreenWindow(this); // switch on FSEM


      // I can now adjust the display modes, if I wish
      showCurrentMode();   // show the current display mode

      // setDisplayMode(800, 600, 8);   // or try 8 bits
      // setDisplayMode(1280, 1024, 32);

      pWidth = getBounds().width;
      pHeight = getBounds().height;

      setBufferStrategy();
    }  // end of initFullScreen()
The graphics card is accessible via a GraphicsDevice object, gd. It’s tested with GraphicsDevice.isFullScreenSupported() to see if FSEM is available. Ideally, if the method returns false, the code should switch to using AFS or UFS, but I give up and keep things as simple as possible.
Once FSEM has been turned on by calling GraphicsDevice.setFullScreenWindow(), modifying display parameters, such as screen resolution and bit depth, is possible. Details on how this can be done are explained below. In the current version of the program, WormChase only reports the current settings by calling my showCurrentMode(); the call to my setDisplayMode() is commented out.
initFullScreen() switches off window decoration and resizing, which otherwise tend to interact badly with FSEM. Paint events are not required since I’m continuing to use active rendering, albeit a FSEM version (which I explain in the section “Rendering the Game”).
After setting the display characteristics, the width and height of the drawing area are stored in pWidth and pHeight. Once in FSEM, a buffer strategy for updating the screen is specified by calling setBufferStrategy():
    private void setBufferStrategy()
    { try {
        EventQueue.invokeAndWait( new Runnable() {
          public void run()
          { createBufferStrategy(NUM_BUFFERS);  }
        });
      }
      catch (Exception e) {
        System.out.println("Error while creating buffer strategy");
        System.exit(0);
      }

      try {  // sleep to give time for buffer strategy to be done
        Thread.sleep(500);  // 0.5 sec
      }
      catch(InterruptedException ex){}

      bufferStrategy = getBufferStrategy();  // store for later
    }
Window.createBufferStrategy() is called with a value of 2 (the NUM_BUFFERS value), so page flipping with a primary surface and one back buffer is utilized.
EventQueue.invokeAndWait() is employed to avoid a possible deadlock between the createBufferStrategy() call and the event dispatcher thread, an issue that’s been fixed in J2SE 5.0. The thread holding the createBufferStrategy() call is added to the dispatcher queue, and executed when earlier pending events have been processed. When createBufferStrategy() returns, so will invokeAndWait().
However, createBufferStrategy() is an asynchronous operation, so the sleep() call delays execution for a short time so the getBufferStrategy() call will get the correct details.
The asynchronous nature of many of the FSEM methods is a weakness of the API making it difficult to know when operations have been completed. Adding arbitrary sleep() calls is inelegant and may slow down execution unnecessarily.
Double Buffering, Page Flipping, and More
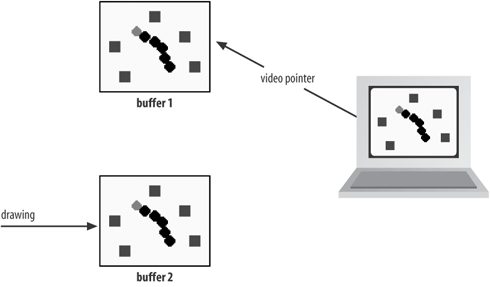
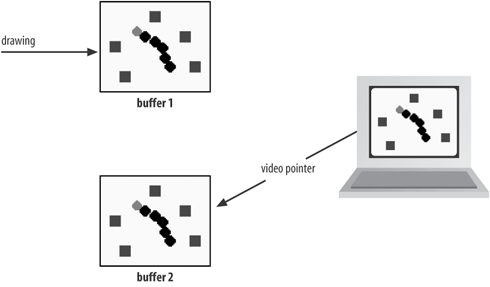
All of my earlier versions of WormChase have drawn to an off-screen buffer (sometimes called a back buffer), which is copied to the screen by a call to drawImage(). The idea is illustrated in Figure 4-11.

The problem with this approach is that the amount of copying required to display one frame is substantial. For example, a display of 1,024×768 pixels, with 32-bit depth, will need a 3-MB copy (1024×768×4 bytes), occurring as often as 80 times per second. This is the principal reason for modifying the display mode: switching to 800×600 pixels and 16 bits reduces the copy size to about 940 KB (800×600×2).
Page flipping avoids these overheads by using a video pointer if one is available since a pointer may not be offered by older graphics hardware. The video pointer tells the graphics card where to look in VRAM for the image to be displayed during the next refresh. Page flipping involves two buffers, which are used alternatively as the primary surface for the screen. While the video pointer is pointing at one buffer, the other is updated. When the next refresh cycle comes around, the pointer is changed to refer to the second buffer and the first buffer is updated.
This approach is illustrated by Figures 4-12 and 4-13.
The great advantage of this technique is that only pointer manipulation is required, with no need for copying.
Tip
I’ll be using two buffers in my code, but it’s possible to use more, creating a flip chain. The video pointer cycles through the buffers while rendering is carried out to the other buffers in the chain.
In initFullScreen(), Window.createBufferStrategy() sets up the buffering for the window, based on the number specified (which should be two or more). The method tries a page flipping strategy with a video pointer first and then copies using hardware acceleration is used as a fallback. If both of these are unavailable, an unaccelerated copying strategy is used.
Rendering the Game
The game update and rendering steps are at the core of run(), represented by two method calls:
    public void run()
    {
      // previously shown code

      while(running) {
        gameUpdate();
        screenUpdate();
        // sleep a while
        // maybe do extra gameUpdate()'s
      }

      // previously shown code
    }
gameUpdate() is unchanged from before; it updates the worm’s state. screenUpdate() still performs active rendering but with the FSEM buffer strategy created in initFullScreen():
    private void screenUpdate()
    { try {
        gScr = bufferStrategy.getDrawGraphics();
        gameRender(gScr);
        gScr.dispose();
        if (!bufferStrategy.contentsLost())
          bufferStrategy.show();
        else
          System.out.println("Contents Lost");
        Toolkit.getDefaultToolkit().sync();   // sync the display on some systems
      }
      catch (Exception e)
      { e.printStackTrace();
        running = false;
      }
    }  // end of screenUpdate()
screenUpdate() utilizes the bufferStrategy reference to get a graphics context (gScr) for drawing. The try-catch block around the rendering operations means their failure causes the running Boolean to be set to false, which will terminate the animation loop.
gameRender() writes to the graphic context in the same way that the gameRender() methods in earlier versions of WormChase write to their off-screen buffer:
    private void gameRender(Graphics gScr)
    {
      // clear the background
      gScr.setColor(Color.white);
      gScr.fillRect (0, 0, pWidth, pHeight);

      gScr.setColor(Color.blue);
      gScr.setFont(font);

      // report frame count & average FPS and UPS at top left
      // report time used and boxes used at bottom left

      // draw the Pause and Quit buttons
      // draw game elements: the obstacles and the worm
      // game over stuff
    } // end of gameRender()
The only change is at the start of gameRender(); there’s no longer any need to create an off-screen buffer because initFullScreen() does it by calling createBufferStrategy().
Back in screenUpdate(), BufferStrategy.contentsLost() returns true or false, depending on if the VRAM used by the buffer has been lost since the call to getDrawGraphics(); buffer loss is caused by the OS taking back the memory.
Normally, the result will be false, and BufferStrategy.show() will then make the buffer visible on screen. This is achieved by changing the video pointer (flipping) or by copying (blitting).
If contentsLost() returns true, it means the entire image in the off-screen buffer must be redrawn. In my code, redrawing will happen anyway, during the next iteration of the animation loop, when screenUpdate() is called again.
Finishing Off
The finishOff() method is called in the same way as in the UFS version of WormChase: either at the end of run() as the animation loop is finishing or in response to a shutdown event:
    private void finishOff()
    {
      if (!finishedOff) {
        finishedOff = true;
        printStats();
        restoreScreen();
        System.exit(0):
      }
    }

    private void restoreScreen()
    { Window w = gd.getFullScreenWindow();
      if (w != null)
        w.dispose();
      gd.setFullScreenWindow(null);
    }
The call to restoreScreen() is the only addition to finishOff(). It switches off FSEM by executing GraphicsDevice.setFullScreenWindow(null). This method also restores the display mode to its original state if it was previously changed with setDisplayMode().
Displaying the Display Mode
initFullScreen() calls methods for reading and changing the display mode (though the call to setDisplayMode() is commented out). The display mode can only be changed after the application is in full-screen exclusive mode:
    public void initFullScreen()
    {
      // existing code

      gd.setFullScreenWindow(this); // switch on FSEM

      // I can now adjust the display modes, if I wish
      showCurrentMode();

      // setDisplayMode(800, 600, 8);     // 800 by 600, 8 bits, or
      // setDisplayMode(1280, 1024, 32);  // 1280 by 1024, 32 bits

      // more previously existing code

    }  // end of initFullScreen()
showCurrentMode() prints the display mode details for the graphic card:
    private void showCurrentMode()
    {
      DisplayMode dm = gd.getDisplayMode();
      System.out.println("Current Display Mode: (" +
              dm.getWidth() + "," + dm.getHeight() + "," +
              dm.getBitDepth() + "," + dm.getRefreshRate() + ")  " );
    }
A display mode is composed of the width and height of the monitor (in pixels), bit depth (the number of bits per pixel), and refresh rate. DisplayMode.getBitDepth() returns the integer BIT_DEPTH_MULTI (-1) if multiple bit depths are allowed in this mode (unlikely on most monitors). DisplayMode.getRefreshRate() returns REFRESH_RATE_UNKNOWN (0) if no information is available on the refresh rate and this means the refresh rate cannot be changed.
The output from showCurrentMode() is shown below, with a screen resolution of 1,024×768, 32-bit depth and an unknown (unchangeable) refresh rate:
    >java WormChase 100
    fps: 100; period: 10 ms
    Current Display Mode: (1024,768,32,0)
Changing the Display Mode
A basic question is, “Why bother changing the display mode since the current setting is probably the most suitable one for the hardware?”
The answer is to increase performance. A smaller screen resolution and bit depth reduces the amount of data transferred when the back buffer is copied to the screen. However, this advantage is irrelevant if the rendering is carried out by page flipping with video pointer manipulation.
A game can run more quickly if its images share the same bit depth as the screen. This is easier to do if I fix the bit depth inside the application. A known screen size may make drawing operations simpler, especially for images that would normally have to be scaled to fit different display sizes.
My setDisplayMode() method is supplied with a width, height, and bit depth, and attempts to set the display mode accordingly:
    private void setDisplayMode(int width, int height, int bitDepth)
    {
      if (!gd.isDisplayChangeSupported()) {
        System.out.println("Display mode changing not supported");
        return;
      }


      if (!isDisplayModeAvailable(width, height, bitDepth)) {
        System.out.println("Display mode (" + width + "," +
                      height + "," + bitDepth + ") not available");
        return;
      }

      DisplayMode dm = new DisplayMode(width, height, bitDepth,
               DisplayMode.REFRESH_RATE_UNKNOWN);   // any refresh rate
      try {
        gd.setDisplayMode(dm);
        System.out.println("Display mode set to: (" +
                 width + "," + height + "," + bitDepth + ")");
      }
      catch (IllegalArgumentException e)
      {  System.out.println("Error setting Display mode (" +
                width + "," + height + "," + bitDepth + ")");  }

      try {  // sleep to give time for the display to be changed
        Thread.sleep(1000);  // 1 sec
      }
      catch(InterruptedException ex){}
    }  // end of setDisplayMode()
The method checks if display mode changing is supported (the application must be in FSEM for changes to go ahead) and if the given mode is available for this graphics device, via a call to my isDisplayModeAvailable() method.
isDisplayModeAvailable() retrieves an array of display modes usable by this device, and cycles through them to see if one matches the requested parameters:
    private boolean isDisplayModeAvailable(int width, int height, int bitDepth)
    /* Check that a displayMode with this width, height, and
       bit depth is available.
       I don't care about the refresh rate, which is probably
       REFRESH_RATE_UNKNOWN anyway.
    */
    { DisplayMode[] modes = gd.getDisplayModes(); // modes list
      showModes(modes);

      for(int i = 0; i < modes.length; i++) {
        if ( width == modes[i].getWidth() &&
             height == modes[i].getHeight() &&
             bitDepth == modes[i].getBitDepth() )
          return true;
      }
      return false;
    }  // end of isDisplayModeAvailable()
showModes() is a pretty printer for the array of DisplayMode objects:
    private void showModes(DisplayMode[] modes)
    {
      System.out.println("Modes");
      for(int i = 0; i < modes.length; i++) {
        System.out.print("(" + modes[i].getWidth() + "," +
                               modes[i].getHeight() + "," +
                               modes[i].getBitDepth() + "," +
                               modes[i].getRefreshRate() + ")  ");
        if ((i+1)%4 == 0)
          System.out.println();
      }
      System.out.println();
    }
Back in my setDisplayMode(), a new display mode object is created and set with GraphicDevice’s setDisplayMode(), which may raise an exception if any of its arguments are incorrect. GraphicDevice.setDisplayMode() is asynchronous, so the subsequent sleep() call delays execution a short time in the hope that the display will be changed before the method returns. Some programmers suggest a delay of two seconds.
The GraphicsDevice.setDisplayMode() method (different from my setDisplayMode()) is known to have bugs. However, it has improved in recent versions of J2SE 1.4, and in J2SE 5.0. My tests across several versions of Windows, using J2SE 1.4.2, sometimes resulted in a JVM crash, occurring after the program had been run successfully a few times. This is one reason why the call to my setDisplayMode() is commented out in initFullScreen().
My setDisplayMode() can be employed to set the screen size to 800x600 with an 8-bit depth:
setDisplayMode(800, 600, 8);
The resulting on-screen appearance is shown in Figure 4-14. The reduced screen resolution means that the various graphical elements (e.g., the text, circles, and boxes) are bigger. The reduced bit depth causes a reduction in the number of available colors, but the basic colors used here (blue, black, red, and green) are still present.
The output from WormChase lists the initial display mode, the range of possible modes, and the new mode:
    D>java WormChase 100
    fps: 100; period: 10 ms
    Current Display Mode: (1024,768,32,0)
    Modes
    (400,300,8,0)  (400,300,16,0)  (400,300,32,0)  (512,384,8,0)
    (512,384,16,0)  (512,384,32,0)  (640,400,8,0)  (640,400,16,0)
    (640,400,32,0)  (640,480,8,0)  (640,480,16,0)  (640,480,32,0)
    (800,600,8,0)  (800,600,16,0)  (800,600,32,0)  (848,480,8,0)
    (848,480,16,0)  (848,480,32,0)  (1024,768,8,0)  (1024,768,16,0)
    (1024,768,32,0)  (1152,864,8,0)  (1152,864,16,0)  (1152,864,32,0)
    (1280,768,8,0)  (1280,768,16,0)  (1280,768,32,0)  (1280,960,8,0)
    (1280,960,16,0)  (1280,960,32,0)  (1280,1024,8,0)  (1280,1024,16,0)
    (1280,1024,32,0)
    Display mode set to: (800,600,8)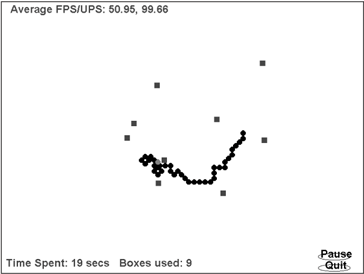
An essential task if the display mode is changed is to change it back to its original setting at the end of the application. WormChase does this by calling gd.setFullScreenWindow(null) in restoreScreen().
Timings for FSEM
Timing results for the FSEM WormChase are given in Table 4-3.
|
Requested FPS |
20 |
50 |
80 |
100 |
|
Windows 98 |
20/20 |
50/50 |
81/83 |
84/100 |
|
Windows 2000 |
20/20 |
50/50 |
60/83 |
60/100 |
|
Windows XP (1) |
20/20 |
50/50 |
74/83 |
76/100 |
|
Windows XP (2) |
20/20 |
50/50 |
83/83 |
85/100 |
WormChase on the Windows 2000 machine is the worst performer as usual, but its UPS values are fine. FSEM produces a drastic increase in the frame rate; it produces 60 FPS when 80 is requested compared to the UFS version of WormChase, which only manages 18 FPS.
The Windows 98 and XP boxes produce good to excellent frame rates at 80 FPS, but can’t go any faster. FSEM improves the frame rates by around 20 percent compared to UFS, except in the case of the first XP machine.
One reason for flattening out the frame rate values may be that BufferStrategy’s show() method—used in my screenUpdate() to render to the screen—is tied to the frequency of the vertical synchronization (often abbreviated to vsync) of the monitor. In FSEM, show() blocks until the next vsync signal.
Frame rates for Windows-based FSEM applications can be collected using the FRAPS utility (http://www.fraps.com). Figure 4-15 shows WormChase with a FRAPS-generated FPS value in the top righthand corner.
Timings at 80 to 85 FPS
Table 4-4 shows the UFS, AFS, and FSEM results for different versions of Windows when 80 FPS are requested.
|
Requested 80 FPS |
AFS |
UFS |
FSEM | |
|
Windows 98 |
75/83 |
70/83 |
81/83 | |
|
Windows 2000 |
20/83 |
18/83 |
60/83 | |
|
Windows XP (1) |
82/83 |
77/83 |
74/83 | |
|
Windows XP (2) |
75/83 |
68/83 |
83/83 |
The numbers send mixed signals and, in any case, the sample size is too small for strong conclusions. Nevertheless, I’ll make a few observations:
The use of additional state updates to keep the UPS close to the requested FPS is an important technique for giving the appearance of speed even when the rendering rate is sluggish.
FSEM offers better frame rates than UFS, sometimes dramatically better. However, FSEM’s benefits rely on MS Window’s access to the graphics device via DirectDraw. The improvements on Linux, Solaris, and the Mac OS may not be so striking.
AFS produces higher frame rates than UFS and may be a good choice if full-screen exclusive mode is unavailable.
All the approaches supply good to excellent frame rates on modern CPUs (the Windows 2000 machine sports a Pentium II). Consequently, the best full-screen technique for a particular game will probably have to be determined by timing the game. Additional optimization techniques, such as clipping, may highlight the benefits of one technique over another.
Tip
I’d like to thank two of my students, Patipol Kulasi and Thana Konglikhit, who helped gather the timing data used in this chapter and Chapter 3.
Get Killer Game Programming in Java now with the O’Reilly learning platform.
O’Reilly members experience books, live events, courses curated by job role, and more from O’Reilly and nearly 200 top publishers.

