Chapter 4. Security Policy
Security policies, sometimes called firewall rules, are a method of selectively allowing traffic through a network. In a sense, security policies control who can talk to whom (or rather, what systems can talk to which other systems), and more importantly, how the conversation takes place. Security policies also provide the means for logging, authentication, and accounting of network traffic. The SRX evaluates every packet that passes through its zones and determines whether the traffic is permitted, dropped, logged, or more deeply inspected, or if it requires further authentication. This chapter explores how the SRX evaluates traffic and performs security policy lookups, how to configure those security policies, and some common issues to avoid.
Security Policy Overview
As illustrated in Figure 4-1, when a packet enters the SRX, the flow daemon (flowd) performs a session lookup. It does this to see whether the packet is already part of an existing session. If the packet is part of an existing session, it takes what is referred to as the fast path. If it is not found to be part of an existing session, it goes down the slow path. The fast path has fewer steps involved in checking the packet, and as a result, it is much faster at processing the packet.
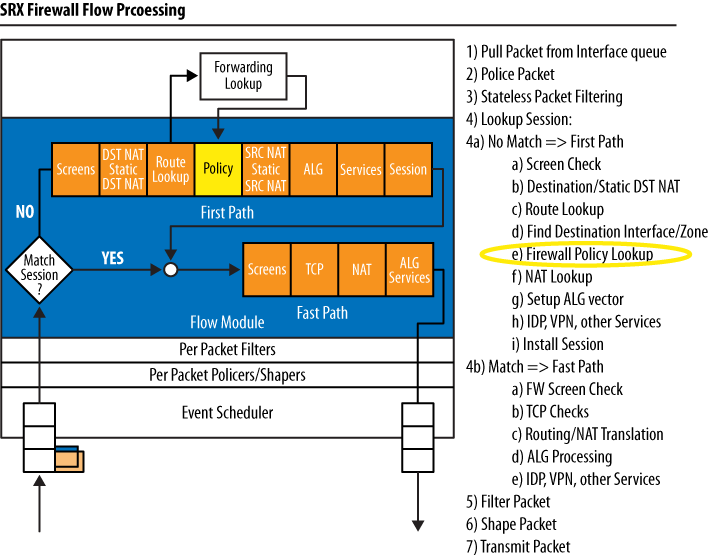
Why does the security policy lookup take place after so many other checks?
The SRX is a zone-based firewall, meaning that all security policies are associated with zones and those zones are tied to interfaces. The SRX must perform a route lookup to determine the destination zone context before it can examine the correct security policies. In fact, before the firewall can do a security policy evaluation for a flow, it must perform three actions: a screen check (detailed in Chapter 6), a route lookup, and finally, a route lookup to determine the destination security zone. Any of these steps might result in the packet being dropped, even before security policy evaluation.
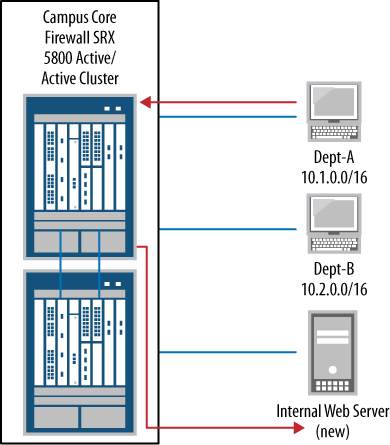
By default, three security zones come preconfigured on the SRX: the Trust zone, the Untrust zone, and the junos-global zone. It’s best to use custom zones with clear names describing their role and placement in the network. An example of this would be calling the accounting department network segment “accounting-dept” or even “Dept-A.” This will be far more user-friendly than a generic name such as “Trust” when an administrator returns to this zone configuration in the future.
Let’s create a new security zone:
[edit] juniper@SRX5800>edit security[edit security] juniper@SRX5800>set zones security-zone accounting-dept
The new zone is called accounting-dept. Once a new zone has been
created there are a few features that can be turned on. The most important
feature is called TCP-RST. TCP-RST will send a RESET packet for any non-TCP
SYN packet that doesn’t already match an existing session. What does that
mean? Well, it basically means that if a session has timed out or is
started improperly, the SRX will tell the source node that it needs to
restart the TCP connection. It is recommended by the authors that TCP-RST
remain disabled unless it is required on your network. This makes the SRX
visible when it drops packets and can be abused by a malicious user to
probe the SRX’s security policies.
Additional zone configuration items include:
Host-inbound-trafficThis tells the SRX what to allow to this security zone. For example, if you want to ping the SRX’s interface, you need to configure ping under the zone’s
host-inbound-trafficprofile. Any protocols or system services that need to be allowed to go to the SRX should be configured underhost-inbound-traffic. Here’s a quick example:juniper@SRX5800> set zones security-zone accounting-dept host-inbound-traffic system-services ping
- Screen
Screens are high-performance denial-of-service (DoS) and distributed denial-of-service (DDoS) protections that are extremely efficient and can block a number of floods and attacks in hardware. We will cover screens thoroughly in Chapter 7.
The last step in configuring a security zone is to apply the interface to the zone:
[edit security]
juniper@SRX5800> set zones security-zone accounting-dept interfaces ge-0/0/0
The new zone configuration is:
[edit security]
juniper@SRX5800>  show zones security-zone accounting-dept
host-inbound-traffic {
    system-services {
        ping;
    }
}
interfaces {
    ge-0/0/0.0;
}
These are the fundamentals of zones, so let’s take a look at a quick security policy. The format and configuration of a simple security policy that the firewall administrator has previously configured might look something like the following:
juniper@SRX5800> show configuration security policies
from-zone trust to-zone Internet {
    policy allow-users {
        match {
            source-address inside-users;
            destination-address any;
            application any;
        }
        then {
            permit;
        }
    }
}
Security policy configurations are composed of six major elements all used within this sample security policy:
- Source zone
The source zone is referred to as
from-zoneand is labeled astrust.- Destination zone
- Policy
This is a descriptive name assigned to the policy. In the preceding example, it’s called
allow-users.- Source address
The source address group is
inside-users. A source address is a collection or a single IP address used in policy to dictate whom is initiating this connection.- Destination address
In the example
allow-userspolicy, the destination address isany. The destination address again is a collection or a single IP address that the source is talking to. In this case,anymeans any destination.- Service
In the example
allow-userspolicy, the service isany. The service is a single port or port range such as HTTP (TCP port 80), SSH (TCP port 22), or, for example, DNS (UDP port 53).
These items are all a part of the match statement which details to what and to whom
this policy applies.
The last line of the example policy is an action configured to take
place if the traffic matches the criteria of the first lines, referred to
as the then statement. If traffic is initiated from the
Trust zone, has a destination address in the Internet zone, and is from
the inside-users segment, the SRX
permits the traffic. The then statement
describes what action should be taken. An action can include logging,
denying, permitting, or sending for deeper inspection in cases such as
Intrusion Detection and Protection (IDP) and Unified Threat Management
(UTM). We will cover both IDP and UTM later in the book, but for now it’s
important to understand that they are enabled and triggered by the
then statement in security policies.
The security policy is what matches traffic and tells the SRX to send the
packet or flow for deeper inspection.
Keep in mind that multiple actions can be configured inside the
then statement.
SRX Policy Processing
In step 4 of Figure 4-1’s illustrated SRX packet flow, the SRX builds a list of configured policies and the order in which they are processed. When the network security process determines a source and destination zone, the SRX evaluates only those policies configured between those two zones and continues to evaluate them (in a top-down order) until a matching condition is found, as shown in Figure 4-2. As the network security process evaluates an incoming packet, if a matching policy is found no further policies will be evaluated.
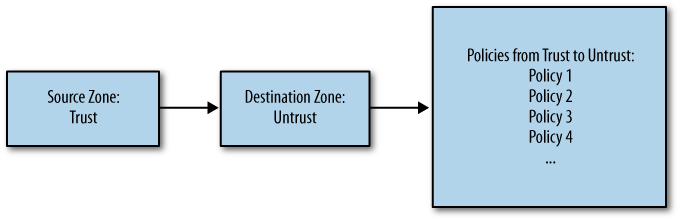
There are two important things to note in the SRX policy process
shown in Figure 4-2. First, not all configured
policies are evaluated when the SRX does its policy processing. Only the
policies that have been configured between the matching from-zone to-zone are evaluated. Second, the
policy tables are evaluated in a top-down fashion, which
means the order of your policies is very important. When the SRX finds a
matching policy it takes whatever action that policy has.
Let’s look at an example of a configuration error that has not taken into account the fact that the policies are evaluated in a top-down fashion:
juniper@SRX5800> show configuration security policies
from-zone trust to-zone Internet {
    policy allow-users {
        match {
            source-address inside-users;
            destination-address any;
            application any;
        }
        then {
            permit;
        }
    }
    policy protect_inside_users {
        match {
            source-address inside-users;
            destination-address bad_hosts;
            application any;
        }
        then {
            deny;
        }
    }
}
When read, the first policy to be evaluated is permitting inside-users to connect to any address using any
application, and the second policy that is evaluated is to keep the
inside-users from connecting to a list
of known, bad hosts, but it is after the permit
policy. So, in this instance, when the SRX does its policy lookup, the
second policy never gets hit and the inside-users network is never protected from
accessing those bad hosts.
Note
For legacy ScreenOS users, it’s important to note that there is no global security policy in the SRX policy system today. This means you cannot write global policies that apply to all zones.
We will discuss proper policy processing throughout this chapter. It really is key to establishing secure and efficient premises, and it depends on how you create the policies. The SRX will do exactly what you tell it to do. Now that we’ve briefly discussed what a security policy is and how the SRX handles its processing let’s take a look at some real policy tables.
Note
A helpful tip that catches many users is where Network Address Translation (NAT) is applied and how that relates to policy. Destination NAT is applied before the policy lookup takes place, and source NAT is applied after. That means when you are configuring policies you must ensure that if a destination NAT is configured, the security policies are using the new NATed address instead of the nontranslated original address.
Viewing SRX Policy Tables
Within the SRX there are multiple ways to view the details of the
configured security policies and their order. While viewing the security
policies you can issue the optional detail command at the end of any policy lookup.
The detail switch gives you additional
information regarding the security policies, such as their address books
and applications.
Before using the detail command,
let’s look at example output that shows how to view all configured
security policies using the show security
policies command:
juniper@SRX5800> show security policies
Default policy: deny-all
From zone: trust, To zone: trust
Policy: default-permit, State: enabled, Index: 4, Sequence number: 1
Source addresses: any
Destination addresses: any
Applications: any
Action: permit
From zone: trust, To zone: Internet
Policy: default-permit, State: enabled, Index: 5, Sequence number: 1
Source addresses: any
Destination addresses: any
Applications: any
Action: permit
Policy: protect_inside_users, State: enabled, Index: 7, Sequence number: 2
Source addresses: inside-users
Destination addresses: bad_hosts
Applications: any
Action: deny
From zone: Internet, To zone: trust
Policy: default-deny, State: enabled, Index: 6, Sequence number: 1
Source addresses: any
Destination addresses: any
Applications: any
Action: denyNote
Did you notice in the preceding output that this SRX is configured
with a default policy of deny-all,
meaning that it will deny all traffic by default? Policies must be
written to allow traffic to pass between the security zones.
By default, there are two configured policies: the default-permit from Trust to Internet and the
default-deny from Internet to Trust.
Any additional behaviors must be configured to block or permit the desired
traffic. Remember, if additional access is needed from the Internet zone
to the Trust zone when a new security policy is configured, it must be
placed before the default-deny. The order of policies is very
important.
Now, let’s get more information by adding detail at the end of the command:
juniper@SRX5800> show security policies detail
Default policy: deny-all
Policy: default-permit, action-type: permit, State: enabled, Index: 4
Sequence number: 1
From zone: trust, To zone: trust
Source addresses:
any: 0.0.0.0/0
Destination addresses:
any: 0.0.0.0/0
Application: any
IP protocol: 0, ALG: 0, Inactivity timeout: 0
Source port range: [0-0]
Destination port range: [0-0]
Policy: default-permit, action-type: permit, State: enabled, Index: 5
Sequence number: 1
From zone: trust, To zone: Internet
Source addresses:
any: 0.0.0.0/0
Destination addresses:
any: 0.0.0.0/0
Application: any
IP protocol: 0, ALG: 0, Inactivity timeout: 0
Source port range: [0-0]
Destination port range: [0-0]Here the show security policies
detail command displays a lot more information than what we saw
in the previous output. Now, the true source/destination address IPs are
displayed as any, or 0.0.0.0/0, and the application port ranges and
protocols are listed.
Instead of viewing all policies configured on the SRX, it is often
easier to view policies between two specific zones by using the additional
command options from-zone <zone> to-zone
<zone>:
juniper@SRX5800> show security policies from-zone trust to-zone Internet
From zone: trust, To zone: Internet
Policy: default-permit, State: enabled, Index: 5, Sequence number: 1
Source addresses: any
Destination addresses: any
Applications: any
Action: permit
Policy: protect_inside_users, State: enabled, Index: 7, Sequence number: 2
Source addresses: inside-users
Destination addresses: bad_hosts
Applications: any
Action: denyIn this example output of only the security policies between the
Trust and Internet zones, you should notice
that the policies are still out of order, and that the protect_inside_users
policy is still after the default-permit policy. We’ll fix this later in
the chapter.
Another way to view a specific policy instead of looking at a large
list is to view it by policy-name. The policy-name option shows only
that specific policy and provides you with the same
level of information as the previous examples, if the name of the policy
is already known (in our case it’s protect_inside_users). In this example, the
detail command has been used to provide
further information about the protect_inside_users policy:
juniper@SRX5800> show security policies policy-name protect_inside_users detail
Policy: protect_inside_users, action-type: deny, State: enabled, Index: 7
Sequence number: 2
From zone: trust, To zone: Internet
Source addresses:
inside-users: 10.1.1.0/24
Destination addresses:
bad_hosts: 198.133.219.25/32
Application: any
IP protocol: 0, ALG: 0, Inactivity timeout: 0
Source port range: [0-0]
Destination port range: [0-0]Viewing Policy Statistics
To enable policy statistics the then action must include the count flag. The count statement then enables counters for the
specific policy.
Here, count is added to default-deny from Internet to Trust:
juniper@SRX5800#edit security policies from-zone Internet to-zone trust[edit security policies from-zone Internet to-zone trust] juniper@SRX5800#set policy default-deny then count
The configuration ends up looking like this:
juniper@SRX5800>show conf security policies from-zone Internet to-zone trustpolicy default-deny { match { source-address any; destination-address any; application any; } then { deny; count; } }
Notice that both the then action
and the count action are deny. This tells the SRX to keep track of
statistics on this policy.
Note
You must configure counting directly on each policy on which counting is needed.
Now, when the policy is viewed, new statistics are shown:
juniper@SRX5800> show security policies policy-name default-deny detail
Policy: default-deny, action-type: deny, State: enabled, Index: 6
Sequence number: 1
From zone: Internet, To zone: trust
Source addresses:
any: 0.0.0.0/0
Destination addresses:
any: 0.0.0.0/0
Application: any
IP protocol: 0, ALG: 0, Inactivity timeout: 0
Source port range: [0-0]
Destination port range: [0-0]
Policy statistics:
Input bytes : 200 5 bps
Output bytes : 500 10 bps
Input packets : 23 2 pps
Output packets : 45 4 pps
Session rate : 3 1 sps
Active sessions : 2
Session deletions: 1
Policy lookups : 3Notice that the input/output rates are shown, as well as the session
ramp rate. The session ramp rate is the number of sessions per second
(sps in the preceding output) that the
SRX has handled as a result of this policy.
Policy counters allow for much more visibility into the details of a policy, but do proceed with caution. Policy counters can add a bit of overhead to the policy processing, and if the device is a lower-end SRX it might be wise to limit the number of policies that have counters enabled to only those that are truly needed. On the higher-end models, policy counters will add a minor amount of overhead, but it is much less noticeable.
To reset policy counters back to zero use the clear security policies statistics
command.
It’s also possible to set alarms based upon predefined traffic count thresholds so that if the number of policy hits exceeds your preconfigured kilobytes-per-minute or bytes-per-second threshold, the SRX can send an alarm or, if an event script is written, take an advanced next-step action such as adding a firewall filter or access control list (ACL) to block the host.
Note
An event script is an automated script that runs directly on the SRX when triggered by a certain event or log. Event scripts are outside the scope of this book. For more information about event scripts, visit http://www.juniper.net/techpubs/.
The code to configure thresholds and alarm for a policy looks something like this:
juniper@SRX5800#edit security policies from-zone Internet to-zone trust[edit security policies from-zone Internet to-zone trust] juniper@SRX5800#set policy default-deny then count alarm per-minute-threshold 100
The configuration will look something like this:
juniper@SRX5800# show security policies from-zone Internet to-zone trust
policy default-deny {
match {
source-address any;
destination-address any;
application any;
}
then {
deny;
count {
alarm per-minute-threshold 100;
}
}
}Viewing Session Flows
Once traffic has gone through the SRX packet flow, and assuming that the traffic has been permitted, the details of that session go into the SRX’s session table. The session table is a real-time list of current sessions going through the SRX. Only connections that are active or haven’t been timed out show up in the session table.
One very important thing to note is that if a flow is in the session table, it has already been permitted by policy and the session has been created—the SRX has allowed this connection and all return traffic for this flow to pass through. At this point, the SRX is only doing some minor checks via the fast path, as we saw in Figure 4-1 earlier in this chapter.
Here’s an example of what a session looks like:
juniper@SRX5800> show security flow session
Session ID: 4785, Policy name: default-permit/1, Timeout: 1800
In: 10.10.1.1/49229 --> 10.1.1.254/23;tcp, If: ge-0/0/0.0
Out: 10.1.1.254/23 --> 10.10.1.1/49229;tcp, If: ge-0/0/1.0You can learn a lot of useful information about this short session:
The policy name that allowed this traffic is
default-permit.The timeout is 1,800 seconds or 30 minutes; 30 minutes is the default timeout for TCP traffic.
Both the source IP, 10.10.1.1, and the destination IP, 10.1.1.254, are shown with their respective source/destination ports, and the session is TCP port 23 or Telnet.
The source interface is ge-0/0/0.0 and the destination interface for this session is ge-0/0/1.0.
To view the session table at a higher level you would use the
summary command, which gives a breakdown of the
different types of sessions and how many sessions there are:
juniper@SRX5800> show security flow session summary
Session summary:
Unicast-sessions: 20
Multicast-sessions: 0
Failed-sessions: 0
Sessions-in-use: 20
Maximum-sessions: 65536Be aware that session tables are often quite large, with thousands
or even millions of sessions at any given time. Even so, the ability to
search through the session table is extremely important, and Juniper has added
some great filters to assist with this. As always, use the question mark (?) in the
command-line interface (CLI) to show the list of possible options, as
shown in the following output:
juniper@SRX5800> show security flow session ?
Possible completions:
<[Enter]> Execute this command
application Show session for specified application or application set
destination-port Show each session that uses specified destination port
destination-prefix Show each session that matches destination prefix
idp Show IDP sessions
interface Show each session that uses specified interface
protocol Show each session that uses specified IP protocol
resource-manager Show resource-manager sessions
session-identifier Show session with specified session identifier
source-port Show each session that uses specified source port
source-prefix Show each session that matches source prefix
summary Show summary of sessions
tunnel Show tunnel sessions
| Pipe through a commandNote
Keep in mind that you can apply multiple filters to the search.
Another feature that has been added in Junos but was not available in ScreenOS is the ability to not only search by a source IP or destination IP, but also by an entire subnet.
This is important because it enables you to search for all traffic coming from or going to an entire subnet:
juniper@SRX5800> show security flow session destination-prefix 10.1.1/24
Session ID: 4785, Policy name: default-permit/1, Timeout: 1800
In: 10.10.1.1/49229 --> 10.1.1.254/23;tcp, If: ge-0/0/0.0
Out: 10.1.1.254/23 --> 10.10.1.1/49229;tcp, If: ge-0/0/1.0
Session ID: 4787, Policy name: default-permit/1, Timeout: 1800
In: 10.10.1.5/49131 --> 10.1.1.254/23;tcp, If: ge-0/0/0.0
Out: 10.1.1.254/23 --> 10.10.1.5/49131;tcp, If: ge-0/0/1.0
2 sessions displayedIn the following example, we are filtering the session table by
destination-port 23 or Telnet:
juniper@SRX5800> show security flow session destination-port 23
Session ID: 4785, Policy name: default-permit/1, Timeout: 1800
In: 10.10.1.1/49229 --> 10.1.1.254/23;tcp, If: ge-0/0/0.0
Out: 10.1.1.254/23 --> 10.10.1.1/49229;tcp, If: ge-0/0/1.0
Session ID: 4787, Policy name: default-permit/1, Timeout: 1800
In: 10.10.1.5/49131 --> 10.1.1.254/23;tcp, If: ge-0/0/0.0
Out: 10.1.1.254/23 --> 10.10.1.5/49131;tcp, If: ge-0/0/1.0
2 sessions displayedAnd finally, here’s how you can apply multiple filters to filter the
session output even further. In the following output, two filters have
been applied: the source-prefix filter
and the destination port filter. This
snippet shows only the sessions that match both of these
requirements:
juniper@SRX5800> show security flow sess source-prefix 10.10.1.5
destination-port 23
Session ID: 4787, Policy name: default-permit/1, Timeout: 1800
In: 10.10.1.5/49131 --> 10.1.1.254/23;tcp, If: ge-0/0/0.0
Out: 10.1.1.254/23 --> 10.10.1.5/49131;tcp, If: ge-0/0/1.0
1 sessions displayedPolicy Structure
Earlier in the chapter we broke down an example security policy into its core elements. Now, let’s discuss how to create the various objects that go into those security policies and toy with some of the advanced configuration options.
Security Zones
The first thing we need to do is to create a new security zone and assign it to the corresponding interface:
juniper@SRX5800>editEntering configuration mode [edit] juniper@SRX5800#set security zones security-zone web-dmzjuniper@SRX5800#set security zones security-zone web-dmz interfaces fe-0/0/2.0
Now we need to configure the IP address of the web servers. IP
addresses or DNS names are configured in what’s called address-books. These address-books store the IP or DNS information
used in security policies. Additionally, address-books are tied to a single security
zone; it’s not possible to assign the same address-book to two different security
zones.
The important thing to note is that it’s not possible to configure
IP addresses directly into the security policy—it
must be done within an address-book.
juniper@SRX5800>editEntering configuration mode [edit] juniper@SRX5800#edit security zones security-zone web-dmz[edit security zones security-zone web-dmz] juniper@SRX5800#set address-book address web1 172.31.100.60
Here, a new address-book has
been created on web-dmz that was previously configured. The new address-book has been assigned the label of
web1, and the IP address of web1 is 172.31.100.60.
You create a second address-book for the second web server on
web-dmz in the same way:
juniper@SRX5800>
[edit security zones security-zone web-dmz]
juniper@SRX5800# set address-book address web2 172.31.100.61The third address-book that is
configured is slightly different. This time, instead of using IP
addresses, the address-book is
configured with a DNS name:
juniper@SRX5800>edit security zones security-zone Internet[edit security zones security-zone Internet] juniper@SRX5800#set address-book address hackers_web hackers.com
Here, the address-book
hackers_web was configured to the Internet security zone. The
hackers_web address-book includes the
DNS name hackers.com.
Warning
Some address-book names are
reserved internally for the SRX and cannot be used. The prefixes are
static_nat_, incoming_nat_, and junos_.
In situations where the policy calls for multiple IP addresses,
ranges, or DNS names, instead of writing multiple security policies that
all take the same action it’s possible to use an address-set. An address-set is simply a grouping of address
books.
Think of the address-book as a
business card with information such as a phone number and name. Those
business cards can all be stored into a single Rolodex or an address-set. Creating an address-set is similar to creating an address-book. Address-sets are also assigned to security
zones and configured in the same manner:
juniper@SRX5800>edit security zones security-zone web-dmzEntering configuration mode [edit security zones security-zone web-dmz] juniper@SRX5800#set address-book address-set web-servers address web1[edit security zones security-zone web-dmz] juniper@SRX5800#set address-book address-set web-servers address web2
A new address-set has been
configured and is called web-servers,
and the two web server address-books
have been assigned to it. Now, when policy is written later, instead of
writing policy for both web1 and
web2 we can just use web-servers and it is applied to both.
We can verify the configuration by looking at the web-dmz zone to
confirm that the proper addresses are assigned to the zone, and that the
address-set is configured properly:
juniper@SRX5800> show configuration security zones security-zone web-dmz
address-book {
address web1 172.31.100.60/32;
address web2 172.31.100.61/32;
address-set web-servers {
address web1;
address web2;
}
}Service Configuration
The next object to configure in our policy structure is the application (or service, as it was previously known in ScreenOS). Applications are used in policy to state how the source and destination can talk to each other, with some examples including HTTP, SSH, DNS, and SIP.
The SRX comes with a large list of preconfigured applications with much of the hard work already done. The protocol, source port, destination port, and other values have already been configured. All we need to do is to assign it to a policy.
These predefined applications start with junos-. To view a list of the predefined
services use the show configuration groups
junos-defaults applications command:
juniper@SRX5800> show configuration groups junos-defaults applications
#
# File Transfer Protocol
#
application junos-ftp {
application-protocol ftp;
protocol tcp;
destination-port 21;
}
#
# Trivial File Transfer Protocol
#
application junos-tftp {
application-protocol tftp;
protocol udp;
destination-port 69;
}
#
# Real Time Streaming Protocol
#
application junos-rtsp {
application-protocol rtsp;
protocol tcp;
destination-port 554;To view the details of a specific application use the syntax
show configuration groups junos-defaults
applications application junos-<application
name>:
juniper@SRX5800> show conf groups junos-defaults app app junos-telnet
protocol tcp;
destination-port 23;Much like address-books and
address-sets, it is also possible to
configure application-sets. This is a useful feature that
replaces the need to write the same policy again and again just to
permit a single additional service. Here’s a web-management application-set that allows the network
administrator to manage the servers on web-dmz:
juniper@SRX5800>edit applications application-setEntering configuration mode [edit applications application-set] juniper@SRX5800#set web_mgt application junos-ssh[edit applications application-set] juniper@SRX5800#set web_mgt application junos-ping[edit applications application-set] juniper@SRX5800#set web_mgt application junos-pc-anywhere
The application-set web_mgt has
been created and then configured for SSH, ping, and pcAnywhere as a part
of that web management group.
If there is a custom program on the network, or perhaps an application isn’t already configured on the SRX, it’s easy to create a custom application. Say the local system administrators don’t use pcAnywhere, but instead use a different remote access solution that goes over TCP port 4999. Now we’ll have to create a custom application for them to use.
You must configure the following items when configuring a custom application:
- Application name
This is a label assigned to the custom application.
- Protocol
This specifies what protocol is used: TCP, UDP, ICMP, and so on.
Source-portThis is the source port for the application. Keep in mind that most of the time the source port is a randomly assigned port between 1024 and 65535.
Anyis not an accepted configuration option; however, a range can be used.Destination-portThis is the destination port or range.
Inactivity-timeoutThis is how long the SRX will let the connection go idle before removing it from the session table. This value is configured in seconds and is optional. If you don’t configure a value, the default timeout for the protocol will apply. For TCP the default is 30 minutes, and for UDP it is 2 minutes.
Here is an example of a custom remote_mgt application created for the system
administrators to access into their web servers. This application allows
them to connect to TCP port 4999, and because no inactivity-timeout is configured, it’s
automatically set for 30 minutes, the TCP default:
juniper@SRX5800>edit applications applicationEntering configuration mode [edit applications application] juniper@SRX5800#set remote_mgt protocol tcp source-port 1024-65535destination-port 4999
Now that the application has been configured, it’s time to create the policies for the web-dmz zone. The first policy to create is to allow system administrators on the Trust zone to manage the web servers on the web-dmz zone and log the traffic.
juniper@SRX5800#edit security policies from-zone trust to-zone web-dmz[edit security policies from-zone trust to-zone web-dmz] juniper@SRX5800#set policy webdmz_mgt match source-address anydestination-address web-servers application web_mgt [edit security policies from-zone trust to-zone web-dmz] juniper@SRX5800#set policy webdmz_mgt then permit[edit security policies from-zone trust to-zone web-dmz] juniper@SRX5800#set policy webdmz_mgt then log session-close session-init
Now let’s confirm the webdmz_mgt policy configuration:
juniper@SRX5800# show security policies from-zone trust to-zone web-dmz
policy webdmz_mgt {
match {
source-address any;
destination-address web-servers;
application web_mgt;
}
then {
permit;
log {
session-init;
session-close;
}
}
}The next step is to set up access from the Internet zone to the web-dmz zone to allow users on the Internet to access the web servers via HTTP and keep statistics on the traffic:
juniper@SRX5800#edit security policies from-zone Internet to-zone web-dmz[edit security policies from-zone Internet to-zone web-dmz] juniper@SRX5800#set policy http-access match source-address anydestination-address web-servers application junos-http [edit security policies from-zone Internet to-zone web-dmz] juniper@SRX5800#set policy http-access then permit[edit security policies from-zone Internet to-zone web-dmz] juniper@SRX5800#set policy http-access then count
Keep in mind that, as stated earlier, unless something is
explicitly permitted, it will be denied. So, there is no reason to write
a deny when evaluating traffic from
the Internet zone to the web-dmz zone, as only HTTP is permitted (as
currently configured), unless you want to modify the deny policy for
logging purposes:
juniper@SRX5800> show conf security policies from-zone Internet to-zone web-dmz
policy http-access {
match {
source-address any;
destination-address web-servers;
application junos-http;
}
then {
permit;
count;
}
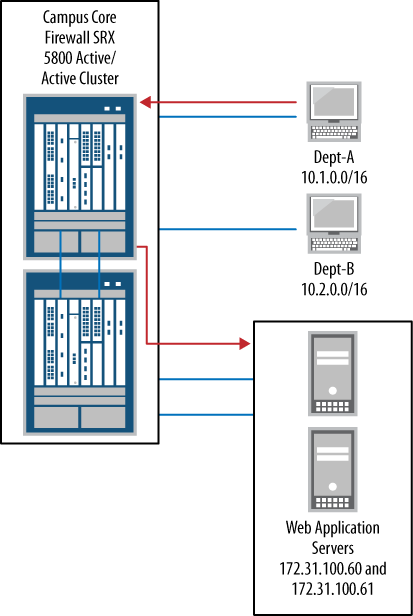
}To recap what we have done so far, we created a new zone named
web-dmz; assigned two web server addresses to the web-servers address-set; created an application-set called web_mgt for system administrator access; and
wrote a policy between both the Internet zone and the web-dmz zone for
HTTP access in addition to a policy between the Trust zone and the
web-dmz zone for management. Figure 4-3 shows that user Dept-A can now connect to the web application
servers.
Blocking Unwanted Traffic
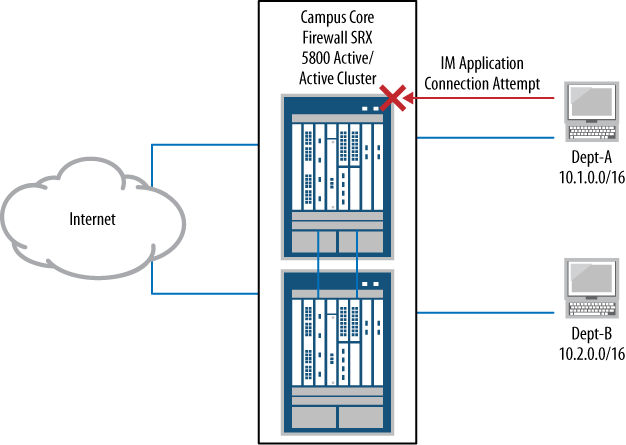
The next thing we need to do as we explore our sample policy structure is to deny unwanted outbound traffic from the users zone. In cases of Trust to Untrust, there is a default permit. Network operators may wish to block undesired programs and protocols from being used on the network using this default permit, such as instant messaging clients, outbound email (with the exception of email going through the corporate email servers), and many popular P2P applications. In this type of situation, we would need to explicitly block them.
Let’s configure the SRX to block some of these services per the Campus Core’s Internet access policy. The goal is to have the SRX silently deny all of these applications, as shown in Figure 4-4.
Let’s start our configuration:
juniper@SRX5800#edit applications application-set[edit applications application-set] juniper@SRX5800#set deny_services application junos-ymsg[edit applications application-set juniper@SRX5800#set deny_services application junos-smtp[edit applications application-set juniper@SRX5800#set deny_services application junos-msn[edit applications application-set juniper@SRX5800#set deny_services application junos-irc[edit applications application-set juniper@SRX5800#set deny_services application junos-gnutella[edit applications application-set juniper@SRX5800#set deny_services application junos-aol
Now, we’ll create an open policy that applies to everyone going to any destination (any source to any destination):
juniper@SRX5800# edit security policies from-zone trust to-zone Internet
[edit security policies from-zone trust to-zone Internet]
juniper@SRX5800# set policy denied_apps match source-address any
destination-address any application deny_servicesWhen blocking traffic on the SRX you have a couple of options that are very different in terms of how they go about dropping traffic:
denyThe
denyflag will silently drop the connection. The packet is dropped and logged (if configured to do so).rejectThe
rejectflag has a key difference from thedenyflag. Althoughrejectdrops the packet and logs (if configured to do so), it will also send an ICMP Port Unreachable packet to the initiating source for every packet that is rejected. This is used to inform the end host that the traffic was dropped.
Obviously, you must be careful with the reject flag because a large number of rejected
packets could cause the SRX’s performance to degrade due to flooding
ICMP messages. In nearly all cases, the authors of this book highly
recommend using deny instead of
reject. For the same reason as the
zone TCP-RST configuration, policies configured with
reject could allow for malicious users to notice the
SRX on your network and assist in mapping out your security policies.
With that in mind, let’s proceed with our blocking traffic
policy:
[edit security policies from-zone trust to-zone Internet]
juniper@SRX5800# set policy denied_apps then deny log session-close session-initNow let’s confirm the deny policy’s configuration:
juniper@SRX5800# show security policies from-zone trust to-zone Internet
policy denied_apps
match {
source-address any;
destination-address any;
application deny_services;
}
then {
deny;
log {
session-init;
session-close;
}
}Always remember to evaluate policy ordering—since the policy that
was just created is after the permit-any policy it must be moved before
the permit-any policy to take effect. To do this use the insert command and insert denied_apps before default-permit:
[edit]
juniper@SRX5800# insert security policies from-zone trust to-zone Internet
policy denied_apps before policy default-permitA quick confirmation shows that the policies are in the correct order:
juniper@SRX5800> show security policies from-zone trust to-zone Internet
From zone: trust, To zone: Internet
Policy: denied_apps, State: enabled, Index: 13, Sequence number: 1
Source addresses: any
Destination addresses: any
Applications: deny_services
Action: deny, log
Policy: default-permit, State: enabled, Index: 5, Sequence number: 2
Source addresses: any
Destination addresses: any
Applications: any
Action: permit
Policy: protect_inside_users, State: enabled, Index: 6, Sequence number: 3
Source addresses: inside-users
Destination addresses: bad_hosts
Applications: any
Action: denyPolicy Logging
We briefly covered policy logging from a configuration standpoint earlier in this chapter. Here we’ll discuss the details of policy logging and how to configure and view the logs.
Note
For legacy NetScreen readers, policy logging is very different on the SRX. The logging system is more of a local syslog server than the traditional traffic log found on NetScreen devices, and nearly everything that could be done with the ScreenOS traffic logs can be done on the SRX’s logfiles.
To log on the SRX you must configure the following two items:
Policy logging must be enabled on the policy via the
session-initandsession-closeconfiguration items.A filter and traffic logfile must be created on the SRX.
First, to enable policy logging, configure log session-close session-init on the specific
policy on which logging is desired. The session-close flag tells the SRX to log whenever
it tears down a session’s connection (a session could close for many
reasons, including a timeout, a FIN packet, or an RST packet). The
session-init flag tells the SRX to log
traffic for that policy when a session is built.
Here’s an example of a policy with logging enabled (that was actually configured earlier in the chapter). This example policy logs both the creation and the teardown of these connections and works on policies that permit traffic as well as policies that deny traffic:
[edit]
juniper@SRX5800# set security policies from-zone trust to-zone web-dmz
policy webdmz_mgt then log session-close session-initThe next item we need to configure is a location for the traffic
logs to go to. You can name the traffic logfile whatever you want,
although it’s always best to give the log a descriptive name, such as
traffic-log or policy-log, just so other users know where to
look for the logs.
Here the traffic logfile is called traffic-log. The second line of the config tells
the SRX to send all traffic matching RT_FLOW_SESSION, which is a string that shows up
in the policy messages:
[edit] juniper@SRX5800#set system syslog file traffic-log any anyjuniper@SRX5800#set system syslog file traffic-log match "RT_FLOW_SESSION"
Now, to view the traffic logs, use the show
log <filename> command to display the entire traffic
log:
juniper@SRX5800> show log traffic-log
Jan 7 12:07:24 SRX5800 RT_FLOW: RT_FLOW_SESSION_CREATE: session created
10.1.1.100/53910->172.31.100.60/22 junos-ssh
10.1.1.100/53910->172.31.100.60/22 None None 6 webdmz_mgt trust web-dmz 59
Jan 7 12:07:25 SRX5800 RT_FLOW: RT_FLOW_SESSION_CLOSE: session closed TCP RST:
10.1.1.100/53908->172.31.100.60/22 junos-ssh 10.1.1.100/53908->172.31.100.60/22
None None 6 webdmz_mgt trust web-dmz 57 1(64) 1(40) 3Here is a detailed breakdown of the different types of messages, followed by an example (borrowed from the SRX documentation):
- Session creation
<source-address>/<source-port>-><destination-address>/<destination-port>,<protocol-id>: <policy-name>RT_FLOW_SESSION_CREATE: session created 10.1.1.100/53908->172.31.100.60/22 junos- ssh 10.1.1.100/53908->172.31.100.60/22 None None 6 webdmz_mgt trust web-dmz 57
- Session close
session closed <reason>: <source-address>/<source-port>-><destination-address>/<destination-port>,<protocol-id>:<policy-name>,<inbound-packets>,<inbound-bytes>,<outbound-bytes> <elapsed-time>RT_FLOW_SESSION_CLOSE: session closed TCP RST: 10.1.1.100/53907->172.31.100.60/22 junos-ssh 10.1.1.100/53907->172.31.100.60/22 None None 6 webdmz_mgt trust web-dmz 56 1(64) 1(40) 2
- Session deny
session denied <source-address>/<source-port>-><destination-address>/<destination-port>,<protocol-id>(<icmp-type>):<policy-name>RT_FLOW_SESSION_DENY: session denied 10.1.1.100/2->10.2.0.254/25931 icmp 1(8) web_deny trust web-dmz
There are no built-in filters, as there were on the NetScreen platform. Instead, the SRX has some very powerful methods for filtering the displayed data that are built into the Junos operating system. Although a deep dive into all of the different filter options is outside the scope of this chapter, let’s cover a few ways to filter through the traffic log. Just remember, this is only a small sample of what’s possible.
The simplest way to filter the traffic log (or any syslog file, for
that matter) is to use the | match
<data> command, which filters the output to only that which matches the
data that was input:
juniper@SRX5800> show log traffic-log | match 3389
Jan 7 12:06:38 SRX5800 RT_FLOW: RT_FLOW_SESSION_CREATE: session created
10.1.1.100/53904->172.31.100.60/3389 None 10.1.1.100/53904->172.31.100.60/
3389 None None 6 webdmz_mgt trust web-dmz 49In this example, the match condition was 3389 (in this case, a port for Windows Remote
Desktop). The match command is very
powerful, and even allows for regular-expression-type searches, such as this match
filter matching on the string 3389 OR
22:
juniper@SRX5800> show log traffic-log | match "3389|22"
Jan 7 12:06:38 SRX5800 RT_FLOW: RT_FLOW_SESSION_CREATE: session created
10.1.1.100/53904->172.31.100.60/3389 None 10.1.1.100/53904->172.31.100.60/
3389 None None 6 webdmz_mgt trust web-dmz 49
Jan 7 12:07:22 SRX5800 RT_FLOW: RT_FLOW_SESSION_CREATE: session created
10.1.1.100/53907->172.31.100.60/22 junos-ssh 10.1.1.100/53907->172.31.100.60/22
None None 6 webdmz_mgt trust web-dmz 56
Jan 7 12:07:23 SRX5800 RT_FLOW: RT_FLOW_SESSION_CREATE: session created
10.1.1.100/53908->172.31.100.60/22 junos-ssh 10.1.1.100/53908->172.31.100.60/22
None None 6 webdmz_mgt trust web-dmz 57Additional methods for viewing the traffic log include the ability
to do a Unix-tail-type command. For example, the last command displays the last
X number of lines. Here, the last filter is used to display only the last two
lines of the traffic log:
juniper@SRX5800> show log traffic-log | last 2 Jan 7 12:07:25 SRX5800 RT_FLOW: RT_FLOW_SESSION_CLOSE: session closed TCP RST: 10.1.1.100/53909->172.31.100.60/22 junos-ssh 10.1.1.100/53909->172.31.100.60/22 None None 6 webdmz_mgt trust web-dmz 58 1(64) 1(40) 2 Jan 7 12:07:25 SRX5800 RT_FLOW: RT_FLOW_SESSION_CLOSE: session closed TCP RST: 10.1.1.100/53910->172.31.100.60/22 junos-ssh 10.1.1.100/53910->172.31.100.60/22 None None 6 webdmz_mgt trust web-dmz 59 1(64) 1(40) 1
Keep in mind that you can use multiple
pipe filters together to form powerful commands. For example, if your goal
is to determine how many times a certain IP, or segment, showed up in the
traffic log, you could use a combination of match and count:
juniper@SRX5800> show log traffic-log | match 172.31.100.60 | count
Count: 13 linesIn the preceding output, 172.31.100.60 shows up 13 times in the traffic log.
You also can see what the firewall has dropped. Assuming that
logging has been enabled on the deny policy, a simple filter on deny shows dropped traffic:
juniper@SRX5800> show log traffic-log | match DENY
Jan 7 12:07:05 SRX5800 RT_FLOW: RT_FLOW_SESSION_DENY: session denied
10.1.1.100/53906->172.31.100.60/21 junos-ftp 6(0) web_deny trust web-dmz
Jan 7 12:07:06 SRX5800 RT_FLOW: RT_FLOW_SESSION_DENY: session denied
10.1.1.100/53906->172.31.100.60/21 junos-ftp 6(0) web_deny trust web-dmz
Jan 7 12:07:11 SRX5800 RT_FLOW: RT_FLOW_SESSION_DENY: session denied
10.1.1.100/0->10.2.0.254/25931 icmp 1(8) web_deny trust web-dmz
Jan 7 12:07:12 SRX5800 RT_FLOW: RT_FLOW_SESSION_DENY: session denied
10.1.1.100/1->10.2.0.254/25931 icmp 1(8) web_deny trust web-dmz
Jan 7 12:07:13 SRX5800 RT_FLOW: RT_FLOW_SESSION_DENY: session denied
10.1.1.100/2->10.2.0.254/25931 icmp 1(8) web_deny trust web-dmzIt is also possible to log the policy denies to their own
logfile—for example, if you wish to keep a separate copy of dropped
traffic. You can do this by creating a new logfile and adjusting the
match condition:
[edit] juniper@SRX5800#set system syslog file traffic-deny any any[edit] juniper@SRX5800#set system syslog file traffic-deny match "RT_FLOW_SESSION_DENY"
A helpful trick to make it easier to troubleshoot traffic when a lot
of data is going to the traffic logfile is to filter with more specific
matching conditions. For example, if we were troubleshooting connectivity
to 172.31.100.60, or wanted to log that specific traffic to a different
logfile for later evaluation, we could filter only that traffic to a
different file. Here, 172.31.100.60 is filtered to a new logfile called
troubleshooting_traffic:
[edit] juniper@SRX5800#set system syslog file troubleshooting_traffic any any[edit] juniper@SRX5800#set system syslog file troubleshooting_traffic match"172.31.100.60"
Now, it’s possible to view the traffic log for just 172.31.100.60:
juniper@SRX5800> show log troubleshooting_traffic
Jan 7 12:24:42 SRX5800 clear-log[1377]: logfile cleared
Jan 7 12:24:46 SRX5800 RT_FLOW: RT_FLOW_SESSION_CREATE: session created
10.1.1.100/53989->172.31.100.60/22 junos-ssh 10.1.1.100/53989->172.31.100.60/22
None None 6 webdmz_mgt trust web-dmz 91
Jan 7 12:24:47 SRX5800 RT_FLOW: RT_FLOW_SESSION_CLOSE: session closed TCP RST:
10.1.1.100/53989->172.31.100.60/22 junos-ssh 10.1.1.100/53989->172.31.100.60/22
None None 6 webdmz_mgt trust web-dmz 91 1(64) 1(40) 2Once you get the hang of it, you’ll see that there are many ways to
filter out and count the data in logfiles using various commands. We’ve
just scratched the surface here. Use the CLI question mark (?) to display all the different command
possibilities:
juniper@SRX5800>show log troubleshooting_traffic|?Possible completions: count Count occurrences display Show additional kinds of information except Show only text that does not match a pattern find Search for first occurrence of pattern hold Hold text without exiting the --More-- prompt last Display end of output only match Show only text that matches a pattern no-more Don't paginate output request Make system-level requests resolve Resolve IP addresses save Save output text to file trim Trim specified number of columns from start of line
Oops, I almost forgot to mention another very useful feature, the
monitor command. Use the
monitor command so that the SRX
displays the output of the traffic log in real time to the console. It’s
very useful when troubleshooting or evaluating traffic.
juniper@SRX5800> monitor start traffic-logThen, as data is written to the traffic logfile, it’s displayed to
the console. Use the monitor stop
command to turn off the monitoring:
juniper@SRX5800> *** traffic-log *** Jan 7 12:07:13 SRX5800 RT_FLOW: RT_FLOW_SESSION_DENY: session denied 10.1.1.100/2->10.2.0.254/25931 icmp 1(8) web_deny trust web-dmz
Note
On the high-end lines such as the SRX5800 a limited amount of logging is available to the local logs. There simply isn’t enough disk space or processing to log the high rate of sessions that the high-end SRX devices are capable of handling. Logging to the local disk should be limited on these platforms to only critical policies.
Troubleshooting Security Policy and Traffic Flows
In most cases, simple policy logging of the traffic that is
being denied and permitted is sufficient to verify what the SRX is doing
with the data. However, in some instances more information is needed. On
the NetScreen platform this information was gained via debugs, typically
via debug flow basic. Juniper has taken into account
how often debugs are used when troubleshooting traffic flows, in addition
to policies, and has improved on this feature with traceoptions.
Within traceoptions you can accomplish the equivalent of a “debug
flow basic” via basic-datapath traceoption. Traceoptions monitor and log traffic flows going into and
out of the SRX and, much like the NetScreen debugs, filters tend to be
very resource-intensive. The authors of this book highly suggest that when
you use traceoptions you always have a packet filter set, and that the
packet filter is as specific as possible to avoid any adverse system
impacts.
Note
Unlike on the NetScreen platform, on the SRX you can configure only one expression per packet filter. To examine bidirectional communication you need multiple packet filters, one for each direction.
Troubleshooting Sample
Our sample problem is as follows: while configuring a new web server, users are complaining that they cannot access the website. It has already been confirmed that policy is written correctly and traffic logs session initiation. It’s all shown somewhat briefly in Figure 4-5.
The source is 10.1.1.100, a local workstation on the Trust zone in
Dept-A via port ge-0/0/0.0.
The destination is 10.2.0.3, a new web server on the web-dmz zone via port fe-0/0/2.0.
The first thing we should do is to configure a logfile for the
traceoption output. We can do this
using the file <file_name>
command. Here, the output file is named tshoot_web:
juniper@SRX5800# edit security flow traceoptions
[edit security flow traceoptions]
juniper@SRX5800# set file tshoot_webNext we need to set the filters. It’s worth noting that nothing takes effect until the configuration is committed, so it’s perfectly safe to change the order in which these items are configured:
[edit security flow traceoptions] juniper@SRX5800#set packet-filter trust_to_web source-prefix 10.1.1.100/32destination-prefix 10.2.0.3/32 [edit security flow traceoptions] juniper@SRX5800#set packet-filter web_to_trust source-prefix 10.2.0.3/32destination-prefix 10.1.1.100/32
Note
In the preceding output, two packet filters have been configured. The first filter is for 10.1.1.100 to 10.2.0.3 and the second filter is for the reverse traffic flow 10.2.0.3 talking to 10.1.1.100.
The last item we need to configure is the actual traceoption flag.
Here, it is basic-datapath, as this
should give us all the information we need:
[edit security flow traceoptions]
juniper@SRX5800# set flag basic-datapathIf you haven’t heard it before, it’s always wise to review the configuration before applying:
juniper@SRX5800# show security flow traceoptions
file tshoot_web;
flag basic-datapath;
packet-filter trust_to_web {
source-prefix 10.1.1.100/32;
destination-prefix 10.2.0.3/32;
}
packet-filter web_to_trust {
source-prefix 10.2.0.3/32;
destination-prefix 10.1.1.100/32;
}
[edit]The output of the config looks correct. All of the required configuration options are there: a traceoptions file, a traceoptions flag, and two packet filters for bidirectional traffic. Since everything looks OK, we can commit the configuration and the workstation can initiate some traffic so that we can monitor it. Once the test traffic has been completed, all the data to troubleshoot our problem should be in the tshoot_web traceoptions file.
Note
The output contains a lot of detailed information regarding what the SRX is doing with the packet as it passes through its hardware and does its series of checks, and the reality is that you can overlook much of this information in the output because it’s for developers who are troubleshooting and does not apply to what you need to know. Also, the traceoptions output will likely change over the printed lifetime of this book, as the developers add and remove information.
Troubleshooting Output
The output of the packet’s details is shown in its entirety in Example 4-1. Look through it and then we’ll break down what each portion means or does and what we can overlook.
This output is from a single first packet as it enters the SRX in our troubleshooting scenario (see Figure 4-5).
juniper@SRX5800> show log tshoot_web
Jan 17 12:35:51 12:35:50.1249501:CID-0:RT:<10.1.1.100/51510-
>10.2.0.3/80;6> matched filter trust_to_web:
Jan 17 12:35:51 12:35:50.1249501:CID-0:RT:packet [48] ipid = 57203,
@423f6b9e
Jan 17 12:35:51 12:35:50.1249501:CID-0:RT:---- flow_process_pkt: (thd
1): flow_ctxt type 13, common flag 0x0, mbuf 0x423f6a00
Jan 17 12:35:51 12:35:50.1249501:CID-0:RT: flow process pak fast ifl
68 in_ifp ge-0/0/0.0
Jan 17 12:35:51 12:35:50.1249501:CID-0:RT: ge-
0/0/0.0:10.1.1.100/51510->10.2.0.3/80, tcp, flag 2 syn
Jan 17 12:35:51 12:35:50.1249501:CID-0:RT: find flow: table
0x4d5c8238, hash 1430(0xffff), sa 10.1.1.100, da 10.2.0.3, sp 51510,
dp 80, proto 6, tok 384
Jan 17 12:35:51 12:35:50.1249501:CID-0:RT: no session found, start
first path. in_tunnel - 0, from_cp_flag - 0
Jan 17 12:35:51 12:35:50.1249501:CID-0:RT: flow_first_create_session
Jan 17 12:35:51 12:35:50.1249501:CID-0:RT: flow_first_in_dst_nat: in
<ge-0/0/0.0>, out <N/A> dst_adr 10.2.0.3, sp 51510, dp 80
Jan 17 12:35:51 12:35:50.1249501:CID-0:RT: chose interface ge-
0/0/0.0 as incoming nat if.
Jan 17 12:35:51 12:35:50.1249501:CID-0:RT:flow_first_rule_dst_xlate:
DST no-xlate: 0.0.0.0(0) to 10.2.0.3(80)
Jan 17 12:35:51 12:35:50.1249501:CID-0:RT:flow_first_routing: call
flow_route_lookup(): src_ip 10.1.1.100, x_dst_ip 10.2.0.3, in ifp ge-
0/0/0.0, out ifp N/A sp 51510, dp 80, ip_proto 6, tos 0
Jan 17 12:35:51 12:35:50.1249501:CID-0:RT:Doing DESTINATION addr
route-lookup
Jan 17 12:35:51 12:35:50.1249501:CID-0:RT: routed (x_dst_ip
10.2.0.3) from trust (ge-0/0/0.0 in 0) to ge-0/0/0.0, Next-hop:
10.1.1.1
Jan 17 12:35:51 12:35:50.1249501:CID-0:RT: policy search from zone
trust-> zone trust
Jan 17 12:35:51 12:35:50.1249501:CID-0:RT: app 6, timeout 1800s,
curr ageout 20s
Jan 17 12:35:51 12:35:50.1249501:CID-0:RT:flow_first_src_xlate:
10.1.1.100/51510 -> 10.2.0.3/80 | 10.2.0.3/80 -> 0.0.0.0/51510:
nat_src_xlated: False, nat_src_xlate_failed: False
Jan 17 12:35:51 12:35:50.1249501:CID-0:RT:flow_first_src_xlate: src
nat 0.0.0.0(51510) to 10.2.0.3(80) returns status: 0, rule/pool id:
0/0, pst_nat: False.
Jan 17 12:35:51 12:35:50.1249501:CID-0:RT: dip id = 0/0,
10.1.1.100/51510->10.1.1.100/51510
Jan 17 12:35:51 12:35:50.1249501:CID-0:RT:flow_first_get_out_ifp:
1000 -> cone nat test
Jan 17 12:35:51 12:35:50.1249501:CID-0:RT: choose interface ge-
0/0/0.0 as outgoing phy if
Jan 17 12:35:51 12:35:50.1249501:CID-0:RT:is_loop_pak: No loop: on
ifp: ge-0/0/0.0, addr: 10.2.0.3, rtt_idx:0
Jan 17 12:35:51 12:35:50.1249501:CID-0:RT:policy is NULL (wx/pim
scenario)
Jan 17 12:35:51 12:35:50.1249501:CID-0:RT:sm_flow_interest_check:
app_id 0, policy 4, app_svc_en 0, flags 0x2. not interested
Jan 17 12:35:51 12:35:50.1249501:CID-0:RT:sm_flow_interest_check:
app_id 1, policy 4, app_svc_en 0, flags 0x2. not interested
Jan 17 12:35:51 12:35:50.1249501:CID-
0:RT:flow_first_service_lookup(): natp(0x4b9f2198):
local_pak(0x3fdedc70.0x423f6a00): TCP proxy NOT interested: 0.
Jan 17 12:35:51 12:35:50.1249501:CID-0:RT: service lookup identified
service 6.
Jan 17 12:35:51 12:35:50.1249501:CID-0:RT: flow_first_final_check:
in <ge-0/0/0.0>, out <ge-0/0/0.0>
Jan 17 12:35:51 12:35:50.1249501:CID-0:RT: existing vector list 2-
446fe828.
Jan 17 12:35:51 12:35:50.1249501:CID-0:RT: Session (id:9270) created
for first pak 2
Jan 17 12:35:51 12:35:50.1249501:CID-0:RT:
flow_first_install_session======> 0x4b9f2198
Jan 17 12:35:51 12:35:50.1249501:CID-0:RT: nsp 0x4b9f2198, nsp2
0x4b9f2204
Jan 17 12:35:51 12:35:50.1249501:CID-0:RT:
make_nsp_ready_no_resolve()
Jan 17 12:35:51 12:35:50.1249501:CID-0:RT: route lookup: dest-ip
10.1.1.100 orig ifp ge-0/0/0.0 output_ifp ge-0/0/0.0 orig-zone 6 out-
zone 6 vsd 0
Jan 17 12:35:51 12:35:50.1249501:CID-0:RT: route to 10.1.1.100
Jan 17 12:35:51 12:35:50.1249501:CID-0:RT:Installing c2s NP session
wing
Jan 17 12:35:51 12:35:50.1249501:CID-0:RT:Installing s2c NP session
wing
Jan 17 12:35:51 12:35:50.1249501:CID-0:RT: flow got session.
Jan 17 12:35:51 12:35:50.1249501:CID-0:RT: flow session id 9270
Jan 17 12:35:51 12:35:50.1249501:CID-0:RT: tcp flags 0x2, flag 0x2
Jan 17 12:35:51 12:35:50.1249501:CID-0:RT: Got syn,
10.1.1.100(51510)->10.2.0.3(80), nspflag 0x1021, 0x20
Jan 17 12:35:51 12:35:50.1249501:CID-0:RT:mbuf 0x423f6a00, exit nh
0x30010
Jan 17 12:35:51 12:35:50.1249501:CID-0:RT: ----- flow_process_pkt rc
0x0 (fp rc 0)That’s a lot to digest. To make this easier (quicker) to read, a
helpful tip is to use the trim command option. The trim command removes a specified number of
characters. For instance, you can use it to remove the date and time to
make the code a lot easier to read or fit on a screen. Example 4-2 shows the trace file trimmed. Trim 42 removes the date and time as well as
the CID-0:RT:, leaving just the
important data.
juniper@SRX5800> show log tshoot_web | trim 42
<10.1.1.100/51510->10.2.0.3/80;6> matched filter trust_to_web:
packet [48] ipid = 57203, @423f6b9e
---- flow_process_pkt: (thd 1): flow_ctxt type 13, common flag 0x0,
mbuf 0x423f6a00
flow process pak fast ifl 68 in_ifp ge-0/0/0.0
ge-0/0/0.0:10.1.1.100/51510->10.2.0.3/80, tcp, flag 2 syn
find flow: table 0x4d5c8238, hash 1430(0xffff), sa 10.1.1.100, da
10.2.0.3, sp 51510, dp 80, proto 6, tok 384
no session found, start first path. in_tunnel - 0, from_cp_flag - 0
flow_first_create_session
flow_first_in_dst_nat: in <ge-0/0/0.0>, out <N/A> dst_adr 10.2.0.3,
sp 51510, dp 80
chose interface ge-0/0/0.0 as incoming nat if.
flow_first_rule_dst_xlate: DST no-xlate: 0.0.0.0(0) to 10.2.0.3(80)
flow_first_routing: call flow_route_lookup(): src_ip 10.1.1.100,
x_dst_ip 10.2.0.3, in ifp ge-0/0/0.0, out ifp N/A sp 51510, dp 80,
ip_proto 6, tos 0
Doing DESTINATION addr route-lookup
routed (x_dst_ip 10.2.0.3) from trust (ge-0/0/0.0 in 0) to ge-
0/0/0.0, Next-hop: 10.1.1.1
policy search from zone trust-> zone trust
app 6, timeout 1800s, curr ageout 20s
flow_first_src_xlate: 10.1.1.100/51510 -> 10.2.0.3/80 | 10.2.0.3/80 -
> 0.0.0.0/51510: nat_src_xlated: False, nat_src_xlate_failed: False
flow_first_src_xlate: src nat 0.0.0.0(51510) to 10.2.0.3(80) returns
status: 0, rule/pool id: 0/0, pst_nat: False.
dip id = 0/0, 10.1.1.100/51510->10.1.1.100/51510
flow_first_get_out_ifp: 1000 -> cone nat test
choose interface ge-0/0/0.0 as outgoing phy if
is_loop_pak: No loop: on ifp: ge-0/0/0.0, addr: 10.2.0.3, rtt_idx:0
policy is NULL (wx/pim scenario)
sm_flow_interest_check: app_id 0, policy 4, app_svc_en 0, flags 0x2.
not interested
sm_flow_interest_check: app_id 1, policy 4, app_svc_en 0, flags 0x2.
not interested
flow_first_service_lookup(): natp(0x4b9f2198):
local_pak(0x3fdedc70.0x423f6a00): TCP proxy NOT interested: 0.
service lookup identified service 6.
flow_first_final_check: in <ge-0/0/0.0>, out <ge-0/0/0.0>
existing vector list 2-446fe828.
Session (id:9270) created for first pak 2
flow_first_install_session======> 0x4b9f2198
nsp 0x4b9f2198, nsp2 0x4b9f2204
make_nsp_ready_no_resolve()
route lookup: dest-ip 10.1.1.100 orig ifp ge-0/0/0.0 output_ifp ge-
0/0/0.0 orig-zone 6 out-zone 6 vsd 0
route to 10.1.1.100
Installing c2s NP session wing
Installing s2c NP session wing
flow got session.
flow session id 9270
tcp flags 0x2, flag 0x2
Got syn, 10.1.1.100(51510)->10.2.0.3(80), nspflag 0x1021, 0x20
mbuf 0x423f6a00, exit nh 0x30010
----- flow_process_pkt rc 0x0 (fp rc 0)Now, let’s analyze the data from the traceoption’s output shown in Example 4-2.
The first line, shown here, displays the source IP 10.1.1.100 and
destination IP 10.2.0.3, as well as the ports used to communicate. It
then documents that this traffic matched the trust_to_web traceoptions filter.
<10.1.1.100/60218->10.2.0.3/80;6> matched filter trust_to_web:
The next line gives us the IPID, which is 57203 in this example:
packet [48] ipid = 57203, @423f6b9e
These two lines are basically useful to internal developers for troubleshooting hardware/software issues, and not for our problem at hand:
---- flow_process_pkt: (thd 1): flow_ctxt type 13, common flag 0x0, mbuf 0x423f6a00 flow process pak fast ifl 68 in_ifp ge-0/0/0.0
Notice that the inbound interface is ge-0/0/0.0 and the protocol is TCP, and that this is a SYN packet:
ge-0/0/0.0:10.1.1.100/60218->10.2.0.3/80, tcp, flag 2 syn
Here is the output as the SRX performs its 5-tuple lookup. The 5-tuple includes the source, destination, source port, destination port, and protocol. Protocol number 6 is TCP.
find flow: table 0x4d5c8238, hash 1430(0xffff), sa 10.1.1.100, da 10.2.0.3, sp 51510, dp 80, proto 6, tok 384
Note
The Internet Assigned Numbers Authority (IANA) has assigned numbers to all protocols. Here is a link to a list that IANA updates periodically: http://www.iana.org/assignments/protocol-numbers/.
Now that the 5-tuple lookup has been completed, a flow lookup is done. At this point, as shown by the output, the SRX determines if there is an existing session for this packet and whether it can take the fast path, or if this is a new session and it needs to go down the slow path. The example packet that is being broken down is, in fact, a first packet of a new session, and as such, the SRX determines that no existing session has been found and one must be created:
no session found, start first path. in_tunnel - 0, from_cp_flag - 0 flow_first_create_session
The SRX then checks to see if there are any destination NAT configurations that apply. In this case, there are none, so no NAT is applied:
flow_first_in_dst_nat: in <ge-0/0/0.0>, out <N/A> dst_adr 10.2.0.3, sp 51510, dp 80 chose interface ge-0/0/0.0 as incoming nat if. flow_first_rule_dst_xlate: DST no-xlate: 0.0.0.0(0) to 10.2.0.3(80)
After the destination NAT has been looked up and applied, a route lookup can be done if one exists. The route lookup must take place after a destination NAT for routing purposes:
10.2.0.3, in ifp ge-0/0/0.0, out ifp N/A sp 51510, dp 80, ip_proto 6, tos 0 Doing DESTINATION addr route-lookup routed (x_dst_ip 10.2.0.3) from trust (ge-0/0/0.0 in 0) to ge-0/0/0.0, Next-hop: 10.1.1.1
Once a route lookup is done on the destination, the SRX can determine the source and destination zones via a zone lookup. It then does a policy search to see if this traffic is denied/rejected/permitted or some other action, but in our case, it’s permitted:
policy search from zone trust-> zone web-dmz app 6, timeout 1800s, curr ageout 20s
If it had been denied by policy, a message such as this would have shown up, saying that the packet was denied and dropped:
packet dropped, denied by policy packet dropped, policy deny. flow find session returns error. ----- flow_process_pkt rc 0x7 (fp rc −1)
But that’s not the case, and now that the policy has been
evaluated, the SRX checks to see if any source NAT configuration
applies. In this case, there is no source NAT and everything returns
false:
flow_first_src_xlate: 10.1.1.100/51510 -> 10.2.0.3/80 | 10.2.0.3/80 -> 0.0.0.0/51510: nat_src_xlated: False, nat_src_xlate_failed: False flow_first_src_xlate: src nat 0.0.0.0(51510) to 10.2.0.3(80) returns status: 0, rule/pool id: 0/0, pst_nat: False. dip id = 0/0, 10.1.1.100/51510->10.1.1.100/51510 flow_first_get_out_ifp: 1000 -> cone nat test
The SRX then determines the outgoing interface for this packet:
choose interface ge-0/0/0.0 as outgoing phy if is_loop_pak: No loop: on ifp: ge-0/0/0.0, addr: 10.2.0.3, rtt_idx:0
Next, the SRX does some additional policy checks to see if items such as TCP proxy and WX apply:
policy is NULL (wx/pim scenario) sm_flow_interest_check: app_id 0, policy 4, app_svc_en 0, flags 0x2. not interested sm_flow_interest_check: app_id 1, policy 4, app_svc_en 0, flags 0x2. not interested flow_first_service_lookup(): natp(0x4b9f2198): local_pak(0x3fdedc70.0x423f6a00): TCP proxy NOT interested: 0. service lookup identified service 6.
In the preceding output, notice the policy number, policy 4. All security policies are assigned an index number. This index
number is mainly for internal reference, but it can be viewed within the
show security policies command, as shown in the
following output, where you can see that policy 4 is a default-permit:
juniper@SRX5800> show security policies | match index
  Policy: default-permit, State: enabled, Index: 4, Sequence number: 1
  Policy: default-permit, State: enabled, Index: 5, Sequence number: 1
  Policy: protect_inside_users, State: enabled, Index: 6, Sequence number: 2
  Policy: webdmz_mgt, State: enabled, Index: 8, Sequence number: 1
  Policy: web_deny, State: enabled, Index: 9, Sequence number: 2
  Policy: default-deny, State: enabled, Index: 7, Sequence number: 1
  Policy: http-access, State: enabled, Index: 10, Sequence number: 1
  Policy: deny-all, State: enabled, Index: 11, Sequence number: 2
Back to our SRX output … the packet is sent out as the last checks are completed, as indicated here:
flow_first_final_check: in <ge-0/0/0.0>, out <ge-0/0/0.0>
  existing vector list 2-446fe828.
  Session (id:9270) created for first pak 2
  flow_first_install_session======> 0x4b9f2198
 nsp 0x4b9f2198, nsp2 0x4b9f2204
  make_nsp_ready_no_resolve()
  route lookup: dest-ip 10.1.1.100 orig ifp ge-0/0/0.0 output_ifp ge-0/0/0.0
orig-zone 6 out-zone 6 vsd 0
  route to 10.1.1.100
Installing c2s NP session wing
Installing s2c NP session wing
  flow got session.
  flow session id 9270
  tcp flags 0x2, flag 0x2
  Got syn, 10.1.1.100(51510)->10.2.0.3(80), nspflag 0x1021, 0x20
mbuf 0x423f6a00, exit nh 0x30010
 ----- flow_process_pkt rc 0x0 (fp rc 0)
Although the output from traceoptions is a bit cryptic and hard to read, sometimes it’s much easier to understand if you look at it line by line, like we just did.
So, from the output in the tshoot_web file, it appears that traffic is
going out the incorrect interface. From the
preceding output, the route lookup is done and it appears that traffic
is exiting the same interface on which it is entering. The ifp is the inbound interface and the output_ifp is the outbound interface.
route lookup: dest-ip 10.1.1.100 orig ifpge-0/0/0.0output_ifpge-0/0/0.0orig-zone 6 out-zone 6 vsd 0
Look at the routing table to confirm that traffic is not exiting the proper interface:
juniper@SRX5800> show route 10.2.0.3
inet.0: 4 destinations, 4 routes (4 active, 0 holddown, 0 hidden)
+ = Active Route, - = Last Active, * = Both
0.0.0.0/0          *[Static/5] 6d 11:52:38
                    > to 10.1.1.1 via ge-0/0/0.0
The routing is incorrect. A quick static route should fix this problem and route traffic out the proper interface:
juniper@SRX5800>edit[edit] juniper@SRX5800>set routing-options static route 10.2.0.0/24 next-hop 10.2.1.1
Fix the problem and return to the show
route command. Once a correct route is added, the traffic
works for all users on the internal LAN:
juniper@SRX5800> show route 10.2.0.3
inet.0: 5 destinations, 5 routes (5 active, 0 holddown, 0 hidden)
+ = Active Route, - = Last Active, * = Both
10.2.0.0/24     *[Static/5] 00:02:32
                    > 10.2.1.1 via fe-0/0/2.0
Turning Off Traceoptions
After you have completed any troubleshooting in your network, is it highly recommended that you turn off traceoptions. Unless there is a very good reason to leave them running, you should always disable them as soon as you have finished troubleshooting, as traceoptions can consume SRX resources, and depending on the amount of traffic being debugged, SRX performance could be impacted.
There are two ways to turn off traceoptions. The first method is to just deactivate the configuration. This leaves the traceoptions configuration in the SRX, but it is turned off until it is reactivated at a later date when troubleshooting has resumed.
To deactivate everything use the deactivate security flow traceoptions command.
However, be careful when using the deactivate command, because much like the
delete command, if you use it
incorrectly, it can have a severe impact on the SRX.
 [edit]
juniper@SRX5800# deactivate security flow traceoptions
To confirm that the traceoptions have been disabled, just look at
the configuration with the show
command. Junos will tell you that this portion of the configuration is
inactive:
juniper@SRX5800# show security flow traceoptions
##
## inactive: security flow traceoptions
##
file tshoot_web;
flag basic-datapath;
packet-filter trust_to_web {
    source-prefix 10.1.1.100/32;
    destination-prefix 10.2.0.3/32;
}
packet-filter web_to_trust {
    source-prefix 10.2.0.3/32;
    destination-prefix 10.1.1.100/32;
}
The second method to turn off traceoptions is to delete the traceoptions configuration. If the traceoptions configuration is no longer needed and troubleshooting has been completed, it’s wise to delete the configuration from the SRX.
To do this, use the delete
command coupled with the security flow
traceoptions configuration:
[edit]
juniper@SRX5800# delete security flow traceoptions
Now confirm that the traceoptions configuration is gone:
[edit]
juniper@SRX5800# show security flow traceoptions
[edit]
juniper@SRX5800#
The authors recommend that whenever you use the delete command you issue a show | compare before committing the configuration. This will display all changes to the
configuration that are applied when a commit is done. It also ensures
that no unintended configurations
are made, or in this case, deleted:
juniper@SRX5800# show | compare
[edit security]
-   flow {
-       traceoptions {
-           file tshoot_web;
-           flag basic-datapath;
-           packet-filter trust_to_web {
-               source-prefix 10.1.1.100/32;
-               destination-prefix 10.2.0.3/32;
-           }
-           packet-filter web_to_trust {
-               source-prefix 10.2.0.3/32;
-               destination-prefix 10.1.1.100/32;
-           }
-       }
-   }
[edit]
As shown, only the traceoptions configuration has been deleted, so
it’s safe to do a commit and exit
configuration mode.
Note
To remove old troubleshooting logfiles, use the file delete <filename> command. It’s
always a best practice to remove old, unused files when you no longer
need them.
Application Layer Gateway Services
Application layer gateways (ALGs) are advanced application-inspecting features available on the SRX that serve two primary purposes. The first is to dynamically pinhole traffic for applications allowing return inbound packets (e.g., for FTP there may be multiple sessions for control and data for the same data connection between the source and destination). The second role of an ALG is to provide a deeper layer of inspection and a more granular layer of application security. ALGs can be better described as extra intelligence built to assist with certain applications that have problems with stateful firewalls.
This type of extra security and inspection is possible because an ALG understands the application protocol and how it is supposed to function. The SRX can prevent many types of SCCP DoS attacks, such as call flooding, from taking place on the network. We will cover these configurable application screens in detail in Chapter 7, but in a nutshell, ALGs are application (Layer 7)-aware packet processing (Layer 4).
Note
It’s worth noting that not all ALGs are available in the higher-end SRX models. For example, at the time of this writing, SCCP and H323 are not available on the high-end SRX devices, while the branch SRX Series has full support for all listed ALGs.
Here is a list of ALGs currently built into the SRX, along with a brief explanation of what each one does:
- REAL
RealAudio/RealVideo are proprietary formats developed by RealNetworks and they use what is called Progressive Network Audio (PNA) or Progressive Network Media (PNM) to send streaming audio data. PNA packets are sent over a TCP connection and act like a control channel. The audio data itself is sent over a UDP connection. The ALG dynamically allows these UDP data connections and performs any NAT that needs to take place.
- RTSP
Real-Time Streaming Protocol is used to establish and control media connections between end hosts. RTSP handles all client-to-media server requests such as play and pause, and is used to control real-time playback of the media files from the server. RTSP does not, however, stream any media data. Commonly, that is left to Real-time Transport Protocol (RTP), and the two are used in combination to deliver media to the clients.
- DNS
The Domain Name System ALG monitors DNS queries and response packets. Since DNS is UDP and is a simple request-response type of flow, the DNS ALG monitors for the
responseflag and then closes down the UDP session. This is very useful; otherwise, the SRX would wait two minutes before timing out the session, which is the default for UDP.- FTP
The File Transfer Protocol ALG monitors the FTP connection for PORT, PASV, and 227 commands. The ALG will handle all NAT functions and pinholing of any additional ports necessary. Additional security options can be leveraged by configuring the FTP ALG to block specific FTP functions, such as FTP put or FTP get.
- TFTP
The Trivial File Transfer Protocol ALG monitors the initiation of a TFTP connection and pinholes a connection through the SRX permitting the reverse direction.
- TALK
TALK is a legacy chat-type application for Unix platforms developed in the early 1980s. TALK communicates on UDP port 517/518 for control-channel-type functions. The TALK ALG will handle all NAT functions in addition to any pinholing that needs to take place.
- RSH
RSH stands for Remote Shell. RSH is a Unix-type program that can execute commands across a network. RSH typically uses TCP port 514. RSH has largely been replaced by SSH as RSH communicates unencrypted. The RSH ALG handles all NAT functions as well as any pinholing that needs to take place.
- PPTP
Point-to-Point Tunneling Protocol is a Layer 2 protocol used for tunneling PPP over an IP network. PPTP is often used as a way to implement virtual private networks (VPNs) and is tunneled over TCP and a Generic Route Encapsulation (GRE) tunnel encapsulating the PPP packets. The PPTP ALG handles all NAT functions and pinholing for functions of PPTP, such as Call IDs of PAC and PNS.
- SQL
The Structured Query Language ALG handles SQL TNS response frames and then evaluates the packet for IP address and port information. The SQL ALG handles all NAT functions and pinholing for the TCP data channel.
- H323
This is a suite of protocols that provides audio-visual communication sessions over an IP network. The H.323 standard includes call signaling, call control, multimedia transport, multimedia control, and bandwidth control. The H323 ALG handles all NAT functions in addition to gatekeeper discovery, endpoint registration/admission/status, and call control/call setup. The H323 ALG also has many application screens that provide additional protections at an application level.
- SIP
Session Initiation Protocol is a signaling protocol used for initiating, modifying, and terminating multimedia sessions such as voice and video calls over IP. The SIP ALG on the SRX only supports Session Description Protocol (SDP), even though SIP can use a variety of different description protocols to describe the session. The SIP ALG monitors SIP connections and dynamically pinholes for the SIP traffic.
- SCCP
Skinny Client Control Protocol is a Cisco protocol for VoIP call signaling to the Cisco CallManager. The SCCP ALG will look within the control packets and allow the RTP port number and IP address of the media termination, dynamically pinholing for the RTP flows. In addition to pinholing, the SCCP ALG also handles all NAT functions and application layer protections.
- MGCP
Media Gateway Control Protocol is a signaling and call control protocol used in VoIP between the media gateway and media controller. The MGCP ALG handles the dynamic pinholing for any additional connections needed, as well as handling all NAT functions. The MGCP ALG also inspects the VoIP signaling data and ensures that it complains to RFC standards blocking any malformed packets or attacks. Additional application layer protections are also configurable within the ALG.
- RPC
Remote Procedure Call is a secure interprocess communication that handles data exchange and invocation to a different process, typically to a machine on the local network or across the Internet. The RPC ALG handles dynamic port negotiation and pinholing as well as all NAT functions.
- IKE/ESP
IKE (Internet Key Exchange) and ESP (Encapsulating Security Payload) are a part of the IP Security (IPsec) protocol. In situations where the SRX is inline and an IPsec VPN passes through the SRX and NAT is enabled, IPsec VPNs can have issues. This is a common problem with IPsec and address translation. The IKE/ESP ALG should help with that problem, enabling the SRX to go inline and not interfere with VPN flows.
ALGs all perform the same type of function: they inspect the applications control channel and handle either NAT, dynamic pinholing of ports, or both. The ALG process does not inspect or monitor the actual data channel, something to keep in mind when working with ALGs.
To view which ALGs are currently enabled on the SRX, use the
show security alg status command to
display the ALGs:
juniper@SRX5800> show security alg status
ALG Status :
  DNS      : Enabled
  FTP      : Enabled
  H323     : Enabled
  MGCP     : Enabled
  MSRPC    : Enabled
  PPTP     : Enabled
  RSH      : Enabled
  RTSP     : Enabled
  SCCP     : Enabled
  SIP      : Enabled
  SQL      : Enabled
  SUNRPC   : Enabled
  TALK     : Enabled
  TFTP     : Enabled
How to Configure an ALG
Let’s use the FTP ALG as our first configuration example, because if you remember from earlier in this chapter, it was configured for web-dmz administration.
From the trust network the web administrators are now requesting FTP access to the web1 server so that files can be uploaded to the server. In a secured network, their request should be denied because FTP transmits everything in clear text as it is an insecure protocol. The web administrators should be told to use SFTP. However, for this example, let’s assume that SFTP is not available and FTP must be used. Sadly, cases such as this widely exist due to many legacy platforms and applications.
Enabling the FTP ALG is simple, since there is already a policy that allows the web administrators to connect to the web-dmz:
juniper@SRX5800> show security policies from-zone trust to-zone web-dmz
From zone: trust, To zone: web-dmz
  Policy: webdmz_mgt, State: enabled, Index: 8, Sequence number: 1
    Source addresses: any
    Destination addresses: web-servers
    Applications: web_mgt
    Action: permit, log
  Policy: web_deny, State: enabled, Index: 9, Sequence number: 2
    Source addresses: any
    Destination addresses: any
    Applications: any
    Action: deny, log
All we need to do is add the Junos-FTP service to the web_mgt application-set:
[edit] juniper@SRX5800#set applications application-set web_mgt application junos-ftp[edit] juniper@SRX5800#commit and-quitcommit complete Exiting configuration mode
Look at the applications the Junos-FTP service shows under
web_mgt:
juniper@SRX5800> show configuration applications application-set web_mgt
application junos-ssh;
application junos-ping;
application junos-pc-anywhere;
application windows_rdp;
application junos-http;
application junos-ftp;
A more detailed look at the webdmz_mgt policy shows the new ALG
information:
juniper@SRX5800> show security policies from-zone trust to-zone web-dmz
policy-name webdmz_mgt detail
Policy: webdmz_mgt, action-type: permit, State: enabled, Index: 8
  Sequence number: 1
  From zone: trust, To zone: web-dmz
  Source addresses:
    any: 0.0.0.0/0
  Destination addresses:
    web2: 10.2.0.2/32
    web1: 172.31.100.60/32
  Application: web_mgt
    IP protocol: tcp, ALG: 0, Inactivity timeout: 1800
      Source port range: [0-0]
      Destination port range: [22-22]
    IP protocol: 1, ALG: 0, Inactivity timeout: 60
      ICMP Information: type=255, code=0
    IP protocol: udp, ALG: 0, Inactivity timeout: 60
      Source port range: [0-0]
      Destination port range: [5632-5632]
    IP protocol: tcp, ALG: 0, Inactivity timeout: 1800
      Source port range: [1024-65535]
      Destination port range: [3389-3389]
    IP protocol: tcp, ALG: 0, Inactivity timeout: 1800
      Source port range: [0-0]
      Destination port range: [80-80]
    IP protocol: tcp, ALG: ftp, Inactivity timeout: 1800
      Source port range: [0-0]
      Destination port range: [21-21]
  Session log: at-create, at-close
Let’s confirm that FTP does work to the server and that the web administrators can now upload their files as needed:
ftp> open 172.31.100.60
Connected to 172.31.100.60.
220-FileZilla Server version 0.9.34 beta
220-written by Tim Kosse (Tim.Kosse@gmx.de)
220 Please visit http://sourceforge.net/projects/filezilla/
Name (172.31.100.60:tle4729):
331 Password required for tle4729
Password:
Now view this connection on the SRX:
juniper@SRX5800> show security flow session application ftp
Session ID: 11663, Policy name: webdmz_mgt/8, Timeout: 788
  In: 10.1.1.100/59832 --> 172.31.100.60/21;tcp, If: ge-0/0/0.0
  Out: 172.31.100.60/21 --> 10.1.1.100/59832;tcp, If: fe-0/0/2.0
Session ID: 11664, Policy name: webdmz_mgt/8, Timeout: 790
  In: 10.1.1.100/59834 --> 172.31.100.60/21;tcp, If: ge-0/0/0.0
  Out: 172.31.100.60/21 --> 10.1.1.100/59834;tcp, If: fe-0/0/2.0
2 sessions displayed
Voilà! Some ALGs are simple to set up, as easy as using the prebuilt Junos application. ALGs such as FTP, TFTP, and DNS are perfect examples of this type of ALG. Other, more complex ALGs have more optional configuration knobs.
Our second ALG configuration example concerns the SIP ALG. The SIP ALG has a lot more configuration options than the FTP ALG, but the SIP ALG is applied in the same way the FTP ALG is applied: via security policy and Junos-SIP as the application.
Although SIP has various configuration knobs under the security alg sip stanza, I’ll cover just a few
here. First, set the SIP ALG maximum-call-duration setting to 1,000 minutes
(that’s more than 15 hours!):
[edit]
juniper@SRX5800# set security alg sip maximum-call-duration 1000
The next optional configuration is the timeout value (this value is in seconds):
[edit]
juniper@SRX5800# set security alg sip inactive-media-timeout 60
Overall, the SIP ALG is pretty easy to set up and configure.
Problems arise when vendors do not follow RFC guidelines or they write
their own one-off SIP implementations. If issues start after the SIP ALG
is configured, the primary things to check are the SIP counters for
errors. For inoperability issues, one possible workaround is to enable
the unknown-message option; by
default, the SRX’s SIP ALG drops all unsupported messages for security
purposes. Note that this disables that security feature:
[edit]
juniper@SRX5800# set security alg sip application-screen unknown-message
permit-routed
Another common issue is when vendors implement proprietary headers into their SIP packets. Per standards, the call-id header should contain a hostname or source IP address, and in some cases, vendors adjust or change this. To disable the call-id enforcement use the following:
[edit] juniper@SRX5800#set security alg sip disable-call-id-hidingjuniper@SRX5800#edit security policies from-zone trust to-zone voip-dmz
Once that has been applied, the base SIP configuration is
finished. SIP calls can be made and should have no problems going
through. Let’s verify the SIP stats by using the show security alg sip counters command to view
the counters, including errors on decoding packets:
juniper@SRX5800> show security alg sip counters
   Method       T     1xx      2xx      3xx     4xx      5xx    6xx
               RT      RT       RT       RT      RT       RT     RT
   INVITE       2       1        0        0       2        0      0
                0       0        0        0       0        0      0
   CANCEL       0       0        0        0       0        0      0
                0       0        0        0       0        0      0
      ACK       2       0        0        0       0        0      0
                0       0        0        0       0        0      0
      BYE       0       0        0        0       0        0      0
                0       0        0        0       0        0      0
 REGISTER      28       0        8        0      20        0      0
                0       0        0        0       0        0      0
  OPTIONS       0       0        0        0       0        0      0
                0       0        0        0       0        0      0
     INFO       0       0        0        0       0        0      0
                0       0        0        0       0        0      0
  MESSAGE       0       0        0        0       0        0      0
                0       0        0        0       0        0      0
   NOTIFY       0       0        0        0       0        0      0
                0       0        0        0       0        0      0
    PRACK       0       0        0        0       0        0      0
                0       0        0        0       0        0      0
  PUBLISH       0       0        0        0       0        0      0
                0       0        0        0       0        0      0
    REFER       0       0        0        0       0        0      0
                0       0        0        0       0        0      0
SUBSCRIBE       0       0        0        0       0        0      0
                0       0        0        0       0        0      0
   UPDATE       0       0        0        0       0        0      0
                0       0        0        0       0        0      0
 BENOTIFY       0       0        0        0       0        0      0
                0       0        0        0       0        0      0
  SERVICE       0       0        0        0       0        0      0
                0       0        0        0       0        0      0
    OTHER       0       0        0        0       0        0      0
                0       0        0        0       0        0      0
SIP Error Counters:
  Total Pkt-in                  : 76
  Total Pkt dropped on error    : 13
  Transaction error             : 0
  Call error                    : 0
  IP resolve error              : 0
  NAT error                     : 0
  Resource manager error        : 0
  RR header exceeded max        : 0
  Contact header exceeded max   : 0
  Call Dropped due to limit     : 0
  SIP stack error               : 0
  SIP decode error              : 13
  SIP unknown method error      : 0
  RTO message sent              : 0
  RTO message received          : 0
  RTO buffer allocation failure : 0
  RTO buffer transmit failure   : 0
  RTO send processing error     : 0
  RTO receive processing error  : 0
  RTO receive invalid length    : 0
To view a higher-level overview of calls, use the show security alg sip calls command as the
optional detail flag at the end to display even more information about
the call:
juniper@SRX5800> show security alg sip calls
Total number of calls: 2 (# of call legs 4)
   Call leg1: zone 3
      UAS callid:120ed748-11121207-04c1279d-0bbb7e18@172.31.100.50 (pending tsx 1)
      Local tag
      Remote tag: 120ed748111212e264b0a951-5cbb0a95
      State: STATE_DISCONNECTED
   Call leg2: zone 2
      UAC callid:120ed748-11121207-04c1279d-0bbb7e18@172.31.100.50 (pending tsx 1)
      Local tag: 120ed748111212e264b0a951-5cbb0a95
      Remote tag
      State: STATE_DISCONNECTED
   Call leg1: zone 3
      UAS callid:120ed748-11121207-04c1279d-0bbb7e18@172.31.100.50 (pending tsx 1)
      Local tag:  120f90542e7e64cd724880f5-65db2f99
      Remote tag: 120ed748111212e264b0a951-5cbb0a95
      State: STATE_ESTABLISHED
   Call leg2: zone 2
      UAC callid:120ed748-11121207-04c1279d-0bbb7e18@172.31.100.50 (pending tsx 1)
      Local tag:  120ed748111212e264b0a951-5cbb0a95
      Remote tag: 120f90542e7e64cd724880f5-65db2f99
To view transactions, use the show
security alg sip transaction command:
 juniper@SRX5800> show security alg sip transaction
Total number of transactions: 1
       Transaction Name   Method  CSeq  State        Timeout  VIA RSC ID
       UAS:gsn0x5a06ddf1   BYE    101   Proceeding      −1        -
       UAC:gsn0x5a06f615   BYE    101   Calling         25        8184
And to view the overall health of the SIP ALG, use show security alg sip rate:
juniper@SRX5800> show security alg sip rate
CPU ticks per microseconds is 3735928559
Time taken for the last message is 0 microseconds
Total time taken for 0 messages is 0 microseconds(in less than 10 minutes)
Rate: 3735928559 messages/second
ALGs provide an additional layer of security and handle NAT as well as dynamic pinholing when needed. With that deeper layer of inspection come more processing and additional potential problems. Oftentimes when Juniper writes ALGs, they are written to follow and enforce RFC specifications. The problem most commonly comes when vendors write one-off applications or their own additions to the protocol, or to the service, and the ALG doesn’t know how to properly handle it.
Juniper has incorporated as many workarounds as possible, such as
called-hiding and unknown-message, in the SIP ALG. However,
sometimes issues still occur. In these events, the only option may be to
open more port ranges than the vendor has provided.
Policy Schedulers
Policy schedulers are rules that you can enable or disable based on time and date. Schedulers are configured on a per-policy basis and only one scheduler can be configured per policy. However, multiple policies can reference a single scheduler.
You can use schedulers in a number of different situations and for several different purposes:
- Internet browsing access
You can write a scheduler to allow Internet access from the employees’ network only during nonbusiness hours. For example, from 5:00 p.m. to 8:00 a.m. and from noon to 1:00 p.m. (lunch hour) employees are allowed to access the Internet via HTTP as this is during nonbusiness hours.
- Access to payroll systems
You can write a scheduler to allow the HR department to access the payroll system only during business hours—for example, from 8:00 a.m. to 6:00 p.m. This can prevent rogue access when nobody is on-site or in the office.
In both of the preceding examples, you can use schedules to restrict or permit access based on the time or date. Schedulers can assist in enforcing company policies and in increasing security, and you can be quite creative based on the habits of typical network users.
You can enable schedules by first creating the scheduler and then applying it to the policy.
Let’s create a few sample schedulers and then discuss what was done.
juniper@SRX5800# set schedulers scheduler deny-web daily start-time 08:00
stop-time 17:00
[edit]
In the preceding output, a scheduler was created called deny-web that is enforced daily from 8:00 a.m.
to 5:00 p.m., thus applying this scheduler to anything that you do not
want done during office hours.
Now, let’s apply that scheduler to a policy that denies access to HTTP:
juniper@SRX5800#edit security policies from-zone trust to-zone Internet[edit security policies from-zone trust to-zone Internet] juniper@SRX5800#set policy deny_daytime_websurfing match source-address anydestination-address any application junos-http [edit security policies from-zone trust to-zone Internet] juniper@SRX5800#set Internet policy deny_daytime_websurfing then deny[edit security policies from-zone trust to-zone Internet] juniper@SRX5800#set policy deny_daytime_websurfing scheduler-name deny-web
In the preceding output, a security policy was written from the
Trust zone going to the Internet zone for any HTTP traffic. Then an action
of deny was applied, and finally the
scheduler deny-web was configured to be
active during those time frames in deny-web.
It is also possible to add days to exclude, as in the following:
juniper@SRX5800#edit schedulers scheduler[edit schedulers scheduler] juniper@SRX5800#set network-access daily start-time 09:00 stop-time 20:00[edit schedulers scheduler] juniper@SRX5800#set network-access saturday exclude[edit schedulers scheduler] juniper@SRX5800#set network-access sunday exclude
The scheduler called network-access runs daily from 9:00 a.m. to 8:00
p.m. (This scheduler might be used to control remote access into the
network.) Notice that two additional lines were configured for both
Saturday and Sunday to be excluded. In other words, remote users will not
be able to access the network on weekends once this scheduler is applied
to the proper policy.
Just like the first policy, let’s configure this setup to allow the
contractor subnet access to everything on the web-dmz zone during the
defined times in network-access:
juniper@SRX5800#set security zones security-zone trust address-book addresscontractor_subnet 10.3.0.0/24 [edit] juniper@SRX5800#edit security policies from-zone trust to-zone web-dmz[edit security policies from-zone trust to-zone web-dmz] juniper@SRX5800#set policy contractor_access match source-addresscontractor_subnet destination-address any application any [edit security policies from-zone trust to-zone web-dmz] juniper@SRX5800#set policy contractor_access then permit[edit security policies from-zone trust to-zone web-dmz] juniper@SRX5800#set policy contractor_access scheduler-name network-access
Now look at the configuration to check that everything is in order:
juniper@SRX5800# show security policies from-zone trust to-zone web-dmz policy
contractor_access
match {
    source-address contractor_subnet;
    destination-address any;
    application any;
}
then {
    permit;
}
scheduler-name network-access;
[edit]
One-Time Schedulers
One-time schedulers can also be configured to run for a predefined period of time. After that period of time, the scheduler becomes inactive and does not activate the policy. You can use this in situations where access should be granted on a temporary basis or something needs to be blocked for a period of time.
An example of a one-time scheduler is a scheduler that grants access to a vendor for a window of time to troubleshoot or fix a problem. If the web servers we configured earlier were having problems, we could configure a policy that allowed Microsoft to access them remotely. The security department should have a problem with granting this type of access permanently, so we would use a scheduler to ensure that access is removed after a previously agreed upon time frame. Here’s a one-time scheduler granting temporary access into the network:
[edit]
juniper@SRX5800# set schedulers scheduler microsoft_remote_access
start-date 2010-02-14.09:00 stop-date 2010-02-15.09:00
[edit]
juniper@SRX5800#
This one-time scheduler is called microsoft_remote_access and is set to enable
on February 14, 2010 at 9:00 a.m. It will end 24 hours later. Here is
the permit that will no longer apply after 24 hours:
juniper@SRX5800# edit [edit] juniper@SRX5800#set security zones security-zone Internet address-book addressms_support 207.46.197.32 [edit] juniper@SRX5800#set security policies from-zone Internet to-zone web-dmz[editsecurity policies from-zone Internet to-zone web-dmz] juniper@SRX5800#set policy temp_ms_access match source-address ms_supportdestination-address web1 application any [editsecurity policies from-zone Internet to-zone web-dmz] juniper@SRX5800#set policy temp_ms_access scheduler-name microsoft_remote_access[editsecurity policies from-zone Internet to-zone web-dmz] juniper@SRX5800#set policy temp_ms_access then permit[editsecurity policies from-zone Internet to-zone web-dmz] juniper@SRX5800#
In the preceding output, a new address book was created for
Microsoft’s source IP address. Then a policy was written to allow that
IP access to the web1 server via any application. The third item
configured was the scheduler microsoft_remote_access that was applied. Now,
this scheduler will be active from February 14 until February 15 to
allow Microsoft to remotely access the server.
Let’s look at the configuration as a whole:
juniper@SRX5800# show security policies from-zone Internet to-zone web-dmz
policy temp_ms_access
match {
    source-address ms_support;
    destination-address web1;
    application any;
}
then {
    permit;
}
scheduler-name microsoft_remote_access;
[edit]
You can view configured schedulers with the show schedulers command. Here is the output
from the three already configured schedulers. Right now it appears that
there are two active schedulers and one inactive scheduler. The output
will also list the next time a scheduler is set to turn on or
off.
juniper@SRX5800> show schedulers
Scheduler name: deny-web, State: active
  Next deactivation: Fri Jan 22 17:00:00 2010
Scheduler name: microsoft_remote_access, State: inactive
  Next activation: Sun Feb 14 09:00:00 2010
Scheduler name: network-access, State: active
  Next deactivation: Fri Jan 22 20:00:00 2010
Let’s look at a detailed policy output to confirm that the
schedule is applied and it is active (the state should show enabled):
juniper@SRX5800>show security policies from-zone trust to-zone web-dmzpolicy-name contractor_access detail Policy: contractor_access, action-type: permit,State: enabled,Index: 14 Sequence number: 3 From zone: trust, To zone: web-dmz Source addresses: contractor_subnet: 10.3.0.0/24 Destination addresses: any: 0.0.0.0/0 Application: any IP protocol: 0, ALG: 0, Inactivity timeout: 0 Source port range: [0-0] Destination port range: [0-0] Scheduler name: network-access
Web and Proxy Authentication
The SRX can also be used as an inline web proxy, forcing users to authenticate for access, or as a pass-through authentication forcing Telnet, FTP, and HTTP to authenticate, adding an additional layer of security while keeping a historical log for later review and auditing.
Web Authentication
Figure 4-6 illustrates the stages of the web authentication process.
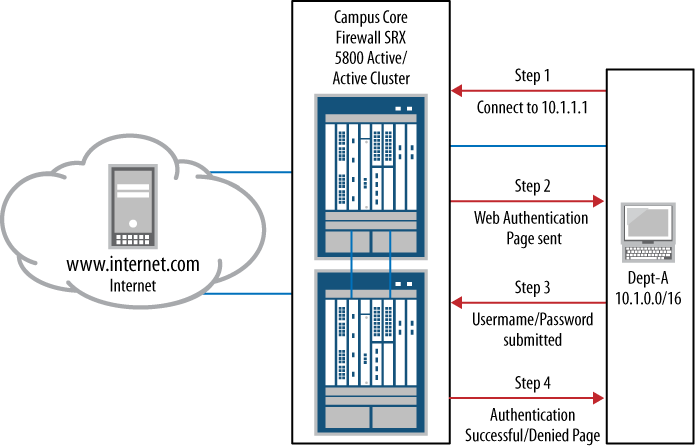
Configuring web authentication is relatively painless. The largest task is creating the user profiles that would be needed for authentication.
The first step is to enable authentication on the interface itself. Here we apply web authentication to an already existing interface, ge-0/0/0, of which the Trust zone is a part:
[edit]
juniper@SRX5800# set interfaces ge-0/0/0 unit 0 family inet
address 10.1.0.254/24 web-authentication http
[edit]
juniper@SRX5800#
Next, we need to create a user or list of users that have
permission to access the Web. Here we use the volunteer sample user
Tim_Eberhard which has been set up
under access profile web-allow-group.
The access profile will be referenced later in the configuration.
[edit]
juniper@SRX5800# set access profile web-allow-group client Tim_Eberhard
firewall-user password letmeinpls
An alternative to using local user lists on the SRX is to authenticate users to an external database on a RADIUS, RSA, or LDAP server.
Let’s begin a web authentication configuration example to an external RADIUS server. A RADIUS server could be configured with thousands of individual accounts:
[edit]
juniper@SRX5800# set access profile web-allow-group_radius
radius-server 10.3.4.100 secret radius_secret_key retry 2
Next we will configure the SRX to try the RADIUS server first; if that server fails, the SRX will resort back to the local database (this way, if the RADIUS server ever fails, it’s possible to have a default account that allows access during emergencies):
[edit]
juniper@SRX5800# set access profile web-allow-group authentication-order radius
authentication-order password
Now we’ll apply the web authentication to the policy, adding the
permit-http policy from the Trust
zone to the Internet zone:
[edit]
juniper@SRX5800# set security policies from-zone trust to-zone Internet
policy permit-http then permit firewall-authentication web-authentication
Let’s look at the configuration as a whole:
[edit]
juniper@SRX5800# show access profile web-allow-group
authentication-order [ radius password ];
client Tim_Eberhard {
    firewall-user {
        password "$9$hISclM7NbgaUX7wgoZkqCtu0RS7Nb2oG"; ## SECRET-DATA
    }
}
radius-server {
    10.3.4.100 {
        secret "$9$iq5Fn6AOBEP5hrvM-d6/CuIcKvLN-wKM7VbsZGREclvLdVYgJD";
## SECRET-DATA
        retry 2;
    }
}
[edit]
juniper@SRX5800# show interfaces ge-0/0/0
description "Inside network";
speed 100m;
link-mode full-duplex;
unit 0 {
    family inet {
        address 10.1.0.254/24 {
            web-authentication http;
        }
    }
}
juniper@SRX5800# show security policies from-zone trust to-zone Internet
policy permit-http {
    match {
        source-address any;
        destination-address any;
        application junos-http;
    }
    then {
        permit {
            firewall-authentication {
                web-authentication;
            }
        }
    }
}
This basic web authentication will prompt users when they try to use HTTP. Web authentication is basically a portal that will authenticate a user’s traffic through.
Pass-Through Authentication
Another method of authentication that you can use on the SRX is called pass-through authentication. Pass-through authentication is different from web authentication as it just prompts the user to enter his account information for authentication somewhat transparently. Pass-through can be triggered by HTTP, Telnet, and FTP traffic.
From a user standpoint, the authentication process looks as though the website or Telnet, or the FTP session, is prompting the user for his account information, whereas with web authentication users need to go to a certain IP address and authenticate before attempting to send any other traffic.
Figure 4-7 illustrates the pass-through authentication process.
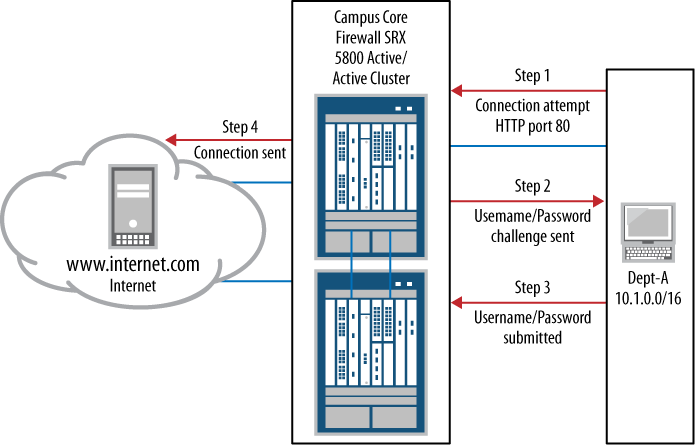
Configuring pass-through authentication is much like configuring
web authentication. The first thing you need to do is to turn on
pass-through authentication and assign it to a profile. For the
following example, we’ll reuse web-allow-group since it already had a user
account and RADIUS server configured. The second thing you need to do is
to set a banner to inform the user what to submit for
authentication.
Note
A banner should provide a phone number or an email address that users can use for support if they cannot get past the inline challenge.
We’ll use the Telnet service for our example. Since Telnet is an insecure protocol that must sometimes be supported due to legacy applications and systems, using inline authentication here is an additional layer of security that we can apply to our connection.
juniper@SRX5800#edit access firewall-authentication pass-through[edit access firewall-authentication pass-through] juniper@SRX5800#set default-profile web-allow-group[edit access firewall-authentication pass-through] juniper@SRX5800#set telnet banner success "PLEASE ENTER IN YOUR ACCOUNT INFO.FOR SUPPORT PLEASE CALL THE NOC AT 1-800-555-1212" [edit access firewall-authentication pass-through] juniper@SRX5800#top[edit] juniper@SRX5800#edit security policies from-zone trust to-zone web-dmz[edit security policies from-zone trust to-zone web-dmz] juniper@SRX5800#set policy permit-telnet match source-address anydestination-address any [edit security policies from-zone trust to-zone web-dmz] juniper@SRX5800#set policy permit-telnet match application junos-telnet[edit security policies from-zone trust to-zone web-dmz] juniper@SRX5800#set policy permit-telnet then permit firewall-authenticationpass-through access-profile web-allow-group
And here is what that configuration looks like all together:
juniper@SRX5800# show | compare
[edit security policies from-zone trust to-zone web-dmz]
      policy web_deny { ... }
+     policy permit-telnet {
+         match {
+             source-address any;
+             destination-address any;
+             application junos-telnet;
+         }
+         then {
+             permit {
+                 firewall-authentication {
+                     pass-through {
+                         access-profile web-allow-group;
+                     }
+                 }
+             }
+         }
+     }
We can view active authenticated information about the SRX’s authentications using the following output:
juniper@SRX5800# show security firewall-authentication users
Firewall authentication data:
  Total users in table: 1
          Id Source Ip       Src zone Dst zone Profile    Age Status   User
           4 10.3.0.12     Trust   Internet      webauth-     4 Success  Tim
The show security firewall-authentication
history command shows all active and authenticated users
currently passing through the SRX:
juniper@SRX5800> show security firewall-authentication history
History of firewall authentication data: Authentications: 2 Id Source Ip
Date Time Duration Status User
1 10.1.0.120 2010-01-12 18:20:02 0: 00:22 Failed bob
2 10.1.0.125 2010-01-13 12:22:48 0: 00:21 Success bill
Firewall authentication provides an additional layer of security as well as logs. It can be used to enforce company access policies or better protect network boundaries and access. It is a very simple way to improve the overall security strategy of anything from the smallest home office to a large corporate network.
Case Study 4-1
Objective: Set up basic firewall policy for the company’s network, including web and email access for the users, and inbound as well as outbound access for the servers.
Our strategies to achieve that objective are as follows:
Create a security policy that allows access to the web server DMZ from anywhere on the Internet.
Allow access to the mail servers on the mail server DMZ from the internal user networks 10.1.0.0/24 and 10.1.2.0/24, and inbound/outbound mail access to the mail server from the Internet.
Create a custom application with a 60-minute timeout for TCP port 6667 and apply that custom application on the web server DMZ to the Internet.
Create a policy that requires users on the trust network 10.1.0.0/24 to authenticate for web browsing during business hours to comply with the company’s Internet access policy.
Figure 4-8 shows our topology for Case Study 4-1.
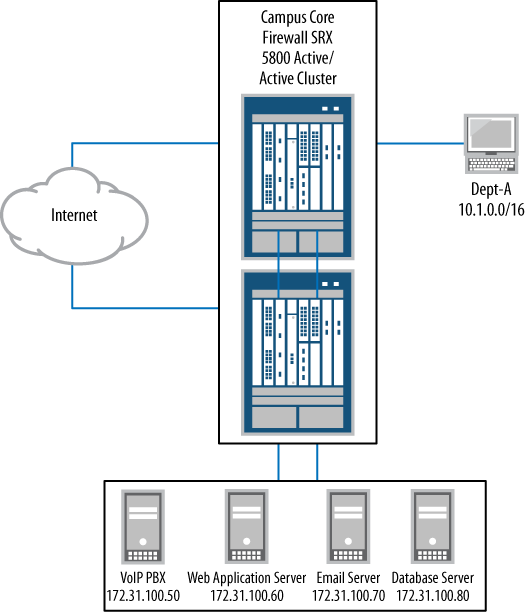
First, we need to write a policy for access to the web server DMZ from the Internet. This is a basic permit policy with any source. Since it’s a web server facing the public Internet logging will be enabled. Let’s start with the following:
[edit] juniper@SRX5800#set security zones security-zone web-dmz address-book addressweb_server 172.31.100.60/32 [edit] juniper@SRX5800#edit security policies from-zone internet to-zone web-dmz[edit security policies from-zone internet to-zone web-dmz] juniper@SRX5800#set policy "allow_http_from_web" match source-address anydestination-address web1 application junos-http [edit security policies from-zone internet to-zone web-dmz] juniper@SRX5800#set policy "allow_http_from_web" then permit[edit security policies from-zone internet to-zone web-dmz] juniper@SRX5800#set policy "allow_http_from_web" then log session-closesession-init
Next, we need to write a couple of policies that make the mail server work. To do this, we’ll create one policy that allows the user segments to access the mail server and another policy to allow both inbound and outbound mail access from the mail server itself.
First we need to create the address-books. An address-set will combine both user segments into
a single address-set:
[edit security policies from-zone internet to-zone web-dmz] juniper@SRX5800#top[edit] juniper@SRX5800#edit security zones security-zone dept-a address-book[edit security zones security-zone dept-a address-book] juniper@SRX5800#set address users1 10.1.0.0/24[edit security zones security-zone dept-a address-book] juniper@SRX5800#set address users2 10.1.2.0/24[edit security zones security-zone dept-a address-book] juniper@SRX5800#set address-set users_segments address users1[edit security zones security-zone dept-a address-book] juniper@SRX5800#set address-set users_segments address users2
Now, we need to create the mail server DMZ and configure an address-book for that server:
[edit security zones security-zone dept-a address-book] juniper@SRX5800#top[edit] juniper@SRX5800#set security zones security-zone mail-dmz[edit] juniper@SRX5800#set security zones security-zone mail-dmz address-bookaddress mail_server 172.31.100.70/32
We need to configure an application-set to allow the various mail
services:
juniper@SRX5800#edit applications application-set[edit applications application-set] juniper@SRX5800#set mail_services application junos-imap[edit applications application-set] juniper@SRX5800#set mail_services application junos-smtp[edit applications application-set] juniper@SRX5800#set mail_services application junos-pop3
Once that is complete, we can configure the first policy that allows users to access the mail server:
[edit applications application-set] juniper@SRX5800#top[edit] juniper@SRX5800#edit security policies from-zone dept-a to-zone mail-dmz[edit security policies from-zone dept-a to-zone mail-dmz] juniper@SRX5800#set policy "allow_users_to_mail" match source-addressusers_segments destination-address mail_server application mail_services [edit security policies from-zone dept-a to-zone mail-dmz] juniper@SRX5800#set policy "allow_users_to_mail" then permit
Now that users are allowed to access the mail servers, the mail servers need to send email out as well as receive mail from the Internet.
Here is the code to send email from mail-dmz to the Internet:
[edit security policies from-zone dept-a to-zone mail-dmz] juniper@SRX5800#top[edit] juniper@SRX5800#edit security policies from-zone mail-dmz to-zone internet[edit security policies from-zone mail-dmz to-zone internet] juniper@SRX5800#set policy "permit_outbound_mail"match source-address mail_server destination-address any application mail_services [edit] juniper@SRX5800#set policy "permit_outbound_mail" then permit
Now, here’s the code to reverse connectivity:
juniper@SRX5800#top[edit] juniper@SRX5800#edit security policies from-zone internet to-zone mail-dmz[edit security policies from-zone internet to-zone mail-dmz] juniper@SRX5800#set policy "permit_inbound_mail" match source-address anydestination-address mail_server application mail_services [edit security policies from-zone internet to-zone mail-dmz] juniper@SRX5800#set policy "permit_inbound_mail" then permit[edit security policies from-zone internet to-zone mail-dmz] juniper@SRX5800#set policy "permit_inbound_mail" then log session-initsession-close
You might have noticed that logging was enabled. It is a best practice to log anything coming in from the Internet, at the very least. Here, both the web server and the mail server inbound connections from the Internet are logged.
Another service that needs to be permitted is TCP port 6667 with an inactivity timeout of 60 minutes; we also need to allow the web server to connect to any destination on the Internet with that port. Since timeouts are configured in seconds, our timeout will need to be 3,600 seconds:
juniper@SRX5800#top[edit] juniper@SRX5800#set applications application tcp_6667 protocol tcpsource-port 6667 destination-port 1-65000 inactivity-timeout 3600 [edit] juniper@SRX5800#edit security policies from-zone web-dmz to-zone internet[edit security policies from-zone web-dmz to-zone internet] juniper@SRX5800#set policy "permit_irc" match source-address web1destination-address any application tcp_6667 [edit] juniper@SRX5800#set policy "permit_irc" then permit
The last few configurations we need to make are to create a policy
that forces users on the Dept-A segment
to authenticate for HTTP access during business hours. We can do this by
creating a scheduler and then configuring pass-through authentication for
HTTP.
But before we can configure anything, we must set a scheduler for the normal business hours of 8:00 a.m. to 5:00 p.m., excluding weekends, to enforce company policy:
juniper@SRX5800#top[edit] juniper@SRX5800#edit schedulers scheduler[edit schedulers scheduler] juniper@SRX5800#set "http-business-hours" daily start-time 08:00:00stop-time 17:00:00 [edit schedulers scheduler] juniper@SRX5800#set "http-business-hours" sunday exclude[edit schedulers scheduler] juniper@SRX5800#set "http-business-hours" saturday exclude
Now we can set up a pass-through authentication profile:
juniper@SRX5800#top[edit] juniper@SRX5800#set access profile web-allow-group radius-server 10.3.4.100secret radius_secret_key retry 2 [edit] juniper@SRX5800#set access firewall-authentication pass-throughdefault-profile web-allow-group http banner login "PLEASE ENTER IN YOUR ACCOUNT INFO. FOR SUPPORT PLEASE CALL THE NOC AT 1-800-555-1212"
OK, now we need to write our policy to reference both the scheduler and the pass-through access profile:
[edit] juniper@SRX5800#edit security policies from-zone dept-a to-zone internet[edit security policies from-zone dept-a to-zone internet] juniper@SRX5800#set policy "http_auth" match source-address users_segmentsdestination-address any application junos-https [edit security policies from-zone dept-a to-zone internet] juniper@SRX5800#set policy "http_auth" scheduler-name http-business-hours[edit security policies from-zone dept-a to-zone internet] juniper@SRX5800#set policy "http_auth" then permit firewall-authenticationpass-through access-profile web-allow-group
Finally, let’s take a look at the entire configuration and ensure that everything commits correctly:
juniper@SRX5800# show | compare
[edit security zones security-zone web-dmz address-book]
       address web2 { ... }
+      address web_server 172.31.100.60/32;
[edit security zones]
     security-zone CDN { ... }
+    security-zone internet;
+    security-zone dept-a {
+        address-book {
+            address users1 10.1.0.0/24;
+            address users2 10.1.2.0/24;
+            address-set users_segments {
+                address users1;
+                address users2;
+            }
+        }
+    }
+    security-zone mail-dmz {
+        address-book {
+            address mail_server 172.31.100.70/32;
+        }
+    }
[edit security]
+   policies {
+       from-zone internet to-zone web-dmz {
+           policy allow_http_from_web {
+               match {
+                   source-address any;
+                   destination-address web1;
+                   application junos-http;
+               }
+               then {
+                   permit;
+                   log {
+                       session-init;
+                       session-close;
+                   }
+               }
+           }
+       }
+       from-zone dept-a to-zone mail-dmz {
+           policy allow_users_to_mail {
+               match {
+                   source-address users_segments;
+                   destination-address mail_server;
+                   application mail_services;
+               }
+               then {
+                   permit;
+               }
+           }
+       }
+       from-zone mail-dmz to-zone internet {
+           policy permit_outbound_mail {
+               match {
+                   source-address mail_server;
+                   destination-address any;
+                   application mail_services;
+               }
+               then {
+                   permit;
+               }
+           }
+       }
+       from-zone internet to-zone mail-dmz {
+           policy permit_inbound_mail {
+               match {
+                   source-address any;
+                   destination-address mail_server;
+                   application mail_services;
+               }
+               then {
+                   permit;
+                   log {
+                       session-init;
+                       session-close;
+                   }
+               }
+           }
+       }
+       from-zone web-dmz to-zone internet {
+           policy permit_irc {
+               match {
+                   source-address web1;
+                   destination-address any;
+                   application tcp_6667;
+               }
+               then {
+                   permit;
+               }
+           }
+       }
+       from-zone dept-a to-zone internet {
+           policy http_auth {
+               match {
+                   source-address users_segments;
+                   destination-address any;
+                   application junos-https;
+               }
+               then {
+                   permit {
+                       firewall-authentication {
+                           pass-through {
+                               access-profile web-allow-group;
+                           }
+                       }
+                   }
+               }
+               scheduler-name http-business-hours;
+           }
+       }
+   }
[edit]
+  access {
+      profile web-allow-group {
+          radius-server {
+              10.3.4.100 {
+                  secret
"$9$VZsoGDjq5T3gonCu0cSjikPz6pu1hclp0Eyrex7F36Au1SyKMX-";
## SECRET-DATA
+                  retry 2;
+              }
+          }
+      }
+      firewall-authentication {
+          pass-through {
+              default-profile web-allow-group;
+              http {
+                  banner {
+                      login "PLEASE ENTER IN YOUR ACCOUNT INFO.
FOR SUPPORT PLEASE CALL THE NOC AT 1-800-555-1212";
+                  }
+              }
+          }
+      }
+  }
[edit applications]
    application windows_rdp { ... }
+   application tcp_6667 {
+       protocol tcp;
+       source-port 6667;
+       destination-port 1-65000;
+       inactivity-timeout 3600;
+   }
[edit applications]
    application-set web_mgt { ... }
+   application-set mail_services {
+       application junos-imap;
+       application junos-smtp;
+       application junos-pop3;
+   }
[edit]
+  schedulers {
+      scheduler http-business-hours {
+          daily {
+              start-time 08:00:00 stop-time 17:00:00;
+          }
+          sunday exclude;
+          saturday exclude;
+      }
+  }
[edit]
juniper@SRX5800# commit check
configuration check succeeds
After reviewing the changes and performing a commit check, everything looks good. Our SRX is
now set up for the company when users come into the office.
Case Study 4-2
Objective: A new department is being added and their network configured on the company’s network, and while in a meeting to talk about their access requirements they stated they need the following networking requirements:
Full unfiltered Internet access
Full unfiltered access to the web and mail servers
Access from the Internet into their network segment so that they can host customer-facing web servers
Our strategy to achieve that objective is to evaluate how best to give them the requested access while maintaining network security. Figure 4-9 illustrates their needs.

This case study is more real-world than you might think. All too often, users (including management) do not understand the needs of their business or how to incorporate security into the workflow. External servers should never be on the same segment as users, and unfiltered access may sound like a good idea from a “getting things done” point of view, but in reality, policies can be written to allow the user department to do everything that they need to do while maintaining an acceptable level of security.
Corporate security policies should apply to everyone. They exist for a reason, and if it’s a corporation’s security policy to block P2P apps on its network, this should be done globally.
First, let’s set up their Internet access. We need to create a new
zone for Dept-B, and we need to create
address-books which should be put into
an address-set.
[edit] juniper@SRX5800#edit security zones security-zone[edit security zones security-zone] juniper@SRX5800#set dept-b[edit security zones security-zone] juniper@SRX5800#set dept-b address-book address users3 10.2.1.0/24[edit security zones security-zone] juniper@SRX5800#set dept-b address-book address users4 10.2.2.0/24[edit security zones security-zone] juniper@SRX5800#set dept-b address-book address users5 10.2.3.0/24[edit security zones security-zone] juniper@SRX5800#set dept-b address-book address-set dept_b_users address users3[edit security zones security-zone] juniper@SRX5800#set dept-b address-book address-set dept_b_users address users4[edit security zones security-zone] juniper@SRX5800#set dept-b address-book address-set dept_b_users address users5
Next, we should block a group of predetermined applications from
accessing the Internet. We should
put these applications into an address-set for ease of policy engineering, and we
need to deny those applications via policy.
[edit security zones security-zone] juniper@SRX5800#top[edit] juniper@SRX5800#edit applications application-set[edit applications application-set] juniper@SRX5800#set deny_services application junos-ymsg[edit applications application-set] juniper@SRX5800#set deny_services application junos-smtp[edit applications application-set] juniper@SRX5800#set deny_services application junos-msn[edit applications application-set] juniper@SRX5800#set deny_services application junos-irc[edit applications application-set] juniper@SRX5800#set deny_services application junos-gnutella[edit applications application-set] juniper@SRX5800#set deny_services application junos-aol[edit applications application-set] juniper@SRX5800#top[edit] juniper@SRX5800#edit security policies from-zone dept-b to-zone internet[edit security policies from-zone dept-b to-zone internet] juniper@SRX5800#set policy "deny_bad_apps" match source-address dept_b_usersdestination-address any application deny_services [edit security policies from-zone dept-b to-zone internet] juniper@SRX5800#set policy "deny_bad_apps" then deny log session-closesession-init
Don’t forget to add the policy that allows everything else! The new department’s users might be upset if all of their traffic was denied.
[edit security policies from-zone dept-b to-zone internet] juniper@SRX5800#set policy "permit-to-internet-any" match source-addressdept_b_users destination-address any application any [edit security policies from-zone dept-b to-zone internet] juniper@SRX5800#set policy "permit-to-internet-any" then permit
Now that we’ve taken care of Internet access, the next order of
business is access to the mail server. Using the application-set and mail
address-book that we created earlier, all we really need to do
is to create a policy to permit the traffic.
[edit security policies from-zone dept-b to-zone internet] juniper@SRX5800#top[edit] juniper@SRX5800#edit security policies from-zone dept-b to-zone mail-dmz[edit security policies from-zone dept-b to-zone mail-dmz] juniper@SRX5800#set policy "permit_b_to_mail" match source-address dept_b_usersdestination-address mail_server application mail_services [edit security policies from-zone dept-b to-zone mail-dmz] juniper@SRX5800#set policy "permit_b_to_mail" then permit
The last item is to address this new web server that Dept-B wants on the network. The web server
should be moved to its own DMZ and policy specifically for that web server
needs to be written:
[edit security policies from-zone dept-b to-zone mail-dmz] juniper@SRX5800#top[edit] juniper@SRX5800#set security zones security-zone Bweb-dmz[edit] juniper@SRX5800#set security zones security-zone Bweb-dmz address-bookaddress web5 10.3.0.1/32 [edit] juniper@SRX5800#edit security policies from-zone internet to-zone Bweb-dmz[edit security policies from-zone internet to-zone Bweb-dmz] juniper@SRX5800#set policy "permit_to_bweb" match source-address anydestination-address web5 application junos-http [edit security policies from-zone internet to-zone Bweb-dmz] juniper@SRX5800#set policy "permit_to_bweb" then permit[edit security policies from-zone internet to-zone Bweb-dmz] juniper@SRX5800#set policy "permit_to_bweb" then log session-close session-init
And if you noticed, as always, it’s suggested that you log the traffic from the Internet.
Now, let’s take a look at the entire configuration for Dept-B:
juniper@SRX5800# show | compare
[edit security zones]
     security-zone mail-dmz { ... }
+    security-zone dept-b {
+        address-book {
+            address users3 10.2.1.0/24;
+            address users4 10.2.2.0/24;
+            address users5 10.2.3.0/24;
+            address-set dept_b_users {
+                address users3;
+                address users4;
+                address users5;
+            }
+        }
+    }
+    security-zone Bweb-dmz {
+        address-book {
+            address web5 10.3.0.1/32;
+        }
+    }
[edit security policies]
     from-zone dept-a to-zone internet { ... }
+    from-zone dept-b to-zone internet {
+        policy deny_bad_apps {
+            match {
+                source-address dept_b_users;
+                destination-address any;
+                application deny_services;
+            }
+            then {
+                deny;
+                log {
+                    session-init;
+                    session-close;
+                }
+            }
+        }
+        policy permit-to-internet-any {
+            match {
+                source-address dept_b_users;
+                destination-address any;
+                application any;
+            }
+            then {
+                permit;
+            }
+        }
+    }
+    from-zone dept-b to-zone mail-dmz {
+        policy permit_b_to_mail {
+            match {
+                source-address dept_b_users;
+                destination-address mail_server;
+                application mail_services;
+            }
+            then {
+                permit;
+            }
+        }
+    }
+    from-zone internet to-zone Bweb-dmz {
+        policy permit_to_bweb {
+            match {
+                source-address any;
+                destination-address web5;
+                application junos-http;
+            }
+            then {
+                permit;
+                log {
+                    session-init;
+                    session-close;
+                }
+            }
+        }
+    }
[edit applications]
    application-set mail_services { ... }
+   application-set deny_services {
+       application junos-ymsg;
+       application junos-smtp;
+       application junos-msn;
+       application junos-irc;
+       application junos-gnutella;
+       application junos-aol;
+   }
[edit]
juniper@SRX5800# commit check
configuration check succeeds
The commit check appears to be
successful and the configuration looks good. The new department can now
come online without any issues and the security of the company has not
been compromised.
Converters and Scripts
To help bridge the gap between the NetScreen system and the SRX system several tools have been developed. One such tool is the S2JES (ScreenOS to Junos-ES) converter. This is a free tool (it requires a valid login to http://www.juniper.net) that will convert a ScreenOS configuration file or syntax to Junos-ES. It can help with migration from a ScreenOS policy base to Junos policy. You can find the tool at https://i2j.juniper.net/s2jes/index.jsp.
Op scripts will also assist in migration efforts. Op scripts are SLAX or XSLT-based scripts that run directly on the SRX. These scripts are often developed by Juniper and by external users. You can use op scripts to view information in a summarized format or, for example, to run a series of health checks.
One of my favorite op scripts for the SRX is the policy test script. The policy test script will take input such as a source IP, destination IP, source port, or destination port and find any matching policies. All of these fields are optional, so the match can be as broad or as narrow as you want it to be.
Here is example output of the policy test script:
user@cli# op policy-test source-address 10.1.1.1 destination-address 10.2.2.2
From-Zone    To-Zone      Name            Src-Addr        Dst-Addr
Application  Action trust        untrust      ftp-permit      any             any
junos-ftp    permit trust        untrust      http-https-rej  any             any
junos-https  reject                                              junos-http
The policy test script found two policies that match the source/destination address. From the preceding output it appears that only FTP is allowed and HTTP/HTTPS is explicitly denied.
Other scripts mimic the output of ScreenOS-type commands, such as “get interface,” “get service,” and “get policy.” You can find these scripts in a number of places, but two of the major sites are:
| http://www.juniper.net/us/en/community/junos/script-automation/library/ |
| http://code.google.com/p/junoscriptorium/ |
You can find the policy test script shown earlier at the following URL:
| http://www.juniper.net/us/en/community/junos/script-automation/library/configuration/policy-test/ |
Summary
The SRX security policy system is extremely flexible and straightforward. We will use security policies in later chapters to perform functions such as VPN, IDP, UTM, and more. The SRX exemplifies why a zone-based firewall is a better choice than a traditional interface-based firewall, and with more granular security and less work involved in assigning levels of trusts to their various zones, will make your life as a security engineer much better.
Although the SRX policy system doesn’t have complete feature parity with NetScreen’s, Juniper continues to make progress with its large resource base that is working on the SRX. New features such as additional ALGs are being deployed regularly with no signs of slowing down.
Chapter Review Questions
How do you write a global security policy on an SRX?
When writing security policies for traffic that the destination is NATed to, which IP address would you put in the security policy—the true destination address or the NATed IP address?
What is the difference between
denyandrejectactions in a security policy?How do you view all active sessions from the 192.168.0.0 subnet?
How do you filter denied traffic to a file called Deny_log?
What are traceoptions and why would you use them to troubleshoot security policies?
What are ALGs and what do they do?
How can you, as the SRX administrator, limit access to specific network segments during nonbusiness hours?
At what step does firewall policy lookup take place in the SRX flow process?
What is the difference between a fast path and a slow path?
Chapter Review Answers
Global security policies are not supported on the SRX. They are a legacy NetScreen feature and are not available today on the SRX platform.
Destination NAT is applied before security policy is evaluated. As a result, all security policies must be written for the NATed address. Source NAT is applied after the security policy is evaluated and should be written for the nontranslated IP address.
The
denyaction will silently drop the packet, whererejectwill send back an ICMP Port Unreachable to the source IP address. Thedenyaction is usually the preferred method, unless it’s critical that the source IP address be notified that its traffic has been dropped by a firewall.To view all active sessions from the 192.168.0.0 subnet, use either:
juniper@SRX5800>
show security flow session source-prefix 192.168/16or:
juniper@SRX5800>
show security flow session source-prefix 192.168.0.0/16Either method is acceptable.
To filter denied traffic to a file called Deny_log, first you will need to ensure that the security policy has logging enabled. Without that, nothing will be sent to the local syslogs. Once that is complete, you’ll need to specify a syslog file and filter for the
RT_FLOW_SESSION_DENYstring:[edit] juniper@SRX5800#
set system syslog file Deny_log any any[edit] juniper@SRX5800#set system syslog file Deny_log match "RT_FLOW_SESSION_DENY"Traceoptions are much like debugs on the NetScreen platform. Traceoptions will monitor and record the packet as it’s evaluated through the various stages of packet processing. You can use traceoptions to verify that a packet is arriving on the correct interface and is being evaluated by the correct policy. You can also use traceoptions to ensure that the correct action is being taken (deny, permit, IDP, etc.) and to verify return traffic.
Application layer gateways are Layer 6 and Layer 7 inspections of certain protocols by the SRX. They are used to assist with certain applications that have problems with stateful firewalls, and can be used to provide an additional layer of application security. ALGs monitor the control channel of a data connection for specific information so that the SRX can dynamically handle firewall pinholing and NAT translation.
This is a perfect example of when to use policy schedulers. Policy schedulers can control when traffic is allowed (or denied) to network segments or services. Using policy schedulers, an SRX admin could lock down the payroll servers during nonbusiness hours by writing a policy scheduler that only permits traffic from 8:00 a.m. to 5:00 p.m. Monday through Friday.
As shown in Figure 4-1 at the beginning of this chapter, security policy lookup takes place just after route lookup/destination zone lookup. It is critical to understand the flow processing, as it will often be used while troubleshooting traffic down the road.
As a packet arrives on the interface of an SRX, an existing session lookup takes place. The SRX looks at the packet and tries to match it to an already established connection in the session table. If one is found, the SRX sends it down the fast path. If no session match is found, it is sent down the slow path.
When a packet is sent down the slow path, the SRX must initially perform several checks when the new session is created, such as NAT, route lookup, and policy lookup, among others. Once those have been completed and the traffic is permitted, the SRX will build a session in the session table and all additional packets for that connection will take the fast path.
The fast path just does some basic TCP checks and screens to ensure that everyone is playing nicely on this already allowed connection. Additionally, the SRX will do some ALG processing, and if an action such as IDP of VPNs exists, the action will also be processed.
Get Junos Security now with the O’Reilly learning platform.
O’Reilly members experience books, live events, courses curated by job role, and more from O’Reilly and nearly 200 top publishers.

