Chapter 13. Intrusion Prevention
Although stateful firewall technology is a powerful mechanism for controlling cyberthreats and preventing denials of service, controlling targeted exploitation requires deeper inspection and control of the application layer traffic itself. The SRX platform integrates the power of stateful firewalling, routing, NAT, and VPNs, along with the power of Juniper IDP technology, into a single unit. Make no mistake: this is true IPS, not a subset of inspection capabilities, and it’s all done within integrated network purposed hardware so that additional types of components are not needed.
This chapter details the Juniper IPS functionality built into the SRX. It starts with an overview of IPS—what it does, why it’s necessary, and how it compares to other technologies, including Juniper’s legacy platforms. Then we look at how to configure, operate, tune, and troubleshoot the IPS on the SRX, and explore some of the features that have been introduced since the Junos Security series book was released. As with all the chapters in this book, questions at the end of the chapter should help those taking Juniper’s security certification to prepare for their exam.
The Need for IPS
Despite what some flashy vendor advertisements and blogs might say, stateful firewalling is not dead, nor will it be anytime soon. Stateful firewalling provides a core layer of security to ensure that network traffic is restricted to only that which a policy dictates from the networking layer and the transport layer (Layers 3 and 4, respectively). It also goes a step further to ensure that the exchanges follow the exchanges that are expected in Layers 3 and 4.
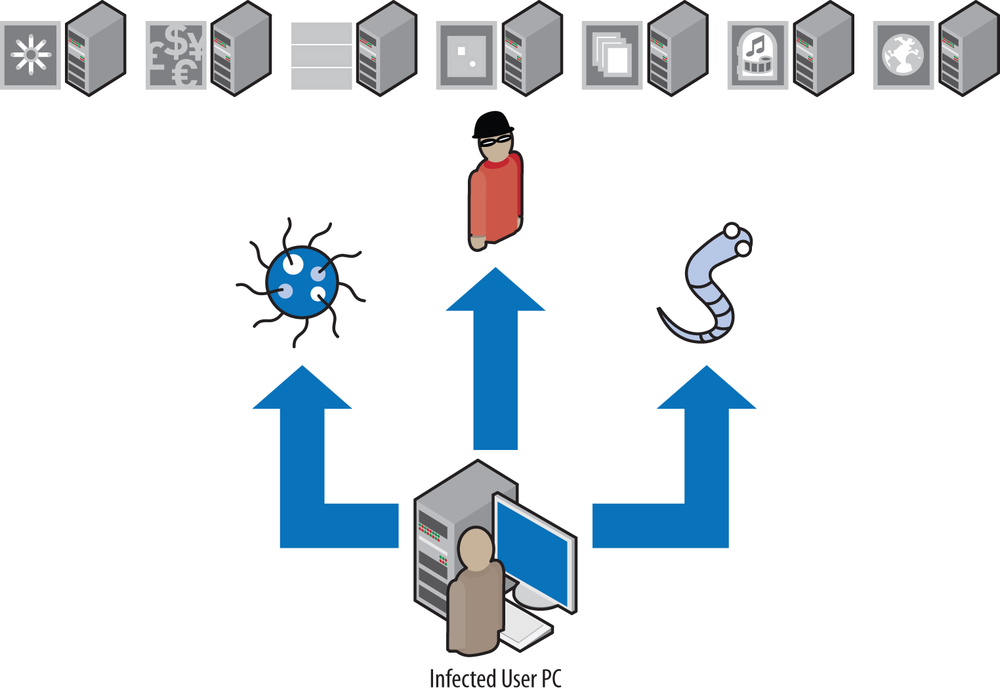
This is a critical layer of network security; however, it should not be the only layer of network security you apply to protect a network infrastructure. The problem with stateful firewalling by itself is that it can go only so far to limit which source IP addresses can communicate to which destination IP addresses, and on which Layer 3 and Layer 4 protocols the communication can be exchanged (see Figure 13-1).
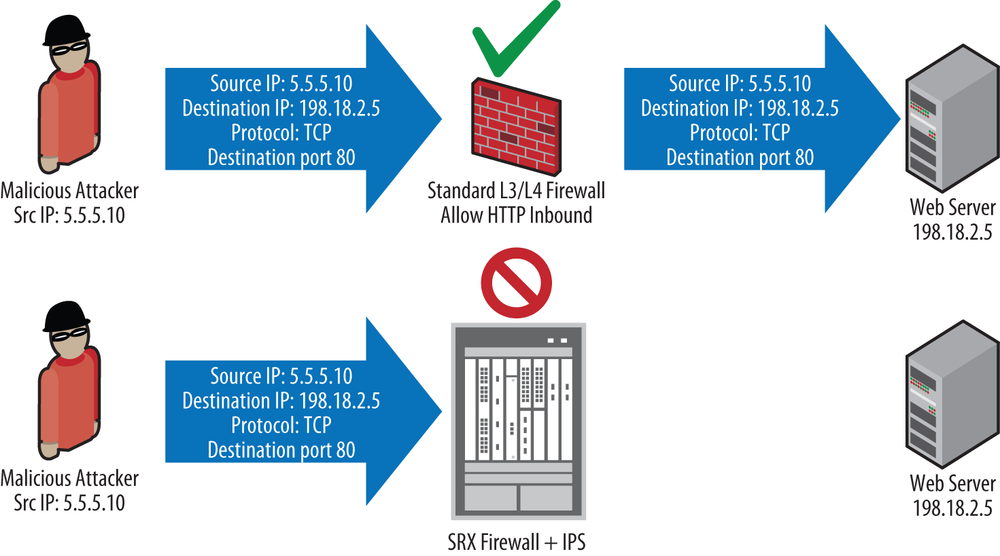
Stateful firewalling cannot actually limit what can be exchanged within the channels of permitted Layer 3 and Layer 4 communication. For instance, if your organization hosts a public web server to serve as the portal for the Internet (say, to get information about your company), assuming you’re using standard ports and protocols, you would need to open a firewall rule that would allow any source IP address to be able to connect to the destination IP address of your web server on TCP port 80. From that perspective, the firewall would ensure that (barring no additional configuration to permit otherwise) only Internet connections to your web server on TCP port 80 would be allowed (no FTP, DNS, SMTP, SMB, etc.).
What About Application Firewalling in NGFW?
There has been a lot of splash over the last few years about the capabilities of application firewalling that has been introduced into firewalls. It is most certainly a very useful feature, and we offer it as a feature in the SRX itself. Juniper’s approach, however, isn’t to make your security policy revolve around the ability to identify applications. Just like we don’t forsake firewalls even though we have IPS (which in a perfect world would remove the need for the access control that firewalls provide because we could just block the threats), we know that stateful firewalls are still a critical part of network infrastructures and probably will be for the foreseeable future. Application firewalling definitely plays an important role in controlling what applications can communicate over the network, but it does nothing to prevent attacks at Layers 3 through 7; it just controls what applications can communicate.
As shown in Figure 13-2, limiting access to only the essentials is very important both from a TCP/IP perspective and a Layer 7 perspective; however, the capabilities of stateful and application firewalling alone do little to control what is actually exchanged within these connections. You can make the analogy that IPS is to networking what airport screening checkpoints are to physical security (although we like to think that network-based IPS can do an even better job than airport security, and won’t take your 3.5-ounce bottle of shampoo away either). In airport screening, not only are you inspected to determine where you are coming from and where you are going, but also your contents are searched via a combination of X-rays, metal detectors, chemical analysis, and sometimes airport security personnel. Although determining where you are coming from and where you are going might be important to security at some level, the items you carry with you are also extremely important to security. Computer networking is no different from physical airport security in the need to inspect and secure communications.
Luckily, although the task of security computer network communications is daunting, powerful tools within the SRX exist to make this task practical.
How Does IPS Work?
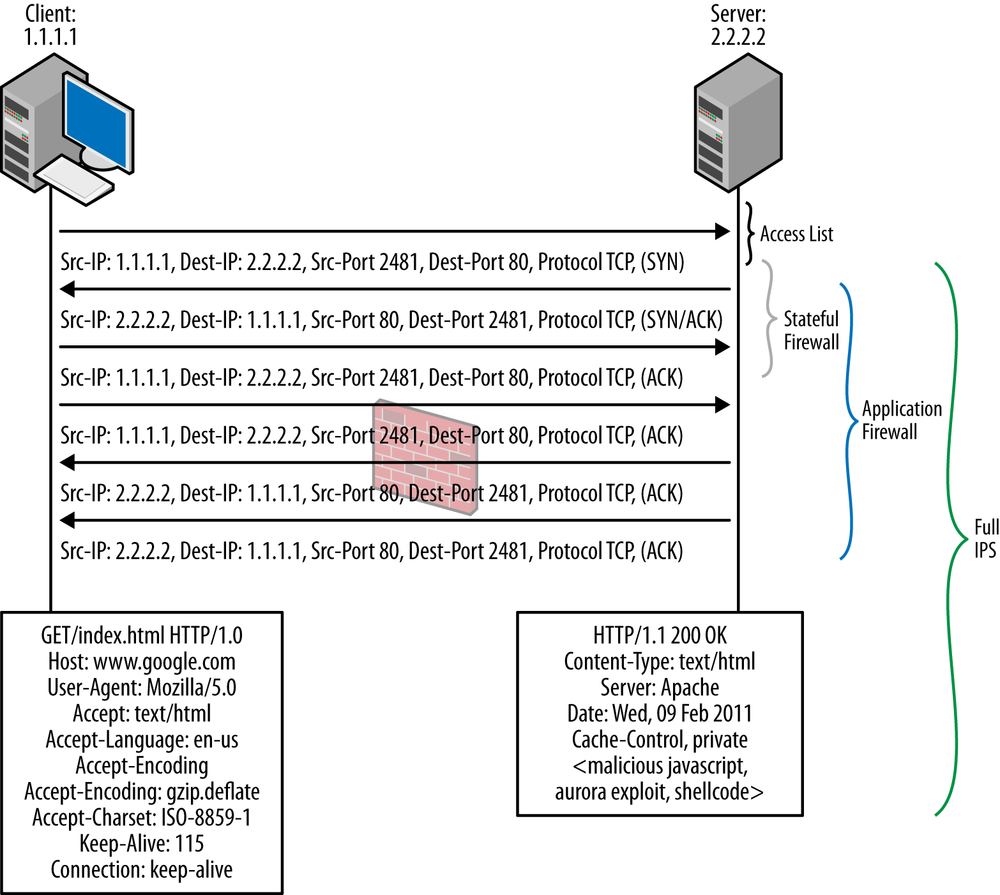
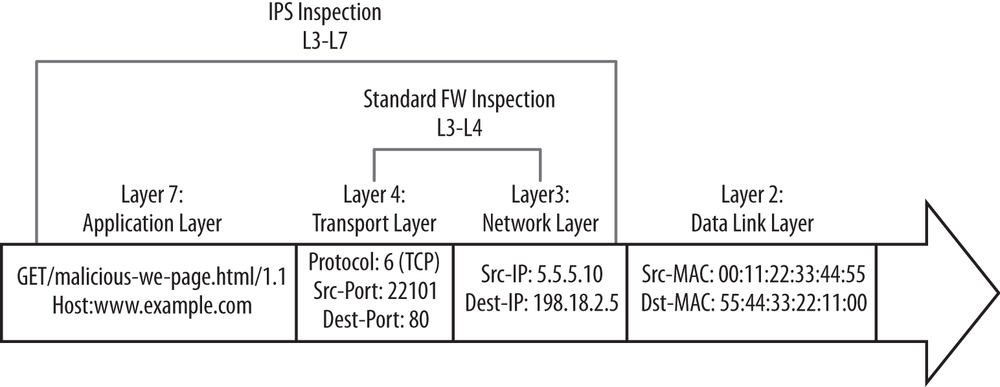
At a high level, IPS works by scrutinizing all of the bits contained within packets to look for both known and unknown attacks, as shown in Figure 13-3. Traditional firewalls primarily look only at Layers 3 and 4 when it comes to security, and ignore the actual contents of the payloads themselves. This makes for efficient processing, which can be accelerated in hardware, but it alone does not provide protection for traffic that is permitted by firewall policies.
So, why do we still need stateful or application firewalling at all if we can just use IPS to ensure that traffic is “scrubbed” to only permit desired traffic, regardless of where it comes from or what port it is on?
That’s an excellent question, and one that some vendors claim the use of their IPS products will answer. The fact of the matter is that no security is perfect, and although in a perfect world using only IPS might be a valid solution, this is not a perfect world. By utilizing Level 3 through Level 7 firewalling as layers of security, you can weed out undesired traffic early in the process so that you don’t have to use any more resources than are necessary for processing traffic that you know early on you don’t want. It’s important, because IPS is a very computationally expensive process that cannot be easily assisted through the use of ASIC-based inspection. By blocking traffic early on, you ensure that neither the IPS nor the destination servers have to process traffic unnecessarily. Resources are always going to be finite, and often expensive.
Note
Eliminate processing of undesired traffic as early in the process as possible to ensure that no more resources than necessary are required.
Licensing
Licenses are required to download the Juniper attack objects and policy templates. If you are just using the IPS functionality and you want to only use your own attack objects, you can do so without the need for a license (although you will see a license warning).
At the time of writing this book, the IPS licenses are based on an annual subscription model, available in one-, three-, or five-year increments. The licenses can be purchased by themselves, or bundled with AppSecure and other UTM features. There is no variability in functionality with IPS. If you buy the license, you get the full capabilities.
Note that if the license expires, the ability to download attack object updates is prevented, but you will still be able to run IPS in its current state. Contact your Juniper reseller for information on getting licenses.
IPS and UTM
If you have IPS, do you still need UTM? The short answer to this question is “yes”; as mentioned previously, best practice dictates that IPS is not a substitute for antivirus or URL filtering, as they each fulfill a different need. IPS is primarily based on detecting attacks in network streams, and although it does some level of file level parsing, or can be used to block access to different websites, that’s not its primary function. Instead we focus the IPS capabilities on looking for known and unknown exploits and anomalies in the traffic streams. Antivirus software is used both to identify known viruses in files exchanged over the network, along with providing a reputation feed for known malicious Uniform Resource Identifiers (URIs) where malware is being served, so that even if the specific virus isn’t known, the system can still provide protection. URL filtering, on the other hand, also provides a layer of protection that can prevent you from going to other sites that might be malicious or affect productivity. Although the database does have an overlap in functionality as antivirus protection, it is never a bad idea to rely on two different types of detection.
Cyberthreats come in many different forms, but let’s classify them as network-based or file-based protection.
Traditionally, IPS is primarily concerned with network-based threats and securing communication between different hosts, as shown in Figure 13-4. File-based protection is another story. Although files can certainly be exchanged over networks, they can also be exchanged through other mechanisms such as USB drives, CDs, DVDs, and sometimes secure communication channels such as IPsec VPNs that are not terminated on the IPS itself. This is true both for network-based antivirus servers and for IPS.
True security is best executed by providing layered security (see Figure 13-4); that is, using IPS for what it is best at, by securing communications between hosts, but on those hosts providing additional security through the use of host-based IPS and antivirus protection. Network-based antivirus software is an excellent perimeter tool as well, but just like IPS, it doesn’t completely remove the need for host-based protection, because it is often difficult to inspect encrypted files and not all files might be exchanged over the network.
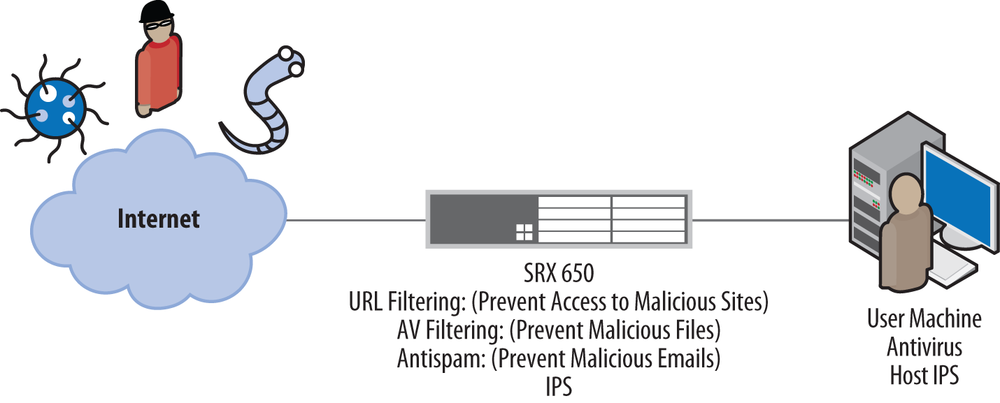
Although the SRX does not focus on inspecting the contents of files, most contemporary threats try to spread themselves over the network, or “phone home” to command and control servers. Here the SRX can be used to not only identify these types of infection and control attempts, but also to actually block them and alert administrators to this activity (see Figure 13-5).
What Is the Difference Between Full IPS and Deep Inspection/IPS Lite?
Previous generations of Juniper firewalls such as the NetScreen and SSG Series (along with many other competitors) offer deep inspection or IPS lite functionality. This provides a limited subset of inspection capability by inspecting the traffic at Layer 7, but it is for only a handful of signatures. Deep inspection/IPS lite does not provide full inspection; therefore, it isn’t really geared toward true security, and it has become more of a checkbox security feature that auditors tend to look for. If you are truly concerned about providing real security for your environment, full IPS should be a requirement. When evaluating solutions, it is important to determine exactly what level of IPS is performed. On the SRX platforms (from the SRX100 to the SRX5800), IPS is a full-featured inspection technology that cuts no corners.
Is It IDP or IPS?
Many SRX administrators might be familiar with the previous generations of IPS products offered by Juniper Networks, including the standalone IDP appliance and the ISG with IDP security modules. In the past, these products referred to IPS functionality as IDP, which originated from OneSecure (developer of the first IPS [rather than IDS] platform). OneSecure was later acquired by NetScreen, which was acquired by Juniper.
To move more in line with industry-standard terms, Juniper Networks has begun to call its IDP IPS. You can still find a lot of references to IDP in the SRX configuration, but over the lifetime of this book, this will be migrated to IPS.
Note
Juniper does not typically change CLI configuration statements without a formal process, so for the short and medium terms, you might notice that IDP is referenced rather than IPS. You can effectively refer to these terms equally.
False Positives and False Negatives in IPS
Some network administrators are wary of IPS because of the risk of false positives. A false positive is when something legitimate is detected as something malicious. If the administrator has configured protection against malicious attacks, it is likely that IPS might actually block legitimate traffic, which we all know can cause a few headaches. A false negative is when a real attack is deemed as legitimate traffic, and therefore is not detected. False negatives are as much a concern as false positives, although without an IPS in place, they would get through anyway.
False positives occur for several reasons, one of which might be that it isn’t a false positive at all; that is, the IPS might detect the traffic accurately as it is instructed to do. Often, particularly in the case of protocol anomaly protection, if a vendor does not follow a standard implementation (e.g., an RFC or manufacturer spec) of a protocol, the IPS detects this as an attack, just like it is programmed to do. In other cases, a signature might be too broad in detection and could identify both malicious and legitimate traffic. Finally, false negatives might occur because the IPS isn’t actually inspecting for such activity, the detection might be disabled, or the signatures might not detect particular iterations of an attack.
The good news is that the SRX goes to great lengths to minimize both false positives and false negatives, and this chapter details how the SRX does this through the use of intelligent application matching, protocol decoding, and context-based inspection. This chapter also discusses fine-tuning of the SRX so that you can minimize occurrences of false positives.
Management IPS Functionality on the SRX
Administrators familiar with prior generations of Juniper IPS products such as the standalone IDP appliance and the ISG with IDP security modules know that the Network and Security Manager (NSM) management platform was required to manage the IPS functionality on the IDP and ISG, respectively. The SRX is different in that it does not require the NSM for any IPS functionality at all, although the NSM can certainly manage the SRX IPS functionality. The SRX allows you to fully manage the SRX IPS via the CLI, and most functions are available via J-Web and Junos Space/Security Design. The STRM platform also has plenty of predefined log views, offenses, and reports for the Juniper IPS product, including the ability to collect PCAPs generated from SRX attacks. In the future, this will likely be added to the central management solution Security Insight as well.
Note
You can view the contents of IPS attack objects online in the Juniper Security Portal including updates to the Attack Database at this link.
Stages of a System Compromise
Understanding the stages of an attack is critical to being able to provide comprehensive security. Many security books go into great detail regarding the different stages of an attack, but for our purposes let’s simplify them into four common stages or aspects of an attack. Note that not all stages are necessary for an attack, but they are common to most attacks.
- Reconnaissance
The first phase of an attack typically identifies vulnerable hosts. Often, this includes port scanning, banner grabbing, and other techniques to get information to leak from the system regarding what platform it is and its respective software. Active reconnaissance is often the case when it comes to client-to-server-based attacks where the attacker actively targets a client directly. With most machines behind a firewall these days, the attackers cannot directly reach out to the clients. Instead they will employ other tactics like phishing emails, injecting malicious content into legitimate sites, and even DNS poisoning to set the stage for a client to go to a malicious site that they control (typically via HTTP) to attempt to compromise the client.
The SRX can help to protect against different types of sweeps and scans through the use of Screens, but also there are a large number of attack objects in the IPS that are associated with information leakage attempts. The SRX also provides a great number of known malicious attack objects that you can leverage to prevent such stages, including drive-by downloads from the server-to-client perspective. You can also use IP actions (discussed later in this chapter) to shun traffic from sources that are attempting such reconnaissance techniques.
- Vulnerability exploitation
Once a vulnerable system is identified, the attacker tries to exploit the vulnerability in the system. There is a lot of confusion about this stage, because technically, the vulnerability exploitation does one of two things: it crashes the system or service (a DoS attack) or it changes the control of execution on the system. As part of the latter case, the attacker often injects code known as shellcode, which allows for further exploitation.
The SRX provides comprehensive protection of vulnerability exploitation with thousands of attack objects that protect against exploitation using both protocol anomaly and signature-based attack objects. These attack objects can protect against both attacks that cause a system or service to crash and attacks that try to compromise the system.
- Shellcode execution
Assuming that the attack is meant to compromise the system rather than simply crash it, the attacker typically injects shellcode as part of the vulnerability exploitation stage. Shellcode is code that is executed in place of the regular application to further compromise the system. Examples of what shellcode can do include opening a backdoor on the system, creating outbound control connections, modifying the system by creating users or elevating access, and injecting malicious applications. Without the use of shellcode, the exploited system would not likely be compromised (controlled) even if the vulnerability was exploited.
Not only does the SRX detect and prevent the exploitation of vulnerabilities, but it can also detect shellcode, so even if it somehow missed the actual exploit, it would likely be able to detect the shellcode. Numerous shellcode attack signatures can be blocked in addition to the actual exploit itself.
- Privilege escalation
Once an exploit has occurred and shellcode is executed, the shellcode is running in the context of the process that it compromised. If it is a system-level vulnerability, then privilege escalation is not usually necessary, but often this is not the case (e.g., compromising a web browser on a client machine). To gain broader control, another exploit must be used to compromise the local machine and escalate the privilege that the shellcode is running with. This stage of the attack is not detectable by the IPS because it doesn’t occur over the network but is local to the compromised machine. This is where both proper patch management and host-based antimalware defenses can help to detect and protect against these types of escalations.
- Infection attempts/phone-home traffic
Once a system is compromised, it typically tries to infect other machines, phone home to the control servers, or do both.
The SRX can detect these infection and phone-home techniques, depending on the nature of the infection method and the communication to the command and control system. The SRX can often detect attempts to infect other machines, with the ability to block those attempts and identify compromised machines. Additionally, the SRX might be able to identify command and control and phone-home traffic. Sometimes this traffic is encrypted, so the SRX might not be able to identify what the machine is controlled by, but the SRX can identify encrypted traffic streams (and block them if so desired).
As you can see, the SRX can do quite a lot to prevent attacks, minimize their impact, and identify and control the spread of machines that could be infected (e.g., a laptop that is infected in a foreign network). By implementing a layered security approach, the SRX can offer real security to the networks that it protects.
IPS Packet Processing on the SRX
To understand how IPS processing on the SRX works, you must first understand where IPS sits in the path of packet processing, what components are utilized for IPS processing, and the actual composition of the IPS functionality itself. Let’s examine how SRX IPS fits into the big picture of your network security exactly in that order.
Packet processing path
We already discussed the packet flow on the SRX when it comes to session setup, steady state processing, and session close. Now let’s focus in more depth on what happens to packet processing in terms of the IPS. It is important to remember that for the high-end SRX, a session is always anchored to a single SPU for the duration of its lifetime. The same holds true in the case of IPS. IPS is always going to be inspected on the same SPU as that of the firewall flow. Unlike previous generations of Juniper IDP platforms and many other vendors’ products, the SRX does not require special hardware to perform its IPS processing. Instead, all IPS services are processed in the SPU itself. If additional IPS processing power is required, the administrator need only add additional SPUs.
Note
In the case of the branch SRX Series, there is only one network processor where all processing is performed.
The SRX IPS functionality is tightly tied to its firewall functionality.
Note
In the case of the branch SRX Series, if packet mode is used, that traffic cannot be inspected by the IPS engine. At the time of this writing, the high-end SRX does not support selective processing; it only supports flow mode.
Figure 13-6 illustrates a high-level flow chart of how packet processing operates in the SRX with regard to the different services. Note that IPS is one of the last things to be processed in the services chain. That means if the traffic is not permitted by a firewall policy (which must also reference it to be inspected by IPS), the traffic never hits the IPS engine. This is intentional, because you don’t want to burden the IPS with inspecting traffic that is ultimately going to be dropped by some other mechanism anyway.
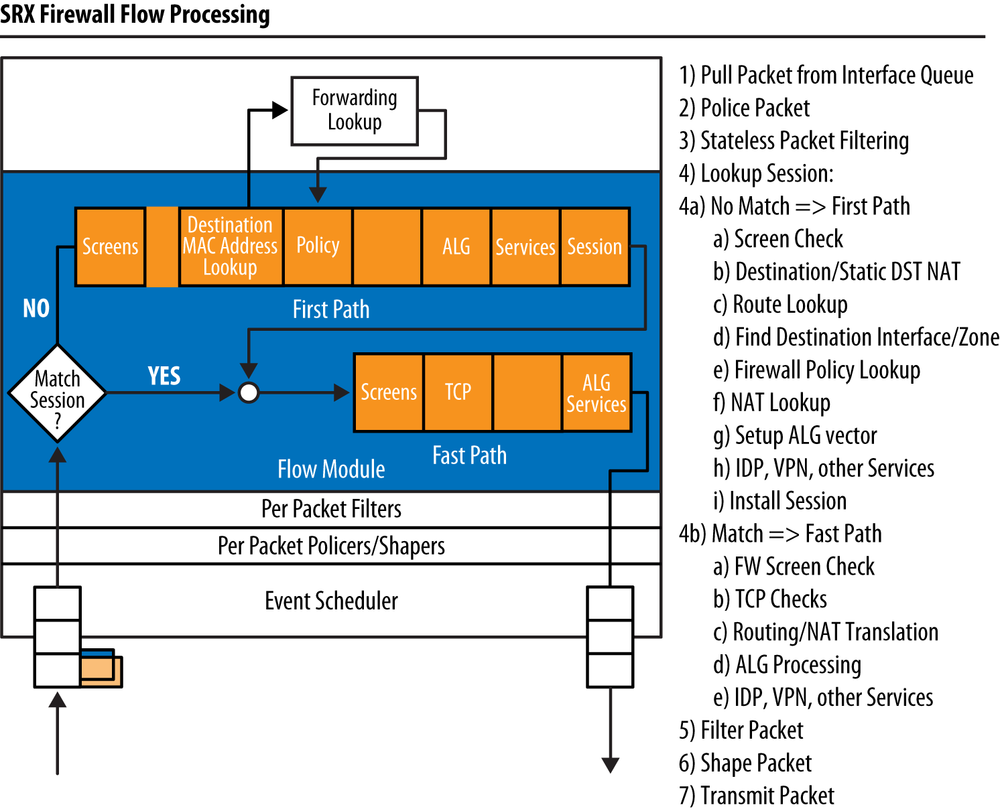
One of the great things about the SRX IPS implementation is that it offers a great deal of granularity. Unlike many other vendors’ implementations, the SRX allows you to enable IPS processing on a firewall rule-by-rule basis, rather than just turning on inspection across the board. This means traffic that is not marked by a firewall rule to be processed by IPS completely bypasses the IPS. Traffic that is marked for IPS processing is then handed off to the IPS engine.
Note
In addition to referencing IPS processing on a firewall rule-by-rule basis, within the IPS rulebase you still have extremely granular rulebase control over how the IPS is enforced. We cover this in depth later in the chapter.
As mentioned, all IPS-bound traffic must be processed by the stateful firewall flow engine first (known as flowd). For now, suffice it to say that if the IPS engine needs to process traffic, the traffic will be handed off after the firewall has completed its processing (and only for permitted traffic). Within the IPS engine there are several stages of processing, as illustrated in Figure 13-7.
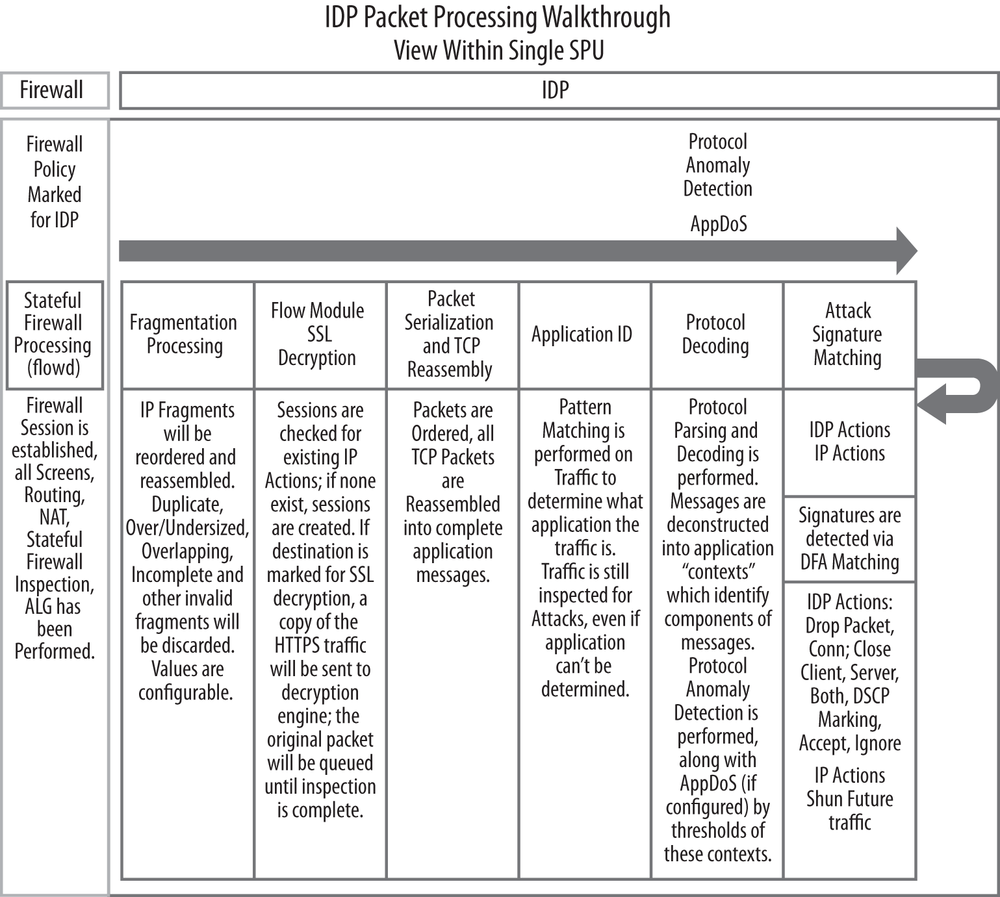
IPS processing on the SRX can be broken down into eight general stages of processing:
- Stage 1: Fragmentation and serialization processing
The first thing that must happen before you can really get to the inspection is that the SRX must process fragmented traffic (if present). To ensure that common IDS evasion techniques using fragmentation are not effective, it rebuilds any fragmented traffic from a Layer 3 perspective. This stage also provides countermeasures against fragment-based attacks such as missing fragments, underlapping or overlapping fragments, duplicate fragments, and other fragment-based anomalies. Many of these values are also configurable in the IPS sensor configuration section, although defaults should suffice in most cases. Most of the fragmentation processing takes place in the flowd engine today outside of the anomaly inspection.
- Stage 2: IPS flow setup
After any Layer 3 fragments are processed, the SRX examines the traffic to see whether it has an existing session for it or if there is an existing session that might need some special processing. The IPS session table is different from the firewall session table, because additional IPS state related to the traffic is required.
- Stage 3: SSL decryption (if applicable)
If SSL decryption is configured, and traffic is destined to a web server that is configured to be decrypted, decryption happens in this phase. Note that SSL Reverse Proxy takes place after application identification if it detects the application as SSL.
- Stage 4: Reassembly
For accurate IPS processing, all messages must be processed in order, in a flow, and the messages must be reassembled if they span multiple packets. Without reassembly, an IPS engine can be easily evaded, which would result in lots of false positives. The SRX IPS engine ensures that before traffic is processed, it is ordered and reassembled in this stage of the processing.
- Stage 5: Application identification
The SRX has the ability to detect what application is running on any Layer 4 port. This is important because it allows the device to determine what traffic is running in a given flow regardless of whether it is running on a standard port. Even if the application cannot be identified, the SRX can still inspect it as a bytestream. This stage typically happens within the first couple of kilobytes of traffic, and the SRX uses both directions of the traffic to identify the application. If SSL Forward Proxy is enabled, it will take place after application identification has identified the traffic as SSL and proxy is enabled.
Note
Starting with Junos 10.2+, the AppID module has been moved from IPS to flowd to provide support to all other components that wish to subscribe to its application identification data like AppFW, AppQoS, SSL Proxy, and so on.
- Stage 6: Protocol decoding
Once the application is identified (or is simply classified as a stream), the SRX decodes the application from a protocol level, a process known as protocol decoding. Protocol decoding allows the SRX to chop up the traffic into contexts, which are specific parts of different messages. Contexts are very important to IPS processing because they allow the SRX to look for attacks in the specific location where they actually occur, not just blindly by byte matching across all traffic that passes through the SRX. After all, you wouldn’t want the SRX to block an email conversation between you and a peer discussing the latest exploit; you would only want the SRX to block the exploit in the precise location where it actually occurs. At the time of this writing, the SRX supports almost 600 application contexts. Contexts are one of the ways that the SRX seeks to eliminate false positives. The protocol decoding stage is also where the SRX performs protocol anomaly protection. Anomaly protection is enabled just like any signature based on enabling an attack object that is of the protocol anomaly type.
- Stage 7: Stateful signature detection
The attack objects that rely on signatures (rather than anomaly detection) are processed in the stateful signature stage of the device’s processing. These signatures are not blind pattern matches, but are highly accurate stateful signatures that not only match attacks within the contexts in which they occur, but also can be composed of multiple match criteria (using Boolean expressions between individual criteria). Typically, the attack signatures do not seek to detect a specific exploit, but rather protect against the vulnerability itself. This is important because attack exploits can vary, so writing signatures around a particular exploit is not a great tactic, but protecting against the actual vulnerability is much more powerful.
- Stage 8: IDP and IP actions
Once an attack object in the IPS policy is matched, the SRX can execute an action on that specific session, along with actions on future sessions. The ability to execute an action on that particular session is known as an IDP action. IDP actions can be one of the following: No-Action, Drop-Packet, Drop-Connection, Close-Client, Close-Server, Close-Client-and-Server, DSCP-Marking, Recommended, or Ignore. IP actions are actions that can be enforced on future sessions. These actions include IP-Close, IP-Block, and IP-Notify, which we cover in more depth later in the chapter.
Direction-specific detection
One theme in IPS processing that reoccurs throughout this chapter (and in other references) is the notion of client-to-server versus server-to-client traffic. There are typically two directions of traffic flow in modern client/server applications (with the exception of, say, multicast, which is primarily the multicast server sending to the clients). The client is always considered the device that initiates the connection (the source) and the server is the device that is accepting the connection (the destination). This is true even if the client is uploading data to the server.
This is important to know as an IPS administrator, and it’s very important for creating custom attack objects. With that explanation, let’s explore the significance of client-to-server versus server-to-client attacks:
- Client-to-server attacks
These are what most administrators think IPS does, which is to protect their server infrastructure from attacks generated by malicious clients to compromise or DoS a system. These attacks primarily work only when the client has access to the server, and firewalls can help mitigate access to unnecessary services on that server. IPS can help to detect and prevent attacks that are generated on permitted services (such as a web server listening on HTTP, TCP port 80).
In this case, the attack is in the traffic generated from the client-to-server direction.
- Server-to-client attacks
Although attacking servers with client-to-server attacks allows attackers to pick their targets, most organizations use firewalls to limit inbound connections to only necessary systems wherever possible. As a result, attackers have changed their tactics, because they can’t directly connect to the assets they are trying to compromise. Now, attackers make their victims come to them. There are many different ways to get a victim to come to the attacker (e.g., spam emails with malicious links, social networking, and other social engineering-based attempts). An example of this type of attack is when an attacker is running a web server that serves malicious HTML pages that exploit a JavaScript vulnerability in Internet Explorer, such as the Aurora exploit. Although the attacker might not always have control over which victims visit this malicious site, she typically doesn’t have to worry about firewalls blocking this access because users are usually allowed to make connections outbound.
In this case, the attack is in the traffic generated from the server-to-client direction.
SRX deployment options
Traditionally, there are a few different modes for deploying an IPS in the network. In the past, often an IPS was a device that sat transparently in the network, simply inspecting traffic as it passed through. Another option was that you could use sniffer mode, which passively listened for out-of-band attacks from the network traffic. This is typically accomplished via SPAN port or network tap. Rarely was an IPS deployed in routed mode, although some standalone IPS systems support that.
The SRX is a different story, because it is a full-featured router, firewall, and IPS device that can serve all of these needs.
Note
One thing that is missing on the SRX at the time of writing this book is support for explicit sniffer mode. You can still accomplish sniffer mode with a bit of a workaround by mirroring traffic to an SRX and putting the interface on the SRX in promiscuous mode. We examine how to configure this later in the chapter.
Attack Object Types
Attack objects can be categorized into two different types: protocol anomaly and stateful signature-based attack objects. Both types of attack objects come bundled with the SRX signature updates and provide security against both known and unknown (zero-day) attacks.
- Protocol anomaly attack objects
These are predefined objects developed by the Juniper Security Team to detect activity that is outside the bounds of a protocol. Typically, the enforcement for what is considered acceptable behavior for protocols is based on an RFC specification or a manufacturer spec if there is no RFC. Protocol anomaly detection is built into the detector engine and is not based on any specific pattern. Administrators cannot create protocol anomaly objects, as this is code that is built into the detector engines; however, you can configure custom attack objects that utilize protocol anomaly objects as part of a compound attack object. If you determine there is a specific type of behavior protection that you need, you can email the Security Team (signatures@juniper.net) with descriptions and preferably PCAPs so they can examine if this can be covered by an anomaly.
- Signature-based attack objects
These are provided by the Juniper Security Team along with protocol anomaly attack objects, firmware, and detector engine updates. Signature-based attack objects are attack objects that actually match specific patterns through the use of a regular expression engine. The use of a regular expression engine provides the ability to match a range of patterns rather than a specific pattern. Additionally, a single attack object can be composed of multiple patterns that can be evaluated as a Boolean expression to make complex matches. As mentioned earlier in the chapter, signature-based attack objects are stateful signatures that match the attack object within the specific location in which it actually occurs in the attack itself (known as a context). You can create custom signature-based attack objects to use alongside predefined attack objects, as we discuss in the section Custom attack objects and groups later in this chapter.
Application contexts
To aid in the accuracy and performance of IPS inspection, the SRX uses a concept called contexts to match an attack in the specific place where it occurs in the application protocol. This helps to ensure that performance is optimized by not searching for attacks where they would not occur, and it limits false positives. There could be many contexts within a single message. The SRX supports about 600 contexts at the time of this writing. Here is an example of an HTTP header message and the associated values and contexts (in bold, not found in the actual message) in that message:
GET /index.html Http1.1http-get-urlHost: www.company.comhttp-header-hostAccept: image/gif, image/x-xbitmap, image/jpeg, image/pjpeghttp-header-acceptAccept-Language: enhttp-header-accept-languageAccept-Encoding: gzip, deflatehttp-header-content-encodingUser-Agent: Mozilla/4.0 (compatible; MSIE 5.5; Windows NT 4.0)http-header-user-agent
Juniper maintains documentation that describes all of the different contexts and their associated function. You can find the documentation by searching the Juniper Support Knowledge Base.
Predefined attack objects and groups
Juniper provides predefined attack objects (both protocol anomaly and signatures) individually and in predefined groups to customers who have active licenses. The predefined attack objects cannot be edited for the most part; however, you can use these as a basis for creating custom attack objects. At the time of this writing, there are more than 9,000 predefined attack objects, and the number is growing every day as new threats emerge. Another feature of Juniper predefined attack objects is that customers can view the actual patterns that are used for signature-based attack objects. Many other vendors keep their signatures closed, which affects customers because they cannot view how the IPS is matching patterns (particularly with pattern matching). Juniper keeps only some signatures closed, if they are providing protection prior to when the vendor has a chance to patch the vulnerability, to ensure that the protection is not going to impact the community.
Custom attack objects and groups
In addition to the vast number of predefined attack objects that are provided as part of the IPS license, you also have a great deal of control over creating your own signature-based attack objects in the SRX. Additionally, you can create custom objects for application identification on the SRX so that you can identify not only custom attacks, but also custom applications. We covered this in greater detail in the section Attack Object Types.
Two types of custom attack groups can be configured in the SRX: static attack groups and dynamic attack groups. The primary difference is that static attack groups are exactly that: you must manually add or remove any attacks into this group. The only thing that will change is if an attack object itself is changed as part of an update, and then its contents will be updated; otherwise, the group does not change. Dynamic attack groups give you the ability to define filters that select which attacks are added into the attack group. The filters can be complex and can consist of multiple factors to identify attack objects to be selected for the dynamic attack group.
Note
We discuss at length how to create custom attack groups (both static and dynamic), but custom attacks themselves are outside the scope of this book, as they are a more advanced topic that typically requires a good working knowledge of regular expressions. Custom attack examples and a custom attack configuration guide are available on the Juniper Knowledge Base.
Severities
Multiple severity levels are used to define the impact an attack can have on a system.
- Critical
Critical attacks are attacks that try to gain “root” level access to a system to crash the entire system. Critical attacks are also certain malicious evasion techniques that are clearly used for nefarious purposes.
- Major
Major attacks are attacks that try to gain “user” level access to a system to crash a particular service or application.
- Minor
Minor attacks are attacks that try to perform information leakage techniques, including those that exploit vulnerabilities to reveal information about the target.
- Warning
Warning attacks are attacks that are suspicious in nature, such as scans and other reconnaissance attempts. Juniper also might drop the severity of legacy attacks to Warning after they are no longer deemed a threat (e.g., Windows 3.1 and Windows 95 vulnerabilities).
- Information
Information attacks are not typically malicious activity, but rather can provide valuable information about activity on the network, such as applications that are running, potential vulnerable software, and best practice violations.
Signature performance impacts
A common question that many IPS administrators have concerns what impact different signatures have on the performance of their IPS (or in this case, the SRX). There is no simple answer to this question, in part because the impact that individual signatures have is not linear and based on the number of signatures, as some signatures have more of a performance impact than others. Generally speaking, the signatures that perform “context”-based matching are going to be the most efficient, as they only perform inspection based on specific locations of protocols; these would be followed by stream signatures, which inspect the entire stream up to a certain limit (e.g., 1 Kb). Signatures that inspect the entire stream for the duration of the session will generally have the worst performance. Juniper attempts to take the guesswork out of signature performance by classifying the signatures with the greatest impact on performance as being low-performing. These signatures are placed under the MISC category and also have a field called Performance. You can filter on the Performance values in dynamic attack groups, or just avoid the MISC signatures wherever possible.
It is important to understand that when you add signatures into the policy, regardless of whether you are permitting, blocking, or exempting them, you are performing inspection first and then determining what to do once an attack is found. For instance, the traffic is examined by the detector engine, and then it is examined again after a signature is matched based on what has been compiled into the policy. After a signature has been matched, the SRX will do a policy lookup to determine what the action should be for the respective traffic (based on the rulebase). This is the case regardless of the action or of whether it is exempted in the policy. The key takeaway is that by having a signature anywhere in the policy, you are going to take a performance hit for traffic matching that protocol. If you do not add an attack object into the policy, it will not be compiled into the policy, and therefore it won’t impact performance. As mentioned earlier, attack objects don’t all have the same performance impacts. Some signatures require more pattern matching than others, resulting in more computational cycles being spent on packet processing.
Understanding the performance impacts of the signatures is not meant to discourage you from deploying a sensible policy, but rather to empower you to understand how policies are impacted by their contents. When performance is the primary concern, you should craft your policy to only the essential attack objects that are necessary to inspect the traffic and provide adequate coverage. Rather than deploying a broad policy, you should create a policy that is very specific in the attack objects that are included. You can do this by using both static and dynamic attack object groups to select the signatures that should be added based on the components of the traffic itself. If your concerns are more focused on coverage rather than security, you can deploy a policy that has broader protection, but also signatures that are meant to provide protection or visibility for the traffic. As we progress through this chapter, we explore the mechanisms to configure and tune an effective policy for the SRX.
IPS Policy Components
A key feature that sets the SRX apart from other platforms that perform firewall and other services together is that the SRX provides extremely granular configuration and application of IPS inspection against processed traffic. The SRX offers exact control over what traffic is processed by the IPS engine, as well as within the IPS policy itself.
You should understand several components to create and apply effective security policies on the SRX, including rulebases, match criteria, actions, and packet logging. Let’s cover the various components and how to apply them.
Rulebases
The IPS functionality in the SRX is composed of rulebases. Each rulebase consists of rules that define what traffic to match, and then what action to take on that traffic. At the time of this writing, three rulebases are part of the SRX IPS policy:
- IPS rulebase
The IPS rulebase defines what traffic should be inspected and what measures should be taken for traffic that matches the IPS attack objects defined in the policy. This is the traditional IPS rulebase used to define attacks and other applications that are enforced by the policy.
- Application-DDoS rulebase
The Application-DDoS rulebase is part of the AppDDoS suite that is only offered on the high-end SRX at the time of this writing. The Application-DDoS rulebase essentially defines the policy to be enforced to protect servers from application-level DoS attacks. AppDDoS is only supported on the high-end SRX and is outside the scope of this book.
- Exempt rulebase
The Exempt rulebase complements the IPS rulebase and provides a simple mechanism to override detected attacks. The Exempt rulebase provides a rulebase for a single location to bypass actions taken by the IPS engine in the IPS rulebase. Rather than having to make a complex IPS rulebase with these overrides, the Exempt rulebase provides a separate location to do this so that the IPS rulebase remains clean and focused on the attacks. Most often, the Exempt rulebase is used to ignore false positives or certain attack scenarios—traffic is first matched in the IPS rulebase, but then also examined in the Exempt rulebase, and if it matches a rule in the Exempt rulebase, it is permitted and nothing will be logged. We cover examples of this at length later in this chapter.
Match criteria
Each rule has match criteria to identify which traffic will have a particular action applied to it. There are several components of the match criteria, many of which are also present in the firewall policy. These criteria are not redundant, as the firewall policy identifies what traffic is to be sent to the IPS engine, and then the IPS engine applies IPS inspection based on the contents of that traffic. The following criteria are evaluated as part of the different rulebases:
- From-zone
Matches traffic based on the zone from which the traffic originates. This can be used to match traffic arriving on a particular logical interface, including per-VLAN matching.
- To-zone
Matches traffic based on which zone the traffic is going to as it leaves the SRX. The to-zone is determined by a route lookup, or in the case of transparent mode, by a bridge lookup to determine what the egress interface is, and therefore the egress zone.
- Source address
The source address defines the IP address of the client and is defined in the address book for the respective from-zone. It is important to remember that IPS processing happens after NAT transformations, so you must configure your source address to match the translated addresses. You can use individual source address objects, address sets, or any combination of object and group in this field.
- Destination address
The destination address defines the IP address of the server and is defined in the address book for the respective to-zone. It is important to remember that IPS processing happens after NAT transformations, so you must configure your destination address to match the translated address. You can use individual destination address objects, address sets, or any combination of object and group in this field.
- Application
The SRX IPS engine has the ability to match attacks on any port for the given Layer 4 protocol (TCP/UDP). By default, an attack is tied to a particular application (Layer 4 protocol) that might or might not have a specific list of ports on which the application will be detected. When the IPS is set to match the application default, it inspects the traffic for specific protocols on the ports they are listed for in the
application-idobject for that attack. You can override checking for applications on the default ports on a rule-by-rule basis.- Attacks
The Attacks field defines what attacks to match as part of this rule. You can combine predefined and custom attacks within a single rule, along with using any combination of static or dynamic groups.
Then actions
On an IPS rule-by-rule basis, you can define what actions should be taken when the appropriate criteria are matched in the IPS engine. You can enforce two types of actions on the traffic: IPS actions and IP actions.
IPS actions perform an action on the offending traffic, whereas IP actions can take action on future sessions (e.g., preventing them). They are exclusive of each other, so you can configure one or the other, but it usually makes sense to configure IPS actions if you are using IP actions for a session. Additionally, you can configure logging and packet capture on a rule-by-rule basis.
The following lists define the IPS and IP actions available for the SRX. Note that these are available for the IPS rulebase, as the Exempt rulebase simply defines scenarios for which no action, logging, or attack counters should be triggered when an attack is matched.
IPS actions
The following IPS actions are available for the SRX:
- No-Action
No-Action means exactly what it says: no action will be taken on the session for this match. That isn’t to say that another rule might not perform a drop or close on the traffic, because even when a rule matches, the IPS processing is not complete. So, you need to be aware of the fact that even with a No-Action defined, that doesn’t mean other rules might not block this traffic.
- Ignore-Connection
Ignore-Connection means the traffic will be permitted, but also that the IPS engine will ignore the rest of the connection and will not process it at all. This is useful for identifying connections (e.g., custom applications) that you do not want to inspect. After a session has been marked Ignore-Connection, the IPS engine will not process it. It’s important to keep that in mind, because an attack could be present later in the connection, but the IPS would not see it. If you only want to ignore a specific attack, but not ignore the rest of the connection, either put that attack in the Exempt rulebase (recommended) or configure the rule with No-Action.
- Drop-Packet
Drop-Packet will drop an individual offending packet, but not the rest of the session. Typically, you want to use the Drop-Connection action when malicious activity is detected on a flow, but in some cases, you might just want to prevent a particular activity that might be contained within a session (e.g., a file transfer) without dropping the entire session. Of course, this is highly dependent on the application’s architecture, so when in doubt, either research the application or just use Drop-Connection. Drop-Packet might be useful for attacks that consist of only a single packet (e.g., SQL Slammer), but this isn’t very common. Note that Drop-Packet will not have any impact in inline tap mode, as the original packet (not the copied one to the IPS engine) has already made it through the SRX and will be recorded as action DISMISS in the logs.
- Drop-Connection
Drop-Connection drops all packets (including the offending ones) of a connection, so essentially, if an attack is triggered, all packets of the session will be silently dropped. This is effective for all supported protocols. If inline tap mode is used, the original offending packet might make it through, but all future packets are dropped by the SRX. Drop-Connection is useful for silently dropping the connection without alerting the client or server that the session is being dropped.
- Close-Client
If TCP is used as the protocol, the SRX can send a TCP Reset to the client (which will appear to be from the server, but is actually spoofed by the SRX) along with blocking all future packets in the flow. With the Close-Client option, the server will not be alerted that the session has been closed. This is useful when you want to protect a client from an attack from the server (e.g., an Internet Explorer exploit generated by the server). Because you are sending a TCP Reset, the web client won’t just sit there and timeout, but will immediately inform the user that the connection was reset. If the Layer 4 protocol of the flow is not TCP, and the action is Close-Client, the action will effectively be Drop-Connection, as there will be no TCP Reset, but the traffic for the offending flow will still be silently dropped.
- Close-Server
If TCP is used as the protocol, the SRX can send a TCP Reset to the server (which will appear to be from the client, but is actually spoofed by the SRX) along with blocking all future packets in the flow. With the Close-Server option, the client will not be alerted that the session has been closed. This is useful for protecting the server from client-based attacks such as resource utilization attacks against the server. By sending a reset, the server does not spend any more time holding the connection open and immediately closes the session out. If the Layer 4 protocol of the flow is not TCP, and the action is Close-Server, the action will effectively be Drop-Connection, as there will be no TCP Reset, but the traffic for the offending flow will still be silently dropped.
- Close-Client-and-Server
If TCP is used as the protocol, the SRX can send a TCP Reset to both the client and the server. The resets are spoofed by the SRX and appear to be from the client (from the server’s perspective) and from the server (from the client’s perspective). Additionally, the SRX blocks all future packets in the connection. This is useful when you want to close the connections and inform both the client and the server so that they don’t continue to retransmit packets or believe that the connection is still open when it really isn’t (which can cause application issues). If the Layer 4 protocol of the flow is not TCP, and the action is Close-Client-Server, the action will effectively be Drop-Connection, as there will be no TCP Reset, but the traffic for the offending flow will still be silently dropped.
- Mark-Diffserv
The SRX is capable of rewriting the DSCP bits of an IP header to a defined value within the IPS rulebase. This is useful if you want to use the IPS to identify applications such that upstream or downstream devices can perform QoS processing on the flows (e.g., on a router). At the time of this writing, the SRX does not honor the DSCP marking performed in the IPS engine because the classification phase of QoS on the SRX happens when traffic arrives, not after it has been processed by the IPS. DSCP marking is most useful for identifying actual applications from a Layer 7 perspective, which a standard router or switch would not be able to do. In the near future, and depending on when you are reading this, the SRX will be able to enforce its own DSCP policy along with shaping traffic based on the IPS policy.
- Recommended
Recommended uses the Whatever action and is defined within a predefined attack object (or within a custom attack object, whatever is configured by the administrator). Predefined attack objects come with a Recommended action set by the Juniper Security Team based on the nature of the attack and the suggested action to perform.
Notification actions
The following notification actions are available for the SRX:
- Log attacks
On a rule-by-rule basis, you can configure logging similar to how it is done on a rule-by-rule basis in a firewall policy. Additionally, the alert flag can be set to help security engineers identify significant events.
- Severity
The severity level can be configured on a rule-by-rule basis to signify events in the logs and to override the default severity levels defined within the attack objects.
- Packet logging
Packet logging is configured under the notification section of a rule and it is covered in detail in the next section.
Packet logging
The IPS packet logging feature is supported on the high-end SRX and is in beta for the SRX branch at the time of writing this book. The PCAPs are not stored locally, but rather are exported via DMI on the data plane to a PCAP receiver. Today, the STRM supports acting as a PCAP receiver that can integrate the IPS attack logs with the PCAP data for local viewing or for downloading for a packet viewing tool like Wireshark (see Figure 13-8).

The packet capture feature is flexible. You can configure it on an IPS rule-by-rule basis, and also define how many packets both before and after the attack should be included. You do need to exercise some caution when enabling packet captures. When packet captures are enabled, you can log packets both prior to and following the attack. To accommodate the capture before an attack functionality, the SRX must buffer packets in all flows prior so it does take some additional memory and processing cycles. Capturing packets after an attack is much more straightforward and has less of an impact. On top of that, if you are logging lots of attacks, you must also send the packet captures externally. For all of these reasons, packet logging should be strictly applied, and not applied across the board with all attacks. Besides the ability to apply packet captures on an IPS rule-by-rule basis, there are also a few parameters that you can configure.
- Host
This is the host that receives the PCAP information. You also define the UDP port that will be used to send the data. This configuration is required.
- Source-Address
This is part of the configuration for sending the PCAP information to the logging host. This IP address is arbitrary, and you do not have to have it be the IP address of the SRX, but typically it’s a best practice to do so.
- Max Sessions
You can configure a percentage value (1 percent to 100 percent) of sessions that are tracked with packet logs. This is an important way to limit how many sessions are processed for resource purposes.
- Total-Memory
You can define the percentage of memory that can be allocated to the packet capture feature.
- Policy Configuration
Within an IPS security policy, you can define how the packets should be logged on the SRX. Within the rule, you can define the following values (which should be used with care to ensure that memory is not overused for buffering and processing the packets):
- Pre-Attack
You can capture from 1 to 255 packets before an attack is triggered. This is accomplished by buffering all packets for the session up to the number of packets logged for the pre-attack limit for that particular rule.
- Post-Attack
You can log from 0 to 255 packets after an attack occurs. Note that if the attack triggers a drop or close connection, there might not be any more packets in the attack.
- Post-Attack-Timeout
When an attack is triggered, the SRX might not know how many packets will follow the attack (e.g., if you configure 20 packets to be logged after the attack, the SRX will not send the PCAP until it has all 20 packets). To ensure that the SRX does not hold on to the packets indefinitely, you configure a Post-Attack-Timeout to define how long the SRX should wait while holding on to the packets before sending them out.
Configuring packet logging in the STRM
To configure packet logging in the STRM, you need to be running a 2012 or later version of the STRM software. The configuration is quite simple in the STRM interface; you merely need to add the SRX device with packet capture enabled and respectively set this configuration on the SRX itself. Once the STRM is configured for the SRX, you can view the attack objects in log entries that contain it.
Go to the Admin tab, and in the Data Source section, click Log Sources.
Specify a name and IP address.
For the Log Source Type, select Juniper SRX.
For the Protocol, you must select PCAP Syslog Combination.
Specify the Log Source Identifier (can be an IP address).
Specify the port that the STRM should be listening for this traffic on.
On the SRX itself, you would configure the PCAP settings to point to the STRM under the IDP sensor configuration. For instance, if our STRM is listening on 192.168.1.20 on port 5000, and the SRX should send traffic from 192.168.1.1, then our configuration would look like this:
[edit]
root@srx3600n0# set security idp sensor-configuration packet-log host 192.168.1.20 port 5000

 [edit]
root@srx3600n0# set security idp sensor-configuration packet-log source-address 192.168.1.1

[edit]
root@srx3600n0# show security idp sensor-configuration
packet-log {
    source-address 192.168.1.1;
    host {
        192.168.1.20;
        port 5000;
    }
}
Then IPS PCAP is enabled on an IDP rule-by-rule basis in the action criteria.
[edit]
root@srx3600n0# set security idp idp-policy IDP rulebase-ips rule 1 then notification packet-log ?
Possible completions:
  <[Enter]>            Execute this command
+ apply-groups         Groups from which to inherit configuration data
+ apply-groups-except  Don't inherit configuration data from these groups
  post-attack          No of packets to capture after attack (0..255)
  post-attack-timeout  Timeout (seconds) after attack before stopping packet capture (0..1800)
  pre-attack           No of packets to capture before attack (1..255)
  |                    Pipe through a command
Figure 13-9 shows the STRM interface, which allows you to view and download the PCAPs collected from the SRX IPS function.

IP actions
The following IP actions are available for the SRX:
- IP-Notify
IP-Notify will simply generate a log when a connection is detected from a host that was previously identified for IP actions. This is useful if you don’t want to block future connections that are identified by IP action, but you do want to identify any future connections made by that host based on the target or timeout.
- IP-Block
IP-Block allows you to silently block (drop) future connections made by hosts that were marked by IP-Block in a previous attack. This is tracked based on the target and timeout that are defined in the rule on which the attack was triggered.
- IP-Close
IP-Close is similar to IP-Block, except TCP Resets will be sent in addition to dropping all of the packets as part of that flow. This is tracked based on the target and timeout that are defined in the rule on which the attack was triggered. If the Layer 4 protocol is not TCP, a silent Drop-Connection will be applied.
- Log/Log-Create
The SRX allows you log when IP Actions take place or only when the IP Action has been triggered. This allows you the flexibility to get more visibility into attacks depending on your use case.
- Refresh-Timeout
The refresh timeout defines how the system should respond if additional sessions match the target parameters in the IP-Action table. Essentially, if you have this configured, it will continue to keep the IP Action active as long as the target is triggering new sessions to the SRX.
Targets and timeouts
Targets define which hosts have IP actions applied to them based on the information matched in the attack that triggered the IP action.
- Destination-Address
This performs the appropriate IP action on the destination address of the connection, so if IP-Block is the action, connections to the Destination-Address are blocked. This is good for blacklisting traffic to a botnet server, or other restricted destinations.
- Service
This performs the appropriate IP action on the source IP, destination IP, destination port, and protocol, so it’s very selective in which connections are blocked. This is good if you want to prevent future connections from a source to a destination on a particular service (destination port and protocol, such as TCP port 80).
- Source-Address
This matches future connections from a particular source address (regardless of which zone is used). This is useful if you want to protect a server from clients that attempt malicious activity. By using IP-Block or IP-Close with the Source-Address target, you can prevent future connections until the timeout expires.
- Source-Zone
This is somewhat of a legacy feature, which will actually block the entire source zone at the time of this writing (that’s right, we confirmed this with the developers). It originally came out of the ISG with IDP feature set. Typically, this won’t be a desired action unless you are dealing with a very hostile source group of clients. Source-Zone-Address and Zone-Service are typically better choices.
- Source-Zone-Address
This matches the target based on the Source Zone and Source Address. It is useful to use this rather than Source-Address Only if you might have IP overlap with different zones (e.g., when using different VRs for overlapping address space) or if the same IP might be coming through different source zones and you want to block the traffic in one scenario and not the other.
- Zone-Service
This is similar to Service, but is also takes into account the Source-Zone in the event of IP overlaps.
The timeout defines how long the IP action is in effect for a given target—for instance, how long a connection will be blocked with IP-Block. You can configure this on a rule-by-rule basis in the IPS engine, so it’s not a global configuration, but rather can be applied very granularly. If a timeout of 0 is configured, the timeout will not automatically expire, but rather will only be cleared via a manual clear of the IP action entry or a reboot.
Terminal Match
Terminal Match is somewhat of a legacy feature that arose from the earlier days of the standalone IDP to make it function similar to a firewall. By default, for IPS processing (both standalone IDP and SRX), even after a match is made for an attack, the rulebase continues to process that traffic to see if any other rules match. The IPS will always take the most stringent action (e.g., drop connection if a rule with Drop-Connection and No-Action is matched), but some customers might want to restrict this even further. By enabling Terminal Match, the IPS rulebase acts more like a firewall, in that once it finds a rule that matches the to-/from-zones, source IP, destination IP, and application, it will do whatever that rule says if the attack is detected; if not, it will not process that traffic any further. Generally, you should not use Terminal Match, especially with No-Action rules, because it can cause you to overlook potentially malicious traffic. Use this feature with caution unless you really know what you’re doing.
Security Packages
Cyberthreats are dynamic in nature and require vigilance to provide up-to-date protection. To provide up-to-date security capabilities, attack updates are provided on a daily basis (if new signatures are required) and as emergencies if a zero-day threat is released.
The important thing to note is that a new attack object might not be required for new attacks, as the Juniper Security Team tries to create attack objects to protect against vulnerabilities and anomalous behavior rather than writing signatures against specific exploits (which could change very frequently). For instance, the Aurora Internet Explorer exploit that was discovered in December 2009 was already covered by the HTTP:STC:SCRIPT:FUNC-REASSIGN attack object (released August 2009, well ahead of the exploit), so customers were fully protected from this zero-day attack.
The security packages themselves are composed of several different components that are updated when a new version of the signature database and detector engines is available. You can either manually trigger the SRX to download the attack objects, or configure the SRX to automatically go and retrieve the updates. The following subsections describe the different components of Juniper security packages.
Attack database
The attack database contains all of the attack objects (both signature- and protocol anomaly-based) and is provided by the Juniper Security Team. New updates are typically posted daily, although sometimes there might not be a new exploit (which isn’t already covered by existing signatures). When the attack database is downloaded, it contains the full attack database in a compressed form. If the attack database is downloaded directly to the SRX, it is stored in /var/db/idpd/sec-download for staging. If it is downloaded from the NSM, it is stored in /var/db/idpd/nsm-download. The /var/db/idpd/sec-repository folder contains the attack, groups, applications, and detector engine files.
Note
You can sign up for Technical Bulletins on the Juniper Support page so that you receive email updates on the release of new detector engines and Junos firmware.
Attack object updates versus full updates
You can perform two types of updates for attack objects.
A standard update downloads the complete attack database to the SRX. You can automate this process so that it occurs at predefined intervals, or you can manually trigger it at your leisure.
Full updates include both the attack database and the latest detector engine. Typically, detector engine updates are released once per quarter, and attack databases are released daily (if there are updates to attack objects). Detector engine updates will provide bug fixes for the detector engine, new inspection capabilities, and new support for different application decoding.
Note
Policy template updates are something that you must manually perform and are not included as part of the attack object updates.
Application objects
Application objects are used by the AppSecure features along with IPS. Per Chapter 12, you can either download these objects by themselves or as part of the IPS download package. Starting in Junos 11.4, the application objects are not stored in the SRX configuration file, but rather their own database similar to how the IPS stores its attack objects.
Detector engines
The detector engine is a module run by the IPS process on the SRX to execute protocol anomaly protection as well as signature-based pattern matching. Detector engine updates are released quarterly, and provide new protocol decoding capabilities, enhancements to protocol anomaly protection, and bug fixes. The detector engine is not installed by default with a signature update; rather, you must trigger a manual “full update” to download the detector engine and install it. The SRX allows for two detector engines to be installed concurrently when an update is applied so that all new sessions use the new detector engine, whereas the old sessions will still be processed by the previous detector engine. When all sessions from the old detector engine are closed, the original detector engine is removed. The installation of the new detector engine does not have any performance impact because of this graceful installation process. Just like the signature updates, you can sign up for notifications when new detector engines are available. The notifications also include release notes that detail all of the new features, addressed issues, and known limitations for that detector engine.
Policy templates
To assist administrators with new IPS installations, Juniper provides several different predefined policies that administrators can download and install. Although these are helpful to understand the basic mechanics of the IPS policies, every environment is going to be different, with different applications and different administrative goals. Best practice therefore recommends creating a customized policy for true enforcement.
The good news is that this chapter details how to deploy and tune an IPS policy effectively, minimizing false positives and providing real security. But in the meantime, you might want to take a look at the policy templates for examples. The policy templates are updated informally by the Juniper Security Team, so you need to check the version numbers for new policy templates.
Scheduling updates
Updates can be scheduled to automatically download and optionally install attack object updates, which include application object updates. When attack updates are scheduled, you can define the interval and schedule for when they should be downloaded, along with whether the SRX should install the new version. Of course, if you are using a central management system such as NSM or Junos Space, you can also trigger installations automatically from there.
Sensor Attributes
The SRX supports a wide range of tunable sensor settings when it comes to how the SRX functions. Most of these settings should generally not be modified without the guidance of JTAC or an expert-level implication of what the settings do; therefore, coverage of the sensor knobs (except for GZIP/Deflate) is outside the scope of this book.
SSL Inspection (Reverse Proxy)
The SRX supports two different types of SSL inspection: SSL Forward Proxy (discussed in Chapter 12), which can be used for IPS inspection as well, and the SSL Inspection (also known as SSL Reverse Proxy) feature, which is an IPS-only feature used to open SSL streams that are terminated on a web server that you control. In SSL Inspection, you would load your private key onto the SRX to allow it to decrypt the stream from the client to server. This feature is becoming less and less pertinent in most networks because customers who wish to run this often have a SSL load balancer that sits in front of their web server to offload the SSL processing. Therefore it is logical to place the SRX between the SSL load balancer and the web server for inspecting the traffic there. Also, at the time of writing this book, SSL Inspection in reverse proxy mode is only supported on the high-end SRX. Therefore covering the SSL Reverse Proxy feature is outside the scope of this book.
Custom Attack Groups
SRX IPS offers an extremely powerful feature that enables you to define your own groups (of both predefined and custom attack objects) along with your own custom attack objects. Although the casual IPS administrator might not need to define custom attack objects, the ability to customize attacks into groups is key to being able to make the administration of an IPS policy much easier to enforce.
Static attack groups
A static attack group is essentially a group to which you manually add attack objects and groups (both predefined and custom) that will not add members during attack updates. If attack objects are modified as part of an attack update, they are updated in the group; if they are deleted, they are removed from the group. No new attack objects are added to this group, however. Static groups are very useful if you want strict control over adding new attacks into attack groups during signature updates to ensure that you don’t cause unexpected results with new attack objects. The only things you need to define for static groups are the members that are added to this group.
Dynamic attack groups
Dynamic attack groups provide administrators with a powerful ability to adjust to new threats when new attack objects are downloaded from Juniper. Whereas static attack groups allow you to create groups that don’t automatically change with signature attack updates, dynamic attack groups do change. And they have very intelligent controls for defining what should be added or removed with attack updates. Dynamic attack groups use filters to define the attributes of attack objects that would select them to be implemented in the group. Additionally, you can override members in the groups to exclude them if need be.
You can use filter categories to select the attacks for the group. When you define multiple filters, they essentially form a logical AND between filters. For instance, if you define Category=HTTP and Severity=Critical, only attacks that are of that category and severity are present in this group. When new attacks are downloaded, if they fit this criteria they are added to the group. Here’s more detail on filter fields you can dial:
- Category
Category defines the Juniper-defined categories for attacks. These are one of the most useful filters to define because they are the applications themselves, such as HTTP, FTP, DNS, and other types of attacks, such as spyware, viruses, Trojan horses, and worms.
- Direction
Direction defines the direction in which the attack takes place. There is a little more to this field than meets the eye. There are six possible values, along with the ability to define how they should be evaluated. The six values are the following:
- Any
Detect attacks that have a member with “Any” as the direction.
- Client-to-Server
Attack objects with members with the client-to-server direction.
- Server-to-Client
Attack objects with members with the server-to-client direction.
- Exclude-Any
: Any attack objects that do not have members with “Any” as the direction.
- Exclude-Client-to-Server
Any attack object that does not have members with client-to-server as the direction.
- Exclude-Server-to-Client
Any attack object that does not have members with server-to-client as the direction.
The key here is that attack objects can have multiple members (known as complex attack objects). If you have an attack object with just one member, the direction is very simple: it’s whatever direction the attack object specifies. But what about when you have an object with multiple members that have different directions (e.g., Member 1 is client-to-server and Member 2 is server-to-client)? In these cases, we support the use of an “Expression” that specifies if the SRX should apply AND logic or the default OR logic when it comes to selecting the direction for attacks. We’ll explore this a bit more later in the chapter.
- False-Positives
False-Positives is a field that is defined for each object indicating how frequently false positives are likely to occur with the individual object. Juniper defines these for predefined attack objects; you can configure this field in your custom attack objects.
- Performance
Juniper tries to specify the attack object performance for the attack objects. This is not an exact science, and performance is typically holistic for the policy as a whole, rather than for an individual attack object. You can also specify this for custom attack objects and you can use this filter to only select the appropriate attacks based on performance impacts. The performance impact of signatures is as follows: 0 = Unknown, 1 = Fast, 5 = Normal, and 9 = Slow. You can use performance filtering in the dynamic attack groups to filter out slow-performing attack objects. Note that, generally, Juniper will put slow-performing attack objects under the MISC attack group.
- Products
Juniper defines products to which the predefined attack objects apply—for instance, protecting against attacks on specific OSs, services, applications, and other software.
- Recommended / No-Recommended
This filter is simply a field. If Recommended is selected, only attacks that are marked with the
Recommendedattribute are selected. Juniper defines theRecommendedflag for attacks that are part of the recommended policy, and you can specify this flag for custom attacks as well. No-Recommended is the opposite of Recommended.- Service
Service defines the actual application protocol (e.g., HTTP, FTP, DNS, SMB, SMTP, etc.) to which the attack belongs. This is similar to some of the attacks defined under the category configuration.
- Severity
You can use the Severity field (as we did earlier in this chapter) to define what traffic should be selected based on the severity defined for the attack object.
- Type
This allows you to specify whether the attack is a signature-based attack object or an anomaly-based attack object.
Configuring IPS Features on the SRX
If you have read this far, you’ve gone through a detailed explanation of just about every component of SRX IPS functionality. Now you can learn how to actually configure these different features within the SRX.
From here on out, you will learn the configuration of the individual elements and focus on common real-world implementations of these features. Let’s get started.
Getting Started with IPS on the SRX
We should perform a few steps before we configure SRX IPS. Here is a list of things to do before configuring the SRX for IPS functionality:
Install the license. You must install an IDP license before you can download any attack objects. If you are using only custom attack objects, you don’t need to install a license (earlier versions had a bug where they required it), but if you want to download Juniper predefined attack objects, you must have this license. Juniper provides you with the ability to download a 30-day trial license to permit this functionality for a brief period of time to evaluate the functionality. We covered license installation earlier in the book; all you need is the
request system license addcommand either specifying a file, or copying and pasting it into the terminal.Configure network access. Before you can download the attack objects, you must have network connectivity to either the Juniper download server or a local server from which the signatures can be downloaded. This typically requires network configuration (IP/Netmask, routing, and DNS) and permitted access to reach the server. At the time of this writing, HTTP proxies are not supported, but you can configure a local web server from which to serve the files.
Download attack objects. Before deploying the IPS, you must first download the attack objects from which the policy will be compiled. Triggering a manual download does not configure the SRX to download them in the future, so you must configure automatic updates to download them.
Install attack objects. Once the download has been completed, you must install the attack updates before they are actually used in a policy. If you already have a policy configured, you do not need to recommit the policy—installing the updates adds them to the policy. The installation process compiles the attack objects that have been downloaded to a stage directory into the configured policy.
Download policy templates (optional). You can optionally download and install predefined IPS policies known as policy templates provided by Juniper to get started. After finishing this chapter, you should be able to configure your own policy, so you probably won’t need policy templates.
Note
Starting with Junos 12.1, the SRX will automatically push the signature package to the secondary member of the HA cluster. Prior to Junos 12.1, you had to use the fxp0 on both members of the cluster because both members had to download their own instance. With 12.1 and beyond, there is no explicit configuration; you will just see the SRX is downloading the package and pushing it to the secondary member during the download process.
Getting started example
Our first example shows the basic configuration and download of attack objects and how to install them prior to actually configuring a security policy. The steps in this example are as follows:
Check IPS status.
Download attack objects including sensor updates.
Install attack objects and sensor updates.
Download policy templates.
Install policy templates.
root@srx3600n0> show security idp security-package-version
  Attack database version:2229(Thu Feb 04 00:23:03 2013 UTC)
  Detector version :12.6.140121210
  Policy template version :N/A

root@srx3600n0> request security idp security-package download
Will be processed in async mode. Check the status using the status checking CLI

root@srx3600n0> request security idp security-package download status
Done;Successfully downloaded from(https://services.netscreen.com/cgi-bin/index.cgi).
Version info:2230(Mon Feb  4 19:40:12 2013 UTC, Detector=12.6.140121210)

root@srx3600n0> request security idp security-package install
Will be processed in async mode. Check the status using the status checking CLI

root@srx3600n0> request security idp security-package install status
In progress:Installing AI ...

root@srx3600n0> request security idp security-package install status
In progress:performing DB update for an xml (SignatureUpdate.xml)

root@srx3600n0> request security idp security-package install status
Done;Attack DB update : successful - [UpdateNumber=2230,ExportDate=Mon Feb  4 19:40:12 2013 UTC,Detector=12.6.140121210]
     Updating control-plane with new detector : successful
     Updating data-plane with new attack or detector : sucessful
It’s important to understand that compiling and applying an IPS policy can take some time, depending on the number of attack objects and the size of the policy. Starting with Junos 12.1, the SRX leverages a smarter compilation engine along with caching compiled information so that the compilation process takes much less time. The compilation process is conducted asynchronously, meaning that the SRX will start the process but it won’t hold up your CLI, web, or SD session, but instead will allow you to check back later on the status.
Note
Starting in Junos 12.1 in HA configurations, the SRX will produce a slightly different output because the download will be synchronized to the backup device rather than having each device perform the download.
{primary:node1}
root@SRX100HM> request security idp security-package download status
node1:
------------------------------------------------------------------
Done;Successfully downloaded from(https://services.netscreen.com/cgi-bin/index.cgi)
and synchronized to backup.
Version info:2233(Thu Feb 14 00:23:07 2013 UTC, Detector=12.6.160121210)
Configuring automatic updates
Although updating the SRX manually is a powerful way to inspect the new signatures before actually deploying them, it does require much more administrative dedication to keep signatures updated. You can configure the SRX to automatically update itself at an interval of your choosing to ensure that the SRX has up-to-date signatures without administrative intervention. This example demonstrates how to configure this functionality with the following objectives.
Enable automatic downloads to start May 7 at midnight, and attempt to download every 24 hours if there is an update. If the update stalls for more than five minutes, after a new version has been downloaded the SRX should install it.
{primary:node0}[edit]
root@SRX5800-1# edit security idp security-package

{primary:node0}[edit security idp security-package]
root@SRX5800-1# set install automatic start-time 05-07.00:00 interval 24 enable
Junos Space also offers another good option for graphically viewing and operating the download process (see Figure 13-10). You can download the attack objects locally to Space and then push them out to the firewalls (including firewalls that don’t have Internet connections). You can also schedule updates for download and installation through Space along with seeing what contents of the attack download have changed.
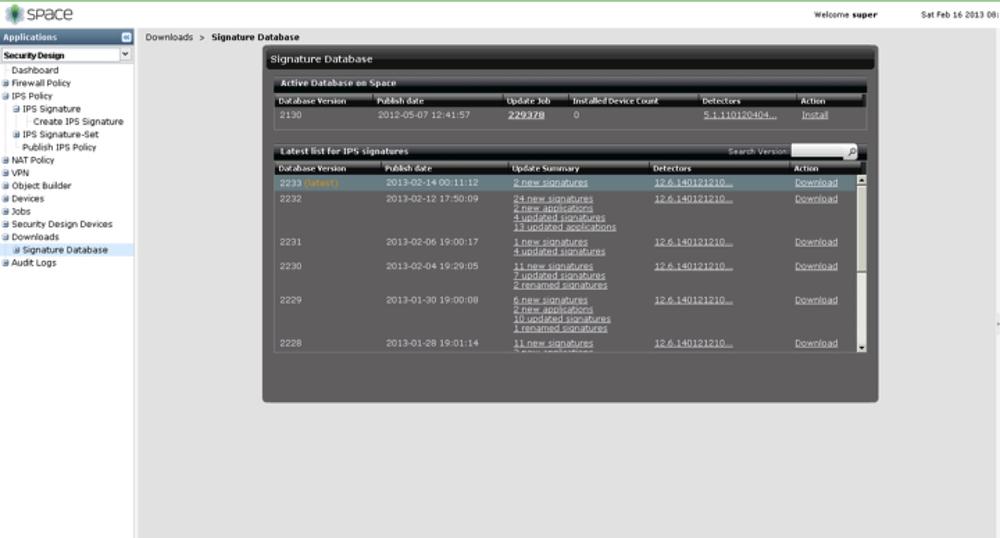
Note
There is a procedure available on the Juniper Knowledge Base that details how you can perform an offline update for Juniper IPS/Application Security data if your SRX cannot access the Internet and you don’t have another solution like Space to serve the content locally to the SRX.
Useful IPS files
At the time of this writing, Juniper was still enhancing the CLI and J-Web to make them more usable for viewing predefined IPS objects (attacks, groups, applications, etc.). The exception is NSM, which has these laid out nicely in a table. Until then, all of the information is available on the SRX. You just need to know where to look.
Note
You should download the attack signatures before viewing these files for the updated version.
- /var/db/idpd/sec-download/SignatureUpdate.xml
This file is the entire attack database. It details every attack, and for signature-based attack objects, it also provides the patterns used to match signatures. This file is the motherlode of the attack objects and provides you with the most information, but it’s in XML format, so you will need to either load it into an XML browser or look at the file with a text editor.
- /var/db/idpd/sec-download/groups.xml
This file is the list of different predefined groups and the attack objects that fit into them. It’s essentially a list of dynamic attack object groups that define the properties that attack objects should match to be part of the group.
- /var/db/idpd/sec-repository/attack.list
This file lists all attacks known by the SRX in their appropriate name format.
- /var/db/idpd/sec-repository/attack-group.list
This file lists all attack groups on the SRX based on their categories.
- /var/db/idpd/sec-repository/application.list
This file lists all the AppID applications that are known to the system and their respective standard ports.
Viewing IPS attack objects and group membership
At the time of writing this book, the best way to view
the IPS attack objects is really through Security Design, which has a
very nice interface for viewing the objects. On box you can leverage
the show security idp attack detail
<attack-name> command to view the contents of an
individual attack, but it does not provide the complete information
today. If you are working with an on-box implementation, it is really
best to drop down to the shell to view this information. Additionally,
you can view the object information on the Juniper Security Portal.
Let’s take a look at what you can do on box and in Junos Space.
root@srx3600n0> show security idp attack detail HTTP:XSS:NAGIOS-XI-ALERT-CLOUD
Display Name: HTTP: Nagios XI Alert Cloud Cross-Site Scripting
Severity: Major
Category: HTTP
Recommended: true
Recommended Action: Drop
Type: chain
False Positives: unknown
Service: HTTP
This command can be used to get a high-level output of the command. If you need more information like patterns and you are operating on box then you can drop down to the command line and view the output in the SignatureUpdate.xml file.
root@srx3600n0> file show /var/db/idpd/sec-download/SignatureUpdate.xml
/NAGIOS
        <Name>HTTP:XSS:NAGIOS-XI-ALERT-CLOUD</Name>
        <DisplayName>HTTP: Nagios XI Alert Cloud Cross-Site Scripting</DisplayName>
        <Severity>Major</Severity>
        <Category>HTTP</Category>
        <Keywords>Alert Cloud Cross-Site Nagios Scripting XI</Keywords>
        <Recommended>true</Recommended>
        <RecommendedAction>Drop</RecommendedAction>
        <Description>This signature detects attempts to exploit a cross-site scripting vulnerability in the Nagios XI Alert Cloud. An attacker can leverage this issue to execute arbitrary script code in the
browser of an unsuspecting user in the context of the affected site</Description>
        <Tags>
          <Tag>
            <Name>severity</Name>
            <Value>Major</Value>
          </Tag>
          <Tag>
            <Name>itw</Name>
          </Tag>
          <Tag>
            <Name>category</Name>
            <Value>HTTP</Value>
          </Tag>
        </Tags>
        <Attacks>
          <Attack>
            <Type>chain</Type>
            <ExportID>1</ExportID>
            <FalsePositives>unknown</FalsePositives>
            <Performance>0</Performance>
            <Service>HTTP</Service>
            <Scope>transaction</Scope>
            <TimeBinding>
              <Scope>none</Scope>
              <Count>1</Count>
            </TimeBinding>
            <Order>no</Order>
            <Reset>no</Reset>
            <Hidden>false</Hidden>
            <Members>
              <Attack>
                <Member>m01</Member>
                <Type>Signature</Type>
                <Direction>CTS</Direction>
                <Flow>control</Flow>
                <Shellcode>no</Shellcode>
                <Context>http-url-parsed</Context>
                <Negate>false</Negate>
                <Pattern><![CDATA[.*\[/nagiosxi/includes/components/alertcloud/index\.php\]]]></Pattern>
                <Regex/>
              </Attack>
              <Attack>
                <Member>m02</Member>
                <Type>Signature</Type>
                <Direction>CTS</Direction>
                <Flow>control</Flow>
                <Shellcode>no</Shellcode>
                <Context>http-variable-parsed</Context>
                <Negate>false</Negate>
                <Pattern><![CDATA[.*=.*}.*]]></Pattern>
                <Regex/>
              </Attack>
            </Members>
            <Versions>
              <Version>idp-srx11.4</Version>
            </Versions>
          </Attack>
        </Attacks>
        <Direction>
          <Value>CTS</Value>
        </Direction>
        <FalsePositives>
          <Value>unknown</Value>
        </FalsePositives>
        <Performance>
          <Value>0</Value>
        </Performance>
        <Service>
          <Value>HTTP</Value>
        </Service>
        <Type>
          <Value>Signature</Value>
        </Type>
      </Entry>
      <Entry>
In terms of viewing the parameters that make up a group and the members of the group if you are doing this on device, your best bet is also to use the command line.
root@srx3600n0> file show /var/db/idpd/sec-download/groups.xml
/HTTP - Major
      <Name>HTTP - Major</Name>
      <Type>dynamic</Type>
      <Filters>
        <Filter>
          <Field>Category</Field>
          <Values>
            <Value>HTTP</Value>
          </Values>
        </Filter>
        <Filter>
          <Expression>And</Expression>
          <Field>Direction</Field>
          <Values>
            <Value>cts</Value>
            <Value>!stc</Value>
            <Value>!any</Value>
          </Values>
        </Filter>
        <Filter>
          <Field>Performance</Field>
          <Values>
            <Value>0</Value>
            <Value>1</Value>
            <Value>5</Value>
          </Values>
        </Filter>
        <Filter>
          <Field>Severity</Field>
          <Values>
            <Value>Major</Value>
          </Values>
        </Filter>
      </Filters>
    </Group>
    <Group>
In the preceding output, we can see the makeout of the HTTP – Major group. We can see the filters that are being applied, and what’s important here is that we can use the same filters ourselves in our policy. The filters include the Severity=Major, Direction is “Client to Server” AND “Not Server to Client” AND “NOT Any” (which we explain in the dynamic group direction filter; this essentially means any attack object with members only in the client-to-server direction, none in the server-to-client direction, and none in the Any direction), and finally the Performance is anything that is 0/1/5, which corresponds to anything that isn’t slow.
Finally, let’s look at how to determine what members are resolved from dynamic and static groups. The easiest way is to look in the compiled policy itself. So, in this case, our Policy is called Recommended, and we want to see the contents of the Recommended-All Group.
root@srx3600n0> show configuration security idp dynamic-attack-group Recommended-All
filters {
    direction {
        values [ client-to-server exclude-any exclude-server-to-client ];
    }
    recommended;
}

root@srx3600n0> file show /var/db/idpd/sets/Recommended.set
/Recommended-All
        :Recommended-All (Recommended-All
                 :type (group)
                 :group (
                         :members (
                                 : ("APP:ADOBE-CF-DIR-TRAV")
                                 : ("APP:AGENTX-RECEIVE-INT-OF")
                                 : ("APP:AGENTX-RECEIVE-OF")
                                 : ("APP:AVAYA-CCRWEBCLIENT-RCE")
                                 : ("APP:BULLETPROOF-FTP-BPS-BOF")
                                 : ("APP:CA:ARCSRV:GWT-INFO-DISC")
                                 : ("APP:CA:ARCSRV:RPC-TAPE-ENG")
                                 : ("APP:CHKPOINT-FW-INFO-DISC")
                                 : ("APP:CISCO:CNS-NETWORK-DOS")
                                 : ("APP:CISCO:REGISTRAR-AUTH-BYPASS")
                                 : ("APP:CITRIX:AG-CMD-INJ")
                                 : ("APP:CITRIX:META-IMA-AUTH")
                                 : ("APP:CITRIX:PROVISIONING-OPCODE")
                                 : ("APP:CITRIX:PROVISIONINGSERV-)
##Output Abridged##
Figures 13-11 and 13-12 are screenshots of the Junos Space Security Design interface, which is a much better interface for navigating objects, group membership, and so forth if you have access to it.
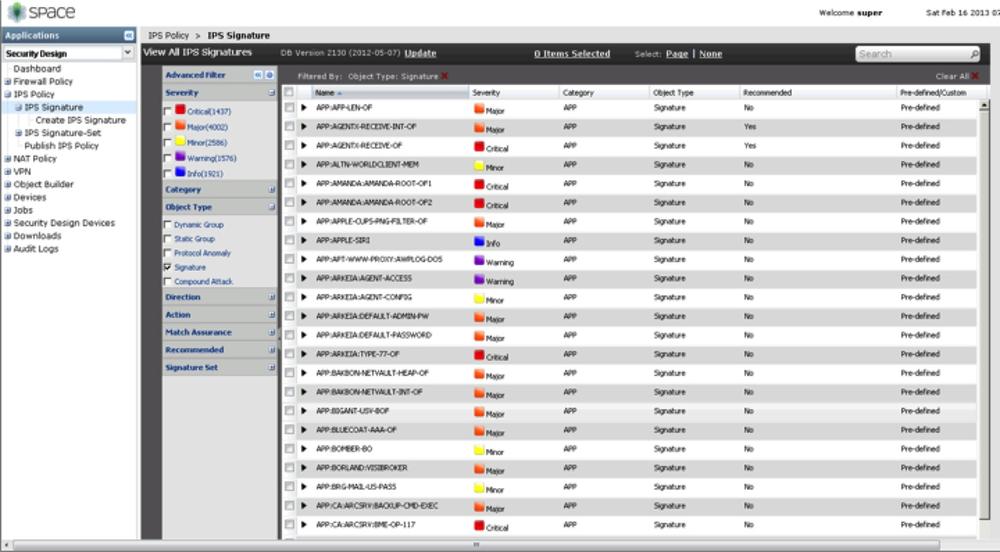
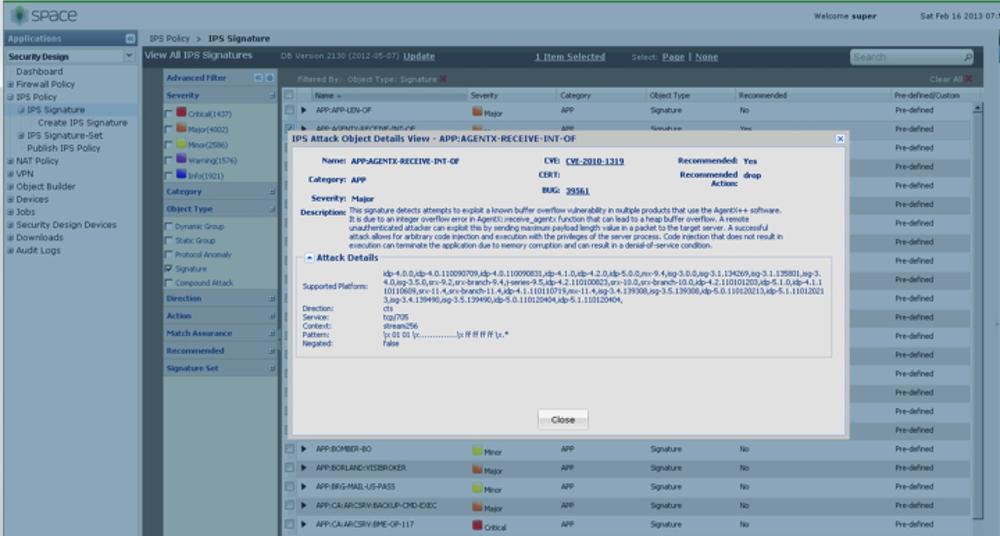
Note
Hopefully, Juniper will be greatly improving the IPS object operation tasks in the future with better on-box support. Although the Junos Space operations are pretty strong, the on-box CLI/J-Web implementation leaves a bit to be desired. Stay current with the release notes for more information on the latest and greatest improvements.
Configuring static and dynamic attack groups
Unless you are going to use predefined attack groups, or the attack objects themselves, you should find yourself configuring static and dynamic attack groups prior to defining the policies. Defining these groups is quite simple, especially when you are familiar with the predefined attack object groups and attacks. This example shows how to configure the following groups:
A static attack group named Aurora that includes the attacks HTTP:STC:SCRIPT:UNI-SHELLCODE and HTTP:STC:SCRIPT:FUNC-REASSIGN, which are two known attack objects that are triggered by the Aurora Internet Explorer exploit.
A static attack group named Protect-FTP that contains the predefined attack groups FTP – Critical, FTP – Major, and FTP – Minor.
A dynamic attack group called Malicious-Activity that contains all shellcode, worms, spyware, viruses, and Trojan horse signatures of severity Critical, Major, and Minor.
A dynamic attack group called Protect-Internal-Clients that contains all server-to-client attacks that are of severity Critical, Major, and Minor. This group should contain members that are to defend clients, but it’s okay if the members have CTS or ANY patterns as well.
{primary:node0}[edit]
root@SRX5800-1# edit security idp custom-attack-group Aurora

{primary:node0}[edit security idp custom-attack Aurora]
root@SRX5800-1#set group-members [ HTTP:STC:SCRIPT:UNI-SHELLCODEHTTP:STC:SCRIPT:FUNC-REASSIGN ]

{primary:node0}[edit security idp custom-attack Aurora]
root@SRX5800-1# show
group-members [ HTTP:STC:SCRIPT:UNI-SHELLCODE HTTP:STC:SCRIPT:FUNC-REASSIGN ];

{primary:node0}[edit security idp custom-attack-group Aurora]
root@SRX5800-1# up

{primary:node0}[edit security idp]
root@SRX5800-1# edit custom-attack-group Protect-FTP

{primary:node0}[edit security idp custom-attack-group Protect-FTP]
root@SRX5800-1# set group-members [ "FTP - Critical" "FTP - Major""FTP - Minor" ]

{primary:node0}[edit security idp custom-attack-group Protect-FTP]
root@SRX5800-1# show
group-members [ "FTP - Critical" "FTP - Major" "FTP - Minor" ];

{primary:node0}[edit security idp custom-attack-group Protect-FTP]
root@SRX5800-1# up

{primary:node0}[edit security idp]
root@SRX5800-1# edit dynamic-attack-group Malicious-Activity

{primary:node0}[edit security idp dynamic-attack-group Malicious-Activity]
root@SRX5800-1# set filters severity values [ critical major minor ]

{primary:node0}[edit security idp dynamic-attack-group Malicious-Activity]
root@SRX5800-1# set category values [ SHELLCODE VIRUS WORMS SPYWARE TROJAN]

{primary:node0}[edit security idp dynamic-attack-group Malicious-Activity]
root@SRX5800-1# show
filters {
  severity {
    values [ critical major minor ];
  }
  category {
    values [ SHELLCODE VIRUS WORMS SPYWARE TROJAN ];
  }
}

{primary:node0}[edit security idp dynamic-attack-group Malicious-Activity]
root@SRX5800-1# up

{primary:node0}[edit security idp]
root@SRX5800-1# edit dynamic-attack-group Protect-Internal-Clients

{primary:node0}[edit security idp dynamic-attack-group Protect-Internal-Clients]
root@SRX5800-1# set filters direction values server-to-client

{primary:node0}[edit security idp dynamic-attack-group Protect-Internal-Clients]
root@SRX5800-1# set filters severity values [ critical major minor ]

{primary:node0}[edit security idp dynamic-attack-group Protect-Internal-Clients]
root@SRX5800-1# show
filters {
  direction {
    values server-to-client;
  }
  severity {
    values [ critical major minor ];
  }
}

{primary:node0}[edit security idp dynamic-attack-group Protect-Internal-Clients]
root@SRX5800-1# top

{primary:node0}[edit]
root@SRX5800-1# commit
node0:
configuration check succeeds
node1:
commit complete
node0:
commit complete
The one significant thing to note in this example is regarding the “direction” value of our Protect-Internal-Clients group. We defined this as server-to-client, but this will contain members with both server-to-client and client-to-server/any directions because we didn’t leverage the AND logic to limit it to only server-to-client members.
Creating, activating, and referencing IPS
Before you can actually perform any inspection, you must define an IPS rulebase, apply it as the active IPS policy (at this time only one IPS policy can be active at a time), and reference this policy in the SRX security policy (firewall) rulebase. Although you could use a predefined policy template for your rulebase, you are going to create your own, because it’s much more fun.
In this example, you will do the following:
Create an IPS rulebase called Protect-Everything. You are going to be using the IPS rulebase. For all rules, you should match from Untrust to Trust, log events, and match any source, destination, or default application.
The first rule should match any attack for the two static groups that you created, and silently drop their connections. Call this rule
Static-Groups.For the two dynamic groups you created, you’ll create a rule to match their connections and close both the client and the server, as well as silently drop traffic from future flows for 120 seconds. Call this rule
Dynamic-Groups.You’ll perform all of this from the Untrust to Trust direction for any traffic, and then log all of these events.
{primary:node0}[edit]
root@SRX5800-1# edit security idp idp-policy Protect-Everything rulebase-ips

{primary:node0}[edit security idp idp-policy Protect-Everything rulebase-ips]
root@SRX5800-1# set rule Static-Groups match from-zone untrust to-zone trustsource-address any destination-address any application default attacks custom-attack-groups [ Aurora Protect-FTP ]

{primary:node0}[edit security idp idp-policy Protect-Everything rulebase-ips]
root@SRX5800-1# set rule Static-Groups then action drop-connection

{primary:node0}[edit security idp idp-policy Protect-Everything rulebase-ips]
root@SRX5800-1# set rule Static-Groups then notification log-attacks

{primary:node0}[edit security idp idp-policy Protect-Everything rulebase-ips]
root@SRX5800-1# show
rule Static-Groups {
  match {
    from-zone untrust;
    source-address any;
    to-zone trust;
    destination-address any;
    application default;
    attacks {
      custom-attack-groups [ Aurora Protect-FTP ];
    }
  }
  then {
    action {
      drop-connection;
    }
    notification {
      log-attacks;
    }
  }
}

{primary:node0}[edit security idp idp-policy Protect-Everything rulebase-ips]
root@SRX5800-1# set rule Dynamic-Groups match from-zone untrust to-zone trustsource-address any destination-address any application default attacks dynamic-attack-groups [ Malicious-Activity Protect-Internal-Clients ]

{primary:node0}[edit security idp idp-policy Protect-Everything rulebase-ips]
root@SRX5800-1# set rule Dynamic-Groups then action close-client-and-server

{primary:node0}[edit security idp idp-policy Protect-Everything rulebase-ips]
root@SRX5800-1# set rule Dynamic-Groups then ip-action ip-block log target source-address timeout 120

{primary:node0}[edit security idp idp-policy Protect-Everything rulebase-ips]
root@SRX5800-1# set rule Dynamic-Groups then notification log-attacks

{primary:node0}[edit security idp idp-policy Protect-Everything rulebase-ips]
root@SRX5800-1# show rule Dynamic-Groups
match {
  from-zone untrust;
  source-address any;
  to-zone trust;
  destination-address any;
  application default;
  attacks {
    dynamic-attack-groups [ Malicious-Activity Protect-Internal-Clients ];
  }
}
then {
  action {
    close-client-and-server;
  }
  ip-action {
    ip-block;
    target source-address;
    log;
    timeout 120;
  }
  notification {
    log-attacks;
  }
}

{primary:node0}[edit security idp idp-policy Protect-Everything rulebase-ips]
root@SRX5800-1# up 2

{primary:node0}[edit security idp]
root@SRX5800-1# set active-policy Protect-Everything


{primary:node0}[edit security idp]
root@SRX5800-1# show active-policy
active-policy Protect-Everything;

{primary:node0}[edit security idp]
root@SRX5800-1# top

{primary:node0}[edit]
root@SRX5800-1# edit security policies from-zone untrust to-zone trust

{primary:node0}[edit security policies from-zone untrust to-zone trust]
root@SRX5800-1# set policy Inspect-IPS match source-address any destination-address any application any

{primary:node0}[edit security policies from-zone untrust to-zone trust]
root@SRX5800-1# set policy Inspect-IPS then permit application-services idp

{primary:node0}[edit security policies from-zone untrust to-zone trust]
root@SRX5800-1# set policy Inspect-IPS then log session-close

{primary:node0}[edit security policies from-zone untrust to-zone trust]
root@SRX5800-1# show
policy Inspect-IPS {
  match {
    source-address any;
    destination-address any;
    application any;
  }
  then {
    permit {
      application-services {
        idp;
      }
    }
    log {
      session-close;
    }
  }
}

{primary:node0}[edit security policies from-zone untrust to-zone trust]
root@SRX5800-1# top

{primary:node0}[edit]
root@SRX5800-1# commit
node0:
configuration check succeeds
node1:
commit complete
node0:
commit complete
A lot is going on in this example. You have configured your IPS
policy and rules, and configured the IPS to assign the active policy
and associated firewall rules to send traffic to the IPS engine.
Without these steps, the traffic would never be sent to the IPS. One
important thing to note is that when you apply this in your
environment, it might take some time to compile and apply the IPS
policy. It all happens automatically, and no traffic will be
disrupted. The best thing to do is to check the output of the show security idp status command to see if
your active policy (in our case, Protect-Everything) has been applied and is
active.
Exempt rulebase
Even with the best of intentions, you might find yourself in an IPS scenario where you have unexpectedly blocked legitimate traffic. For instance, if you are running protocol anomaly protection and you have mistaken some nonstandard application behavior that is not really malicious as an attack, it will be dropped according to your policy. To help make a clean IPS rulebase, with simple yet granular overrides, Juniper employs the Exempt rulebase to ensure that we can easily ignore certain scenarios, and at the same time not ignore inspection for the entire connection. In this example, you’ll handle the following scenario.
After applying the IPS policy in the last example, some users are complaining that they are not able to access the web server. It turns out that their machines are infected with the FunWebProducts spyware, which adds a toolbar in Internet Explorer applications. It is more of a nuisance than actual malicious software, so you don’t want to block your customers from accessing your web server at 172.31.100.60. Create an Exempt policy to not block this attack from the Internet to the 172.31.100.60 web server with the FunWebProducts attack object.
{primary:node0}[edit]
root@SRX5800-1# set security zones security-zone trust address-book address Web-Server-172.31.100.60/32 172.31.100.60/32

{primary:node0}[edit security zones security-zone trust address-book]
root@SRX5800-1# show
address Web-Server-172.31.100.60/32 172.31.100.60/32;

{primary:node0}[edit]
root@SRX5800-1# edit security idp idp-policy Protect-Everything rulebase-exempt

{primary:node0}[edit security idp idp-policy Protect-Everything rulebase-exempt]
root@SRX5800-1# set rule FunWebProducts match from-zone untrust to-zone trust source-address any destination-address Web-Server-172.31.100.60/32 attacks predefined-attacks SPYWARE:BH:FUNWEBPRODUCTS

{primary:node0}[edit security idp idp-policy Protect-Everything rulebase-exempt]
root@SRX5800-1# show
rule FunWebProducts {
  match {
    from-zone untrust;
    source-address any;
    to-zone trust;
    destination-address Web-Server-172.31.100.60/32;
    attacks {
      predefined-attacks SPYWARE:BH:FUNWEBPRODUCTS;
    }
  }
}

{primary:node0}[edit security policies from-zone untrust to-zone trust]
root@SRX5800-1# top

{primary:node0}[edit]
root@SRX5800-1# commit
node0:
configuration check succeeds
node1:
commit complete
node0:
commit complete
Enabling GZIP/Deflate Decompression
There is one sensor knob that might be worth enabling, particularly if you are concerned with protecting internal resources: the GZIP/Deflate option for HTTP traffic. This can be an evasive channel that attackers can try to sneak server-to-client attacks through. You can enable it as shown here.
[edit]
root@srx3600n0# set security idp sensor-configuration detector protocol-name http tunable-name sc_http_compress_inflating tunable-value 1

[edit]
root@srx3600n0# set security idp sensor-configuration detector protocol-name http tunable-name sc_http_c2s_file_decode tunable-value 1

[edit]
root@srx3600n0# set security idp sensor-configuration detector protocol-name http tunable-name sc_http_s2c_file_decode tunable-value 1

[edit]
root@srx3600n0# show security idp sensor-configuration
detector {
    protocol-name HTTP {
        tunable-name sc_http_compress_inflating {
            tunable-value 1;
        }
        tunable-name sc_http_c2s_file_decode {
            tunable-value 1;
        }
        tunable-name sc_http_s2c_file_decode {
            tunable-value 1;
        }
        tunable-name sc_http_html_parse_opt {
            tunable-value 1;
        }
        tunable-name sc_http_max_request_parameters {
            tunable-value 1000;
        }
        tunable-name sc_http_skip_contents_1 {
            tunable-value 1024;
        }
Deploying and Tuning IPS
Deploying IPS requires a slight learning curve. You could memorize every command and feature by heart and still have a rocky deployment. The challenge is that every environment is different, just like a fingerprint or DNA. There are different applications, different volumes of the applications, different policies on what is accepted activity, and different resources to protect, all of which can make for different goals for the IPS. Although this book can’t tell you exactly what your policy should be, it can certainly help you to build and deploy that policy.
First Steps to Deploying IPS
Before you get too caught up in the actual deployment, do a bit of legwork and map out the policy you want to deploy. Think of it as brainstorming for your IPS. You should identify the assets you want to protect, and identify the systems and applications and how they interact with others in your network. You might need to contact the application owners beforehand to identify this information. You should also determine your IPD protection goals. This would include the types of threats you want to prevent, and any other factors that might limit the scope of the deployment. (Often this involves management approval so that there aren’t any surprises.)
Building the Policy
Once you have identified the assets and the goals of the IPS, and you have gotten all of the necessary approvals, you should be ready to build your IPS policy on the SRX. Remember that if you are using predefined attack objects, you must purchase and install the IPS license. You should then download and install the latest and greatest attack objects and detector engine using the full update. This ensures that you have all of the latest attack objects when writing your policy. With those prerequisite tasks taken care of, you should create your policy based on the skills you gained earlier in the chapter. If you want a decent place to start, you can download and install the policy templates, and then modify them to suit your needs. Don’t apply the policy just yet, though.
Testing Your Policy
We would like to tell you to just deploy your IPS policy and let it go from there, but this is not the case for IPS (in our combined broad experience, with many competitor IPS systems, it is no different for them, either).
As mentioned, different environments with different applications make it difficult to make a one-size-fits-all policy with no adverse effects. The best thing that you can do is to test your policy before actually deploying it into production.
This can mean different things for different organizations. If you are a large organization that has lots of resources, you probably have a production lab in which you can replicate your production environment. You could place your SRX in that environment with the appropriate policy deployed and then see what happens. Because it is a lab, you can work out any of the kinks (e.g., false positives) there, without impacting production. Alternatively, you might be able to make a mirrored segment of the production segments on which you want to deploy the SRX using switchport mirroring (SPAN) or network taps so that even if the SRX has a false positive, it is on the mirrored segment rather than on the production segment.
On the other hand, many organizations don’t have the luxury of full test labs. Fear not, because even in these environments you can still deploy with caution and confidence. The other option (which is a good idea to use even if you have the production lab) is to deploy the SRX, but not block anything in the IPS engine. You can do this by using the No-Action actions in the SRX IPS policy so that the SRX is not interfering with any traffic, but is still performing all of the inspection. In this configuration, you should have the SRX log the output to a syslog server such as the STRM so that you can evaluate the output and determine if any false positives are occurring, and if there is anything that should be tuned.
As part of the tuning process, you will likely be adding exceptions into the Exempt rulebase, tuning thresholds, and getting accustomed to the facilities that provide visibility into the SRX IPS and the actual traffic itself. Just like IPS policies, there is no standard length of time to perform this phase; however, typically you want to ensure that you have a good cycle of traffic. This means if you have certain applications that run only at certain times, you want to wait until they have been given a chance to run with IPS enabled to see if there are any adverse effects. If you are pressed for a single time frame, best practice says to let it run a month before enabling blocking (vary this to be shorter or longer depending on the environment), but any time frames can be worked with, as something is better than nothing.
By carefully performing this measured approach, you are going a long way toward ensuring the success of the SRX IPS deployment, and mitigating the risk of issues that might occur in production.
Leveraging sniffer mode for the deployment
You do have the option of deploying interfaces in sniffer mode rather than a full-blown inline mode (see Figure 13-13). You can do this as part of an initial deployment or on a more permanent basis. This configuration can be leveraged on an interface-by-interface basis so you don’t need to choose all or nothing. Unfortunately, you do have to jump through a few hoops to pull off sniffer mode on the SRX today, at the time of writing this book. Essentially, you put the desired interface into sniffer mode, with that interface in its own VR zone so that you can manipulate the traffic to go back out of that interface. Because the traffic will be off a mirror port or network tap you will need to hardcode the route and static ARP of the next hop so the system doesn’t try to resolve it. It will take a few steps, but once it’s up and running you should be good to go.
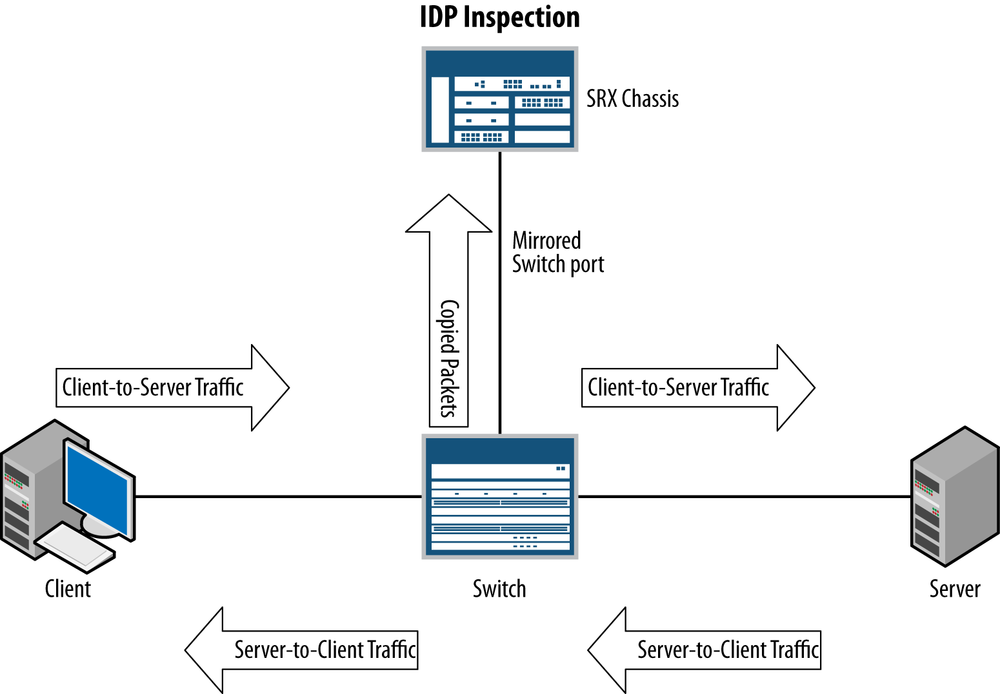
Let’s configure an example where we put interface ge-0/0/0 into promiscuous mode in a VR called Sniffer, a Zone called Sniffer. Be sure to create a default route to next hop 192.168.1.254, which is on the same interface with a fake static ARP entry as well.
##Config Interface
[edit]
root@srx3600n0# set interfaces ge-0/0/0 promiscuous-mode

[edit]
root@srx3600n0# set interfaces ge-0/0/0 unit 0 family inet address 192.168.1.1/24 arp 192.168.1.254 mac 00:00:01:01:01:01

##Config Custom VR
[edit]
root@srx3600n0# set routing-instances Sniffer instance-type virtual-router

[edit]
root@srx3600n0# set routing-instances Sniffer interface ge-0/0/0.0

[edit]
root@srx3600n0# set routing-instances Sniffer routing-options static route 0.0.0.0/0 next-hop 192.168.1.254

##Zone Config
[edit]
root@srx3600n0# set security zones security-zone Sniffer interfaces ge-0/0/0.0

##Define Policy

[edit]
root@srx3600n0# set security policies from-zone Sniffer to-zone Sniffer policy 1 match source-address any destination-address any application any

[edit]
root@srx3600n0# set security policies from-zone Sniffer to-zone Sniffer policy 1 then permit application-services idp

[edit]
root@srx3600n0# set security policies from-zone Sniffer to-zone Sniffer policy 1 then log session-close
Looking at this example, there are a few things that we need to call out. First, besides putting the physical interface in its own VR zone and creating the policy that references IPS, the interesting thing is the use of the static route that points back out the same interface. Of course, because the traffic is off a mirrored SPAN port, the traffic will never be received back on the real network, but this tricks the SRX into completing the data path processing by sending it back out. We need to also make a fake ARP entry because the SRX will not be able to resolve the next hop because this is a mirrored segment, and without the ARP entry the SRX will not be able to forward the traffic.
Technically, you can also accomplish this with Level 2 mode (without the need for promiscuous mode as that’s for Level 3 mode only). In Level 2 mode, the SRX will forward the traffic similar to a switch so it doesn’t care about the destination MAC or IP address of the packet so long as the switching table has a MAC address for the destination frame.
Note
At the time of writing this book, the branch SRX does not support putting its interface in promiscuous in Layer 3 mode. Keep posted to the release notes to see if there is a change in this limitation. Another option when using a tap interface is to hardcode the MAC address for the interface the same as the upstream or downstream router so the SRX will listen for the packet. You can do this with multiple IP addresses on the same interface with multiple MAC addresses. It won’t work well if the device is directly connected to a client segment, but if placed between two Level 3 devices, it should work fine. Just make sure that this is off of a network tap or mirrored switchport.
Actual Deployment
After you have completed your testing phase you are ready to deploy in an active blocking mode, unless your goal is just to keep it in an IDS state, in which case your work is finished.
If you did all of the legwork up front to build and tune the policy, typically the only thing to do here is to change the actions on the appropriate rules to the appropriate actions, rather than just taking no action. If all goes well, there really shouldn’t be any surprises in this process. IPS is always going to be in somewhat of a state of evolution, because the threats themselves are always evolving, so it is not a set-and-forget technology as an unmanaged switch would be.
Day-to-Day IPS Management
Once you have completed the initial deployment, you (or your coworkers or external monitoring party) must still maintain the IPS and examine incidents. In terms of maintenance, it comes down to keeping the attack database on the SRX properly updated (not necessarily with the latest and greatest updates, but you should make sure you investigate updates and don’t let them lapse too long) with detector engines and new features to help protect against new attacks.
Keeping the device updated can be automated. If you are concerned
about new attacks being false positives, you should use static groups
for the rules in which you block attacks, and only monitor new attacks
with the no-action parameter so that
you don’t block new exploits without ensuring that it is safe to do so
first. This means you have to manually add the new attack objects that
you want to block into the static groups, but it provides the best
balance of updated protection and stability.
The next thing you will likely do on a day-to-day basis is to monitor the IPS logs. Because you will probably see thousands of events per day (maybe more in large environments), you need a rational way to manage the alerts and to somehow investigate only the important ones. We recommend that you use reporting, such as that in the STRM, which can not only generate a report, but also allow you to drill down into that report (all the way to the offending logs themselves). This way, you will not go blind watching logs whiz by on the screen, but rather start from a high-level human-readable report that summarizes the pertinent events. Typically, you will have lots of different reports (e.g., worms, shellcode, server-to-client exploits, and more), but they will at least provide a good starting point. Then you can drill down where necessary to identify events that should be investigated in more detail.
Of course, simply logging and reporting all by itself probably does not provide everything you need. Generally, you are going to want to layer your implementation to provide different functionality for different events. For instance, some attacks you want to block when they occur, to protect the system’s infrastructure, and other attacks you might not want to block, although you want to be notified when they occur. This can typically be accomplished with logging plus action on the syslog server to generate an email, or trap of some sort, to alert you that an event has occurred. (Be careful that you don’t trigger a DoS yourself with too many alerts!) Next, you will have events that you don’t want to block, and you don’t need to be alerted right when they happen, but they are of interest (e.g., users running unauthorized games). This is where logging and reporting come in handy. You can review your logs at a later point to determine if further action is required.
Best Practices
Juniper’s IPS has been around for more than 12 years at the time of writing this book, so plenty of features and enhancements have gone into its development and functionality. As a result, there are numerous capabilities that you have to deal with when working with the SRX. In this section, we review some of the best practices when it comes to managing the SRX IPS.
A good IPS deployment, whether it be with an SRX or some other competitive device, starts with clearly identifying the assets you wish to protect with IPS and the types of attacks you wish to protect them from (including by what vectors). For instance, what type of assets are you dealing with? Protecting servers? Clients? What services are they running?
When configuring an IPS policy, it is best to create an efficient policy rather than simply enabling All Attacks. Because Juniper has been developing IPS attacks for more than 12 years and seldom retires attack objects, enabling an all attacks policy (particularly when the device is in line with the traffic) can have performance effects if you aren’t careful. Instead, you should look to craft an effective, efficient policy.
Be sure to follow the proper deployment methodology that we mentioned in this chapter. Rather than just putting the device in line with attacks in blocking mode, you should at least examine what type of baseline you are seeing in the network to ensure that turning on protect won’t adversely affect the network with any potential false positives. This methodology is tried and true and can be used with other IPS products as well.
Only enable IPS on firewall policies that need it. The SRX allows you to leverage IPS on a firewall policy-by-policy basis so you don’t need to turn it on device wide. This is good for keeping performance effects down on traffic that doesn’t require it.
It is critical to leverage a layered security approach to network security and the same is true for leveraging the IPS. IPS serves a very critical need to protect your systems, but it shouldn’t be relied on by itself. This means that you should still be leveraging a proper firewall policy, security features like Screens, UTM, and host-based protections like antivirus solutions, among others. No single technology is going to solve all of your problems, and any person or vendor who says otherwise is being disingenuous.
It is important to keep your IPS relatively up to date (if not completely up to date) when it comes to attack objects. Because new threats come out all the time, if you wait too long, your system might not be able to provide protection against the latest and most critical threats. You can configure automatic attack object download along with installation at your own schedule. This is an ideal way to keep the box up to date if you don’t have the time to review each new update.
Remember to leverage the http://www.juniper.net/security portal for attack information along with change logs and update information.
It is typically a best practice to not modify the IPS sensor configuration unless you have a solid understanding of the implications of the changes that you are making. This is because making changes can have impacts on the devices’ capabilities and is not intended for folks who aren’t experts.
It is a best practice to use static groups if you want to select a specific group of attack objects that you want to be part of a group. The membership won’t change from attack object download to download, but members themselves can change if Juniper updates the signature. Dynamic groups are best to use if you have a broad requirement to select a group of attack objects based on characteristics rather than explicit attacks. Dynamic groups get updated when new attack objects are added, removed, or changed based on their tags and the filters you set in the policy.
It is best to not use the terminal option in policies unless you know what you are doing because it can potentially prevent you from inspecting traffic.
Remember that the No-Action option is preferred if you just want to continue to inspect the session, whereas the Ignore option is used to inform the IPS to stop inspection of a particular session. If you want to just prevent the IPS from taking action on an attack, you can simply use the Exempt rulebase.
It is a best practice to leave the “application” field in the IPS policy set to default so that the IPS will leverage AppID. If you change this field, then it can impact how the IPS will inspect traffic based on the Layer 3/Layer 4 service information. If this is your stated intention that’s fine, but it’s usually best to let AppID do the heavy lifting.
It is a best practice to not leave Packet Capture on if you can avoid it, especially with capture packets before the attack because the IPS will need to capture and store all packets for a period of time, having a performance impact. If you do want to leave this on at all times, do it with a bit of caution in your deployment to check and make sure that your device is not overwhelmed by it.
It is most certainly a best practice to review your devices’ CPU and memory and to check to ensure that the security packages are being updated every so often. You can view the devices’ CPU utilization via SNMP polling, through OpenNMS in Junos Space or other platforms like Cacti. See the MIB information that we discuss in Chapter 5 for more information. You can make this process quite painless via automation.
It is a best practice to have some cadence for reviewing security incidents. We’re not suggesting that you watch logs being generated all day long, but instead leverage a combination of reporting and alerting to simplify this task. The STRM platform has an extensive predefined library of offenses that can trigger alerts (including via email), extensive predefined reports, and logview. That way you can be alerted when an important event happens, review security incidents as necessary, and leverage reporting to start with a high-level view that you can drill down into. You are not forced to use the Juniper STRM platform, however, because the SRX exports all of its information in syslog format (other than the PCAP, which is DMI, but that can be ported to other third-party platforms as well). The benefit of the STRM and in the future Security Insight is that they have this information predefined and customized for the SRX, but there’s really nothing that stops you from using the solution that you are most comfortable with.
Troubleshooting and Operation
The SRX has a wealth of facilities that you can use to gain lots of information about IPS functionality and the security state of the inspection events for traffic that is passing through the SRX. So, in addition to the security events of the SRX, there are also troubleshooting facilities to look at in the IPS policy commit process. Additionally, Juniper has added a number of features since the 10.2 release to provide more IPS policy compilation and status information that can be very useful if you are running into any issues. In this section, we have broken down troubleshooting into several sections with examples of the commands, their output, and things to look for.
Checking IPS Status
First, it is important to make sure the SRX is up and running with an active IPS policy and that it is seeing traffic. If you don’t see the information, the SRX is not inspecting traffic.
This first example shows the SRX without the IPS configured; the second example uses an active configuration. Note that on top of these steps, you can also add flow debugging to the list of things to examine. Although flow debugging won’t get into the gory details of IPS debugging, it will give you a good idea of what is happening prior to IPS processing.
## Inactive IPS example, note Policy Name, No Detector Engine ##
root@SRX100HM> show security idp status
node0:
--------------------------------------------------------------------------
State of IDP: 2-default,    Up since: 1987-07-02 12:00:52 UTC (1179w6d 06:24 ago)

Packets/second: 0        Peak: 0 @ 1987-07-02 12:00:52 UTC
KBits/second : 0        Peak: 0 @ 1987-07-02 12:00:52 UTC
Latency (microseconds): [min: 0] [max: 0] [avg: 0]

Packet Statistics:
 [ICMP: 0] [TCP: 0] [UDP: 0] [Other: 0]

Flow Statistics:
 ICMP: [Current: 0] [Max: 0 @ 1987-07-02 12:00:52 UTC]
 TCP: [Current: 0] [Max: 0 @ 1987-07-02 12:00:52 UTC]
 UDP: [Current: 0] [Max: 0 @ 1987-07-02 12:00:52 UTC]
 Other: [Current: 0] [Max: 0 @ 1987-07-02 12:00:52 UTC]
Session Statistics:
 [ICMP: 0] [TCP: 0] [UDP: 0] [Other: 0]

Number of SSL Sessions : 0


 Policy Name : none

Forwarding process mode : maximizing sessions
## Active IPS policy, note detector engine and active stats ##

root@SRX100HM> show security idp status
node0:
--------------------------------------------------------------------------
State of IDP: Default,  Up since: 2013-02-05 18:42:49 EST (1w3d 01:17 ago)

Packets/second: 0               Peak: 0 @ 2013-02-05 18:42:49 EST
KBits/second  : 0               Peak: 0 @ 2013-02-05 18:42:49 EST
Latency (microseconds): [min: 0] [max: 0] [avg: 0]

Packet Statistics:
 [ICMP: 0] [TCP: 0] [UDP: 0] [Other: 0]

Flow Statistics:
  ICMP: [Current: 0] [Max: 0 @ 2013-02-05 18:42:49 EST]
  TCP: [Current: 0] [Max: 0 @ 2013-02-05 18:42:49 EST]
  UDP: [Current: 0] [Max: 0 @ 2013-02-05 18:42:49 EST]
  Other: [Current: 0] [Max: 0 @ 2013-02-05 18:42:49 EST]

Session Statistics:
 [ICMP: 0] [TCP: 0] [UDP: 0] [Other: 0]

  Policy Name : Recommended
  Running Detector Version : 12.6.160121210
This command is a very useful starting point because it lets you know if the engine is active and what policy is loaded, along with the detector engine version.
Checking Security Package Version
It is important to keep track of the active IPS security update version and the detector engine version. This is particularly important when running in HA to ensure that both devices are running the same version. It’s easy to check by simply issuing the command shown here.
{primary:node1}
root@SRX100HM> show security idp security-package-version
node0:
--------------------------------------------------------------------------

  Attack database version:2233(Thu Feb 14 00:23:07 2013 UTC)
  Detector version :12.6.160121210
  Policy template version :N/A

node1:
--------------------------------------------------------------------------

  Attack database version:2233(Thu Feb 14 00:23:07 2013 UTC)
  Detector version :12.6.160121210
  Policy template version :N/A
Troubleshooting and Monitoring Security Package Installation
When downloading and installing a new security package, the output should look something like the output shown here. You can issue the status commands repeatedly to get the up-to-date status. Juniper chose to do this asynchronously because this process can take some time, and rather than holding up the command line, they allow you to check with the status option if you desire.
root@srx3600n0> request security idp security-package download
Will be processed in async mode. Check the status using the status checking CLI

root@srx3600n0> request security idp security-package download status
In progress:groups.xml.gz                               100 % 76271 Bytes/ 76271 Bytes

root@srx3600n0> request security idp security-package download status
Done;Successfully downloaded from(https://services.netscreen.com/cgi-bin/index.cgi).
Version info:2233(Thu Feb 14 00:23:03 2013 UTC, Detector=12.6.140121210)

root@srx3600n0> request security idp security-package install
Will be processed in async mode. Check the status using the status checking CLI

root@srx3600n0> request security idp security-package install status
In progress:Installing AI ...

root@srx3600n0> request security idp security-package install status
Done;Attack DB update : successful - [UpdateNumber=2233,ExportDate=Thu Feb 14 00:23:03 2013 UTC,Detector=12.6.140121210]
     Updating control-plane with new detector : successful
     Updating data-plane with new attack or detector : successful
That output is roughly what you should be seeing when you go to download and install a new security package. If that isn’t working for some reason, there are some things that you can check. You can enable flow traces on both the AppID installation and the IPS policy installation as follows, then check the logs that are generated for any obvious clues in the output of the trace. If the output doesn’t give an obvious clue, then you might want to try clearing the download and cache files or contacting JTAC. There are far too many log entries in the trace to review, but usually you can tell if something is going dramatically wrong.
{primary:node1}
root@SRX100HM> show configuration services application-identification traceoptions
file AppID;
flag all;

{primary:node1}
root@SRX100HM> show configuration security idp traceoptions
file IDP-Commit;
flag all;
level all;

{edit]
root@SRX100HM# set security idp traceoptions flag ?
Possible completions:
  all                  All events
{primary:node1}[edit]
root@SRX100HM# set security idp traceoptions level ?
Possible completions:
  all                  Match all levels
  error                Match error conditions
  info                 Match informational messages
  notice               Match conditions that should be handled specially
  verbose              Match verbose messages
  warning              Match warning messages
You can use just the error level if you don’t want all of the details in the output. If something is going wrong, there are usually a few culprits with the download and installation process.
- Problem
You don’t have proper DNS set up or network reachability to the update server services.netscreen.com.
- Solution
Fix DNS/Routing/Access.
- Problem
You have an IPS update in progress so the installation can’t be completed.
- Solution
Wait for the installation to be completed before installing the package.
- Problem
Your disk drive is full!
- Solution
Free up some space with
request system storage
                  cleanup
.
- Problem
The cache files are corrupted.
- Solution
Clear the download and cache file and redownload.
- Problem
There is a low memory condition on the data plane.
- Solution
This can be a tough call. Usually it is best to contact JTAC if this is occurring.
- Problem
You are running a really old version of Junos without all of the latest installation optimizations.
- Solution
Ideally, you should be running 11.4r7 code or later because there have been a ton of enhancements that have gone into the newer code. Junos 12.1 has better support for HA and some new commands as well.
Note
It is not an issue to leave traceoptions on at all times when it comes to these AppID and IPS settings, as they primarily deal with the download, installation, and compilation process and not real-time processing. For other features like flow traceoptions, you would not want to do that and instead only enable it selectively. There is usually not an issue with doing it here, however.
Clearing the download and cache files on the SRX
Starting in Junos 12.1, the SRX gives you support in the Junos command line to clear the download files and the cache files on the filesystem. Prior to this version, you would need to drop to the OS shell and simply remove the files. We show both methods here. With Junos 12.1+, there is support for deleting the download and cache files.
{primary:node1}
root@SRX100HM> request security idp storage-cleanup downloaded-files
node0:
--------------------------------------------------------------------------
Successfully deleted downloaded secdb files

node1:
--------------------------------------------------------------------------
Successfully deleted downloaded secdb files

{primary:node1}
root@SRX100HM> request security idp storage-cleanup cache-files
node0:
--------------------------------------------------------------------------
Successfully deleted cache files

node1:
--------------------------------------------------------------------------
Successfully deleted cache files
Prior to Junos 12.1, you could do this manually.
{primary:node1}
root@SRX100HM> start shell
root@SRX100HM% rm -rf /var/db/idpd/sec-download/*
root@SRX100HM% rm -rf /var/db/idpd/db/*
root@SRX100HM% cli
{primary:node1}
root@SRX100HM> restart idp-policy
IDP policy daemon started, pid 48044
Checking Policy Compilation Status
This is perhaps one of the most powerful commands that you can leverage when checking to see if a policy was generated successfully. This is good to run both when doing an installation of a security package and after you commit any changes to the IPS policy that result in policy compilation.
The policy installation and compilation roughly involves the following steps, which it is helpful to have a working understanding of:
Installing and compiling the AppID object
Compiling the IDP policy
Packaging the policy for loading
Loading the policy/detector to the data plane
Cleanup and completion
If you run the show security idp
policy-commit-status command several times throughout the
process, you will likely see different messages that explain what is
happening with each step. You can also checkout the debug that we
mentioned in the previous example for AppID and IPS to get more
information about the play-by-play of the policy installation.
{primary:node1}
root@SRX100HM> show security idp policy-commit-status
node0:
--------------------------------------------------------------------------
 IDP policy[/var/db/idpd/bins/Recommended.bin.gz.v] and detector[/var/db/idpd/sec-repository/installed-detector/libidp-detector.so.tgz.v] loaded successfully.
 The loaded policy size is:19877540 Bytes

node1:
--------------------------------------------------------------------------
IDP policy[/var/db/idpd/bins/Recommended.bin.gz.v] and detector[/var/db/idpd/sec-repository/installed-detector/libidp-detector.so.tgz.v] loaded successfully.
 The loaded policy size is:19877540 Bytes
That output is what you should see when the process successfully completes. There are several different error messages that can occur here. Usually they are self-explanatory, but if not, please contact JTAC.
IPS Attack Table
Viewing the list of attacks detected will not give you the specifics of the attacks, so it’s very useful to view the numbers to give you a better idea of your environment. You can also use modifiers to count or only match specific attacks, as shown here.
root@SRX5800-1>show security idp attack tablenode0: -------------------------------------------------------------------------- IDP attack statistics: Attack name #Hits TCP:OPTERR:NONSYN-MSS 9496 TCP:AUDIT:S2C-OLD-ESTB 1923 TCP:AUDIT:C2S-FUTURE-ACK 516 HTTP:AUDIT:URL 120 POP3:AUDIT:REQ-NESTED-REQUEST 83 TCP:AUDIT:OPTIONS-UNNEGOT-TS 74 POP3:AUDIT:REQ-INVALID-STATE 62 IMAP:AUDIT:REQ-INVALID-STATE 56 TCP:AUDIT:OLD-3WH-ACK 56 TCP:AUDIT:S2C-FUTURE-ACK 40 SMTP:AUDIT:REQ-NESTED-REQUEST 27 APP:AI:PARTIAL-MATCH 19 FTP:AUDIT:REQ-UNKNOWN-CMD 17 PROTOCOLS:TRAFFIC:NOT-FTP 16 HTTP:SQL:INJ:SQL-INJ-URL 15 HTTP:SQL:INJ:CMD-CHAIN-1 14 HTTP:SQL:INJ:CMD-IN-URL 14 HTTP:SQL:INJ:CMD-CHAIN-2 10 HTTP:REQERR:REQ-MALFORMED-URL 9 HTTP:SQL:INJ:GENERIC 6 HTTP:STC:SCRIPT:UNI-SHELLCODE 6 CHAT:IRC:NICK 5 HTTP:STC:ACTIVEX:UNCOMMON-AX 5 CHAT:IRC:SRV-RESPONSE 4 HTTP:STC:SCRIPT:UNICODE-SLED 4 HTTP:EXT:METAFILE 3 NNTP:AUDIT:NESTED-REQ 3 HTTP:AUDIT:LENGTH-OVER-256 2 HTTP:AUDIT:LENGTH-OVER-512 2 HTTP:INFO:HTTPPOST-GETSTYLE 2 HTTP:STC:STREAM:CONTENT-TYPE 2 LPR:AUDIT:PORT 2 POP3:EXT:DOT-WMF 2 PROTOCOLS:PORT:FTP 2 RTSP:EXPLOIT:INVALID-PORT 2 VNC:SESSION 2 CHAT:AUDIT:IRC-CMD 1 CHAT:IRC:OVERFLOW:LINE 1 FTP:CISCO-VPN-ACCESS 1 FTP:OVERFLOW:LINE-TOO-LONG 1 HTTP:AUDIT:LENGTH-OVER-1024 1 HTTP:AUDIT:LENGTH-OVER-2048 1 HTTP:AUDIT:LENGTH-OVER-4096 1 {primary:node0} root@SRX5800-1>show security idp attack table | countCount: 124 lines {primary:node0} root@SRX5800-1>show security idp attack table | match HTTP | match SQLHTTP:SQL:INJ:SQL-INJ-URL 15 HTTP:SQL:INJ:CMD-CHAIN-1 14 HTTP:SQL:INJ:CMD-IN-URL 14 HTTP:SQL:INJ:CMD-CHAIN-2 10 HTTP:SQL:INJ:GENERIC 6
IPS Counters
Several IPS counters are valuable to examine when determining the status of the IPS, the traffic that the IPS is processing, and the events that the IPS is taking. Several counters are worthwhile to examine, but we focus on the flow output in this example.
{primary:node0}
root@SRX5800-1> show security idp counters ?
Possible completions:
  application-identification  Show Application Identification counters
  dfa                  Show IDP DFA counters
  flow                 Show IDP Flow counters
  http-decoder         Show the HTTP decoder counters
  ips                  Show IPS counters
  log                  Show IDP Log counters
  packet               Show IDP Packet counters
  pdf-decoder          Show the PDF decoder counters
  policy-manager       Show IDP Policy counters
  tcp-reassembler      Show IDP Reassembler counters
{primary:node0}
root@SRX5800-1> show security idp counters flow node 0 | no-more
node0:
--------------------------------------------------------------------------
IDP counters:

 IDP counter type                           Value
 Fast-path packets                            53655
 Slow-path packets                            2289
 Session construction failed                       0
 Session limit reached                          0
 Memory limit reached                          0
 Not a new session                            0
 Invalide index at ageout                        0
 Packet logging                             0
 Busy packets                              0
 Busy packet Errors                           0
 Dropped queued packets (async mode)                   0
 Reinjected packets (async mode)                     0
 Policy cache hits                            802
 Policy cache misses                           1771
 Maximum flow hash collisions                      0
 Flow hash collisions                          0
 Gates added                               0
 Gate matches                              0
 Sessions deleted                            2052
 Sessions aged-out                            0
 Sessoins in-use while aged-out                     0
 TCP flows marked dead on RST/FIN                    1670
 Policy init failed                           0
 Number of Sessions exceeds high mark                  0
 Number of Sessions drops below low mark                 0
 Memory of Sessions exceeds high mark                  0
 Memory of Sessions drops below low mark                 0
 Sessions constructed                          2289
 SM Sessions ignored                           1890
 SM Sessions interested                         0
 SM Sessions not interested                       0
 SM Sessions interest error                       0
 Sessions destructed                           2138
 SM Session Create                            2289
 SM Packet Process                            0
 SM Session close                            0
 SM Client-to-server packets                       0
 SM Server-to-client packets                       0
 SM Client-to-server L7 bytes                      13395204
 SM Server-to-client L7 bytes                      25598889
IP Action Table
When a violation occurs, the administrator has the option to perform an action not only on that connection, but also on future connections depending on configuration. This is known as IP Action, and you can view the contents of this table, including using modifiers to select specific entries.
{primary:node0}
root@SRX5800-1>show security flow ip-action

Src-Addr  Src-Port  Dst-Addr  Proto/Dst-Port  Timeout(sec)
 16.0.80.0 0      0.0.0.0   0/0       598/600      0   close

 16.0.66.15 0      0.0.0.0   0/0       596/600      0   close

 16.0.74.17 0      0.0.0.0   0/0       595/600      0   close

 16.0.0.47 0      0.0.0.0   0/0       596/600      0   close

 16.0.80.56 0      0.0.0.0   0/0       596/600      0   close

 16.0.22.59 0      0.0.0.0   0/0       596/600      0   close

 16.0.78.76 0      0.0.0.0   0/0       598/600      0   close
From the output of the show security flow
ip-table command you can determine if a host has been shunned
(source, destination, protocol, destination port) and the timeout
remaining in the maximum time. In this example, the shunned host shows a
timeout of 600 seconds that counts down. The entries remain in the table
until they timeout.
Sample Deployments
There is a lot to be said for putting the theory of IPS into action in a production network. The good news is that we will look at a few example policies that can be used to secure an enterprise network against internal and external threats. In this case study, we examine the ability to provide protection under three different scenarios:
- DMZ network
In the DMZ, several servers must be protected against attacks by clients, including HTTP, HTTPS, FTP, SMTP, and DNS servers. For performance reasons, we only want to look at signatures that have members in the client-to-server direction. We also want to make sure these machines are not compromised and start to infect other machines in the network or the Internet at large with spyware, worms, Trojan horses, and viruses. The DMZ server can only talk outbound on HTTP and HTTPS for updates. All logs should be taken in this example. Assume that the DMZ zone uses the interface Reth4.
- Internal clients
We want to protect internal clients against attacks from malicious servers in the wild. These hosts will only be allowed to communicate over HTTP, HTTPS, FTP, IM, and out to the Internet; all other services are restricted by the firewall policy itself. We also want to identify and block any hosts that are infected by spyware, worms, Trojan horses, or viruses for two hours, along with setting the
alertflag in the logs. Assume that the Internal-Clients zone includes Dept-A and Dept-B with interfaces Reth2 and Reth3, respectively.- Internal servers
Clients are permitted to access a wide variety of services on the internal servers. Currently, your organization does not restrict services between internal clients and servers, but it does wish to provide additional security. At this time, management is hesitant to interfere with internal traffic, but they would like to provide visibility, so you should just log the attacks at this point. The internal servers are allowed to talk out to the Internet via HTTP and HTTPS for updates. Additionally, we want to identify any servers that might be infected by spyware, worms, Trojan horses, or viruses. Assume that the Internal-Servers zone uses interface Reth5.
For these examples, we leverage the power of dynamic groups. The most significant attacks will be located in the Critical, Major, and Minor severities. We will also use category, direction, and performance filters to ensure that our policy is as specific and lean as possible, while still providing serious coverage. Figure 13-14 shows an overview of the case study.
First, we define our network elements, their zones, and the firewall policy that will be used to pass the traffic to the IPS for inspection. We assume that the NAT has already been taken care of, as it will not change the objects in our policies.
[edit]
root@SRX5800# set security address-book global address DMZ-Server-172.31.100.0/24 172.31.100.0/24

[edit]
root@SRX5800# set security address-book global address-book address Dept-A-10.1.0.0/16 10.1.0.0/16

[edit]
root@SRX5800# set security address-book global address Dept-B-10.2.0.0/16 10.2.0.0/16

[edit]
root@SRX5800# set security address-book global address Internal-Servers-10.3.0.0/16 10.3.0.0/16


[edit]
root@SRX5800# edit security zones security-zone DMZ


[edit security zones security-zone DMZ]
root@SRX5800# set interfaces reth4

[edit security zones security-zone DMZ]
root@SRX5800# up

[edit security zones]
root@SRX5800# edit security-zone Dept-A


[edit security zones security-zone Dept-A]
root@SRX5800# set interfaces reth2

[edit security zones security-zone Dept-A]
root@SRX5800# up

[edit security zones]
root@SRX5800# edit security-zone Dept-B


[edit security zones security-zone Dept-B]
root@SRX5800# up

[edit security zones]
root@SRX5800# edit security-zone Internal-Servers


[edit security zones security-zone Internal-Servers]
root@SRX5800# set interfaces reth5

[edit security zones security-zone Internal-Servers]
root@SRX5800# up

[edit]
root@5800# show security address-book
    global {
        address DMZ-Server-172.31.100.0/24 172.31.100.0/24;
        address Dept-A-10.1.0.0/16 10.1.0.0/16;
        address Dept-B-10.2.0.0/16 10.2.0.0/16;
        address Internal-Servers-10.3.0.0/16 10.3.0.0/16;

    }


[edit security zones]
root@SRX5800# show
security-zone DMZ {

    interfaces {
        reth4.0;
    }
}
security-zone Dept-A {
    interfaces {
        reth2.0;
    }
}
security-zone Dept-B {
}
    interfaces {
        reth5.0;
    }
}

[edit security zones]
root@SRX5800# top

[edit]
root@SRX5800# set applications application-set DMZ-Services application
junos-http

[edit]
root@SRX5800# set applications application-set DMZ-Services application
junos-https

[edit]
root@SRX5800# set applications application-set DMZ-Services application
junos-ftp

[edit]
root@SRX5800# set applications application-set DMZ-Services application
junos-smtp

[edit]
root@SRX5800# set applications application-set DMZ-Services application
junos-dns-udp

[edit]
root@SRX5800# set applications application-set Allowed-Outbound application
junos-http

[edit]
root@SRX5800# set applications application-set Allowed-Outbound application
junos-https

[edit]
root@SRX5800# set applications application-set Allowed-Outbound application
junos-ftp

[edit]
root@SRX5800# set applications application-set Allowed-Outbound application
junos-aol

[edit]
root@SRX5800# set applications application-set Allowed-Outbound application
junos-ymsg

[edit]
root@SRX5800# show applications
application-set DMZ-Services {
    application junos-http;
    application junos-https;
    application junos-ftp;
    application junos-smtp;
    application junos-dns-udp;
}
application-set Allowed-Outbound {
    application junos-http;
    application junos-https;
    application junos-ftp;
    application junos-aol;
    application junos-ymsg;
}

[edit]
root@SRX5800# edit security policies from-zone Dept-A to-zone DMZ

[edit security policies from-zone Dept-A to-zone DMZ]
root@SRX5800# set policy Dept-A-to-DMZ match source-address Dept-A-10.1.0.0/16
destination-address DMZ-Server-172.31.100.0/24 application DMZ-Services

[edit security policies from-zone Dept-A to-zone DMZ]
root@SRX5800# set policy Dept-A-to-DMZ then permit application-services idp

[edit security policies from-zone Dept-A to-zone DMZ]
root@SRX5800# set policy Dept-A-to-DMZ then log session-close

[edit security policies from-zone Dept-A to-zone DMZ]
root@SRX5800# up

[edit security policies]
root@SRX5800# edit from-zone Dept-B to-zone DMZ

[edit security policies from-zone Dept-B to-zone DMZ]
root@SRX5800# set policy Dept-B-to-DMZ match source-address Dept-B-10.2.0.0/16
destination-address DMZ-Server-172.31.100.0/24 application DMZ-Services

[edit security policies from-zone Dept-B to-zone DMZ]
root@SRX5800# set policy Dept-B-to-DMZ then permit application-services idp

[edit security policies from-zone Dept-B to-zone DMZ]
root@SRX5800# set policy Dept-B-to-DMZ then log session-close

[edit security policies from-zone Dept-B to-zone DMZ]
root@SRX5800# up

[edit security policies]
root@SRX5800# edit from-zone Dept-A to-zone Internal-Servers

[edit security policies from-zone Dept-A to-zone Internal-Servers]
root@SRX5800# set policy Dept-A-to-Internal-Servers match source-address Dept-A-
10.1.0.0/16 destination-address Internal-Servers-10.3.0.0/16 application any

[edit security policies from-zone Dept-A to-zone Internal-Servers]
root@SRX5800# set policy Dept-A-to-Internal-Servers then permit application-
services idp

[edit security policies from-zone Dept-A to-zone Internal-Servers]
root@SRX5800# set policy Dept-A-to-Internal-Servers then log session-close

[edit security policies from-zone Dept-A to-zone Internal-Servers]
root@SRX5800# up

[edit security policies]
root@SRX5800# edit from-zone Dept-B to-zone Internal-Servers

[edit security policies from-zone Dept-B to-zone Internal-Servers]
root@SRX5800# set policy Dept-B-to-Internal-Servers match source-address Dept-B-
10.2.0.0/16 destination-address Internal-Servers-10.3.0.0/16 application any

[edit security policies from-zone Dept-B to-zone Internal-Servers]
root@SRX5800# set policy Dept-B-to-Internal-Servers then permit application-
services idp

[edit security policies from-zone Dept-B to-zone Internal-Servers]
root@SRX5800# set policy Dept-B-to-Internal-Servers then log session-close

[edit security policies from-zone Dept-B to-zone Internal-Servers]
root@SRX5800# up

[edit security policies]
root@SRX5800# edit from-zone untrust to-zone DMZ

[edit security policies from-zone untrust to-zone DMZ]
root@SRX5800# set policy untrust-to-DMZ match source-address any destination-
address DMZ-Server-172.31.100.0/24 application DMZ-Services

[edit security policies from-zone untrust to-zone DMZ]
root@SRX5800# set policy untrust-to-DMZ then permit application-services idp

[edit security policies from-zone untrust to-zone DMZ]
root@SRX5800# set policy untrust-to-DMZ then log session-close

[edit security policies from-zone untrust to-zone DMZ]
root@SRX5800# up

[edit security policies]
root@SRX5800# edit from-zone Dept-A to-zone untrust

[edit security policies from-zone Dept-A to-zone untrust]
root@SRX5800# set policy Dept-A-to-untrust match source-address
Dept-A-10.1.0.0/16 destination-address any application Allowed-Outbound

[edit security policies from-zone Dept-A to-zone untrust]
root@SRX5800# set policy Dept-A-to-untrust then permit application-services idp

[edit security policies from-zone Dept-A to-zone untrust]
root@SRX5800# set policy Dept-A-to-untrust then log session-close

[edit security policies from-zone Dept-A to-zone untrust]
root@SRX5800# up

[edit security policies]
root@SRX5800# edit from-zone Dept-B to-zone untrust

[edit security policies from-zone Dept-B to-zone untrust]
root@SRX5800# set policy Dept-B-to-untrust match source-address
Dept-B-10.2.0.0/16 destination-address any application Allowed-Outbound

[edit security policies from-zone Dept-B to-zone untrust]
root@SRX5800# set policy Dept-B-to-untrust then permit application-services idp

[edit security policies from-zone Dept-B to-zone untrust]
root@SRX5800# set policy Dept-B-to-untrust then log session-close

[edit security policies from-zone Dept-B to-zone untrust]
root@SRX5800# up

[edit security policies]
root@SRX5800# edit from-zone DMZ to-zone untrust

[edit security policies from-zone DMZ to-zone untrust]
root@SRX5800# set policy DMZ-to-untrust match source-address DMZ-Server-
172.31.100.0/24 destination-address any application [ junos-http junos-https ]

[edit security policies from-zone DMZ to-zone untrust]
root@SRX5800# set policy DMZ-to-untrust then permit application-services idp

[edit security policies from-zone DMZ to-zone untrust]
root@SRX5800# set policy DMZ-to-untrust then log session-close

[edit security policies from-zone DMZ to-zone untrust]
root@SRX5800# up

[edit security policies]
root@SRX5800# edit from-zone Internal-Servers to-zone untrust

[edit security policies from-zone Internal-Servers to-zone untrust]
root@SRX5800# set policy Internal-Servers-to-untrust match source-address
Internal-Servers-10.3.0.0/16 destination-address any application [ junos-http
junos-https ]

[edit security policies from-zone Internal-Servers to-zone untrust]
root@SRX5800# set policy Internal-Servers-to-untrust then permit application-
services idp

[edit security policies from-zone Internal-Servers to-zone untrust]
root@SRX5800# set policy Internal-Servers-to-untrust then log session-close

[edit security policies]
root@SRX5800# top

from-zone Dept-A to-zone DMZ {
    policy Dept-A-to-DMZ {
        match {
            source-address Dept-A-10.1.0.0/16;
            destination-address DMZ-Server-172.31.100.0/24;
            application DMZ-Services;
        }
        then {
            permit {
                application-services {
                    idp;
                }
            }
            log {
                session-close;
            }
        }
    }
}
from-zone Dept-B to-zone DMZ {
    policy Dept-B-to-DMZ {
        match {
            source-address Dept-B-10.2.0.0/16;
            destination-address DMZ-Server-172.31.100.0/24;
            application DMZ-Services;
        }
        then {
            permit {
                application-services {
                    idp;
                }
            }
            log {
                session-close;
            }
        }
    }
}
from-zone Dept-B to-zone Internal-Servers {
    policy Dept-B-to-Internal-Servers {
        match {
            source-address Dept-B-10.2.0.0/16;
            destination-address Internal-Servers-10.3.0.0/16;
            application any;
        }
        then {
            permit {
                application-services {
                    idp;
                }
            }
            log {
                session-close;
            }
        }
    }
}
from-zone Dept-A to-zone Internal-Servers {
    policy Dept-A-to-Internal-Servers {
        match {
            source-address Dept-A-10.1.0.0/16;
            destination-address Internal-Servers-10.3.0.0/16;
            application any;
        }
        then {
            permit {
                application-services {
                    idp;
                }
            }
            log {
                session-close;
            }
        }
    }
}
from-zone untrust to-zone DMZ {
    policy untrust-to-DMZ {
        match {
            source-address any;
            destination-address DMZ-Server-172.31.100.0/24;
            application DMZ-Services;
        }
        then {
            permit {
                application-services {
                    idp;
                }
            }
            log {
                session-close;
            }
        }
    }
}
from-zone Dept-A to-zone untrust {
    policy Dept-A-to-untrust {
        match {
            source-address Dept-A-10.1.0.0/16;
            destination-address any;
            application Allowed-Outbound;
        }
        then {
            permit {
                application-services {
                    idp;
                }
            }
            log {
                session-close;
            }
        }
    }
}
from-zone Dept-B to-zone untrust {
    policy Dept-B-to-untrust {
        match {
            source-address Dept-B-10.2.0.0/16;
            destination-address any;
            application Allowed-Outbound;
        }
        then {
            permit {
                application-services {
                    idp;
                }
            }
            log {
                session-close;
            }
        }
    }
}
from-zone DMZ to-zone untrust {
    policy DMZ-to-untrust {
        match {
            source-address DMZ-Server-172.31.100.0/24;
            destination-address any;
            application [ junos-http junos-https ];
        }
        then {
            permit {
                application-services {
                    idp;
                }
            }
            log {
                session-close;
            }
        }
    }
}
from-zone Internal-Servers to-zone untrust {
    policy Internal-Servers-to-untrust {
        match {
            source-address Internal-Servers-10.3.0.0/16;
            destination-address any;
            application [ junos-http junos-https ];
        }
        then {
            permit {
                application-services {
                    idp;
                }
            }
            log {
                session-close;
            }
        }
    }
}
Next, we will create the dynamic group objects that will be used for the IPS policy to protect our infrastructure.
[edit]
root@SRX5800# edit security idp dynamic-attack-group Protect-DMZ
[edit security idp dynamic-attack-group Protect-DMZ]

[edit security idp dynamic-attack-group Protect-DMZ]
root@SRX5800# set filters category values [ HTTP SSL SMTP DNS SHELLCODE
WORM TROJAN ]

[edit security idp dynamic-attack-group Protect-DMZ]
root@SRX5800# set filters direction values [client-to-server exclude-server-to-client exclude-any]

[edit security idp dynamic-attack-group Protect-DMZ]
root@SRX5800# set filters direction expression and

[edit security idp dynamic-attack-group Protect-DMZ]
root@SRX5800# set filters severity values [ critical major minor ]

[edit security idp dynamic-attack-group Protect-DMZ]
root@SRX5800# set filters performance values [ fast normal unknown ]


[edit security idp dynamic-attack-group Protect-DMZ]
root@SRX5800# up

[edit security idp]
root@SRX5800# edit dynamic-attack-group Protect-Clients

[edit security idp dynamic-attack-group Protect-Clients]
root@SRX5800# set filters severity values [ critical major minor ]

[edit security idp dynamic-attack-group Protect-Clients]
root@SRX5800# set filters performance values [ fast normal unknown ]

[edit security idp dynamic-attack-group Protect-Clients]
root@SRX5800# set filters direction values server-to-client

[edit security idp dynamic-attack-group Protect-Clients]
root@SRX5800# set filters category values [ HTTP SSL FTP CHAT SHELLCODE WORM
SPYWARE TROJAN VIRUS ]

[edit security idp dynamic-attack-group Protect-Clients]
root@SRX5800# up

[edit security idp]
root@SRX5800# edit dynamic-attack-group Detect-Infection

[edit security idp dynamic-attack-group Detect-Infection]
root@SRX5800# set filters performance values [ fast normal unknown ]

[edit security idp dynamic-attack-group Detect-Infection]
root@SRX5800# set filters direction values client-to-server

[edit security idp dynamic-attack-group Detect-Infection]
root@SRX5800# set filters severity values [ critical major minor ]

[edit security idp dynamic-attack-group Detect-Infection]
root@SRX5800# set filters category values [ WORM SPYWARE TROJAN VIRUS SHELLCODE ]

[edit security idp dynamic-attack-group Detect-Infection]
root@SRX5800# up

[edit security idp dynamic-attack-group Detect-Infection]
root@SRX5800# up

[edit security idp]
root@SRX5800# edit dynamic-attack-group Protect-Servers

[edit security idp dynamic-attack-group Protect-Servers]
root@SRX5800# set filters severity values [ critical major minor ]

[edit security idp dynamic-attack-group Protect-Servers]
root@SRX5800# set filters performance values [ fast normal unknown ]

[edit security idp dynamic-attack-group Protect-Servers]
root@SRX5800# set filters direction values client-to-server

[edit security idp dynamic-attack-group Protect-Servers]
root@SRX5800# up

[edit security idp dynamic-attack-group Protect-Servers]
root@SRX5800# show | find dynamic-attack-group
dynamic-attack-group Protect-DMZ {
    filters {
        direction {
            values client-to-server;
        }
        severity {
            values [ critical major minor ];
        }
        performance {
            values [ fast normal unknown ];
        }
        category {
            values [ HTTP SSL FTP SMTP DNS SHELLCODE WORM TROJAN ];
        }
    }
}
dynamic-attack-group Protect-Clients {
    filters {
        direction {
            values server-to-client;
        }
        severity {
            values [ critical major minor ];
        }
        performance {
            values [ fast normal unknown ];
        }
        category {
            values [ HTTP SSL FTP CHAT SHELLCODE WORM SPYWARE TROJAN VIRUS ];
        }
    }
}
dynamic-attack-group Detect-Infection {
    filters {
        direction {
            values client-to-server;
        }
        severity {
            values [ critical major minor ];
        }
        performance {
            values [ fast normal unknown ];
        }
        category {
            values [ WORM SPYWARE TROJAN VIRUS SHELLCODE ];
        }
    }
}
dynamic-attack-group Protect-Servers {
    filters {
        direction {
            values client-to-server;
        }
        severity {
            values [ critical major minor ];
        }
        performance {
            values [ fast normal unknown ];
        }
    }
}
Now that we have defined all of the objects, firewall policy, and IPS attack groups, we will finally define the actual IPS policy to take everything into account in the objectives and put it into place.
[edit security idp]
root@SRX5800# edit idp-policy IDP rulebase-ips rule Protect-DMZ

[edit security idp idp-policy IDP rulebase-ips rule Protect-DMZ]
root@SRX5800# set match from-zone untrust to-zone DMZ source-address any
destination-address DMZ-Server-172.31.100.0/24 application default attacks
dynamic-attack-groups Protect-DMZ

[edit security idp idp-policy IDP rulebase-ips rule Protect-DMZ]
root@SRX5800# set then action drop-connection

[edit security idp idp-policy IDP rulebase-ips rule Protect-DMZ]
root@SRX5800# set then notification log-attacks

[edit security idp idp-policy IDP rulebase-ips rule Protect-DMZ]
root@SRX5800# up

[edit security idp idp-policy IDP rulebase-ips]
root@SRX5800# edit rule Protect-Clients-Dept-A

[edit security idp idp-policy IDP rulebase-ips rule Protect-Clients-Dept-A]
root@SRX5800# set match from-zone Dept-A to-zone untrust source-address Dept-A-
10.1.0.0/16 destination-address any application default attacks dynamic-attack-
groups [ Protect-Clients Detect-Infection ]

[edit security idp idp-policy IDP rulebase-ips rule Protect-Clients-Dept-A]
root@SRX5800# set then action drop-connection

[edit security idp idp-policy IDP rulebase-ips rule Protect-Clients-Dept-A]
root@SRX5800# set then notification log-attacks alert

[edit security idp idp-policy IDP rulebase-ips rule Protect-Clients-Dept-A]
root@SRX5800# set then ip-action ip-block target source-address timeout 7200 log

[edit security idp idp-policy IDP rulebase-ips rule Protect-Clients-Dept-A]
root@SRX5800# up

[edit security idp idp-policy IDP rulebase-ips]
root@SRX5800# edit rule Protect-Clients-Dept-B

[edit security idp idp-policy IDP rulebase-ips rule Protect-Clients-Dept-B]
root@SRX5800# set match from-zone Dept-B to-zone untrust source-address Dept-B-
10.2.0.0/16 destination-address any application default attacks dynamic-attack-
groups [ Protect-Clients Detect-Infection ]

[edit security idp idp-policy IDP rulebase-ips rule Protect-Clients-Dept-B]
root@SRX5800# set then action drop-connection

[edit security idp idp-policy IDP rulebase-ips rule Protect-Clients-Dept-B]
root@SRX5800# set then ip-action ip-block target source-address log timeout 7200

[edit security idp idp-policy IDP rulebase-ips rule Protect-Clients-Dept-B]
root@SRX5800# set then notification log-attacks alert

[edit security idp idp-policy IDP rulebase-ips rule Protect-Clients-Dept-B]
root@SRX5800# up

[edit security idp idp-policy IDP rulebase-ips rule Protect-Clients-Dept-B]
root@SRX5800# up

[edit security idp idp-policy IDP rulebase-ips]
root@SRX5800# edit rule Protect-DMZ-Outbound

[edit security idp idp-policy IDP rulebase-ips rule Protect-DMZ-Outbound]
root@SRX5800# set match from-zone DMZ to-zone untrust source-address DMZ-Server-
172.31.100.0/24 destination-address any application default attacks
dynamic-attack-groups [ Protect-Clients Detect-Infection ]

[edit security idp idp-policy IDP rulebase-ips rule Protect-DMZ-Outbound]
root@SRX5800# set then action drop-connection

[edit security idp idp-policy IDP rulebase-ips rule Protect-DMZ-Outbound]
root@SRX5800# set then ip-action ip-block target source-address log timeout 7200

[edit security idp idp-policy IDP rulebase-ips rule Protect-DMZ-Outbound]
root@SRX5800# set then notification log-attacks alert

[edit security idp idp-policy IDP rulebase-ips rule Protect-DMZ-Outbound]
root@SRX5800# up

[edit security idp idp-policy IDP rulebase-ips]
root@SRX5800# edit rule Protect-Servers-Outbound

[edit security idp idp-policy IDP rulebase-ips rule Protect-Servers-Outbound]
root@SRX5800# set match from-zone Internal-Servers to-zone untrust
source-address Internal-Servers-10.3.0.0/16 destination-address any application
default attacks dynamic-attack-groups [ Protect-Clients Detect-Infection ]

[edit security idp idp-policy IDP rulebase-ips rule Protect-Servers-Outbound]
root@SRX5800# set then action drop-connection

[edit security idp idp-policy IDP rulebase-ips rule Protect-Servers-Outbound]
root@SRX5800# set then ip-action ip-block target source-address log timeout 7200

[edit security idp idp-policy IDP rulebase-ips rule Protect-Servers-Outbound]
root@SRX5800# set then notification log-attacks alert

[edit security idp idp-policy IDP rulebase-ips rule Protect-Servers-Outbound]
root@SRX5800# up

[edit security idp idp-policy IDP rulebase-ips rule Protect-Servers-Outbound]
root@SRX5800# up

[edit security idp idp-policy IDP rulebase-ips]
root@SRX5800# edit rule Protect-Servers

[edit security idp idp-policy IDP rulebase-ips rule Protect-Servers]
root@SRX5800# set match from-zone any to-zone Internal-Servers source-address
any destination-address Internal-Servers-10.3.0.0/16 application default attacks
dynamic-attack-groups Protect-Servers

[edit security idp idp-policy IDP rulebase-ips rule Protect-Servers]
root@SRX5800# set then action no-action

[edit security idp idp-policy IDP rulebase-ips rule Protect-Servers]
root@SRX5800# set then notification log-attacks

[edit security idp idp-policy IDP rulebase-ips rule Protect-Servers]
root@SRX5800# up 3

[edit security idp]
root@SRX5800# set active-policy IDP

[edit security idp]
root@SRX5800# show idp-policy IDP
rulebase-ips {
    rule Custom {
        match {
            source-address any;
            destination-address any;
            attacks {
                custom-attacks [ Block-Facebook Compound-Attack ];
            }
        }
        then {
            action {
                drop-connection;
            }
        }
    }
    rule Protect-DMZ {
        match {
            from-zone untrust;
            source-address any;
            to-zone DMZ;
            destination-address [ edit security idp dynamic-attack-group Detect-
Infection DMZ-Server-172.31.100.0/24 ];
            application default;
            attacks {
                dynamic-attack-groups Protect-DMZ;
            }
        }
        then {
            action {
                drop-connection;
            }
            notification {
                log-attacks;
            }
        }
    }
    rule Protect-Clients-Dept-A {
        match {
            from-zone Dept-A;
            source-address Dept-A-10.1.0.0/16;
            to-zone untrust;
            destination-address any;
            application default;
            attacks {
                dynamic-attack-groups [ Protect-Clients Detect-Infection ];
            }
        }
        then {
            action {
                drop-connection;
            }
            ip-action {
                ip-block;
                target source-address;
                log;
                timeout 7200;
            }
            notification {
                log-attacks {
                    alert;
                }
            }
        }
    }
    rule Protect-Clients-Dept-B {
        match {
            from-zone Dept-B;
            source-address Dept-B-10.2.0.0/16;
            to-zone untrust;
            destination-address any;
            application default;
            attacks {
                dynamic-attack-groups [ Protect-Clients Detect-Infection ];
            }
        }
        then {
            action {
                drop-connection;
            }
            ip-action {
                ip-block;
                target source-address;
                log;
                timeout 7200;
            }
            notification {
                log-attacks {
                    alert;
                }
            }
        }
    }
    rule Protect-DMZ-Outbound {
        match {
            from-zone DMZ;
            source-address DMZ-Server-172.31.100.0/24;
            to-zone untrust;
            destination-address any;
            application default;
            attacks {
                dynamic-attack-groups [ Protect-Clients Detect-Infection ];
            }
        }
        then {
            action {
                drop-connection;
            }
            ip-action {
                ip-block;
                target source-address;
                log;
                timeout 7200;
            }
            notification {
                log-attacks {
                    alert;
                }
            }
        }
    }
    rule Protect-Servers-Outbound {
        match {
            from-zone Internal-Servers;
            source-address Internal-Servers-10.3.0.0/16;
            to-zone untrust;
            destination-address any;
            application default;
            attacks {
                dynamic-attack-groups [ Protect-Clients Detect-Infection ];
            }
        }
        then {
            action {
                drop-connection;
            }
            ip-action {
                ip-block;
                target source-address;
                log;
                timeout 7200;
            }
            notification {
                log-attacks {
                    alert;
                }
            }
        }
    }
    rule Protect-Servers {
        match {
            from-zone any;
            source-address any;
            to-zone Internal-Servers;
            destination-address Internal-Servers-10.3.0.0/16;
            application default;
            attacks {
                dynamic-attack-groups Protect-Servers;
            }
        }
        then {
            action {
                no-action;
            }
            notification {
                log-attacks;
            }
        }
    }
}

[edit security idp]
root@SRX5800# show active-policy
active-policy IDP;

[edit security idp]
root@SRX5800# top

[edit]
root@SRX5800# commit
Summary
One of the key technologies that the SRX platform brings to the table when it comes to security is its IPS feature set. With a lineage of more than 12 years from the days of OneSecure, the Juniper IPS solution provides a full solution to inspect and protect against malicious threats that can traverse your network. There is no technology that acts as an overall panacea when it comes to security, but IPS is surely a layer of protection that you should strongly consider deploying in addition to other technologies that we have discussed throughout this book and in the industry at large. In this chapter, we covered the majority of the features in the IPS platform that an administrator is likely to leverage in day-to-day operations. We could easily fill an entire book with Juniper SRX content all by itself, but if you have mastered the concepts in this chapter, then you should be able to get your IPS deployment up and running successfully, and maximize the impact that it can have on your security. IPS remains a key technology that Juniper is focusing on improving and integrating with new technologies going forward, so it should be very exciting to see where the future takes us and how IPS will remain a key contributor to securing our computer networks.
Study Questions
- Questions
What is the difference between full IPS and deep inspection/IPS lite?
How are security updates handled when dealing with an HA cluster?
What types of exploits does IPS focus on preventing compared to technologies like antivirus protection and URL filtering?
What is the difference between signature-based attack objects and protocol anomaly detection?
Describe the key points and differences between an exploit, shellcode, privilege escalation, command and control, and further infection.
What is the difference between client-to-server and server-to-client attacks?
What is the difference between SSL Reverse Proxy and SSL Forward Proxy?
What is the difference between static and dynamic attack groups?
Can you create custom protocol anomaly objects?
Explain how Packet Capture works with IPS.
What does the terminal setting do in the IPS rulebase?
What is the difference between no-action, ignore, and exempting an attack?
What does setting the IPS application to default do compared to other services?
What is an IP action? How does it vary from a regular IPS action?
How is an IPS policy triggered for traffic passing through the firewall?
How many IPS policies can be active at a time?
- Answers
Full IPS provides a much more complete inspection capability than deep inspection/IPS lite. This includes much more in the way of protocol inspection, decoding, application identification, and anomaly-based detection. Deep inspection is typically a small subset of IPS capabilities. The SRX only offers full IPS, including the full protocol parsing capabilities and anomaly protection, compared to legacy ScreenOS platforms and many competitive solutions.
Prior to Junos 12.1, you had to have both members enabled with fxp0 able to reach the Internet as they would independently contact the update server and download and install the database. Starting with 12.1, the primary device will download the package and synchronize it to the secondary device. There is no requirement for fxp0 connectivity (but it’s still a good idea).
IPS is focused on detecting and protecting against network-based attacks and malicious activity. Although it can and does perform attack detection in files, and can prevent access to different resources similar to a URL filter, it is best to leverage an antivirus solution for virus protection and a URL filter for filtering policies as a best practice as they are more focused on their respective tasks.
Signature-based attack objects use detection based on stateful signatures and regular expressions, whereas protocol anomaly-based attack objects are coded into the detector engine to detect anomalous behavior, but this is not strictly a predefined regular expression pattern; rather, it is more intelligent detection.
An exploit is a piece of code that gains control over a victim machine, typically by assuming control over the execution of that program. Shellcode takes the attack a step further to perform some actions after the system execution has been commandeered. Privilege escalation is triggering another local exploit on the victim to raise the attacker’s privileges from running in the context of the exploited process to something much greater. Command and control can be used to phone home to the attacker source for further instructions, and further infections can be used to pivot from the original victim to compromise other devices in the network.
Client-to-server attacks are attacks that are generated from the client, which is attacking the server of the connection. Server-to-client attacks are those in which the server attacks the client that made the connection to the server.
SSL Reverse Proxy (SSL Decryption/Inspection) is a feature supported only on the high-end SRX at the time of writing this book; the SRX will sit in front of an SSL-enabled web server and you will load the private SSL key of the web server on the SRX so that the SRX can crack open the SSL stream and inspect it for attacks. SSL Forward Proxy is used to protect your clients from external web servers by acting as a proxy that rewrites the SSL sessions between the client and the server (bidirectionally) to ensure that it can inspect the traffic and look for threats.
Static groups are groups that you add members into manually, and the groups’ membership will not be changed during updates. Dynamic attack groups are specifically set up to define filters that define the criteria regarding which attack objects to add into the group.
You cannot define the protocol anomaly code itself, as that must be handled by the Juniper Security Team. However, you can create your own attack objects that are made up of protocol anomaly conditions.
Packet Capture is a feature that’s supported in the IPS and can be triggered on an IPS rule-by-rule basis. It can capture not only the packets of the violating attack, but also packets before and after the attack. The packets are not stored on the device, but rather are sent via DMI to an external capture device like the Juniper STRM.
The terminal setting in an IPS rule informs the SRX to stop processing on that rule if the seven-tuple parameters match (just like a firewall). Normally the IPS will process the traffic and evaluate the entire policy in a nonterminal manner, taking the most restrictive action, but terminal informs the SRX to stop processing on that specific rule.
No-Action tells the SRX to keep processing the traffic but allows you to log the traffic (and will count it) if configured. Other actions can take place on the traffic. Ignore tells the IPS to stop processing the session and ignore the duration of the session. It will still be processed by the firewall and other Level 7 features. Exempt tells the SRX to silently ignore the specific attack without logging or counting it but continuing to inspect the rest of the connection for other attacks.
The application “default” in the IPS match criteria tells the SRX to use AppID to detect the application and use that for the attack inspection. Defining other applications will restrict what port or protocol range the IPS will look at for the attack.
A regular IPS action merely takes an action on the offending connection, but an IP action that can be triggered on a rule-by-rule basis specifies what should happen for future connections for the target. These actions can be to log, drop, or close future connections for different targets, which can include source IPs, destination IPs, combinations of the source, destination, zone, and service, and also to define some sort of timeout and refresh criteria when this happens.
You trigger IPS processing on a firewall rule-by-rule basis for traffic that is permitted at the firewall level. This traffic will be referred to the IPS engine for further inspection where it will be evaluated based on the active and defined IPS policy.
You can configure multiple IPS policies, but only one IPS policy can be active at a time. There is a slight variation when it comes to LSYS, but behind the scenes it is still only one policy.
Get Juniper SRX Series now with the O’Reilly learning platform.
O’Reilly members experience books, live events, courses curated by job role, and more from O’Reilly and nearly 200 top publishers.

