Chapter 12. AppSecure Basics
Digging up any computer networking reference material from the 1990s and early 2000s will surely emphasize that application servers listen on “well-known” ports for communication, including the infamous HTTP on TCP port 80. Although many of these conventions are still honored today, we must recognize several facts that have changed since the earlier days of the Internet. First—and this has always been the truth—no application must listen on a particular port or protocol. The only thing that must be true is that the client and server are speaking the same application layer protocol on the expected ports or protocols, and that all transit networking equipment must understand how to forward packets between the client and the server. Over time, web browsers gained popularity and became ubiquitous for virtually any network-capable device. At the same time, server-side technology for HTTP became much more powerful with both open source and commercial tools for not only the web servers themselves, but a plethora of server-side technologies that could bring a dynamic user experience that was once only possible with full client applications. This, coupled with the fact that most computer network administrators allowed only certain ports out of their network (chiefly TCP port 80 for HTTP), gave web technologies even more popularity as communication protocols.
During this time, both nefarious and undesirable parties took notice of the shift in access control and adjusted their applications accordingly. More and more legitimate (although perhaps undesirable) applications shifted to use HTTP as a new transport, or at least communicate over TCP port 80, and other parties that traditionally designed their applications to run over nonstandard ports changed their tune to also leverage TCP port 80, or perhaps other well-known ports that they spoofed to appear as a legitimate application.
For these reasons, simply leveraging a stateful firewall rulebase is not enough to adequately control application access on your network (particularly when dealing with unknown third parties on the Internet). The good news is that in addition to other mechanisms already provided in the SRX, the AppSecure feature set can further assist in not only controlling malicious behavior, but controlling what applications are allowed to communicate over the network itself.
AppSecure Component Overview
Now that we know that traditional Layer 3/Layer 4 stateful firewall policies alone might not be enough to control contemporary application behavior on modern networks, we can explore some proven solutions to empower the administrator to be able to achieve such goals. AppSecure is a suite of components composed of Application Identification at the core, followed by AppTrack, AppFW, AppQoS, AppDDoS, and IPS. There are also the auxiliary components SSL Proxy, User Role Firewall, and UTM. In this chapter, we focus on AI, AppTrack, AppFW, AppQoS, User Role Firewall, and SSL Proxy. IPS and UTM are covered in their own respective chapters, and AppDDoS is outside the scope of this book.
We’ll start with a high-level description of what each component does, and then follow that with an in-depth examination of those features in action.
Application Identification
AppSecure is the name of a product suite that was born from Application Identification (AI) technology. This technology is not new at all, and in fact has been a part of Juniper’s portfolio of products since the IDP standalone devices in 2007, and has been in the SRX as part of IPS since the first version 9.2. AI technology essentially leverages the same components used in the IPS engine but for a defined purpose, which is to identify applications rather than malicious intrusive attacks. In fact, originally it was part of the IPS engine itself, but was abstracted from the IPS engine in version 10.2 and placed in the flow module so that other components can leverage the results of the AI process. AI can identify applications by several different mechanisms, including signature based, heuristic based, and statically defined regardless of the application port or protocol that is used to transmit the application.
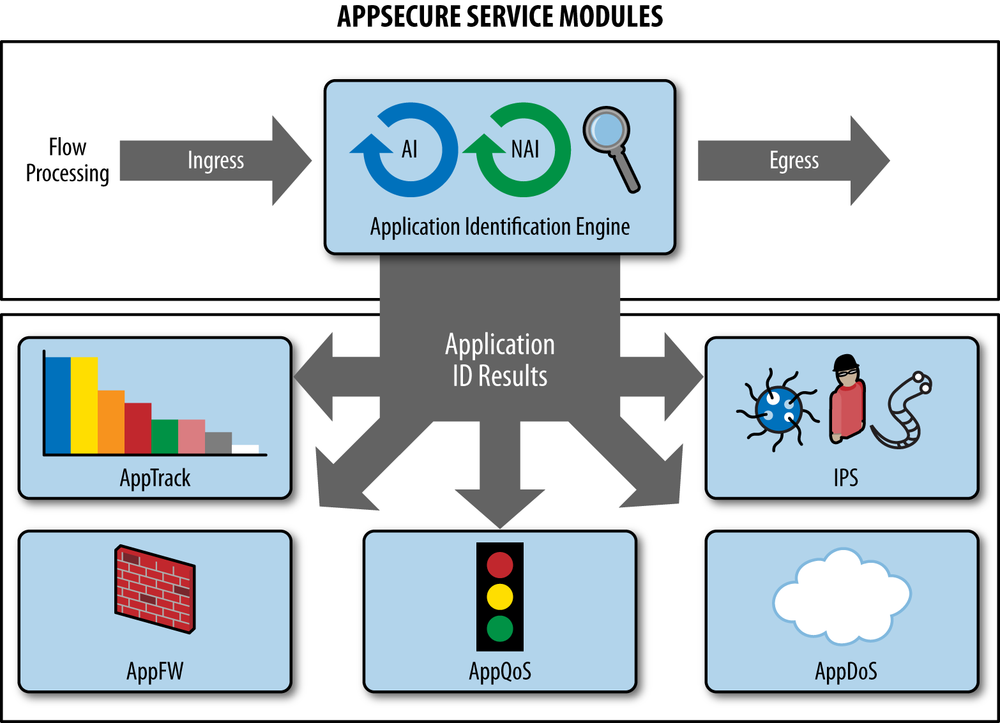
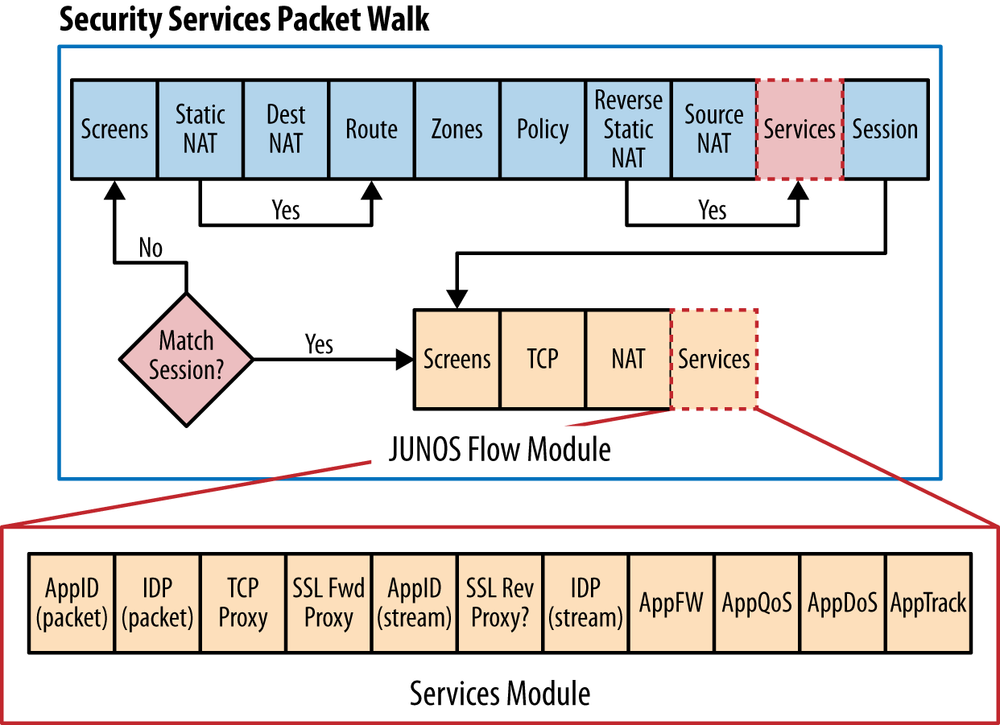
AI is only the beginning of the process chain. The beauty of AppSecure is that the AI information is distributed among other modules in the processing chain, as shown in Figure 12-1. These other components can perform various tasks on the traffic based on the result of the AI process and the configuration of each module. We cover what each module does later in this chapter.
Application Tracking
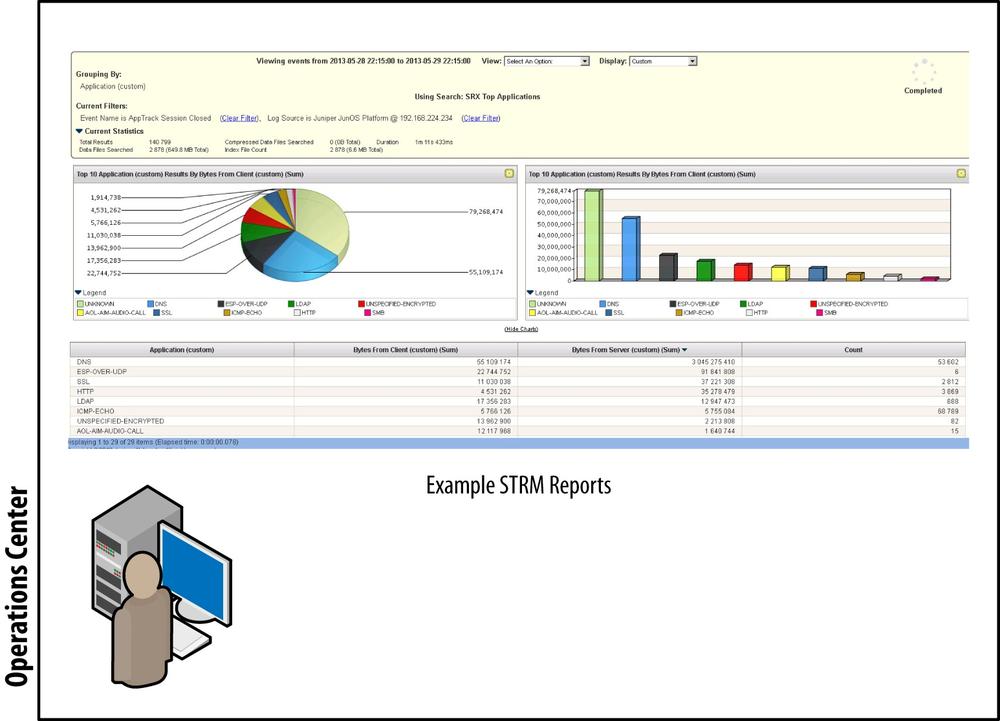
AppTrack was the first AppSecure feature, added back in version 10.2. It is essentially a logging and reporting tool that can be used to share information for application visibility. After AI identifies the application, AppTrack not only keeps statistics on the box for application usage, but also it sends log messages via syslog providing application activity update messages (see Figure 12-2). Because these are sent by syslog, they can be consumed by both Juniper products like the STRM and third-party devices.
Note
AppTrack log information is also contained in firewall logs so long as another AI component is enabled like AppFW or AppQoS. Typically, this is best leveraged by itself if you are not running another AppSecure component but want to still collect this information.
Application Firewall
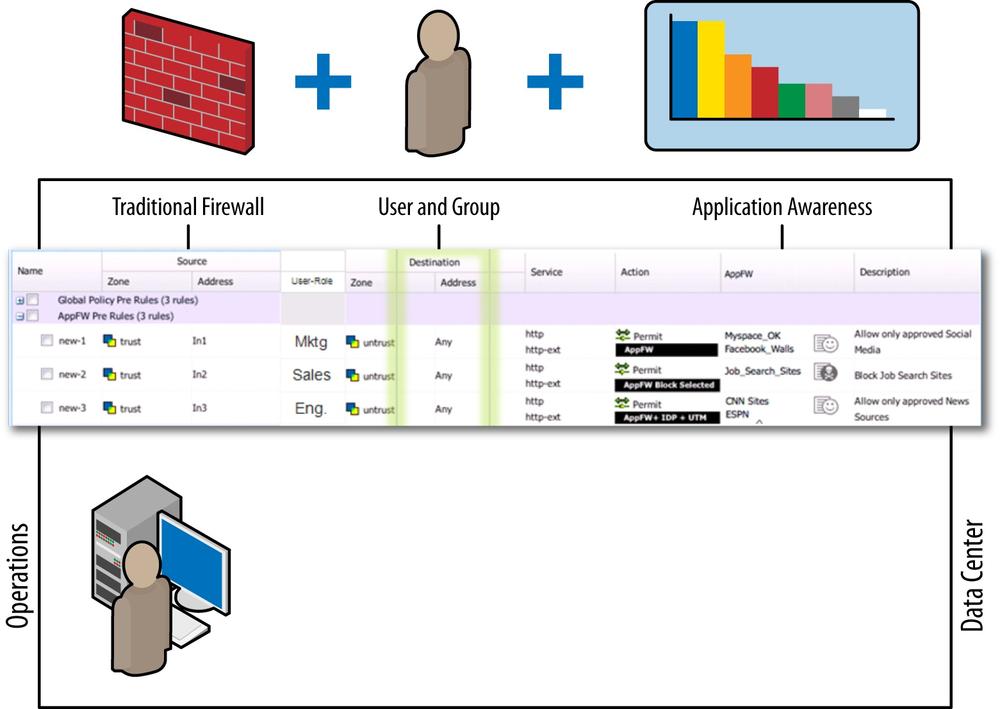
Application Firewall (AppFW) refers to the ability to take the results from the AI engine and leverage them to make an informed decision to permit, deny/reject, or redirect the traffic, as shown in Figure 12-3. AppFW sits on top of the existing stateful firewall engine that makes decisions based on the standard seven-tuple (from-/to-zone, source/destination IP address, source/destination port, and protocol). This allows you to still enforce traditional firewall controls on the traffic while layering AppFW to enforce that the application conforms not only to the well-known port information, but to what is actually being transmitted between the client and the server. As we’ll see later, AppFW provides an auxiliary rulebase that is tied to each firewall rule for maximum granularity with the ability to leverage the standard match criteria of the firewall rule, plus the application identity. You can permit, deny, and reject applications, along with a special redirect feature for HTTP and HTTPS. The redirect action provides a better user experience; rather than explicitly blocking the application, the user can be redirected to an SRX or externally hosted URL. We explore AppFW in much more detail later.
Application Quality of Service
Sometimes permitting or denying traffic in and of itself is not granular enough for real-world scenarios. For instance, you might have traffic that you don’t want to explicitly block, but at the same time, you don’t want to give it free reign on your network. Often such examples include applications that impact productivity (e.g., online games) or consume large amounts of bandwidth such as peer-to-peer apps or streaming video. Alternatively, you might also have applications that you want to provide a higher QoS ranking that will prioritize the traffic over other applications.
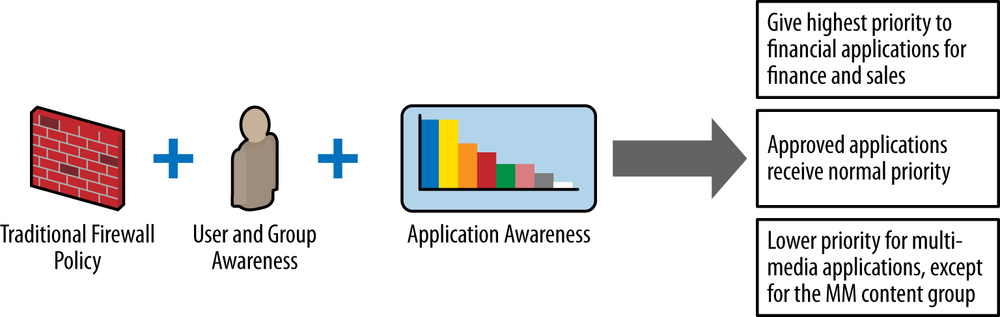
AppQoS allows you to do this by providing the ability to invoke AppQoS on top of the firewall rulebase (similar to how AppFW is instantiated). AppQoS provides the ability to prioritize, rate limit, DSCP rewrite, set loss priority, and queue traffic, as shown in Figure 12-4. It leverages the underlying Junos QoS engine (and hardware on the high-end SRX) but also provides the granularity of the stateful firewall rulebase (including User Role Firewall and Dynamic Application identified by AppID) to match and enforce QoS at the application layer. We examine this feature in much more depth later in the chapter.
User Role Firewalling
Over time we’ve seen computers develop from mainframes to desktops to laptops to ubiquitous mobile and tablet devices. Because the devices themselves have become so portable, this also means that they are not staying in the same place on computer networks, and may move around a computer network numerous times in a single day. The mobility of computing devices means that leveraging traditional firewall techniques based on source addresses has become much more difficult to effectively enforce. This is particularly true when you must deliver a varying network experience for different users based on their identity rather than their IP address. Enter User Role Firewalling, which provides a foolproof mechanism to authenticate users against a backend Active Directory database, local database, or external identity feed, as shown in Figure 12-5. Once the identity information is determined, it can be used in the security policy to provide differentiated services based on the user’s identity rather than strictly on the standard seven-tuple. This even includes the ability to apply differing application firewall, QoS, UTM, IPS, and other services based on user identity.
User Role Firewalling was added starting in Junos 12.1. In this chapter, we examine how it works and how to leverage it with other security components.

SSL Forward Proxy
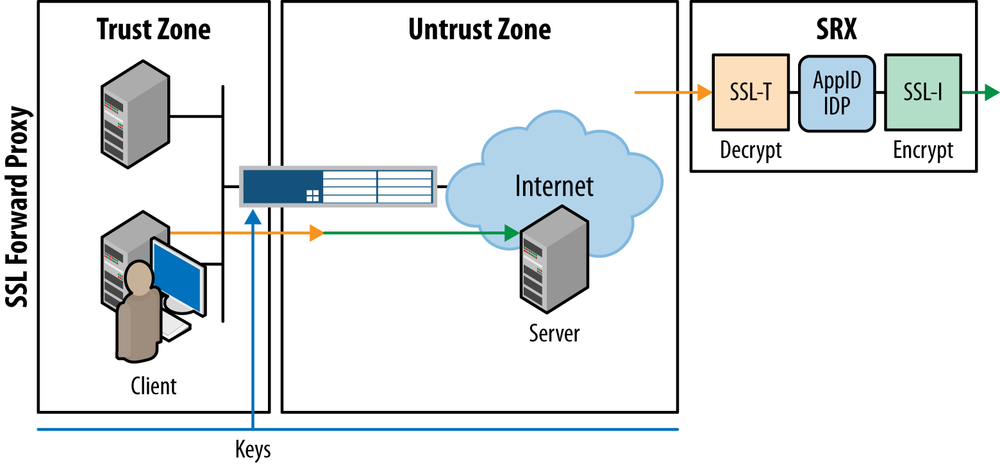
With the advancement of HTTP as a protocol used to deliver applications and communication, it was only a natural progression that the technology that secured it, Secure Sockets Layer (SSL), would become even more prevalent. At the same time, attackers have shifted their attacks from client-to-server to server-to-client as firewalls have secured inbound connections. Evasive applications and malicious attackers have also taken note and sought to use SSL to encrypt communications to bypass traditional security mechanisms like IPS. To help protect against evasive applications tunneling over SSL or malicious threats over SSL against your clients, you can leverage SSL Forward Proxy to crack open the SSL session between the client and server to inspect it with AppSecure and IPS technologies, as shown in Figure 12-6.
Note
The high-end SRX also supports SSL Reverse Proxy for IPS, which allows you to protect your SSL-enabled web servers against client-to-server attacks from malicious clients. This functions by loading the SSL private key onto the SRX and is different from SSL Forward Proxy, which functions to protect your clients against threats from web servers that you do not control. SSL Reverse Proxy is outside the scope of this book but is covered in documentation and in Junos Security (O’Reilly).
AI Processing Architecture
Now that we’ve discussed some of the features that leverage the AppSecure technology, let’s get a deeper understanding of how AI works and feeds the application identity to other components. Looking at our familiar Figure 12-7, AI sits in the services component of the firewall flow engine—as do all other Level 7 features, although AI starts to occur with session setup assuming the firewall policy is to permit the traffic.
Once the AI module is invoked (on firewall permit), then the AI process will begin. We’ll talk a little more about how this works in some detail later, but assume for now that this process is invoked and returns a result. This result in and of itself does not do anything to the traffic; however, the result is delivered to other modules like AppFW, Application Quality of Service (AppQoS), Application DDoS (AppDoS), IDP (aka IPS), and the AppTrack module. These modules can take some action on the traffic that will affect its forwarding and reporting.
Note
It’s important to understand the fundamental importance of the firewall rulebase in this process. If the result of the firewall policy lookup is a deny, then AI will never take place because it will be dropped on the first ingress packet before the AI engine is ever invoked. This differs from some competitive platforms that might still allow traffic to be permitted until an application is identified, even if the firewall action is to be denied—resulting in an information leak!
How Application Identification identifies applications
So we know that AppSecure is a suite of features that relies on AI to identify the applications communicating within firewall sessions, and that these results are shared among other components that can perform some action on the traffic; let’s talk about how the AI process actually identifies the applications themselves. There are essentially five different mechanisms that AI can use to identify traffic at the time of writing this book.
Signature-based pattern match.
Heuristic engine match.
Predictive session matching.
Application system cache.
Level 3/Level 4 application entries.
Additionally, just like IPS, to ensure that the AI process is not vulnerable to network evasions, the firewall flow engine helps with packet serialization and reassembly before a match is made for identification purposes.
What’s important to note is that the SRX need not take port numbers or even protocol into account when identifying applications with signature-based or heuristic pattern match (cached and manually defined are not really applicable to this statement because they are not really detection mechanisms but rather predetermined results). Rather than just relying on the fact that HTTP’s well-known port is TCP port 80 to identify the result. The AppID performed by the SRX will actually dig into the traffic stream itself to determine what the identity of the traffic is based on well-known patterns and behaviors of these applications.
Signature-based pattern matching
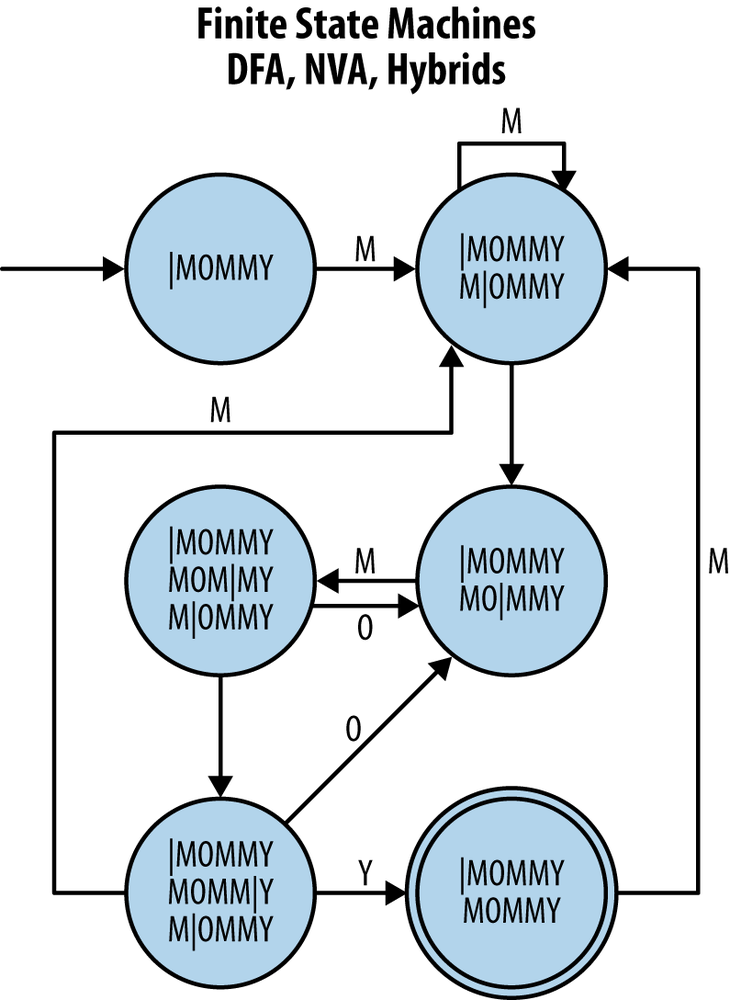
As we alluded to earlier, signature-based pattern matching is one of the most common mechanisms to identify applications, particularly those that are not evasive. Signature-based matching leverages the same pattern-matching technology that is used by the IPS engine to match attacks, but it has been repurposed (particularly from a UI perspective) to be leveraged by the AI engine. AI primarily uses Deterministic Finite Automaton (DFA) technology for pattern matching. The details of this mechanism, shown in Figure 12-8, are beyond the scope of this book, but you can think of it as a state machine that matches patterns based on evaluating different pattern-matching states at each bit of the traffic stream compared to match criteria. When a match occurs, a result can be determined.
All of Juniper’s AI objects are fully open and can be viewed on the SRX—a really nice feature that most competitive platforms do not provide with closed source signatures. The benefit here is that you can not only view the signatures yourself, but also leverage them to create new signatures of your own.
Let’s look at an example that shows the content of the HTTP object.
root@srx3600n0> show services application-identification application detail junos:HTTP
Application Name: junos:HTTP
Application type: HTTP
Description: This signature detects HyperText Transfer Protocol (HTTP), which is a protocol used by the World Wide Web. It defines how messages are formatted and transmitted and what actions Web servers
             and browsers should take in response to various commands. HTTP usually runs on TCP port 80.
Application ID: 64
Disabled: No
Number of Parent Group(s): 1
Application Groups:
    junos:web
Application Tags:
    characteristic        : Can Leak Information
    characteristic        : Supports File Transfer
    characteristic        : Prone to Misuse
    characteristic        : Known Vulnerabilities
    characteristic        : Carrier of Malware
    characteristic        : Capable of Tunneling
    risk                  : 5
    category              : Web
Port Mapping:
    Default ports: TCP/80,3128,8000,8080
Signature:
    Port range: TCP/0-65535
    Client-to-server
        DFA Pattern: (\[OPTIONS|HEAD|GET|POST|PUT|B?DELETE|TRACE|SEARCH|B?PROPFIND|PROPPATCH|MKCOL|B?COPY|B?MOVE|LOCK|UNLOCK|CHECKOUT|CHECKIN|UNCHECKOUT|VERSION-CONTROL|CONTINUE|REPORT|UPDATE|MKWORKSPACE|LABEL|MERGE|BASELINE-CONTROL|MKACTIVITY|CMD|RPC_CONNECT|PATCH|UNLINK|POLL|CONNECT|BPROPPATCH|(UN)?SUBSCRIBE|RPC_IN_DATA|INDEX|REVLOG|CCM_POST|RPC_OUT_DATA|INVOKE|BITS_POST|SMS_POST|B?PROPPATCH|NOTIFY|X-MS-ENUMATTS|DESCRIBE\])[\s\x07\x0b\x1b].+

        Regex Pattern: None
    Server-to-client
        DFA Pattern: (.*HTTP/1\.[01]\s|.?.?\u[\x3C]!\[DOCTYPE\]\u|.?.?\u[\x3C]\[HTML\]\u|.?.?\u[\x3C]\?\[xml\]\u|\[Content-type\]: ).*
        Regex Pattern: None
    Minimum data client-to-server: 8
    Minimum data server-to-client: 8
    Order: 186
Looking at the output of the AI object, we can see a few things. First, there is a lot of detail around descriptions and characteristics of the signature, but most important we can see how the application is being detected. The port range shows that we’re looking for this on any port 0-65535. There is a default port setting, but that’s only used when AI is disabled for services like IPS that normally rely on it. A very important feature that the SRX has is that we match patterns on both client to server and server to client. If you match patterns only on one direction, it could not only be more prone to false positives, but also could be prone to evasions. There are specific patterns that are matched in the client-to-server and in the server-to-client portions of the communication. If we don’t match both directions, we do not have a match.
There is also a regex field, but this refers to PCRE regex rather than the standard Juniper Regex engine. Most signatures just use the Juniper Regex rather than both engines (more performing impacting).
Nested application signatures
Identifying traditional applications like FTP, SSH, SMTP, and others can be useful, but sometimes when you have applications like HTTP act as their own transport layer, stopping at just identifying the application is not useful. Instead we can opt to look deeper into the application stream to identify not only what the base application is, but what application runs on top of it. For instance, in this example, we show the application object for Google.
root@srx3600n0> show services application-identification application detail junos:GOOGLE
Application Name: junos:GOOGLE
Application type: GOOGLE
Description: This signature detects traffic to Google.com.
Application ID: 987
Disabled: No
Number of Parent Group(s): 1
Application Groups:
    junos:web:portal
Application Tags:
    characteristic        : Loss of Productivity
    characteristic        : Bandwidth Consumer
    risk                  : 2
    subcategory           : Portal
    category              : Web
Signature NestedApplication:GOOGLE
    Layer-7 Protocol: HTTP
    Chain Order: Yes
    Maximum Transactions: 15
    Order: 33459
    Member(s): 1
        Member 0
            Context: http-header-host
            Pattern: (.*\.)?google\.com
            Direction: CTS
Here we can see that this is a nested application. The base Layer 7 Protocol is HTTP, meaning that the engine must first identify HTTP as an application, then it will look deeper. In this case, it looks at the header host to determine if it is a well-known Google host. HTTP is not the only application that supports nested apps today; there are 11 others, although HTTP is by far the most commonly used protocol when it comes to nested applications.
Keeping honest applications honest
The important thing to note is that AI is not perfect, and is primarily meant to keep honest applications honest; it is not a security panacea. The best security is a layered approach, not a single mechanism (despite hype from other vendors). For instance, in the last example, technically, if a server would accept it’s IP address as the hostname rather than a DNS name (or the name could be spoofed), then it would be possible to get AppID to detect it as another application (although it can vary between applications based on how the match is performed). It is particularly difficult to identify applications when both the client and the server are colluding. Other mechanisms such as IPS, URL filtering, AV, and other mechanisms can further help to ensure that even if a service acts evasively that the behavior can be detected as such and flagged. For this same reason, just because you have an IPS engine, you shouldn’t merely disable your entire stateful firewall policy; IPS is not perfect at detecting attacks. Security mechanisms are all about mitigating risk, so it’s best to deploy AppSecure with this in mind, and use it as another layer to filter out undesirable applications and to identify behaviors that you might want to block, in conjunction with other traditional mechanisms.
Heuristic-based detection
Another mechanism that the SRX can use to identify evasive applications that do not provide any obvious patterns to match is by leveraging heuristics. Heuristics allow the SRX to look at the traffic in an analytical fashion to detect what application is running. For instance, the SRX supports detecting unknown encrypted applications. If the AI engine cannot detect the application as being another protocol, it can then examine the byte stream to determine if it is encrypted by measuring the randomness of the payload bytes. Any application stream that is encrypted (or compressed) will exhibit a highly randomized byte stream. Again, this isn’t looking for any specific pattern, but looking at the behavior of the traffic. Heuristic-based detection is very similar to the protocol anomalies in the IPS engine, in that it is not something for which we can publish the signatures, because it is code that’s built into the IPS engine itself.
Heuristics is a very powerful mechanism that will likely become even more and more important going into the future as applications become more and more evasive to avoid traditional pattern-matching techniques. Of course, we also have an application named “junos:UNKNOWN,” which means that a pattern match was not possible, so it is also possible to catch any others with this and perform an action accordingly.
Predictive session identification
Sometimes the SRX can identify that a future session will be based on other sessions or activity. For instance, with ALGs (assuming they are enabled) the SRX can identify that the data (auxiliary) session will be based on the control session that negotiates the port or protocol between the client and server dynamically. This is supported for any ALG supported on the SRX. Additionally, using the heuristic engine, the SRX can identify applications based on other information exchanged. For instance, the SRX can look at the distributed hash tables exchanged by peer-to-peer (P2P) applications to determine what servers are super nodes or other server infrastructure for P2P apps, which often change frequently. This ability is called predictive session identification, another mechanism that can be used to identify applications. This won’t appear as a signature with a pattern per se, but will be used to identify application objects that can be used in enforcement control of other components like AppFW and AppQoS.
Application system cache
Application caching is a technique that can be used so that the engine does not have to go through the effort of processing the session with AI each and every time that the traffic is sent through the box. Essentially, application caching (enabled by default) will do a lookup on the first pass of processing traffic to determine if it already knows the identity of the application. This is based on the server IP address, server port, Layer 3/Layer 4 protocol, and LSYS (if used). If the system can identify what the application is, it will make an entry for it so that this isn’t required next time (with a default timeout of 60 minutes).
{primary:node0}
root@SRX100HM> show services application-identification application-system-cache
node0:
-----------------------------------------
Application System Cache Configurations:
  application-cache: on
  nested-application-cache: on
  cache-unknown-result: on
  cache-entry-timeout: 3600 seconds
pic: 0/0
Logical system name: 0
IP address: 173.255.241.134                Port: 53     Protocol: UDP
Application: DNS                           Encrypted: No

Logical system name: 0
IP address: 172.16.42.205                  Port: 445    Protocol: TCP
Application: SMB                           Encrypted: No

Logical system name: 0
IP address: 192.168.222.50                 Port: 1096   Protocol: TCP
Application: MSRPC                         Encrypted: No

Logical system name: 0
IP address: 68.169.198.3                   Port: 80     Protocol: TCP
Application: HTTP                          Encrypted: No

Logical system name: 0
IP address: 192.168.222.35                 Port: 80     Protocol: TCP
Application: HTTP                          Encrypted: No

Logical system name: 0
IP address: 172.16.42.204                  Port: 445    Protocol: TCP
Application: SMB                           Encrypted: No

Logical system name: 0
IP address: 64.208.138.126                 Port: 80     Protocol: TCP
Application: HTTP                          Encrypted: No
We can see from this example that a table is maintained that has a breakdown of each server, destination port, and protocol. This helps to improve performance for AI to near firewall performance when in use, assuming a decent number of cache hits. If a cache hit does occur, the AI engine does not need to inspect the traffic, although other functions will still occur like IPS, AppFW, UTM, and so on.
The benefit to using cache is performance, and the disadvantage is that if a client and server are colluding they might be able to evade the AI engine if they change the session between each round. Running IPS can help to better detect this behavior with the use of anomaly detection, or you can also disable the AI cache so that AI examines the traffic every time.
Note
Of the mechanisms just listed, you can create your own custom signatures and Layer 3/Layer 4 objects, along with influencing if application caching is enabled, and what ALGs and heuristic mechanisms are enabled for AI—although you can’t create your own heuristics or predictive session identification techniques because these are coded into the AI engine itself.
As we showed in Figure 12-2, once the AI engine has produced a match (or unknown), it will publish this application to other components internally that are “interested” in the result. There is nothing that you as the administrator need to do make this data exchange occur, assuming that you haven’t altered any default options (as you can technically disable AI for services like IPS).
Deploying AppSecure
In this section, we discuss how to deploy the different components of AppSecure. We also take a deeper look at each feature so that you have a solid background on how to deploy them. We start with the basics of getting AppSecure up and running, and then break into each feature itself with detailed examples and use cases for each scenario.
AppSecure Licensing
Just like IPS, you don’t technically need a license to run AppSecure, but you will need to load your own AI signatures. This can be useful as a utility function if you have a specific need to detect a particular application. For most users, licensing will be the route to go when it comes to AppSecure. Essentially, the license gets you the Juniper application feed, which can be downloaded for updates from the Juniper live server. Typically, AI objects are discovered and updated on a daily basis with exports shipped at least once a week (to allow for thorough QA testing). The license SKUs vary slightly between the branch SRX and the high-end SRX at the time of writing this book. The branch SRX has licenses for AI + IPS, along with bundle licenses that include other components like UTM as well. Licenses are offered in one-, three-, and five-year terms and are tied to a serial number. On the high-end SRX Series, you can license AI + IPS, but there are no other bundles at this time.
Note
Just like other licenses, if running in HA, you must license both nodes in the cluster. If you do not, on failover, the secondary device will not have an active policy.
Regarding license expiration, Juniper has a 30-day grace period on
expired licensing. After that, AppSecure will continue to run but will
not be able to update its objects. Installing and checking licensing is
just like any other feature, such as IPS or UTM. You would use the
request system license add command
(with either the terminal attribute
to pull the license from the CLI or specify the filename to retrieve the
license from a file either on a local or remote system) along with the
show system license command to view
the licenses loaded and their status. Note that these commands are node
specific, so you need to run them on the specific node on which you want
to retrieve the information.
Downloading and Installing Application Identification Sigpacks
There are two ways that you can download and install the AI sigpacks: either by leveraging the AI framework or using the IPS framework. The difference is that IPS relies on AI to function, so it will automatically pull down both AI + IPS sigpacks. Alternatively, you can also leverage the AI framework to download and install just the AI sigpacks.
Downloading/Installing via IPS
{primary:node0}
root@SRX100HM> request security idp security-package download
node0:
--------------------------------------------------------------------------
Will be processed in async mode. Check the status using the status checking CLI


root@SRX100HM> request security idp security-package download status
node0:
--------------------------------------------------------------------------
Done;Successfully downloaded from(https://services.netscreen.com/cgi-bin/index.cgi)
and synchronized to backup.
Version info:2223(Wed Jan  9 19:12:58 2013 UTC, Detector=12.6.160121210)

{primary:node0}
root@SRX100HM> request security idp security-package install
node0:
--------------------------------------------------------------------------
Will be processed in async mode. Check the status using the status checking CLI

node1:
--------------------------------------------------------------------------
Will be processed in async mode. Check the status using the status checking CLI

{primary:node0}
root@SRX100HM> request security idp security-package install status
node0:
--------------------------------------------------------------------------
Done;Attack DB update : successful - [UpdateNumber=2222,ExportDate=Mon Jan  7 23:39:10 2013 UTC,Detector=12.6.140121210]
     Updating control-plane with new detector : successful
     Updating data-plane with new attack or detector : sucessful

node1:
--------------------------------------------------------------------------
Done;Attack DB update : successful - [UpdateNumber=2222,ExportDate=Mon Jan  7 23:39:10 2013 UTC,Detector=12.6.140121210]
     Updating control-plane with new detector : successful
     Updating data-plane with new attack or detector : sucessful
Note
Prior to Junos 11.4, applications were installed into the Junos configuration itself. Now the applications are installed into a database so they don’t clog up the configuration or get in the way of the commit process.
Also, starting in Junos 12.1, the SRX will automatically synchronize the IPS and AI packages to the secondary member when in an HA cluster. Prior to 12.1, you had to have fxp0 active on both devices and able to reach the Internet. If you did not, then only the active control plane would get the update while the secondary would not. Now with 12.1 regardless of whether you are using fxp0 on both nodes or just leveraging the data plane to get the updates rather than directly out the control plane, the primary SRX will download the package and synchronize it to the secondary node. Installation is still the same process.
Downloading/Installing via AI
root@srx3600n0> request services application-identification download
Please use command "request services application-identification download status" to check status

root@srx3600n0> request services application-identification download status
Downloading application package 2223 succeed.

root@srx3600n0> request services application-identification install
Please use command "request services application-identification install status" to check status

root@srx3600n0> request services application-identification install status
Install application package 2223 succeed
Controlling application caching
Application caching is a feature that allows you to improve performance by caching the results of application detection for a given server IP, protocol, or protocol combination so that in the future the SRX won’t need to run AppID again until the session ages out (one hour by default). Application caching poses the traditional performance versus security dilemma. For the most security-sensitive environments, it’s best to disable this so that AppID runs every time (along with running other services like IPS, UTM, and others). Although the potential for application cache attacks is not very common, it is technically possible if the client and server are both colluding (e.g., with a very intentionally evasive application). There aren’t many common examples of this on the Internet, but we never know how things could change in the future. Running other services (particularly IPS) on top of AppID really solidifies the threat vector because noncompliant applications will more than likely light up the protocol anomaly engine like a Christmas tree.
There are a few options that you have when working with application caching:
Disable application caching entirely: Application caching is enabled by default, but you can disable it entirely.
Disabling application caching for nested applications: The SRX will not cache the results of nested applications like Facebook, so that AppID will need to run on any application that is nested, but still caches base applications.
You can alter the cache timeout so that application ID entries are stored for a shorter period of time.
In this example, we alter the default settings on two different devices. On the SRX100 we disable application caching entirely, whereas on our SRX3600 we disable the caching of nested applications and change the default cache time to 10 minutes.
[edit]
root@SRX100# set services application-identification no-application-system-cache

[edit]
root@SRX100# show services application-identification
no-application-system-cache;

[edit]
root@srx3600n0# set services application-identification nested-application-settings no-application-system-cache

 [edit]
root@srx3600n0# set services application-identification application-system-cache-timeout 600

[edit]
root@srx3600n0# show services application-identification
nested-application-settings {
    no-application-system-cache;
}
application-system-cache-timeout 600;
Enabling application identification heuristics
The SRX can leverage both signature-based pattern matching and heuristic-based application matching. At the time of writing this book, heuristic-based pattern matching is disabled by default, but it can be enabled quite simply. The heuristic engine will allow you to detect applications by other mechanisms that are contained within the AppID engine itself. For instance, the SRX can detect the presence of encrypted applications that are not standard such as ESP, SSL, SSH, and so on. You can then use this result in your AppFW ruleset or other AppSecure features to control the “Unspecified-Encrypted” application. More features will likely be added in the future, so definitely keep updated on the release notes.
[edit]
root@srx3600n0# set services application-identification enable-heuristics

[edit]
root@srx3600n0# show services application-identification
enable-heuristics;
AppID Signature Operations
Although you do not necessarily need to do any of these defined actions, it is very helpful to have a working knowledge of the AppID operations in this section. We discuss enabling and disabling applications, application groups, and creating your own applications or application groups. It is important to understand that starting in Junos 11.4, predefined AppID objects are no longer stored in the Junos configuration, but in a separate database. This is for performance optimization purposes, but it also means that you will need to leverage some other facilities to work with the configuration.
Enabling and disabling applications and application groups
Although it isn’t common, you might find yourself in a position where you need to turn off certain AppID objects or groups (or perhaps you turned some off in the past and you need to turn them back on). With Junos 12.1X44+, you can also override applications using Layer 3/Layer 4 applications if you have a false positive, which we show you how to do in this section. Let’s say, though, that you have a signature that is misfiring on applications broadly. You can disable the signature or group as follows:
root@srx3600n0> show services application-identification application summary
Application(s): 233
Nested Application(s): 872
  Applications                        Disabled         ID      Order
  junos:TWITTER-SSL                    No               1287    33694
  junos:EBAY-CLASSIFIEDS               No               1286    33693
  junos:MYSPACE-SSL                    No               1285    33692
  junos:DROPBOX-CLEAR                  No               1284    33689
  junos:IPERNITY                       No               1282    33680
  junos:PLAXO                          No               1281    33681
  junos:PROJECTPLACE                   No               1280    33685
  junos:MICROSOFT-LIVE-SERVICES        No               1279    33686
  junos:CLARIZEN-SSL                   No               1278    33688
  junos:CLARIZEN                       No               1277    33687
  junos:ZORPIA                         No               1276    33678
  junos:PINTEREST                      No               1275    33679
  junos:GATHER                         No               1274    33676
  junos:GAIAONLINE                     No               1273    33675
  junos:FEDGEWING                      No               1272    33677

root@srx3600n0> show services application-identification group summary
Application Group(s): 82
Application Groups                                Disabled  ID
  junos:web:social-networking:business             No        84
  junos:web:infrastructure:encryption              No        83
  junos:web:remote-access:tunneling                No        82
  junos:web:infrastructure:mobile                  No        81
  junos:web:infrastructure:software-update         No        80
  junos:web:infrastructure:database                No        79
  junos:web:infrastructure                         No        78
  junos:web:gaming:protocols                       No        77
  junos:web:p2p:file-sharing                       No        76
  junos:web:p2p                                    No        75
  junos:web:multimedia:audio-streaming             No        74
  junos:web:social-networking:linkedin             No        73
  junos:web:messaging:mail                         No        72
  junos:web:multimedia:adult                       No        71
  junos:web:remote-access:interactive-desktop      No        70
  junos:web:remote-access                          No        69

root@srx3600n0> request services application-identification application disable junos:TWITTER-SSL
Please wait while we are re-compiling signatures ...
Please wait while we are re-compiling signatures ...
Please wait while we are re-compiling signatures ...
Disable application junos:TWITTER-SSL succeed.

root@srx3600n0> show services application-identification application summary
Application(s): 233
Nested Application(s): 872
  Applications                          Disabled         ID      Order
  junos:TWITTER-SSL                      Yes              1287    33694
  junos:EBAY-CLASSIFIEDS                 No               1286    33693
  junos:MYSPACE-SSL                      No               1285    33692
  junos:DROPBOX-CLEAR                    No               1284    33689
  junos:IPERNITY                         No               1282    33680
  junos:PLAXO                            No               1281    33681
  junos:PROJECTPLACE                     No               1280    33685
  junos:MICROSOFT-LIVE-SERVICES          No               1279    33686
  junos:CLARIZEN-SSL                     No               1278    33688


root@srx3600n0> request services application-identification group disable junos:messaging
Disable application group junos:messaging succeed.

root@srx3600n0> request services application-identification group enable junos:messaging
Enable application group junos:messaging succeed.

root@srx3600n0> request services application-identification application enable junos:TWITTER-SSL
Please wait while we are re-compiling signatures ...
Please wait while we are re-compiling signatures ...
Enable application junos:TWITTER-SSL succeed.
In that example, we first viewed a summary of the application status along with the group status (both outputs were trimmed for brevity, but you can run these on your system). Then we disabled a signature and group and reenabled them just for an example. This is how you would disable a signature or group or reenable signatures if need be. By default, all applications and groups in the export are active (a different concept than how it is run in IPS, where you need to explicitly enable objects). There is also a copy function as part of the request command that allows you to copy the signature into a custom signature so you can modify it, as you can’t modify any predefined signatures—although you can copy it to a new one, modify it, and disable the predefined one. Also note that the action of enabling and disabling signatures survives reboots and application package updates, so you must manually undo it.
We already showed how to view the contents of application objects in the preceding section, but you can also view the contents of application groups with the following command (which can be used recursively to dig deeper into the group until only members remain):
root@srx3600n0> show services application-identification group detail junos:web:multimedia
Group Name: junos:web:multimedia
Group ID: 60
Description: N/A
Disabled: No
Number of Applications: 0
Number of Sub-Groups: 4
Number of Parent-Groups: 1
Sub Groups:
    junos:web:multimedia:audio-streaming
    junos:web:multimedia:adult
    junos:web:multimedia:web-based
    junos:web:multimedia:video-streaming
Parent Groups:
    junos:web

root@srx3600n0> show services application-identification group detail junos:web:multimedia:web-based
Group Name: junos:web:multimedia:web-based
Group ID: 64
Description: N/A
Disabled: No
Number of Applications: 65
Number of Sub-Groups: 0
Number of Parent-Groups: 1
Applications:
    junos:NETFLIX
    junos:AAJTAK
    junos:STEREOMOOD
    junos:HULU
    junos:GROOVESHARK-STREAMING
    junos:BABELGUM
    junos:MOG
    junos:VIDEOSURF
    junos:DEEZER
    junos:WE7
    junos:VIMEO
    junos:HTTP-VIDEO
    junos:SOCIALTV
    junos:LAST-FM-STREAMING
    junos:JUSTIN-TV
    junos:PANDORA
    junos:BEEMP3
    junos:PDF
    junos:METACAFE
    junos:FREEETV
    junos:SILVERLIGHT
    junos:CRACKLE
    junos:IMGUR
    junos:NETFLIX-STREAM
    junos:TIDALTV
    junos:TUDOU
    junos:AOL-VIDEO
    junos:LIVEFLASH
    junos:JANGO
    junos:MIXCLOUD
    junos:YOUTUBE-COMMENT
    junos:TAGOO
    junos:ZAYCEV
    junos:LIVE365
    junos:YOUKU
    junos:YUVUTU
    junos:GOOGLE-VIDEOS
    junos:BOXEE-TV
    junos:YOUTUBE
    junos:DAILYMOTION
    junos:NETFLIX-PLAYER
    junos:TED
    junos:MTV-HD-VIDEO-STREAM
    junos:SONGS-PK
    junos:PPLIVE
    junos:TWITVID
    junos:NEWGROUNDS
    junos:STARTV
    junos:MOBILATORY-SEND-TO-PHONE
    junos:YAHOO-DOUGA
    junos:YOUTUBE-STREAM
    junos:USTREAM
    junos:TVUNETWORKS
Creating Layer 3/Layer 4 applications
In this example, we create a Layer 3/Layer 4 application that overrides the application name for the server 192.168.1.2 on TCP port 80 rather than using the standard AppID pattern matching. This is useful when you have a signature that is having false positive issues on a particular server, but is still valid more broadly on the system (e.g., when you have a poorly written application). Rather than disabling the signature entirely, you can make a Layer 3/Layer 4 signature that overrides this setting for the server only while leaving the signature intact. Then this object can be referenced in other AppSecure policies.
[edit]
root@srx3600n0# set services application-identification application Override-192.168.1.2:TCP80 address-mapping Override destination ip 192.168.1.2 port-range tcp 80

[edit]
root@srx3600n0# set services application-identification application Override-192.168.1.2:TCP80 address-mapping Override order 1500

[edit]
root@srx3600n0# show services application-identification
application Override-192.168.1.2:TCP80 {
    address-mapping Override {
        destination {
            ip 192.168.1.2/32;
            port-range {
                tcp 80;
            }
        }
        order 1500;
    }
}
In that example, we specified a new AppID object that is based on a particular destination IP address and protocol and port match. We also need to define the order when using multiple Layer 3/Layer 4 application signatures for the match. Note that you would also use the same base command to define custom applications with pattern regex, but that is a more advanced topic that is outside the scope of this book.
Creating custom application groups
The SRX allows you to define your own custom application group, which can be composed of predefined applications, as well as custom applications and groups. This group can then be referenced in the AppSecure policies just like any other Application object.
[edit]
root@srx3600n0# set services application-identification application-group Web-and-Games application-groups junos:web

[edit]
root@srx3600n0# set services application-identification application-group Web-and-Games application-groups junos:gaming


[edit]
root@srx3600n0# set services application-identification application-group Web-and-Games applications junos:BITTORRENT-UDP

[edit]
root@srx3600n0# show services application-identification
application-group Web-and-Games {
    application-groups {
        junos:gaming;
        junos:web;
    }
    applications {
        junos:BITTORRENT-UDP;
    }
}
In that example, we created a new group called Web and Games that contains all applications in the Junos:web group, Junos:gaming group, and a standalone application junos:BITTORRENT-UDP, just for example.
Configuring and Deploying AppTrack
AppTrack is a useful feature to provide visibility into the applications that are traversing your network at the application layer rather than just the standard firewall log information. The first question you might have is this: do I need to deploy AppTrack? The answer is yes or no, depending on your scenario. Let’s explore why you might need to leverage AppTrack.
You want to collect Level 7 application information and you do not have another AppSecure feature enabled like AppFW, AppQoS, or IPS. If you have these other features configured in a zone context, it will enable AI for that zone and thus the information will be included in the firewall logs.
You want additional application statistics to be tracked on box. At the time of writing this book, the SRX provides additional statistics on box if you are running AppTrack. These stats can still be collected on a third-party device if AppTrack isn’t being used, however.
You want to collect syslog information not only at the creation or close of a session, but also at defined intervals.
AppTrack generates log messages in addition to the standard firewall log messages that are generated by the stateful firewall process. The information provides some additional information such as dynamic application, nested application, and packets and bytes sent from client to server and server to client. For the most part, these messages are very similar to the firewall logs, especially after Junos 11.1.
<Application Create Log>

<14>1 2013-01-19T15:18:17.040 SRX100HM RT_FLOW - APPTRACK_SESSION_CREATE [junos@2636.1.1.1.2.41 source-address="192.168.224.30" source-port="3129" destination-address="207.17.137.56" destination-port="21" service-name="junos-ftp" application="UNKNOWN" nested-application="UNKNOWN" nat-source-address="173.167.224.7" nat-source-port="14406" nat-destination-address="207.17.137.56" nat-destination-port="21" src-nat-rule-name="1" dst-nat-rule-name="None" protocol-id="6" policy-name="General-Outbound" source-zone-name="LAN" destination-zone-name="Danger" session-id-32="5058" username="N/A" roles="N/A" encrypted="N/A"]

<Application Update Log>

<14>1 2013-01-19T15:18:17.040 SRX100HM RT_FLOW - APPTRACK_SESSION_VOL_UPDATE [junos@2636.1.1.1.2.41 source-address="192.168.224.30" source-port="3129" destination-address="207.17.137.56" destination-port="21" service-name="junos-ftp" application="UNKNOWN" nested-application="UNKNOWN" nat-source-address="173.167.224.7" nat-source-port="14406" nat-destination-address="207.17.137.56" nat-destination-port="21" src-nat-rule-name="1" dst-nat-rule-name="None" protocol-id="6" policy-name="General-Outbound" source-zone-name="LAN" destination-zone-name="Danger" session-id-32="5058" packets-from-client="1" bytes-from-client="48" packets-from-server="0" bytes-from-server="0" elapsed-time="0" username="N/A" roles="N/A" encrypted="N/A"]

<Application Close Log>

<14>1 2013-01-19T15:18:17.040 SRX100HM RT_FLOW - APPTRACK_SESSION_CLOSE [junos@2636.1.1.1.2.41 reason="application failure or action" source-address="192.168.224.30" source-port="3129" destination-address="207.17.137.56" destination-port="21" service-name="junos-ftp" application="FTP" nested-application="UNKNOWN" nat-source-address="173.167.224.7" nat-source-port="14406" nat-destination-address="207.17.137.56" nat-destination-port="21" src-nat-rule-name="1" dst-nat-rule-name="None" protocol-id="6" policy-name="General-Outbound" source-zone-name="LAN" destination-zone-name="Danger" session-id-32="5058" packets-from-client="3" bytes-from-client="144" packets-from-server="2" bytes-from-server="104" elapsed-time="1" username="N/A" roles="N/A" encrypted="N/A"]
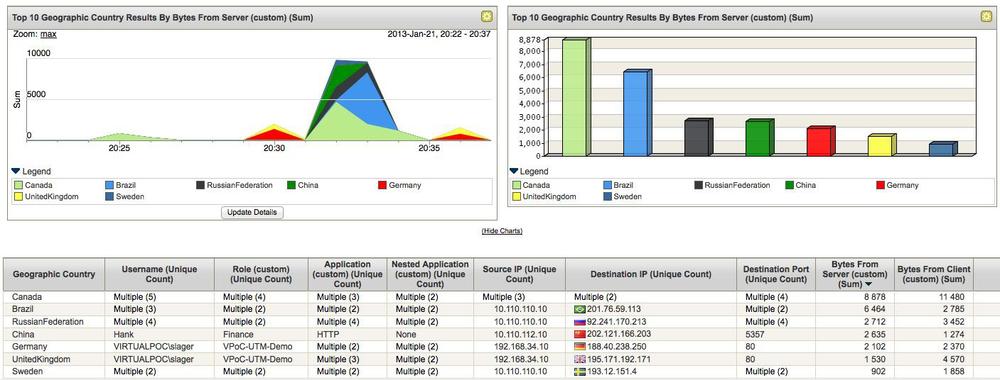
As you can see, the AppTrack logs nearly mirror the standard firewall logs, but they also provide the ability to log when a session is created, during the session at predefined intervals (update logs), and at the session close—whereas the firewall can only log at the session open and close. These logs are generated in syslog format so you can send them to any syslog device. Juniper’s STRM platform has customized dashboards, log views, and reports prebuilt for AppTrack and other AppSecure functions, so it’s always a good choice if you want a plug-and-play experience. Figures 12-9 and 12-10 show samples of the log views in STRM.
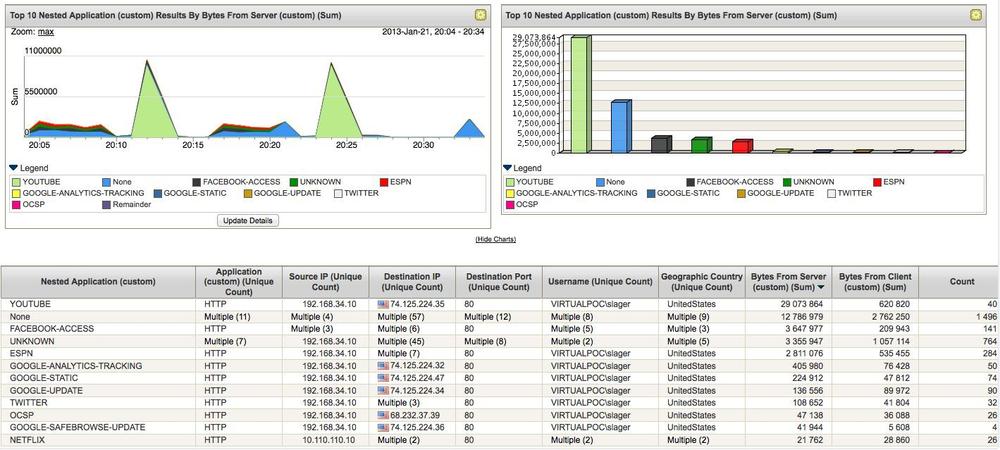
Additionally, AppTrack records some additional session statistics on the platform itself about applications seen sessions, bytes, and so on.
root@SRX3600> show services application-identification statistics applications

Last Reset: 2013-01-19 07:28:30 EST
                  Application     Sessions           Bytes  Encrypted
                   APPLE-PUSH            7           46492         No
                          BGP          276          341167         No
                     BUZZFEED            1            4775         No
                          DNS        10778         2429503         No
                      DROPBOX            2           16110         No
                  ENCODED-DNS        52041      1493293274         No
                 ESP-OVER-UDP           60            4960         No
              FACEBOOK-ACCESS            9           51360         No
          FACEBOOK-ACCESS-SSL          354         4906829         No
                        FLASH           32          126965         No
                          FTP            9        13581304         No
                       GOOGLE           15          779906         No
    GOOGLE-ANALYTICS-TRACKING            2         2175642         No
       GOOGLE-MOBILE-MAPS-APP            2          208041         No
        GOOGLE-SAFEBROWSE-SUB           59        19727033         No
     GOOGLE-SAFEBROWSE-UPDATE           57         5766450         No
                GOOGLE-STATIC           32         1498515         No
                GOOGLE-UPDATE           14         2347290         No
                         HTTP         2711       216440024         No
                   HTTP-VIDEO            1           57112         No
                       ITUNES            3           71617         No
                         KRB5            4            3544         No
                         LDAP          530         7393707         No
                     LINKEDIN            2           50315         No
            LIVE-SKYDRIVE-SSL            3          294613         No
             MICROSOFT-UPDATE            4           23185         No
                        MSRPC          792         3368107         No
                       NBNAME           40           43076         No
                          NTP          205           45524         No
                         OCSP            8           42636         No
                 OUTLOOK-LIVE           21          172475         No
                   PICASA-WEB          147         1935022         No
                          RDP           15           45565         No
                          SIP            9            3941         No
                          SMB          416         2476519         No
                         SMTP          181          368336         No
                         SPDY          120          225731         No
                          SSH          353          867939         No
                          SSL          900       207951891        Yes
                  STUMBLEUPON            2            6423         No
                       SYSLOG         2512       157987112         No
                       TEREDO            5             420         No
                      TWITTER            7          131803         No
                      YOUTUBE           14          126084         No
                      unknown           16             492         No
You might be asking yourself why the SRX generates separate logs for AppTrack versus standard firewall, considering they are so similar? The answer is that AppTrack started in Junos 10.2, and the other features of AppSecure were not available at that point. Because the AppTrack feature used some internal application constructs, it generated its own logs so as to not interfere with the firewall logs. Now that the AppSecure suite is more fully integrated into the SRX infrastructure, it is likely that at some point in the future the logs and functionality will be merged into a single firewall log. Keep posted on the latest Junos release for more information. For now, AppTrack is useful if you want application visibility without deploying other AppSecure features, session update logs, or additional statistics.
Enabling AppTrack
Turning on AppTrack is very simple once you’ve licensed the box and downloaded signature packs (assuming you’re not using your own custom applications). All you need to do is to enable AppTrack on a zone-by-zone basis. This will enable the AppTrack function for any traffic that traverses the zone, whether the zone is the source or destination zone. This provides some granularity when it comes to enabling AI. Once you have AppTrack enabled, the only other thing that you need to do is to make sure that you have data plane logging enabled, either to a syslog server or locally through the control plane. We discussed how to configure this at length in Chapter 5.
In this example, we enable AppTrack in the trust and untrust zone, along with a syslog server to send the logs to our STRM at 192.168.1.20.
[edit]
root@srx3600n0# set security zones security-zone trust application-tracking

[edit]
root@srx3600n0# set security zones security-zone untrust application-tracking

[edit]
root@srx3600n0# set security log mode stream format sd-syslog stream STRM host 192.168.1.20

[edit]
root@srx3600n0# show security zones
security-zone trust {
    interfaces {
        xe-1/0/0.0;
    }
    application-tracking;
}
security-zone untrust {
    interfaces {
        xe-1/0/1.0;
    }
    application-tracking;
}


[edit]
root@srx3600n0# show security log
mode stream;
format sd-syslog;
stream STRM {
    host {
        192.168.1.20;
    }
}
Configuring AppTrack options
In this example, we extend AppTrack from our last example to turn on logging when the session is first created, and set the update interval to every five minutes for long-lived sessions.
[edit]
root@srx3600n0# set security application-tracking first-update session-update-interval 5

[edit]
root@srx3600n0# show security application-tracking
first-update;
session-update-interval 5;
Configuring and Deploying Application Firewall
If you seek to not only have the visibility of AppTrack but also the ability to enforce control on L7 traffic, then AppFW is what you should look to deploy. As we discussed earlier, AppFW is a module that sits on top of the existing firewall policy to extend its capability to enforce beyond the standard seven-tuple (eight if you consider the Source-Identity we discuss later in this chapter) to look at the L7 application as well. The key to properly deploying AppFW is to first ensure that you are building the AppFW policy on a solid security policy just as you have always done with the practice of least privilege. Although some competitors have touted AppFW as a the panacea for security, in our opinion it is just another layer of protection that should be stacked on top of your firewall policy to ensure the identity of the applications conform with the intentions of the security administrator. To do this, the SRX will leverage a separate AppFW policy. This policy or ruleset, to be specific, is very simple. It contains the ability to “match” applications or application groups, along with a “then” action that should be taken on that traffic. Additionally, there is a default action that is taken on the traffic in that rulebase that doesn’t match any rule. Although only one AppFW ruleset can be applied to an individual firewall policy rule, you can specify different AppFW profiles for each firewall policy rule. Additionally, each ruleset can have multiple rules to match different applications.
Three types of Application Firewall rulesets
There are three types of AppFW rulesets: blacklist, whitelist, and hybrid. Actually, hybrid is a new feature starting in Junos 12.1X44. As we mentioned earlier, you can define match criteria for the rules in the ruleset and the action criteria, along with a default action. If you were using a blacklist approach, you would define the rules with actions of deny/reject/redirect and the default action as permit. If you were using the whitelist approach, you would define rules with the action of permit, and the default action would be deny/reject/redirect. The hybrid technique comes from the challenge of nested applications. For instance, let’s say you wanted to define a rule that blocked Facebook, allowed all other HTTP-based web traffic, and denied all other applications. Prior to Junos 12.1X44 you could not do this, because you could not mix permit and deny in the rules; all of the rules had to be either permit or deny, with the default action the opposite. As of version 12.1X45, we added the ability to also leverage redirect as an action of the firewall ruleset for HTTP and HTTPS traffic to redirect to a local splash page, or send the results externally. Just like standard firewall rules, the AppFW ruleset is evaluated from top to bottom until a match is made or the default action is reached.
Let’s take a look at setting up each one of these examples.
Configuring a blacklist application ruleset
In this example, we perform a very common scenario where we want to make sure that a certain application and application group are not allowed. Often this happens with HTTP when you want to allow HTTP as an application but you don’t want to allow certain applications, like Facebook, to be sent. For this example, we allow HTTP as a Layer 4 application out to the Internet on TCP port 80, but we will ensure that Facebook Farmville or any known games are not allowed.
[edit]
root@srx3600n0# set security application-firewall rule-sets Facebook-Games rule 1 match dynamic-application junos:FACEBOOK-FARMVILLE

[edit]
root@srx3600n0# set security application-firewall rule-sets Facebook-Games rule 1 then deny

[edit]
root@srx3600n0# set security application-firewall rule-sets Facebook-Games rule 2 match dynamic-application-group junos:gaming

[edit]
root@srx3600n0# set security application-firewall rule-sets Facebook-Games rule 2 then deny

[edit]
root@srx3600n0# set security application-firewall rule-sets Facebook-Games default-rule permit

[edit]
root@srx3600n0# set security policies from-zone trust to-zone untrust policy Allowed-Outbound match source-address any destination-address any application junos-http

root@srx3600n0# set security policies from-zone trust to-zone untrust policy Allowed-Outbound then permit application-services application-firewall rule-set Facebook-Games

[edit]
root@srx3600n0# set security policies from-zone trust to-zone untrust policy Allowed-Outbound then log session-close

[edit]
root@srx3600n0# show security application-firewall rule-sets Facebook-Games
rule 1 {
    match {
        dynamic-application junos:FACEBOOK-FARMVILLE;
    }
    then {
        deny;
    }
}
rule 2 {
    match {
        dynamic-application-group junos:gaming;
    }
    then {
        deny;
    }
}
default-rule {
    permit;
}

[edit]
root@srx3600n0# show security policies from-zone trust to-zone untrust policy Allowed-Outbound
match {
    source-address any;
    destination-address any;
    application junos-http;
}
then {
    permit {
        application-services {
            application-firewall {
                rule-set Facebook-Games;
            }
        }
    }
    log {
        session-close;
    }
}
So we can see in that example that we first set up an AppFW ruleset that looks to block Facebook Farmville, followed by another rule that blocks any known games. Technically, we could have placed these in the same rule, but we separated them for a cleaner look. Any traffic that doesn’t match those first two rules is then allowed. This AppFW ruleset is applied to our allowed-outbound rule. Of course, this only works when the traffic is permitted because otherwise the AppFW ruleset wouldn’t ever be triggered if we dropped at a Layer 3/Layer 4 level. We also restricted the application match to only junos-http rather than making this any. Why? As we suggested, you shouldn’t put all of your eggs in any one basket when it comes to security. Why open the attack surface to other ports when we can funnel everything outbound to just port 80 and inspect it to ensure that whatever is allowed through at Layer 3/Layer 4 is correct at the Layer 7 level? In your network you’ll likely also specify source and destination addresses as you see fit.
Note
Here it can be good to leverage the following show commands to see both group
membership and individual application members:
root@srx3600n0# run show services application-identification application detail junos:FACEBOOK-FARMVILLE
Application Name: junos:FACEBOOK-FARMVILLE
Application type: FACEBOOK-FARMVILLE
Description: This signature detects the Facebook embedded version of FarmVille. FarmVille is a social game that allows the user to control a virtual farm and share the farming experience with other users.
Application ID: 510
Disabled: No
Number of Parent Group(s): 1
Application Groups:
    junos:web:social-networking:facebook
Application Tags:
    characteristic        : Loss of Productivity
    risk                  : 1
    subcategory           : Social-Networking
    category              : Web
Signature NestedApplication:FACEBOOK-FARMVILLE
    Layer-7 Protocol: HTTP
    Chain Order: no
    Maximum Transactions: 1
    Order: 33048
    Member(s): 2
        Member 0
            Context: http-header-host
            Pattern: apps\.facebook\.com
            Direction: CTS
        Member 1
            Context: http-url-parsed
            Pattern: /onthefarm/.*
            Direction: CTS

 [edit]
root@srx3600n0# run show services application-identification group detail junos:gaming
Group Name: junos:gaming
Group ID: 3
Description: N/A
Disabled: No
Number of Applications: 0
Number of Sub-Groups: 2
Number of Parent-Groups: 1
Sub Groups:
    junos:gaming:web-based
    junos:gaming:protocols
Configuring a whitelist application ruleset
The opposite of explicitly blacklisting certain applications and allowing all others in a ruleset is the whitelist ruleset. The whitelist ruleset explicitly defines the applications that you want to allow while denying all others. The format is the same, but you use the inverse actions of the blacklist ruleset. For this example, we want to allow traffic out on TCP port 80, but we want to ensure that it is truly HTTP and not some other protocol like Skype that is masquerading on TCP port 80.
[edit]
root@srx3600n0# set security application-firewall rule-sets Allow-Web rule 1 match dynamic-application-group junos:web

[edit]
root@srx3600n0# set security application-firewall rule-sets Allow-Web rule 1 then permit

[edit]
root@srx3600n0# set security application-firewall rule-sets Allow-Web default-rule deny

[edit]
root@srx3600n0# set security policies from-zone trust to-zone untrust policy Allowed-Outbound match source-address any destination-address any application junos-http

root@srx3600n0# set security policies from-zone trust to-zone untrust policy Allowed-Outbound then permit application-services application-firewall rule-set Allow-Web

[edit]
root@srx3600n0# set security policies from-zone trust to-zone untrust policy Allowed-Outbound then log session-close

[edit]
root@srx3600n0# show security policies from-zone trust to-zone untrust policy Allowed-Outbound
match {
    source-address any;
    destination-address any;
    application junos-http;
}
then {
    permit {
        application-services {
            application-firewall {
                rule-set Allow-Web;
            }
        }
    }
    log {
        session-close;
    }
}


[edit]
root@srx3600n0# show security application-firewall rule-sets Allow-Web
rule 1 {
    match {
        dynamic-application-group junos:web;
    }
    then {
        permit;
    }
}
default-rule {
    deny;
}
Looking at the example, we see a few interesting things. First, our AppFW ruleset explicitly permits junos:web and denies all else, effectively enforcing that the traffic is web based or denied. The firewall rule is essentially the same as before except it is referencing a different ruleset. Why did we choose to do junos:web rather than junos:HTTP here? The reason is because of a unique ability for HTTP. Unlike other protocols like, say, FTP, SMTP, and DNS (among hundreds of other Level 7 base applications), HTTP can carry additional applications on it called nested apps. If we only defined junos:HTTP, we would only allow applications that we could detect to be HTTP but that we don’t have a more specific match for, like junos:Facebook. By using the junos:web group, we’re including all known web applications functioning over HTTP. This is the best option when you’re looking to generally permit web versus a specific application. Again, this is unique to HTTP at this time. This is true for both blacklist, whitelist, and other apps.
Configuring a hybrid application ruleset
Starting in 12.1X44, we have the ability to define hybrid rulesets, which is useful when you are using nested applications in a complex fashion. As we mentioned, prior to 12.1X44, you could only have one action in your rules (permit or deny) with the default action the opposite. Now you can mix them. Let’s look at a real-world example of how you would do this. In this example, we block any Facebook traffic, allow any other web traffic, and ensure that no applications are allowed to communicate over this rule, which allows traffic on TCP port 80. Silently drop any traffic going to Facebook, but the other nonweb traffic should be actively closed immediately.
[edit]
root@srx3600n0# set security application-firewall rule-sets Allow-Web-No-Facebook rule 1 match dynamic-application-group junos:web:social-networking:facebook

[edit]
root@srx3600n0# set security application-firewall rule-sets Allow-Web-No-Facebook rule 1 then deny

[edit]
root@srx3600n0# set security application-firewall rule-sets Allow-Web-No-Facebook rule 2 match dynamic-application-group junos:web

[edit]
root@srx3600n0# set security application-firewall rule-sets Allow-Web-No-Facebook rule 2 then permit

[edit]
root@srx3600n0# set security application-firewall rule-sets Allow-Web-No-Facebook default-rule reject

[edit]
root@srx3600n0# set security policies from-zone trust to-zone untrust policy Allowed-Outbound match source-address any destination-address any application junos-http

root@srx3600n0# set security policies from-zone trust to-zone untrust policy Allowed-Outbound then permit application-services application-firewall rule-set Allow-Web-No-Facebook

[edit]
root@srx3600n0# set security policies from-zone trust to-zone untrust policy Allowed-Outbound then log session-close

[edit]
root@srx3600n0# show security policies from-zone trust to-zone untrust policy Allowed-Outbound
match {
    source-address any;
    destination-address any;
    application junos-http;
}
then {
    permit {
        application-services {
            application-firewall {
                rule-set Allow-Web-No-Facebook;
            }
        }
    }
    log {
        session-close;
    }
}

[edit]
root@srx3600n0# show security application-firewall rule-sets Allow-Web-No-Facebook
rule 1 {
    match {
        dynamic-application-group junos:web:social-networking:facebook;
    }
    then {
        deny;
    }
}
rule 2 {
    match {
        dynamic-application-group junos:web;
    }
    then {
        permit;
    }
}
default-rule {
    reject;
}
This example shows a few things. First, we have the rule that matches any Facebook traffic (we used the group rather than individual Facebook applications), which we deny. That means that we silently drop the traffic. We have to place the rule before the second rule that allows all web traffic because order is important. If we had the allow all web traffic rule first, we’d never hit the rule that would block Facebook traffic. Finally, we have a default rule that rejects all traffic that isn’t web to ensure that no other applications can be passed through this device. The difference between deny and reject is that the system will send a TCP reset to the client and server rather than just silently dropping the traffic. This is often better for clients because a silent drop will result in application timeouts and sometimes hanging until the OS times out the session rather than immediately reporting the connection loss. Just as before, this hybrid ruleset is applied to our firewall rule, which only permits traffic on the Layer 3/Layer 4 application HTTP.
One question that we often hear when discussing the hybrid approach is why use the hybrid approach instead of splitting this up into multiple firewall rules? The answer is that it depends. If you can key in on some specific attribute like source IP or destination IP, then you might be able to stick to blacklist and whitelist using multiple firewall rules. The issue is that often this functionality is needed when you have a single allow outbound-like rule that doesn’t explicitly define the source and destination hosts, which is normally the case allowing traffic out to the Internet. In these cases where you can’t separate the traffic into separate firewall rules, and you are dealing with nested apps, you might need to use the hybrid approach. This is usually not needed for base applications like FTP, SMTP, DNS, and so on because there is no such overlap in the application traffic like there is with nested apps.
When to use blacklist, whitelist, and hybrid rulesets
So the obvious question here is this: Is there some strategy that I should use when configuring these rulesets? Yes! You can use the following points as a guide:
If you want to allow specific applications while blocking anything else, the whitelist-based approach is best.
If you want to explicitly block specific applications but allow all others, then the blacklist approach is best.
If you are filtering on nested applications and you want to allow some through while blocking others, performing a broader action on all other traffic, then the hybrid approach is best.
From a security perspective, whitelisting is usually the best (particularly if you are specific on the applications you want to allow) because all anomalous and evasive applications will be blocked (unless they are masquerading as the applications you are allowing; in such cases IPS and other Level 7 UTM is helpful as well). Blacklisting is best if you want to prevent certain applications from functioning.
Configuring application redirect
Starting in Junos 12.1X45, you have an additional option that instead of merely silently dropping the traffic or sending a TCP reset (neither of which are particularly pleasant from a user experience perspective), you can redirect the user to either a local web page explaining the violation or to a third-party web server where the connection information is posted as a URL variable so the web server can generate a nice-looking web page with the information to inform the user of the violation.
[edit]
root@srx3600n0# set security application-firewall profile Redirect block-message type custom-text content "YOUR APPLICATION IS BLOCKED DUE TO POLICY VIOLATION"

 [edit]
root@srx3600n0# set security application-firewall rule-sets Facebook-Games profile Redirect

 [edit]
root@srx3600n0# set security application-firewall rule-sets Facebook-Games rule 1 then reject block-message

[edit]
root@srx3600n0# set security application-firewall profile Redirect-Server block-message type custom-redirect-url content "http://blockpage.company.local/ ?JNI_SRCIP=<src-ip>&JNI_SRCPORT=<src-port>&JNI_DSTIP=<dst-ip>&JNI_DSTPORT=<dst-port>&JNI_USER=<username>&JNI_APPNAME=<appname>""

[edit]
root@srx3600n0# set security application-firewall rule-sets Allow-Web profile Redirect-Server

[edit]
root@srx3600n0# set security application-firewall rule-sets Allow-Web default-rule reject block-message

[edit]
root@srx3600n0# show security application-firewall
profile Redirect {
    block-message {
        type {
            custom-text {
                content "YOUR APPLICATION IS BLOCKED DUE TO POLICY VIOLATION";
            }
        }
    }
}
profile Redirect-Server {
    block-message {
        type {
            custom-redirect-url {
                content http://blockpage.company.local/ ?JNI_SRCIP=<src-ip>&JNI_SRCPORT=<src-port>&JNI_DSTIP=<dst-ip>&JNI_DSTPORT=<dst-port>&JNI_USER=<username>&JNI_APPNAME=<appname>";
            }
        }
    }
}
rule-sets Facebook-Games {
    rule 1 {
        match {
            dynamic-application junos:FACEBOOK-FARMVILLE;
        }
        then {
            reject {
                block-message;
            }
        }
    }
    rule 2 {
        match {
            dynamic-application-group junos:gaming;
        }
        then {
            deny;
        }
    }
    default-rule {
        permit;
    }
    profile Redirect;
}
rule-sets Allow-Web {
    rule 1 {
        match {
            dynamic-application-group junos:web;
        }
        then {
            permit;
        }
    }
    default-rule {
        reject {
            block-message;
        }
    }
    profile Redirect-Server;
}
So, as you can see, there are two options that we can leverage
for redirects when using either the deny or reject actions in any of
the rules or the default rule. You can redirect locally, where you
just redirect them to an internal page, or you can redirect to a
third-party device. In this case, we redirect to http://blockpage.company.local/
but we append a special URL string that passes variables: ?JNI_SRCIP=<src-ip>&JNI_SRCPORT=<src-port>&JNI_DSTIP=<dst-ip>&JNI_DSTPORT=<dst-port>&JNI_USER=<username>&JNI_APPNAME=<appname>.
Essentially, this passes the information to the third-party web
server so that the content can be displayed in a more elegant
fashion, as the server can take the information in the URL and turn
that into a custom page with the real parameters of the
message.
Configuring and Deploying Application Quality of Service
Sometimes the pure action of dropping an application is not appropriate, but at the same time, you might want to have some sort of control of the traffic and not give it carte blanche access to the network from a traffic perspective. There are several common scenarios for this. For instance, many universities and ISPs might not be able to block traffic, but they also want to ensure that particular applications like P2P applications cannot completely saturate the network bandwidth either. Another major use case is in the enterprise, ensuring that traffic receives a certain priority of processing within the network. Of course, you could always handle this with the standard Junos QoS facilities, but these cannot function at the application level and operate at the packet level. AppQoS allows you to take the application identity information into account to jump to the next level with QoS.
Note
AppQoS only takes place on the egress interface of the SRX and does not take place on the ingress. If you want to do ingress traffic processing, then you should use ingress policing. This is not application aware but can leverage stateless filters to define how it should be processed.
So we know that AppQoS leverages the application identity information determined from AppID, but how does it function? Very similar to AppFW, AppQoS uses a ruleset-based approach that is enabled on a per firewall rule basis. The ruleset contains rules that define match criteria, which is the application or application groups. AppQoS does not have a default-rule like AppFW, but you can leverage the concept of unknown or any application along with specific groups and applications. The actions of each rule include configuring any or all of the following:
DSCP rewrite
Forwarding class
Logging when thresholds are met
Loss priority
Rate limiters (configurable in both client-to-server and server-to-client directions)
Note
It’s worthwhile to note that on the high-end SRX platforms, all of the QoS is done in the network processor for maximum capabilities and minimal impact on the system. Because this is done in a potentially distributed manner, if your traffic happens to egress multiple network processors, each network processor will handle the rate limiting and forwarding class separately so it is possible that more traffic could be sent than what is defined if not all of the traffic for an individual profile passes through multiple NPUs. However, you can usually engineer around this, and on the high-end SRX you’re usually dealing with much larger circuits so this won’t be a main concern.
The next logical question is what function and use case each of the items provides. Let’s take a look.
DSCP rewrite
DSCP is a standard 6-bit field in the IP header that is well understood by networking equipment like routers, switches, firewalls and other devices. This field can be leveraged to make class of service, routing, and filtering decisions by upstream and downstream devices in the data path. The advantage of setting this on the SRX is that the SRX is application aware, whereas most of the routers and switches are not or would have to incur a major performance tax. The SRX could therefore be used to identify that the traffic is, say, VoIP, and rewrite the DSCP so that other devices in the network will give it low latency prioritized forwarding. On the other hand, you could change the bits for unknown or P2P traffic so that at your edge router it could give it the lowest service. This is particularly useful if you have multiple firewalls that do not sit directly on the edge but rather an edge router like an MX.
Forwarding class
Forwarding classes are a concept that is used to define how traffic is mapped to different hardware queues in the network processor (or in software on the branch SRX). These different queues are serviced by the engine in different ways, depending on the settings. Junos includes four default forwarding classes or queues: Best Effort, Expedited Forwarding, Assured Forwarding, and Network Control. Typically, you would put general traffic in Best Effort, higher priority traffic that needs better service in Expedited Forwarding, sensitive latency traffic into Assured Forwarding, and leave network protocol traffic for the Network Control queue. This allows you to better service traffic when bandwidth is in contention on the egress interface and decisions need to be made on which traffic to service first (queuing strategies).
Forwarding classes can be very complex and offer a lot of different tuning knobs that are outside the scope of this book. We recommend that you review the Class of Service Configuration guide if you’re interested in deeper detail with custom forwarding classes. For the purposes of this book, we focus on leveraging the predefined forwarding classes.
Logging
This is a simple on–off setting that can be defined on a per-rule basis. When it is enabled and a QoS action is triggered, like exceeding a rate limit, a separate AppQoS log message will be generated (on the data plane via syslog), which informs that a QoS action was taken on the traffic.
Loss priority
Loss priority is a concept that is used to define if the traffic should be dropped when there is congestion. The SRX supports four different loss priorities, Low, Medium Low, Medium High, and High. Different loss priorities define at what level of queue saturation (in percentage) the probability of dropping traffic will be. By default, all of the loss priorities have the default drop priority, but you can set your own as well (in fact you will need to; otherwise, it won’t have an effect until the interface is at 100 percent capacity which isn’t of much use). This is because Juniper has no idea how individual customers will want their system to behave when the queue begins to fill so this makes sense and is considered an advanced feature.
Rate limiter
Rate limiters are really at the core of AppQoS and allow you to define a rate at which traffic will be permitted to flow out of the SRX. This allows you to specifically set caps on the traffic in both the client-to-server and the server-to-client directions. Setting a bidirectional limiter is very important because your circuit might have asymmetric data rates—very common in broadband environments. The rate limiter allows you to set the bandwidth limit as well as the burst size. The bandwidth limit is the base amount of bandwidth that you want to allow the traffic to be allowed to use, although the burst size is the amount of traffic that you will allow the traffic to use if there is room available.
Configuring an AppQoS example
We’ve examined what AppQoS looks like from a high level, but there’s nothing better than looking at an example to see how it is actually leveraged. In this example, we configure AppQoS on a firewall rule called allowed outbound in a university environment where no traffic filtering can be performed, but traffic can be classified and rate limited based on type. We assume the following criteria:
P2P traffic should be put into the Best Effort forwarding class, and should be rate limited to 100 Mbps in each direction. Log when a violation occurs.
Multimedia traffic should be given Expedited Forwarding and limited to 200 Mbps in the download direction and 50 Mbps in the upload direction.
Unknown applications should be put in the Best Effort forwarding class and be given 25 Mbps in both directions. Set the DSCP value to 000000, which upstream routers know should be given the lowest processing priority.
Any other known application should be given 50 Mbps in both directions.
[edit]
root@srx3600n0# set class-of-service application-traffic-control rule-sets AppQoS rule 1 match application-group junos:p2p

 [edit]
root@srx3600n0# set class-of-service application-traffic-control rule-sets AppQoS rule 1 then forwarding-class best-effort log rate-limit client-to-server 100Mbps server-to-client 100Mbps

[edit]
root@srx3600n0# set class-of-service application-traffic-control rule-sets AppQoS rule 2 match application-group junos:multimedia

[edit]
root@srx3600n0# set class-of-service application-traffic-control rule-sets AppQoS rule 2 then forwarding-class expedited-forwarding rate-limit client-to-server 50Mbps server-to-client 200Mbps

 [edit]
root@srx3600n0# set class-of-service application-traffic-control rule-sets AppQoS rule 3 match application-unknown

[edit]
root@srx3600n0# set class-of-service application-traffic-control rule-sets AppQoS rule 3 then dscp-code-point 000000

[edit]
root@srx3600n0# set class-of-service application-traffic-control rule-sets AppQoS rule 3 then forwarding-class best-effort rate-limit client-to-server 25Mbps server-to-client 25Mbps

[edit]
root@srx3600n0# set class-of-service application-traffic-control rule-sets AppQoS rule 4 match application-known

[edit]
root@srx3600n0# set class-of-service application-traffic-control rule-sets AppQoS rule 4 then rate-limit client-to-server 50Mbps server-to-client 50Mbps

[edit]
root@srx3600n0# set security policies from-zone trust to-zone untrust policy Allowed-Outbound match source-address any destination-address any application any

[edit]
root@srx3600n0# set security policies from-zone trust to-zone untrust policy Allowed-Outbound then permit application-services application-traffic-control rule-set AppQoS

[edit]
root@srx3600n0# set security policies from-zone trust to-zone untrust policy Allowed-Outbound then log session-close

[edit]
root@srx3600n0# show class-of-service
application-traffic-control {
    rate-limiters HTTP {
        bandwidth-limit 5000;
    }
    rate-limiters P2P {
        bandwidth-limit 100000;
    }
    rate-limiters 100Mbps {
        bandwidth-limit 100000;
    }
    rate-limiters 200Mbps {
        bandwidth-limit 200000;
    }
    rate-limiters 50Mbps {
        bandwidth-limit 50000;
    }
    rate-limiters 25Mbps {
        bandwidth-limit 25000;
    }
    rule-sets AppQoS {
        rule 1 {
            match {
                application-group junos:p2p;
            }
            then {
                forwarding-class best-effort;
                rate-limit {
                    client-to-server 100Mbps;
                    server-to-client 100Mbps;
                }
                log;
            }
        }
        rule 2 {
            match {
                application-group junos:multimedia;
            }
            then {
                forwarding-class expedited-forwarding;
                rate-limit {
                    client-to-server 50Mbps;
                    server-to-client 200Mbps;
                }
            }
        }
        rule 3 {
            match {
                application-unknown;
            }
            then {
                dscp-code-point 000000;
                forwarding-class best-effort;
                rate-limit {
                    client-to-server 25Mbps;
                    server-to-client 25Mbps;
                }
            }
        }
        rule 4 {
            match {
                application-known;
            }
            then {
                rate-limit {
                    client-to-server 50Mbps;
                    server-to-client 50Mbps;
                }
            }
        }
    }
}

[edit]
root@srx3600n0# show security policies from-zone trust to-zone untrust policy Allowed-Outbound
match {
    source-address any;
    destination-address any;
    application any ;
}
then {
    permit {
        application-services {
            application-traffic-control {
                rule-set AppQoS;
            }
        }
    }
    log {
        session-close;
    }
}
So let’s talk a bit about this example. The first thing
that we had to do is to configure the AppQoS infrastructure, which in
this case was rate limiters. If you were doing all sorts of advanced
options like configuring custom forwarding classes, queues,
schedulers, loss priority, and so on, then you would also want to do
this first. Each of these values are configured under the set class-of-service stanzas, which is
common to standard Junos QoS rather than in the security
configuration. This is because these components are shared with the
standard QoS facilities in Junos, although the
application-traffic-control ruleset is unique to AppQoS today. Next
you create an AppQoS ruleset that is similar to AppFW from the
perspective that it matches applications and groups and then applies a
QoS action. Finally, this ruleset is applied to a firewall rule if the
action is permit. In this example, we only set the bandwidth limit
without configuring a burst size, because the system can automatically
generate one for us and that’s fine for most cases. We had to define a
rate limit for each bandwidth amount leveraged, in this case 25 Mbps,
50 Mbps, 100 Mbps, and 200 Mbps. The setting itself is in Kbps not
Mbps (1 Mb is 1,000 Kb) and remember we’re talking about bits not
bytes (1 byte = 8 bits)—although the burst size is actually defined in
bytes, which is no doubt a gotcha. By letting the system define it,
you don’t have to worry much about it.
For the rulesets, order is important. And like AppFW we try to leverage application groups wherever possible because they can encompass numerous applications of the same type and are automatically updated with new members when they are created. There are three constructs in AppQoS that are a bit unique to AppQoS versus AppFW, which are Application Any, Application Known, and Application Unknown. Basically, Application Any is any application known or unknown, Application Known is any application that is not Unknown (so we have a match for it in the AppID database), and Application Unknown is any application for which we do not have a match in the database. We leveraged these identities for the last two rules. Unknown apps in particular are often items that you would want to rate limit because they could be some sort of P2P or evasive application that could consume a lot of bandwidth (if you can’t outright block them due to organizational policy).
Note
When setting rate limiters, it is important to understand that these are applied to the rule as a whole so collectively all traffic that is processed by the rule will be counted toward the rate limit. At the time of writing this book, there is no per user or per flow rate limiting available in AppQoS. You can, however, break out firewall rules to provide better granularity for enforcing per user controls, but this probably isn’t ideal at scale.
Configuring and Deploying User Role Firewall
Much has changed in the last 10 years in networking. We’ve shifted from legacy desktop PCs hard-wired into the network to laptops and now mobile devices that fit in our pockets. Users can be placed anywhere in the network, and they desire the same experience wherever they are. At the same time, as a network security administrator, you are tasked with the job of securing the network and providing this level of functionality. We feel that it is always best to segment users into separate VLANs with different security controls wherever possible through the use of end-to-end Network Access/Admission Control (NAC), such as the Juniper Unified Access Control system. The challenge with this system for the casual network administrator who wears many hats is that it can be a lot of work to do a full NAC deployment. For the environments that do have the resources to deploy this, it is a very powerful capability to be leveraged. For instance, you can fully authenticate and evaluate a host’s security posture before it ever even gets an IP address on the network, and it can be segmented into the appropriate VLAN, too. When deploying full NAC is not an option, the User Role Firewall (UserFW) feature is a good option to provide identity services and control at the firewall level for enforcement. Even better, because the SRX uses the User Identity in the match criteria, this can be used to incorporate other Level 7 services including different AppFW, AppQoS, IPS, and UTM criteria.
Note
UserFW requires that you are running Junos 12.1+ on the SRX along with UAC 4.2+. Ideally, you will be running UAC 4.3+ because that has some additional tools for newer versions of Active Directory.
UserFW functionality overview
At the time of writing this book, the UserFW feature leverages both the SRX and the UAC solution that is available in a UAC, Juniper MAG Gateways, or VM appliance. In terms of functionality, this is how UserFW operates:
The SRX and UAC are configured to securely connect to each other, creating a control channel to exchange user-to-IP information.
A new firewall session arrives on the SRX. The SRX does the normal packet lookup to determine what should happen with the traffic. There is an additional match criteria field that defines the identity of the source IP from a user-to-IP mapping. As part of the firewall policy lookup, the SRX is responsible for determining if there is a known user-to-IP mapping for that source IP. If there is, the firewall will evaluate the policy as usual without any additional external intervention.
If there is no source-to-IP mapping for that source, the SRX will do a redirect to the UAC on the traffic (if configured to do so) to trigger authentication. This redirect works for HTTP or HTTPS traffic. If the traffic is not HTTP or HTTPS, it cannot be redirected, but the good news is that most modern OSs automatically send an HTTP message to the Internet to determine if they are behind a captive portal or not, so even if a web browser isn’t open, you’ll likely see a message to authenticate. This can also be done in an automated fashion using Windows Login scripts pushed out by Group Policy.
The redirected HTTP(S) traffic will arrive on the UAC. The UAC will attempt to trigger an SPNEGO authentication session with the browser. SPNEGO is a standards-based authentication mechanism in web browsers that instructs the user’s machine to go out and get a Kerberos ticket from the domain controller and present it to the server. The server will then validate the user Kerberos ticket with Active Directory to ensure its validity.
If the client browser doesn’t support SPNEGO (most all of them do, but some need to be configured to do so; see the browser documentation for more information), then the UAC will fall back to captive portal authentication where the user will enter his domain credentials. If you have an advanced UAC license, then you can also leverage other authentication mechanisms like certificates so that the user doesn’t need to manually authenticate with credentials.
Once the SPNEGO exchange has occurred, the client session will maintain an HTTPS AJAX session with the UAC that will send a heartbeat every five seconds to ensure that no other device could come in and steal the IP address of the user and gain that user’s privileges if he were to log off.
The UAC will then send a message to the SRX that will include the user-to-IP mapping and the associated Roles for that user.
From now on, the SRX will have the user-to-IP mapping until the client’s session ends so the policy lookup will be very fast and not require any user intervention. When the user closes his session, the UAC will remove the user-to-IP mapping from the SRX.
All of this might sound a little bit more complex than competitive solutions, and in truth it is; however, it is also more secure. Many competitive solutions merely place an agent on a domain controller in the hopes that the client will “log in” to the machine without cached credentials and the domain controller will know about it. In reality, we know that this doesn’t always happen. Second, these solutions can’t account for the fact that users log off (which Active Directory doesn’t do a great job of tracking) nor that they might simply drop from the network—particularly on Wi-Fi. All of this opens them up to another user coming along and leveraging the IP address of the said client and gaining their privileges. This isn’t possible with the SRX solution. The aforementioned competitive approach might be fine for environments that merely want a best effort security implementation, but for those that want deterministic security, the SRX and UAC solution is the way to go—and for even more powerful security, the full UAC NAC solution can offer end-to-end deterministic security.
Additionally, the SRX solution scales considerably better than the competitive solutions, with up to 50,000 concurrent users per platform on the high-end SRX at the time of writing this book (hopefully much higher in the future). It also functions well in domains with multiple domain controllers, trusts, and forests, something that other competitive solutions cannot boast, as they would need to install agents on every domain controller.
Note
At the time of writing this book, Juniper is also in a beta phase of testing an Integrated UserFW product that doesn’t require a secondary device or agent. Keep posted to the release notes for more information.
UserFW packaging and licensing
As we pointed out, the UserFW solution today does require the use of the UAC platform. The good news is that Juniper has packaged this in a way that it isn’t cost or administratively prohibitive to deploy. First, on the SRX itself, there are no additional licensing or cost requirements; you simply need to be running Junos 12.1+. On the UAC, the MAG2600 starts at $1,500, with licensing for 25 role-based firewall users at $300, making this affordable for all but the smallest of SMB deployments. This can scale up to massive deployments with tens of thousands of users on the high-end SRX with full HA capabilities on both the SRX and the UAC platforms.
Deploying UserFW
The initial deployment of the UserFW feature is a little bit complex, but if you follow these steps, you should be able to get it up and running without issues. The good news is that once the UserFW setup is up and running, you should be able to operate it without much effort because the overhead is quite small. In terms of setting things up, the tasks break down into three areas:
Configuring the SRX
Configuring the UAC
Miscellaneous tasks in your Active Directory environment
In the following sections, we look at what must be done in each of these three areas to ensure that your infrastructure is set up to run UserFW properly. We use Figure 12-11 as a model for our configuration, with clients in the trust zone, a server zone that houses our Active Directory infrastructure, and the Infranet controller, and resources that our users want to access on the Internet.

Configuring the SRX for UserFW
There are a few required and some optional configuration elements that we discuss in this section to help prepare the SRX to act as a UserFW enforcer.
Required steps include the following:
Configure the SRX to UAC communication.
Ensure that DNS and NTP are enabled on the SRX.
Configure firewall rules to redirect clients to UAC.
Configure firewall rules leveraging Source-Identity to match users.
Optionally, depending on your deployment, you might want or need to do the following:
Create firewall rules to allow clients to communicate with the Infranet controller and Active Directory infrastructure (required in our example because clients and the IC/AD are in different zones; if they were all in the trust zone, it wouldn’t be required).
Create rules to allow IC/AD infrastructure or other equipment to communicate out the firewall (required in this example, for AD to go to the Internet for DNS resolution).
Configure local entries for UserFW. This is useful if you want to bypass UAC authentication or if you are using NetConf as a user identity feed to pass user-to-IP mapping via some other channel.
Let’s look at configuring this example with the required components just mentioned. Let’s assume the following information:
Clients are in the 192.168.1.0/24 Subnet in the trust zone.
The Servers zone contains the Infranet controller and the Active Directory domain controller. The IC has an IP address of 172.16.1.50 and the domain controller is 172.16.1.60. The IC has a DNS name of ic.company.local.
Kevin has a hardcoded IP address that we want to enter into the local database as 192.168.1.100. He is part of the Sales Team for the Sales role. He should be able to reach Salesforce.
Bob is the CEO and should be able to access both Facebook and Salesforce.
Susan is part of the Marketing role and should be able to reach Facebook to perform company-related marketing tasks.
Let’s start by configuring the SRX to IC communication.
[edit]
root@srx3600n0# set services unified-access-control certificate-verification warning timeout-action open

[edit]
root@srx3600n0# set services unified-access-control captive-portal IC-Redirect redirect-traffic unauthenticated redirect-url "https://ic.company.local/"

[edit]
root@srx3600n0# set services unified-access-control infranet-controller ic.company.local address 172.16.1.50 interface ge-0/0/0 password onetimepassword

[edit]
root@srx3600n0# set system name-server 172.16.1.60

[edit]
root@srx3600n0# set system ntp server 172.16.1.60

[edit]
root@srx3600n0# show services unified-access-control
infranet-controller ic.company.local {
    address 172.16.1.50;
    interface ge-0/0/0.0;
    password "$9$T39peK8-dsWLs4aU.mz36/pBIRSeMXhS4ZjqQzhSrlK8"; ## SECRET-DATA
}
certificate-verification warning;
timeout-action open;
captive-portal IC-Redirect {
    redirect-traffic unauthenticated;
    redirect-url https://ic.company.local/;
}

[edit]
root@srx3600n0# show system ntp
server 172.16.1.60;

[edit]
root@srx3600n0# show system name-server
172.16.1.60;
Note
If you want the IC to automatically redirect users to the
original destination to which they were browsing, then you would
define the redirect-url to “https://<ic.fqdn>/<sign-in
page>?target=%dest-url%&enforcer=%enforcer-id%&policy=%policy-id%”.
Where the ic.fqdn is the hostname, the sign-in page is optional. The
rest is information that will be passed from the SRX to the UAC via
the redirect URL so that after successfully logging in, the UAC can
redirect the client to the target destination.
There are a few things going on in the preceding example. First, we specify the high-level configuration parameters for the UAC communication. Because the IC and SRX communicate via an encrypted SSL channel, you need to upload trusted certificates and a CA to the SRX and IC. In this example, we’re going to skip this and just configure the SRX to warn us if the certificate between the SRX and IC are not trusted (which it won’t be). To make it trusted, you will need to install the public CA certificate on both the SRX and IC and generate a certificate for both separately and install them using the certificate for communication.
Next, we specified the captive portal configuration. This will be used in the firewall policy configuration to determine where the users should be redirected. This must be to the IC and is best in the FQDN format. If you are using a separate realm, you would also post it at the end of the URL as well. For this example, we assume the realm is just at the base URL for the IC. We specify that all unauthenticated traffic be sent to the IC, but this is really overridden at the firewall policy level.
Finally, we specified the IP address and password along with the optional source interface for the SRX to communicate with the IC from. The SRX will always contact the IC, so if there is any firewall filtering device between the SRX and the IC, you need to make sure that it allows communication between the two. The default port is TCP 11122 for the secure control channel communication. We did add DNS and NTP to resolve from the AD domain controller because we want to make sure time and name resolution are in sync with the domain.
Next let’s look at configuring the security policy infrastructure.
[edit]
root@srx3600n0# set security policies from-zone trust to-zone servers policy Clients-to-IC match source-address Clients-192.168.1.0/24 destination-address IC-172.16.1.50/32 application [junos-http junos-https]

[edit]
root@srx3600n0# set security policies from-zone trust to-zone servers policy Clients-to-IC then permit

[edit]
root@srx3600n0# set security policies from-zone trust to-zone servers policy Clients-to-IC then log session-close

[edit]
root@srx3600n0# set security policies from-zone trust to-zone servers policy Allow-AD match source-address Clients-192.168.1.0/24 destination-address AD-172.16.1.60/32 application any

[edit]
root@srx3600n0# set security policies from-zone trust to-zone servers policy Allow-AD then permit

root@srx3600n0# set security policies from-zone trust to-zone servers policy Allow-AD then log session-close

[edit]
root@srx3600n0# set security policies from-zone servers to-zone untrust policy Allow-DNS-NTP match source-address AD-172.16.1.60/32 destination-address any application [junos-dns-udp junos-ntp]

[edit]
root@srx3600n0# set security policies from-zone servers to-zone untrust policy Allow-DNS-NTP then permit

[edit]
root@srx3600n0# set security policies from-zone servers to-zone untrust policy Allow-DNS-NTP then log session-close

[edit]
root@srx3600n0# set security policies from-zone trust to-zone internet policy Redirect-Unauthenticated match source-address Clients-192.168.1.0/24 source-identity unauthenticated-user destination-address any application any

[edit]
root@srx3600n0# set security policies from-zone trust to-zone internet policy Redirect-Unauthenticated then permit application-services uac-policy captive-portal IC-Redirect

[edit]
root@srx3600n0# set security policies from-zone trust to-zone internet policy Redirect-Unauthenticated then log session-close

[edit]
root@srx3600n0# set security policies from-zone trust to-zone internet policy Facebook match source-address Clients-192.168.1.0/24 source-identity [CEO Marketing] destination-address www.facebook.com application [junos-https]

[edit]
root@srx3600n0# set security policies from-zone trust to-zone internet policy Facebook then permit

[edit]
root@srx3600n0# set security policies from-zone trust to-zone internet policy Facebook then log session-close

[edit]
root@srx3600n0# set security policies from-zone trust to-zone internet policy Salesforce match source-address Clients-192.168.1.0/24 source-identity [CEO Sales] destination-address www.salesforce.com application [junos-https]

[edit]
root@srx3600n0# set security policies from-zone trust to-zone internet policy Salesforce then permit

[edit]
root@srx3600n0# set security policies from-zone trust to-zone internet policy Salesforce then log session-close

[edit]
root@srx3600n0# set security address-book global address Clients-192.168.1.0/24 192.168.1.0/24

[edit]
root@srx3600n0# set security address-book global address IC-172.16.1.50/32 172.16.1.50/32

[edit]
root@srx3600n0# set security address-book global address AD-172.16.1.60/32 172.16.1.60/32

[edit]
root@srx3600n0# set security address-book global address www.facebook.com dns-name www.facebook.com

[edit]
root@srx3600n0# set security address-book global address www.salesforce.com dns-name www.salesforce.com

[edit]
root@srx3600n0# run request security user-identification local-authentication-table add user-name Kevin roles Sales ip-address 192.168.1.100

[edit]
root@srx3600n0# run show security user-identification local-authentication-table all
Total entries: 5
Source IP       Username     Roles
192.168.1.100   kevin        sales

[edit]
root@srx3600n0# show security address-book
global {
    address Clients-192.168.1.0/24 192.168.1.0/24;
    address IC-172.16.1.50/32 172.16.1.50/32;
    address AD-172.16.1.60/32 172.16.1.60/32;
    address www.facebook.com {
        dns-name www.facebook.com;
    }
    address www.salesforce.com {
        dns-name www.salesforce.com;
    }
}

[edit]
root@srx3600n0# show security policies | no-more
from-zone trust to-zone servers {
    policy Clients-to-IC {
        match {
            source-address any;
            destination-address IC-172.16.1.50/32;
            application [ junos-http junos-https ];
        }
        then {
            permit;
            log {
                session-close;
            }
        }
    }
    policy Allow-AD {
        match {
            source-address any;
            destination-address AD-172.16.1.60/32;
            application any;
        }
        then {
            permit;
            log {
                session-close;
            }
        }
    }
}
from-zone servers to-zone untrust {
    policy Allow-DNS-NTP {
        match {
            source-address AD-172.16.1.60/32;
            destination-address any;
            application [ junos-dns-udp junos-ntp ];
        }
        then {
            permit;
            log {
                session-close;
            }
        }
    }
}
from-zone trust to-zone internet {
    policy Redirect-Unauthenticated {
        match {
            source-address Clients-192.168.1.0/24;
            destination-address any;
            application any;
            source-identity [ unauthenticated-user ];
        }
        then {
            permit {
                application-services {
                    uac-policy {
                        captive-portal IC-Redirect;
                    }
                }
            }
            log {
                session-close;
            }
        }
    }
    policy Facebook {
        match {
            source-address Clients-192.168.1.0/24;
            destination-address www.facebook.com;
            application junos-https;
            source-identity [ CEO Marketing ];
        }
        then {
            permit;
            log {
                session-close;
            }
        }
    }
    policy Salesforce {
        match {
            source-address Clients-192.168.1.0/24;
            destination-address www.salesforce.com;
            application junos-https;
            source-identity [ CEO Sales ];
        }
        then {
            permit;
            log {
                session-close;
            }
        }
    }

}
There are a few more things going on here. Let’s review them.
Here we are building out our UserFW policy infrastructure. As we
mentioned at first, because the clients and the IC/AD infrastructure
are in a different zone, you need to configure rules to allow them to
communicate, hence the rules in the “trust to servers” policy context.
If they were all in the same zone, like trust, this would not be
necessary. However, we would still likely need to create some rules to
allow the AD infrastructure to communicate with other areas of the
network (like other AD servers) or to the Internet for things like
NTP/DNS resolution, as we assume our domain controller is also our DNS
server. That is what we have done in the servers to internet policy ruleset. Finally,
and the most interesting part, we have set up our security policy
infrastructure for our client access out to the Internet. This is
where all of the magic really happens, because we can now leverage the
“Source-Identity” field! Notice in this example, we do not reference
the users by name, but instead by role. This is how the SRX is
designed at the time of writing this book, but this will likely change
in the future to be able to reference users and AD groups directly. We
see how these are mapped in the IC to the domain groups later, and we
can also see in this example, how Kevin is mapped locally to the Sales
role by local mapping.
Finally, we configure the actual security policy infrastructure for the trust to Internet rules. At the top of this ruleset is the rule that matches any clients with Source-Identity unknown or unauthenticated, with an action of permit and to redirect to the IC. There are three special roles in the SRX: unknown, unauthenticated, and any. Unknown is a role that matches users when the IC communication is down so that you can still leverage fallback policies. Unauthenticated is any IP address that doesn’t have an actively associated identity to it, and any is any user, known, unauthenticated, or unknown. In this example, we choose to use unauthenticated so that these users will be matched and redirected to the IC to have their identity validated. All of their HTTP and HTTPS sessions will be redirected to the IC until they authenticate. All other traffic will be dropped. Once users are authenticated, they will no longer match the unauthenticated user role, but instead will have a role like CEO, Marketing, or Sales and thus will match rules. As you can see, just like with standard firewall policies, rule ordering is very important. If you put the redirect in the wrong place, they might match a different rule (including one without user identity) first and might never be authenticated. Again, once you have the UserFW infrastructure in place, this is a very simple task from an administration perspective, but it does take a bit of extra work up front to get going.
Note
It is important to understand that at the time of writing this book, the Source-Identity field refers to a role name that is either delivered from the IC or from the local database. In both the IC and local database, the user is mapped to a given role. In the future, this will likely change to allow you to reference the users directly. This is very important to understand not only when writing the firewall policy, but when you are creating roles, and especially in the role mapping section in the upcoming IC configuration steps, as you will soon see.
Configuring the IC
Now that we have configured the SRX, we’ll look at the IC. Technically you can configure the IC first if you want. IC tasks would include the following:
Configure the SRX to IC communication.
Configure the authentication server.
Configure the realm, role, and sign-in policy.
For this example, we assume that you already have the IC up and running on the network, licensed with the User Role or Full User Access licenses, and that it has a certificate that your client devices in your domain trust so that they don’t get warning messages when they get redirected. If you are new to the UAC solution and working with the IC, we suggest you review the Juniper Jump Start guides on the UAC solution for getting the box up and running, along with the appropriate information. Juniper also offers full courses on the UAC solution that are very worthwhile, particularly if you are thinking about extending this configuration to full end-to-end NAC in the future.
For this example, we are going to be working with the IC, not the SRX, so we handle the configuration format a little bit differently because the IC doesn’t have a command line so to speak.
Configuring the SRX as an IC enforcer
Once you’ve set up the SRX configuration, the SRX will try to connect to the IC; however, the IC won’t accept the connections until you complete this stage in the IC Admin interface.
Go to UAC, click Infranet Enforcer, then click Connections.
Click New Enforcer
In the new window, select the Enforcer Type as the Junos SRX.
Give a name to the connection, specify the shared password that you set on the SRX, and specify the serial numbers of the SRX (see “show chassis hardware” from the SRX CLI). We say numbers because you can do this in HA.
The location group should be left at No 802.1x, and you don’t need to check the IDP module option.
Click Save Changes to complete this step.
Configuring the authentication server
This step is relatively simple in the IC. We’re assuming that you already have the SRX up and running and configured, along with the IC setup and on the network. It is best to have the SRX communicate with the IC on the internal port. We also assume that you have added the licensing, and set up the proper DNS and NTP (where the DNS really should be a DNS server in your domain or capable of authenticating to the domain). We recommend using UAC 4.3+ so that you can use the new Active Directory mode that automatically resolves the AD structure. The legacy AD mode (configurable by the button at the bottom) works, too, but you have to manually specify the domain controllers and it isn’t quite as resilient, so you should use the new mode wherever possible.
Add a new Authentication Server of type Active Directory under Authentication, Auth Servers, by selecting Active Directory/Windows NT and clicking New.
Specify a name in the IC to reference the IC.
Specify the NetBIOS domain name (in our example it’s COMPANY) along with the full Kerberos Realm name, which in our example is COMPANY.LOCAL.
Specify the domain credentials for the IC service account. You can also use an account with domain admin rights, but it is a best practice to give a specific service account for the IC.
For the IC to work, it will need to join the domain, so you must specify where the machine should be created. By default, this is in the Computers container, but you might want to do it elsewhere. You should also specify the name of the IC that will be in the domain. This name should be capable of being resolved internally and your certificate on the IC should match this name so clients don’t get error messages.
The final step is to Enable SPNEGO and upload the Kerberos ticket file that you created in Active Directory.
Click Save Changes.
If all goes well, the Domain Status should turn green after a short period of time. If it doesn’t work, you will likely see an error message. You can also check in the Event Log as well. Common mistakes include incorrect credentials or insufficient rights, incorrect domain name, incorrect DNS settings, and IC unable to contact the domain controller due to routing or firewall policies. If you need more explanation of these steps, the IC documentation goes into all of them, including getting the system up and running in great detail. There is also a guided setup wizard when you first log in to the system as an administrator.
Configuring realms, roles, and sign-in policies
For this section, we assume that you are somewhat familiar with the concepts of realms, roles, and sign-in policies on the IC.
Start by creating one or more roles. The role is a logical container for the user to role mapping. To create a new role, go to Users, select User Roles, and then select New-User-Role.
The only thing that you need to make sure is enabled in the role is under the Agentless tab. Enable Agentless Access for this role. Repeat for each different role for which you want to set up access.
Click Save Changes.
Next, you will want to make a new realm for authenticating the clients to your IC. Under Users, select User Realms, then select New User Realm.
Give the new realm a name, and specify the authentication and directory services. This should be the authentication server that you created in the previous example for both the authentication and directory services.
Click Save Changes. This would be done for the CEO, Marketing, and Sales roles.
Next you will want to create the role mapping rules within the realm. These define how the user will be mapped to what role. The IC automatically takes you to this screen.
You will need to create a new role.
There are a few paths that you can take in the next step, and it all depends on how you want to map the user. You can do it simply by listing the usernames that you want to be part of the role. That is simply done by listing the users in the Username text box. For this example, we could simply do it based on username to map Kevin, Susan, and Bob to their respective roles. In many cases, you will want to map users based on Active Directory group membership. This is done by changing the Rule Based On drop-down menu setting to Group Membership, then clicking Update. You will see the page refresh, which will create a new button called Groups. If you haven’t clicked this before, it will open a new window that can query Active Directory for group membership names. You can enter the name directly into that field or click Search and search for the name in Active Directory. Once you have identified the group that you want to select, click OK. You now select the Group names and move them from the Available groups list to the Selected groups list.
Next you will need to select the appropriate roles to be mapped to this rule by selecting the roles in the Available roles list and moving them into the Selected roles list. Typically, you will want to select the Stop processing checkbox unless you want users to fall under multiple roles. Click Save Changes to complete this step.
From Step 10 you’ve now mapped incoming users that are authenticated to a role that you created. You can repeat this stage for each new rule you want. Order is important for role mapping, as roles are mapped from top to bottom until a match is hit (if Stop processing is enabled for that role).
The final step is to make sure that the realm is part of the sign-in page that you’ve specified in the Redirect-URL on the SRX. By default, the only sign-in page that is created is the “/” sign-in page. For instance, if your server is called https://ic.company.local/, that would be the base page. You can create additional sign-in pages as well, but it’s not required. For this example, we won’t create a new sign-in page, but we must add our realm to the list of realms; preferably you will only have one realm on this page.
To select the realm in the sign-in page, go to Authentication, select Signing-In, and then click Sign-In Policies and select the user policy “*/”.
By default, there will be a realm called Users in there, but you will be able to change this to the realm you created in Step 4. You should also change the Authentication Protocol Set to “Not Applicable” by clicking the 802.1x field, changing the value, and clicking the checkbox. Finally, click Save Changes.
Note
If you just want to leverage a simple captive portal-based form of authentication rather than the transparent SPNEGO auth, you do not need to configure the Active Directory server, but instead you can rely on the local database on the IC. This makes for a simpler configuration and sometimes is ideal to use for testing to ensure that the platforms are up and talking correctly. There is nothing special about this configuration. It is the same as it would be with the standard Coordinated Threat Control configuration except the SRX can now leverage the Source-Identity in the policy itself.
As we mentioned earlier, in this example, you are defining a role and mapping users to that role. In the SRX Source-Identity field you will be referencing the role name, not the username, at least at the time of writing this book. This might change in the future, so check the release notes. That should complete the IC configuration necessary to get things up and running. There are numerous options and customizations that you can use to further extend the capabilities of the IC with the SRX, but they are outside the scope of this book. We suggest you check out the IC documentation or training courses for detailed information on all of the other available options if they appeal to you.
Miscellaneous Active Directory tasks
Now that we have the SRX and UAC fully up and running, the last set of tasks is to perform a few tasks in Active Directory. Again, you can do these before the SRX/IC steps if you would like. The exact steps to configure these will largely be outside the scope of this book because they have to do with Microsoft Active Directory tasks, but documentation is largely available online for completing these tasks in your environment. We focus on the how where necessary.
Set up a DNS entry for the IC in your company’s DNS infrastructure. This is needed so that clients can resolve the ic.company.local (in this example).
Create an SSL certificate for your IC. Technically this doesn’t need to be done in AD, but can be done by another CA like OpenSSL/OpenCA. The benefit of doing this in AD is that your clients will automatically trust the IC certificate. This certificate will need to be imported in the IC.
Create a Kerberos ticket with KTPass, which is imported into the IC so that the IC can speak directly with AD and validate the client’s Kerberos tickets.
In this example, we focus on the third step as creating DNS
entries and SSL certificates are well-known tasks in AD, but creating
the Kerberos tickets is probably not. The good news is that you only
need to do this once. This ticket should be created on the command
line of one of your domain controllers with a domain administrator
account. The KTpass command has the
following syntax that we are concerned with:
Ktpass -out <kerberos-ticket-output-file> -mapuser <IC Service Account in AD> -prin HTTP/<IC-FQDN>@<kerberos-realm> /pass <Service Account password>
Let’s assume the following information and configure this command for real.
We create a Kerberos file named kbt-ticket.
Our user will be ICDomainAdmin.
Our IC FQDN is ic.company.local.
Our NetBIOS realm name is COMPANY.
Our password is onetimepassword.
Then the output would look like this:
C:\Documents and Settings\Administrator>ktpass -out kbt-ticket -mapuser ICDomainAdmin@company.local -princ HTTP/ic.company.local@COMPANY /pass onetimepassword
Targeting domain controller: dc.company.local
Successfully mapped HTTP/ic.company.local to ICDomainAdmin.
Output keytab to out:
Keytab version: 0x502
keysize 71 HTTP/ic.company.local@COMPANY ptype 0 (KRB5_NT_UNKNOWN) vno 1
ketype 0x17 (RC4-HMAC) keylength 16 (0xd2b330d2301b3bb5c18f5c0394089938)
We then take the keyfile and upload it into the IC in our Active Directory server by following these steps:
Configuring and Deploying SSL Forward Proxy
The final component of AppSecure that we discuss in this chapter is SSL Forward Proxy. The high-end SRX supports two types of SSL inspection technology: SSL Forward Proxy (SSL FP) and SSL Reverse Proxy (SSL RP). SSL RP is used when you are looking to crack open the SSL traffic for a web server that you own so you can provide its private keys to the SRX. This feature is outside the scope of this book and is primarily intended to protect your web servers from malicious external clients. We are concerned with SSL FP, which is used to protect your clients from malicious external servers by leveraging the fact that SSL uses a trust relationship with certificates in which the clients trust any certificates that are signed by a trusted CA (and are not revoked), as shown in Figure 12-12. In this case, we install a CA certificate on the SRX, which must be delivered to clients so that they trust the CA certificate themselves. Each web browser and even the OS itself has a list of trusted CAs, although this list can be manipulated to add and remove trusted CAs. This allows the SRX to “rewrite” target destination certificates on the fly so that the SRX makes an SSL session between the client and itself, with another SSL session between the SRX and the destination server. This allows the SRX to inspect the traffic and then perform additional actions on it.
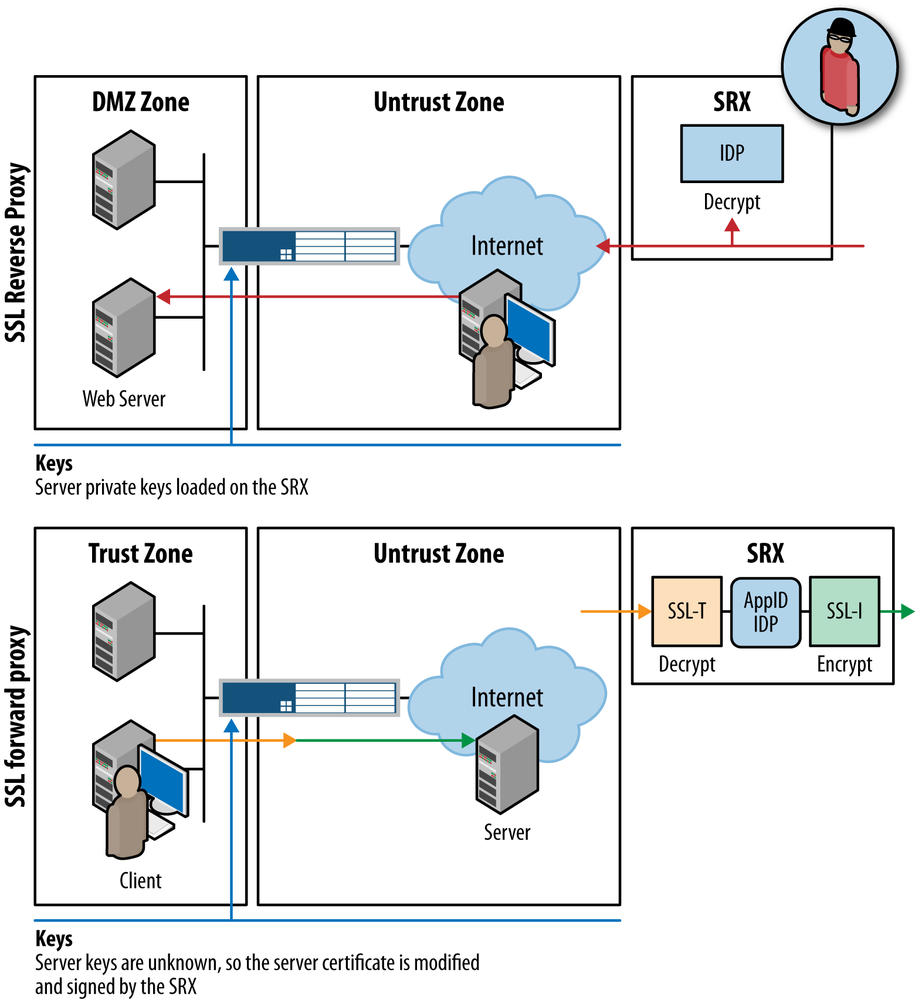
Note
At the time of writing this book, SSL FP on the branch SRX is in beta. Please check the release notes for the latest information on when it will be released. SSL RP is not planned for the branch SRX at this point due to the use case of leveraging it in data centers where an SRX1400 and higher is best leveraged.
When it comes to configuration, the following steps are required for configuring SSL FP:
Generate a CA certificate (can be done locally on the SRX or can be done on a separate CA like OpenSSL, Active Directory Certificate Services, etc., and imported to the SRX with both public and private keys).
Configure an SSL profile on the SRX.
Import any trusted CAs to the SRX (optional).
Distribute the public key to all of your clients as a trusted CA.
Configure SSL FP on a firewall rule-by-rule basis along with Level 7 features like AppFW/IPS.
Configuring SSL Forward Proxy on the SRX
SSL FP essentially supports two different ways to install the CA certificate that will be used to rewrite the traffic in the SSL Proxy example. You can either generate a self-signed certificate on the box or you can import a CA certificate (with private key) that was generated by some external source like OpenSSL or Microsoft Certificate Services.
Generating a self-signed certificate is usually fine for lab and Proof of Concept (PoC) testing because it is very quick to set up, but generally in real-world deployments you would opt for a certificate that was part of the greater certificate infrastructure that your clients would implicitly trust—otherwise you will need to manually import the CA certificates into all of your clients.
In this example, we show both ways of installing the CA certificate along with configuring an SSL profile in a firewall rule. We use an AppFW ruleset that is already configured from previous examples, along with IPS for this rule.
Creating a self-signed CA certificate.
root@srx3600n0> request security pki generate-key-pair certificate-id SELF-SIGNED size 2048 type ?
Possible completions:
  dsa                  DSA encryption with SHA-1 hash
  rsa                  RSA encryption
root@srx3600n0> request security pki generate-key-pair certificate-id SELF-SIGNED size 2048 type rsa
Generated key pair SELF-SIGNED, key size 2048 bits

root@srx3600n0> req  uest security pki local-certificate generate-self-signed add-ca-constraint certificate-id SELF-SIGNED domain-name company.local email admin@company.local ip-address 192.168.1.1 subject "DC=company, DC=local"
Self-signed certificate generated and loaded successfully

root@srx3600n0> show security pki local-certificate
Certificate identifier: SELF-SIGNED
  Issued to: (null), Issued by: DC = company, DC = local
  Validity:
    Not before: 02- 5-2013 01:41
    Not after: 02- 4-2018 01:41
  Public key algorithm: rsaEncryption(2048 bits)
So we can see that first we generate a key pair, then we locally sign that on our box. We can also check its output as well. When signing the certificate, you would provide your own information that would be present in the certificate so others can identify it.
Importing an external certificate assumes that you loaded the certificate onto the device via SCP or another mechanism.
root@srx3600n0> request security pki local-certificate load certificate-id External filename ca.cer key ca.key passphrase onetimepassword
Local certificate External loaded successfully
Now that you have chosen one of those two routes, the rest of the configuration will be the same as follows.
[edit]
root@srx3600n0# set services ssl proxy profile SSL-FP root-ca SELF-SIGNED whitelist www.salesforce.com preferred-ciphers strong

 [edit]
root@srx3600n0# set services ssl proxy profile SSL-FP actions disable-session-resumption renegotiation allow-secure

[edit]
root@srx3600n0# set security policies from-zone trust to-zone untrust policy SSLFP match source-address Clients-192.168.1.0/24 destination-address any application any

[edit]
root@srx3600n0# set security policies from-zone trust to-zone untrust policy SSLFP then permit application-services idp application-firewall rule-set Allow-Web-No-Facebook

[edit]
root@srx3600n0# set security policies from-zone trust to-zone untrust policy SSLFP then permit application-services ssl-proxy profile-name SSL-FP

[edit]
root@srx3600n0# show services ssl
proxy {
    profile SSL-FP {
        preferred-ciphers strong;
        root-ca SELF-SIGNED;
        whitelist www.salesforce.com;
        actions {
            renegotiation allow-secure;
            disable-session-resumption;
        }
    }
}

[edit]
root@srx3600n0# show security policies from-zone trust to-zone untrust policy SSLFP
match {
    source-address Clients-192.168.1.0/24;
    destination-address any;
    application any;
}
then {
    permit {
        application-services {
            idp;
            ssl-proxy {
                profile-name SSL-FP;
            }
            application-firewall {
                rule-set Allow-Web-No-Facebook;
            }
        }
    }
}
There’s a lot going on here, but actually it’s not as complex as it seems. First, remember that once you have the SSL profile set up, it’s as simple as referencing it in a policy as we did for the policy SSL FP.
Starting with the SSL profile itself, we’ve already generated
and uploaded our CA certificate (in this example, we just used the
self-signed one, but there’s no difference from the configuration
perspective if it is self-signed or uploaded). We then create an SSL
Proxy profile, which you will notice is under the set services stanza rather than set security because this is a service that
might be able to be leveraged by other components in the future. In
the SSL Proxy profile itself there is really only one required field
that we need to configure: the root-ca field, which specifies the CA
certificate that we just generated and uploaded to the SRX. The rest
of the fields are optional but are worth mentioning.
- Whitelist
The whitelist field allows you to specify an address object (either by IP or even better FQDN) that will allow the SRX to bypass SSL inspection for that host based on the certificate name presented from the server. The important thing to note is that you can enable SSL Proxy on a firewall rule-by-rule basis, so there are other ways to bypass this, but the whitelist is helpful if you have broader firewall rules where SSL FP is enabled and you want a simple mechanism to bypass it for certain sites.
- Preferred Ciphers
This allows you to define the cipher that should be accepted on the SRX/Servers to ensure that a lower than acceptable SSL cipher strength cannot be used. You can also define your own with the custom cipher list.
- Trusted-CA
This allows you to add your own list of CAs that the SRX platform should trust when it acts as the client to the server destination. You would need to upload these CA certificates to the SRX and then would reference them here. Note that this isn’t required if you have ignore-server-authentication enabled.
- Logging
We have some additional logging facilities that are helpful both for audit and for troubleshooting purposes that can be used to log connections and outcomes for the SSL Proxy.
- Actions
There are a handful of additional options, or actions as they are called here, that are important to review.
- Ignore-Server-Auth-Failure
This option is best left for PoC environments. Essentially, it disables the check to see if the certificate that the server is presenting to the SRX is trusted. Normally your client would do this task, but because the client is only terminating the SSL connection on the SRX where it always trusts the certificate, it falls on the SRX to determine if the certificate is trusted. If you do not have any trusted CAs installed or are testing this in a PoC environment, you can enable this for simplicity, but generally you would not want to enable this because it would remove the SRX’s ability to validate trust, just that the certificate is indeed in the valid format. That means that although your session would be secured by SSL, anyone could spoof the server identity on the other side.
- Disable Session Resumption
SSL supports a concept called session resumption. Because it’s an expensive task to do an SSL handshake, session resumption allows the SRX to store the session information and restart an SSL session that was previously negotiated even though its original TCP connection was closed. Turning this on or off is up to you. It does take more resources to keep the session information around, so if you don’t think there will be much in the way of resumed session, then this is a good option to disable, but if you think the sessions will be restarted often, then leave it on.
- Renegotiation
SSL supports a feature called Renegotiation that allows either the client or the server to generate new SSL keys for the existing SSL session. This is similar to how IKE will renegotiate Phase 1 and 2 session keys after a certain time period or amount of bytes exchanged. You might want to disable it because of some well-known DDoS attacks with tools like BEAST. You can also leverage the Allow-Secure, which follows RFC 5746 to provide additional protection.
Once we’ve defined the SSL profile, then we merely need to reference it in the desired firewall rules. In this case, we did so in the SSL FP firewall rule. The one thing that you’ll notice is that we left the application as any. We could have restricted it down to TCP port 443 with junos-https, but the SRX can automatically detect an SSL session using AppID and will be able to inspect it regardless of the port on which it is operating.
Using the SSL Proxy by itself wouldn’t do us too much good; we would still want to have additional services like AppFW or IPS enabled to provide inspection now that we’ve cracked open the SSL sessions.
Finally, as we mentioned earlier, you can define multiple profiles, so this provides you with the ability to do different SSL profiles on a firewall rule-by-rule basis if you want to provide different options for the SSL processing.
Note
At the time of writing this book, there are a few feature gaps with SSL Proxy that are no doubt being addressed by Juniper, so stay tuned to the release notes as these will likely be addressed soon! The branch SRX doesn’t yet support SSL FP, and the UTM feature set does not support SSL FP yet, but these gaps should be resolved along with the other gaps in the AppSecure suite. Moving forward, there is a strong emphasis on not introducing any new gaps, so we should be in much better shape as SRX customers.
AppFW with encrypted applications
There is a special use case that we want to consider when it comes to AppFW and SSL encrypted sessions. Prior to the Junos 12.1 release when SSL FP was introduced, the SRX had another way to detect SSL-enabled applications without leveraging SSL Proxy, similar to how many URL filters do it: we would look at the certificate exchange to check the certificate name compared to the FQDN for the site. Because most sites (e.g., Facebook) would use the FQDN in the SSL certificate, this is a fairly decent way to detect SSL apps without having to crack them open. We would create a separate AppID object for this such as FACEBOOK-ACCESS-SSL versus standard HTTP access of FACEBOOK-ACCESS. The challenge here is how to properly rectify this when you now have an option to detect Facebook as HTTP, SSL Enabled, or within SSL Forward Proxy. In this case, FACEBOOK-ACCESS-SSL would still be the same because it detects it without cracking open the session, but how would you be able to block FACEBOOK-ACCESS if it looked the same unencrypted versus SSL encrypted? Many customers might want to block an application regardless of how it is delivered, whereas others might want to block a specific method while allowing others (like blocking unencrypted forms but allowing encrypted ones). For this we have developed a special option within the AppFW ruleset that defines if you want to enforce if it’s SSL encrypted, not, or either.
[edit security application-firewall rule-sets Block-Facebook]
root@srx3600n0# show
rule 1 {
    match {
        dynamic-application junos:FACEBOOK-ACCESS;
    }
    then {
        deny;
    }
}
default-rule {
    permit;
}

[edit security application-firewall rule-sets Block-Facebook]
root@srx3600n0# set rule 1 ?
Possible completions:
  <[Enter]>            Execute this command
+ apply-groups         Groups from which to inherit configuration data
+ apply-groups-except  Don't inherit configuration data from these groups
> match                Specify security rule  match-criteria
> then                 Specify rule action to take when packet match criteria
  |                    Pipe through a command
[edit security application-firewall rule-sets Block-Facebook]
root@srx3600n0# set rule 1 then ?
Possible completions:
  <[Enter]>            Execute this command
+ apply-groups         Groups from which to inherit configuration data
+ apply-groups-except  Don't inherit configuration data from these groups
  deny                 Deny packets
  permit               Permit packets
  reject               Reject packets
  |                    Pipe through a command
[edit security application-firewall rule-sets Block-Facebook]
root@srx3600n0# set rule 1 match ?
Possible completions:
  <[Enter]>            Execute this command
+ apply-groups         Groups from which to inherit configuration data
+ apply-groups-except  Don't inherit configuration data from these groups
+ dynamic-application  Dynamic application
+ dynamic-application-group  Dynamic application group
  ssl-encryption       Select SSL encryption rules
  |                    Pipe through a command
[edit security application-firewall rule-sets Block-Facebook]
root@srx3600n0# set rule 1 match ssl-encryption ?
Possible completions:
  any                  Encrypted and non-encrypted rule
  no                   Non-encrypted rule
  yes                  Encrypted rule
[edit security application-firewall rule-sets Block-Facebook]
root@srx3600n0# set rule 1 match ssl-encryption any

[edit security application-firewall rule-sets Block-Facebook]
root@srx3600n0# show
rule 1 {
    match {
        dynamic-application junos:FACEBOOK-ACCESS;
        ssl-encryption any;
    }
    then {
        deny;
    }
}
default-rule {
    permit;
}
Per this example, we will block FACEBOOK-ACCESS if we see it encrypted or not encrypted. If we chose No, then we’d block it only if it was unencrypted and not if it was encrypted with SSL FP. If the answer was Yes, then we’d only block it if it was encrypted.
Note
SSL FP can also come in very handy for blocking evasive applications that tunnel over SSL. For instance, applications like TOR, Ultrasurf, Skype, and many others have capabilities to use SSL to tunnel their traffic. They do so in a highly evasive manner that typically uses preshared keys. SSL Proxy can help prevent this as an evasive channel because it will not allow SSL traffic through that it cannot inspect. Additionally, by filtering unknown applications you can successfully block anything the SRX engine cannot identify.
Best Practices
There are many features in the AppSecure suite of products, and certainly several ways in which they can be deployed. Let’s look at some of the examples of how to best leverage each technology on a feature-by-feature basis.
Application Identification
It is typically best to schedule automatic updates for AppID. If you are also deploying IPS, then the SRX will automatically get the signatures downloaded via IPS because IPS relies on AppID.
If you are most concerned about performance, it is best to leave application caching enabled; however, if you are more concerned about security, it is best to disable caching to prevent potential attackers from colluding to trick the system.
Starting in Junos 12.1X44, you can define your own Level 3/Level 4 applications. These are useful if you want to explicitly override what application a particular connection will have. This is most commonly done based on the server IP, protocol, and port rather than having to write your own custom applications with pattern regex support.
AppTrack
AppTrack is enabled on a zone-by-zone basis. If it is enabled for either the source or destination zone on the traffic, it will be active.
To minimize the performance impact, only enable AppTrack on the zones of interest, particularly in high-performance environments. Although AppTrack doesn’t have a major impact on performance in most cases, it’s good to keep your device operating as lean as possible if you are not interested in the information or if you have AppFW enabled.
AppFW
It is best to use the AppFW ruleset in the blacklist format when you want to block specific applications but allow all others through. This is best when you know that you do not want a particular application, but just want to identify the others rather than block them.
Whitelist AppFW rulesets are a very powerful security mechanism that leverages least privilege to allow only those applications that are explicitly allowed, while all others (including unknowns) are blocked. This is best if you know a specific set of applications you want to permit and block anything else.
Hybrid AppFW rulesets are only needed when you are filtering using nested objects like HTTP Applications where you want to do one action on some and another action on others, while taking the same action as the top rule for the default rule (e.g., Block Facebook, Allow HTTP, Block All Else).
It is imperative that even with AppFW you should still use the same best practices of least privilege in the firewall policy whenever possible to ensure that you are containing the attack surface of applications going out to the Internet. Whenever possible, you should not configure policies with Allow Any policies whenever possible.
It is usually best to use predefined application groups when dealing with broad category applications like those of HTTP. This is because these lists are frequently updated with new members, which will automatically be applied in the policy. If you are dealing with base applications (e.g., SMTP, FTP, DNS, etc.) that aren’t likely to change, then it is okay to use the objects directly, but if you are trying to capture, say, all social networking applications, it is best to use groups like junos:web:social-networking rather than defining every single app if you want to apply the same policy.
Starting in Junos 12.1X44, you have the ability to define how you want to filter applications when they can be detected over HTTP or HTTPS using the encryption knob. Typically, you’ll want to leave this as any if you are concerned with detecting or enforcing an action on the app regardless of its SSL encryption status. If you want to detect the app in an SSL encrypted channel, select Yes (assuming SSL FP is enabled), or No if you only want to detect the plain-text version.
AppQoS
AppQoS is applied in largely a similar manner to AppFW. The primary use case is to leverage AppQoS to rate limit applications, but you can also use it for prioritizing traffic, rewriting QoS values, setting loss priority, and setting the forwarding class.
If you want to leverage forwarding classes, prioritization, and queuing, you will most likely need to customize the existing classes and settings or create your own new ones.
UserFW
It is best to still define the Source-IP fields when using UserFW to help restrict the potential ranges that the users can access on the network rather than leaving it wide open. This allows you to enforce different security capabilities if the user is accessing the network from different subnets within the same zone.
It is a best practice to not have a NAT device between the client and the SRX when using UserFW because the SRX will not be able to limit the traffic to the originating host. This can be done, however, with the full-blown NAC software.
Depending on where your AD and IC servers are, you might need to create permit rules that allow the users to reach the servers to authenticate.
You should typically put your redirect rule toward the top of your rulebase with your resource access rules that specify the user roles below so that users will be forced to authenticate before they can match the rules below per user.
If you want to allow access to certain resources in the event the communication with the IC fails, then you can use the unknown-user predefined role. This is different than the unauthenticated-user, which is when the IC communication is fully functional but there is no active user-to-IP mapping on the SRX.
It is a best practice to leverage Active Directory to push out Group Policy scripts to trigger a background web browser session when using SPNEGO so that the user will automatically be authenticated to the network without having to open a browser manually. Juniper provides a sample script that can do this, which is available within the documentation.
It is a best practice to use both DNS resolution for the IC hostname as well as a certificate that is signed by the AD certificate services so that there is an established trust relationship between the clients and the IC so there will be less error messages.
It is a best practice to define a unique service account for the IC to use when connecting to the domain rather than having a shared service account with other devices. This is done from a security perspective and also for auditing purposes.
It is a best practice to leverage local authentication if you have a scenario where the user is not going to change on the machine, the machine does not support SPNEGO authentication, and falling back to captive portal is undesirable.
It is a best practice to leverage a common DNS and NTP system in the domain, typically that of AD. Synchronized timekeeping (especially with the SRX/IC) is critical for the functionality to work properly, as the underlying mechanisms like Kerberos rely on synchronized clocks.
If you want to leverage external automation for passing user information to the SRX, you can do so with NetConf over SSH to pass user or role-to-IP mapping. You can then leverage this feed to add, change, or delete users from any external authentication feed.
SSL FP
It is a best practice to use a CA that your organization controls to generate the CA signing certificate that is placed on the SRX. Typically, this will be Active Directory for enterprise customers or some other open source or commercial CA product. This approach is much better than leveraging a self-generated CA certificate except when you are doing a PoC.
It is essential to make sure that your CA certificate that the SRX is using to resign the certificates is trusted by all clients whose sessions are inspected by SSL FP. This is critical because if your clients do not trust the SRX’s certificate as a trusted CA certificate, then all certificates it generates will not be trusted by the clients and will result in error messages.
It is best to not disable server certificate authentication unless testing in a PoC lab. This is because if you disable the server certificate check, the SRX cannot confirm whether or not the certificate is coming from a trusted source. Normally, this function is carried out by the client, but because the SRX is proxying the client connection, it falls on the SRX to validate this behavior. If the check is off, then the SRX is only ensuring the certificate is in the proper format and that the traffic is secured by SSL—but it can’t validate if the server is coming from the proper identity or if the certificate has been revoked.
It is generally a good idea to enforce requirements for stronger ciphers and not weak ciphers. You may also customize this list if you need to, but generally it shouldn’t be required.
You can disable session resumption and renegotiation if you don’t want the SRX to support these behaviors. They are not terribly common for most environments, but some applications do leverage them. Turning them off will allow the SRX to save resources tracking and controlling these functions.
You can add your own CA certificates to the list of trusted CAs that the SRX should trust. This should be done for internal sites that come from a custom CA, along with some public CA servers at your discretion. The SRX must trust the CA certificate (unless server authentication is disabled) so this should typically be enabled.
You can enable the SSL Proxy on a firewall rule-by-rule basis. This allows you to be quite granular when it comes to enabling SSL Proxy (e.g., for which source-ip addresses, users, destination IP addresses, etc.). You can also leverage the whitelist feature in the SSL Proxy profile, which can whitelist certain sites based on FQDN in the certificate. This is good for keeping your firewall rulebase clean while whitelisting some of the servers.
You can also leverage logging for SSL to provide messages and information for successful SSL transactions, failures, and other events related to SSL processing.
Troubleshooting and Operation
We’ve covered several different technologies in this chapter, so now’s a good time to review some of the capabilities that you have at your disposal as an operator of the platform. We cover AppID, AppTrack, AppFW, AppQoS, UserFW, and SSL FP.
Operating Application Identification
There are not many tasks that you will need to cover when operating Application Identification, but they mainly include checking the signature package version, application statistics, and the engine settings.
Checking the AppID package
You have two options when checking the AppID package. If
you are using AppID by itself, then use the show services application-identification
version command. If you are running IPS as well, you can
check the show security idp
security-package-version.
root@srx3600n0> show services application-identification version
  Application package version: 2227


root@srx3600n0> show security idp security-package-version
  Attack database version:2227(Wed Jan 23 19:12:53 2013 UTC)
  Detector version :12.6.140121210
  Policy template version :N/A
These packages should typically be the same unless you
updated the AppID independently of the IDP package. If you are running
into issues with installing the AppID package itself, it can be a good
idea to run the request services
application-identification uninstall command, followed by
the request services
application-identification download and finally the request services application-identification
install command. After Junos 11.4, it is very rare to have
AppID itself fail to install now that the applications have been moved
to their own database instance rather than being part of the Junos
configuration.
Checking the AppID engine settings and cache
This operation is one and the same. You use the show services application-identification
application-system-cache command. At the top, you see the
engine setting followed by the application cache entries. You can
clear the cache with the clear services
application-identification application-system-cache
command.
root@srx3600n0> show services application-identification application-system-cache
Application System Cache Configurations:
  application-cache: on
  nested-application-cache: off
  cache-unknown-result: on
  cache-entry-timeout: 600 seconds
pic: 2/0
Logical system name: root-logical-system
IP address: 10.102.2.36                      Port: 48929  Protocol: TCP
Application: EDONKEY-TCP                     Encrypted: No

Logical system name: root-logical-system
IP address: 10.102.2.122                     Port: 43604  Protocol: TCP
Application: UNSPECIFIED-ENCRYPTED           Encrypted: Yes

Logical system name: root-logical-system
IP address: 10.102.2.72                      Port: 50365  Protocol: TCP
Application: SKYPE                           Encrypted: No

Logical system name: root-logical-system
IP address: 10.102.2.244                     Port: 5060   Protocol: UDP
Application: SIP                             Encrypted: No
Note
On the high-end SRX, the cache is built on a per-SPU basis, because it is more expensive to try to synchronize the cache between the different SPUs (especially with the NG-SPC where there could be up to 88 in an SRX5800 platform), so you will see the output on a per PIC basis.
Checking AppID counters
Sometimes it can be helpful to take a look at the counters when having operational or performance issues with AppID. There can be some self-explanatory information in the output.
root@srx3600n0> show services application-identification counter
pic: 2/0
  Counter type                                           Value
 AI cache hits                                                63920
 AI cache hits by nested application                          0
 AI cache misses                                              49272
 AI matches                                                   13589
 AI uni-matches                                               0
 AI no-matches                                                11630
 AI partial matches                                           11111
 AI no-partial matches                                        16154
 AI address based matches                                     0
 AI ICMP based matches                                        0
 AI IP protocol based matches                                 0
 Sessions that triggered Appid create session API             113192
 Sessions that do not incur signature match or decoding       43880
 Sessions that incur signature match or decoding              68715
 Client-to-server packets processed                           154218
 Server-to-client packets processed                           92944
 Client-to-server layer-7 bytes processed                     45026050
 Server-to-client layer-7 bytes processed                     35646345
 Terminal first data packets on both direction                22623
 Unspecified encrypted sessions                               798
 Encrypted P2P sessions                                       0
One thing to call out here is the AI cache hits and misses. Because we disabled the Nested AppID cache, there are no hits there, but we do have base application hits. Misses means that we did not have a cache hit and had to do inspection. If you have a lot of misses (and the cache is enabled), it means that your traffic is highly variable. The AI matches means that we were able to match the application. Partial means that we matched individual patterns or a single direction but not both. The rest of the information provides data about bytes and sessions processed.
Checking application statistics
The SRX allows you to capture statistics locally on the SRX about application matches. At the time of writing this book, this is only enabled when you have AppTrack on for the respective zones, but check the release notes for potential changes in the future. These stats provide a very quick way to see the type of applications that you are matching in your environment. You can do this both from an application level and an application group level.
root@srx3600n0> show services application-identification statistics applications
Last Reset: 2013-02-10 16:58:35 UTC
                Application     Sessions          Bytes    Encrypted
                 ACTIVESYNC            7         178571           No
                        AIM        35772      226465959           No
                 APPLEJUICE         6791        1328038           No
                       ARES         6919       18396477           No
                        BGP         5161        6046977           No
                 BITTORRENT       131942        8095152           No
             BITTORRENT-DHT         2708         430654           No
                 BITTRACKER        28028       43695052           No
                    CHARGEN         5250      226980076           No
                    DISCARD         5234        4100251           No
                        DNS       287945       47335266           No
                       DRDA         5262       29171426           No
                       EBAY         2623       44445540           No
                       ECHO         5414        7790964           No
                EDONKEY-TCP         7872        4075097           No
                ENCODED-DNS          314          46890           No
                     FINGER         5481        2927491           No
                        FTP        10651       35538633           No
                      GMAIL         7478       98487632           No
                   GNUTELLA         2742       13844306           No
               GNUTELLA-URN         2741       65261900           No
                     GOOGLE         8810       44408708           No
               GOOGLE-EARTH         2802       14751472           No
             GOOGLE-WEBCHAT           20          25415           No
                 GOOGLETALK           40         243520           No
                     GOPHER         5380        2896172           No
                    H225RAS         9236        3930742           No
                    H225SGN         2742        3683995           No
                       HTTP         3889        6389789          Yes
                       HTTP       100371     1035498048           No
         HTTP-AUDIO-CONTENT         5829      153265606           No
                 HTTP-VIDEO         9915      249373068           No
                        ICA            4            440           No
                    ICA-TCP         1045      832631416           No
                      IDENT         5369        2703354           No
                     IEC104         2617        1413180           No
                       IMAP        12873       90780242           No
                        IRC        10141      948940888           No
                     JABBER         4347      380166729           No
                       KRB5        77536       21185825           No
                       LDAP         5536        8486227           No
                        LPR         8183       10536126           No
                       MAPI         2613        4446501           No
    MICROSOFT-LIVE-SERVICES         7762       28117770           No
           MICROSOFT-UPDATE         2659       18645790           No
                  MINECRAFT         3176       60556222           No
              MMS-OVER-HTTP         3521       11057295           No
                     MODBUS         2698        1524370           No
                        MSN        20587      292382563           No
                      MSRPC         7894        9245891           No
                      MYSQL         5955      120751897           No
             NETFLIX-PLAYER         5426      100469152           No
                        NFS         2594        9677987           No
                       NNTP         2676        5555376           No
                        NTP        15716        2336032           No
                 PCANYWHERE         2636         110712           No
                       POP3        13457     8141896095           No
                POPO163-P2P        10920      154547955           No
                 PORTMAPPER         8178        1803490           No

root@srx3600n0> show services application-identification statistics application-groups
Last Reset: 2013-02-10 16:58:35 UTC
                Application Group        Sessions         Kilo Bytes
                     junos:gaming            3178              56640
           junos:gaming:protocols            3178              56640
             junos:infrastructure          610438            2449716
junos:infrastructure:authentication          4017               1315
    junos:infrastructure:database           16384             190020
   junos:infrastructure:directory           16976               5536
  junos:infrastructure:encryption          119560              51553
junos:infrastructure:file-servers           35331            1838589
junos:infrastructure:file-sharing            5380                  0
      junos:infrastructure:legacy           15898             228438
      junos:infrastructure:mobile             513                513
  junos:infrastructure:monitoring            5319               2609
  junos:infrastructure:networking          317319               9243
         junos:infrastructure:rpc           18672               6002
       junos:infrastructure:scada            5315                  0
        junos:infrastructure:voip           49754             115898
                  junos:messaging          127355           10085786
junos:messaging:instant-messaging           89602            2027110
             junos:messaging:mail           37753            8058676
                 junos:multimedia            2614                  0
       junos:multimedia:transport            2614                  0
                        junos:p2p          158974              24725
           junos:p2p:file-sharing          158974              24725
              junos:remote-access           31741             957306
      junos:remote-access:command           12042              73500
junos:remote-access:interactive-desktop     17092             881199
    junos:remote-access:tunneling            2607               2607
                        junos:web          195405            2203529
           junos:web:applications           10564              35551
           junos:web:file-sharing           28028              27799
         junos:web:infrastructure            2666              16974
  junos:web:infrastructure:mobile               7                171
junos:web:infrastructure:software-update     2659              16803
              junos:web:messaging           11019             100226
junos:web:messaging:instant-messaging          20                 20
         junos:web:messaging:mail            7478              91825
             junos:web:multimedia           24694             917247
junos:web:multimedia:audio-streaming         5829             146691
   junos:web:multimedia:web-based           18865             770556
                    junos:web:p2p            2741              62158
       junos:web:p2p:file-sharing            2741              62158
                 junos:web:portal            8810              37992
               junos:web:shopping            2623              41874
                       unassigned            2651                  0
                          unknown          250807           12064862
We also covered how to show which AppID signatures and groups are active in the SRX earlier in this chapter. That output can also be helpful for troubleshooting operations if you have altered the default behavior, which is all signatures enabled.
AppTrack
AppTrack is relatively simple from an operational perspective. You only need to enable it per zone. There is only one troubleshooting command at the time of writing this book, which is to view the update messages. The presence of any failed messages would mean there is some sort of an issue that you should raise with JTAC. The other part of troubleshooting involves checking the AppTrack configuration and the zone configuration to ensure it is enabled.
root@srx3600n0> show configuration security application-tracking
first-update;
session-update-interval 5;

root@srx3600n0> show security application-tracking counters
Application tracking counters:

    AppTrack counter type                             Value
 Session create messages                                3683662
 Session close messages                                 3587760
 Session volume updates                                 0
 Failed messages                                        0

root@srx3600n0> show configuration security zones
security-zone trust {
    interfaces {
        xe-1/0/0.0 {
            host-inbound-traffic {
                system-services {
                    all;
                }
                protocols {
                    all;
                }
            }
        }
    }
    application-tracking;
}
security-zone untrust {
    host-inbound-traffic {
        system-services {
            ssh;
            http;
        }
    }
    interfaces {
        xe-1/0/1.0 {
            host-inbound-traffic {
                system-services {
                    all;
                }
                protocols {
                    all;
                }
            }
        }
    }
    application-tracking;
}
Operating Application Firewall
AppFW is a pretty simple feature to operate once it is set up. The main thing that you will be looking at (besides the syslog information that it generates) is the counters on box which show the hits per rule. This helps you to understand how the traffic is behaving in your network.
root@srx3600n0> show security application-firewall rule-set all
Rule-set: Block-P2P
    Logical system: root-logical-system
    Rule: 1
        Dynamic Application Groups: junos:p2p:file-sharing, junos:p2p
        SSL-Encryption: any
        Action:deny
        Number of sessions matched: 147665
    Rule: 2
        Dynamic Applications: junos:FACEBOOK-CHAT
        SSL-Encryption: any
        Action:deny
        Number of sessions matched: 0
Default rule:permit
        Number of sessions matched: 923639
Number of sessions with appid pending: 21707
The preceding output would show a stat for every ruleset (you can specify the individual ruleset to view as well). The output is pretty self-explanatory in terms of the counters. The number of sessions with AppID pending refers to sessions that haven’t completed the AppID phase so their traffic is still allowed to pass.
root@srx3600n0> show security application-firewall match-rule rule-set Block-P2P dynamic-application junos:BITTORRENT-UDP
Logical system: root-logical-system
Non-SSL-Encrypted rules:
    Rule: 1
        Dynamic Application Groups: junos:p2p:file-sharing, junos:p2p
        SSL-Encryption: any
        Action: deny
SSL-Encrypted rules:
    Rule: 1
        Dynamic Application Groups: junos:p2p:file-sharing, junos:p2p
        SSL-Encryption: any
        Action: deny

root@srx3600n0> show security application-firewall shadow-rules rule-set Block-P2P

Number of shadowed dynamic application: 0
The preceding two commands allow you to look and see how dynamic applications would be matched in your ruleset and if there are any shadow rules. This is very similar to the functionality available for the standard firewall policy.
Note
Starting in Junos 12.1X45, the preceding output also contains a new field that defines number of sessions redirected if you have redirection enabled.
Typically, AppFW is pretty easy to troubleshoot because it just enforces the output of the dynamic application that is detected. Sometimes you can have an issue with properly detecting an application due to a false positive. In these cases you can open a JTAC ticket, or if you have a copy of the packet capture for the application, you can submit it via email to applications@juniper.net for the team to review.
Operating Application QoS
AppQoS is very simple to operate. Enabling logging within the AppQoS ruleset as we discussed earlier in the chapter is a good way to see externally what sessions are being enforced on. You can also check the AppQoS counters and statistics to get some simple information about the processing information. Additionally, you can further look at the system-level QoS information about the different queue matching and real-time processing.
root@srx3600n0> show class-of-service application-traffic-control counter
pic: 2/0
  Counter type                                              Value
 Sessions processed                                         108470
 Sessions marked                                            370
 Sessions honored                                           370
 Sessions rate limited                                      1293
 Client-to-server flows rate limited                        1293
 Server-to-client flows rate limited                        1293

root@srx3600n0> show class-of-service application-traffic-control statistics rule
pic: 2/0
 Ruleset                       Rule                Hits
 Limit-HTTP                    1                   1293
 Limit-HTTP                    2                   370

root@srx3600n0> show class-of-service application-traffic-control statistics rate-limiter
pic: 2/0
 Ruleset        Application        Client-to-server   Rate(kbps)   Server-to-client   Rate(kbps)
 Limit-HTTP     junos:HTTP         HTTP               5000        HTTP               5000

Traffic statistics:
   Input  bytes  :         147620775030                    0 bps
   Output bytes  :          41752053072                    0 bps
   Input  packets:            185832453                    0 pps
   Output packets:            165929731                    0 pps
   IPv6 transit statistics:
    Input  bytes  :                   0
    Output bytes  :                   0
    Input  packets:                   0
    Output packets:                   0
  Dropped traffic statistics due to STP State:
   Input  bytes  :                    0
   Output bytes  :                    0
   Input  packets:                    0
   Output packets:                    0
  Input errors:
    Errors: 0, Drops: 0, Framing errors: 0, Runts: 0, Policed discards: 0, L3 incompletes: 0, L2 channel errors: 0, L2 mismatch timeouts: 0, FIFO errors: 0, Resource errors: 0
  Output errors:
    Carrier transitions: 1, Errors: 0, Drops: 0, Collisions: 0, Aged packets: 0, FIFO errors: 0, HS link CRC errors: 0, MTU errors: 0, Resource errors: 0
  Egress queues: 8 supported, 4 in use
  Queue counters:  Queued packets  Transmitted packets Dropped packets
    0 best-effort       164953301            164953301               0
    1 expedited-fo              0                    0               0
    2 assured-forw              0                    0               0
    3 network-cont         250528               250528               0
  Queue number:         Mapped forwarding classes
    0                   best-effort
    1                   expedited-forwarding
    2                   assured-forwarding
    3                   network-control

root@srx3600n0> show class-of-service
Forwarding class                       ID      Queue  Restricted queue  Fabric priority  Policing priority   SPU priority
  best-effort             0       0     0     low     normal      low
  expedited-forwarding    1       1     1     low     normal      low
  assured-forwarding      2       2     2     low     normal      low
  network-control         3       3     3     low     normal      low
***Output Limited***
This output shows five different commands that are useful
for checking the status of AppQoS. First, you can look at the overall
stats on how many sessions have been processed, rate limited, rewritten,
and honored. Honored means that the system honors its own DSCP rewrite
value to apply it to an appropriate forwarding class. The next command
shows how many hits we are getting on a per-rule basis on the SRX. This
is very important when you are not getting the expected results because
you might have some sort of rule shadowing. The next command shows what
the rate limiters are in terms of how they are configured to limit
bandwidth. Looking at the extensive interface output is very helpful to
see what activity is happening on the interface itself, and finally, a
treasure trove of information is available in the show class-of-service command. This command
literally dumps the entire Junos QoS running information, so it was too
large to include here, but it is very valuable when troubleshooting
advanced issues.
Of course, the configuration itself is another critical place to check when running into issues. The following are key items to check:
Check that the AI database is properly installed.
Check to ensure that your traffic is matching the correct firewall rule and that that rule references the correct AppQoS ruleset.
Check the overall CoS configuration under
show class-of-servicein the configuration. This is particularly true if you have modified any of the default CoS parameters.Check your AppQoS configuration under
show class-of-service
          application-traffic-control
.
Operating UserFW
UserFW can be a bit tricky to operate, particularly when you are getting it up and running initially. Usually it’s a piece of cake to operate after the initial setup, but that can be challenging. The following is a useful checklist.
If you are using the IC to operate UserFW (rather than just using local authentication), first check that the SRX is connected to the IC. If it is not, check to see if the SRX can properly connect to the IC (port TCP 11122 by default.) It could potentially be an access list or host-outbound traffic policy, routing issue, or intermediate device not allowing the connection like a firewall between the SRX and IC. Also, you should be connecting to the internal port on the IC.
If this isn’t working, but you can telnet from the SRX to the IC, check to see if the SRX and the IC have the right certificate trust. You can also disable this check as we discussed in the chapter.
If the IC to SRX is functioning properly, you should see roles being populated in the SRX and, ideally, the user information if the users are able to authenticate to the IC.
Ensure that the user is properly being redirected to the IC. There are several facets of this important step. First, you must make sure that the client is able to communicate with the IC/AD infrastructure (so FW rules might be required depending on where these components are placed). Next, you need to make sure that the redirect rules for unauthenticated users are above the actual resource rules that you want to match the appropriate users to. Finally, you need to make sure that you have the appropriate source identity in the respective resource rules.
As a quick workaround, if IC authentication is not working to AD, you can have the users authenticate locally to the IC using system authentication. That should help you resolve if there is an issue authenticating to the domain itself but that two-way communication including Role/IP/User mapping is working properly.
If you are experiencing authentication issues with Active Directory there are a few things to make sure of:
Make sure that you have a valid service account for the IC and that the Kerberos ticket is based on that account. You should be able to check and ensure that this is working under the IC event log along with the AD domain controller security log, which will log invalid authentication and resource access attempts.
Make sure that you have DNS working properly. Typically, if you point the SRX/IC to the AD that is operating a DNS server, that is the easiest model. Additionally, make sure that the IC has an FQDN in the domain.
Make sure that the SRX and IC have the appropriate time sync.
Ensure that the Kerberos ticket you generated on the domain controller is correct and installed on the IC.
If all of these facets are working but your client can’t authenticate to the IC, it could be a few things.
First, make sure that the client trusts the IC certificate. If you generated and signed this in AD, this shouldn’t be an issue.
Make sure that the client is being redirected to the correct sign-in page with the correct realm.
Make sure the client has SPNEGO enabled and that the IC is a trusted site. Even if SPNEGO doesn’t work, you should still be able to authenticate manually with the user’s credentials. If this works, then you know that AD authentication is working and that it is likely just a web browser issue with the configuration to focus on.
If all else fails, contact JTAC.
Now that we’ve taken a high-level look at all of the different steps to evaluate when running into issues with UserFW, let’s look at some useful commands.
root@SRX1400> show services unified-access-control status
Host           Address         Port   Interface     State
192.168.226.45 192.168.226.45  11123  fxp0.0        connected


root@SRX1400> show services unified-access-control roles
Name                                     Identifier
Sales                                    0000000001.000005.0
Engineering                              0000000001.000006.0
Accounting                               0000000001.000007.0
Total: 3

root@SRX1400> show services unified-access-control authentication-table detail
Identifier: 1
  Source IP: 192.168.1.127
  Username: bradmatic
  Age: 0
  Role identifier       Role name
    0000000001.000005.0 Sales
Total: 1
There are also troubleshooting facilities available on the IC itself. Primarily you will be interested in looking at the Event Log and User Access Logs in the Admin console Log/Monitoring → Events → Log, along with the User Access log. If you are familiar with Policy Tracing, that can be a helpful process as well. JTAC can definitely help if you run into issues here as well, as there is a great deal more debug information available with advanced troubleshooting procedures on the IC.
Beyond the preceding output, your troubleshooting is
primarily the same as standard firewall troubleshooting as discussed in
Chapter 8. You want to make sure that you’re
properly matching rules. The show security
match-policies command is very helpful for this operation
because you can specify the source identity.
root@srx3600n0> show security match-policies ?
Possible completions:
  destination-ip       Match policy for the given destination IP
  destination-port     Match policy for the given destination port) (1..65535)
  from-zone            Match policy for the given source zone
  global               Match global policy
  logical-system       Logical-system name
  protocol             Match policy for the given protocol)
  result-count         Expected results count (optional) (1..16)
  root-logical-system  Root logical-system (default)
  source-identity      Match policy for the given roles (optional)
  source-ip            Match policy for the given source IP
  source-port          Match policy for the given source port) (1..65535)
  to-zone              Match policy for the given destination zone
Operating SSL Forward Proxy
The last section that we look at is operating the SSL Forward Proxy feature. In terms of troubleshooting the SSL FP feature, it is useful to check the following items:
Make sure that you have properly generated or installed the SSL CA certificate on the SRX. This certificate must be a trusted CA certificate on all of your clients or else they will see warning messages. Active Directory and other software delivery platforms can help with the distribution aspect of this.
Ensure that your SSL Proxy is properly configured. This includes referencing the correct certificate, with the appropriate proxy settings.
Check to ensure that the SRX has the trusted CA certificates installed, or else you need to have the ignore-server-authentication enabled (which can be good for troubleshooting but is not recommended for permanent operation).
Finally, ensure that you have SSL Proxy enabled on the correct FW rules, that the traffic is being matched by those rules, and that the proper SSL Proxy profile is referenced.
If you are still running into issues, you can enable logging and tracing to look for additional clues or contact JTAC. Once SSL Proxy is enabled, it is pretty easy to operate and shouldn’t require much maintenance other than ensuring that your CA certificate on the SRX hasn’t expired or been revoked.
In terms of statistics, there is only one command, but it is useful for checking the status of sessions. On the high-end SRX, it is outputted on a per-SPU basis.
root@srx3600n0> show services ssl proxy statistics
PIC:spu-4 fpc[2] pic[0] ------
        sessions matched                       3389
        sessions whitelisted                      0
        sessions bypassed:non-ssl                 0
        sessions bypassed:mem overflow            0
        sessions created                       3389
        sessions ignored                         54
        sessions active                           0
        sessions dropped                          1
Matched sessions are those that are enforced with SSL Forward Proxy. Whitelisted are those that are explicitly whitelisted in the configuration. Bypass non-ssl and memory overflow indicate some sort of issue processing the sessions. Ignored can occur for different reasons; you will need to look deeper into the logs. Sessions active are the sessions that are currently being processed by SSL Proxy, and sessions dropped occur when the system can’t process the sessions and drops them (typically if there is some error or performance limit reached).
Finally, there are some useful facilities when checking the certificate status on the box, along with certificate operations to familiarize yourself with.
root@srx3600n0> show security pki ?
Possible completions:
  ca-certificate       Show certificate-authority certificate information
  certificate-request  Show PKCS-10 certificate request information
  crl                  Show certificate revocation list information
  local-certificate    Show router certificate information
root@srx3600n0> show security pki local-certificate
Certificate identifier: SELF-SIGNED
  Issued to: (null), Issued by: DC = company, DC = local
  Validity:
    Not before: 02- 5-2013 01:41
    Not after: 02- 4-2018 01:41
  Public key algorithm: rsaEncryption(2048 bits)

Certificate identifier: CA-CERT
  Issued to: www.juniper.net, Issued by: CN = www.juniper.net
  Validity:
    Not before: 11- 2-2011 14:47
    Not after: 10-31-2016 14:47
  Public key algorithm: rsaEncryption(2048 bits)

root@srx3600n0> request security pki ?
Possible completions:
  ca-certificate       Perform operations on certificate-authority certificates
  crl                  Perform operations on certificate revocation list
  generate-certificate-request  Generate the certificate request in PKCS-10 format
  generate-key-pair    Generate RSA private and public key pair
  local-certificate
  verify-integrity-status  Check the integrity of PKI files (in CC mode)
Sample Deployments
For the sample deployment, we are going to perform an overall example that includes all of the features that we discussed in the chapter, including mixing features like UserFW with AppFW, AppQoS, SSL FP, and even for other Level 7 features like IPS/UTM. This allows you to maximize your flexibility as an administrator. In this example, shown in Figure 12-13, we configure the following:
For users in the Sales role, create an AppFW policy that allows them to go to any web-based real estate and social networking applications. Leverage AppQoS to ensure that they can only use 10 Mbps upload and download for any social networking applications, but leave everything else as is. Also enable SSL FP, IPS, and session logging for this rule. You should restrict this rule to TCP ports 80 and 443.
For users in the Engineering role, only allow them to view social networking applications between 12 noon and 1 p.m. during their lunch break. During all other times they should only be able to view forum sites. Enable SSL FP, IPS, and session logging. You should restrict this rule to TCP ports 80 and 443.
Allow all other users to go to the Internet, but make sure that the UTM Profile called Protect Users is enabled, which uses the default Websense Enhanced and Sophos AV profiles (more on this in Chapter 14). Block any multimedia-based web applications with AppFW, but allow any other known web application, while blocking everything else over TCP port 80.
For this example, we assume that the IC and SSL FP are already configured per earlier examples in this chapter, so we focus on the security policy sections.
Note
At the time of writing this book, UTM was in beta testing for the high-end SRX. Stay tuned to the release notes for more information on its GA availability.
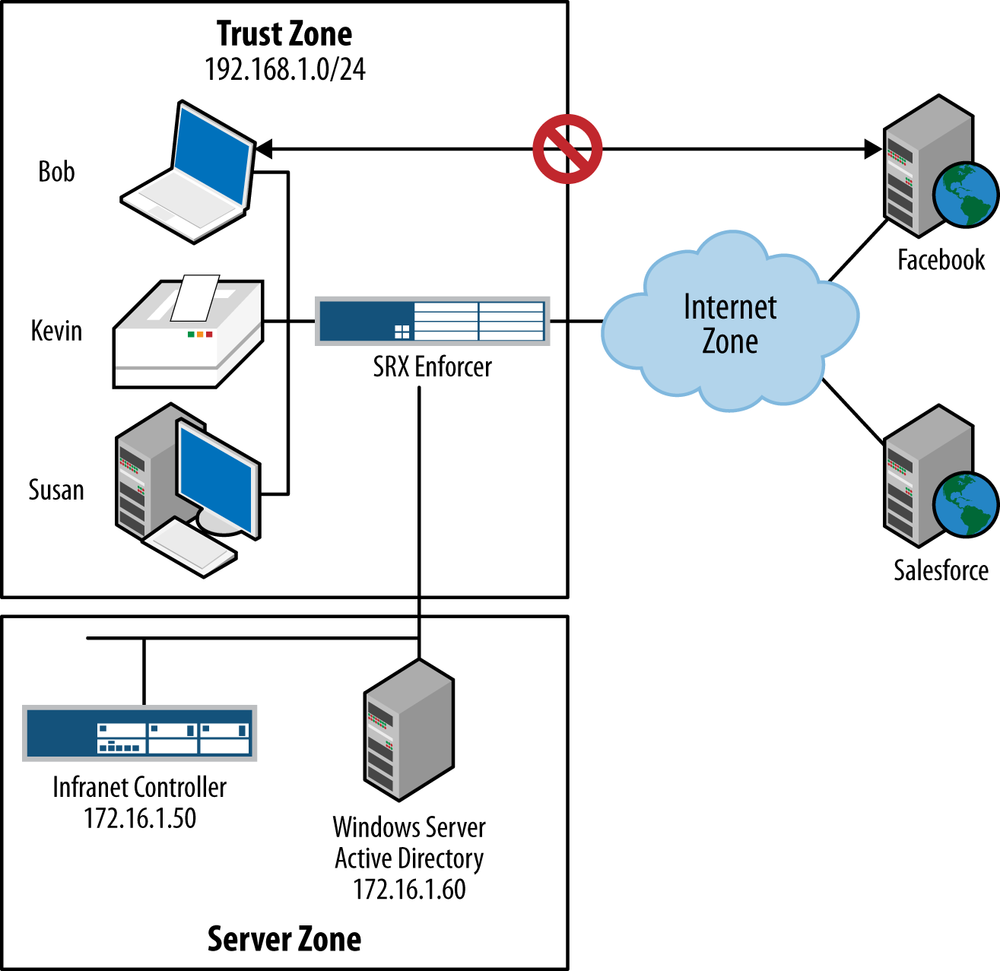
[edit]
root@srx3600n0# set security zone security-zone Trust application-tracking

[edit]
root@srx3600n0# set security zones security-zone Internet

[edit]
root@srx3600n0# set security policies from-zone Trust to-zone Internet policy Sales match source-address any source-identity Sales destination-address any application [junos-http junos-https]

root@srx3600n0# set security policies from-zone Trust to-zone Internet policy Sales then permit application-services application-traffic-control rule-set 10Mbps-Social-Networking

[edit]
root@srx3600n0# set security policies from-zone Trust to-zone Internet policy Sales then permit application-services application-firewall rule-set Real-Estate-Social-Networking

[edit]
root@srx3600n0# set security policies from-zone Trust to-zone Internet policy Sales then permit application-services idp

root@srx3600n0# set security policies from-zone Trust to-zone Internet policy Sales then permit application-services ssl-proxy profile-name SSL-FP

[edit]
root@srx3600n0# set security policies from-zone Trust to-zone Internet policy Sales then log session-close

[edit]
root@srx3600n0# set security application-firewall rule-sets Real-Estate-Social-Networking rule 1 match dynamic-application-group junos:web:real-estate

[edit]
root@srx3600n0# set security application-firewall rule-sets Real-Estate-Social-Networking rule 1 match dynamic-application-group junos:web:social-networking

[edit]
root@srx3600n0# set security application-firewall rule-sets Real-Estate-Social-Networking rule 1 then permit

root@srx3600n0# set security application-firewall rule-sets Real-Estate-Social-Networking default-rule deny

 [edit]
root@srx3600n0# set class-of-service application-traffic-control rate-limiters 10Mbps bandwidth-limit 10000

 [edit]
root@srx3600n0# set class-of-service application-traffic-control rule-sets 10Mbps-Social-Networking rule 1 match application-group junos:web:social-networking

[edit]
 [edit]
root@srx3600n0# set class-of-service application-traffic-control rule-sets 10Mbps-Social-Networking rule 1 then rate-limit client-to-server 10Mbps

[edit]
root@srx3600n0# set class-of-service application-traffic-control rule-sets 10Mbps-Social-Networking rule 1 then rate-limit server-to-client 10Mbps


[edit]
root@srx3600n0# set security application-firewall rule-sets Social-Engineering rule 1 match dynamic-application-group junos:web:social-networking

[edit]
root@srx3600n0# set security application-firewall rule-sets Social-Engineering rule 1 then permit

[edit]
root@srx3600n0# set security application-firewall rule-sets Social-Engineering default-rule deny

[edit]
root@srx3600n0# set security application-firewall rule-sets Forums rule 1 match dynamic-application-group junos:web:forums

[edit]
root@srx3600n0# set security application-firewall rule-sets Forums rule 1 then permit

[edit]
root@srx3600n0# set security application-firewall rule-sets Forums default-rule deny

[edit]
root@srx3600n0# set schedulers scheduler Engineering daily start-time 12:00 stop-time 13:00

[edit]
root@srx3600n0# set security policies from-zone Trust to-zone Internet policy Engineering-Lunch scheduler-name Engineering

[edit]
root@srx3600n0# set security policies from-zone Trust to-zone Internet policy Engineering-Lunch match source-address any source-identity Engineering destination-address any application [junos-http junos-https]

root@srx3600n0# set security policies from-zone Trust to-zone Internet policy Engineering-Lunch then permit application-services application-firewall rule-set Social-Engineering

[edit]
root@srx3600n0# set security policies from-zone Trust to-zone Internet policy Engineering-Lunch then permit application-services idp

[edit]
root@srx3600n0# set security policies from-zone Trust to-zone Internet policy Engineering-Lunch then permit application-services ssl-proxy profile-name SSL-FP

[edit]
root@srx3600n0# set security policies from-zone Trust to-zone Internet policy Engineering-Lunch then log session-close


root@srx3600n0# set security policies from-zone Trust to-zone Internet policy Engineering-Normal-Hours match source-address any source-identity Engineering destination-address any application [junos-http junos-https]

root@srx3600n0# set security policies from-zone Trust to-zone Internet policy Engineering-Normal-Hours then permit application-services application-firewall rule-set Forums

[edit]
root@srx3600n0# set security policies from-zone Trust to-zone Internet policy Engineering-Normal-Hours then permit application-services idp

[edit]
root@srx3600n0# set security policies from-zone Trust to-zone Internet policy Engineering-Normal-Hours then permit application-services ssl-proxy profile-name SSL-FP

[edit]
root@srx3600n0# set security policies from-zone Trust to-zone Internet policy Engineering-Normal-Hours then log session-close

[edit]
root@srx3600n0# set security utm utm-policy "Protect Users" web-filtering http-profile junos-wf-enhanced-default

[edit]
root@srx3600n0# set security utm utm-policy "Protect Users" anti-virus http-profile junos-sophos-av-defaults


[edit]
root@srx3600n0# set security application-firewall rule-sets Other-Users rule 1 match dynamic-application-group junos:web:multimedia

[edit]
root@srx3600n0# set security application-firewall rule-sets Other-Users rule 1 then deny

[edit]
root@srx3600n0# set security application-firewall rule-sets Other-Users rule 2 match dynamic-application-group junos:web

[edit]
root@srx3600n0# set security application-firewall rule-sets Other-Users rule 2 then permit

root@srx3600n0# set security application-firewall rule-sets Other-Users default-rule deny

[edit]
root@srx3600n0# set security policies from-zone Trust to-zone Internet policy All-Other-Users match source-address any source-identity authenticated-user destination-address any application junos-http

[edit]
root@srx3600n0# set security policies from-zone Trust to-zone Internet policy All-Other-Users then permit application-services application-firewall rule-set Other-Users

[edit]
root@srx3600n0# set security policies from-zone Trust to-zone Internet policy All-Other-Users then permit application-services utm-policy "Protect Users"

[edit]
root@srx3600n0# set security policies from-zone Trust to-zone Internet policy All-Other-Users then log session-close

[edit]
root@srx3600n0# show security policies from-zone Trust to-zone Internet
policy Sales {
    match {
        source-address any;
        destination-address any;
        application [ junos-http junos-https ];
        source-identity Sales;
    }
    then {
        permit {
            application-services {
                idp;
                ssl-proxy {
                    profile-name SSL-FP;
                }
                application-firewall {
                    rule-set Real-Estate-Social-Networking;
                }
                application-traffic-control {
                    rule-set 10Mbps-Social-Networking;
                }
            }
        }
        log {
            session-close;
        }
    }
}
policy Engineering-Lunch {
    match {
        source-address any;
        destination-address any;
        application [ junos-http junos-https ];
        source-identity Engineering;
    }
    then {
        permit {
            application-services {
                idp;
                ssl-proxy {
                    profile-name SSL-FP;
                }
                application-firewall {
                    rule-set Social-Engineering;
                }
            }
        }
        log {
            session-close;
        }
    }
    scheduler-name Engineering;
}
policy Engineering-Normal-Hours {
    match {
        source-address any;
        destination-address any;
        application [ junos-http junos-https ];
        source-identity Engineering;
    }
    then {
        permit {
            application-services {
                idp;
                ssl-proxy {
                    profile-name SSL-FP;
                }
                application-firewall {
                    rule-set Forums;
                }
            }
        }
        log {
            session-close;
        }
    }
}
policy All-Other-Users {
    match {
        source-address any;
        destination-address any;
        application junos-http;
        source-identity authenticated-user;
    }
    then {
        permit {
            application-services {
                utm-policy "Protect Users";
                application-firewall {
                    rule-set Other-Users;
                }
            }
        }
        log {
            session-close;
        }
    }
}

[edit]
root@srx3600n0# show security application-firewall
rule-sets Real-Estate-Social-Networking {
    rule 1 {
        match {
            dynamic-application-group [ junos:web:real-estate junos:web:social-networking ];
        }
        then {
            permit;
        }
    }
    default-rule {
        deny;
    }
}
rule-sets Social-Engineering {
    rule 1 {
        match {
            dynamic-application-group junos:web:social-networking;
        }
        then {
            permit;
        }
    }
    default-rule {
        deny;
    }
}
rule-sets Forums {
    rule 1 {
        match {
            dynamic-application-group junos:web:forums;
        }
        then {
            permit;
        }
    }
    default-rule {
        deny;
    }
}
rule-sets Other-Users {
    rule 1 {
        match {
            dynamic-application-group junos:web:multimedia;
        }
        then {
            deny;
        }
    }
    rule 2 {
        match {
            dynamic-application-group junos:web;
        }
        then {
            permit;
        }
    }
    default-rule {
        deny;
    }
}

[edit]
root@srx3600n0# show security utm utm-policy "Protect Users"
anti-virus {
    http-profile junos-sophos-av-defaults;
}
web-filtering {
    http-profile junos-wf-enhanced-default;
}

[edit]
root@srx3600n0# show class-of-service application-traffic-control
rate-limiters 10Mbps {
    bandwidth-limit 10000;
}
rule-sets 10Mbps-Social-Networking {
    rule 1 {
        match {
            application-group junos:web:social-networking;
        }
        then {
            rate-limit {
                client-to-server 10Mbps;
                server-to-client 10Mbps;
            }
        }
    }
}
Summary
As computer networks have evolved, providing cutting-edge services and feature-rich applications, the underlying protocols that drive these improvements will also evolve. So, too, must our security capabilities on devices like firewalls to ensure that administrators can effectively secure their networks. The technologies offered as part of AppSecure are just a piece of the puzzle, but by no means should these be your only security mechanisms. AppSecure is just a building block that further strengthens the security controls that came before it, like stateful firewalling, IPS, and UTM. As time goes on, we’ll definitely expect to see new and innovative features that are set to improve administrative controls and experience in the realm of application security. This is definitely a technology segment that you will want to stay updated on.
Study Questions
- Questions
What do all of the components in AppSecure have in common?
Explain the functions of AppTrack, AppFW, AppQoS, UserFW, and SSL FP.
What does the Application Cache do? When is it best to have it on? When is it best to turn it off?
What options are available for AppTrack processing?
Where do you turn on AppTrack?
How is AppFW enforced in the SRX, and how are the AppFW rules evaluated?
What is the difference between whitelist, blacklist, and hybrid rulesets in AppFW?
What options are available when using AppFW and what do they do?
How is AppQoS enabled on the SRX, and what actions can it take on matched traffic?
What are the required and optional values available in the AppQoS rate limiters?
What are the roles and responsibilities of the components involved in UserFW?
How is the user-to-IP mapping leveraged in the SRX for security policies?
Explain how SSL Forward Proxy functions on the SRX.
What is the difference between SSL resumption and SSL renegotiation?
What is the difference between Application Identification with signatures and heuristics?
- Answers
They all leverage AppID to provide application identity information to the different modules.
AppTrack is used to provide logging information via syslog and other on-box statistics around application usage. It not only captures the standard firewall information but also the Level 7 application as well. AppFW extends the logging and reporting side of AppTrack to be able to enforce an action on the traffic itself. This allows you to permit, deny, reject, or redirect traffic based on its application identity. AppQoS allows you to perform QoS on traffic based on its application identity. You can provide rate limiting, provide DSCP rewriting, set loss priority, and set the forwarding class (including priority queuing, guaranteeing bandwidth, and scheduling purposes). UserFW allows you to tie in user identity information to the firewall policies as match criteria. This further allows you to leverage the user identity information for other Level 7 services like AppFW, AppQoS, UTM, and IPS. Finally, SSL FP allows you to inspect outbound SSL Proxy connections from your internal clients to external resources on the Internet. You can leverage this for services like AppFW and IPS at the time of writing this book.
The application cache allows the SRX to record the results of previous AppID detection based on the server IP, protocol, and port, so that AppID doesn’t need to run for future connections. It is on by default, and applications have a 60-minute timeout by default. If you are most concerned about network performance, it is best to leave it on; however, if you are more concerned about security, it is best to turn it off. Leveraging IPS will also help when it comes to AppID to ensure that evasive behaviors are not being employed to trick the system.
AppTrack allows you define whether or not to send a log on the AppTrack session creation, along with how often it should send application volume updates which can be useful to get a more real-time view of how data is being transmitted (especially important for long-lived sessions) rather than just logging at the end of the session.
AppTrack is enabled on a per zone basis under
set security zones security-zone <zone> application-tracking.AppFW can be configured on a firewall rule-by-rule basis for any rule that has an action of permit. Each rule allows you to define a single AppFW ruleset that should be enforced. Within the AppFW ruleset, rules are evaluated from top to bottom until an application match is hit or the default option is reached.
Whitelist, blacklist, and hybrid are just titles and aren’t explicitly referenced in the configuration, but these are useful terms to describe what the AppFW ruleset is trying to accomplish. Whitelist is when you have one or more applications or application groups that are matched at the top of the AppFW ruleset with an action of permit, and the default action is to deny any unmatched applications. Blacklists are the opposite: they try to match applications or application groups with an action of deny, reject, or redirect, and all other applications are matched to the default rule, which is permit. Finally, hybrid rulesets are those that use both deny and permit in the ruleset. These are sometimes necessary when you are filtering with nested applications in very specific manners.
AppFW supports permit, deny, reject, and redirect as actions. Permit is simply to allow the traffic, deny is a silent drop on the traffic, reject is a TCP RST on the traffic, and redirect can be used for HTTP and HTTPS traffic (when SSL Proxy is used) to redirect the traffic either internally on the SRX or to a third-party web server effectively blocking the traffic from being redirected to a final destination but providing a better user experience than a simple drop or reject.
AppQoS is deployed in a ruleset manner very similar to AppFW in that the rulesets are enabled on a per-firewall rule basis when the action is permit. Within the ruleset, applications are matched and then an action is defined. The actions can include rate limiting bandwidth to a maximum limit (configurable from both client to server and server to client) as a whole for the rule, setting the forwarding class, setting a DSCP value to rewrite the traffic, logging actions, and setting loss priority.
Besides setting the name of the rate limiter, there are only two values that are configurable. You must set the bandwidth limit that defines the maximum bandwidth cap available for the rate limiter to enforce (expressed in Kbps); setting the burst size is optional and expressed in bps (bytes per second). The system will automatically set this for you if you do not explicitly define it. The only time you would need to set this is if you want a larger burst size available if there is additional bandwidth.
There are essentially five components to UserFW (assuming you’re not using local authentication): the client, the original destination server, the SRX, the Infranet Controller, and the Active Directory domain. When an unauthenticated client initiates traffic to a destination server through the SRX, the SRX will do a lookup to see if there is an active user-to-IP mapping for the client. Assuming there is no mapping, the SRX will do an HTTP redirect to redirect the HTTP session to the IC. The IC will attempt to authenticate the client via SPNEGO, which is a standards-based web authentication protocol. If the client supports it, it will retrieve a Kerberos ticket from the domain controller and present it to the IC which the IC will authenticate with the domain controller. If the client doesn’t support (or isn’t configured to support) SPNEGO, then the IC will fall back to captive portal to manually authenticate the client. Once the client is authenticated, they are allowed to continue on to the destination server. In the background, the client will maintain an HTTPS session with the IC that will send an AJAX heartbeat every five seconds to ensure that the client maintains its presence on the network.
As of Junos 12.1, the SRX has a new field called Source-Identity that allows you to map a user role (locally generated or from the IC) in the policy as an additional match criteria just like source IP, destination IP, application, and so on. This then allows the policy to have user identity intelligence and this can be further leveraged by Level 7 rulebases like UTM, IPS, AppFW, AppQoS, and more.
SSL FP allows the SRX to inspect SSL traffic that is generated from internal clients to whom you can distribute a CA signing certificate. The SRX will intercept the traffic from both a TCP Proxy and SSL Proxy perspective to negotiate an SSL tunnel between the client and the SRX, and from the SRX to the destination server. This allows the SRX to inspect the contents with Level 7 functionality like AppFW and IPS. SSL FP is configured on a firewall rule-by-rule basis, allowing you to set SSL Proxy profiles on a per-rule basis. This is different than SSL RP, with which you are protecting your own web servers by placing their SSL private key on the SRX so the SRX can decrypt the secure communication and detect attacks from external clients to your web servers.
SSL session resumption allows a client and the SRX to start an SSL session with a previously established key negotiated in a previous SSL session (bypassing the need for the SSL establishment phase). SSL renegotiation is a feature that allows the client or the server to trigger a renegotiation of the SSL session key during an existing SSL session.
The SRX supports matching applications based on both patterns and heuristics. Most “honest” applications can be easily matched via signatures, but there are many evasive applications that intentionally do not follow a particularly obvious pattern. This is where the heuristics engine comes in. It can help to detect applications via traffic analysis. Although you can’t code your own heuristic checks today, you can enable the predefined heuristic engine and then leverage the application identification results it generates for the purpose of AppSecure policy enforcement.
Get Juniper SRX Series now with the O’Reilly learning platform.
O’Reilly members experience books, live events, courses curated by job role, and more from O’Reilly and nearly 200 top publishers.

