Chapter 4. Notifications and Reports
One of the core uses of Jenkins is implementing automation. In addition to repeatable processing that is triggered by some event, we also rely on being automatically notified when processes have completed, and of their overall status. Additionally, many plugins and steps produce useful reports as part of their processing.
The pipeline DSL contains steps that help with notifications. In this chapter, we’ll look at what it takes to configure Jenkins and implement code to leverage some common notification methods and services.
Starting out, we’ll look at some of the types of notifications that Jenkins can send—from basic and extended email to using services such as Slack and HipChat.
Then we’ll move on to how to surface reports that are generated by pipeline processing to a more convenient location.
With these tools, you should be equipped to get the information you need from Jenkins and share it with other users.
Notifications
In this section, we’ll look at notifications—that is, informing users of some status, event, or piece of information that we want them to be aware of. For most cases, this will happen in the “post-processing” parts of a pipeline. In a Scripted Pipeline, this usually entails using a try-catch-finally construct if you want to always do post-processing (as described in Chapter 3). For Declarative Pipelines, we have the more straightforward post section that we can use.
Regardless of where you employ notifications, users today have a lot more options with Jenkins than just the traditional email route. Many of the options fall into the area of instant messaging, and even allow the user to do things like specify coloring for messages. We’ll look at several of these in this chapter.
Traditionally in Jenkins, email was the primary means of notification. As such, there is significant support (and significant options) for configuring email notifications in Jenkins. The options are managed on the Configure System page of the Manage Jenkins area. We’ll break these down for simplicity.
Jenkins Location
In addition to the “nice” URL that you can set in this section (see the following note), this is where you can set the system administrator’s email address. This is intended to be the “from” address that users will see in emails from Jenkins to the project owners. As described in the help screen shown in Figure 4-1, this can be a simple email address or a fuller one with a name for your Jenkins instance. Regardless, it is a required field.
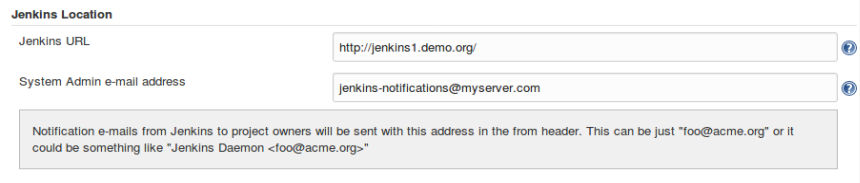
Figure 4-1. Jenkins Location settings
Jenkins URL
The Jenkins URL field in this section provides a place to put in the more user-friendly name of your Jenkins system. Jenkins can’t detect the URL itself. Note that this is optional, and you could leave it as something like “localhost:8080”. However, this is the Jenkins URL that will appear in the links in emails sent from Jenkins. So you will need to reference a clickable URL.
In reality, for most purposes, the email address for the user (configured later) will be the one surfaced in the emails. In most cases, you likely won’t see the admin address unless you dig into the headers for the email. An example of deep-diving into those is shown next. Here, you can see the value of the “System Admin e-mail address” field in the X-Google-Original-From header:
X-Received: by 10.55.93.197 with SMTP id r188mr35950021qkb.277.1502803051345;
 Tue, 15 Aug 2017 06:17:31 -0700 (PDT)
Received: from diyvb2 (sas08001.nat.sas.com. [149.173.8.1])
 by smtp.gmail.com with ESMTPSA id 131sm6301940qki.23.2017.08.15.06.17.30
 for <bcl@nclasters.org >
 (version=TLS1 cipher=ECDHE-RSA-AES128-SHA bits=128/128);
 Tue, 15 Aug 2017 06:17:30 -0700 (PDT)
From: jenkins-demo@gmail.com
X-Google-Original-From: jenkins-notifications@myserver.com
Date: Tue, 15 Aug 2017 09:17:30 -0400 (EDT)
Reply-To: no-reply@jenkins.foo
To: bcl@nclasters.org
Message-ID: <2007092803.5.1502803050373.JavaMail.jenkins@diyvb2>
Subject: Test email #6
MIME-Version: 1.0
Content-Type: text/plain; charset=UTF-8
Content-Transfer-Encoding: 7bit
Next, we’ll look at the traditional settings for email notifications in Jenkins.
E-mail Notification
Still on the global configuration page, there is an E-mail Notification section that you fill in to set up the basic email functionality. These fields should be pretty much self-explanatory in terms of setup, as long as you can gather the details for your email configuration. Note that there is an Advanced button to the right that you need to click to get access to some fields.
Figure 4-2 shows this section of the page.
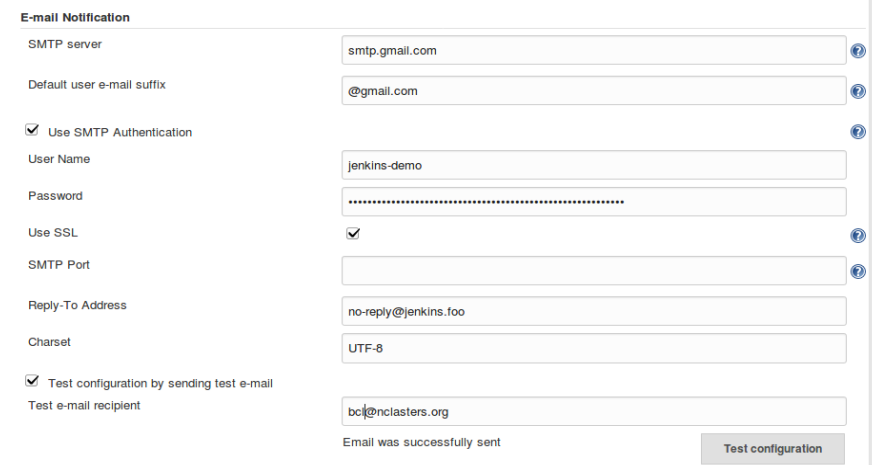
Figure 4-2. E-mail Notification settings
A couple of notes:
-
The SMTP server will default to the one on localhost if this field is left empty.
-
If using SSL, the port will default to 465; otherwise, it defaults to 25.
-
The Reply-To Address field here is optional, but can be convenient if you need to set one.
-
Arguably the most important part of this section is the ability to test your email configuration by sending a test email (the last fields at the bottom). Doing this is highly recommended. If this test fails, you will commonly see a Java error traceback, as shown in Figure 4-3. This is typically due to a bad username or password, or a bad address for the email recipient.
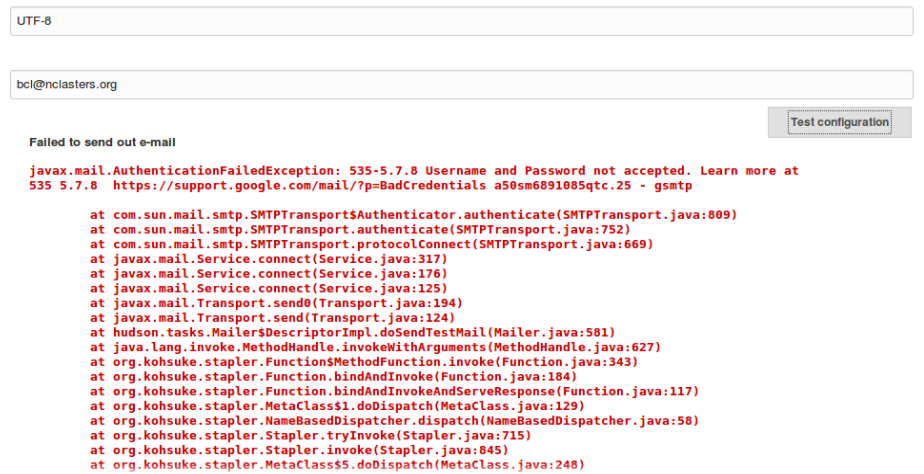
Figure 4-3. Traceback for failure sending test email
With this background, let’s see how we might use this in a pipeline script.
Sending email in pipelines
The following code listing shows an example of using the basic mail step in a Scripted Pipeline. As explained in other chapters of the book, the try-catch-finally block is the primary way with a Scripted Pipeline to ensure that post-processing is always done regardless of success or failure:
node('worker_node1'){try{...}currentBuild.result='SUCCESS'}catch(err){currentBuild.result='FAILURE'}finally{to:'bcl@nclasters.org',subject:"Status of pipeline: ${currentBuild.fullDisplayName}",body:"${env.BUILD_URL} has result ${currentBuild.result}"}}
Setting Build Results
You may have noticed that we specifically set the currentBuild.result value in this listing. The reason for this is that you can’t depend on pipeline steps to explicitly set the build result, and if the build result is not set the emails will show a status of null.
In a similar way, the pipeline mail step can be used in a Declarative Pipeline. Here’s a simple example:
pipeline{agentanystages{...}post{always{to:'bcl@nclasters.org',subject:"Status of pipeline: ${currentBuild.fullDisplayName}",body:"${env.BUILD_URL} has result ${currentBuild.result}"}}}
post Section of a Declarative Pipeline
Note that, as described in Chapter 7, the post section supports separate processing for build statuses such as success, failure, etc. In this case, we are simply using the always clause for a generic demonstration.
These pipelines will produce an email like the following if there is a failure:
---------------------------- Original Message ----------------------------
Subject: Status of pipeline: pipeline2 #1
From:    jenkins-demo@gmail.com
Date:    Tue, August 15, 2017 9:33 pm
To:      bcl@nclasters.org
--------------------------------------------------------------------------

http://jenkins1.demo.org/job/pipeline2/1/ has result FAILURE
If there is a successful build, this will look the same except FAILURE will be replaced with SUCCESS.
While the built-in functionality covers the basic email needs, there may be times when you need or want to further customize and control the emails that Jenkins sends. The Email Extension plugin provides many additional options for expanding how emails are handled, but it also comes with trade-offs when using it in a pipeline environment. We’ll dive into it next.
Extended email notifications
In addition to the basic email functionality, there is also an Extended Email (email-ext) plugin that adds numerous additional options and levels of control for sending email through Jenkins. It contains a similar general mail configuration section similar to the mail plugin, but also adds functionality in three areas:
- Content
It’s possible to dynamically modify the contents of an email notification’s subject and body.
- Recipients
You can define which user roles should receive an email notification.
- Triggers
You can specify what conditions should initiate sending an email notification. (Note that these do not currently apply to pipelines.)
We’ll look at each of these areas in more detail next and see how to incorporate them where applicable.
Global configuration
The email-ext plugin requires some global configuration before being used in Pipeline jobs. Most of this is the same as the configuration we did for the basic email functionality (see Figure 4-4).
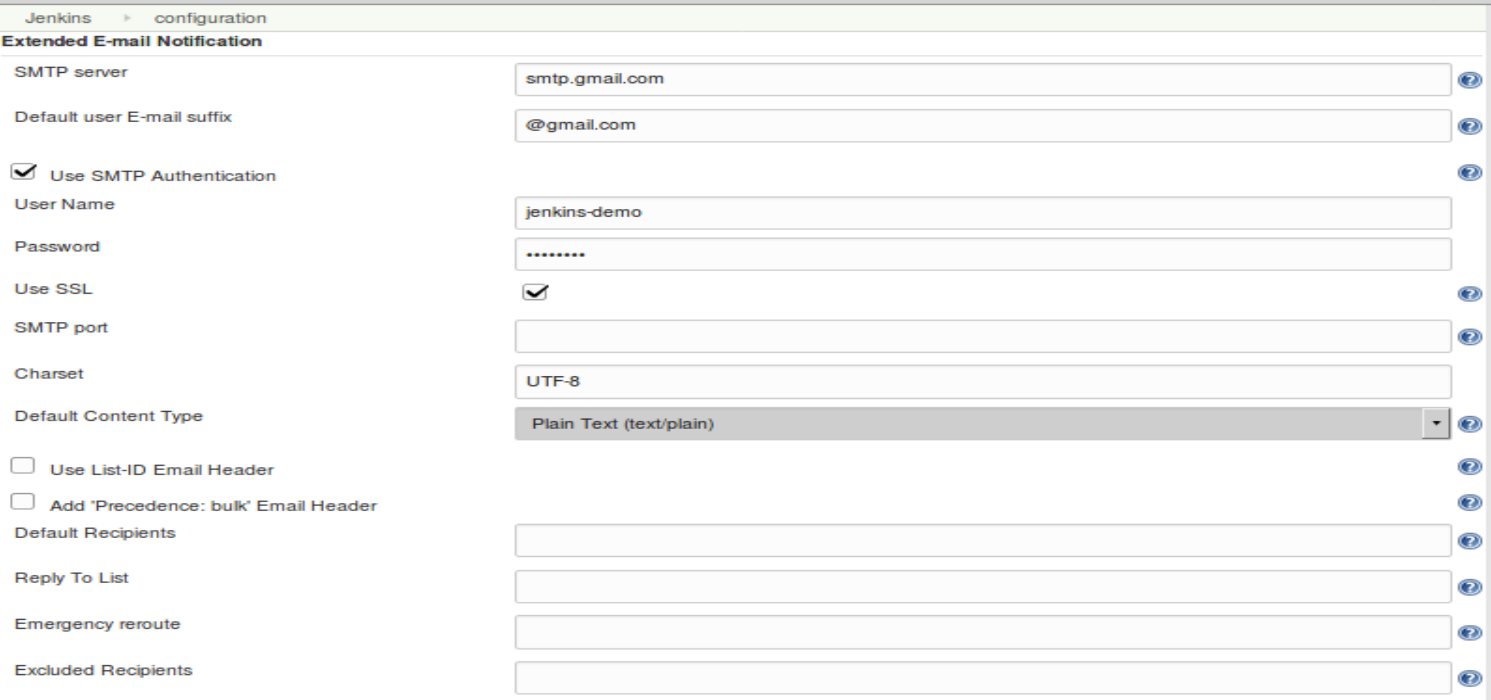
Figure 4-4. General configuration for extended emails
A few new fields deserve further explanation. They include:
- Use List-ID Email Header
Selecting this option allows you to apply a list-id header to all emails. As the help suggests, this can be useful with filtering and also avoiding autoresponders. The help contains example formats.
- Add ‘Precedence: bulk’ Email Header
This option adds a header to emails from Jenkins. Based on a standard used by mail systems, this option should eliminate or cut down on autoresponses being sent back to Jenkins.
- Reply To List
This isn’t a new one, but note that we can provide a comma-separated list of users/addresses.
- Emergency reroute
If this field is filled in, all Jenkins emails will be sent to just that or those recipients. This could be useful for temporarily not allowing Jenkins to send out wider emails if there is an issue that warrants that.
- Excluded Recipients
As the name implies, this can exclude (filter out) any email addresses from the list generated by other functionality in this plugin.
Next, we’ll look at the functionality in the plugin that allows us to set the default elements of emails.
Content
Still in the global configuration, we have a set of fields that are intended to allow us to dynamically generate/modify the contents of the email notices sent out from Jenkins. Figure 4-5 shows these fields.
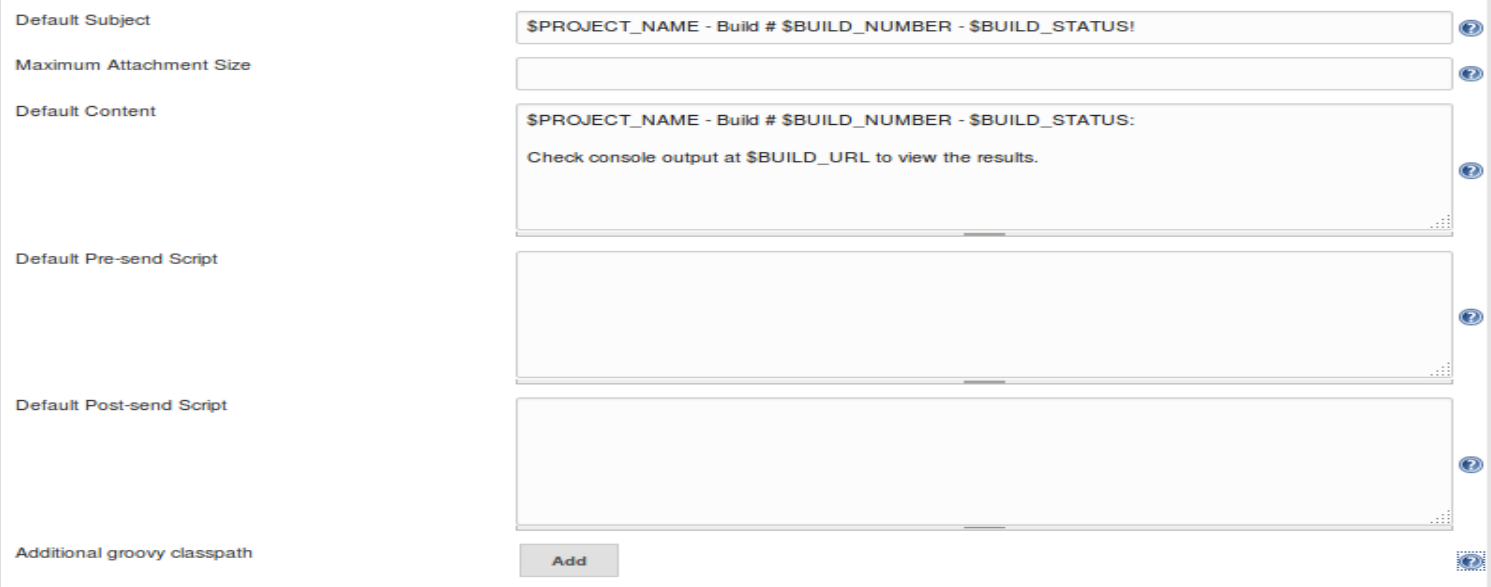
Figure 4-5. Default global content settings for extended email
The emailext Step and Default Fields
Currently, these fields are of no value in Pipeline scripts as there doesn’t seem to be a way to tell the emailext step to use the defaults from here. However, we’re including them in our discussion in case that functionality becomes available later.
The first three fields (Default Subject, Maximum Attachment Size, and Default Content) are pretty self-explanatory. Note that the attachment size should be expressed in terms of megabytes and this is cumulative for all attachments.
The Default Pre-send Script and Default Post-send Script areas offer places to enter a Groovy script to run before the email is sent (and potentially modify it) and after the email is sent, respectively. If you’re interested in these, there are a number of “recipes” available on the web. A good place to start is the plugins page.
You can also use a number of tokens in constructing the contents of the Default Subject and Default Content fields. “Tokens” here refers to what we might call build or environment variables filled in by Jenkins in other contexts. $BUILD_NUMBER contains the number of the build and $PROJECT_NAME contains the name of the project, for example. If defined, the default pre-send and post-send scripts can be referenced in other jobs as ${DEFAULT_PRESEND_SCRIPT} and ${DEFAULT_POSTSEND_SCRIPT}, respectively.
As well as providing more options for the content of emails, the extended email functionality also provides more options for choosing the types of recipients to send emails to. That’s next.
Recipients
The Email Extension plugin provides several categories of recipients through the emailext pipeline step. These are in addition to any designated individual recipients.
Figure 4-6 shows the selectable categories in the drop-down for the step.
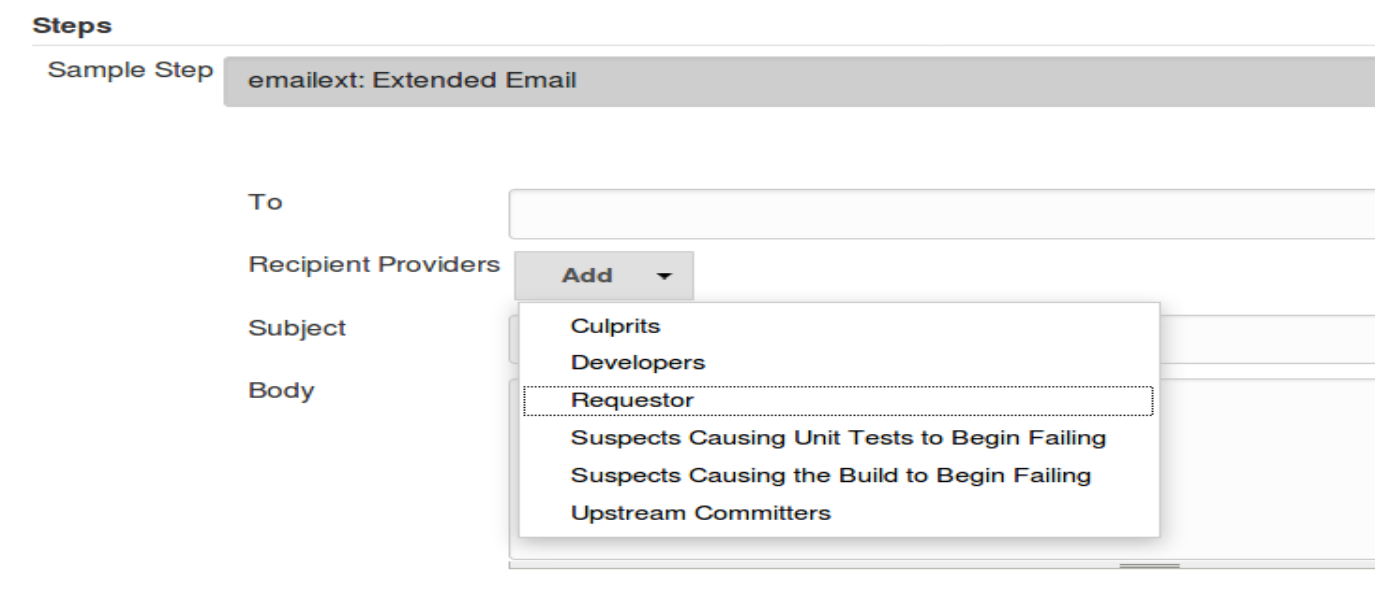
Figure 4-6. Adding extended email recipients
Table 4-1 lists the categories along with their definitions, drawing on the wording from the plugin documentation.
| Name | Description (from plugin documentation) |
|---|---|
| Culprits | Sends email to the list of users who committed a change between the last nonbroken build and now. This list at least always includes people who made changes in this build, but if the previous build was a failure it also includes the culprit list from that. |
| Developers | Sends email to all the people who caused a change in the changeset. |
| Requestor | Sends email to the user who initiated the build (assuming it was manually initiated). |
| Suspects Causing Unit Tests to Begin Failing | Sends email to the list of users suspected of causing a unit test to begin failing. This list includes committers and requestors of the build where the test began to fail, and of any consecutive failed builds prior to the build in which the test began to fail. |
| Suspects Causing the Build to Begin Failing | Sends email to the list of users suspected of causing the build to begin failing. |
| Upstream Committers | Sends email to the list of users who committed changes in upstream builds that triggered this build. |
When using these in the emailext pipeline step, we need to use the $class notation to reference the names (at least as of the time of this writing). For example:
emailextbody:'body goes here',recipientProviders:[[$class:'CulpritsRecipientProvider'],[$class:'DevelopersRecipientProvider'],[$class:'RequesterRecipientProvider'],[$class:'FailingTestSuspectsRecipientProvider'],[$class:'FirstFailingBuildSuspectsRecipientProvider'],[$class:'UpstreamComitterRecipientProvider']],subject:'subject goes here'
Triggers
The global configuration for the email-ext plugin also allows you to select a set of default triggers for events to send email on. However, this adds those automatic emails only when you are using Freestyle jobs and add “Editable Email Notifications” to the “Post-build Actions” part of the job. As such, they are not useful in the Pipeline context.
A similar approach can be constructed in a pipeline by doing things like checking the build status in a finally block in a Scripted Pipeline, or in a post block with conditionals in a Declarative Pipeline, and sending email off of that. See Chapter 3 (on Pipeline flow) and Chapter 7 (on Declarative Pipelines) for examples of post-build processing like this.
Including logs
One of the other useful built-in functions for the email-ext plugin is that it can also include (and compress) logs. To use this setting in the pipeline step, you can simply enable the options shown here:
attachLog:true,compressLog:true
Ultimately, the plugin provides a mixed bag for Pipeline developers. On the good side, it allows adding the extended classes of recipients and doing things like attaching logs. On the downside, emailext is one of those steps that was targeted to do a lot by default based on global configuration and adding a post-build action to a Freestyle job. That doesn’t translate well into a Pipeline environment unless (until) there is some way to set a similar post-processing property, so the default functionality can be activated. Perhaps that will be added in the future, past this writing.
One other note is that using pre-send or post-send scripts in the emailext pipeline step seems to currently be broken. Objects that those scripts should have access to, such as the build object, are not accessible. Hopefully, this too will be fixed in the not-too-distant future.
With all that in mind, here’s a final example of using the emailext pipeline step with many of the useful components:
emailextattachLog:true,body:"""<p>EXECUTED: Job <b>\'${env.JOB_NAME}:${env.BUILD_NUMBER})\'</b></p><p>View console output at "<a href="${env.BUILD_URL}">${env.JOB_NAME}:${env.BUILD_NUMBER}</a>"</p><p><i>(Build log is attached.)</i></p>""",compressLog:true,recipientProviders:[[$class:'DevelopersRecipientProvider'],[$class:'RequesterRecipientProvider']],replyTo:'do-not-reply@company.com',subject:"Status: ${currentBuild.result?:'SUCCESS'} -Job \'${env.JOB_NAME}:${env.BUILD_NUMBER}\'",to:'bcl@nclasters.org Brent.Laster@domain.com'
There are several items worth noting about this step:
The step is formatted to fit the space available on the page.
A better approach when you’re writing a Scripted Pipeline would be to define variables to hold some of the longer values and then use the variables in the step.
Note the use of the triple double quotes around the text of the body. This is a Groovy-ism, where triple quotes are used to encapsulate multiline messages.
We are using HTML tags in the body of the email. In order for this to be rendered as HTML, the default content type needs to be set to HTML (not text) in the global configuration for the email-ext plugin.
Note the use of double quotes around strings that have variables to interpolate—another Groovy-ism.
The syntax
${currentBuild.result?:'SUCCESS'}checks whethercurrentBuild.resultisNULLand, if so, assigns it the'SUCCESS'value. This is necessary because aNULLvalue in Jenkins for the build result indicates success.We have used the
replyTofield to set an address for replies.Note that multiple names can be used in the
tostring, separated by spaces.
Figure 4-7 shows an example of an email generated by the previous command.
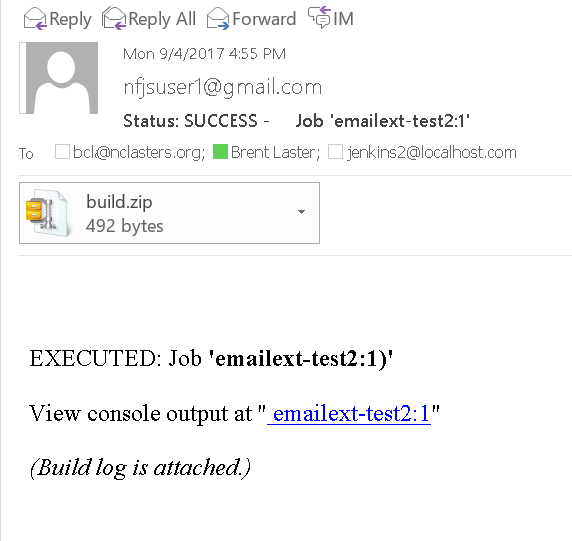
Figure 4-7. Example email from sample command
While emails still provide the most ubiquitous means of notifying Jenkins users of events and sharing information, more and more teams are using instant messaging services for collaboration and notifications. Two of the most popular are Slack and HipChat. Let’s look at how Jenkins can work with each of them.
Collaboration Services
For several of the popular messaging/communications services, there are plugins to provide notifications to the services from Jenkins. In this section, we’ll look at two of these—for Slack and HipChat.
Slack notifications
To send notifications to Slack, you first need to install the Slack Notification plugin. After installing and configuring the global parts of this plugin, your pipeline will be able to send notifications to a Slack channel via a slackSend step. But first, you’ll need to enable the integration through Slack.
Setup in Slack
Enabling the Jenkins integration with Slack assumes you have a Slack account, a team, and a channel defined first. (We won’t cover that here, but there is plenty of documentation for this available on the web.) For our purposes here, I’ve created an explore-jenkins team and a #jenkins2 channel on Slack.
Next, you’ll want to configure the Jenkins integration. This will guide you through creating a Slack API integration token to allow Jenkins to connect to Slack.
Figure 4-8 shows an example of the first screen of the configuration. Here, we are logged into the explore-jenkins team and are going to enable Jenkins CI integration for the #jenkins2 channel within that team.
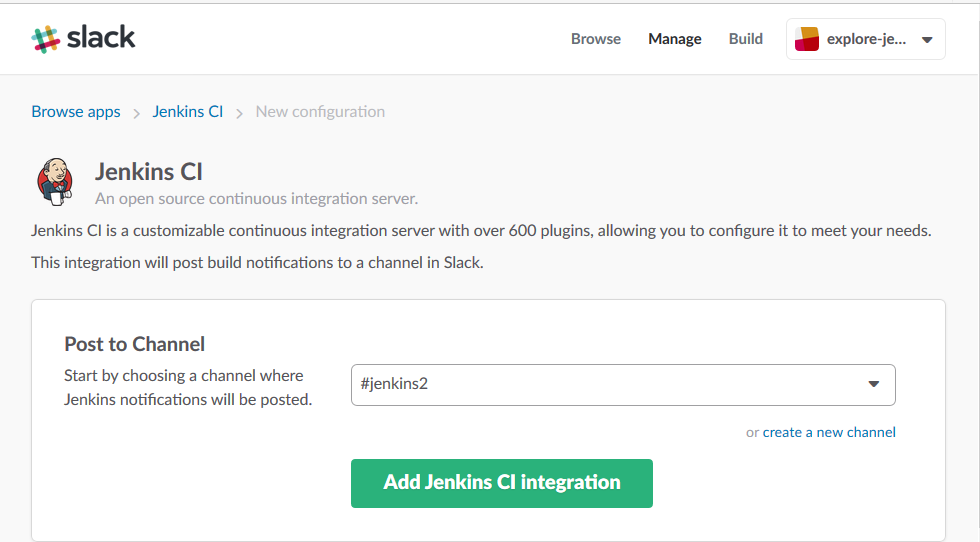
Figure 4-8. Enabling the Jenkins Slack integration on a channel
After clicking the “Add Jenkins CI integration” button, you’ll be taken to the next screen, which will have directions for what to do in Jenkins to use the integration. Further down on the page will be the integration settings to use in Jenkins.
The main things you need from this are the base URL and the token. Both of these currently can be found in the output for Step 3 on the page (Figure 4-9). Modify any other settings you want and then click the Save Settings button at the bottom of the page. This will save the options but will return you to the same page.

Figure 4-9. Information from Slack integration page with info needed for Jenkins config
This is a good time to take care of a security issue. While you could use the token directly in the Jenkins global configuration, this is considered a security risk. You are better off creating a “Secret text” credential to hold this. More information on creating credentials is in Chapter 5, but Figure 4-10 shows the main step of filling in the dialog for a new credential.
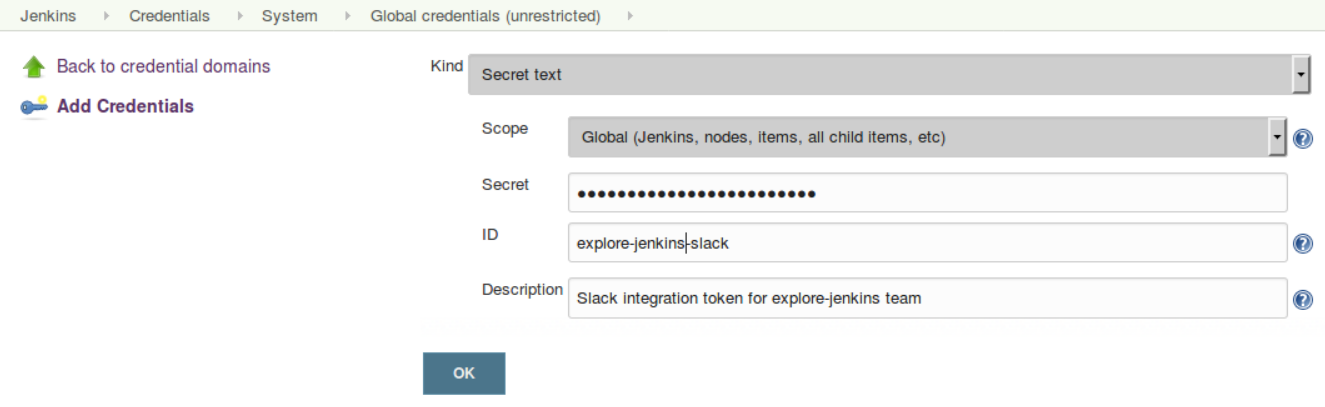
Figure 4-10. Creating a new “Secret text” credential for Slack
The next section assumes that you’ve created such a credential to use in the global configuration.
Global configuration in Jenkins
The global setup for the Slack notifications involves just a few basic pieces of information, as shown in Figure 4-11.
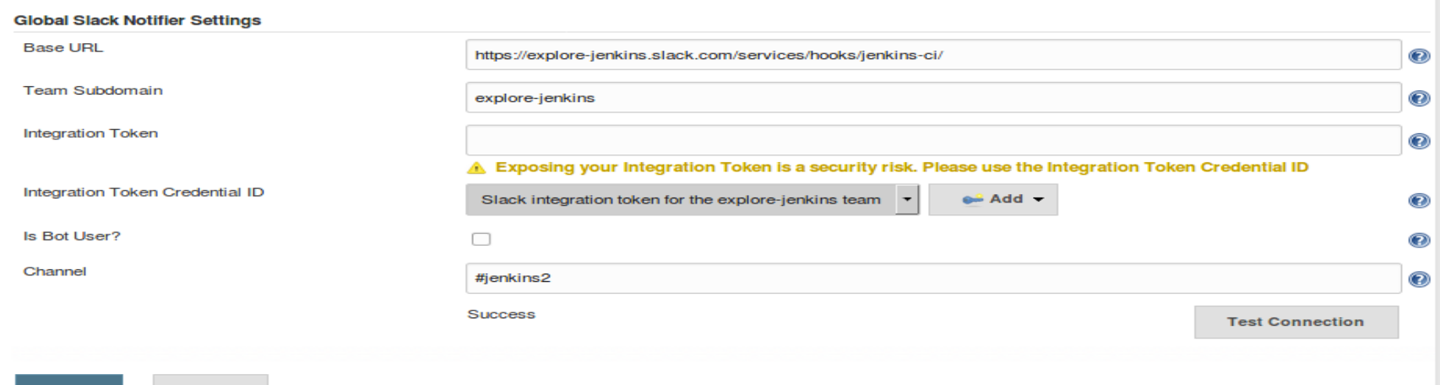
Figure 4-11. Global configuration for the Jenkins/Slack notifications
First is the base URL. This can be obtained from the Slack integration output as described in the previous section.
Next is the team subdomain, which is the team you will be using in Slack (the same one you configured the token for). Likewise, you can fill in the last argument with the channel that you configured the token for.
As we discussed in the previous section, it’s better to create a new credential to use for the Slack integration token than to directly expose the token itself. The Integration Token Credential ID field is where you select the credential you previously set up that contains the token. When using this option, you can leave the “Integration Token” field blank.
Finally, there’s the “IsBot User?” checkbox. Enabling (checking) this option allows notifications to be sent from a bot user. For this to work, credentials for the bot user (integration token credentials) need to be provided.
Once you have these fields filled in, you can test the connection by clicking the Test Connection button. If all went well, you should see a Success message. And then, in Slack itself, you’ll be able to see the notifications regarding the integration setup (Figure 4-12).

Figure 4-12. Notifications of Slack integration setup
Webhooks in Slack
While API tokens are fairly easy to set up for integration, there is another approach that can be used—webhooks. This is the newer approach for integration between Jenkins and Slack, allowing Slack to send a payload to a public endpoint defined in Jenkins when it has something to share. This is also the approach for Slack-compatible applications. We won’t go into all the details here, but I’ll provide some pointers on getting this set up just in case you need to at some point.
As with the Jenkins CI integration previously outlined, you first need to enable the webhook integration for your subdomain/team from within Slack. Note that you want to set up an outgoing webhook (information sent from Slack) as opposed to an incoming webhook. Figure 4-13 shows the screen in Slack to enable the outgoing webhook integration.
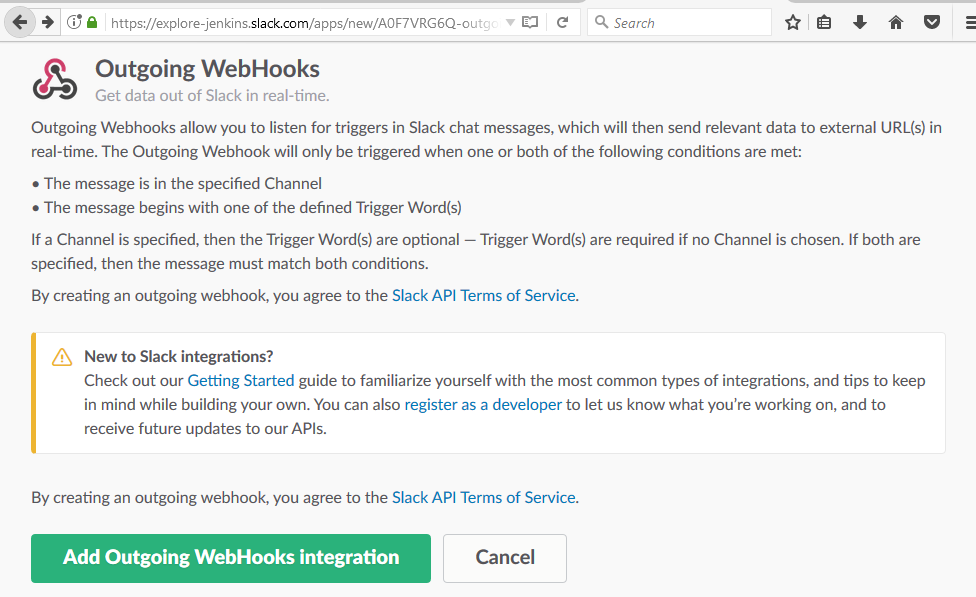
Figure 4-13. Enabling the outgoing webhook integration in Slack
After you click the “Add Outgoing WebHooks Integration” button, you’ll be taken to a screen where you’ll find additional information about your new integration, including the token (Figure 4-14).
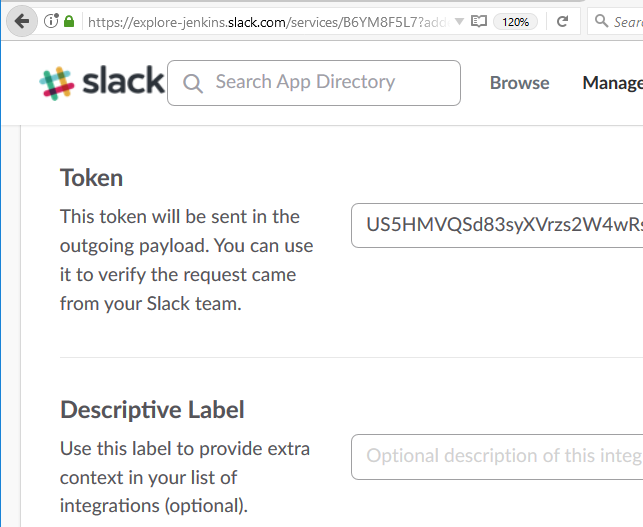
Figure 4-14. Outgoing webhook integration details—including token
You can then configure the global setup for Slack webhooks with the token and your endpoint (Figure 4-15).

Figure 4-15. Setting global configuration in Jenkins for Slack webhooks
Sending Slack notifications in a job
The slackSend pipeline step allows for actually sending the message via Slack. The only required (default) parameter is the message string to send. While you can send any message string, if you are using this for notifications from Jenkins then you probably want to include Jenkins environment variables or global variables, such as env.JOB_NAME, env.BUILD_NUM, etc. When using these, remember to enclose them in the ${} syntax in a string that is enclosed itself in double quotes so that the Groovy interpolation will work correctly. Here’s a simple example with only the default parameter:
slackSend"Build ${env.BUILD_NUMBER} completed for ${env.JOB_NAME}."
Adding Links in the Message
Links can be added using standard HTML code (assuming the “Text format” option is not set)—simply code the item as (<link | text>). For example, to add a link to the URL you send out, you could modify the previous step this way:
slackSend"Build ${env.BUILD_NUMBER} completed for${env.JOB_NAME}. Details: (<${env.BUILD_URL} | here >)"
The other likely parameter that you’ll use will be color. This setting is used to color the border along the left side of the message attachment.
Colors can be specified via a couple of predefined labels or a hex string (explained more in the upcoming note). The predefined labels are good (dark green), warning (orange-yellow), and danger (dark red).
Adding in a color and a link, the example step might look like this:
slackSendcolor:'good',message:"Build ${env.BUILD_NUMBER}completed for ${env.JOB_NAME}. Details: (<${env.BUILD_URL} |here >)"
Note that the part of the message with the variables must be enclosed in double quotes to allow for the interpolation of the values.
Colors and Color Codes
The slackSend step can use a color code represented by a string of hexadecimal (base-16) characters. The hipchatSend step (discussed shortly) uses a name for the color. Let’s take a moment and see how these map.
The hex representation for a color consists of six characters, which can be numbers from 0–9 or characters from A–F. Each character position represents a certain part/tone of the color, and the combination of values for the six characters makes up a unique color.
Within this combination, the first two characters represent the red elements, the next two colors represent the green elements, and the final two characters represent the blue elements.
Using combinations of the hex digits in the different positions allows us to create any unique color with different combinations of the red, green, and blue elements. Here are some examples:
#000000means that all color parts are off, so this equates to black.#FFFFFFmeans that all color parts are on, so this equates to white.#FF0000means that all of the red elements are on, so this is red.#00FF00means that all of the green elements are on, so this is green.#FFFF00means that all of the red and green elements are on, which makes yellow (red mixed with green).
So, if you wanted to have the color be purple, you could turn on the red components (two left hex digits) and the blue components (two right hex digits) and turn off the green components (middle two digits), as in #FF00FF.
There are additional parameters that the slackSend step can take. Most of these have the same names and types of settings as the values in the global configuration for Slack integration. They are designed to allow the step to override the default settings if desired. You can find out more about these by going to the Pipeline Syntax screen, selecting the slackSend step, and clicking the Advanced button.
Finally, one other parameter that is available is failOnError. Setting this to true causes the run to abort if there is a problem sending the notification.
HipChat notifications
Similar to the Slack Notification plugin, there is also a HipChat Notification plugin. It adds a hipchatSend step to the Pipeline DSL. Like the Slack plugin, the HipChat plugin requires some configuration in the application itself first. Unlike with Slack, you have a choice (currently) of using either HipChat’s version 1 API or the new version 2 API. Although version 2 is recommended going forward, as of the time of this writing version 1 is still supported, so we’ll cover setup for both.
For these examples, I assume that you have an account already with at least one room set up. For the example here, I have a room set up named explore-jenkins.
Setup in HipChat for version 1 API use
From your room’s menu, you can select Integrations and then browse to find the Jenkins tile (Figure 4-16).
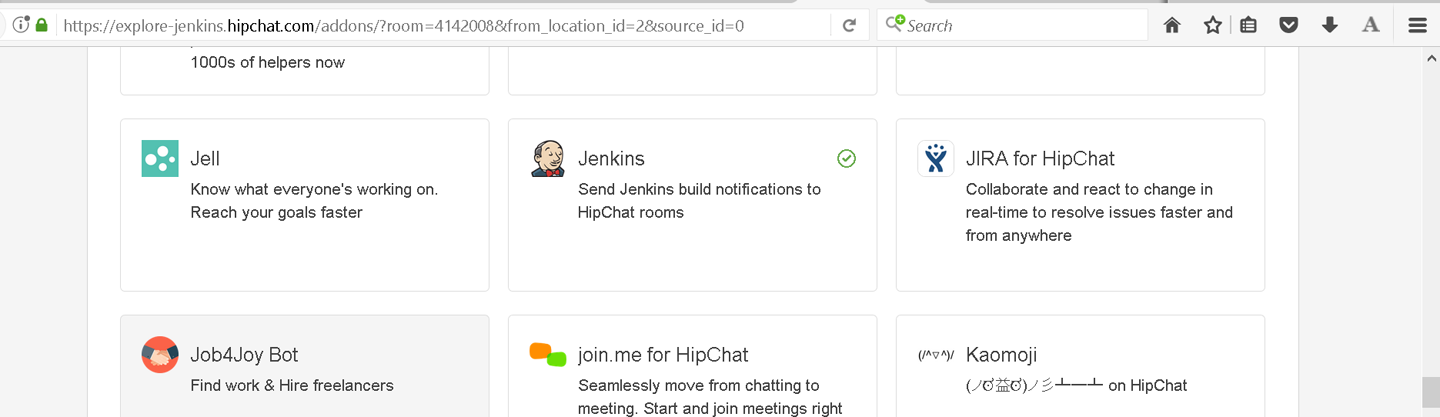
Figure 4-16. The Jenkins integration tile in HipChat
Select this tile and you’ll be presented with a screen that has the version 1 token on it (Figure 4-17).
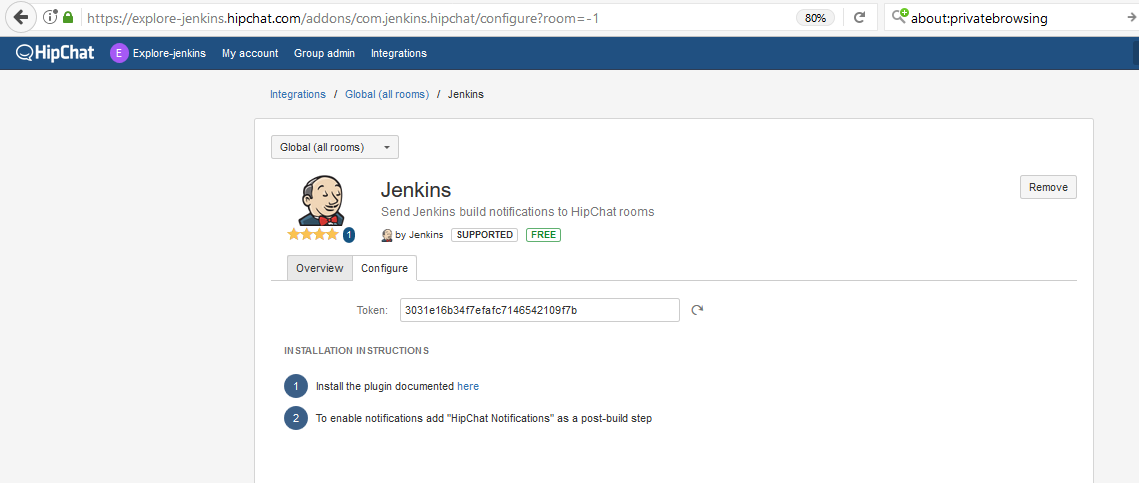
Figure 4-17. v1 token screen
To use this token in the Jenkins global configuration, you must create a new Jenkins “Secret text” credential. The process is shown in “Setup in Slack”. Note that you do not have the option to use the token in plain text in the Jenkins global configuration, as you do with the Slack setup.
Setup in HipChat for version 2 API use
If you want to (or are required to) use the HipChat version 2 API, the easiest way to get a token is to go to http://<your room>.hipchat.com/account/api. (Note that this is for a personal token.) Once there, in the “Create new token” section, provide a label for the token and select the type. (The examples here use the label “jenkins” and the Send Notification scope). Click the Create button and you’ll see a v2 token that you can use (Figure 4-18).
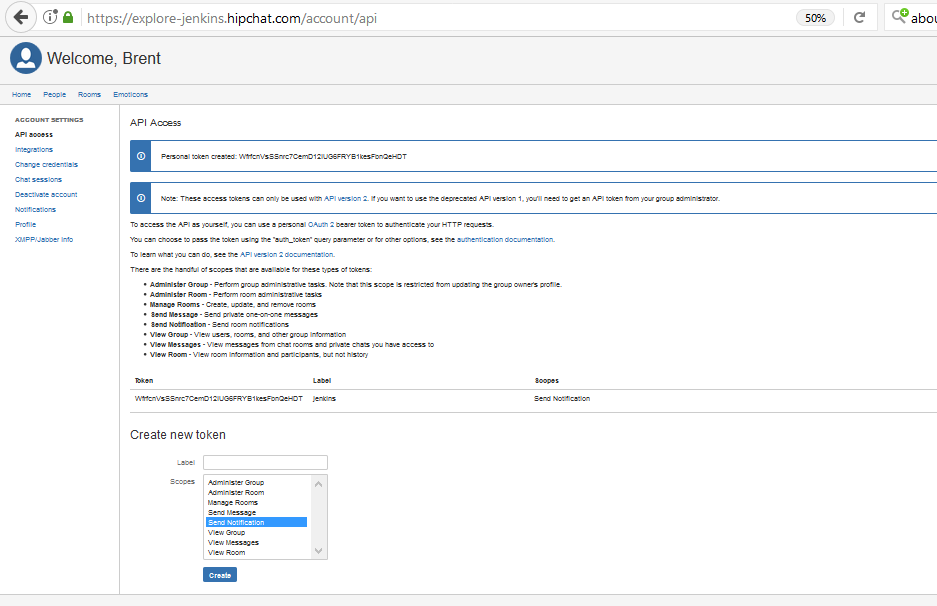
Figure 4-18. Getting a HipChat v2 token
To use this token in the Jenkins global configuration, you must create a new Jenkins “Secret text” credential. The process is shown in “Setup in Slack”.
Global configuration in Jenkins
For the HipChat global configuration, you need to first fill in the location of the HipChat server. Unless you have a dedicated server with its own name for this, you can just leave it as the default api.hipchat.com.
Next is the checkbox to indicate whether or not you are using the v2 API. If you are using the v1 API, leave it unchecked.
Under that, enter the room name you want to send notifications to. This can be either the room name (case-sensitive) or the HipChat ID number. Multiple names can be provided as long as they are comma-separated.
Next, if you are using v1, you can specify a different ID from which to send the notifications. The default is “Jenkins”.
The Card Provider field has to do with notification cards in HipChat. A discussion of notification cards is outside the scope of this book; unless you have a specific reason to do otherwise, you can just leave this as “Default cards”.
Figure 4-19 shows an example of the global configuration for HipChat in Jenkins.
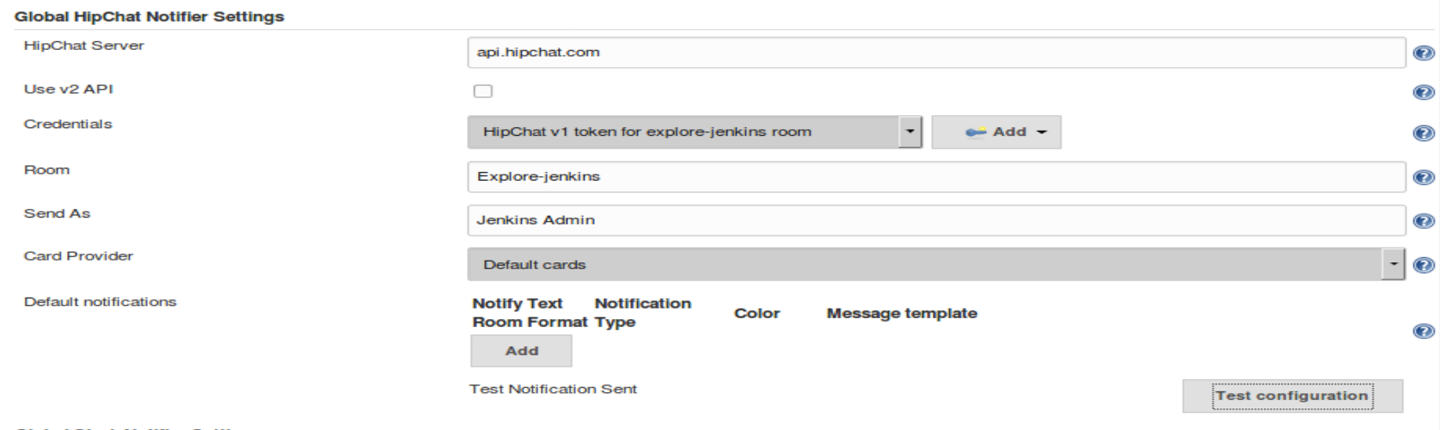
Figure 4-19. HipChat global configuration
Once you have this information filled in, it is a good time to test out the communication between Jenkins and HipChat. You can do that by pressing the “Test configuration” button. If all is set up correctly, you should see a Test Notification Sent message like that in Figure 4-20.
Figure 4-20. Test notification from Jenkins
Default notifications
There is one more piece of global configuration for the HipChat plugin—default notifications. This is the last section of the globally configured options. The boldfaced headers in that section are columns that you can configure when you add a default notification. To add a default notification, you simply click the Add button and fill in the fields.
As the name implies, the intent is to allow setting up default notifications for a job. However, these notifications are only sent if specific notifications aren’t configured in a job and if the HipChat Notifications option is added as a post-build action. Since those conditions can only be met with a Freestyle project, and since Pipeline projects using the HipChat integration will have a specific notification step by definition, these don’t apply for Pipeline projects.
Sending HipChat notifications in a job
The HipChat Notification plugin provides the previously mentioned hipchatSend step that you can use in your pipeline. The only required (default) parameter is a message. While you can send any message string, if you are using this for notifications from Jenkins then you probably want to include Jenkins environment variables or global variables, such as env.JOB_NAME, env.BUILD_NUM, etc. When using these, remember to enclose them in the ${} syntax in a string that is enclosed itself in double quotes so that the Groovy interpolation will work correctly. Here’s a simple example with only the default parameter:
hipchatSend"Build Started: ${env.JOB_NAME} ${env.BUILD_NUMBER}"
The other common option to use sets the color for the background of the message in the interface. Unlike the Slack color options, the color value can only be one of GREEN, YELLOW, RED, PURPLE, GRAY, or RANDOM. The default is GRAY.
Additional options control other aspects of the message. The notify option can be set to true or false; it indicates whether the message should trigger a user notification with sounds for notifying mobile devices and so on. And the textFormat option indicates whether the message should be sent in text format (if set to true). The default is false (HTML).
Adding Links in the Message
Assuming the textFormat option is not set to true, links can be added in hipchatSend messages by just using standard HTML. For example:
hipchatSend"Build ${env.BUILD_NUMBER} completed for${env.JOB_NAME}. Details: <a href=${env.BUILD_URL}>here</a>"
An example of a more elaborate command with the color option and notifications for the room would look like this:
hipchatSendcolor:'GREEN',notify:true,message:"Build ${env.BUILD_NUMBER} completed for${env.JOB_NAME}. Details: <a href=${env.BUILD_URL}>here</a>"
The notification in HipChat would look like Figure 4-21.

Figure 4-21. HipChat notification from Jenkins
There are additional parameters that the hipchatSend step can take. These have the same names and types of settings as the values in the global configuration for HipChat. They are designed to allow the step to override the default settings if desired. You can find out more about these by going to the Pipeline Syntax screen, selecting the hipChat step, and clicking the Advanced button.
Unlike the underlying email functionality, the integration points for the collaboration services continue to evolve. HipChat is moving from the v1 API to the v2 API. Slack is adding more support for webhooks. And compatible services may also use slightly different approaches. Always check the Plugins index for the latest information.
There are certainly other types of notifications that Jenkins can provide with appropriate plugin integration, but hopefully this section has given you enough to get going with meaningful communication.
Another means that Jenkins uses to convey information is producing reports—or rather, the applications that Jenkins integrates with produce reports. Getting these exposed for easier access is the subject of our next section.
Reports
Many plugins or tools used with Jenkins generate HTML reports for various tasks. Example tasks include code analysis, code coverage, and unit test reports. Some of these, such as those for SonarQube and JaCoCo, provide custom integrations with Jenkins job output. These usually take the form of visual elements such as badges or graphs or simple links that the user can click to get to the application itself and view the reports.
However, some tooling doesn’t supply that level of integration with Jenkins. It simply creates the reports in a location relative to the workspace and leaves it up to the user to determine the location, browse to it, and view the content there. This is less convenient than having a link to the report on the job output page, especially if you are trying to locate the report within one of Jenkins’s workspaces and/or need to access this information over multiple runs of a job.
Fortunately, the HTML Publisher plugin is available. This plugin allows you to add a step in your pipeline code to point to an HTML report. It also allows you to have a custom link created on the job’s output page, and it provides options such as ensuring that reports are preserved over time (archived).
Publishing HTML Reports
To see how the HTML Publisher plugin works, let’s look at an example. Assume we have a Gradle build for a project with multiple subprojects, including one named api and one named util. Our pipeline runs the Gradle test task against these subprojects, exercising a set of unit tests that we have created for each.
By convention, Gradle creates a report named index.html for any unit testing it does, and places it in a <component>/build/reports/test directory. For our pipeline, we want to add links to the HTML test reports produced by Gradle for the api and util subprojects.
This provides us with the basic information we need to pass to the DSL step, which is named publishHTML. An invocation of this step for the api report might look like this:
publishHTML(target:[allowMissing:false,alwaysLinkToLastBuild:false,keepAll:true,reportDir:'api/build/reports/test',reportFiles:'index.html',reportName:"API Unit Testing Results"])
The purpose of most of the fields specified for the step are obvious from their names, and with the HTML Publisher plugin installed the syntax is available via the Snippet Generator. We’ll cover the fields here anyway, but as usual, it may be easier to generate the actual code through the generator.
To start with, notice that we have the target block as the main parameter. Within that we have a number of subparameters:
allowMissingThis setting has to do with whether or not the build should fail if the report is missing. If set to
false, a missing report will fail the build.alwaysLinkToLastBuildIf this setting is
true, then Jenkins will always show a link to the report from the last successful build—even if the current build failed.keepAllIf this is set to
true, then Jenkins archives the reports for all successful builds. Otherwise Jenkins only archives the report for the most recent successful build.reportDirThis is the path to the HTML file, relative to the Jenkins workspace.
reportFilesThis is the name of the HTML file(s) to display (if multiple, they should be separated by commas).
reportNameThis is the name you want the link to the report to have on the job output page.
Typically, like a notification, we may want this step to run at the end of the build. And we may want it to run regardless of whether the build succeeded (especially if we have it set up to link to the last successful build). We can add it to a notifications stage in a try-catch-finally section for a Scripted Pipeline or a post stage for a Declarative Pipeline. An example finally section of a pipeline script with this step is shown next. Note that here we are unstashing content because it was produced on separate nodes running in a parallel step:
finally{unstash'api-reports'publishHTML(target:[allowMissing:false,alwaysLinkToLastBuild:false,keepAll:true,reportDir:'api/build/reports/test',reportFiles:'index.html',reportName:"API Unit Testing Results"])unstash'util-reports'publishHTML(target:[allowMissing:false,alwaysLinkToLastBuild:false,keepAll:true,reportDir:'util/build/reports/test',reportFiles:'index.html',reportName:"Util Unit Testing Results"])}
A corresponding post section could be used in a Declarative Pipeline.
Figure 4-22 shows the output page from our job with the custom report name links that we created on the left side.

Figure 4-22. Job output showing the custom report links in the left menu
Summary
In this chapter, we’ve covered some of the basic ways to facilitate Jenkins-to-user communication when working with pipelines. We’ve looked at the built-in and extended email functionality and how we can leverage those, and we’ve seen how to use collaboration services like Slack and HipChat to send dynamic status information back to wherever you use those apps.
We also looked at how to better integrate the HTML reports produced by many applications with the job’s output page for easier access.
It’s important to realize that the information presented here is the most basic implementation for several of the steps, particularly the ones on notifications. Other pipeline constructs could certainly be used to render these in a more elegant way in the code.
For example, for the sake of space, long strings were included in some of the steps that, in a Scripted Pipeline, would be better defined as variables and passed in to the step.
As another point, shared library routines could be used to encapsulate functions with any of the steps to make them easier to call and more generic. (Shared libraries are discussed in Chapter 6.)
However, hopefully this chapter has given you the information you need to get started. I encourage you to explore and build on these examples to make your pipeline the best fit for the notification mechanisms that you and your team need.
In the next chapter, we’ll explore how to set up and use Jenkins credentials and some key items around securing your pipelines.
Get Jenkins 2: Up and Running now with the O’Reilly learning platform.
O’Reilly members experience books, live events, courses curated by job role, and more from O’Reilly and nearly 200 top publishers.

