Chapter 1. Introducing Jenkins 2
Welcome to Jenkins 2: Up and Running. Whether you’re a build administrator, developer, tester, or any other role, you’ve come to the right place to learn about this evolution in Jenkins. With this book, you’re on your way to leveraging the features of Jenkins 2 to design, implement, and execute your pipelines with a level of flexibility, control, and ease of maintenance that hasn’t been possible with Jenkins before. And, no matter what your role, you’ll quickly see the benefits.
If you’re a developer, writing your pipeline-as-code will feel more comfortable and natural. If you’re a DevOps professional, maintaining your pipeline will be easier because you can treat it like any other set of code that drives key processes. If you’re a tester, you’ll be able to take advantage of increased support for features such as parallelism to gain more leverage for your efforts. If you’re a manager, you’ll be able to ensure the quality of your pipeline as you do for your source code. If you’re a Jenkins user, you’re going to grow your skill base substantially and be ready for this new evolution of “pipelines-as-code.”
Getting to these goals requires understanding and mapping out the transition from your existing implementations. Jenkins 2 represents a significant shift from the older, more traditional, form-based versions of Jenkins. And with such a shift, there’s a lot to learn. But it’s all manageable. As the first step, we need to lay a solid foundation of Jenkins 2 fundamentals (What is it? What are the big-ticket items?), including its new features, the changes in the working environment, and an understanding of the new concepts that it is based on. That’s what this chapter and the next are all about. Some of this you may already be familiar with. And if so, that’s great. But I suggest at least scanning those sections that look familiar. There may be something in there that’s new or has changed enough to be worth noting.
In this chapter, we’ll explore at a high level what makes Jenkins 2 different and how that will fit in with what you’re accustomed to. We’ll look at three key areas:
What is Jenkins 2, in terms of the significant new features and functionality it introduces?
What are the reasons (motivations and drivers) for the shift in Jenkins?
How compatible is Jenkins 2 with previous versions? What are the compatibility considerations?
Let’s get started by taking a look at what makes Jenkins 2 different from the traditional Jenkins versions.
What Is Jenkins 2?
In this book, the term “Jenkins 2” is used a bit loosely. In our specific context, this is a way to refer to the newer versions of Jenkins that directly incorporate support for pipelines-as-code and other new features such as Jenkinsfiles that we will talk about throughout the book.
Some of these features have been available for Jenkins 1.x versions for some time via plugins. (And, to be clear, Jenkins 2 gains much of its new functionality from major updates of existing plugins as well as entirely new plugins.) But Jenkins 2 represents more. It represents a shift to focusing on these features as the preferred, core way to interact with Jenkins. Instead of filling in web forms to define jobs for Jenkins, users can now write programs using the Jenkins DSL and Groovy to define their pipelines and do other tasks.
DSL here refers to Domain-Specific Language, the “programming language” for Jenkins. The DSL is Groovy-based and it includes terms and constructs that encapsulate Jenkins-specific functionality. An example is the node keyword that tells Jenkins that you will be programmatically selecting a node (formerly “master” or “slave”) that you want to execute this part of your program on.
The DSL is a core piece of Jenkins 2. It serves as a building block that makes other key user-facing features possible. Let’s look at a few of these features to see how they differentiate Jenkins 2 from “legacy” Jenkins. We’ll quickly survey a new way to separate your code from Jenkins in a Jenkinsfile, a more structured approach to creating workflows with Declarative Pipelines, and an exciting new visual interface called Blue Ocean.
The Jenkinsfile
In Jenkins 2, your pipeline definition can now be separate from Jenkins itself. In past versions of Jenkins, your job definitions were stored in configuration files in the Jenkins home directory. This meant they required Jenkins itself to be able to see, understand, and modify the definitions (unless you wanted to work with the XML directly, which was challenging). In Jenkins 2, you can write your pipeline definition as a DSL script within a text area in the web interface. However, you can also take the DSL code and save it externally as a text file with your source code. This allows you to manage your Jenkins jobs using a file containing code like any other source code, including tracking history, seeing differences, etc.
The filename that Jenkins 2 expects your job definitions/pipelines to be stored as is Jenkinsfile. You can have many Jenkinsfiles, each differentiated from the others by the project and branch it is stored with. You can have all of your code in the Jenkinsfile, or you can call out/pull in other external code via shared libraries. Also available are DSL statements that allow you to load external code into your script (more about these in Chapter 6).
The Jenkinsfile can also serve as a marker file, meaning that if Jenkins sees a Jenkinsfile as part of your project’s source code, it understands that this is a project/branch that Jenkins can run. It also understands implicitly which source control management (SCM) project and branch it needs to work with. It can then load and execute the code in the Jenkinsfile. If you are familiar with the build tool Gradle, this is similar to the idea of the build.gradle file used by that application. I’ll have more to say about Jenkinsfiles throughout the book.
Figure 1-1 shows an example of a Jenkinsfile in source control.

Figure 1-1. An example Jenkinsfile in source control
Declarative Pipelines
In the previous incarnations of pipelines-as-code in Jenkins, the code was primarily a Groovy script with Jenkins-specific DSL steps inserted. There was very little imposed structure, and the program flow was managed by Groovy constructs. Error reporting and checking were based on the Groovy program execution rather than what you were attempting to do with Jenkins.
This model is what we now refer to as Scripted Pipelines. However, the DSL for the pipeline has continued to evolve.
In Scripted Pipelines, the DSL supported a large number of different steps to do tasks, but was missing some of the key metafeatures of Jenkins-oriented tasks, such as post-build processing, error checking for pipeline structures, and the ability to easily send notifications based on different states. Much of this could be emulated via Groovy programming mechanisms such as try-catch-finally blocks. But that required more Groovy programming skills in addition to the Jenkins-oriented programming. The Jenkinsfile shown in Figure 1-1 is an example of a Scripted Pipeline with try-catch notification handling.
In 2016 and 2017, CloudBees, the enterprise company that is the majority contributor to the Jenkins project, introduced an enhanced programming syntax for pipelines-as-code called Declarative Pipelines. This syntax adds a clear, expected structure to pipelines as well as enhanced DSL elements and constructs. The result more closely resembles the workflow of constructing a pipeline in the web interface (with Freestyle projects).
An example here is post-build processing, with notifications based on build statuses, which can now be easily defined via a built-in DSL mechanism. This reduces the need to supplement a pipeline definition with Groovy code to emulate traditional features of Jenkins.
The more formal structure of Declarative Pipelines allows for cleaner error checking. So, instead of having to scan through Groovy tracebacks when an error occurs, the user is presented with a succinct, directed error message—in most cases pointing directly to the problem. Figure 1-2 shows a snippet of the output produced by the following Declarative Pipeline with the enhanced error checking:
pipeline{agentanystages{stae('Source'){gitbranch:'test',url:'git@diyvb:repos/gradle-greetings'stashname:'test-sources',includes:'build.gradle,/src/test'}stage('Build'){}}}
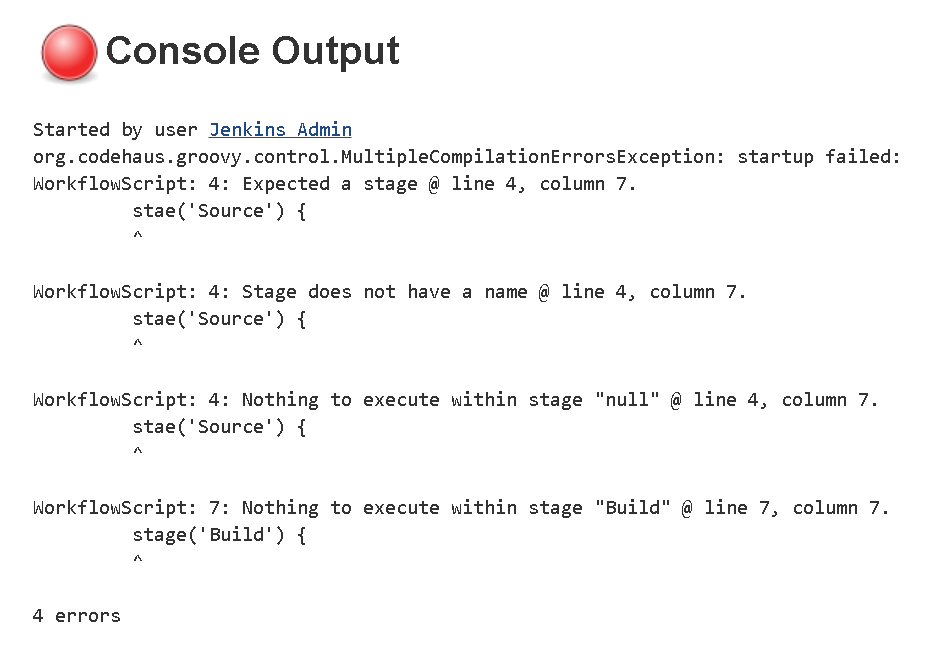
Figure 1-2. Declarative Pipeline with enhanced error checking
Blue Ocean Interface
The structure that comes with Declarative Pipelines also serves as the foundation for another innovation in Jenkins 2—Blue Ocean, the new Jenkins visual interface. Blue Ocean adds a graphical representation for each stage of a pipeline showing indicators of success/failure and progress, and allowing point-and-click access to logs for each individual piece. Blue Ocean also provides a basic visual editor. Figure 1-3 shows an example of a successful pipeline run with logs as displayed in Blue Ocean. Chapter 9 is devoted entirely to the new interface.
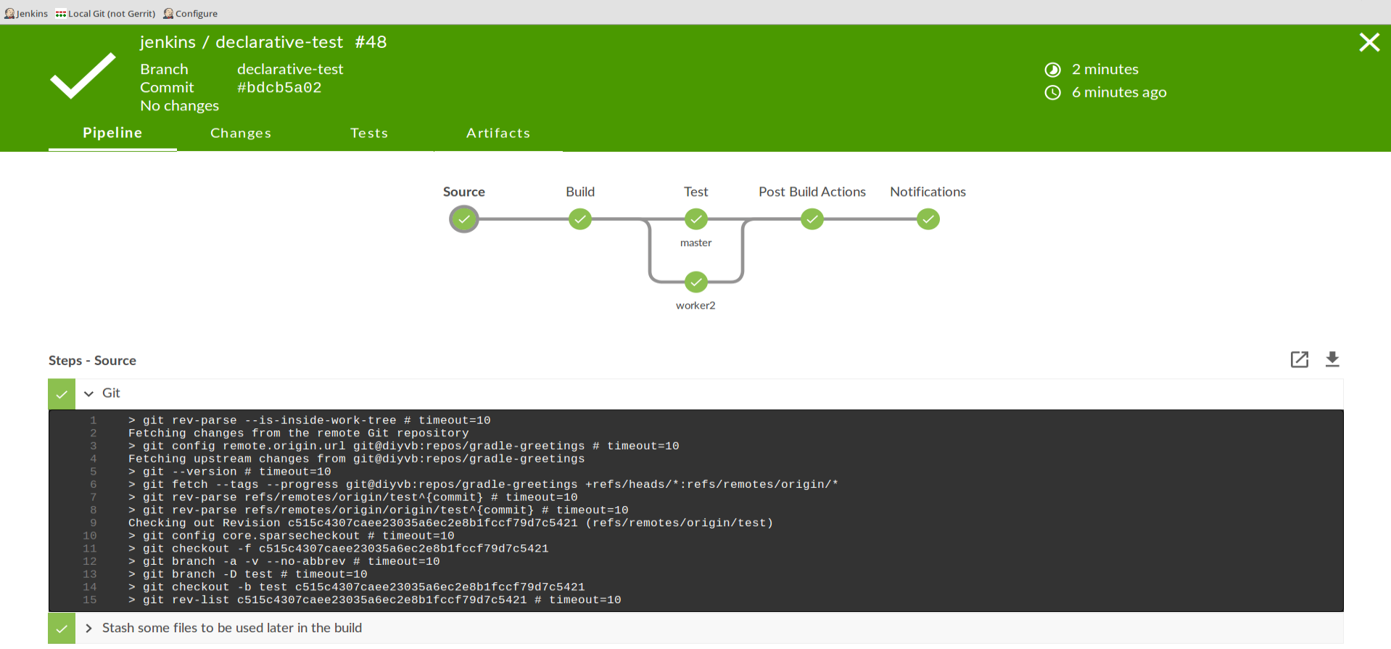
Figure 1-3. Displaying a successful run and examining logs via the Blue Ocean interface
New Job Types in Jenkins 2
Jenkins 2 comes with a number of new job types, mostly designed around taking advantage of key functionalities such as pipelines-as-code and Jenkinsfiles. These types make it easier than ever to automate job and pipeline creation and organize your projects. Creation of each new job/item/project starts the same way.
New Job Types and Plugins
To be clear, having these new job types available is dependent on having the requisite plugins installed. If you accept the recommended plugins during the install process, you will get the job types discussed here.
Once Jenkins 2 is installed and you have logged in, you can create new jobs just as before. As Figure 1-4 shows, the blurb under the “Welcome to Jenkins!” banner suggests users “create new jobs,” but the menu item for this is actually labeled “New Item.” Most of these items are ultimately a kind of project as well. For our purposes, I’ll use the terms “job,” “item,” and “project” interchangeably throughout the book.
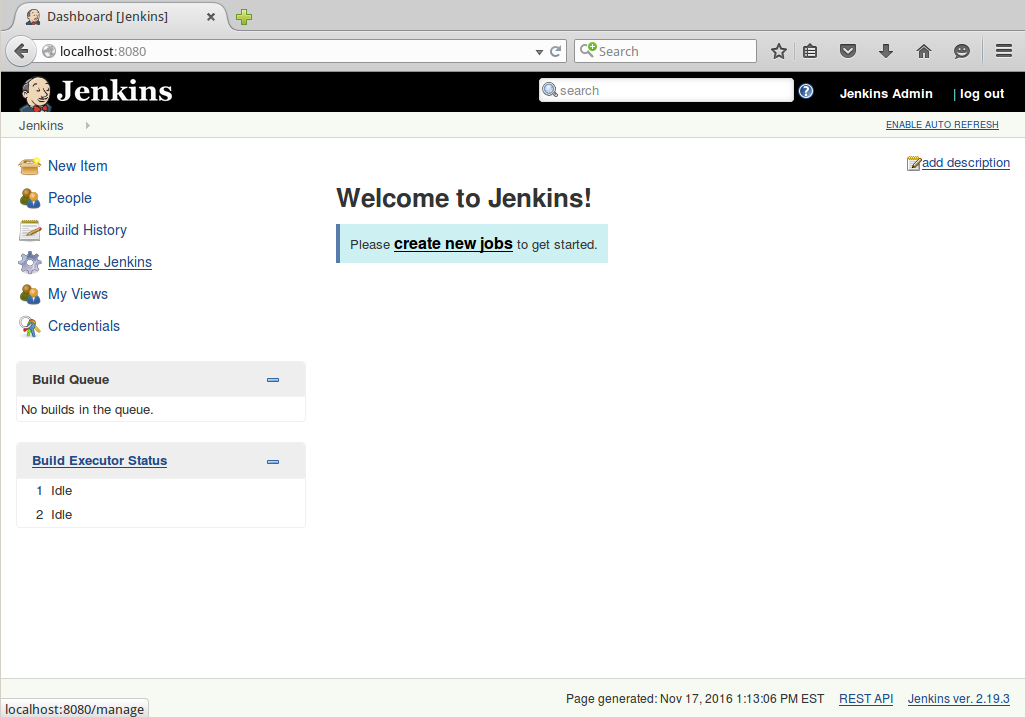
Figure 1-4. The Jenkins welcome screen: the launching point for creating new jobs, items, and projects
When you choose to create a new item in Jenkins 2, you’re presented with the screen to select the type of new job (Figure 1-5). You’ll notice some familiar types, such as the Freestyle project, but also some that you may not have seen before. I’ll briefly summarize the new job types here and then explain each of them in more detail in Chapter 8.

Figure 1-5. Jenkins 2 project choices
Pipeline
As the name implies, the Pipeline type of project is intended for creating pipelines. This is done by writing the code in the Jenkins DSL. This is the main type of project we’ll be talking about throughout the book.
As already noted, pipelines can either be written in a “scripted” syntax style or a “declarative” syntax style. Pipelines created in this type of project can also be made easily into Jenkinsfiles.
Folder
This is a way to group projects together rather than a type of project itself. Note that this is not like the traditional “View” tabs on the Jenkins dashboard that allow you to filter the list of projects. Rather, it is like a directory folder in an operating system. The folder name becomes part of the path of the project.
Organization
Certain source control platforms provide a mechanism for grouping repositories into “organizations.” Jenkins integrations allow you to store Jenkins pipeline scripts as Jenkinsfiles in the repositories within an organization and execute based on those. Currently GitHub and Bitbucket organizations are supported, with others planned for the future. For simplicity in this book, we’ll talk mainly about GitHub Organization projects as our example.
Assuming sufficient access, Jenkins can automatically set up an organization webhook (a notification from the website) on the hosting side that will notify your Jenkins instance when any changes are made in the repository. When Jenkins is notified, it detects the Jenkinsfile as a marker in the repository and executes the commands in the Jenkinsfile to run the pipeline.
Multibranch Pipeline
In this type of project, Jenkins again uses the Jenkinsfile as a marker. If a new branch is created in the project with a Jenkinsfile in it, Jenkins will automatically create a new project in Jenkins just for that branch. This project can be applied to any Git or Subversion repository.
We’ll be taking a closer look at each of these new project types in Chapter 8 of the book. However, it is also worth noting that Jenkins still supports the traditional workhorse of jobs—Freestyle projects. You can still create jobs using web-based forms there and execute them as you have before. But certainly the emphasis in Jenkins 2 is on Pipeline jobs.
It’s easy to see that Jenkins 2 represents a major shift from the traditional Jenkins model. As such, it’s worth spending a few minutes to discuss the reasons for the change.
Reasons for the Shift
Arguably, Jenkins has been the most prolific workflow and pipeline management tool for many years. So what drove the need to make the shift in Jenkins 2? Let’s look at a few potential causes, both external and internal to Jenkins.
DevOps Movement
The ideas behind continuous integration, continuous delivery, and continuous deployment have been around for a number of years. But early on, they were more of an end goal rather than a starting point. With the increased focus on DevOps in recent years, users and enterprises have come to expect that tooling will support them in implementing DevOps and continuous practices out of the box (or at least not make it more difficult).
Given its place in the workflow automation space, it was somewhat expected (and perhaps required) that Jenkins would evolve in its capabilities to support these industry drivers.
Assembling Pipelines
Creating any one job in the Jenkins Freestyle interface wasn’t necessarily problematic. But trying to assemble multiple jobs into a continuous software delivery pipeline, that could take code from commit to deployment, could frequently be a challenge. Jenkins’ core functionality allowed for kicking off a specific job after another one finished, but sharing data between jobs, such as workspaces, parameters, etc., was often problematic or required special plugins or tricks to accomplish.
Resumability
A key part of Jenkins 2 functionality hinges on the ability of pipelines to be durable—meaning jobs continue to run on agents or pick up where they left off if the master node restarts. In fact, one of the requirements for a plugin to be compatible with Jenkins 2 is the ability to serialize states so that those can be recovered in the event of a master restart. That was not the case with prior versions of Jenkins; users and processes were often left in a place where they needed to either wade through logs to figure out where things were left or just opt to start the process again from the beginning.
Configurability
Since users were largely limited to the web-based interface, working with legacy Jenkins usually required finding the right place on the screen, figuring out the buttons and fields, and trying not to make typos when entering data. Workflow changes (such as reordering steps in a job or changing the order in which jobs executed) could require multiple interactions of clicking and dragging and typing, as opposed to simpler updates available in a text editor interface. In some cases where GUI elements were provided to interface with tooling, ways to send particular commands to the tooling through the Jenkins interface weren’t available. The web-based forms prevalent in Jenkins lent themselves well to simple, structured choices, but not as well to iterative or decision-based flow control.
Sharing Workspaces
Traditionally in Jenkins, each job had its own workspace to pull down the source code, do builds in, or do whatever other processing was needed. This worked well for distinct jobs, isolating their environments and preventing writing over data. However, when chaining jobs together, this could result in an ineffective process that was challenging to overcome. For example, if multiple jobs in a pipeline needed to perform processing on built artifacts, having to rebuild the artifacts each time was highly inefficient. Storing and retrieving the artifacts in a repository between execution of the jobs required adding multiple steps and configuration to each job. A more efficient strategy would be to share the workspace between the jobs—but doing this in legacy Jenkins was not easily supported. Rather, the user was required to define custom workspaces and employ parameters that pointed to the workspace, or use a specialized plugin to make it work.
Access to Logic
Legacy Jenkins typically relied on web forms to input data and stored it in XML configuration files in its home directory. With this implementation, there was no easy way to view at a glance the logic involved in executing multiple jobs. For users not familiar with it, understanding a Jenkins setup and job definitions could require quite a bit of scrolling through screens, looking at values in forms, flipping back and forth between global configurations, and so on. This made wider support, collaboration among multiple users, and understanding of multijob pipelines challenging, especially if there were substantial changes, reviews, or debugging that needed to be done.
Pipeline Source Management
As highlighted in the previous section, the “source” for a legacy Jenkins job was an XML file. This was not only difficult to read, but difficult to change and get correct without going through the web interface. The configuration was not designed to exist in the same place as the source code. Configuration and source code were two separate entities, managed in two different ways.
A corollary was lack of auditability. While there were plugins to help track changes over time, this was not as convenient as tracking simple source file changes and still required the Jenkins application itself to be able to track changes in jobs.
Competition
One additional factor that undoubtedly has come into play here is that other applications have sprung up around setting up pipelines-as-code. There are various examples, such as Pivotal’s Concourse, which uses containerization to do jobs and allows pipelines to be described in YAML files.
Meeting the Challenges
So how does Jenkins 2 meet these challenges? I’ve already alluded to some of the ways, but there are a few points that are worth highlighting in this space:
-
Pipelines are treated as first-class citizens. That means that there is design and support for working with pipelines as an entity in the application, rather than pipelines being something produced from connecting together jobs in Jenkins.
-
Pipelines can be programmed through coding, rather than just expressed through a configuration interface. This allows for additional logic and workflows to be used, as well as programming constructs that were not available or not surfaced in legacy Jenkins.
-
There is a structured DSL specifically to program pipelines.
-
A pipeline can be created directly as a script in a job without requiring any substantial web form interaction. Additionally, they can be created completely separately in Jenkinsfiles.
-
Pipelines stored as Jenkinsfiles can now be stored with the source code separate from Jenkins.
-
The DSL includes functions to easily share files across workspaces.
-
There is more advanced, built-in support for working with Docker containers.
All of this leads to easier maintainability and testing as well as more resiliency. We can handle exception cases with typical constructs and better survive events like restarts.
Before we go further into the Jenkins 2 features, it’s worth taking a moment to talk about compatibility between the old and new.
Compatibility
For the vast majority of items, there are corresponding ways to get the same functionality through pipelines as through the traditional web interface and Freestyle jobs. In fact, there may be multiple ways, some built-in and some more contrived. This can best be described with a brief discussion about the two different syntax styles that Jenkins supports for creating pipelines.
Pipeline Compatibility
As noted, Jenkins 2 now supports two styles of pipelines—scripted and declarative—each with their own syntax and structure. We will delve more into both types in the next few chapters, but for now let’s look at one specific example: post-build notification in a traditional Freestyle structure and corresponding functionality in Scripted and Declarative Pipelines.
Figure 1-6 shows a traditional Freestyle project’s post-build configuration for a typical operation, sending email notifications. In a Freestyle project, there’s a specific web page element for this with fields to fill in to do the configuration.
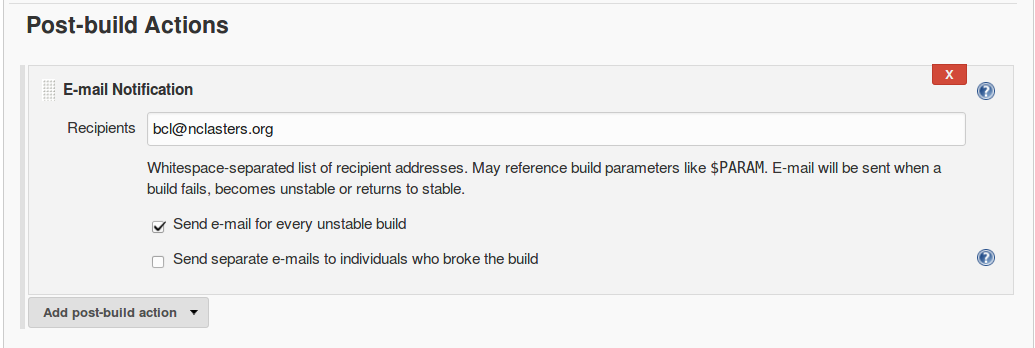
Figure 1-6. Post-build actions in a Freestyle project
In the syntax for a Scripted Pipeline, we don’t have a built-in way to do such post-build actions. We are limited to the DSL steps plus whatever can be done with Groovy coding. So, to always send an email after a build, we need to resort to coding as shown here:
node{try{// do some work}catch(e){currentBuild.result="FAILED"throwe}finally{to:"buildAdmin@mycompany.com",subject:"STATUS FOR PROJECT: ${currentBuild.fullDisplayName}",body:"RESULT: ${currentBuild.result}"}}
Assuming we have our email setup already configured globally in Jenkins, we can use the DSL mail statement to send an email. Because we don’t have a pipeline statement/feature in the scripted syntax to always do something as a post-build operation, we fall back to the Groovy try-catch-finally syntax.
This highlights compatibility exceptions in the case of some Jenkins functions such as post-build processing. DSL constructs can be missing for cases like this. In those instances, you may have to resort to using Groovy constructs that can mimic the processing that Jenkins would do. (This approach is covered in more detail in Chapter 3.)
If you choose to use the Declarative Pipeline structure, then chances are good that you will have constructs available to handle most of the common Jenkins functions. For example, in the Declarative Pipeline syntax, there is a post section that can be defined to handle post-processing steps along the lines of the traditional post-build processing and notifications (we cover this more in Chapter 7):
pipeline{agentanystages{stage("dowork"){steps{// do some work}}}post{always{to:"buildAdmin@mycompany.com",subject:"STATUS FOR PROJECT: ${currentBuild.fullDisplayName}",body:"RESULT: ${currentBuild.result}"}}}
Compatibility doesn’t just come into play in the actual coding. An additional area that’s worth mentioning is plugin compatibility.
Plugin Compatibility
As with legacy Jenkins, the majority of functionality for Jenkins 2 is provided through integration with plugins. With the advent of Jenkins 2, new requirements were created for plugins to be compatible. We can broadly categorize the requirements into two categories: they must survive restarts and provide advanced APIs that can be used in pipeline scripts.
Surviving restarts
One of the features/requirements of Jenkins 2 pipelines is that they must be able to survive restarts of a node. In order to support this, the main criterion is that stateful objects in plugins be serializable—that is, able to have their state recorded. This is not a given for many of the constructs in Java and Groovy, so plugins may have to be substantially changed to meet this requirement.
Having Restartable Pipeline Scripts
If there is a certain piece of code that is not serializable, there are ways to work around its use in some cases. See Chapter 16 for some suggestions on how to work around this type of issue.
Providing scriptable APIs
To be compatible with writing pipeline scripts, steps that were formerly done by filling in the Jenkins web forms now have to be expressible as pipeline steps with compatible Groovy syntax. In many cases, the terms and concepts may be close to what was used in the forms. Where Foo was a label for a text entry box in the form-based version of the plugin, there may now be a DSL call with Foo as a named parameter with a value passed in.
As an example, we’ll use configuration and operations for Artifactory, a binary artifact manager. Figure 1-7 shows how we might configure the build environment for a Freestyle Jenkins job to be able to access Artifactory repositories.
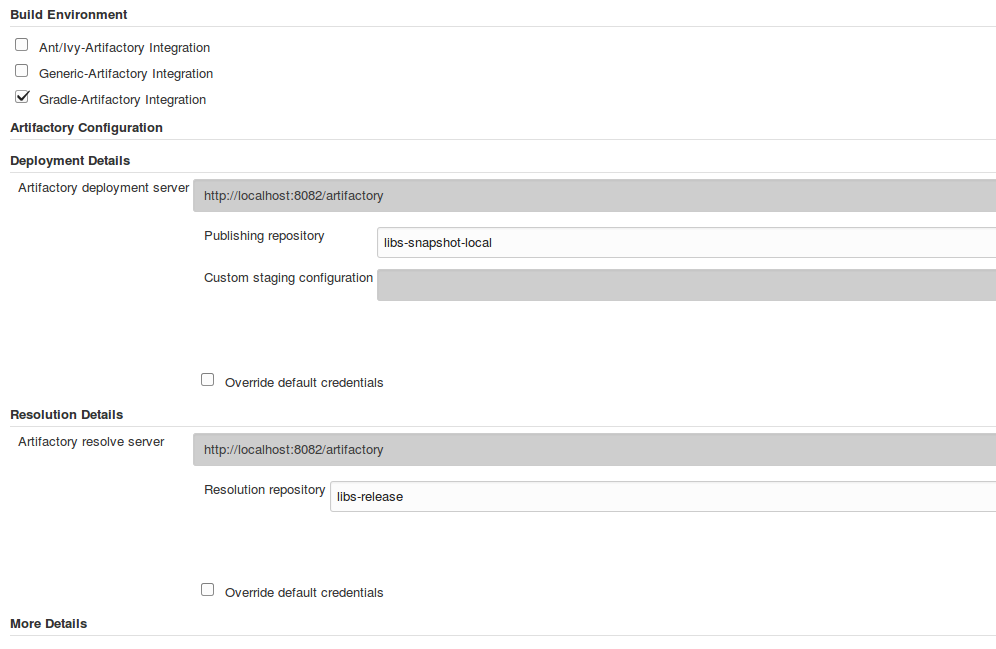
Figure 1-7. Configuring Artifactory servers in a Freestyle job
And here’s how we could do the similar configuration in a pipeline script:
// Define new Artifactory server based on our configurationdefserver=Artifactory.server"LocalArtifactory"// Create a new Artifactory for Gradle objectdefartifactoryGradle=Artifactory.newGradleBuild()artifactoryGradle.tool="gradle4"// Tool name from Jenkins configurationartifactoryGradle.deployerrepo:'libs-snapshot-local',server:serverartifactoryGradle.resolverrepo:'remote-repos',server:server
Beyond configuration, we have the actual operations that need to be done. In the Freestyle jobs, we have checkboxes and web forms again to tell Jenkins what to do. (See Figure 1-8.)
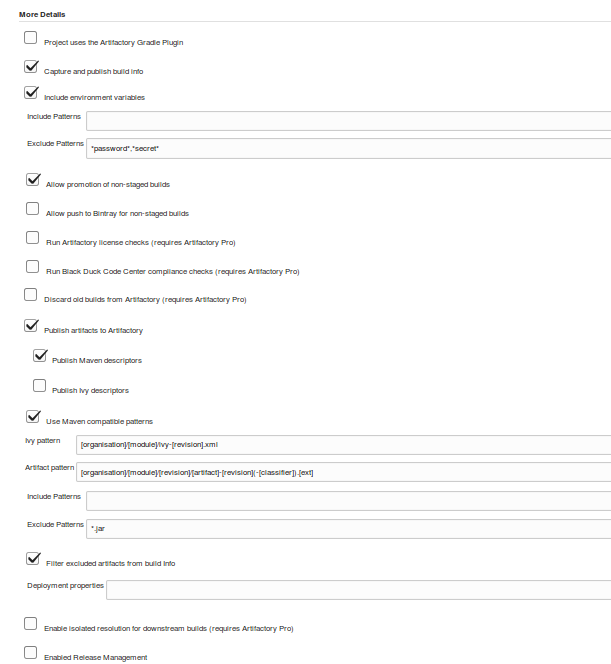
Figure 1-8. Specifying Artifactory operations in a Freestyle job
And, again, in the context of a pipeline script, if the plugin is pipeline-compatible we will likely have similar DSL statements to make the API calls to provide the same functionality. The following shows a corresponding pipeline script example for the preceding Artifactory Freestyle example:
// buildinfo configurationdefbuildInfo=Artifactory.newBuildInfo()buildInfo.env.capture=true// Deploy Maven descriptors to ArtifactoryartifactoryGradle.deployer.deployMavenDescriptors=true// extra gradle configurationsartifactoryGradle.deployer.artifactDeploymentPatterns.addExclude("*.jar")artifactoryGradle.usesPlugin=false// run the Gradle piece to deployartifactoryGradle.runbuildFile:'build.gradle'tasks:'cleanartifactoryPublish'buildInfo:buildInfo// publish build infoserver.publishBuildInfobuildInfo
In some cases, pipeline scripts may also take advantage of items already configured in the traditional Jenkins interface, such as global tools. An example with the use of Gradle is shown next.
In the first figure (Figure 1-9), we see the global tool setup for our Gradle instance. Then we see it used in a Freestyle project (Figure 1-10), and finally we see it used in a pipeline project via a special DSL step called tool that allows us to refer back to the global configuration based on the supplied name argument.
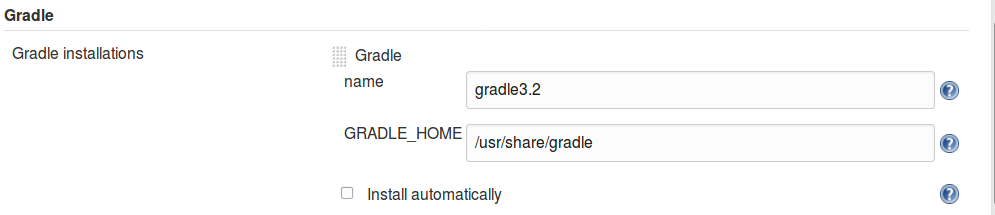
Figure 1-9. Global tool configuration for Gradle

Figure 1-10. Using the global tool Gradle version in a Freestyle project
stage('Compile'){// Compile and do unit testing// Run gradle to execute compilesh"${tool 'gradle3.2'}/bin/gradle clean build"}
Declarative Pipelines also have a tool directive that allows for the same functionality in that type of pipeline. (Chapter 7 discusses Declarative Pipelines in detail.)
As we have seen, providing APIs (and thus plugin pipeline compatibility) is central to being able to execute traditional functionality in pipelines. Eventually all plugins will need to be Pipeline-compatible, but at this point, there are still plugins that are not compatible, or not completely compatible. There are places a user can go to check for compatibility, though.
Checking Compatibility
To help users know whether or not existing plugins are compatible with using pipelines in Jenkins 2, there are a couple of websites available. Note that information here is not guaranteed to be up to date, but these sites offer probably the best summary information available.
One site is on GitHub, as shown. An example of the page from it is shown in Figure 1-11.
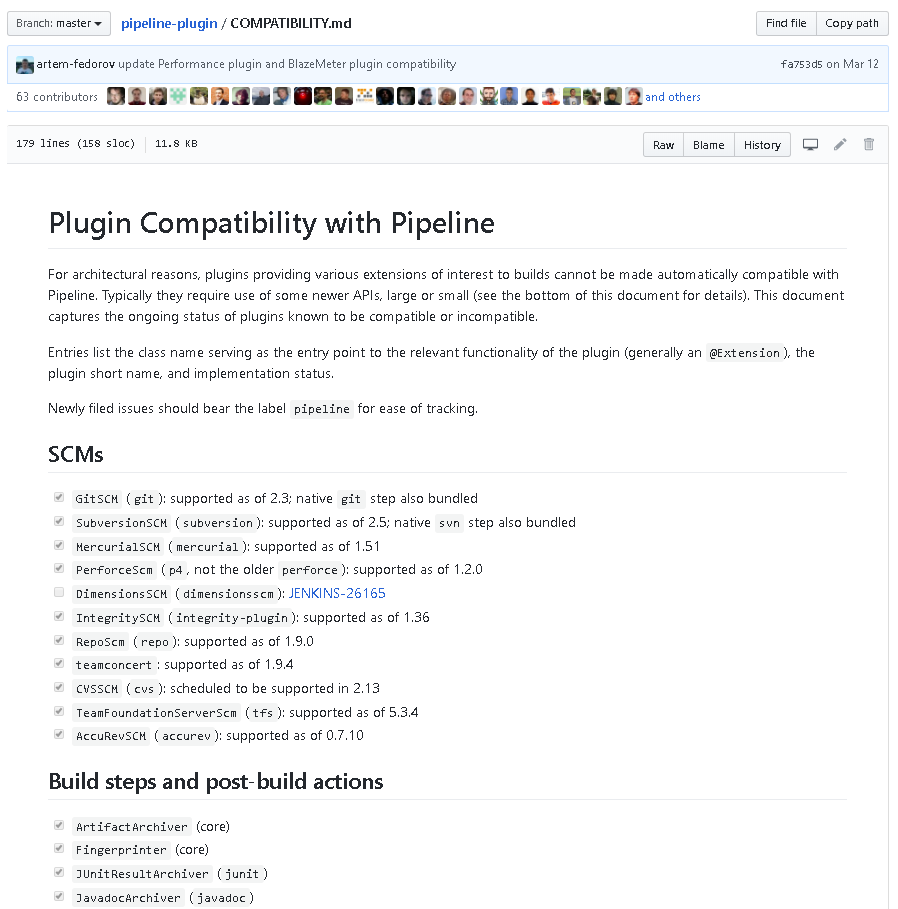
Figure 1-11. GitHub page for Jenkins plugin pipeline compatibility
The other is the Pipeline Steps Reference on the Jenkins.io site, which lists the pipeline-compatible plug-ins.
Some of these specific plugins and their steps will be discussed in later chapters of this book.
Summary
This chapter has provided a quick survey of what makes Jenkins 2 different from traditional Jenkins. There is core support for pipelines both as jobs themselves and also separate from Jenkins, as Jenkinsfiles. In writing your code for a pipeline, you can choose from the traditional, more flexible Scripted Pipeline or the more structured Declarative Pipeline syntax.
Jenkins 2 also provides several new project types. The Folder type allows for grouping projects together under a shared namespace and shared environment. The Multibranch Pipeline type provides easy automated job creation per branch and continuous integration, all triggered by Jenkinsfiles residing in the branches. And the organization project type extends the multibranch functionality across all projects in an organization structure on GitHub or Bitbucket.
We also looked at some of the drivers for the evolution from the traditional Jenkins model to the pipeline-centric model. These included the growth of pipelines as an entity, as well as the challenges of making multiple jobs work together across Jenkins. Another factor was the traditional tight coupling of the pipeline configuration to the Jenkins application.
Finally, we discussed some of the compatibility factors to be aware of when moving from classic Jenkins to Jenkins 2. We will discuss specifics for various applications throughout the book, but familiarity with the general ideas laid out here will give you a good foundation to understand this, and begin thinking about what it may take to convert your existing pipelines.
Speaking of foundations, in Chapter 2 we’ll cover more of the foundational aspects of working with pipelines in Jenkins 2. This will help to fill out the basic knowledge you need to begin making use of pipelines.
Get Jenkins 2: Up and Running now with the O’Reilly learning platform.
O’Reilly members experience books, live events, courses curated by job role, and more from O’Reilly and nearly 200 top publishers.

