Chapter 1. Writing Your First JavaScript Program
By itself, HTML doesnât have any smarts: It canât do math, it canât figure out if someone has correctly filled out a form, and it canât make decisions based on how a Web visitor interacts with it. Basically, HTML lets people read text, look at pictures, and click links to move to other Web pages with more text and pictures. In order to add intelligence to your Web pages so they can respond to your siteâs visitors, you need JavaScript.
JavaScript lets a Web page react intelligently. With it, you can create smart Web forms that let visitors know when theyâve forgotten to include necessary information; you can make elements appear, disappear, or move around a Web page (see Figure 1-1); you can even update the contents of a Web page with information retrieved from a Web serverâwithout having to load a new Web page. In short, JavaScript lets you make your Web sites more engaging and effective.
Introducing Programming
For a lot of people, the word âcomputer programmingâ conjures up visions of super-intelligent nerds hunched over keyboards, typing nearly unintelligible gibberish for hours on end. And, honestly, some programming is just like that. Programming can seem like complex magic thatâs well beyond the average mortal. But many programming concepts arenât difficult to grasp, and as programming languages go, JavaScript is relatively friendly to nonprogrammers.
Still, JavaScript is more complex than either HTML or CSS, and programming often is a foreign world to Web designers; so one goal of this book is to help you think more like a programmer. Throughout this book youâll learn fundamental programming concepts that apply whether youâre writing JavaScript, ActionScript, or even writing a desktop program using C++. More importantly, youâll learn how to approach a programming task so youâll know exactly what you want to do before you start adding JavaScript to a Web page.
Many Web designers are immediately struck by the strange symbols and words used in JavaScript. An average JavaScript program is sprinkled with symbols ({ } [ ] ; , ( ) !=) and full of unfamiliar words (var, null, else if). Itâs like staring at a foreign language, and in many ways learning a programming language is a lot like learning another language. You need to learn new words, new punctuation, and understand how to put them together so you can communicate successfully.
In fact, every programming language has its own set of key words and characters, and its own set of rules for putting those words and characters togetherâthe languageâs syntax. Learning JavaScriptâs syntax is like learning the vocabulary and grammar of another language. Youâll need to memorize the words and rules of the language (or at least keep this book handy as a reference). When learning to speak a new language, you quickly realize that placing an accent on the wrong syllable can make a word unintelligible. Likewise, a simple typo or even a missing punctuation mark can prevent a JavaScript program from working, or trigger an error in a Web browser. Youâll make plenty of mistakes as you start to learn to programâthatâs just the nature of programming.
At first, youâll probably find JavaScript programming frustratingâyouâll spend a lot of your time tracking down errors you made when typing the script. Also, you might find some of the concepts related to programming a bit hard to follow at first. But donât worry: If youâve tried to learn JavaScript in the past and gave up because you thought it was too hard, this book will help you get past the hurdles that often trip up folks new to programming. (And if you do have programming experience, this book will teach you JavaScriptâs idiosyncrasies and the unique concepts involved in programming for Web browsers.)
Whatâs a Computer Program?
When you add JavaScript to a Web page, youâre writing a computer program. Granted, most JavaScript programs are much simpler than the programs you use to read email, retouch photographs, and build Web pages. But even though JavaScript programs (also called scripts) are simpler and shorter, they share many of the same properties of more complicated programs.
In a nutshell, any computer program is a series of steps that are completed in a designated order. Say you want to display a welcome message using the name of the person viewing a Web page: for example, âWelcome, Bob!â There are several things youâd need to do to accomplish this task:
Ask the visitor his or her name.
Get the visitorâs response.
Print (that is, display) the message on the Web page.
While you may never want to print a welcome message on a Web page, this example demonstrates the fundamental process of programming: determine what you want to do, then break that task down into each step thatâs necessary to get it done. Every time you want to create a JavaScript program, you must go through the process of determining the steps needed to achieve your goal. Once you know the steps, youâre ready to write your program. In other words, youâll translate your ideas into programming codeâthe words and characters that make the Web browser behave how you want it to.
How to Add JavaScript to a Page
Web browsers are built to understand HTML and CSS and convert those languages into a visual display on the screen. The part of the Web browser that understands HTML and CSS is called the layout or rendering engine. But most browsers also have something called a JavaScript interpreter. Thatâs the part of the browser that understands JavaScript and can execute the steps of a JavaScript program. Since the Web browser is usually expecting HTML, you must specifically tell the browser when JavaScript is coming by using the <script> tag.
The <script> tag is regular HTML. It acts like a switch that in effect says âHey Web browser, here comes some JavaScript code; you donât know what to do with it, so hand it off to the JavaScript interpreter.â When the Web browser encounters the closing </script> tag, it knows itâs reached the end of the JavaScript program and can get back to its normal duties.
Much of the time, youâll add the <script> tag in the <head> portion of the Web page like this:
<!DOCTYPE HTML PUBLIC "-//W3C//DTD HTML 4.01//EN" "http://www.w3.org/TR/ html4/strict.dtd"> <html> <head> <title>My Web Page</title><script type="text/javascript"></script></head>
The <script> tagâs type attribute indicates the format and the type of script that follows. In this case, type="text/javascriptâ means the script is regular text (just like HTML) and that itâs written in JavaScript. Theoretically, a Web browser could handle multiple types of scripting languages, but not every browser supports other languages.
Note
Make sure you include type="text/javascriptâ in the opening script tag. If you leave it out, your Web page wonât validate (see the box on CSS: Adding Style to Web Pages for more on validation).
You then add your JavaScript code between the opening and closing <script> tags:
<!DOCTYPE HTML PUBLIC "-//W3C//DTD HTML 4.01//EN" "http://www.w3.org/TR/
html4/strict.dtd">
<html>
<head>
<title>My Web Page</title>
<script type="text/javascript">
alert('hello world!');
</script>
</head>Youâll find out what this JavaScript actually does in a moment. For now, turn your attention to the opening and closing <script> tags. To add a script to your page, start by inserting these tags. In most cases, youâll put the <script> tags in the pageâs <head> in order to keep your JavaScript code neatly organized in one area of the Web page.
However, itâs perfectly valid to put <script> tags anywhere inside the HTML of the page. In fact, as youâll see later in this chapter, thereâs a JavaScript command that lets you write information directly into a Web page. Using that command, you place the <script> tags in the location on the page (somewhere inside the body) where you want the script to write its message.
External JavaScript Files
Using the <script> tag as discussed in the previous section lets you add JavaScript to a single page. But many times youâll create scripts that you want to share with all of the pages on your site. For example, you might use a JavaScript program to add animated, drop-down navigation menus to a Web page. Youâll want that same fancy navigation bar on every page of your site, but copying and pasting the same JavaScript code into each page of your site is a really bad idea for several reasons.
First, itâs a lot of work copying and pasting the same code over and over again, especially if you have a site with hundreds of pages. Second, if you ever decide to change or enhance the JavaScript code, youâll need to locate every page using that JavaScript and update the code. Finally, since all of the code for the JavaScript program would be located in every Web page, each page will be that much larger and slower to download.
A better approach is to use an external JavaScript file. If youâve used external CSS files for your Web pages, this technique should feel familiar. An external JavaScript file is simply a text file that ends with the file extension .jsânavigation.js, for example. The file only includes JavaScript code and is linked to a Web page using the <script> tag. For example, to add a JavaScript file named navigation.js to your home page, you might write the following:
<!DOCTYPE HTML PUBLIC "-//W3C//DTD HTML 4.01//EN" "http://www.w3.org/TR/
html4/strict.dtd">
<html>
<head>
<title>My Web Page</title>
<script type="text/javascript" src="navigation.js"></script>
</head>
The src attribute of the <script> tag works just like the src attribute of an <img> tag, or an <a> tagâs href attribute. In other words, it points to a file either in your Web site or on another Web site (see the box on the next page).
Note
When adding the src attribute to link to an external JavaScript file, donât add any JavaScript code between the opening and closing <script> tags. If you want to link to an external JavaScript file and add custom JavaScript code to a page, use a second set of <script> tags. For example:
<script type="text/javascript" src="navigation.js"></script>
<script type="text/javascript">
  alert('Hello world!');
</script>You can (and often will) attach multiple external JavaScript files to a single Web page. For example, you might have created one external JavaScript file that controls a drop-down navigation bar, and another that lets you add a nifty slideshow to a page of photos (youâll learn how to do that on The Basics). On your photo gallery page, youâd want to have both JavaScript programs, so youâd attach both files.
In addition, you can attach external JavaScript files and add a JavaScript program to the same page like this:
<!DOCTYPE HTML PUBLIC "-//W3C//DTD HTML 4.01//EN" "http://www.w3.org/TR/html4/strict.dtd"> <html> <head> <title>My Web Page</title><script type="text/javascript" src="navigation.js"></script><script type="text/javascript" src="slideshow.js"></script><script type="text/javascript">alert('hello world!');</script></head>
Just remember that you must use one set of opening and closing <script> tags for each external JavaScript file. Youâll create an external JavaScript file in the tutorial that starts on Attaching an External JavaScript File.
You can keep external JavaScript files anywhere inside your Web siteâs root folder (or any subfolder inside the root). Many Web developers create a special directory for external JavaScript files in the siteâs root folder: common names are js (meaning JavaScript) or libs (meaning libraries).
Note
Sometimes the order in which you attach external JavaScript files matters. As youâll see later in this book, sometimes scripts you write depend upon code that comes from an external file. Thatâs often the case when using JavaScript libraries (JavaScript code that simplifies complex programming tasks). Youâll see an example of a JavaScript library in action in the tutorial on Attaching an External JavaScript File.
Your First JavaScript Program
The best way to learn JavaScript programming is by actually programming. Throughout this book, youâll find hands-on tutorials that take you step-by-step through the process of creating JavaScript programs. To get started, youâll need a text editor (see Free Programs for recommendations), a Web browser, and the exercise files located at www.sawmac.com/javascript (see the note on the next page for complete instructions).
Note
The tutorials in this chapter require the example files from this bookâs Web site, www.sawmac.com/javascript. Click the âDownload tutorialsâ link to download them. (The tutorial files are stored as a single Zip file.)
Windows users should download the Zip file and double-click it to open the archive. Click the Extract All Files option, and then follow the instructions of the Extraction Wizard to unzip the files and place them on your computer. Mac users, just double-click the file to decompress it. After youâve downloaded and decompressed the files, you should have a folder named MM_JAVASCRIPT on your computer, containing all of the tutorial files for this book.
To get your feet wet and provide a gentle introduction to JavaScript, your first program will be very simple:
In your favorite text editor, open the file 1.1.html.
This file is located in the chapter01 folder in the MM_JAVASCRIPT folder you downloaded from www.sawmac.com/javascript. Itâs a very simple HTML page, with an external cascading style sheet to add a little visual excitement.
Click in the empty line just before the closing </head> tag and type:
<script type="text/javascript">
This code is actually HTML, not JavaScript. It informs the Web browser that the stuff following this tag is JavaScript.
Press the Return key to create a new blank line, and type:
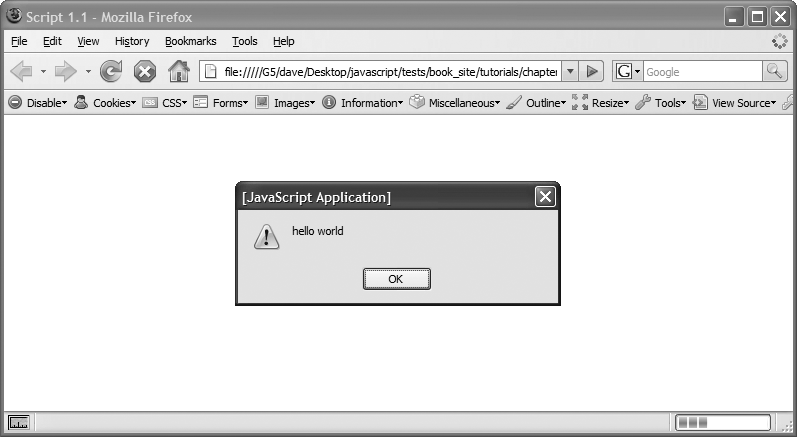
alert('hello world');Youâve just typed your first line of JavaScript code. The JavaScript alert() function, is a command that pops open an Alert box and displays the message that appears inside the parenthesesâin this case hello world. Donât worry about all of the punctuation (the parentheses, quotes, and semicolon) just yet. Youâll learn what they do in the next chapter.
Press the Return key once more, and type </script>. The code should now look like this:
<link href="../css/global.css" rel="stylesheet" type="text/css">
<script type="text/javascript">alert('hello world');</script></head>In this example, the stuff you just typed is shown in boldface. The two HTML tags are already in the file; make sure you type the code exactly where shown.
Launch a Web browser and open the 1.1.html file to preview it.
A JavaScript Alert box appears (see Figure 1-2). Notice that the page is blank when the alert appears. (If you donât see the Alert box pictured in Figure 1-2, you probably mistyped the code listed in the previous steps. Double-check your typing and read the Tip below.)
Click the Alert boxâs OK button to close it.
When the Alert box disappears, the Web page appears in the browser window.
Tip
When you first start programming, youâll be shocked at how often your JavaScript programs donât seem to workâ¦at all. For new programmers, the most common cause of nonfunctioning programs is simple typing mistakes. Always double-check to make sure you spelled commands (like alert in the first script) correctly. Also, notice that punctuation frequently comes in pairs (the opening and closing parentheses, and single-quote marks from your first script, for example). Make sure you include both opening and closing punctuation marks when theyâre required.
Although this first program isnât earth-shatteringly complex (or even that interesting), it does demonstrate an important concept: A Web browser will run a JavaScript program the moment it reads in the JavaScript code. In this example, the alert() command appeared before the Web browser displayed the Web page, because the JavaScript code appeared before the HTML in the <body> tag. This concept comes into play when you start writing programs that manipulate the HTML of the Web pageâas youâll learn in Chapter 5.
Writing Text on a Web Page
The last script popped up a dialog box in the middle of your monitor. What if you want to print a message directly onto a Web page using JavaScript? There are many ways to do so, and youâll learn some sophisticated techniques later in this book. However, you can achieve this simple goal with a built-in JavaScript command, and thatâs what youâll do in your second script:
In your text editor, open the file 1.2.html.
While <script> tags usually appear in the <head> of a Web page, you can put them and JavaScript programs directly in the body of the Web page.
Directly below â<h1>Writing to the document window</h1>â, type the following code:
<script type="text/javascript">
document.write('<p>Hello world!</p>');
</script>
Like the alert() function, document.write() is a JavaScript command that literally writes out whatever you place between the opening and closing parentheses. In this case, the HTML <p>Hello world!</p> is added to the page: a paragraph tag and two words.
Save the page, and open it in a Web browser.
The page opens and the words âHello world!â appear below the red headline (see Figure 1-3).
Note
The tutorial files you downloaded also include the completed version of each tutorial. If you canât seem to get your JavaScript working, compare your work with the file that begins with complete_ in the same folder as the tutorial file. For example, the file complete_1.2.html contains a working version of the script you added to file 1.2.html.
The two scripts you just created may leave you feeling a little underwhelmed with JavaScriptâ¦or this book. Donât worry. Itâs important to start out with a full understanding of the basics. Youâll be doing some very useful and complicated things using JavaScript in just a few chapters. In fact, in the remainder of this chapter youâll get a taste of some of the advanced features youâll be able to add to your Web pages after youâve worked your way through the first two parts of this book.
Attaching an External JavaScript File
As discussed on External JavaScript Files, youâll usually put JavaScript code in a separate file if you want to use the same scripts on more than one Web page. You can then instruct a Web page to load that file and use the JavaScript inside it. External JavaScript files also come in handy when youâre using someone elseâs JavaScript code. In particular, there are collections of JavaScript code called libraries, which provide useful JavaScript programming: Usually, these libraries make it easy for you to do something thatâs normally quite difficult to do. Youâll learn more about JavaScript libraries on Introducing JavaScript Libraries, and, in particular, the JavaScript library this book usesâjQuery.

But for now, youâll get experience attaching an external JavaScript file to a page, and writing a short program that does some amazing things:
In your text editor, open the file 1.3.html.
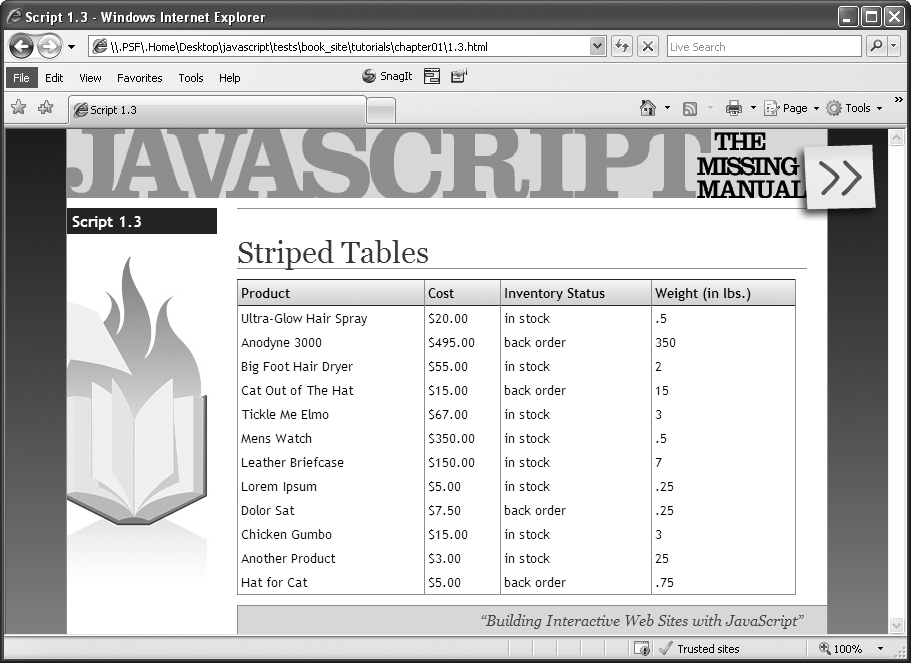
This page has a basic HTML table, containing data on a handful of products (see Figure 1-4). HTML tables are like spreadsheets: They organize data into rows and columns. One problem with tables that contain lots of rows and columns is that itâs easy to lose your place as you read across a row. One helpful visual effect many designers use is to put a background color on every other row, making it much easier to quickly scan across a row of data. To do this, you create a CSS class style that defines a background color or image, then apply that class to every other table row using HTML like this: <tr class="even">. Now, thatâs a lot of repetitive work, and you can ruin it just by inserting a new row in the middle of the table. Fortunately, thereâs a quick JavaScript solution to this common design problem.
Click in the blank line between the <link> and closing </head> tags near the top of the page, and type:
<script type="text/javascript" src="../js/jquery.js"></script>
Figure 1-4. A plain HTML table can be hard to read if there are lots of columns, rows, and data. While scanning across a long row of data, itâs easy to lose your place and view data from a different row.This code links a file named jquery.js, thatâs contained in a folder named js, to this Web page. When a Web browser loads this Web page, it also downloads the jquery.js JavaScript file and runs the code inside it.
Next, youâll add your own JavaScript programming to this page.
Press Return to create a new blank line, and then type:
<script type="text/javascript">
HTML tags usually travel in pairsâan opening and closing tag. To make sure you donât forget to close a tag, it helps to close the tag immediately after typing the opening tag, and then fill in the stuff that goes between the tags.
Press return twice to create two blank lines, and then type:
</script>
This ends the block of JavaScript code. Now youâll add some programming.
Click the empty line between the opening and closing script tags and type:
$(document).ready(function() {Youâre probably wondering what the heck that is. Youâll find out all the details of this code on Waiting for the HTML to Load, but in a nutshell, this line takes advantage of the programming thatâs inside the jquery.js file to make sure that the browser executes the next line of code at the right time.
Hit return to create a new line, and then type:
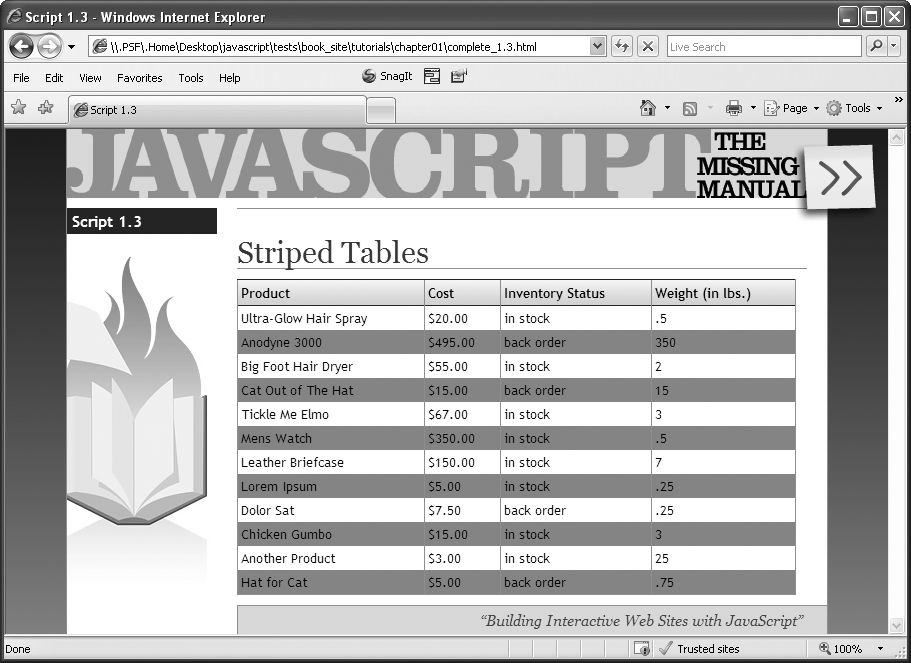
$('table.striped tr:even').addClass('even');This line does the magic of adding a background to every other row of the table. Specifically, it does so by adding a CSS class of .even to every even row of the table. In the CSS style sheet attached to this page, the .even class style sets a blue color for the background property. When you apply this class to a table row, that row gets a blue background.
Hit Return one last time, and then type:
});
This code closes up the JavaScript code, much like a closing </script> tag indicates the end of a JavaScript program. Donât worry too much about all those weird punctuation marksâyouâll learn how they work in detail later in the book. The main thing you need to make sure of is to type the code exactly as itâs listed here. One typo, and the program may not work.
The final code you added to the page should look like the bolded text below:
<link href="../css/global.css" rel="stylesheet" type="text/css">
<script type="text/javascript" src="../js/jquery.js"></script><script type="text/javascript">$(document).ready(function() {$('table.striped tr:even').addClass('even');});</script></head>Save the HTML file, and open it in a Web browser.
You should now see a table in which every other row has a blue background (see Figure 1-5).
As you can see, it doesnât take a whole lot of JavaScript to do some amazing things to your Web pages. Thanks to JavaScript libraries like jQuery, youâll be able to create sophisticated, interactive Web sites without being a programming wizard yourself. However, it does help to know the basics of JavaScript and programming. In the next three chapters, weâll cover the very basics of JavaScript so that youâre comfortable with the fundamental concepts and syntax that make up the language.
Tracking Down Errors
The most frustrating moment in JavaScript programming comes when you try to view your JavaScript-powered page in a Web browserâ¦and nothing happens. Itâs one of the most common experiences for programmers. Even very experienced programmers donât always get it right the first time they write a program, so figuring out what went wrong is just part of the game.
Most Web browsers are set up to silently ignore JavaScript errors, so you usually wonât even see a âHey this program doesnât work!â dialog box. (Generally, thatâs a good thing, since you donât want a JavaScript error to interrupt the experience of viewing your Web pages.)
So how do you figure out whatâs gone wrong? There are many ways to track errors in a JavaScript program. Youâll learn some advanced debugging techniques in Chapter 13, but the most basic method is to consult the Web browser. Most Web browsers keep track of JavaScript errors and record them in a separate window called a JavaScript console. When you load a Web page that contains an error, you can then view the console to get helpful information about the error, like which line of the Web page it occurred in and a description of the error.
However, not all consoles are created equal. Internet Explorerâs JavaScript console is notoriously cryptic and often misleading. If you suspect errors, youâll find the most helpful JavaScript console in Firefox. Often, you can find the answer to the problem, fix the JavaScript, and then the page will work in Firefox and other browsers as well. The console helps you weed out the basic typos you make when you first start programming, like forgetting closing punctuation, or mistyping the name of a JavaScript command. But since scripts sometimes work in one browser and not another, this section shows you how to turn on the JavaScript console in all major browsers, so you can track down problems in each.
The Firefox JavaScript Console
Firefoxâs JavaScript console is the best place to begin tracking down errors in your code. Not only does the console provide fairly clear descriptions of errors (no descriptions are ever that clear when it comes to programming), it also identifies the line in your code where the error occurred.
For example, in Figure 1-6 the console identifies the error as a missing closing parenthesis after an argument list (youâll learn exactly what an argument list is on Giving Information to Your Functions). The console also identifies the name of the file the error is in (complete_1.3.html in this case) and the line number the error occurs (line 9). Best of all, it even indicates the line containing the error with an arrow.
Warning
Although the error console draws an arrow pointing to the location where Firefox encountered the error, thatâs not always where you made the mistake. Sometimes you need to fix your code before or after that arrow.

To show the JavaScript console, choose Tools â Error Console. The console is a free-floating window that you can move around. It not only displays JavaScript errors but CSS errors as well, so if youâve made any mistakes in your Cascading Styles Sheets, youâll find out about those as well. (Make sure you select the Errors button at the top of the console; otherwise you might see warnings and messages that arenât related to your JavaScript error.)
Tip
Since the error console displays the line number where the error occurred, you may want to use a text-editor that can show line numbers. That way, you can easily jump from the error console to your text editor and identify the line of code you need to fix.
Unfortunately, thereâs a long list of things that can go wrong in a script, from simple typos to complex errors in logic. When youâre just starting out with JavaScript programming, many of your errors will be the simple typographic sort. For example, you might forget a semicolon, quote mark, or parentheses, or misspell a JavaScript command. Youâre especially prone to typos when following examples from a book (like this one). Here are a few errors you may see a lot of when you first start typing the code from this book:
Missing ) after argument list. You forgot to type a closing parenthesis at the end of a command. For example in this codeâalert('helloâ;âthe parenthesis is missing after âhelloâ.
Unterminated string literal. A string is a series of characters enclosed by quote marks (youâll learn about these in greater detail on Numbers). For example, âhelloâ is a string in the code alert('hello');. Itâs easy to forget either the opening or closing quote.
Missing } in compound statement. In addition to parentheses and quote marks, youâll often use other types of punctuation in your programs, like the { } symbols (which are called braces). As with other errors of this kind, you just need to make sure you include both the opening and closing brace.
XXX is not defined. If you misspell a JavaScript commandâaler('hello');âyouâll get an error saying that the (misspelled) command isnât defined: for example, âaler is not defined.â
Syntax error. Occasionally, Firefox has no idea what you were trying to do and provides this generic error message. A syntax error represents some mistake in your code. It may not be a typo, but you may have put together one or more statements of JavaScript in a way that isnât allowed. In this case, you need to look closely at the line the error was found on and try to figure out what mistake you madeâunfortunately, these types of errors often require experience with and understanding of the JavaScript language to fix.
As you can see from the list above, many errors youâll make simply involve forgetting to type one of a pair of punctuation marksâlike quote marks or parentheses. Fortunately, these are easy to fix, and as you get more experience programming, youâll eventually stop making them almost completely (no programmer ever does).
Displaying the Internet Explorer Error Dialog Box
The Internet Explorer console uses a disruptive error dialog box. If you turn the console on, youâll get an annoying error dialog box each time IE encounters an error (see Figure 1-7). To turn it on anyway, choose Tools â Internet Options. Click the Advanced tab, and then turn on the âDisplay a notification about every script errorâ checkbox. When youâre tired of those annoying error dialogs appearing on every site you visit, repeat these steps to hide the console.
Fortunately, thereâs a more selective (and less obnoxious) way to view errors in IE: when IE encounters a JavaScript error, a small yellow alert (!) triangle appears in the bottom-left corner of the browser. (Itâs circled in Figure 1-7.) Just click this icon, and the dialog box appears.
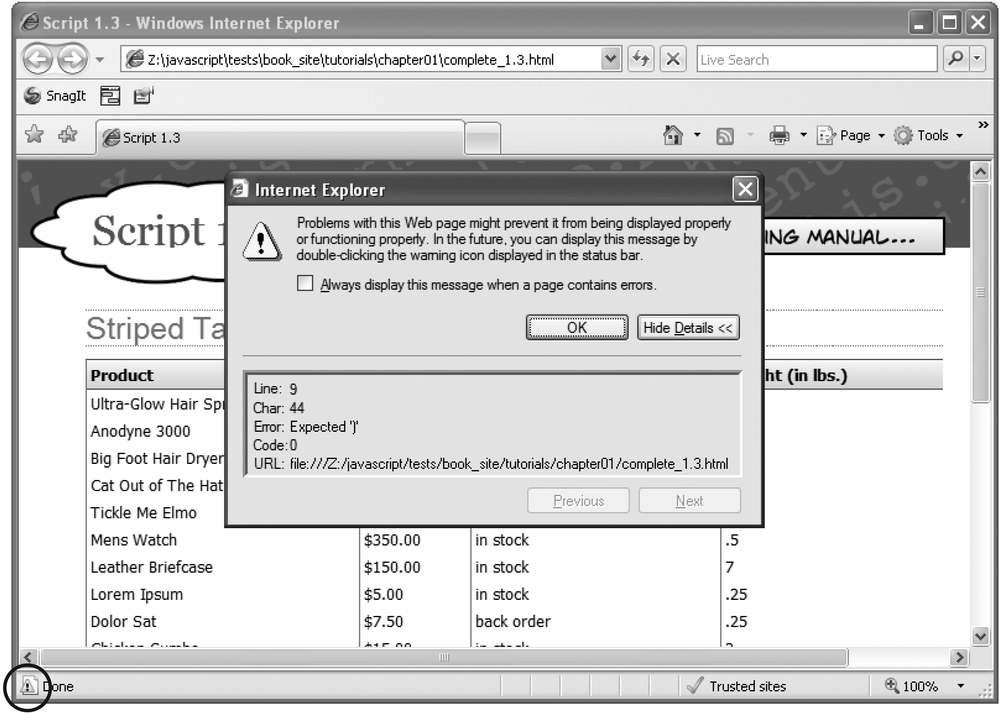
Internet Explorerâs error console, unfortunately, is usually not very helpful. Not only are the error messages often cryptic, the line number the console identifies as the location of the error usually isnât correct.
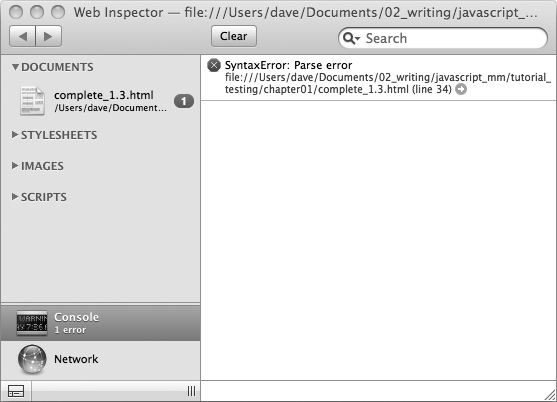
Accessing the Safari Error Console
Safari 3âs error console is available from the Develop menu: Develop â Show Error Console (on the Mac you can use the keyboard shortcut Option-â-C). However, the Debug menu isnât normally turned on when Safari is installed, so there are a couple of steps to get to the JavaScript console. The process is slightly different, depending on whether youâre using the Mac or Windows version of Safari.
On a Mac, choose Safari â Preferences and click the Advanced button. Check the âShow Develop menu in menu barâ box and close the Preferences window.
Note
If youâre using Safari 2 on a Mac, the Develop menu is actually called the Debug Menu. To enable this menu for Safari 2, you must launch the Terminal application (Applications â Utilities â Terminal). In the Terminal window, type the following:
defaults write com.apple.Safari IncludeDebugMenu 1
On Windows, you need to edit a file named Defaults.plist, which is located at C:\ Program Files\Safari\Safari.Resources\Defaults.plist. Use a plain text editor, like WordPad, and add the text shown in bold to the end of the file, just before the closing </dict> tag. The last four lines of the file should look like the following:
<key>IncludeDebugMenu</key><true /></dict> </plist>
When you restart Safari, the Develop menu will appear between the Bookmarks and Window menus in the menu bar at the top of the screen. Select Develop â Show Error Console to open the console (see Figure 1-8).
Get JavaScript: The Missing Manual now with the O’Reilly learning platform.
O’Reilly members experience books, live events, courses curated by job role, and more from O’Reilly and nearly 200 top publishers.

