Chapter 21. JavaScript Outside the Box
21.0. Introduction
I believe JavaScript is the most important programming language a web developer should learn. Sure, you can learn Java or PHP, Python, Ruby, ASP.NET, or any other programming environment or language, but one thing all these options share is that eventually, one way or another, youâll probably need to use JavaScript.
JavaScript is fun, too. You have to spend a considerable amount of time working on architecture issues and setup issues in many of the other environments, but all you need with JavaScript is a browser and a text-editing tool. When I say you can go from opening your text editor to your first real JavaScript application in five minutes, Iâm not exaggerating. Take the following file:
<!DOCTYPE html>
<head>
<title>Blank</title>
<meta http-equiv="Content-Type" content="text/html;charset=utf-8" >
</head>
<body>
</body>
Add the following script after the title element:
<script>
alert("Wow, that was easy!");
</script>
Open the page in any browser, and youâre done. The only thing simpler in application development would be direct thought transference.
In the first 20 chapters of this book, I covered how to use JavaScript primarily to build standard web applications, but thatâs only part of the JavaScript story. JavaScript is an important component of major frameworks such as Microsoftâs Silverlight, as well as desktop development environments, such as Adobe AIR. JavaScript and JSON are the baseline functionality for Apacheâs new CouchDB, which features a JSON-enabled database and query engine.
JavaScript is also used in many different applications and development environments, some of which are only indirectly related to typical web page functionality.
In this chapter, Iâm going to provide a sampling of out-of-the-box JavaScript uses that exist today, touching on some of the more popular. By the time youâre done with the chapter, youâll understand why every developer needs to know JavaScript.
Note
Wikipediaâs page on JavaScript includes one section titled âUses outside web pages,â which can be a good resource for seeing how JavaScript can be used for something other than web applications.
21.1. Creating a Browser Add-0n, Plug-in, or Extension
Problem
You have an idea that would make a good browser add-on, plug-in, or extension, but you want to leverage your JavaScript skills to make the application.
Solution
Use the browserâs plug-in SDK, Extension API, or other packaged functionality that lets you use JavaScript to create the application.
Discussion
Not all browsers provide a relatively simple way to create browser add-ons, plug-ins, or extensions. Opera doesnât provide this functionality at all, and WebKitâs plug-in architecture isnât trivial. However, if youâre motivated, you should be able to use your JavaScript skills to create any number of useful browser tools.
Creating Google Chrome extensions
A Google Chrome extension is the simplest development environment of all the browsers. Your extension can consist of a manifest file, created in JSON, a download icon, and then the extension web page and JavaScript. Itâs uncomplicated, and itâs the environment I recommend you try first, before developing an extension for other browsers. You can run through the beginning tutorial and have your first Chrome extension finished in an hour.
If, I should add, you can run Chrome in your environment at all, as Google also provides limited platform support for its browser. Currently, the Google Chrome extension environment only seems to work in Windows, though you can see about getting into an early release program for Mac and Linux. Note that Chromeâs Mac support is for Intel-based machines only.
If you can work with Chrome, your extension begins with a manifest file that uses JSON and looks like:
{
  "name": "Hello World",
  "version": "1.0",
  "description": "Giving this a try",
  "browser_action": {
    "default_icon": "icon.png",
  "popup" : "popup.html"
  }
}Youâll provide an extension name and description, provide the environments in which youâll work (âpermissionsâ), such as Google or Flickr, and provide browser actions to load pages or add icons.
The popup.html file for my
first extension has a style section
and a script section:
<style>
body {
min-width:357px;
overflow-x:hidden;
background-color: #ff0000;
color: #ffff00;
font-weight: bold;
font-size: 48px;
}
</style>
<script>
window.onload=function(){
var txt = document.createTextNode("Hello World!");
var div = document.createElement("div");
div.appendChild(txt);
document.body.appendChild(div);
}
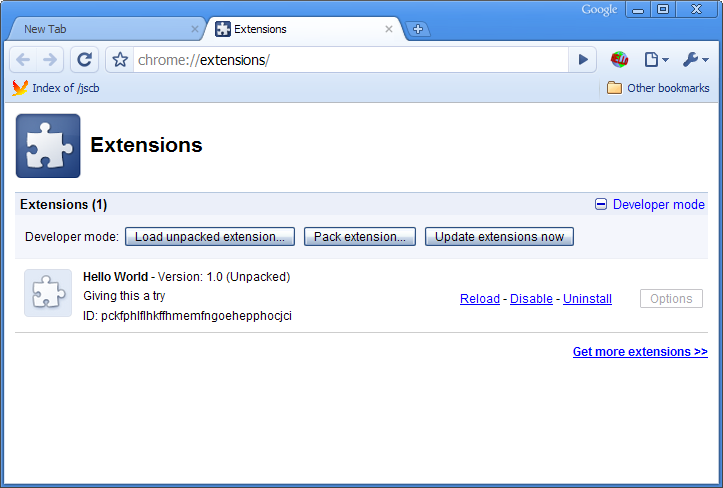
</script>After you create the manifest and application page, youâll load the extension in Chrome via the Tools menu, choosing Extensions. Make sure the Developer Tools are exposed, and click the âLoad unpacked extensionâ¦â button for the extension folder, as shown in Figure 21-1. If all goes well, the icon shows in the toolbar.
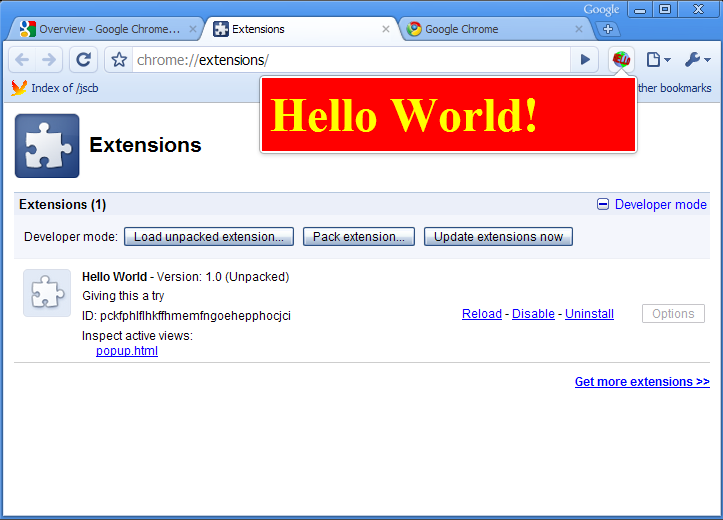
If you click the icon, the extension pop-up should open, as shown in Figure 21-2.
Note
Access the Google Chrome Extension Lab at http://code.google.com/chrome/extensions/overview.html.
Mozilla extensions
The Mozilla extensions for the organizationâs applications, including Firefox and Thunderbird, are reasonably uncomplicated to create, but even then, the number of files you need in order to implement an add-on is a little awe-inspiring.
To assist the new extension developer, Mozilla provides a section on extensions, including how to set up a development environment, what all of the files mean, and what you need to bring your application together. There is also an Extension Wizard, which can simplify your work.
The functionality for your Firefox add-on is going to be based, in part, on JavaScript, though the environment may not be one you recognize. For instance, your extension could consist of an XPCOM component, which has to be compiled using the Gecko SDK.
Robert Nyman provided probably one of the cleanest tutorials on creating a Firefox extension, including a no-nonsense description of what files are needed, and where they are located. Once you plow through all of the files, youâll find a JavaScript code listing. Though the objects in the code are unfamiliar, the coding is not.
Note
The Mozilla Extensions site is at https://developer.mozilla.org/en/Extensions. The Extension Wizard can be found at http://ted.mielczarek.org/code/mozilla/extensionwiz/. A tutorial on how to build XPCOM components using JavaScript can be found at http://ted.mielczarek.org/code/mozilla/extensionwiz/. Robert Nymanâs Extension tutorial can be found at http://robertnyman.com/2009/01/24/how-to-develop-a-firefox-extension/.
Creating a Greasemonkey script
Greasemonkey is a popular Firefox extension that simplifies the process of building new functionality for the browser. Rather than going through the entire extension-building process, you can create a Greasemonkey script using JavaScript, and not have to worry about XUL, XPCOM, or intimidating file structures.
Note
Mozilla recently released the first milestone release of the Jetpack SDK, providing a simpler environment for creating Firefox extensions. Read more about it and download the SDK at http://mozillalabs.com/jetpack/2010/03/09/announcing-the-jetpack-sdk/.
A Greasemonkey script has a metadata section, which provides information about the script. Following the metadata section is the application functionality. Hereâs an example of the beginning of a Greasemonkey script, from the popular YouTube Enhancer Greasemonkey script:
// @name     YouTube Enhancer
// @author    GIJoe
// @license   (CC) by-nc-sa
// @include   http://*.youtube.*/*
// @include   http://userscripts.org/scripts/show/33402*
This partial list of the metadata describes the name of the script and the author, provides copyright information, and also several include rules. The include and exclude rules determine if the script is run or not. If the include dependency isnât met, the script isnât run; similarly, if whatâs listed in the exclude rule is met, the script isnât run. This prevents running of script where it does no good, or may conflict with other applications.
The code, though, is very familiar. The following is a snippet
from the UnShortEmAll Greasemonkey
script, which unshortens the
shortened URLs in Twitter:
var as = document.getElementsByTagName('a');
for (var i = 0; i < as.length; i++) {
   var a = as[i];
   if (isshort(a)) {
      unshorten(a);
   }
}
...
function unshorten(short_link) {
   GM_xmlHttpRequest( {
       method: "HEAD",
       url: short_link, href,
       headers: {"User-Agent": "Mozilla/5.0", "Accept": "text/xml"},
       onload: function(response) {
                       short_link.href=response.finalUrl;
       }
   });
}
The code looks familiar. Whatâs different is the objects, and how the objects are used. However, weâve used libraries before, and the objects are intuitive.
Note
Download Greasemonkey from Greasespot. Get Greasemonkey scripts at http://userscripts.org, and the YouTube Enhancer script at http://userscripts.org/scripts/show/33042. The Greasemonkey Manual can be found online at http://wiki.greasespot.net/Greasemonkey_Manual.
21.2. Creating Desktop and Mobile Widgets
Problem
You want to create a widget that can be run in a browser, on the desktop, or in a mobile device.
Solution
Use a widget development toolset.
Discussion
The world is widget-crazy, and rightfully so. Rather than large cumbersome multipurpose applications, a widget is a small, friendly little bit of single-purpose functionality that is easy on our eyes, wallets, and computer resources.
Widgets are especially attuned to the mobile environment, requiring little space and providing simple or no required interactionâthey just work, as the saying goes. More importantly, widgets make use of existing technology, including HTML and JavaScript, and minimize the esoteric file structures endemic to browser extensions and full-blown phone applications.
Widgets can be defined for a specific environment, such as the desktop, or can easily migrate from desktop to mobile. The difference is the toolset used.
Note
Microsoft also supports HTML-based widgets in Vista and Windows 7 (http://www.microsoft.com/windows/windows-vista/features/sidebar-gadgets.aspx). Yahoo! has a nice summary of desktop widgets at http://widgets.yahoo.net/blog/?p=16.
Developing Mac Dashboard widgets
Widgets came into their own when Apple released the Mac Dashboard, an environment conducive to embedding small, single-purpose applications. Currently on my Macâs Dashboard, I have a weather widget, a clock, a calendar, and a countdown timer. Some I downloaded, some I made.
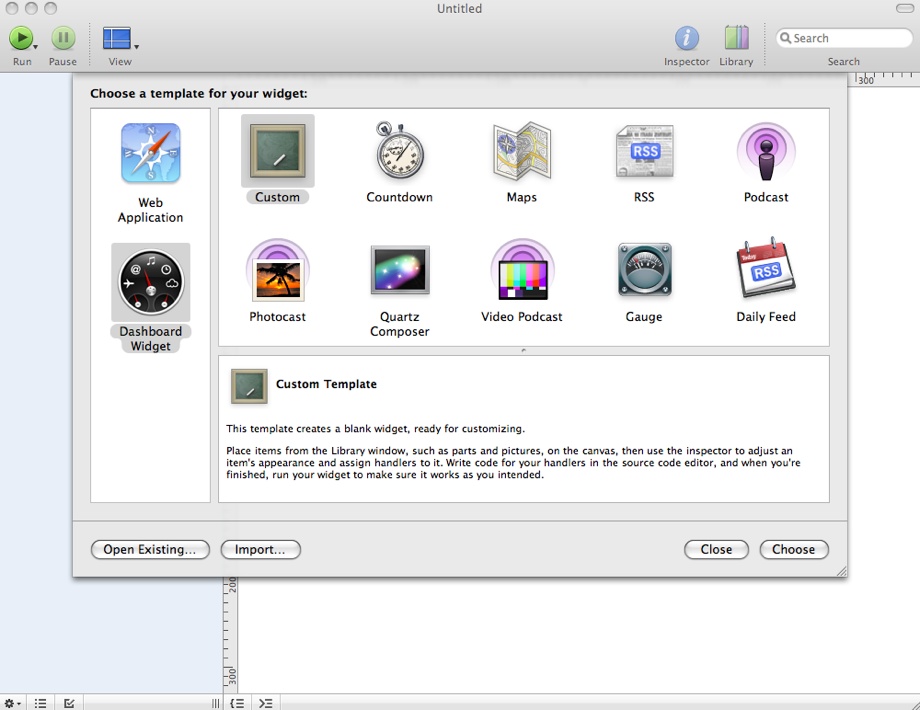
The best environment for building Dashboard widgets is to use Appleâs Dashcode, which comes bundled with Xcode 3.0 and up. Dashboard comes prebuilt with templates you can select from in order to short-cut the widget development effort. As Figure 21-3 shows, there are a lot of different widget templates.
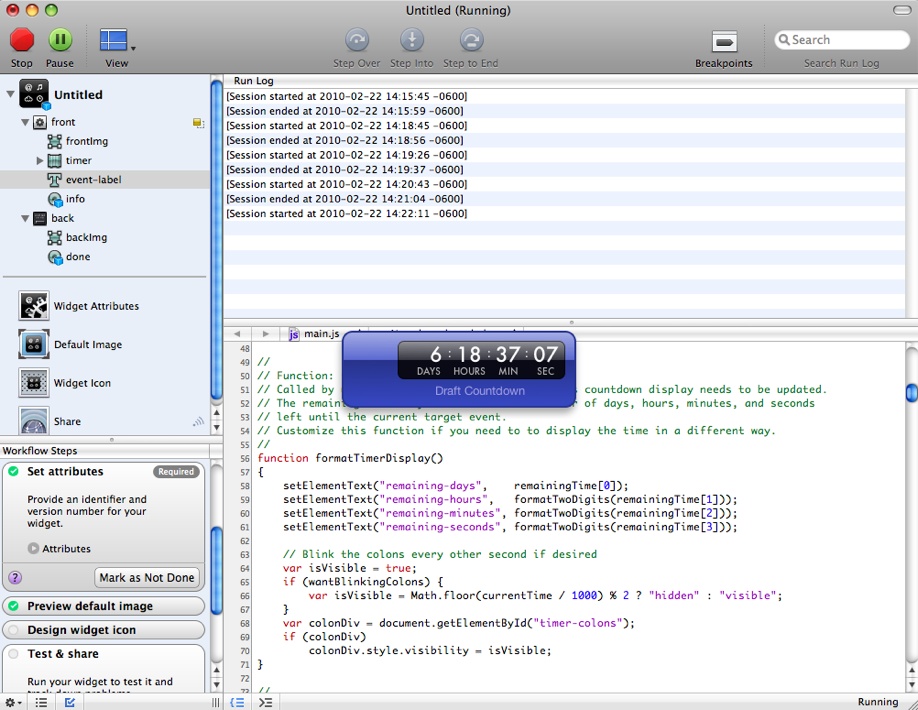
Once youâve picked a template, youâll get a project interface where you can change the widget attributes, mark off completed workflow items, modify the graphics, include a widget icon, and package the whole thing. You can also add in JavaScript and see the existing script by clicking the ViewâSource Code menu option.
At any time in the development process, you can run the widget to see how it looks, as shown in Figure 21-4 with a little book draft countdown widget I created. Notice the JavaScript in the window in the background.
You can also use Dashcode to create a mobile Safari application.
Note
Dashcode is installed with the XCode tool set, which you can either install from your Mac discs or access from http://developer.apple.com.
The Opera Widgets development environment
Opera doesnât have an add-on or extension API/SDK, but it does have a very nice widget development environment. This isnât surprising when you consider Operaâs focus on its very popular mobile browser. However, you can also run Opera widgets as standalone desktop applications, as long as Opera 10.2 or higher is installed somewhere on your computer. Beginning with Opera 10.5, the widgets install as first-class citizens (like a regular application).
Building an Opera widget is little different than building any other widget: you create an HTML file for the widget, add script, a CSS stylesheet, and a configuration file (in XML) to manage the packaging of the widget. Opera widgets can be downloaded and installed and given chromeâmore like an application than a widget.
I created a simple Opera widget, but instead of the traditional Hello World, decided to print the date and time. I also added widget-like behavior to flip the widget when the front is clicked, in order to show the back, and to return.
The HTML file is simple, and includes stylesheet and script inline:
<!DOCTYPE html>
<html>
  <head>
    <title>Date/Time</title>
    <style>
      body
      {
          background-color: #006600;
          color: #ffff00;
          font-weight: bold;
          font-size: 24px;
      }
      span
      {
          padding: 10px;
      }
      p a
      {
        color: #fff;
      }
    </style>
    <script type="text/javascript">
      window.addEventListener("load", function () {
           // print out date
           var dt = new Date();
           var dtStr = dt.toDateString();
           document.getElementById("date").innerHTML=dtStr;

           // time
           var timeStr = dt.toTimeString();
           document.getElementById("time").innerHTML=timeStr;

        }, false);
    </script>
  </head>
  <body>
     <div id="datetime"><span id="date"></span><br /><span id="time"></span></div>
  </body>
</html>
One very nice thing about developing for a specific browser and
environment, is you donât have to worry about cross-browser support,
and can use something like addEventListener for
the window load event without
worrying about IE. I could have also split the style into a stylesheet and the script into a script fileâseparate or inline, makes no
difference.
The config.xml file is also simple, just providing some basic information about the widget and the widget author:
<?xml version='1.0' encoding='UTF-8'?>
<widget>
  <widgetname>Date and Time</widgetname>
  <description>Prints out current date and time</description>
  <width>440</width>
  <height>200</height>
  <author>
    <name>Shelley Powers</name>
    <email>shelleyp@burningbird.net</email>
    <link>http://burningbird.net</link>
    <organization>Burningbird</organization>
  </author>
  <id>
    <host>burningbid.net</host>
    <name>DateTime</name>
    <revised>2010-03</revised>
  </id>
</widget>
To package the widget, all we need do is zip it up and change the file extension to .wgt. When downloaded and double-clicked, the widget is installed and run, as shown in Figure 21-5.
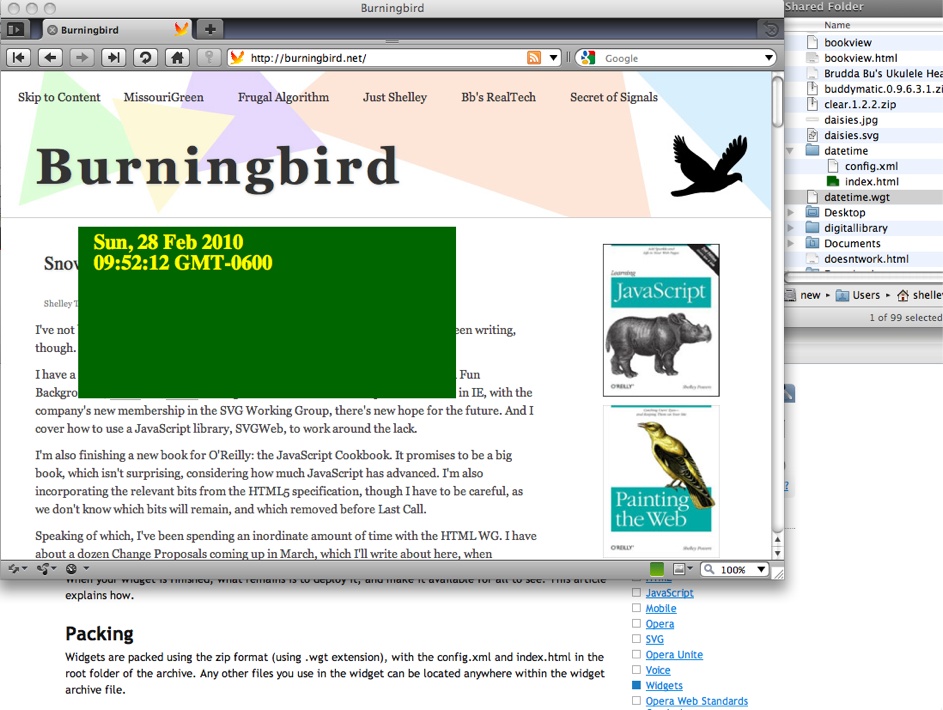
Of course, this is a simple widget, without chrome (which can be added), or controls (ditto), and it doesnât update the time with a timer. But it does demonstrate how simple it can be to create a working widget.
There are any number of widget SDKs and instructions for making both desktop and mobile widgets. Among those I thought most interesting are the following:
The W3Câs Widget Packaging and Configuration specification is in Candidate Recommendation state.
The Yahoo! Konfabulator SDK. The site also provides a widget converter.
Microsoft has provided a how-to on creating widgets for Windows Mobile 6.5. Windows Mobile 7 should be released towards the end of 2010.
Widgetbox is a commercial site that provides tools and hosting for widgets. You can use the siteâs free services, or sign up for a Pro account.
21.3. Creating JavaScript Applications for the iPhone, Android, and BlackBerry with PhoneGap
Solution
For many different platforms, including the iPhone, Android, and BlackBerry, use PhoneGap to create the application with HTML and JavaScript,.
Discussion
Smart phone development requires a commitment of both time and money. No matter how clever the tools you use, youâll need to test your application in a real device, and therein lies the cost. In addition, setting up the development environment and becoming familiar with the SDKs and plug-ins, as well as with PhoneGap, is not a trivial undertaking. However, smart phone applications are a hot commodity now, as well as an interesting environment, and can be worth both the time and the cost.
PhoneGap provides a way to develop an application once in HTML and JavaScript, and port that application to the three smart phone environments: iPhone, Android, and BlackBerry (and Windows Mobile, Palm, and so on). What it doesnât provide is a way to work around any environment restrictions, such as having to have a Mac Intel machine in order to develop for the iPhone.
If you donât have a Mac Intel machine, though, you can still try out the tool for other phones, even if at first you donât have the phones for testing. PhoneGap provides an emulator, as does Android and BlackBerry. BlackBerry provides a variety of simulators for every type of device.
Youâll need to install the Eclipse development environment, but this application is freely available for most environments. Youâll also need to download either the BlackBerry or Android SDKs, and/or Eclipse plug-ins. It does take a nontrivial amount of time getting to know the environments, the files, and how everything holds together.
Once youâve met these background requirements, youâre back on familiar ground: using HTML, CSS, and JavaScript. For instance, the following code snippet (from the book Building iPhone Apps with HTML, CSS, and JavaScript, by Jonathan Stark, published by OâReilly) demonstrates using jQuery for building an iPhone application:
if (window.innerWidth && window.innerWidth <= 480) {

    $(document).ready(function(){
        $('#header ul').addClass('hide');
        $('#header').append('<div class="leftButton"
            onclick="toggleMenu()">Menu</div>');
    });
    function toggleMenu() {
        $('#header ul').toggleClass('hide');
        $('#header .leftButton').toggleClass('pressed');
    }
}
As you can see, once you get past all of the framework issues, the JavaScript is little different than what you use for your web applications.
See Also
Download PhoneGap and find the help wiki at http://phonegap.com/. You can also separately download the PhoneGap emulator, which runs on Adobe AIR. I found the emulator to be helpful when it came to debugging how my many websites look on various mobile devices.
Another helpful tool for jQuery development for the iPhone is jQTouch, a jQuery plug-in developed by David Kaneda to simplify converting HTML pages into iPhone applications. The plug-in comes with prebuilt animations, as well as event handling specific to iPhones, such as swipe detection. You can download the plug-in and see documentation at http://www.jqtouch.com/. Jonathan Stark provides a how-to tutorial on using jQTouch on YouTube at http://www.youtube.com/watch?v=6X4K2MQsSeI.
Eclipse can be downloaded from http://www.eclipse.org. The Android development environment can be found at http://developer.android.com/sdk/index.html, and the BlackBerry at http://na.blackberry.com/eng/developers/.
If you have the bucks to ensure you have the development machine, the iPhone development center is at http://developer.apple.com/iphone/. If you are interested in iPhone development, I recommend Building iPhone Apps with HTML, CSS, and JavaScript by Jonathan Stark (OâReilly). Jonathan provides a chapter on using PhoneGap for iPhone development.
21.4. Enhancing Tools with JavaScript
Problem
You have a favorite tool, such as Photoshop or Adobe Bridge, or a favorite application, such as OpenOffice. You want to add an extension or macro that takes a set of behaviors written in JavaScript and integrates it into the product.
Solution
A quick search online is going to show if you can extend your favorite tools, utilities, and applications with JavaScript. In most cases, you already have the tools you need.
Discussion
When we hear JavaScript, we think web, and forget that JavaScript is a compact, easy-to-learn language being incorporated as the basic scripting language for many applications.
In this section, weâll look at how JavaScript can be used to extend, enhance, or package reusable functionality, and then be integrated into two different applications.
Working with the Adobe Bridge SDK and the ExtendScript Toolkit
JavaScript can be used with the Adobe Creative Suite (CS) products, using the Adobe Bridge SDK and the ExtendScript Toolkit (ESTK) thatâs installed with the Suite. There are SDKs currently available for CS3 and CS4. You can use any editor for the JavaScript, but the ESTK allows you to build and test within the environment in which the scripts run.
The easiest way to get started with writing scripts for the Creative Suite products is to open it and take a close look at the samples provided with the SDK and Creative Suite installations, most likely under a subdirectory labeled Scripting Guide. Both the SDK and the CS come with extensive documentation.
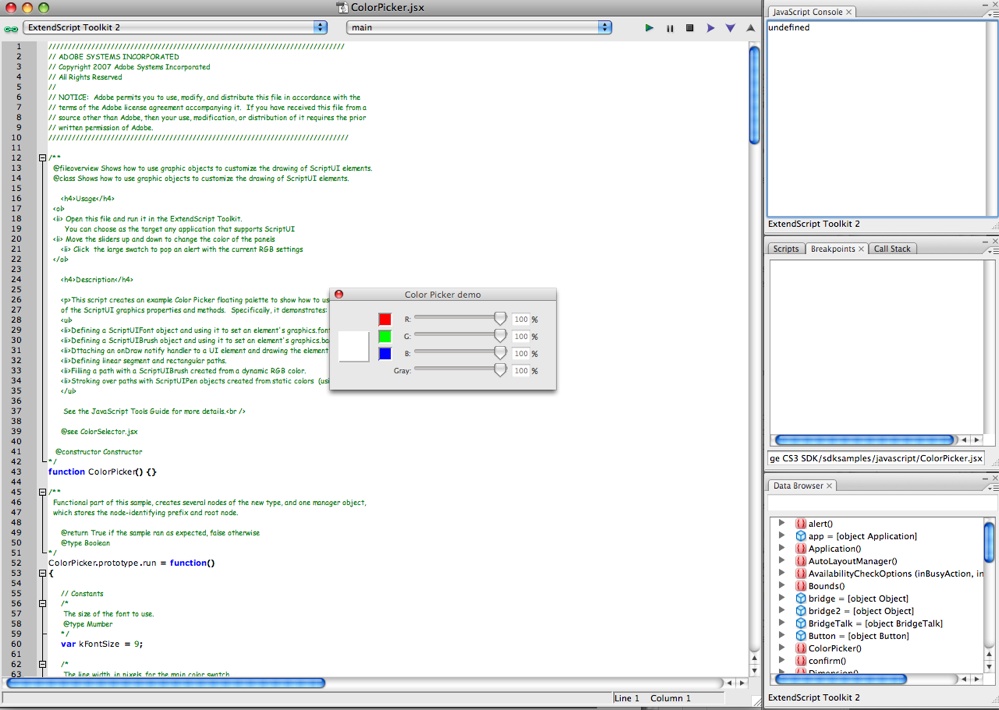
For the Adobe Bridge SDK, the JavaScript samples are located in the sdksamples/javascript subdirectory. I picked one called ColorPicker.jsx, and double-clicked the file to open it within the ESTK, as shown in Figure 21-6.
The Photoshop script files have a specialized ESTK file extension, .jsx, but they contain regular JavaScript. The sample code is well documented and easy to follow. Utilizing the advice in the CS3 Scripting Guide, I created a PhotoShop version of Hello World with the following JavaScript:
// Remember current unit settings and then set units to
// the value expected by this script
var originalUnit = preferences.rulerUnits
preferences.rulerUnits = Units.INCHES

// Create a new 2x4 inch document and assign it to a variable
var docRef = app.documents.add( 8, 8 )

// Create a new art layer containing text
var artLayerRef = docRef.artLayers.add()
artLayerRef.kind = LayerKind.TEXT

// Set the contents of the text layer.
var textItemRef = artLayerRef.textItem
textItemRef.contents = "Hello, World from Shelley!"

// Release references
docRef = null
artLayerRef = null
textItemRef = null

// Restore original ruler unit setting
app.preferences.rulerUnits = originalUnit
I saved the file as helloworld.jsx in the CS3 PhotoshopâPresetsâScripts subdirectory, and when I started
Photoshop and selected FileâScripts,
my helloworld script was displayed
in the menu that opened. Clicking it opened a very plain document with
my simple message.
As you can see, the JavaScript is simple, but you do have to spend a significant amount of time becoming familiar with the Adobe CS environment and objects.
Note
You can download the Adobe Bridge SDK from the Photoshop Developer Center.
Creating an OpenOffice macro
Most office-like tools provide some form of extensibility, though not all applications allow JavaScript. OpenOffice, which is the tool Iâm using to write this book, allows us to write macros using JavaScript within the ScriptingFramework architecture.
A JavaScript macro is created in its own subdirectory, with a parcel-descriptor.xml file providing a descriptor for the macro. A very simple example is my own modified version of the Hello World JavaScript macro that is installed with Open Office. The descriptor looks as follows:
?xml version="1.0" encoding="UTF-8"?>

<parcel language="JavaScript" xmlns:parcel="scripting.dtd">

    <script language="JavaScript">
        <locale lang="en">
            <displayname value="Shelley's Hello World"/>
            <description>
                Adds the the string "Hello World, from Shelley!"
into the current text doc.
            </description>
        </locale>
        <functionname value="helloworldfromshelley.js"/>
        <logicalname value="ShelleyHelloWorld.JavaScript"/>
    </script>

</parcel>
Pretty simple and intuitive: a display name, a description, the function name (which is the filename), and a logical name. The JavaScript is almost as simple:
/ Hello World in JavaScript
importClass(Packages.com.sun.star.uno.UnoRuntime);
importClass(Packages.com.sun.star.text.XTextDocument);
importClass(Packages.com.sun.star.text.XText);
importClass(Packages.com.sun.star.text.XTextRange);

//get the document from the scripting context
oDoc = XSCRIPTCONTEXT.getDocument();

//get the XTextDocument interface
xTextDoc = UnoRuntime.queryInterface(XTextDocument,oDoc);

//get the XText interface
xText = xTextDoc.getText();

//get an (empty) XTextRange interface at the end of the text
xTextRange = xText.getEnd();

//set the text in the XTextRange
xTextRange.setString( "Hello World, from Shelley!" );
All macros have access to the OpenOffice API through the
XScriptContext object, shown highlighted in the code snippet, which
provides an interface between the macro and the OpenOffice
documents.
Once both of the files were created, I uploaded my macro subdirectory to the OpenOffice macro subdirectory, and when I clicked on ToolsâMacrosâOrganize MacrosâJavaScript, the dialog opened, showing my newly installed Macro, as in Figure 21-7.
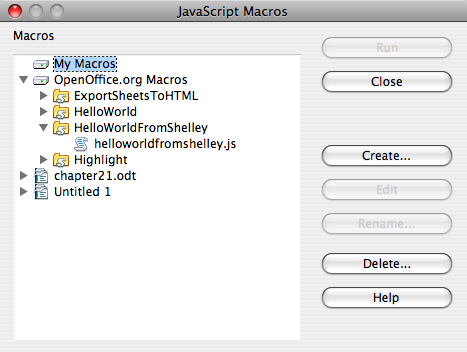
Running the macro creates a line of text in the top of the document that says, âHello World from Shelley!â
Simple, true, but the line could have easily contained the typical header for all of your letters, preformatted and ready to insert into the page by clicking a key that is bound to the macro.
Note
The OpenOffice Writing Macros page can be found at http://wiki.services.openoffice.org/wiki/Documentation/DevGuide/Scripting/Writing_Macros.
21.5. Creating Efficient Desktop Applications with Web Workers and the File API
Problem
Youâre interested in adding the necessary functionality so that your browser-based online application can function as a full-featured desktop application.
Solution
In addition to using many of the other technologies covered earlier in the book, add four new capabilities to your JavaScript/CSS/HTML-based application: application cache, so your site can function offline; geolocation, if your application is mobile-based; direct file access through the File API; and Web Workers, for efficient concurrent processing.
Application cache isnât JavaScript-specific, and the geolocation API requires specialized equipment for testing, so Iâm going to focus on the File API and Web Workers in this recipe.
Discussion
The File API bolts on to the existing input element file type, used for file uploading. In
addition to the capability of uploading the file to the server via a
form upload, you can now access the file directly in JavaScript, and
either work with it locally or upload the file using the XMLHttpRequest object.
There are three objects in the File API:
Each of the objects has associated properties and events,
including being able to track the progress of a file upload (and provide
a custom progress bar), as well as signaling when the upload is
finished. The File object can provide
information about the file, including file size and MIME type. The
FileList object provides a list of
File objects, because more than one
file can be specified if the input element has the multiple attribute set. The FileReader is the object that does the actual
file upload.
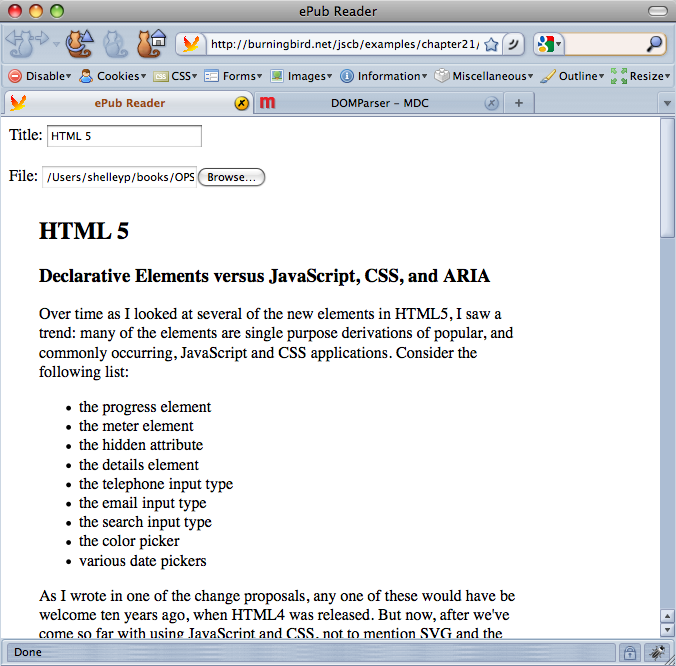
Example 21-1 is an
application that uses all three objects in order to upload a file as
text, and embed the text into the web page. In the example, Iâm using it
to access uncompressed ePub book chapters. Since ePub chapter files are
valid XHTML, I can use the built-in XML Parser object, DOMParser, to process the file.
<!DOCTYPE html>
<head>
<title>ePub Reader</title>
<meta charset="utf-8" />
<style>
#result
{
width: 500px;
margin: 30px;
}
</style>
<script>
window.onload=function() {
var inputElement = document.getElementById("file");
inputElement.addEventListener("change", handleFiles, false);
}
function handleFiles() {
var fileList = this.files;
var reader = new FileReader();
reader.onload = loadFile;
reader.readAsText(fileList[0]);
}
function loadFile() {
// look for the body section of the document
var parser = new DOMParser();
var xml = parser.parseFromString(this.result,"text/xml");
var content = xml.getElementsByTagName("body");
// if found, extract the body element's innerHTML
if (content.length > 0) {
var ct = content[0].innerHTML;
var title = document.getElementById("bookTitle").value;
title = "<h2>" + title + "</title>";
document.getElementById("result").innerHTML = title + ct;
}
}
</script>
</head>
<body>
<form>
<label for="title">Title:</label>
<input type="text" id="bookTitle" /></br ><br />
<label for="file">File:</label> <input type="file" id="file" /><br />
</form>
<div id="result"></div>
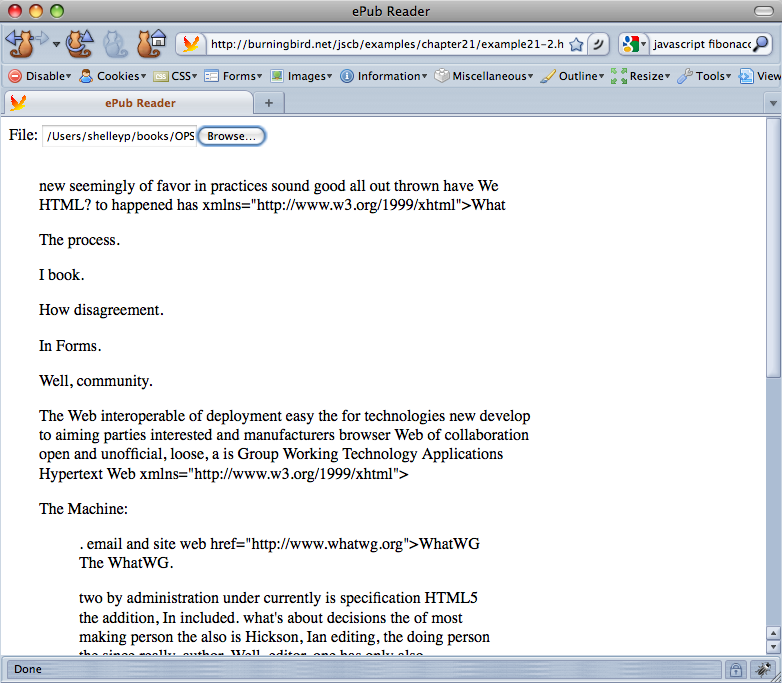
</body>Figure 21-8 shows the page with a chapter of one of my books loaded.
The File API is still a work in progress, and only Firefox 3.6 and up support it. However, itâs an intriguing functionality thatâs also necessary for an application to be considered a âdesktopâ applicationâif you want to be able to upload and work with files when your application is currently offline. Itâs also pretty handy for other uses.
Note
The File API is a W3C effort. You can read the latest draft at http://www.w3.org/TR/FileAPI/. Read Mozillaâs coverage at https://developer.mozilla.org/en/Using_files_from_web_applications.
The last new technology Iâm going to cover in this book is Web Workers. Before I get into the new functionality, though, I want to provide a brief introduction to multithreaded development.
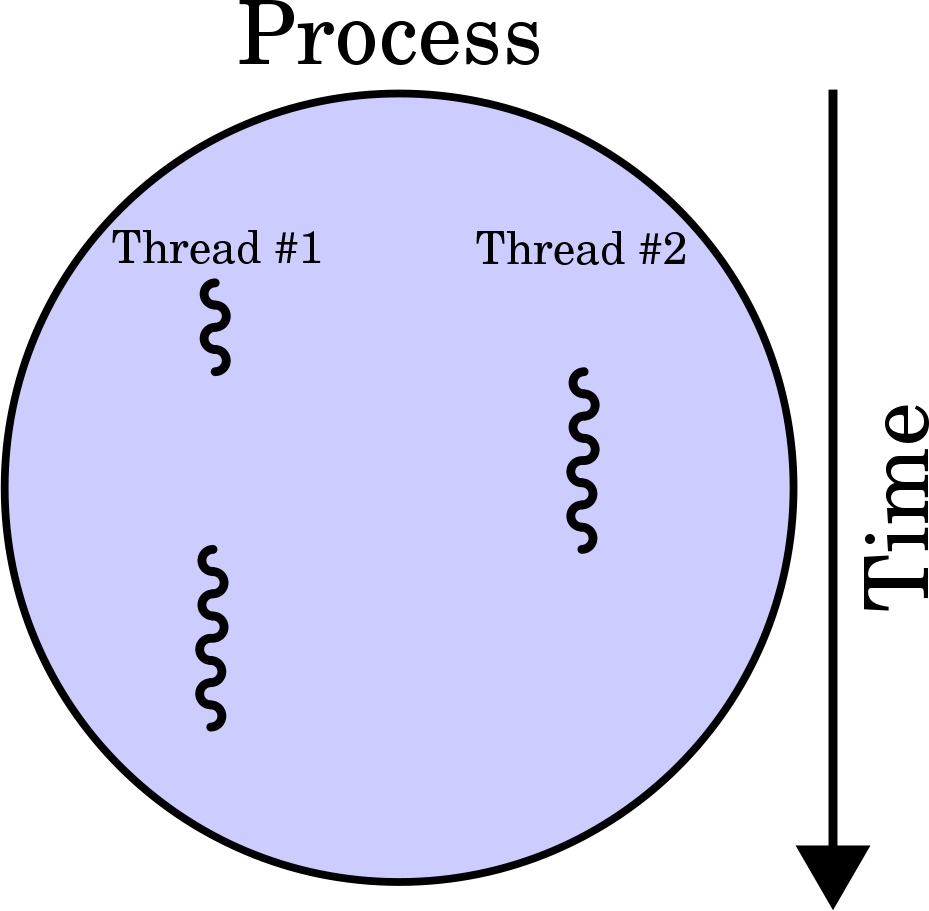
In a language such as Java, you can create multiple threads of execution, which can operate concurrently. Computers and operating systems have long had the ability to support multiple threads, switching the necessary resources among the threads as needed, demonstrated in Figure 21-9. Handled correctly, threads can make your application run faster and more efficiently. Multithreaded development also provides the functionality necessary to ensure the threads are synced, so the applications are accurate, too.
In the past, a major difference between JavaScript and these multithreaded programming languages is that JavaScript runs within a single thread of execution. Even when a timer fires, the associated event falls into the same queue as other pending events. This single-execution-thread queue is why you canât absolutely depend on the preciseness of a JavaScript timer. With Web Workers, introduced as one of the W3C WebApps 1.0 specifications, for better or worse, this all changes.
I say âfor better or worseâ because thread-based development has always been a two-edged sword in most development environments. If theyâre not properly managed, multithreaded applications can crash and burn rather spectacularly. Of course, with most of the other multithreaded environments, you also have more control over the creation and destruction of threads. Web Workers provides threaded development, but at a higher, hopefully safer level.
To create a web worker, all you need do is call the Worker object constructor, passing in the URI for a script file to run:
var theWorker = new Worker("background.js");You can also assign a function to the web workerâs onmessage event handler, and onerror event
handler:
theWorker.onmessage = handleMessage;
theWorker.onerror = handleError;
To communicate with the web worker, use the postMessage method, providing any data it
needs:
theWorker.postMessage(dataObject);
In the web worker, an onmessage
event handler receives this message, and can extract the data from the
event object:
onmessage(event) {
   var data = event.data;
   ...
}
If the web worker needs to pass data back, it also calls postMessage. The function to receive the
message in the main application is the event handler function assigned
to the web workerâs onmessage event
handler:
theWorker.onmessage= handleMessage;
The function can extract any data itâs expecting from the event object.
Normally the script youâd run would be a computationally intensive script, with results that arenât immediately needed. Mozillaâs example for web workers demonstrates a script that computes a Fibonacci sequence. It reminded me of the recursive function I demonstrated in Chapter 6, the one that reversed arrays.
In Example 21-2, I
converted the reversed array function into a web worker JavaScript
routine. In the JavaScript library, an onmessage event handler function accesses the
data from the event objectâthe array
to reverseâand passes it to the reversed array function. Once the
function finishes, the web worker routine calls postMessage, sending the resulting string back
to the main application.
// web worker thread - reverses array
onmessage = function(event) {

   var reverseArray = function(x,indx,str) {
      return indx == 0 ? str :
reverseArray(x,--indx,(str+= " " + x[indx]));;
   }

   // reverse array
   var str = reverseArray(event.data, event.data.length, "");

   // return resulting string to main application
   postMessage(str);
};
I copied and modified the application in Example 21-1 to Example 21-3. When the
application retrieves the uploaded file and extracts the body element, it splits the content into an
array based on the space character. The application sends the array
through to the reversed array web worker. Once the web worker finishes,
the data is retrieved and output to the page.
<!DOCTYPE html>
<head>
<title>ePub Reader</title>
<meta charset="utf-8" />
<style>
#result
{
width: 500px;
margin: 30px;
}
</style>
<script>
window.onload=function() {
var inputElement = document.getElementById("file");
inputElement.addEventListener("change", handleFiles, false);
}
function handleFiles() {
var fileList = this.files;
var reader = new FileReader();
reader.onload = loadFile;
reader.readAsText(fileList[0]);
}
function loadFile() {
// look for the body section of the document
var parser = new DOMParser();
var xml = parser.parseFromString(this.result,"text/xml");
var content = xml.getElementsByTagName("body");
// if found, extract the body element's innerHTML
if (content.length > 0) {
var ct = content[0].innerHTML;
var ctarray = ct.split(" ");
var worker = new Worker("reverse.js");
worker.onmessage=receiveResult;
worker.postMessage(ctarray);
}
}
function receiveResult(event) {
document.getElementById("result").innerHTML = event.data;
}
</script>
</head>
<body>
<form>
<label for="file">File:</label> <input type="file" id="file" /><br />
</form>
<div id="result"></div>
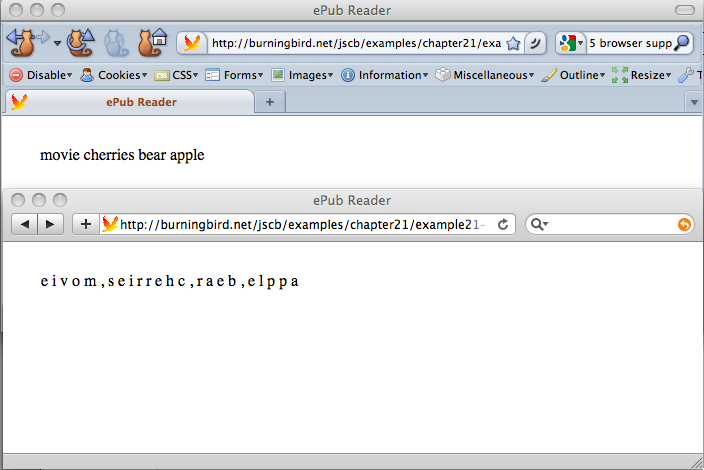
</body>As you can see in Figure 21-10, the results are interesting. Not very usefulâexcept they demonstrate that the web worker performs as expected, and quickly, too.
Firefox 3.6 is the only browser that supports both File API and Web Workers at the time this was written. WebKit, and WebKit-based browsers, Safari and Chrome, support Web Workers. To test the result in the WebKit browsers, I converted the main application to work on a statically created array, rather than an uploaded file:
window.onload=function() {

  var ctarray = ["apple","bear","cherries","movie"];
  var worker = new Worker("reverse.js");
  worker.onmessage=receiveResult;
  worker.postMessage(ctarray);
}

function receiveResult(event) {
     document.getElementById("result").innerHTML = event.data;
}
I ran the application in Firefox and then in Safari, and ended up with unexpected results, as shown in Figure 21-11.
The Firefox results are what I would expect: the array entries are reversed, and the entries converted to a string. The result from Safari, though, is unexpected: every character within the string is reversed, including the commas between the array elements.
Running the application again, but this time in the newest WebKit
nightly build, the results match the Firefox result. What happened with
Safari 4 is that postMessage didnât
serialize the object correctly when it transmitted the object to the web
worker routine. The newer WebKit nightly shows that this bug was fixed,
and the object is now serialized correctly.
However, to ensure that objects are passed correctly, regardless
of browser version, we can use JSON.stringify on any object before we send
it, and JSON.parse on any data that
we receive, in order to ensure the object is handled correctly
regardless of browser and browser version:
window.onload=function() {

  var ctarray = ["apple","bear","cherries","movie"];
  var worker = new Worker("reverse2.js");
  worker.onmessage=receiveResult;
  worker.postMessage(JSON.stringify(ctarray));
}

function receiveResult(event) {
     document.getElementById("result").innerHTML = event.data;
}
In the web worker, we use JSON.parse to restore the serialized version
of the object:
// web worker thread - reverses array
onmessage = function(event) {

   var reverseArray = function(x,indx,str) {
      return indx == 0 ? str :
reverseArray(x,--indx,(str+= " " + x[indx]));;
   }

   // reverse array
   var obj = JSON.parse(event.data);
   var str = reverseArray(obj, obj.length, "");

   // return resulting string to main application
   postMessage(str);
};
Now the application works the same in Firefox 3.6 and Safari 4. The application should also work with Chrome. Web workers donât work with Opera 10.5, or IE8. However, both browsers should support web workers, and hopefully the File API, in an upcoming version.
See Also
See Recipe 6.6 for a
description of the array reversal recursive function. The postMessage method is
introduced in Recipe 18.10, and JSON is
covered in Recipes 19.4 and 19.5.
Get JavaScript Cookbook now with the O’Reilly learning platform.
O’Reilly members experience books, live events, courses curated by job role, and more from O’Reilly and nearly 200 top publishers.

