Chapter 9. Form Elements and Validation
9.0. Introduction
Outside of hypertext links, form
elements were the very first form of interaction between web developers
and web page readers, and were also one of the first reasons for interest
in a scripting language.
With the advent of JavaScript, form elements could be validated before the data
was sent to the server, saving the reader time and the website extra
processing. JavaScript can also be used to modify form elements based on the data the web reader
provides, such as filling a selection list with the names of cities when a
certain state is selected.
The important point to remember when using JavaScript with form elements is that people turn JavaScript
off, so it canât be a dependency for any form action. JavaScript enhances,
not replaces.
9.1. Accessing Form Text Input Values
Solution
Use the DOM to access the form
element:
var formValue = document.forms["formname"].elements["elementname"].
value;
Discussion
Forms in a web page can be accessed through an object collection
(forms) via the
document object. Each form has its
own collection (elements) of form elements.
Accessing the form elementâs
value varies, based on the type of form element. For instance, a text input or
textarea form elementâs value can be
accessed using the value attribute.
To access the following form input
elementâs data:
<form id="textsearch">
<input type="text" id="firstname" />
</form>
use the following JavaScript:
txtValue = document.forms["textsearch"].elements("pattern"].value;As demonstrated earlier in the book, you can also access the input
form element directly, via its
identifier:
var txtValue = document.getElementByid("pattern").value;However, when youâre working with a larger form, youâre more likely going to want to work with the DOM Level 0 form collections, in order to be consistent.
You can also access the form
element using an integer representing the form and the elementâs
position in the page. The first form
that appears in the page is given an array index of zero, the second an
index of one, and so on. The same with the elements. So to access the
example form element, use the
following:
var txtValue = document.forms[0].elements[1].value;
Using an array index is tricky, since it may be difficult to
determine the location of a specific form and element. In addition,
adding a new form or element can make for incorrect JavaScript, or a web
page application that doesnât perform as expected. However, itâs also a
simple way to process all form
elements in a loop:
while (var i = 0; i < document.forms[0].elements.length; i++) {
   var val = document.forms[0].elements[i].value;
}
Note
Whenever youâre accessing data from a text or other field where
the user can input whatever value he wants, before sending to the
database or displaying in the page, you will want to strip or encode
any harmful SQL, markup, or script that may be embedded in the value.
You can use encodeURI and encodeURIComponent in JavaScript for
encoding.
See Also
See Recipe 2.4 for another demonstration of accessing a form and elements.
The solution uses the ECMAScript Binding for the DOM Level 2 HTML API, which can be found at http://www.w3.org/TR/DOM-Level-2-HTML/ecma-script-binding.html. For more on how to secure form input and the challenges of input security, read Jeff Atwoodâs âProtecting Your Cookies: HttpOnlyâ.
9.2. Dynamically Disabling and Enabling Form Elements
Solution
Use the disabled property to enable or disable form element(s), accessing the element via the
forms/elements collections:
document.forms["formname"].elements["elementname"].disabled=true;
or via direct access to an element with an identifier:
document.getElementById("elementname").disabled=true;Discussion
Itâs not unusual to disable some fields in a form until information is provided or a
specific event occurs. An example would be clicking a radio button
enabling or disabling other form
elements, such as input text fields.
See Also
See Recipe 9.4
for an example of clicking radio buttons and enabling or disabling
specific form elements. See Recipe 9.8 for another approach to
providing access to form elements
based on activity (hiding or showing form elements).
9.3. Getting Information from a Form Element Based on an Event
Solution
Depending on the form element,
you can capture any number of events, and based on the event, process
the form element data.
If you want to validate a form
field after the data in the field has changed, you can assign a function
to the onchange event handler function for the element:
document.getElementById("input1").onchange=textChanged;In the related function, access the form elementâs value:
var value = this.value;
You can also attach a function to a form element based on whether it gets or loses
focus, using the onfocus and onblur event
handlers. The onblur event handler
can be handy if you want to ensure a form field has data:
document.getElementById("input2").onblur=checkValue;In the function that checks to ensure some value is provided,
youâll first need to trim any whitespace. Since the String trim method is not supported in IE8, the
following code uses a variation of the regular expression String.replace method covered in Chapter 2:
var val = this.value;
val = val.replace(/^\s\s*/, '').replace(/\s\s*$/, '')
if (val.length == 0) alert("need value!");
You can capture keyboard events for form elements, such as onkeypress for a checkbox, but a click event
is triggered for most form elements
whether the element is clicked on by a mouse or the spacebar is clicked
when the element has keyboard focus:
document.getElementById("check1").onclick=getCheck;In the function, you can then access the checkbox checked property:
var checked = this.checked;
if (checked) { ...}
Discussion
There are several different events based on the type of form element. Each can be captured, and the
appropriate event handler assigned a function.
Table 9-1
contains a list of form elements and
the events most commonly captured for the element.
The list of elements isnât exhaustive, nor is the list of events,
but this gives you an idea of the more commonly occurring form element/event pairings.
In the form event handler
function, you can access both the event and the element to get
information about both. How you do this depends on your browser, and
also how you assign the events.
For instance, if you use the DOM Level 0 event handling in which you assign the event handler function directly to the event handler property:
document.getElementById("button1").onclick=handleClick;In all browsers, you can access the element using the element
context this. However, if you use DOM Level 2 and up event handling,
such as the following function, which provides cross-browser event
handling:
function listenEvent(eventObj, event, eventHandler) {
   if (eventObj.addEventListener) {
      eventObj.addEventListener(event, eventHandler,false);
   } else if (eventObj.attachEvent) {
      event = "on" + event;
      eventObj.attachEvent(event, eventHandler);
   } else {
      eventObj["on" + event] = eventHandler;
   }
}
You can access the element context with this for Firefox, Opera, Chrome, Safari, but
not for IE8. For IE8, youâll have to access the element using the
event object:
function handleClick(evt) {
   // cross browser event access
   evt = evt || window.evt;

   // cross browser element access
   var elem;
   if (evt.srcElement)
      elem = evt.srcElement;
   else
      elem = this;
See Also
See Chapter 2 for using regular
expressions with form elements, and
Chapter 7 for more on event handling, including
with form elements.
9.4. Performing an Action When a Radio Button Is Clicked
Solution
Attach an onclick event handler
to each of the radio buttons; in the event handler function, perform
whatever action you need:
window.onload=function() {
  var radios = document.forms[0].elements["group1"];
  for (var i = 0; i < radios.length; i++)
    radios[i].onclick=radioClicked;
}

function RadioClicked() {
    if (this.value == "one") {
      document.forms[0].elements["line_text"].disabled=true;
   }
}
Discussion
One relatively common use for JavaScript is to modify form elements based on actions taken elsewhere
in the form. For example, clicking a specific radio button may disable
some elements, but enable others. To do this, you need to assign an
event handler function to a form
elementâs event handler, and then find out information about the element
that received the event.
In the solution, a set of radio buttons with the name of group1 are accessed from the form, and the
onclick event handler for each is
assigned to a function named functionRadioClicked. In the function,
properties associated with the clicked radio button are accessible via
this, which is a proxy for the owner
of the event. Via this, we can find
out information about the eventâs owner, including the type of element
receiving the event (âradioâ), the tagName (âinputâ), and the value (âoneâ).
With this information, we can determine which of the radio buttons was clicked, and perform whatever action we need based on this information.
One action associated with radio buttons is to enable or
disable other form
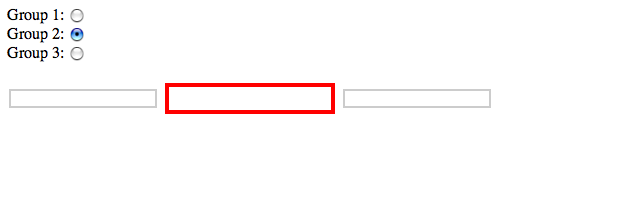
elements when one or another of the radio buttons is clicked. Example 9-1 shows a more
complete demonstration of this type of activity. In the example, three
radio buttons are paired with three text input fields. All three text
input fields are disabled when the web page is loaded. Clicking any one
of the radio buttons enables one input field and disables the other
two.
<!DOCTYPE html>
<head>
<title>Radio Click Pick</title>

<style>
:enabled {
    border: 4px solid #ff0000;
    padding: 5px 5px 5px 15px;
}

:disabled {
    border: 2px solid #cccccc;
}

</style>
<script>

window.onload=function() {

  // first, disable all the input fields
  document.forms[0].elements["intext"].disabled=true;
  document.forms[0].elements["intext2"].disabled=true;
  document.forms[0].elements["intext3"].disabled=true;

  // next, attach the click event handler to the radio buttons
  var radios = document.forms[0].elements["group1"];
  for (var i = [0]; i < radios.length; i++)
    radios[i].onclick=radioClicked;
}
function radioClicked() {

  // find out which radio button was clicked and
  // disable/enable appropriate input elements
  switch(this.value) {
    case "one" :
       document.forms[0].elements["intext"].disabled=false;
       document.forms[0].elements["intext2"].disabled=true;
       document.forms[0].elements["intext3"].disabled=true;
       break;
    case "two" :
       document.forms[0].elements["intext2"].disabled=false;
       document.forms[0].elements["intext"].disabled=true;
       document.forms[0].elements["intext3"].disabled=true;
       break;
    case "three" :
       document.forms[0].elements["intext3"].disabled=false;
       document.forms[0].elements["intext"].disabled=true;
       document.forms[0].elements["intext2"].disabled=true;
       break;
  }

}

</script>
</head>
<body>
<form id="picker">
Group 1: <input type="radio" name="group1" value="one" /><br />
Group 2: <input type="radio" name="group1" value="two" /><br />
Group 3: <input type="radio" name="group1" value="three" /><br />
<br />
<input type="text" id="intext" />
<input type="text" id="intext2"  />
<input type="text" id="intext3"  />
</form>
</body>
The nonassociated text input fields are disabled with each new clicked event, in order to clear previous activity. In addition, to add a little flair to the example, new CSS3 functionality to style enabled and disabled attributes is used in the example, as shown in Figure 9-1. The CSS3 setting works with all of the book target browsers except IE8.
See Also
See Recipe 9.2 for
more information about attaching event handlers to form elements, and getting information from
the elements in an event handler function.
9.5. Checking for a Valid Phone Number
Problem
You want to validate form information that requires a certain format, such as a valid phone number.
Solution
Access the form field value, and then use a regular expression to validate the format. To validate a U.S.-based phone number (area + prefix + digits):
// filter out anything but numbers to
// standardize input
var phone = document.forms[0].elements["intext"].value;
var re = /\D+/g;
var cleanphone = phone.replace(re,"");

// check length
if (cleanphone.length < 10) alert("bad phone");
Discussion
To validate form fields, you need to strip out any extraneous material first, and then test only what is necessary. Phone numbers can be provided using different formats:
(314) 555-1212
314-555-1212
314.555.1212
3145551212
All you really need are the numbers; everything else is just syntactic sugar. To validate a phone number, strip out anything that isnât a number, and then check the length, as shown in the solution.
Once validated, you can then reformat into a standard format, though usually if youâre going to store a phone number in a database, you want to store it in the smallest form possible (all numbers).
Another way to ensure that the data is correct is to provide three fields for the number, and only allow the number of characters for each field (3-3-4). But itâs probably simpler for you and for your users to use just one field.
See Also
There are any number of regular expression formulas that work for various validation purposes. See more on regular expressions in Chapter 2. Also note that many JavaScript frameworks and libraries provide simple-to-use validation routines, where all you have to do is give each input element a class name or some other indicator in order to trigger proper validation.
See Recipe 14.2 for integrating accessibility into your forms using ARIA.
9.6. Canceling a Form Submission
Problem
You want to cancel a form submission if you find the data entered into the form fields invalid.
Solution
If the form fields donât validate, cancel the form submission event using the technique appropriate to the event handling technique youâre using. Here, weâre borrowing from Chapter 7 (where we covered events):
// listen to an event
function listenEvent(eventObj, event, eventHandler) {
   if (eventObj.addEventListener) {
      eventObj.addEventListener(event, eventHandler,false);
   } else if (eventObj.attachEvent) {
      event = "on" + event;
      eventObj.attachEvent(event, eventHandler);
   } else {
      eventObj["on" + event] = eventHandler;
   }
}


// cancel event
function  cancelEvent (event) {
   if (event.preventDefault) {
      event.preventDefault();
   } else {
      event.returnValue = false;
   }
}

window.onload=function() {
   var form = document.forms["picker"];
   listenEvent(form,"submit",validateFields);
}

function validateFields(evt) {
   evt = evt ? evt : window.event;
   ...

   if (invalid) {
      cancelEvent(evt);
   }
}
Discussion
In the same function you use to validate the form field(s), cancel
the event. In the event function, the cancelEvent function
checks to see if the preventDefault
method is supported. If it is, itâs called. If not, the eventâs returnValue is set to false (cancel
event).
See Also
See Chapter 7 for more information on event handling.
9.7. Preventing Duplicate Form Submissions
Problem
Potential harm could occur if a user submits the same form multiple times. You want to prevent duplicate form submissions.
Solution
One approach is to provide a message that the form has been submitted, and then provide some means to prevent the web page reader from submitting the form again. In its simplest variation, the following would work:
function validateSubmission(evt) {
...
alert("Thank you, we're processing your order right now");
document.getElementById("submitbutton").disabled=true; // disable
Discussion
Multiple concurrent form submissions are one of the worst problems that can occur in a user interface. Most people would be unhappy if, say, they found they had purchased two of the same item when they were only expecting to purchase one.
There are several different approaches you can take to prevent duplicate form submissions, and how strict you want to be depends on the seriousness of the double submission.
For example, comment forms donât usually restrict form submission. Duplicate submissions may result in a message that duplicate comments have posted, and the first has been rejected. Even if the duplicate comment is posted, itâs a minor nuisance, rather than a serious problem.
However, itâs essential to prevent duplicate form submission with any kind of storefront, and anything that could result in unexpected charges to your web customers.
If you do restrict duplicate form submissions, provide some form of feedback to the customer. In the solution, I took a simple approach, popping up a message providing feedback to the users that the form has been submitted, and then disabling the submit button so they canât click it again.
Itâs an OK approach, but we can take the security a little further. Instead of a pop up, we can embed a message directly into the page. Instead of just disabling the submit button, we can also use a flag to doubly ensure that a submission canât be initiated while an existing form submission is being processed. Example 9-2 demonstrates a safer way to prevent duplicate form submissions.
<!DOCTYPE html>
<html xmlns="http://www.w3.org/1999/xhtml">
<head>
<title>Prevent Duplication Form Submission</title>

<style>
#refresh
{
   display: none;
   width: 200px; height: 20px;
   background-color: #ffff00;
}
</style>
<script>
//<![CDATA[

var inprocess=false;

window.onload=function() {
   document.forms["picker"].onsubmit=validateSubmit;
   document.getElementById("refresh").onclick=startOver;
}

function validateSubmit() {

  // prevent duplicate form submission
  if (inprocess) return;
  inprocess=true;
  document.getElementById("submitbutton").disabled=true;

  // for example only
  document.getElementById("refresh").style.display="block";
  document.getElementById("message").innerHTML=
"<p>We're now processing your request, which can take a minute.</p>";

  // validation stuff
  return false;
}

function startOver() {
   inprocess=false;
   document.getElementById("submitbutton").disabled=false;
   document.getElementById("message").innerHTML="";
   document.getElementById("refresh").style.display="none";
}
//--><!]]>
</script>
</head>
<body>
<form id="picker" method="post" action="">
Group 1: <input type="radio" name="group1" value="one" />
Group 2: <input type="radio" name="group1" value="two" />
Group 3: <input type="radio" name="group1" value="three" /><br />
<br />
Input 1: <input type="text" id="intext" />
Input 2: <input type="text" id="intext2"  />
Input 3: <input type="text" id="intext3"  /><br /><br />
<input type="submit" id="submitbutton" value="Send form" />
</form>
<div id="refresh">
<p>Click to reset example</p>
</div>
<div id="message">
</div>
</body>
</html>
If you load the example into a browser and click the Send Form button, it will become disabled and two new elements will display: a processing message and a button to refresh the page. The latter is included only because this is an example, as a way to reset the example.
Normally, in a form, a post-processing web page will display with a confirmation of the action and a message of thanks, or whatever is appropriate. If Ajax is used to make the update, the form can be reenabled once the Ajax processing is complete.
9.8. Hiding and Displaying Form Elements
Solution
Surround the form elements that
will be hidden with a div
element:
<form id="picker" method="post" action="">
Item 1: <input type="radio" name="group1" value="one" />
Item 2: <input type="radio" name="group1" value="two" />
Item 3: <input type="radio" name="group1" value="three" /><br />
<br />
<div id="hidden_elements">
Input 1: <input type="text" id="intext" />
Input 2: <input type="text" id="intext2"  />
Input 3: <input type="text" id="intext3"  /><br /><br />
</div>
<input type="submit" id="submitbutton" value="Send form" />
</form>
Change the divâs display to
none when the page loads:
window.onload=function() {

  document.getElementById("hidden_elements").style.display="none";

  //  attach the click event handler to the radio buttons
  var radios = document.forms[0].elements["group1"];
  for (var i = [0]; i < radios.length; i++)
    radios[i].onclick=radioClicked;
}
When the event to display the form elements occurs, change the div elementâs display so that the form elements are displayed:
function radioClicked() {
   if (this.value == "two") {
    document.getElementById("hidden_elements").style.display="block";
   } else {
    document.getElementById("hidden_elements").style.display="none";
   }
}
Discussion
In the solution, the hidden form elements are surrounded by a div element in order to make it easier to work
with them as a group. However, you could also control the display for
elements individually.
The CSS display property allows
you to completely remove elements from the page (display="none"), as shown in Figure 9-2. This makes it an
ideal CSS property to use; the visibility property
will only hide the elements, but it doesnât remove them from the
display. If you used visibility,
youâd have a gap between the displayed elements and the form
button.
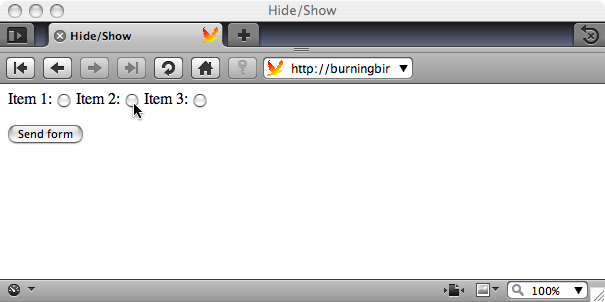
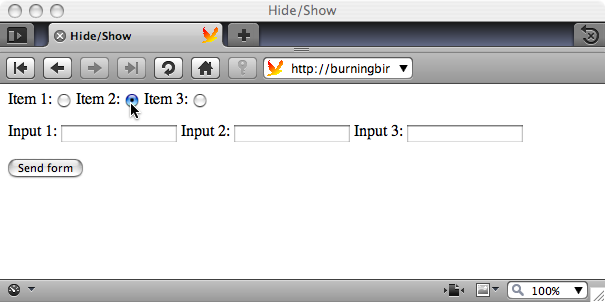
In the solution, clicking the second radio button displays the
input fields, as shown in Figure 9-3. Notice in the
code that if you click on the first or third radio button, the display for the hidden elements is set to
none, just in case it is currently
displayed after a previous second radio button selection.
You always want to take into account the state of the page whenever youâre processing an event that changes the makeup of a form. If certain elements are only displayed for given form values, then any activity in the form should either check the current state of the form or just reissue either the hide or show functionality, because it doesnât hurt to reshow a shown element or rehide one already hidden.
See Also
See a full-page example of the hidden/displayed form element example in Recipe 10.1 (Example 10-1).
9.9. Modifying a Selection List Based on Other Form Decisions
Problem
You want to modify the contents of a second selection list based on the choice made in a first selection list.
Solution
You have two options when it comes to modifying the contents of one selection list, based on the choice in another selection list.
The first is to query a database and build the selection list based on the choice. This is demonstrated in Recipe 18.9, which covers Ajax.
The second approach is to maintain a static copy of the second selection list options:
var citystore = new Array();
citystore[0] = ['CA','San Francisco'];
citystore[1] = ['CA','Los Angeles'];
citystore[2] = ['CA','San Diego'];
citystore[3] = ['MO','St. Louis'];
citystore[4] = ['MO','Kansas City'];
citystore[5] = ['WA','Seattle'];
citystore[6] = ['WA','Spokane'];
citystore[7] = ['WA','Redmond'];
//And use this copy to rebuild the selection list:
function filterCities() {
  var state = this.value;
  var city = document.getElementById('cities');
  city.options.length=0;

  for (var i = 0; i < citystore.length; i++) {
    var st = citystore[i][0];
    if (st == state) {
      var opt = new Option(citystore[i][1]);
      try {
        city.add(opt,null);
      } catch(e) {
        city.add(opt);
      }
    }
  }
}
Discussion
Selection lists are often built from direct database queries. To
prevent the lists from being too large, they may be built based on
choices in other form elements, from
an Ajax-enabled query, an array, or even a hidden selection list.
As the solution demonstrates, regardless of approach, the simplest and quickest way to populate the selection list is to first set the options array list to zero, which deletes everything from the list; then go through the available option data, and based on whatever criteria, create new options with the option data and append to the empty selection list.
To see this type of functionality in action, Example 9-3 shows an entire application
that incorporates the code in the solution. Clicking a state will
populate the second selection list with cities for that state. A
try...catch block is used when adding
the new option to the selection list, because IE8 does not support the
second parameter for the elementâs position in the add method. If the first add method fails, the second is used.
<!DOCTYPE html>
<html xmlns="http://www.w3.org/1999/xhtml">
<head>
<title>Populating Selection Lists</title>
<script>
//<![CDATA[

var citystore = new Array();
citystore[0] = ['CA','San Francisco'];
citystore[1] = ['CA','Los Angeles'];
citystore[2] = ['CA','San Diego'];
citystore[3] = ['MO','St. Louis'];
citystore[4] = ['MO','Kansas City'];
citystore[5] = ['WA','Seattle'];
citystore[6] = ['WA','Spokane'];
citystore[7] = ['WA','Redmond'];

window.onload=function() {
  document.getElementById("state").onchange=filterCities;
}

function filterCities() {
  var state = this.value;
  var city = document.getElementById('cities');
  city.options.length=0;

  for (var i = 0; i < citystore.length; i++) {
    var st = citystore[i][0];
    if (st == state) {
      var opt = new Option(citystore[i][1]);
      try {
        city.add(opt,null);
      } catch(e) {
        city.add(opt);
      }
    }
  }
}

//--><!]]>
</script>
</head>
<body>
<form id="picker" method="post" action="">
<select id="state">
<option value="">--</option>
<option value="MO">Missouri</option>
<option value="WA">Washington</option>
<option value="CA">California</option>
</select>
<select id="cities">
</select>
</form>
</body>
</html>
If scripting is disabled in an application like this one, the best option is to hide the city selection list by default and display a button (again by default) that submits the form and populates the city selection on a second page.
See Also
See Recipe 18.9
for a demonstration of using Ajax to populate a selection list. More on
the try...catch error handling in
Recipe 10.4.
Get JavaScript Cookbook now with the O’Reilly learning platform.
O’Reilly members experience books, live events, courses curated by job role, and more from O’Reilly and nearly 200 top publishers.

