In this chapter, we continue our discussion by reimplementing the printer server using RMI as a distribution mechanism instead of sockets. As part of doing so, I will introduce the core infrastructure of RMI in a familiar setting. In fact, the application itself will look remarkably similar to the socket-based version. By the end of this chapter, you will have received a glimpse at how an RMI application is structured and the basic sequence of steps required to build one.
In the previous chapter, we covered the basics of implementing a socket-based distributed application. In doing so, we reinforced the lessons of the previous two chapters on streams and sockets. In addition, we discovered that the code necessary for writing a socket-based distributed application falls into five basic categories:
Code that actually does something useful. This code is commonly referred to as business logic.[20] An example is an implementation of the
Printerinterface.User interface code for the client application.
Code that deals with marshalling and demarshalling of data and the mechanics of invoking a method in another process. This is tedious code, but it is straightforward to write and is usually a significant percentage of the application.
Code that launches and configures the application. We used a number of hard-wired constants (in
NetworkBaseClass) to enable the client to initially connect with the server. And we wrote twomain( )methods—one to launch the client and one to launch the server.Code whose sole purpose is to make a distributed application more robust and scalable. This usually involves one or more of the following: client-side caching (so the server does less work); increasing the number of available servers in a way that’s as transparent as possible to the client; using naming services and load balancing; making it possible for a server to handle multiple requests simultaneously (threading); or automatically starting and shutting down servers, which allows the server lifecycle to conserve resources.
In any distributed application, programmers need to write the first and second types of code; if they did not need to write the business logic, the application wouldn’t be necessary. Similarly, the user interface, which enables users to access the business logic, needs to be written for any application. And the fifth type, code that enables the application to scale, can be the most difficult and application-specific code to write.
The third and fourth types of code, however, are different. Most of this code can be automatically generated without much programmer thought or effort.[21] It may seem difficult to write marshalling code if you’ve never done so before. However, by the second time, it’s easy. By the third time, most programmers are flat-out bored by the task.
We will see in this chapter that RMI either already contains—or will automatically generate—most of the code in the third and fourth categories. Indeed, this alone is a compelling reason to use RMI.[22]
Though convenient, automatically generating marshalling and demarshalling code is mostly a side effect produced in the service of a much more important goal. In a nutshell:
RMI is designed to make communication between two Java programs, running in separate JVMs, as much like making a method call inside a single process as possible.
This is an ambitious goal. How does RMI achieve it?
Recall
that in order to communicate with the printer
server, we wrote an object, ClientNetworkWrapper,
which did three things:
It opened a socket.
It told an instance of
DocumentDescriptionto write itself to the stream.It read and interpreted information from the input stream associated with the socket.
In
addition, we wrote a companion object, ServerNetworkWrapper,
which played an analogous role on the server side.
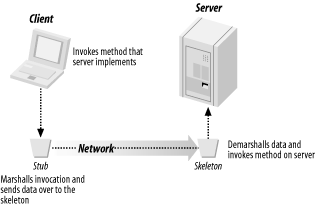
RMI relies on two similar types of objects that are automatically generated by the RMI Compiler from an implementation of the server: stubs and skeletons. A stub is a client-side object that represents a single server object inside the client’s JVM. It implements the same methods as the server object, maintains a socket connection to the server object’s JVM automatically and is responsible for marshalling and demarshalling data on the client side. A skeleton is a server-side object responsible for maintaining network connections and marshalling and demarshalling data on the server side.
Tip
The word stub is actually used to mean two different things. Depending on context, it might refer to a stub class that is automatically generated from a server class object. Alternatively, it might refer to an instance of a particular stub class (that is, to a reference to a specific instance of the server class). Because stubs have such a well-defined role in a distributed architecture, the meaning is usually clear from context. Similarly, skeleton can either refer to the skeleton class or to an instance of the skeleton class.
The basic procedure a client uses to communicate with a server is as follows:
The client obtains an instance of the stub class. The stub class is automatically pregenerated from the target server class and implements all the methods that the server class implements.
The client calls a method on the stub. The method call is actually the same method call the client would make on the server object if both objects resided in the same JVM.
Internally, the stub either creates a socket connection to the skeleton on the server or reuses a pre-existing connection. It marshalls all the information associated to the method call, including the name of the method and the arguments, and sends this information over the socket connection to the skeleton.
The skeleton demarshalls the data and makes the method call on the actual server object. It gets a return value back from the actual server object, marshalls the return value, and sends it over the wire to the stub.
The stub demarshalls the return value and returns it to the client code.
Stubs and skeletons are shown in Figure 4-1.
If this approach seems familiar, it’s because the stub and the skeleton are really automatically generated, object-oriented versions of the objects we created for our socket-based printer server.
Let’s
take a close look at this. Here is part of the
stub generated for our NullPrinter class:
public final class NullPrinter_Stub extends java.rmi.server.RemoteStub implements
    com.ora.rmibook.chapter4..Printer, java.rmi.Remote {
   ...
    // methods from remote interfaces

    // implementation of printDocument(DocumentDescription)
	public boolean printDocument(com.ora.rmibook.chapter4.DocumentDescription $param
         DocumentDescription_1) throws om.ora.rmibook.chapter4.PrinterException,
         java.rmi.RemoteException {
		try  {
			...
			java.rmi.server.RemoteCall call = ref.newCall((java.rmi.server.
                  RemoteObject) this, operations, 0, interfaceHash);
			try  {
				java.io.ObjectOutput out = call.getOutputStream(  );
				out.writeObject($param_DocumentDescription_1);
			}
			catch (java.io.IOException e)  {
				throw new java.rmi.MarshalException("error marshalling
                       arguments", e);
			}
			ref.invoke(call);
			boolean $result;
			try {
				'java.io.ObjectInput in = call.getInputStream(  );
				result = in.readBoolean(  );
			}
			 catch (java.io.IOException e) {
				throw new java.rmi.UnmarshalException("error unmarshalling
                       return", e);
			}
			finally  {
				ref.done(call);
			}
			return $result;
While
this may seem a bit more complex than the code we
wrote for the socket-based printer server (and the
fact that we’re showing only part of the code
indicates that stubs are actually quite a bit more
complicated than the ClientNetworkWrapper class might have
led us to expect), the fact remains: the stub
implements the Printer interface, and the
implementation of each method in the Printer interface simply
pushes data onto a stream, and then reads data
from a stream.
Tip
Strictly speaking, skeletons aren’t really necessary. They can be replaced by a more generic framework that uses Java’s reflection API to invoke methods on the server side. We’ll cover this in more detail in Chapter 8. In this book, however, our code uses skeletons.
In the
first section of this chapter, we stated that RMI
automatically generates most of the marshalling
and demarshalling code required to build a
distributed application. It’s easy to see how RMI
could automatically do this for primitive argument
types. After all, an int is simply four consecutive bytes.
Automatically marshalling and demarshalling
objects, on the other hand, is a more difficult
task. And, in order to do so correctly, RMI
requires us to distinguish between two main types
of objects: those that implement the Remote marker interface
and those that implement the Serializable marker
interface.
Tip
A
marker interface doesn’t
define any methods; it simply provides information
(available by reflection) about other code. In
this case, RMI checks to see whether a given
object implements either Remote or Serializable and behaves differently in
either case.
Remote objects are
servers. That is, they have a fixed location and
run in a specific JVM on a particular computer
somewhere in the network; they are the objects
that receive remote method invocations. In RMI,
remote objects are passed by reference. That way,
if two instances of some remote object type exist,
they are logically distinct. For example, in the
current application, each Printer is a remote object, and any two
instances of Printer are not equal.
Serializable
objects, on the other hand, are objects whose
location is not important to their notion of
identity. That is, while they do have a location,
the location is not particularly relevant to their
state. Instead, serializable objects encapsulate
data and are mobile—they can be passed from one
JVM to another. Hence, serializable objects are
very much like the primitive datatypes, such as
float and
int, which are
also always passed by value.
Note that if an argument is a remote object (e.g., a server), the skeleton doesn’t send a serialized copy of the server. Instead, it creates a stub that serves as a reference to that object and sends a serialized copy of the stub over the wire. What about arguments that are neither serializable nor remote? Well, if it’s a primitive datatype, it is passed by value as well. But if it’s an object and is neither serializable nor remote, an exception is thrown.
While the printer application is simple enough so that the RMI-based application is similar to the socket-based application, RMI does add one more conceptual wrinkle. Recall that in the socket-based version, we used a set of constants to help the client find the server:
public abstract class NetworkBaseClass {
	public static final String DEFAULT_SERVER_NAME = "localhost";
 	public static final int DEFAULT_SERVER_PORT = 2100;
	public static final int DEFAULT_SERVER_BACKLOG = 10;
....
}
That’s a bad design strategy. If the server is moved to another computer, or if you want to use the same client to talk to multiple servers, you need to deploy a new version of the client application.
A much better strategy is to have a centralized naming service. A naming service is an application that runs on a central server and functions like a phone book. In order for a client to connect to a server, it must do two things:
It must connect to the naming service and find out where the server is running.
It must then connect to the server.
At
first glance, a naming service appears to suffer
from the same design flaw as NetworkBaseClass.
Instead of hardwiring the location of the server
into our client code, we’re hardwiring the
location of the naming service. There are,
however, a number of differences that combine to
make this a more palatable solution. Among the
most significant are:
Naming services are fairly simple applications that place limited demands on a computer. This means that the server running a naming service doesn’t need to be upgraded often.
Naming services are stable applications with simple APIs. They are not updated or revised often.
The application may actually have several servers. Rather than hardwiring all their locations into the client application, we need only one predetermined location.
The first two are especially important. Some common reasons for moving a server application to a new machine include scaling the application or providing for changes in application functionality. In the case of a naming service, however, the hardware will likely be sufficient to handle the load for quite a long period of time. Moreover, because the naming service is a simple and well-understood application that rarely changes, chances are that the implementation is a reliable piece of code. In other words, a computer running a naming service can often be set up and left alone.
In
RMI, the default naming service that ships with
Sun Microsystem’s version of the JDK is called the
RMI registry.[23] Messages are sent to the registry via
static methods that are defined in the java.rmi.Naming class.
Including the RMI registry in our printer
application architecture leads to the diagram in
Figure
4-2.
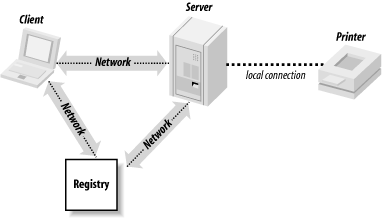
While we’ve introduced only one new server into our application, we’ve added two new types of messages to those that are flowing across the network:
The registry must be told about the printer server.
This must happen before any other types of messages can be sent. Note that the printer server is a remote object, so what really gets passed to the registry is a stub (recall that stubs are serializable and can therefore be passed by value). This stub knows on which computer the printer server runs, and on which port the skeleton receives messages. Thus, the stub can relay method calls to the printer server’s skeleton.
The client must communicate with the registry to find out how to connect with the printer server.
The client must do this before the client can actually request that a document be printed. As a result of this, the client will obtain a copy of the stub that the server originally sent to the registry.
And, of course:
The client must send print requests to the printer server.
All of the communication in the socket-based version of the printer server is of this type.
Tip
In order to provide distributed garbage collection, RMI also sends other types of messages dealing with renewing leases. We will cover these messages (which are sent automatically and don’t require any work by application developers) in Chapter 16.
Now let’s
start implementing the RMI-based printer server.
As in the socket-based version, we have three
basic objects: the Printer interface, the DocumentDescription
object, and the PrinterException object. Conceptually,
these objects are the same as their counterparts
in Chapter 3.
However, as might be expected, using RMI will
force us to change a few details.
There
are two basic changes to the Printer interface: it
now extends the Remote interface, and every method is
defined to throw RemoteException, a subclass of Exception defined in the
package java.rmi. This class is shown in Example 4-1.
Example 4-1. Printer.java
public interface Printer extends PrinterConstants, Remote {
	public boolean printerAvailable(  ) throws RemoteException;
	public boolean printDocument(DocumentDescription document) throws RemoteException,
         PrinterException;
}
That Printer extends Remote shouldn’t be a
surprise—the whole point of the application is to
turn a local printer into a server that can
receive calls from clients’ applications running
on other computers.
The other change
involves adding RemoteException to each method
signature. RemoteException is an exception thrown
by RMI to signal that something unforeseen has
happened at the network level. That is, it’s a way
for the RMI infrastructure to tell a client
application that “something went wrong in the RMI
infrastructure.” For example, if the server
crashes while handling a client’s request, RMI
will automatically throw a RemoteException on the
client side.
Adding RemoteException to every method has one
important consequence. Recall that rmic is used to
automatically generate a stub class for each
implementation of Printer. This stub implements the
Printer
interface and, therefore, every method implemented
by the stub is declared to throw RemoteException.
However, because RemoteException is a checked exception,
any client-side code trying to invoke a method on
the server must do so inside a try/catch block and
explicitly catch RemoteException.
Making RemoteException a checked exception is
one of the most controversial design decisions in
the entire RMI framework. On one hand, it forces
programmers writing client-side code to think
about how to gracefully handle network failures.
On the other hand, it is often the case that the
catch block for a RemoteException doesn’t do anything
interesting. Moroever, forcing programmers to
catch RemoteException in their client code
merely winds up making the code much harder to
read and understand.
Tip
Notice that the printDocument( ) method
is still defined as throwing PrinterException. If the
implementation of Printer throws a PrinterException, the
RMI skeleton will automatically marshall the
PrinterException object and send it
across the wire to the stub. The stub will
demarshall the instance of PrinterException and
throw it again. At this point, the exception will
be caught by the catch(
) block. What’s happening here is
simple: since RMI, via the stub and skeleton,
controls the communication between the client and
server, it can also automatically propagate
exceptions across the network and rethrow them on
the client side. Contrast this to the socket-based
version, where Printer returned a status argument that
the client was free to ignore.
In order to implement
a printer, we need to do two things: write and
compile the actual server code and generate the
stub and skeleton using rmic. The code for NullPrinter itself is
almost identical to the code used in the
socket-based version. The only difference is that
the NullPrinter
class extends java.rmi.server.UnicastRemoteObject.,
as shown in Example 4-2.
Example 4-2. NullPrinter.java
public class NullPrinter extends UnicastRemoteObject implements Printer {
	private PrintWriter _log;
	public NullPrinter(OutputStream log) throws RemoteException  {
		_log = new PrintWriter(log);
	}
UnicastRemoteObject is a convenient
base class for RMI servers. It handles most of the
tasks associated with creating a server. For
example, the constructors of UnicastRemoteObject
cause a server socket to be created automatically
and start listening for client method invocations.
Restating this slightly: when we instantiate
NullPrinter, it
immediately starts listening on a port for client
requests. The RMI infrastucture handles all the
details of opening a socket and listening for
client requests.
After compiling the server, we need to
generate stubs and skeletons. The stubs and
skeleton classes are in the same package as the
server class (in this case, com.ora.rmibook.chapter4.printers). In
this case, we simply use:
rmic -keep -d d:\classes com.ora.rmibook.chapter4.printers.NullPrinter
Just as we briefly
examined the generated stub, it’s also worth
looking for a moment at the skeleton that’s
generated. The generated skeleton has one major
method, named dispatch(
). dispatch(
) is the method that actually forwards
requests to the server. Here’s a snippet of code
from the dispatch(
) method of our skeleton:
 public void dispatch(java.rmi.Remote obj, java.rmi.server.RemoteCall call,
     int opnum, long hash) throws java.lang.Exception {
	...	// validation and error-checking code omitted
	com.ora.rmibook.chapter4.printers.NullPrinter server =
		(com.ora.rmibook.chapter4.printers.NullPrinter) obj;
	switch (opnum)  {
		case 0: // printDocument(DocumentDescription) {
			com.ora.rmibook.chapter4.DocumentDescription
                  		$param_DocumentDescription_1;
			 try  {
				java.io.ObjectInput in = call.getInputStream(  );
				$param_DocumentDescription_1 =
					 (com.ora.rmibook.chapter4.DocumentDescription)
                             		in.readObject(  );
			}
			catch (java.io.IOException e)  {
				throw new java.rmi.UnmarshalException(
                       			"error unmarshalling arguments", e);
			}
			catch (java.lang.ClassNotFoundException e)  {
				throw new java.rmi.UnmarshalException(
                       			"error unmarshalling arguments", e);
			}
			finally  {
				call.releaseInputStream(  );
			}
			boolean $result = server.printDocument($param_DocumentDescription_1);
			try  {
				java.io.ObjectOutput out = call.getResultStream(true);
				out.writeBoolean($result);
			}
			catch (java.io.IOException e)  {
				throw new java.rmi.MarshalException(
                       			"error marshalling return", e);
			}
			 break;


		}
	}
}
Let’s
look at the arguments of this method first. The
method takes an instance of Remote, a RemoteCall, an int, and a long. These arguments
have the following meanings:
The instance of
Remoteis actually an instance ofNullPrinter.RemoteCallis an object that encapsulates a socket connection. The instance ofRemoteCallbeing passed is a connection to a particular client.The integer is mapped to a particular method on the server. That is, when
rmiccompiles the stub and the skeleton, it numbers all the methods. Afterwards, instead of passing the method name, it passes the associated integer. This saves bandwidth and also makes the skeleton more efficient by allowing it to perform method dispatch based on integer comparisons, rather than using string comparisons.The
longis an integrity check. Each method defined inNullPrinterhas a uniquelongassociated with it. Thislongis a hash of the method name and all the arguments. Sending this hash, along with the method number, helps to prevent versioning problems.
So what does this method do? It essentially contains marshalling and demarshalling code, similar to the code written by hand for the socket-based version of the printer server.
We still have two
further objects to implement: DocumentDescription and
PrinterException. Let’s start with
PrinterException. Example 4-3
shows the source code for PrinterException.
Example 4-3. PrinterException.java
public class PrinterException extends Exception {
	private int _numberOfPagesPrinted;
	private String _humanReadableErrorDescription;

	public PrinterException(  ) {
 		// zero arg constructor needed for serialization
 	}

	public PrinterException(int numberOfPagesPrinted, String
         humanReadableErrorDescription) {
		_numberOfPagesPrinted = numberOfPagesPrinted;
		_humanReadableErrorDescription = humanReadableErrorDescription;
	}

	 public int getNumberOfPagesPrinted(  ) {
		return _numberOfPagesPrinted;
	}

	 public String getHumanReadableErrorDescription(  ) {
		return _humanReadableErrorDescription;


	}
}
This is exactly what a generic exception[24] should be; it has enough state for the catch block to print out or display a meaningful error message. You can easily imagine a client popping up a dialog box to tell the user what went wrong, as in the following code snippet:
catch (PrinterException printerException) {
	String errorMessage =  "Print failed after " + printerException
         getNumberOfPagesPrinted(  ) + " pages.";
	JOptionPane.showMessageDialog(SimpleClientFrame.this, errorMessage,
         "Error in printing" , JOptionPane.INFORMATION_MESSAGE);
	_messageBox.setText("Exception attempting to print " + (_fileChooser
         getSelectedFile(  )).getAbsolutePath(  ) + "\n\t Error was: " +
         printerException getHumanReadableErrorDescription(  ));
}
Even more impressively, PrinterException has no
“extra” networking code. For example, it does not
contain any code that either reads or writes from
a stream. This is possible because RMI
automatically uses serialization to send objects
over the wire.
The other object we
pass by value is an instance of DocumentDescription.
However, we have a problem here: DocumentDescription
stores the document as an instance of InputStream, and
InputStream
doesn’t implement the Serializable interface. This means that
the generic serialization mechanism won’t work
with DocumentDescription. We’re going to
have to write custom marshalling and demarshalling
code ourselves. The code is shown in Example 4-4.
Example 4-4. DocumentDescription.java
public class DocumentDescription implements Serializable, PrinterConstants {
	private transient InputStream _actualDocument;
	private int _length;
	private int _documentType;
	private boolean _printTwoSided;
	private int _printQuality;

	public DocumentDescription(  ) {
	// zero arg constructor needed for serialization
	}
....
	private void writeObject(java.io.ObjectOutputStream out) throws IOException {
		out.defaultWriteObject(  );
		copy(_actualDocument, out);
	}

	private void readObject(java.io.ObjectInputStream in) throws IOException,
         ClassNotFoundException {
		in.defaultReadObject(  );
		ByteArrayOutputStream temporaryBuffer = new ByteArrayOutputStream(  );
		copy(in, temporaryBuffer, _length);
		_actualDocument = new DataInputStream(new ByteArrayInputStream(temporaryBuffer
              toByteArray(  )));
	}
We
start by declaring _actualDocument to be transient. transient is a Java
keyword that tells the serialization mechanism not
to serialize the variable’s value out. We then
implement writeObject(
), which does two things:
Calls
out.defaultWriteObject( ). This invokes the generic serialization mechanism (which is the default) to write out all nontransient objects. That is, whenout.defaultWriteObject( )is called, everything but_actualDocumenthas been encoded in the stream.Copies
_actualDocumentto the stream, exactly as we did for the socket-based version of the program.
Similarly, in readObject( ), we first call defaultReadObject( ),
which retrieves all the nontransient values,
including _length, from the stream. We then read
_actualDocument
from the stream.
Tip
Why doesn’t
InputStream
implement the Serializable interface? The answer is
that InputStream is an abstract base class
whose concrete subclasses often have
machine-specific state. For example, File-InputStream explicitly
refers to a file on a hard drive and probably has
a file descriptor as part of its state. Making
objects such as FileInputStream serializable makes very
little sense, since you can’t guarantee that
either the file or the file descriptor will be
available (or meaningful) when the information is
deserialized. Similarly, classes such as Frame or Thread, which
encapsulate operating-system resources, are not
serializable.
To finish building our
server, we need to write launch code. Launch code
is code that is application-specific, but not
business-domain specific, and handles the details
of registering a server with a naming service such
as the RMI registry. In our case, this boils down
to two pieces of code: a Java program that runs
PrinterServer
and a batch file that starts the RMI registry and
then runs our program. The former is shown in
Example
4-5.
Example 4-5. SimpleServer.java
public class SimpleServer implements NetworkConstants {
	public static void main(String args[]) {
		try {
			File logfile = new File("C:\\temp\\serverLogfile");
			OutputStream outputStream = new FileOutputStream(logfile);
			Printer printer = new NullPrinter(outputStream);
			Naming.rebind(DEFAULT_PRINTER_NAME, printer);
		}
		catch (Exception e) {
			e.printStackTrace(  );
		}
	}
}
This creates an instance of NullPrinter and then
binds it into the registry under the name DEFAULT_PRINTER_NAME.
The only surprising detail is this: if everything
is successful, our program will exit main( ). Don’t worry;
this is normal. The fact that the RMI registry has
a reference (e.g., a stub) for the server keeps
the application alive even though we’ve exited.
I’ll explain why, and how this works, in Chapter 16.
Note
Note that we used
rebind( )
instead of bind(
) in our launch code. The reason is that
bind( ) fails
if the name we’re binding the server to is already
in use. rebind(
), on the other hand, is guaranteed to
succeed. If another server is bound into the
registry using the name we want to use, that
server will be unbound from the name. In reality,
bind( ) is
rarely used in launch code, but is often used in
code that attempts to repair or update a registry.
The format of names that are bound into the registry is fairly simple: they follow the pattern //host-name:port-number/human-readable-name. host-name and port-number are used to find the registry.
The batch file, rmiprinterserver.bat, consists of the following two commands:
start rmiregistry
start java com.ora.rmibook.chapter4.rmiprinter.applications.SimpleServer
start is a
Windows command that executes the rest of the line
in a separate process. It is equivalent to putting
an ampersand (&) after a command in a Unix
shell. Thus, invoking rmiprinterserver.bat from the DOS
shell launches the RMI registry in another
process, launches SimpleServer in a third process, and
then returns to the command prompt to wait for
further instructions.
Once the changes to the data objects have been made and the skeletons and stubs have been generated from the server, the networking part of the client application is a remarkably straightforward piece of code. Recall that our client application had the GUI shown in Figure 4-3.
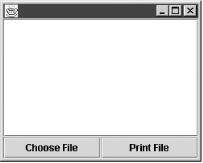
The only part of this that’s changed is the
ActionListener
attached to the Print File button. And it’s much
simpler:
private class PrintFile implements ActionListener {
	public void actionPerformed(ActionEvent event) {
		try {
			FileInputStream documentStream = new FileInputStream(_fileChooser
                  getSelectedFile(  ));
			DocumentDescription documentDescription = new
			DocumentDescription(documentStream);

/*
			New network code follows
*/
			Printer printer = (Printer) Naming.lookup(DEFAULT_PRINTER_NAME);
			printer.printDocument(documentDescription);
		}
		catch (PrinterException printerException){
		....
		}
	}
	...
}
All this does is use a predetermined name,
which must be the same name as the server used to
bind, to locate an object inside the RMI registry.
It then casts the object to the correct type (the
RMI registry interface, like many Java interfaces,
returns instances of Object) and invokes the printDocument( ) method
on the server. And that’s it! We’ve finished
reimplementing the socket-based printer server as
an RMI application.
Tip
In this code example, as in many of the
examples in this book, the client and server must
be located on the same machine. This is because
the call to Naming.lookup( ) simply used DEFAULT_PRINTER_NAME
(with no hostname or port number specified). By
changing the arguments used in the call to
Naming.lookup(
                                                  )
, you can turn the example into a truly
distributed application.
In this chapter, we’ve gone over the basics of developing an RMI application in a cookbook-style way, in order to get acquainted with the basic structure and components of an RMI application. Consequently, we glossed over many of the details. However, the key points to remember are:
Simple RMI applications are, in fact, not much more complicated than single-process applications.
RMI includes reasonable default solutions for the common problems in building distributed applications (serialization handles marshalling and demarshalling, the registry helps clients find servers, and so on).
Even when problems arise (e.g.,
DocumentDescription), the code is remarkably similar to, and simpler than, the analogous socket code.The conceptual cost to using RMI isn’t all that high. In most cases, using RMI amounts to adding an extra layer of indirection to your code.
The application evolution problems mentioned in Chapter 3 aren’t nearly so forbidding when using RMI. The default mechanisms, and the automatically generated stubs and skeletons, handle many application evolution problems nicely.
[20] “Business logic” is actually a generic term that refers to the code that justifies the application’s existence (e.g., the code that actually implements the desired functionality).
[21] As a corollary, it ought to be generated automatically. Code that bores the programmer is code that is likely to contain errors.
[22] Or a similar object-distribution framework such as CORBA.
[23] More often referred to as simply “the registry.”
[24] This is a generic exception because it
covers a wide range of devices. Since it’s
impossible to define all the different types of
exceptions a printer can generate (and create
subclasses of PrinterException for each one), we
simply rely on the user to interpret the
exception. java.sql.SQLException follows a similar
design strategy.
Get Java RMI now with the O’Reilly learning platform.
O’Reilly members experience books, live events, courses curated by job role, and more from O’Reilly and nearly 200 top publishers.

