15
Toolkit and Peers
In this chapter:
- Toolkit
- The Peer Interfaces
This chapter describes the Toolkit class and the purposes it serves. It also describes the java.awt.peer package of interfaces, along with how they fit in with the general scheme of things. The most important advice I can give you about the peer interfaces is not to worry about them. Unless you are porting Java to another platform, creating your own Toolkit, or adding any native component, you can ignore the peer interfaces.
15.1 Toolkit
The Toolkit object is an abstract class that provides an interface to platform-specific details like window size, available fonts, and printing. Every platform that supports Java must provide a concrete class that extends the Toolkit class. The Sun JDK provides a Toolkit for Windows NT/95 (sun.awt.win32.MToolkit [Java1.0] or sun.awt.windows.MToolkit [Java1.1]), Solaris/Motif (sun.awt.motif.MToolkit), and Macintosh (sun.awt.macos.MToolkit). Although the Toolkit is used frequently, both directly and behind the scenes, you would never create any of these objects directly. When you need a Toolkit, you ask for it with the static method getDefaultToolkit() or the Component.getToolkit() method.
You might use the Toolkit object if you need to fetch an image in an application (getImage()), get the font information provided with the Toolkit (getFontList() or getFontMetrics()), get the color model (getColorModel()), get the screen metrics (getScreenResolution() or getScreenSize()), get the system clipboard (getSystemClipboard()), get a print job (getPrintJob()), or ring the bell (beep()). The other methods of Toolkit are called for you by the system.
15.1.1 Toolkit Methods
Constructors
public Toolkit()—cannot be called by user
Because Toolkit is an abstract class, it has no usable constructor. To get a Toolkit object, ask for your environment's default toolkit by calling the static method getDefaultToolkit() or call Component.getToolkit() to get the toolkit of a component. When the actual Toolkit is created for the native environment, the awt package is loaded, the AWT-Win32 and AWT-Callback-Win32 or AWT-Motif and AWT-Input threads (or the appropriate threads for your environment) are created, and the threads go into infinite loops for screen maintenance and event handling.
Pseudo-Constructors
public static synchronized Toolkit getDefaultToolkit ()
The getDefaultToolkit() method returns the system's default Toolkit object. The default Toolkit is identified by the System property awt.toolkit, which defaults to an instance of the sun.awt.motif.MToolkit class. On the Windows NT/95 platforms, this is overridden by the Java environment to be sun.awt.win32.MToolkit (Java1.0) or sun.awt.windows.MToolkit (Java1.1). On the Macintosh platform, this is overridden by the environment to be sun.awt.macos.MToolkit. Most browsers don't let you change the system property awt.toolkit. Since this is a static method, you don't need to have a Toolkit object to call it; just call Toolkit.getDefaultToolkit().
Currently, only one Toolkit can be associated with an environment. You are more than welcome to try to replace the one provided with the JDK. This permits you to create a whole new widget set, outside of Java, while maintaining the standard AWT API.
System information
public abstract ColorModel getColorModel ()
The getColorModel() method returns the current ColorModel used by the system. The default ColorModel is the standard RGB model, with 8 bits for each of red, green, and blue. There are an additional 8 bits for the alpha component, for pixel-level transparency.
public abstract String[] getFontList ()
The getFontList() method returns a String array of the set Java fonts available with this Toolkit. Normally, these fonts will be understood on all the Java platforms. The set provided with Sun's JDK 1.0 (with Netscape Navigator and Internet Explorer, on platforms other than the Macintosh) contains TimesRoman, Dialog, Helvetica, Courier (the only fixed-width font), DialogInput, and ZapfDingbat.
In Java 1.1, getFont() reports all the 1.0 font names. It also reports Serif, which is equivalent to TimesRoman; San Serif, which is equivalent to Helvetica; and Monospaced, which is equivalent to Courier. The names TimesRoman, Helvetica, and Courier are still supported but should be avoided. They have been deprecated and may disappear in a future release. Although the JDK 1.1 reports the existence of the ZapfDingbat font, you can't use it. The characters in this font have been remapped to Unicode characters in the range \u2700 to \u27ff.
public abstract FontMetrics getFontMetrics (Font font)
The getFontMetrics() method returns the FontMetrics for the given Font object. You can use this value to compute how much space would be required to display some text using this font. You can use this version of getFontMetrics() (unlike the similar method in the Graphics class) prior to drawing anything on the screen.
public int getMenuShortcutKeyMask() ![]()
The getMenuShortcutKeyMask() method identifies the accelerator key for menu shortcuts for the user's platform. The return value is one of the modifier masks in the Event class, like Event.CTRL_MASK. This method is used internally by the MenuBar class to help in handling menu selection events. See Chapter 10, Would You Like to Choose from the Menu? for more information about dealing with menu accelerators.
public abstract PrintJob getPrintJob (Frame frame, String jobtitle, Properties props) ![]()
The getPrintJob() method initiates a print operation, PrintJob, on the user's platform. After getting a PrintJob object, you can use it to print the current graphics context as follows:
// Java 1.1 only
PrintJob p = getToolkit().getPrintJob (aFrame, "hi", aProps);
Graphics pg = p.getGraphics();
printAll (pg);
pg.dispose();
p.end();
With somewhat more work, you can print arbitrary content. See Chapter 17, Printing, for more information about printing. The frame parameter serves as the parent to any print dialog window, jobtitle serves as the identification string in the print queue, and props serves as a means to provide platform-specific properties (default printer, page order, orientation, etc.). If props is (Properties)null, no properties will be used. props is particularly interesting in that it is used both for input and for output. When the environment creates a print dialog, it can read default values for printing options from the properties sheet and use that to initialize the dialog. After getPrintJob() returns, the properties sheet is filled in with the actual printing options that the user requested. You can then use these option settings as the defaults for subsequent print jobs.
The actual property names are Toolkit specific and may be defined by the environment outside of Java. Furthermore, the environment is free to ignore the props parameter altogether; this appears to be the case with Windows NT/95 platforms. (It is difficult to see how Windows NT/95 would use the properties sheet, since these platforms don't even raise the print dialog until you call the method getGraphics().) Table 15-1 shows some of the properties recognized on UNIX platforms; valid property values are shown in a fixedwidth font.
Table 15–1: UNIX Printing Properties
| Property Name | Meaning and Possible Values |
| awt.print.printer | The name of the printer on your system to send the job to. |
| awt.print.fileName | The name of the file to save the print job to. |
| awt.print.numCopies | The number of copies to be printed. |
| awt.print.options | Other options to be used for the run-time system's print command. |
| awt.print.destination | Whether the print job should be sent to a printer or saved in a file. |
| awt.print.paperSize | The size of the paper on which you want to print—usually, letter. |
| awt.print.orientation | Whether the job should be printed in portrait or landscape orientation. |
public static String getProperty (String key, String defaultValue) ![]()
The getProperty() method retrieves the key property from the system's awt.properties file (located in the lib directory under the java.home directory). If key is not a valid property, defaultValue is returned. This file is used to provide localized names for various system resources.
public abstract int getScreenResolution ()
The getScreenResolution() method retrieves the resolution of the screen in dots per inch. The sharper the resolution of the screen, the greater number of dots per inch. Values vary depending on the system and graphics mode. The PrintJob.getPageResolution() method returns similar information for a printed page.
public abstract Dimension getScreenSize ()
The getScreenSize() method retrieves the dimensions of the user's screen in pixels for the current mode. For instance, a VGA system in standard mode will return 640 for the width and 480 for the height. This information is extremely helpful if you wish to manually size or position objects based upon the physical size of the user's screen. The PrintJob.getPageDimension() method returns similar information for a printed page.
public abstract Clipboard getSystemClipboard() ![]()
The getSystemClipboard() method returns a reference to the system's clipboard. The clipboard allows your Java programs to use cut and paste operations, either internally or as an interface between your program and objects outside of Java. For instance, the following code copies a String from a Java program to the system's clipboard:
// Java 1.1 only
Clipboard clipboard = getToolkit().getSystemClipboard();
StringSelection ss = new StringSelection("Hello");
clipboard.setContents(ss, this);
Once you have placed the string "Hello" on the clipboard, you can paste it anywhere. The details of Clipboard, StringSelection, and the rest of the java.awt.datatransfer package are described in Chapter 16, Data Transfer.
public final EventQueue getSystemEventQueue() ![]()
After checking whether the security manager allows access, this method returns a reference to the system's event queue.
protected abstract EventQueue getSystemEventQueueImpl() ![]()
getSystemEventQueueImpl() does the actual work of fetching the event queue. The toolkit provider implements this method; only subclasses of Toolkit can call it.
Images
The Toolkit provides a set of basic methods for working with images. These methods are similar to methods in the Applet class; Toolkit provides its own implementation for use by programs that don't have access to an AppletContext (i.e., applications or applets that are run as applications). Remember that you need an instance of Toolkit before you can call these methods; for example, to get an image, you might call Toolkit.getDefaultToolkit().getImage("myImage.gif").
public abstract Image getImage (String filename)
The getImage() method with a String parameter allows applications to get an image from the local filesystem. Its argument is either a relative or absolute filename for an image in a recognized image file format. The method returns immediately; the Image object that it returns is initially empty. When the image is needed, the system attempts to get filename and convert it to an image. To force the file to load immediately or to check for errors while loading, use the MediaTracker class.
NOTE
This version of getImage() is not usable within browsers since it will throw a security exception because the applet is trying to access the local filesystem.
public abstract Image getImage (URL url)
The getImage() method with the URL parameter can be used in either applets or applications. It allows you to provide a URL for an image in a recognized image file format. Like the other getImage() methods, this method returns immediately; the Image object that it returns is initially empty. When the image is needed, the system attempts to load the file specified by url and convert it to an image. You can use the MediaTracker class to monitor loading and check whether any errors occurred.
public abstract boolean prepareImage (Image image, int width, int height, ImageObserver Observer)
The prepareImage() method is called by the system or a program to force image to start loading. This method can be used to force an image to begin loading before it is actually needed. The Image image will be scaled to be width height. A width and height of -1 means image will be rendered unscaled (i.e., at the size specified by the image itself). The observer is the Component on which image will be rendered. As the image is loaded across the network, the observer's imageUpdate() method is called to inform the Observer of the image's status.
public abstract int checkImage (Image image, int width, int height, ImageObserver observer)
The checkImage() method returns the status of the image that is being rendered on observer. Calling checkImage() only provides information about the image; it does not force the image to start loading. The image is being scaled to be width height. Passing a width and height of –1 means the image will be displayed without scaling. The return value of checkImage() is some combination of ImageObserver flags describing the data that is now available. The ImageObserver flags are: WIDTH, HEIGHT, PROPERTIES, SOMEBITS, FRAMEBITS, ALLBITS, ERROR, and ABORT. Once ALLBITS is set, the image is completely loaded, and the return value of checkImage() will not change. For more information about these flags, see Chapter 12, Image Processing.
The following program loads an image; whenever paint() is called, it displays what information about that image is available. When the ALLBITS flag is set, checkingImages knows that the image is fully loaded, and that a call to drawImage() will display the entire image.
import java.awt.*;
import java.awt.image.*;
import java.applet.*;
public class checkingImages extends Applet {
    Image i;
    public void init () {
        i = getImage (getDocumentBase(), "ora-icon.gif");
    }
    public void displayChecks (int i) {
        if ((i & ImageObserver.WIDTH) != 0)
            System.out.print ("Width ");
        if ((i & ImageObserver.HEIGHT) != 0)
            System.out.print ("Height ");
        if ((i & ImageObserver.PROPERTIES) != 0)
            System.out.print ("Properties ");
        if ((i & ImageObserver.SOMEBITS) != 0)
            System.out.print ("Some-bits ");
        if ((i & ImageObserver.FRAMEBITS) != 0)
            System.out.print ("Frame-bits ");
        if ((i & ImageObserver.ALLBITS) != 0)
            System.out.print ("All-bits ");
        if ((i & ImageObserver.ERROR) != 0)
            System.out.print ("Error-loading ");
        if ((i & ImageObserver.ABORT) != 0)
            System.out.print ("Loading-Aborted ");
        System.out.println ();
    }
    public void paint (Graphics g) {
        displayChecks (Toolkit.getDefaultToolkit().checkImage(i, -1, -1, this));
        g.drawImage (i, 0, 0, this);
    }
}
Here's the output from running checkingImages under Java 1.0; it shows that the width and height of the image are loaded first, followed by the image properties and the image itself. Java 1.1 also displays Frame-bits once the image is loaded.
Width Height
Width Height Properties Some-bits
Width Height Properties Some-bits All-bits
Width Height Properties Some-bits All-bits
Width Height Properties Some-bits All-bits
... (Repeated Forever More)
public abstract Image createImage (ImageProducer producer)
This createImage() method creates an Image object from an ImageProducer. The producer parameter must be some class that implements the ImageProducer interface. Image producers in the java.awt.graphics package are FilteredImageSource (which, together with an ImageFilter, lets you modify an existing image) and MemoryImageSource (which lets you turn an array of pixel information into an image). The image filters provided with java.awt.image are CropImageFilter, RGBImageFilter, AreaAveragingScaleFilter, and ReplicateScaleFilter. You can also implement your own image producers and image filters. These classes are all covered in detail in Chapter 12.
The following code uses this version of createImage() to create a modified version of an original image:
Image i = Toolkit.getDefaultToolkit().getImage (u);
      TransparentImageFilter tf = new TransparentImageFilter (.5f);
Image j = Toolkit.getDefaultToolkit().createImage (
                new FilteredImageSource (i.getSource(), tf));
public Image createImage (byte[] imageData) ![]()
This createImage() method converts the entire byte array in imageData into an Image. This data must be in one of the formats understood by this AWT Toolkit (GIF, JPEG, or XBM) and relies on the “magic number” of the data to determine the image type.
public Image createImage (byte[] imageData, int offset, int length) ![]()
This createImage() method converts a subset of the byte data in imageData into an Image. Instead of starting at the beginning, this method starts at offset and goes to offset+length-1, for a total of length bytes. If offset is 0 and length is imageData.length, this method is equivalent to the previous method and converts the entire array.
The data in imageData must be in one of the formats understood by this AWT Toolkit (GIF, JPEG, or XBM) and relies on the “magic number” of the data to determine the image type.
NOTE
For those unfamiliar with magic numbers, most data files are uniquely identified by the first handful or so of bytes. For instance, the first three bytes of a GIF file are “GIF”. This is what createImage() relies upon to do its magic.
Miscellaneous methods
public abstract void beep () ![]()
The beep() method attempts to play an audio beep. You have no control over pitch, duration, or volume; it is like putting echo ^G in a UNIX shell script.
public abstract void sync ()
The sync() method flushes the display of the underlying graphics context. Normally, this is done automatically, but there are times (particularly when doing animation) when you need to sync() the display yourself.
15.2 The Peer Interfaces
Each GUI component that AWT provides has a peer. The peer is the implementation of that component in the native environment. For example, the Choice component in AWT corresponds to some native object that lets the user select one or more items from a list. As a Java developer, you need to worry only about the interface of the Choice object; when someone runs your program, the Choice object is mapped to an appropriate native object, which is the Choice peer, that “does the right thing.” You don't really care what the peer is or how it's implemented; in fact, the peer may look (and to some extent, behave) differently on each platform.
The glue that allows an AWT component and its peer to work together is called a peer interface. A peer interface is simply an interface that defines the methods that the peer is required to support. These interfaces are collected in the package java.awt.peer. For example, this package contains the ButtonPeer interface, which contains the single method setLabel(). This means that the native object used to implement a Button must contain a method called setLabel() in order for AWT to use it as a button peer. (It's not quite that simple; since a button is also a Component, the button's peer must also implement the ComponentPeer interface, which is much more complicated.)
With one exception, there is a one-to-one correspondence between Component classes and peer interfaces: a Window has a WindowPeer, a Checkbox has a CheckboxPeer, and so on. The one exception is a new peer interface that appears in Java 1.1: the LightweightPeer, which doesn't have a corresponding component. The LightweightPeer is used by components that exist purely in Java, don't have a native peer, and are displayed and managed by another container. LightweightPeer makes it easier to create new components or containers that can behave like other components, but don't subclass Canvas or Panel and don't correspond to anything in the native environment. The best usage I can think of is to subclass Container to create a lightweight Panel. If you are only using a Panel to manage layout, there is no need for a peer to be created to process events. This should result in substantial resource savings where multiple panels need to be created just to help with layout. The following code is all you need to create a LightWeightPanel:
import java.awt.*;
public class LightWeightPanel extends Container {
}
There also tends to be a one-to-one relationship between the peer methods and the methods of the Java component. That is, each method in the peer interface corresponds to a method of the component. However, although a peer must implement each method in its peer interface, it doesn't necessarily have to do anything in that method. It's entirely possible for a platform to have a native button object that doesn't let you set the label. In this case, the button peer would implement the setLabel() method required by the ButtonPeer interface, but it wouldn't do anything. Of course, the component may also have many methods that don't correspond to the peer methods. Methods that don't correspond to anything in the peer are handled entirely within Java.
The ComponentPeer interface is the parent of all non-menu objects in the peer package. The MenuComponentPeer is the parent of all menu objects. The trees mirror the regular object hierarchies. Figure 15-1 shows the object hierarchy diagram.
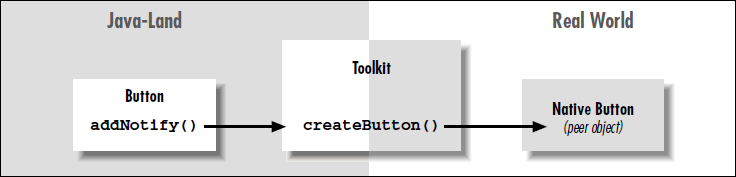
Creating a Java component (e.g., Button b = new Button ("Foo")) does not create the peer. An object's peer is created when the object's addNotify() method is called. This is usually when the component's container is added to the screen. The call to a component's addNotify() method in turn calls the appropriate createxxxx() method of the Toolkit (for a Button, createButton()). Figure 15-2 shows the process.
When you remove a component from a container by calling remove(), the container calls the component's removeNotify() method. This usually results in a call to the peer's dispose() method. Depending on the particular component, removeNotify() may be overridden to perform additional work. Removing a Component from a Container does not destroy the Component. The next time the method addNotify() is called, the component must be recreated by the peer, with its previous characteristics. For instance, when a TextField is removed, the current text, plus the start and stop points for the current selection, are saved. These will be restored if you add the text field to its container again. For some components, like a Label, there is no need to retain any additional information.
A component's peer needs to exist only when the user is interacting with it. If you are developing resource-intensive programs, you might want to consider drawing the components manually when they do not have the focus and using the peer only when they actually have input focus. This technique can save a considerable amount of memory resources but requires extra work on your part as a developer and goes beyond the scope of this book. The LightweightPeer interface appears to be designed to make this process easier: you could create a dummy button that doesn't do anything and uses the LightweightPeer. Whenever the mouse enters the button's space, you could quickly remove the dummy button and add a real button.
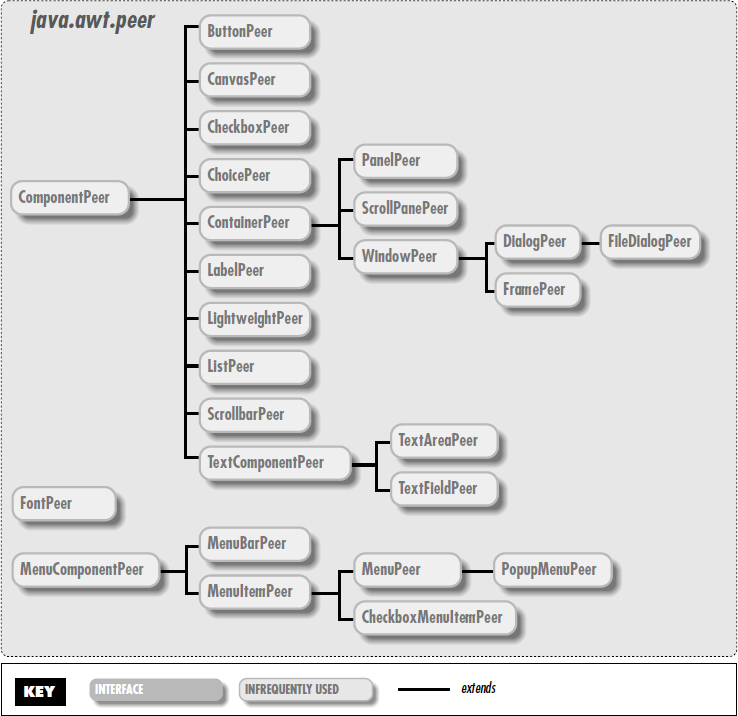
Figure 15–1: java.awt.peer object hierarchy
The peer interfaces are listed in their entirety in the reference section. We won't list them here, primarily because you don't need to worry about them unless you're porting Java to a new platform. Each method in a peer interface corresponds exactly to the similarly named method in the matching component. LightweightPeer is the only exception, because it doesn't have a matching component, but that's easy to take care of: as you'd expect, LightweightPeer doesn't define any methods. (Of course, a peer that implements LightweightPeer would still need to implement the methods inherited from ComponentPeer, but those are inherited when you subclass Component.)
Get Java AWT Reference now with the O’Reilly learning platform.
O’Reilly members experience books, live events, courses curated by job role, and more from O’Reilly and nearly 200 top publishers.

