7
Layouts
In this chapter:
- The LayoutManager Interface
- FlowLayout
- BorderLayout
- GridLayout
- CardLayout
- GridBagLayout
- GridBagConstraints
- Combining Layouts
- Disabling the LayoutManager
- Designing Your Own LayoutManager
- The sun.awt Layout Collection
- Other Layouts Available on the Net
This chapter expands upon the idea of a layout manager, which was mentioned briefly in the previous chapter. Every container has a LayoutManager that is responsible for positioning the component objects within it, regardless of the platform or the screen size. Layout managers eliminate the need to compute component placement on your own, which would be a losing proposition since the size required for any component depends on the platform on which it is displayed. Even for a simple layout, the code required to discover component sizes and compute absolute positions could be hundreds of lines, particularly if you concern yourself with what happens when the user resizes a window. A layout manager takes care of this for you. It asks each component in the layout how much space it requires, then arranges the components on the screen as best it can, based on the component sizes on the platform in use and the space available, resizing the components as needed.
To find out how much space a component needs, a layout manager calls the component's getMinimumSize() and getPreferredSize() methods. (Java 1.1 also has a getMaximumSize() method; the existing layout managers don't take advantage of it.) These methods report the minimum space that a component requires to be displayed correctly and the optimal size at which it looks best. Thus, each component must know its space requirements; the layout manager uses these to arrange the screen; and your Java program never has to worry about platform-dependent positioning.
The java.awt package provides five layout managers: FlowLayout, BorderLayout, GridLayout, CardLayout, and GridBagLayout. Four additional layouts are provided in the sun.awt package: HorizBagLayout, VerticalBagLayout, OrientableFlowLayout, and VariableGridLayout. OrientableFlowLayout is new to Java 1.1. Of the 1.0 layouts, all are available in the JDK and Internet Explorer. The VariableGridLayout is also available with Netscape Navigator. This chapter discusses all of them, along with the LayoutManager and LayoutManager2 interfaces; we'll pay particular attention to how each layout manager computes positions for its components. We will also discuss how to combine layouts to generate more complex screens and how to create your own LayoutManager for special situations.
7.1 The LayoutManager Interface
The LayoutManager interface defines the responsibilities of something that wants to lay out Components within a Container. It is the LayoutManager’s duty to determine the position and size of each component within the Container. You will never directly call the methods of the LayoutManager interface; for the most part, layout managers do their work behind the scenes. Once you have created a LayoutManager object and told the container to use it (by calling setLayout()), you're finished with it. The system calls the appropriate methods in the layout manager when necessary.
Therefore, the LayoutManager interface is most important when you are writing a new layout manager; we'll discuss it here because it's the scaffolding on which all layout managers are based. Like any interface, LayoutManager specifies the methods a layout manager must implement but says nothing about how the LayoutManager does its job. Therefore, we'll make a few observations before proceeding. First, a layout manager is free to ignore some of its components; there is no requirement that a layout manager display everything. For example, a Container using a BorderLayout might include thirty or forty components. However, the BorderLayout will display at most five of them (the last component placed in each of its five named areas). Likewise, a CardLayout may manage many components but displays only one at a time.
Second, a layout manager can do anything it wants with the components’ minimum and preferred sizes. It is free to ignore either. It makes sense that a layout manager can ignore a preferred size; after all, “preferred” means “give me this if it's available.” However, a layout manager can also ignore a minimum size. At times, there is no reasonable alternative: the container may not have enough room to display a component at its minimum size. How to handle this situation is left to the layout manager's discretion. All layout managers currently ignore a component's maximum size, though this may change in the future.
7.1.1 Methods of the LayoutManager Interface
Five methods make up the LayoutManager interface. If you create your own class that implements LayoutManager, you must define all five. As you will see, many of the methods do not have to do anything, but there must still be a stub with the appropriate method signature.
public abstract void addLayoutComponent (String name, Component component)
The addLayoutComponent() method is called only when the program assigns a name to the component when adding it to the layout (i.e., the program calls add(String, Component) rather than simply calling add(Component) or the Java 1.1 add(Component, Object)). It is up to the layout manager to decide what, if anything, to do with the name. For example, BorderLayout uses name to specify an area on the screen in which to display the component. Most layout managers don't require a name and will only implement a stub.
public abstract void removeLayoutComponent (Component component)
The removeLayoutComponent() method's responsibility is to remove component from any internal storage used by the layout manager. This method will probably be stubbed out for your own layouts and do nothing. However, it may need to do something if your layout manager associates components with names.
public abstract Dimension preferredLayoutSize (Container parent)
The preferredLayoutSize() method is called to determine the preferred size of the components within the Container. It returns a Dimension object that contains the required height and width. parent is the object whose components need to be laid out. Usually, the LayoutManager determines how to size parent by calculating the sizes of the components within it and calculating the dimensions required to display them. On other occasions, it may just return parent.setSize().
public abstract Dimension minimumLayoutSize (Container parent)
The minimumLayoutSize() method is called to determine the minimum size of the components within the Container. It returns a Dimension object that contains the required height and width. parent is the object whose components need to be laid out.
public abstract void layoutContainer (Container parent)
The layoutContainer() method is where a LayoutManager does most of its work. The layoutContainer() method is responsible for the positioning of all the Components of parent. Each specific layout positions the enclosed components based upon its own rules.
7.1.2 The LayoutManager2 Interface
Numerous changes were introduced in Java 1.1 to make it conform to various design patterns. These patterns provide consistency in usage and make Java programming easier. The LayoutManager2 interface was introduced for this reason. This new interface solves a problem that occurs when working with the GridBagLayout. While the addLayoutComponent(String, Component) method of LayoutManager works great for BorderLayout and CardLayout, you can't use it for a GridBagLayout. The position of a component in a GridBagLayout is controlled by a number of constraints, which are encapsulated in a GridBagConstraints object. To associate constraints with a component, you needed to call a setConstraints() method. Although this works, it is not consistent with the way you add components to other layouts. Furthermore, as more and more people create their own layout managers, the number of ways to associate positioning information with a component could grow endlessly. LayoutManager2 defines a version of addLayoutComponent() that can be used by all constraint-based layout managers, including older managers like BorderLayout and CardLayout. This method lets you pass an arbitrary object to the layout manager to provide positioning information. Layout managers that need additional information (like the GridBagConstraints object) now implement LayoutManager2 instead of LayoutManager.
In addition to swapping the parameters to the addLayoutComponent(Component, Object), the new LayoutManager2 interface also defines several methods that aren't really needed now but will facilitate the introduction of “peerless components” in a later release.
Methods of the LayoutManager2 interface
public abstract void addLayoutComponent(Component comp, Object constraints) ![]()
The addLayoutComponent() method is called when a program assigns constraints to the component comp when adding it to the layout. In practice, this means that the program added the component by calling the new method add(Component component, Object constraints) rather than the older methods add(Component component) or add(String name, Component component)). It is up to the layout manager to decide what, if anything, to do with the constraints. For example, GridBagLayout uses constraints to associate a GridBagConstraints object to the component comp. BorderLayout uses constraints to associate a location string (like “Center”) with the component.
public abstract Dimension maximumLayoutSize(Container target) ![]()
The maximumLayoutSize() method must return the maximum size of the target container under this layout manager. Previously, only minimum and preferred sizes were available. Now a container can have a maximum size. Once layout managers support the concept of maximum sizes, containers will not grow without bounds when additional space is available. If there is no actual maximum, the Dimension should have a width and height of the constant Integer.MAX_VALUE.
public abstract float getLayoutAlignmentX(Container target) ![]()
The getLayoutAlignmentX() method must return the alignment of target along the x axis. The return value should be between 0.0 and 1.0. Values nearer 0 mean that the container will be positioned closer to the left edge of the area available. Values nearer 1 mean that the container will be positioned closer to the right. The value 0.5 means the container should be centered.
public abstract float getLayoutAlignmentY(Container target) ![]()
The getLayoutAlignmentY() method must return the alignment of target along they axis. The return value should be between 0.0 and 1.0. Values nearer 0 mean that the container will be positioned closer to the top of the area available. Values nearer 1 mean that the container will be positioned closer to the bottom. The value 0.5 means the container should be centered.
public abstract void invalidateLayout(Container target) ![]()
The invalidateLayout() method tells the layout manager that any layout information it has for target is invalid. This method will usually be implemented as a stub (i.e., {}). However, if the layout manager caches any information about target when this method is called, the manager should consider that information invalid and discard it.
7.2 FlowLayout
FlowLayout is the default LayoutManager for a Panel. A FlowLayout adds components to the container in rows, working from left to right. When it can't fit any more components in a row, it starts a new row—not unlike a word processor with word wrap enabled. When the container gets resized, the components within it get repositioned based on the container's new size. If sufficient space is available, components within FlowLayout containers are given their preferred size. If there is insufficient space, you do not see the components in their entirety.
7.2.1 FlowLayout Methods
Constants
FlowLayout defines three constants, all of which are used to specify alignment. The alignment tells FlowLayout where to start positioning the components on each row. Each component is still added from left to right, no matter what the alignment setting is.
public final static int LEFT
LEFT is the constant for left alignment.
public final static int CENTER
CENTER is the constant for center alignment and is the default.
public final static int RIGHT
RIGHT is the constant for right alignment.
Constructors
public FlowLayout ()
This constructor creates a FlowLayout using default settings: center alignment with a horizontal and vertical gap of five pixels. The gap is the space between the different components in the different directions. By default, there will be five pixels between components. The constructor is usually called within a call to setLayout(): setLayout (new FlowLayout()). Figure 7-1 shows how the default FlowLayout behaves with different screen sizes. As the screen C shows, if the screen is too small, the components will not be shrunk so that they can fit better.
public FlowLayout (int alignment)
This version of the constructor creates a FlowLayout using the specified alignment and a horizontal and vertical gap of five pixels. Valid alignments are the FlowLayout constants, although there is no verification. Figure 7-2 shows the effect of different alignments: FlowLayout.LEFT (screen A), FlowLayout.CENTER (B), and FlowLayout.RIGHT (C).
public FlowLayout (int alignment, int hgap, int vgap)
The final version of the constructor is called by the other two. It requires you to explicitly specify the alignment, horizontal gap (hgap), and vertical gap (vgap). This creates a FlowLayout with an alignment of alignment, horizontal gap of hgap, and vertical gap of vgap. The units for gaps are pixels. It is possible to have negative gaps if you want components to be placed on top of one another. Figure 7-3 shows the effect of changing the gap sizes.
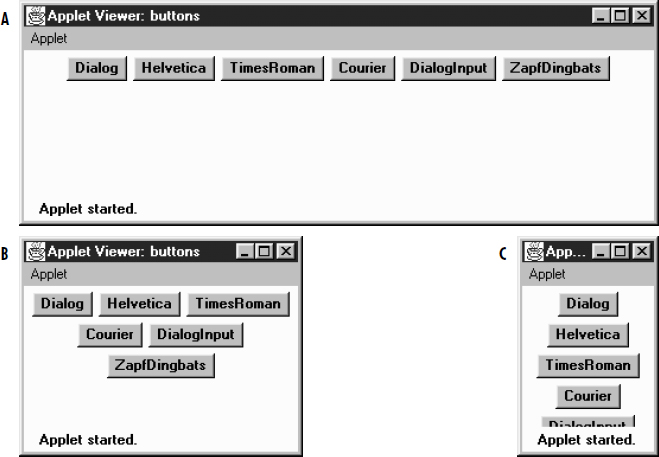
Figure 7–1: FlowLayout with six buttons and three different screen sizes
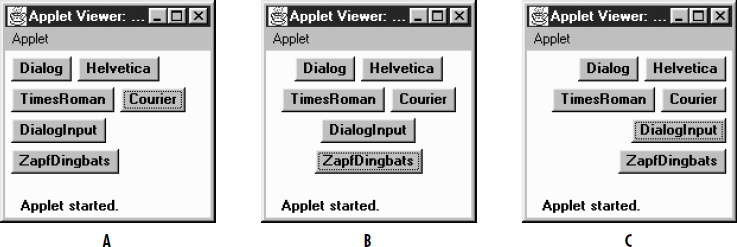
Figure 7–2: FlowLayout with three different alignments
Informational methods
public int getAlignment () ![]()
The getAlignment() method retrieves the current alignment of the FlowLayout. The return value should equal one of the class constants LEFT, CENTER, or RIGHT.
public void setAlignment (int alignment) ![]()
The setAlignment() method changes the FlowLayout alignment to alignment. The alignment value should equal one of the class constants LEFT, CENTER, or RIGHT, but this method does not check. After changing the alignment, you must validate() the Container.
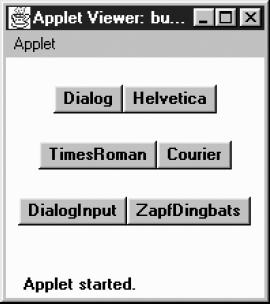
Figure 7–3: FlowLayout with hgap of 0 and vgap of 20
public int getHgap () ![]()
The getHgap() method retrieves the current horizontal gap setting.
public void setHgap (int hgap) ![]()
The setHgap() method changes the current horizontal gap setting to hgap. After changing the gaps, you must validate() the Container.
public int getVgap () ![]()
The getVgap() method retrieves the current vertical gap setting.
public void setVgap (int hgap) ![]()
The setVgap() method changes the current vertical gap setting to vgap. After changing the gaps, you must validate() the Container.
LayoutManager methods
public void addLayoutComponent (String name, Component component)
The addLayoutComponent() method of FlowLayout does nothing.
public void removeLayoutComponent (Component component)
The removeLayoutComponent() method of FlowLayout does nothing.
public Dimension preferredLayoutSize (Container target)
The preferredLayoutSize() method of FlowLayout calculates the preferred dimensions for the target container. The FlowLayout computes the preferred size by placing all the components in one row and adding their individual preferred sizes along with gaps and insets.
public Dimension minimumLayoutSize (Container target)
The minimumLayoutSize() method of FlowLayout calculates the minimum dimensions for the container by adding up the sizes of the components. The FlowLayout computes the minimum size by placing all the components in one row and adding their individual minimum sizes along with gaps and insets.
public void layoutContainer (Container target)
The layoutContainer() method draws target's components on the screen, starting with the first row of the display, going left to right across the screen, based on the current alignment setting. When it reaches the right margin of the container, it skips down to the next row, and continues drawing additional components.
Miscellaneous methods
public String toString ()
The toString() method of FlowLayout returns the current horizontal and vertical gap settings along with the alignment (left, center, right). For a FlowLayout that uses all the defaults, toString() produces:
java.awt.FlowLayout[hgap=5,vgap=5,align=center]
7.3 BorderLayout
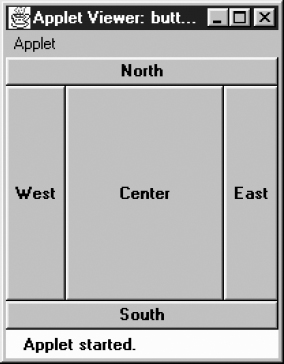
BorderLayout is the default LayoutManager for a Window. It provides a very flexible way of positioning components along the edges of the window. The following call to setLayout() changes the LayoutManager of the current container to the default BorderLayout: setLayout(new BorderLayout()). Figure 7-4 shows a typical BorderLayout.
BorderLayout is the only layout provided that requires you to name components when you add them to the layout; if you're using a BorderLayout, you must use add(String name, Component component) in Java 1.0 or add(Component component, String name) in Java 1.1 (parameter order switched). (The CardLayout can use these versions of add(), but does not require it.) The name parameter of add() specifies the region to which the component should be added. The five different regions are “North”, “South”, “East”, and “West” for the edges of the window, and “Center” for any remaining interior space. These names are case sensitive. It is not necessary that a container use all five regions. If a region is not used, it relinquishes its space to the regions around it. If you add() multiple objects to a single region, the layout manager only displays the last one. If you want to display multiple objects within a region, group them within a Panel first, then add() the Panel.
NOTE
In Java 1.1, if you do not provide a name, the component is placed in the “Center” region.
7.3.1 BorderLayout Methods
Constants
Prior to Java 1.1, you had to use string constants to specify the constraints when adding a component to a container whose layout is BorderLayout. With Java 1.1, you can use class constants, instead of a literal string, in the following list.
public static final String CENTER ![]()
The CENTER constant represents the “Center” string and indicates that a component should be added to the center region.
public static final String EAST ![]()
The EAST constant represents the “East” string and indicates that a component should be added to the east region.
public static final String NORTH ![]()
The NORTH constant represents the “North” string and indicates that a component should be added to the north region.
public static final String SOUTH ![]()
The SOUTH constant represents the “South” string and indicates that a component should be added to the south region.
public static final String WEST ![]()
The WEST constant represents the “West” string and indicates that a component should be added to the west region.
Constructors
public BorderLayout ()
This constructor creates a BorderLayout using a default setting of zero pixels for the horizontal and vertical gaps. The gap specifies the space between adjacent components. With horizontal and vertical gaps of zero, components in adjacent regions will touch each other. As Figure 7-4 shows, each component within a BorderLayout will be resized to fill an entire region.
public BorderLayout (int hgap, int vgap)
This version of the constructor allows you to create a BorderLayout with a horizontal gap of hgap and vertical gap of vgap, putting some space between the different components. The units for gaps are pixels. It is possible to have negative gaps if you want components to overlap.
Informational methods
public int getHgap () ![]()
The getHgap() method retrieves the current horizontal gap setting.
public void setHgap (int hgap) ![]()
The setHgap() method changes the current horizontal gap setting to hgap. After changing the gaps, you must validate() the Container.
public int getVgap () ![]()
The getVgap() method retrieves the current vertical gap setting.
public void setVgap (int hgap) ![]()
The setVgap() method changes the current vertical gap setting to vgap. After changing the gaps, you must validate() the Container.
LayoutManager methods
public void addLayoutComponent (String name, Component component) ![]()
This version of addLayoutComponent() has been deprecated and replaced by the addLayoutComponent(Component, Object) method of the LayoutManager2 interface.
public void removeLayoutComponent (Component component)
The removeLayoutComponent() method of BorderLayout removes component from the container, if it is in one of the five regions. If component is not in the container already, nothing happens.
public Dimension preferredLayoutSize (Container target)
The preferredLayoutSize() method of BorderLayout calculates the preferred dimensions for the components in target. To compute the preferred height, a BorderLayout adds the height of the getPreferredSize() of the north and south components to the maximum getPreferredSize() height of the east, west, and center components. The vertical gaps are added in for the north and south components, if present. The top and bottom insets are also added into the height. To compute the preferred width, a BorderLayout adds the width of the getPreferredSize() of east, west, and center components, along with the horizontal gap for the east and west regions. It compares this value to the preferred widths of the north and south components. The BorderLayout takes the maximum of these three and then adds the left and right insets, plus twice the horizontal gap. The result is the preferred width for the container.
public Dimension minimumLayoutSize (Container target)
The minimumLayoutSize() method of BorderLayout calculates the minimum dimensions for the components in target. To compute the minimum height, a BorderLayout adds the height of the getMinimumSize() of the north and south components to the maximum of the minimum heights of the east, west, and center components. The vertical gaps are added in for the north and south components, if present, along with the container's top and bottom insets. To compute the minimum width, a BorderLayout adds the width of the getMinimumSize() of east, west, and center components, along with the horizontal gap for the east and west regions. The BorderLayout takes the maximum of these three and then adds the left and right insets, plus twice the horizontal gap. The result is the minimum width for the container.
public void layoutContainer (Container target)
The layoutContainer() method draws target's components on the screen in the appropriate regions. The north region takes up the entire width of the container along the top. South does the same along the bottom. The heights of north and south will be the heights of the components they contain. The east and west regions are given the widths of the components they contain. For height, east and west are given whatever is left in the container after satisfying north's and south's height requirements. If there is any extra vertical space, the east and west components are resized accordingly. Any space left in the middle of the screen is assigned to the center region. If there is insufficient space for all the components, space is allocated according to the following priority: north, south, west, east, and center. Unlike FlowLayout, BorderLayout reshapes the internal components of the container to fit within their region. Figure 7-5 shows what happens if the east and south regions are not present and the gaps are nonzero.
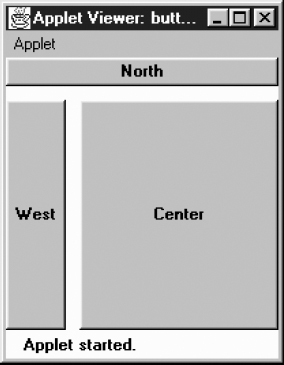
Figure 7–5: BorderLayout with missing regions
LayoutManager2 methods
public void addLayoutComponent (Component component, Object name) ![]()
This addLayoutComponent() method puts component in the name region of the container. In Java 1.1, if name is null, component is added to the center. If the name is not “North”, “South”, “East”, “West”, or “Center”, the component is added to the container but won't be displayed. Otherwise, it is displayed in the appropriate region.
There can only be one component in any region, so any component already in the named region is removed. To get multiple components in one region of a BorderLayout, group the components in another container, and add the container as a whole to the layout.
If name is not a String, addLayoutComponent() throws the run-time exception IllegalArgumentException.
public abstract Dimension maximumLayoutSize(Container target) ![]()
The maximumLayoutSize() method returns a Dimension object with a width and height of Integer.MAX_VALUE. In effect, this means that BorderLayout does not support the concept of maximum size.
public abstract float getLayoutAlignmentX(Container target) ![]()
The getLayoutAlignmentX() method says that BorderLayout containers should be centered horizontally within the area available.
public abstract float getLayoutAlignmentY(Container target) ![]()
The getLayoutAlignmentY() method says that BorderLayout containers should centered vertically within the area available.
public abstract void invalidateLayout(Container target) ![]()
The invalidateLayout() method of BorderLayout does nothing.
Miscellaneous methods
public String toString ()
The toString() method of BorderLayout returns a string showing the current horizontal and vertical gap settings. If both gaps are zero, the result will be:
java.awt.BorderLayout[hgap=0,vgap=0]
7.4 GridLayout
The GridLayout layout manager is ideal for laying out objects in rows and columns, where each cell in the layout has the same size. Components are added to the layout from left to right, top to bottom. setLayout(new GridLayout(2,3)) changes the LayoutManager of the current container to a 2 row by 3 column GridLayout. Figure 7-6 shows an applet using this layout.
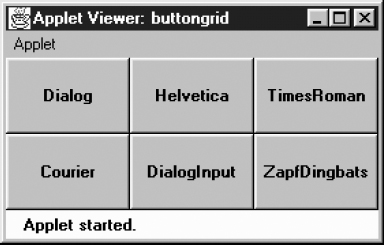
Figure 7–6: Applet using GridLayout
7.4.1 GridLayout Methods
Constructors
public GridLayout () ![]()
This constructor creates a GridLayout initially configured to have one row, an infinite number of columns, and no gaps. A gap is the space between adjacent components in the horizontal or vertical direction. With a gap of zero, components in adjacent cells will have no space between them.
public GridLayout (int rows, int columns)
This constructor creates a GridLayout initially configured to be rows columns in size. The default setting for horizontal and vertical gaps is zero pixels. The gap is the space between adjacent components in the horizontal and vertical directions. With a gap of zero, components in adjacent cells will have no space between them.
You can set the number of rows or columns to zero; this means that the layout will grow without bounds in that direction. If both rows and columns are zero, the run-time exception IllegalArgumentException will be thrown.
NOTE
The rows and columns passed to the GridLayout constructor are only recommended values. It is possible that the system will pick other values if the number of objects you add to the layout is sufficiently different from the size you requested; for example, you placed nine objects in a six-element grid.
public GridLayout (int rows, int columns, int hgap, int vgap)
This version of the constructor is called by the previous one. It creates a GridLayout with an initial configuration of rows columns, with a horizontal gap of hgap and vertical gap of vgap. The gap is the space between the different components in the different directions, measured in pixels. It is possible to have negative gaps if you want components to overlap.
You can set the number of rows or columns to zero; this means that the layout will grow without bounds in that direction. If both rows and columns are zero, the run-time exception IllegalArgumentException will be thrown.
Informational methods
public int getColumns () ![]()
The getColumns() method retrieves the current column setting, which may differ from the number of columns displayed.
public void setColumns (int columns) ![]()
The setColumns() method changes the current column setting to columns. After changing the setting, you must validate() the Container. If you try to set the number of rows and the number of columns to zero, this method throws the run-time exception IllegalArgumentException.
public int getRows () ![]()
The getRows() method retrieves the current row setting; this may differ from the number of rows displayed.
public void setRows (int rows) ![]()
The setRows() method changes the current row setting to rows. After changing the setting, you must validate() the Container. If you try to set the number of rows and the number of columns to zero, this method throws the runtime exception IllegalArgumentException.
public int getHgap () ![]()
The getHgap() method retrieves the current horizontal gap setting.
public void setHgap (int hgap) ![]()
The setHgap() method changes the current horizontal gap setting to hgap. After changing the gaps, you must validate() the Container.
public int getVgap () ![]()
The getVgap() method retrieves the current vertical gap setting.
public void setVgap (int hgap) ![]()
The setVgap() method changes the current vertical gap setting to vgap. After changing the gaps, you must validate() the Container.
LayoutManager methods
public void addLayoutComponent (String name, Component component)
The addLayoutComponent() method of GridLayout does nothing.
public void removeLayoutComponent (Component component)
The removeLayoutComponent() method of GridLayout does nothing.
public Dimension preferredLayoutSize (Container target)
The preferredLayoutSize() method of GridLayout calculates the preferred dimensions for the components in target. The preferred size depends on the size of the grid, which may not be the size requested by the constructor; the GridLayout treats the constructor's arguments as recommendations and may ignore them if appropriate.
The actual number of rows and columns is based upon the number of components within the Container. The GridLayout tries to observe the number of rows requested first, calculating the number of columns. If the requested number of rows is nonzero, the number of columns is determined by (# components + rows − 1) / rows. If request is for zero rows, the number of rows to use is determined by a similar formula: (# components + columns − 1) / columns. Table 7-1 demonstrates this calculation. The last entry in this table is of special interest: if you request a 33 grid but only place four components in the layout, you get a 22 layout as a result. If you do not want to be surprised, size the GridLayout based on the number of objects you plan to put into the display.
Table 7–1: GridLayout Row/Column Calculation
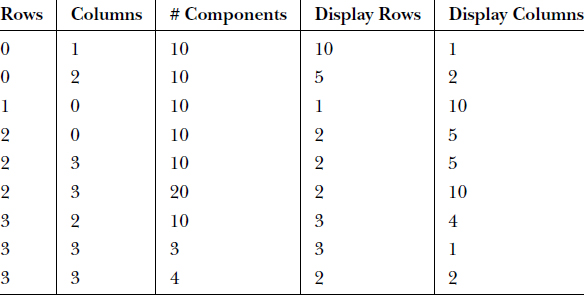
Once we know the dimensions of the grid, it's easy to compute the preferred size for the layout. The GridLayout takes the maximum height and maximum width of the preferred sizes for all the components in the layout. (Note that the maximum width and maximum height aren't necessarily from the same component.) This becomes the preferred size of each cell within the layout. The preferred size of the layout as a whole is computed using the preferred size of a cell and adding gaps and insets as appropriate.
public Dimension minimumLayoutSize (Container target)
The minimumLayoutSize() method of GridLayout calculates the minimum dimensions for the components in target. First it determines the actual number of rows and columns in the final layout, using the method described previously. The minimumLayoutSize() method then determines the widest and tallest getMinimumSize() of a component, and this becomes the minimum size of a cell within the layout. The minimum size of the layout as a whole is computed using the minimum size of a cell and adding gaps and insets as appropriate.
public void layoutContainer (Container target)
The layoutContainer() method draws target's components on the screen in a series of rows and columns. Each component within a GridLayout will be the same size, if it is possible. If there is insufficient space for all the components, the size of each is reduced proportionally.
Miscellaneous methods
public String toString ()
The toString() method of GridLayout returns a string including the current horizontal and vertical gap settings, along with the rows and columns settings. For a GridLayout created with 2 rows and 3 columns, the result would be:
java.awt.GridLayout[hgap=0,vgap=0,rows=2,cols=3]
7.5 CardLayout
The CardLayout layout manager is significantly different from the other layouts. Whereas the other layout managers attempt to display all the components within the container at once, a CardLayout displays only one component at a time. (That component could be a Component or another Container.) The result is similar to Netscape Navigator's Property sheets or a tabbed Dialog, without the tabs. You can flip through the cards (components) in the layout in order or jump to a specific card if you know its name. The following call to setLayout() changes the LayoutManager of the current container to CardLayout:
lm = new CardLayout();
setLayout (lm);
Unlike most other layout managers, CardLayout has a number of instance methods that programs have to call. Therefore, you usually have to retain a reference to the layout manager. In addition, you usually have some other component to control the CardLayout (i.e., select which card to view). Most simply, you could put some buttons in a panel and stick this panel in the north region of a BorderLayout; then make another panel with a CardLayout, and place that in the center. A more complex task would be to build a set of tabs to control the CardLayout.
A CardLayout allows you to assign names to the components it manages. You can use the name to jump to an arbitrary component by calling the manager's show() method. In Java 1.0, naming was optional; you could call add(Component) to put a component in the layout with a null name. A null name meant only that you couldn't flip to the component at will; you could only display the component by calling next() or previous() (or first() or last()), which cycle through all the components in order. In Java 1.1, all components added to a CardLayout must be named.
7.5.1 CardLayout Methods
Constructors
public CardLayout ()
This constructor creates a CardLayout using a horizontal and vertical gap of zero pixels. With CardLayout, there is no space between components because only one component is visible at a time; think of the gaps as insets.
public CardLayout (int hgap, int vgap)
This version of the constructor allows you to create a CardLayout with a horizontal gap of hgap and vertical gap of vgap to add some space around the outside of the component that is displayed. The units for gaps are pixels. Using negative gaps chops off components at the edges of the container.
Informational methods
public int getHgap () ![]()
The getHgap() method retrieves the current horizontal gap setting.
public void setHgap (int hgap) ![]()
The setHgap() method changes the current horizontal gap setting to hgap. After changing the gaps, you must validate() the Container.
public int getVgap () ![]()
The getVgap() method retrieves the current vertical gap setting.
public void setVgap (int hgap) ![]()
The setVgap() method changes the current vertical gap setting to vgap. After changing the gaps, you must validate() the Container.
LayoutManager methods
public void addLayoutComponent (String name, Component component) ![]()
This version of addLayoutComponent() has been deprecated and replaced by the addLayoutComponent(Component, Object) method of the LayoutManager2 interface.
public void removeLayoutComponent (Component component)
The removeLayoutComponent() method of CardLayout removes component from the container. If component is not in the container already, nothing happens.
public Dimension preferredLayoutSize (Container target)
The preferredLayoutSize() method of CardLayout retrieves the preferred size for all the components within it. The preferredLayoutSize() method then determines the widest and tallest size of all components (not necessarily from the same one), adds the appropriate insets and gaps, and uses that as the preferred size for the layout.
public Dimension minimumLayoutSize (Container target)
The minimumLayoutSize() method of CardLayout calculates the minimum size for all the components within it. The minimumLayoutSize() method then determines the widest and tallest minimum size of all components (not necessarily from the same one), adds the appropriate insets and gaps, and uses that as the minimum size for the layout.
public void layoutContainer (Container target)
The layoutContainer() method draws target's visible components one on top of another. Initially, all components are visible. Components do not become invisible until you select one for display, by calling the first(), last(), next(), previous(), or show() methods. Where possible, CardLayout reshapes all components to fit the target container.
LayoutManager2 methods
public void addLayoutComponent (Component component, Object name) ![]()
This addLayoutComponent() method of CardLayout puts component into an internal table with a key of name. The name comes from the version of add() that has a constraints object as a parameter. The name allows you to refer to the component when you call other card layout methods, like show(). If you call the version of add() that only takes a Component parameter, you cannot call the show() method to flip to the specific component.
If name is not a String, the run-time exception IllegalArgumentException is thrown.
public abstract Dimension maximumLayoutSize(Container target) ![]()
The maximumLayoutSize() method returns a Dimension object with a width and height of Integer.MAX_VALUE. In practice, this means that CardLayout doesn't support the concept of maximum size.
public abstract float getLayoutAlignmentX(Container target) ![]()
The getLayoutAlignmentX() method says that CardLayout containers should be centered horizontally within the area available.
public abstract float getLayoutAlignmentY(Container target) ![]()
The getLayoutAlignmentY() method says that CardLayout containers should be centered vertically within the area available.
public abstract void invalidateLayout(Container target) ![]()
The invalidateLayout() method of CardLayout does nothing.
CardLayout methods
This group of methods controls which component the CardLayout displays. The show() is only usable if you assigned components names when adding them to the container. The others can be used even if the components are unnamed; they cycle through the components in the order in which they were added. All of these methods require the parent Container (i.e., the container being managed by this layout manager) as an argument. If the layout manager of the parent parameter is anything other than the container using this instance of the CardLayout, the method throws the run-time exception IllegalArgumentException.
public void first (Container parent)
The first() method flips to the initial component in parent.
public void next (Container parent)
The next() method flips to the following component in parent, wrapping back to the beginning if the current component is the last.
public void previous (Container parent)
The previous() method flips to the prior component in parent, wrapping to the end if the current component is the first.
public void last (Container parent)
The last() method flips to the final component in parent.
public void show (Container parent, String name)
The show() method displays the component in parent that was assigned the given name when it was added to the container. If there is no component with name contained within parent, nothing happens.
Miscellaneous methods
public String toString ()
The toString() method of CardLayout returns the a string showing the current horizontal and vertical gap settings. The result for a typical CardLayout would be:
java.awt.CardLayout[hgap=0,vgap=0]
7.5.2 CardLayout Example
Figure 7-7 shows a simple CardLayout. This layout has three cards that cycle when you make a selection. The first card (A) contains some Checkbox items within a Panel, the second card (B) contains a single Button, and the third (C) contains a List and a Choice within another Panel.
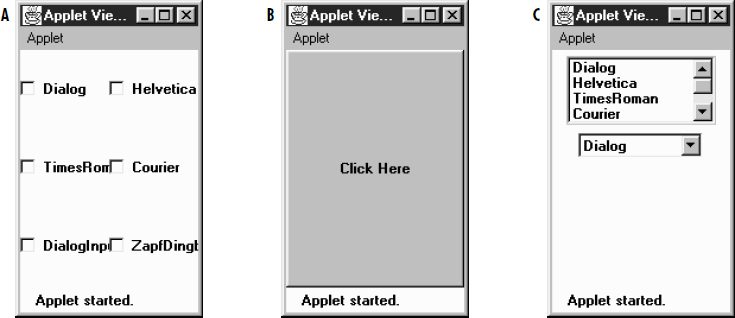
Figure 7–7: Different views of CardLayout
Example 7-1 is the code that generated Figure 7-7.
Example 7–1: The CardExample Class
import java.awt.*;
import java.applet.*;
public class CardExample extends Applet {
    CardLayout cl = new CardLayout();
    public void init () {
        String fonts[] = Toolkit.getDefaultToolkit().getFontList();
        setLayout (cl);
        Panel pA = new Panel();
        Panel pC = new Panel ();
        p1.setLayout (new GridLayout (3, 2));
        List l = new List(4, false);
        Choice c = new Choice ();
        for (int i=0;i<fonts.length;i++) {
            pA.add (new Checkbox (fonts[i]));
            l.addItem (fonts[i]);
            c.addItem (fonts[i]);
        }
        pC.add (l);
        pC.add (c);
        add ("One", pA);
        add ("Two", new Button ("Click Here"));
        add ("Three", pC);
    }
public boolean action (Event e, Object o) {
        cl.next(this);
        return true;
    }
}
Each panel within the CardLayout has its own layout manager. Panel A uses a GridLayout; panel C uses its default layout manager, which is a FlowLayout. When the user takes any action (i.e., clicking on a checkbox or button, or selecting an item from the List or Choice components), the system generates a call to action(), which calls the CardLayout's next() method, thus displaying the next card in the sequence.
7.6 GridBagLayout
The GridBagLayout is the most complex and flexible of the standard layout managers. Although it sounds like it should be a subclass of GridLayout, it's a different animal entirely. With GridLayout, elements are arranged in a rectangular grid, and each element in the container is sized identically (where possible). With GridBagLayout, elements can have different sizes and can occupy multiple rows or columns. The position and behavior of each element is specified by an instance of the GridBagConstraints class. By properly constraining the elements, you can specify the number of rows and columns an element occupies, which element grows when additional screen real estate is available, and various other restrictions. The actual grid size is based upon the number of components within the GridBagLayout and the GridBagConstraints of those objects. For example, Figure 7-8 shows a GridBagLayout with seven components, arranged on a 33 grid. The maximum capacity of a screen using GridBagLayout in Java 1.0 is 128 128 cells; in Java 1.1, the maximum size is 512 512 cells.
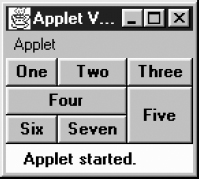
Figure 7–8: GridBagLayout with seven components on a 33 grid
With the other layout managers, adding a component to the container requires only a call to add(). In Java 1.0, the GridBagLayout also requires you to call setConstraints() to tell the layout manager how to position the component. With Java 1.1, you use the new add() method that permits you to pass the component and its constraints in a single method call (add(Component, Object)). If no components are added with constraints (thus all using the defaults), the GridBagLayout places the components in a single row at the center of the screen and sizes them to their getPreferredSize(). This is a nice way to place a single object in the center of the screen without stretching it to take up the available space, as BorderLayout does. Figure 7-9 compares the default GridBagLayout with a BorderLayout displaying the same object in the center region.

Figure 7–9: Centering a component: GridBagLayout vs. BorderLayout
When designing a container that will use GridBagLayout, it is easiest to plan what you want on graph paper, and then determine how the constraints should be set. The alternative, adding the components to the layout and then tweaking the constraints until you have something you like, could lead to premature baldness. Seriously, a trial-and-error approach to getting the constraints right will certainly be frustrating and will probably fail. Figure 7-10, using the same GridBagLayout used in Figure 7-8, indicates how the layout manager counts cells. The partial code used to create the screen follows in Example 7-2.
Example 7–2: Creating a GridBagLayout
public void init() {
    Button b;
    GridBagLayout gb = new GridBagLayout();
    GridBagConstraints gbc = new GridBagConstraints();
    setLayout(gb);
    try {
/* Row One - Three button */
        b = new Button ("One");
        addComponent (this, b, 0, 0, 1, 1,
                GridBagConstraints.NONE, GridBagConstraints.CENTER);
        b = new Button ("Two");
        addComponent (this, b, 1, 0, 1, 1,
                GridBagConstraints.NONE, GridBagConstraints.CENTER);
b = new Button ("Three");
        addComponent (this, b, 2, 0, 1, 1,
                GridBagConstraints.NONE, GridBagConstraints.CENTER);
/* Row Two - Two buttons */
        b = new Button ("Four");
        addComponent (this, b, 0, 1, 2, 1,
                GridBagConstraints.NONE, GridBagConstraints.CENTER);
        b = new Button ("Five");
        addComponent (this, b, 2, 1, 1, 2,
                GridBagConstraints.NONE, GridBagConstraints.CENTER);
/* Row Three - Two buttons */
        b = new Button ("Six");
        addComponent (this, b, 0, 2, 1, 1,
                GridBagConstraints.NONE, GridBagConstraints.CENTER);
        b = new Button ("Seven");
        addComponent (this, b, 1, 2, 1, 1,
                GridBagConstraints.NONE, GridBagConstraints.CENTER);
        } catch (Exception e) {
            e.printStackTrace();
        }
    }
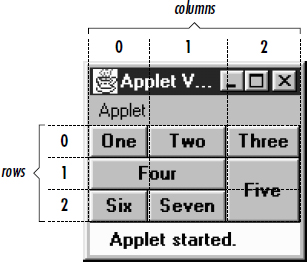
Figure 7–10: How GridBagLayout counts rows and columns
Most of the work in Example 7-2 is done by the helper method addComponent(), which creates a set of constraints, applies them to a component, and adds the component to a container. The code for addComponent() appears in Section 7.7; its signature is:
public static void addComponent (Container container, Component component,
        int gridx, int gridy, int gridwidth, int gridheight, int fill,
        int anchor) throws AWTException ;
The top left cell in the layout has location (0,0). There's nothing very surprising about buttons one, two, three, six, and seven. They occupy a 11 area on the layout's 33 grid. Button four occupies a 21 area; it is placed at location (0,1), and thus occupies this cell plus the cell at (1,1). Likewise, button five occupies a 12 area, and takes up the cells at (2,1) and (2,2). The total size of the layout is determined entirely by the components that are placed in it and their constraints.
7.6.1 GridBagLayout Methods
Variables
There are a handful of instance variables for GridBagLayout. They are not initialized until the container whose layout is GridBagLayout has been validated.
public int columnWidths[]
The columnWidths[] array contains the widths of the components in the row with the most elements. The values of this array are returned by the getLayoutDimensions() method. You can access the array directly, but it is not recommended.
public int rowHeights[]
The rowHeights[] array contains the heights of the components in the column with the most elements. The values of this array are returned by the getLayoutDimensions() method. You can access the array directly, but it is not recommended.
public double columnWeights[]
The columnWeights[] array contains the weightx values of the components in the row with the most elements. The values of this array are returned by the getLayoutWeights() method. You can access the array directly, but it is not recommended.
public double rowWeights[]
The row Weights[] array contains the weighty values of the components in the column with the most elements. The values of this array are returned by the getLayoutWeights() method. You can access the array directly, but it is not recommended.
Constructors
public GridBagLayout ()
The constructor for GridBagLayout creates an instance of GridBagLayout with default GridBagConstraints behavior. An internal table is used to keep track of the components added to the layout.
LayoutManager methods
public void addLayoutComponent (String name, Component component)
The addLayoutComponent() method of GridBagLayout does nothing. This method is not deprecated, unlike the similarly named methods in the other layout managers that implement LayoutManager2.
public void removeLayoutComponent (Component component)
The removeLayoutComponent() method of GridBagLayout does nothing.
public Dimension preferredLayoutSize (Container target)
The preferredLayoutSize() method calculates the preferred dimensions of the components of target. Sizing is based on the constraints of the various components. This task is definitely better off left to the computer.
public Dimension minimumLayoutSize (Container target)
The minimumLayoutSize() method calculates the minimum dimensions required to position the components of target. Sizing is based on the constraints of the various components.
public void layoutContainer (Container target)
The layoutContainer() method positions the components within target based upon the constraints of each component. If a component's anchor constraints are invalid, layoutContainer() throws the run-time exception IllegalArgumentException. The process of arranging the components is very complicated and beyond the scope of this book.
LayoutManager2 methods
public void addLayoutComponent (Component component, Object constraints) ![]()
This addLayoutComponent() method of GridBagLayout associates the component with the given constraints object. It calls the setConstaints() method.
If name is not a GridBagConstraints, addLayoutComponent() throws the runtime exception IllegalArgumentException.
public abstract Dimension maximumLayoutSize(Container target) ![]()
The maximumLayoutSize() method returns a Dimension object with a width and height of Integer.MAX_VALUE. In practice, this means that GridBagLayout doesn't support the concept of maximum size.
public abstract float getLayoutAlignmentX(Container target) ![]()
The getLayoutAlignmentX() method says that GridBagLayout containers should be centered horizontally within the area available.
public abstract float getLayoutAlignmentY(Container target) ![]()
The getLayoutAlignmentY() method says that GridBagLayout containers should be centered vertically within the area available.
public abstract void invalidateLayout(Container target) ![]()
The invalidateLayout() method of GridBagLayout does nothing.
Constraints
public GridBagConstraints getConstraints (Component component)
The getConstraints() method returns a clone of the current constraints for component. This makes it easier to generate constraints for a component based on another component.
public void setConstraints (Component component, GridBagConstraints constraints)
The setConstraints() method changes the constraints on component to a clone of constraints. The system creates a clone() of constraints so you can change the original constraints without affecting component.
Layout
public Point getLayoutOrigin ()
The getLayoutOrigin() method returns the origin for the GridBagLayout. The origin is the top left point within the container at which the components are drawn. Before the container is validated, getLayoutOrigin() returns the Point (0,0). After validation, getLayoutOrigin() returns the actual origin of the layout. The space used by the components within a GridBagLayout may not fill the entire container. You can use the results of getLayoutOrigin() and getLayoutDimensions() to find the layout's actual size and draw a Rectangle around the objects.
public int[][] getLayoutDimensions ()
The getLayoutDimensions() method returns two one-dimensional arrays as a single two-dimensional array. Index 0 is an array of widths (columnWidths instance variable), while index 1 is an array of heights (rowHeights instance variable). Until the layout is validated, these will be empty. After validation, the first array contains the widths of the components in the row with the most elements. The second contains the heights of the components in the column with the most elements. For Figure 7-10, the results would be (38, 51, 48) for widths since the first row has three elements and (21, 21, 21) for the heights since the first (and second) column has three elements in it.
public double[][] getLayoutWeights ()
The getLayoutWeights() method returns two one-dimensional arrays as a single two-dimensional array. Index 0 is an array of column weights (columnWeights instance variable), while index 1 is an array of row weights (rowWeights instance variable). Until the layout is validated, these will be empty. After validation, the first dimension contains all the weightx values of the components in the row with the most elements. The second dimension contains all the weighty values of the components in the column with the most elements. For Figure 7-10, the results would be (0, 0, 0) for weightx since the first row has three elements and (0, 0, 0) for weighty since the first column has three elements in it.
Miscellaneous methods
public Point location (int x, int y)
The location() method returns the Point (0,0) until the container is validated. After validation, this method returns the grid element under the location (x, y), where x and y are in pixels. The results could be used as the gridx and gridy constraints when adding another component.
public String toString ()
The toString() method of GridBagLayout returns the name of the class:
java.awt.GridBagLayout
7.7 GridBagConstraints
GridBagConstraints are the meat behind the GridBagLayout; they specify how to display components. Unlike other layout managers, which have a built-in idea about what to do with their display, the GridBagLayout is a blank slate. The constraints attached to each component tell the layout manager how to build its display.
Every Component added to a GridBagLayout has a GridBagConstraints object associated with it. When an object is first added to the layout, it is given a default set of constraints (described later in this section). Calling setConstraints() (or add(Component, GridBagConstraints)) applies a new set of constraints to the object. Most people create a helper method to make the setConstraints() calls, passing constraint information as parameters. The helper method used in Example 7-2 follows:
public static void addComponent (Container container, Component component,
    int gridx, int gridy, int gridwidth, int gridheight, int fill,
    int anchor) throws AWTException {
    LayoutManager lm = container.getLayout();
    if (!(lm instanceof GridBagLayout)) {
throw new AWTException ("Invalid layout" + lm);
    } else {
        GridBagConstraints gbc = new GridBagConstraints ();
        gbc.gridx = gridx;
        gbc.gridy = gridy;
        gbc.gridwidth = gridwidth;
        gbc.gridheight = gridheight;
        gbc.fill = fill;
        gbc.anchor = anchor;
        ((GridBagLayout)lm).setConstraints(component, gbc);
        container.add (component);
      }
  }
In Java 1.1, you can make this method slightly cleaner by adding the component and applying the constraints in the same call to add(). To do so, replace the lines calling setConstraints() and add() with this line:
// Java 1.1 only
container.add(component, gbc);
7.7.1 GridBagConstraints Methods
Constants and variables
public int anchor
The anchor specifies the direction in which the component will drift in the event that it is smaller than the space available for it. CENTER is the default. Others available are NORTH, SOUTH, EAST, WEST, NORTHEAST, NORTHWEST, SOUTHEAST, and SOUTHWEST.
public final static int CENTER
public final static int EAST
public final static int NORTH
public final static int NORTHEAST
public final static int NORTHWEST
public final static int SOUTH
public final static int SOUTHEAST
public final static int SOUTHWEST
public final static int WEST
Constants used to set the anchor.
public int fill
The value of fill controls the component's resize policy. If fill is NONE (the default), the layout manager tries to give the component its preferred size. If fill is VERTICAL, it resizes in height if additional space is available. If fill is HORIZONTAL, it resizes in width. If fill is BOTH, the layout manager takes advantage of all the space available in either direction. Figure 7-11 demonstrates VERTICAL (A), HORIZONTAL (B), and NONE (C) values; Figure 7-8 demonstrated the use of BOTH.
public final static int NONE
public final static int BOTH
public final static int HORIZONTAL
public final static int VERTICAL
Constants used to set fill.
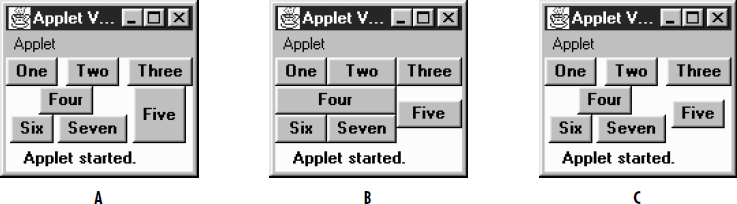
Figure 7–11: GridBagLayout with fill values of VERTICAL, HORIZONTAL, and NONE
public int gridx
public int gridy
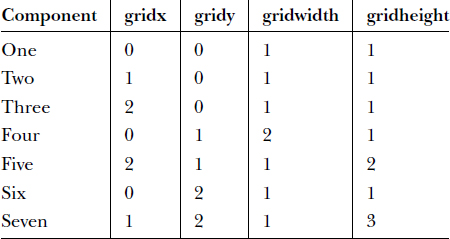
The gridx and gridy variables specify the grid position where this component will be placed. (0,0) specifies the cell at the origin of the screen. Table 7-2 shows the gridx and gridy values for the screen in Figure 7-8.
It isn't necessary to set gridx and gridy to a specific location; if you set these fields to RELATIVE (the default), the system calculates the location for you. According to the comments in the source code, if gridx is RELATIVE, the component appears to the right of the last component added to the layout. If gridy is RELATIVE, the component appears below the last component added to the layout. However, this is misleadingly simple. RELATIVE placement works best if you are adding components along a row or a column. In this case, there are four possibilities to consider:
- gridx and gridy RELATIVE: components are placed in one row.
- gridx RELATIVE, gridy constant: components are placed in one row, each to the right of the previous component.
- gridx constant, gridy RELATIVE: components are placed in one column, each below the previous component.
- Varying gridx or gridy while setting the other field to RELATIVE appears to start a new row, placing the component as the first element in the row.
public int gridwidth
public int gridheight
gridwidth and gridheight set the number of rows (gridwidth) and columns (gridheight) a particular component occupies. If gridwidth or gridheight is set to REMAINDER, the component will be the last element of the row or column occupying any space that's remaining. Table 7-2 shows the gridwidth and gridheight values for the screen in Figure 7-8. For the components in the last column, the gridwidth values could be REMAINDER. Likewise, gridheight could be set to REMAINDER for the components in the last row.
gridwidth and gridheight may also have the value RELATIVE, which forces the component to be the next to last component in the row or column. Looking back to Figure 7-8: if button six has a gridwidth of RELATIVE, button seven won't appear because button five is the last item in the row, and six is already next to last. If button five has a gridheight of RELATIVE, the layout manager will reserve space below it, so the button can be the next to last item in the column.
public final static int RELATIVE
Constant used for gridx and gridy to request relative placement, and by gridheight and gridwidth to specify the next to last component in a column or row. The behavior of RELATIVE placement can be very counter intuitive; in most cases, you will be better off specifying gridx, gridy, gridheight, and gridwidth explicitly.
public final static int REMAINDER
Constant used for gridwidth and gridheight, to specify that a component should fill the rest of the row or column.
Table 7–2: Demonstrating gridx/gridy/gridwidth/gridheight
The insets field specifies the external padding in pixels around the component (i.e., between the component and the edge of the cell, or cells, allotted to it). An Insets object can specify different padding for the top, bottom, left, and right sides of the component.
public int ipadx
public int ipady
ipadx and ipady specify the internal padding within the component. ipadx specifies the extra space to the right and left of the component (so the minimum width increases by 2*ipadx pixels). ipady specifies the extra space above and below the component (so the minimum height increases by 2*ipady pixels).
The difference between insets (external padding) and the ipadx, ipady variables (internal padding) is confusing. The insets don't add space to the component itself; they are external to the component. ipadx and ipady change the component's minimum size, so they do add space to the component itself.
public double weightx
public double weighty
The weightx and weighty variables describe how to distribute any additional space within the container. They allow you to control how components grow (or shrink) when the user resizes the container. If weightx is 0, the component won't get any additional space available in its row. If one or more components in a row have weightx values greater than 0, any extra space is distributed proportionally between them. For example, if one component has a weightx value of 1 and the others are all 0, that one component will get all the additional space. If four components in a row each have weightx values of 1 and the other components have weightx values of 0, the four components each get one quarter of the additional space. weighty behaves similarly. Because weightx and weighty control the distribution of extra space in any row or column, setting either for one component may affect the position of other components.
Constructors
public GridBagConstraints ()
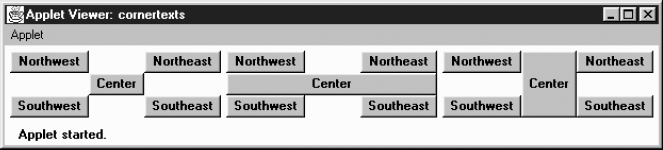
The constructor creates a GridBagConstraints object in which all the fields have their default values. These defaults are shown in the Table 7-3.
Table 7–3: GridBagConstraints Defaults.
Miscellaneous methods
public Object clone ()
The clone() method creates a clone of the GridBagConstraints so the same GridBagConstraints object can be associated with multiple components.
7.8 Combining Layouts
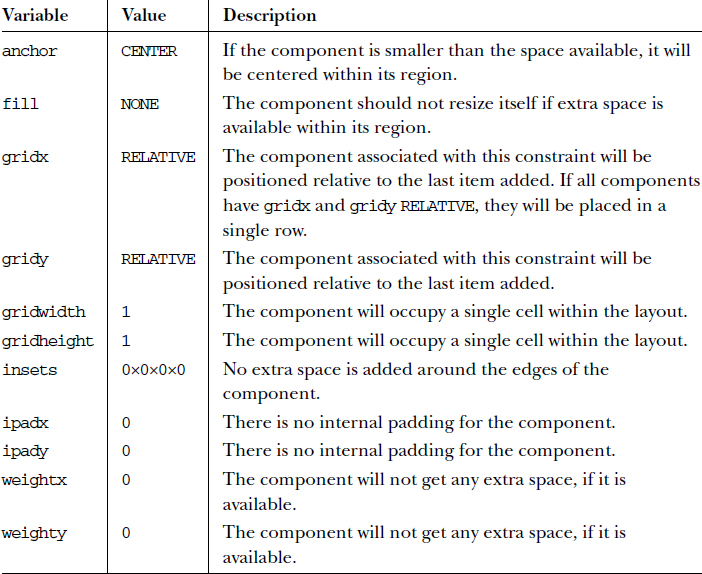
If you can't create the display you want with any of the standard layout managers, or you are unable to figure out GridBagLayout, you may want to try combining several different layouts. This technique can often help you build the display you want. Figure 7-12 shows a display that uses three panels and three different layouts.
Here's the source code to generate the display in Figure 7-12:
import java.awt.*;
public class multi extends java.applet.Applet {
    public void init() {
        Panel s = new Panel();
        Panel e = new Panel();
        setLayout (new BorderLayout ());
        add ("North", new Label ("Enter text", Label.CENTER));
        add ("Center", new TextArea ());
        e.setLayout (new GridLayout (0,1));
        e.add (new Button ("Reformat"));
        e.add (new Button ("Spell Check"));
        e.add (new Button ("Options"));
        add ("East", e);
        s.setLayout (new FlowLayout ());
        s.add (new Button ("Save"));
        s.add (new Button ("Cancel"));
        s.add (new Button ("Help"));
        add ("South", s);
    }
}
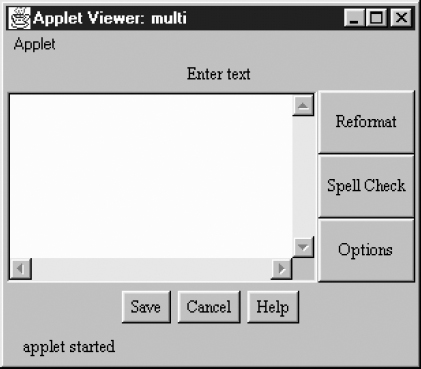
Figure 7–12: Multipanel screen using several layouts
The display in Figure 7-12 is created by adding four sections to a single BorderLayout. The north region contains a panel with a single Label in it. The panel uses its default LayoutManager, which is a FlowLayout. Why bother with this panel? Why not just add a label at the north position in the BorderLayout? Our strategy gives the label the position and size we want: the label is centered and displayed at its preferred size. If we had added the label directly to the BorderLayout, it would have been left justified and resized to fill the region.
The TextArea has no special requirements, so we added it directly to the center of the BorderLayout.
The three buttons on the right of the screen were arranged in a panel with a GridLayout; then this panel was placed in the east region of the BorderLayout.
To create the buttons at the bottom of the screen, we used another Panel with a FlowLayout. It centers the three buttons and displays them at their preferred size, with a gap between them.
With a little work, we could have created this display using a single Panel with a GridBagLayout. The result would have been more efficient; placing panels within panels has performance implications. Each container in the display has its own peer object, which uses up system resources. Furthermore, in the 1.0 version of AWT, nesting containers complicates event handling. However, using a GridBagLayout would have required much more work: figuring out the right GridBagConstraints for each component would be time consuming and result in code that is harder to understand. Sometimes, it's best to settle for the easy solution: a hybrid layout composed of several simple panels, rather than a single very complex panel.
In Java 1.1, you can make this program even more efficient in its resource usage by using a lightweight component instead of panels. This is particularly easy because the panels in the multipanel screen exist strictly to help with layout and not for partitioning event handling. Therefore, you can define a LightweightPanel that extends Container, with no methods. Use this class instead of Panel. The LightweightPanel allows you to lay out areas without creating unnecessary peers. Here's all the code for the LightweightPanel:
// Java 1.1 only
import java.awt.*;
public class LightweightPanel extends Container {
}
7.9 Disabling the LayoutManager
To create a container with no layout manager, use null as the argument to setLayout(). If you do this, you must size and position every component individually. In most cases, disabling the LayoutManager is a bad idea because what might look great on one platform could look really bad on another, due to differences in fonts, native components, and other display characteristics. Figure 7-13 displays a container with a disabled LayoutManager; both buttons were positioned by specifying their size and location explicitly.
Here's the code that produces Figure 7-13:
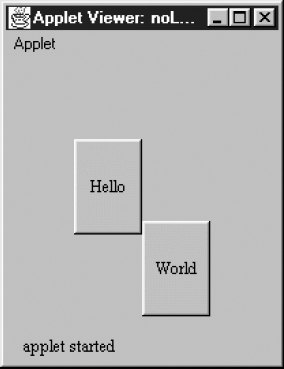
Figure 7–13: Applet with disabled layout manager
import java.awt.Button;
import java.applet.Applet;
public class noLayout extends Applet {
    public void init () {
        setLayout (null);
        Button x = new Button ("Hello");
        add (x);
        x.reshape (50, 60, 50, 70);
        Button y = new Button ("World");
        add (y);
        y.reshape (100, 120, 50, 70);
    }
}
7.10 Designing Your Own LayoutManager
What if you can't find a LayoutManager that fits your requirements, or you find yourself repeatedly building the same multipanel display? In cases like these, you can build your own layout manager. It's really not that difficult; you only need to implement the five methods of the LayoutManager interface, plus a constructor and any additional methods your design requires. In this section, we'll review the LayoutManager interface and then construct a custom LayoutManager called CornerLayout.
7.10.1 LayoutManager Methods
A custom LayoutManager must implement the following five methods (ten methods if you implement LayoutManager2). For many layout managers, several of these methods can be stubs that don't do anything.
public void addLayoutComponent (String name, Component component)
The addLayoutComponent() method is called by the add(name, component) method of Container. If your new LayoutManager does not have named component areas or does not pass generic positioning information via name, this method will be a stub with no code; you can let the container keep track of the components for you. Otherwise, this method must keep track of the component added, along with the information in name.
How would you implement this method? For layouts that have named component areas (like BorderLayout), you could use a private instance variable to hold the component for each area. For layouts like CardLayout, which lets you refer to individual components by name, you might want to store the components and their names in an internal Hashtable.
public void removeLayoutComponent (Component component)
This method is called by the remove() and removeAll() methods of Container. If you are storing information in internal instance variables or tables, you can remove the information about the given Component from the tables at this point. If you're not keeping track of the components yourself, this method can be a stub that does nothing.
public Dimension preferredLayoutSize (Container target)
This method is called by preferredSize() to calculate the desired size of target.* Obviously, the preferred size of the container depends on the layout strategy that you implement. To compute the preferred size, you usually need to call the preferredSize() method of every component in the container.
Computing the preferred size can be messy. However, some layout strategies let you take a shortcut. If your layout policy is “I'm going to cram all the components into the space given to me, whether they fit or not,” you can compute the preferred size of your layout simply by calling target.size() or (in Java 1.1) target.getSize().
public Dimension minimumLayoutSize (Container target)
This method is called by minimumSize() to calculate the minimum size of target. The minimum size of the container depends on the layout strategy that you implement. To compute the minimum size, you usually need to call the minimumSize() method of every component in the container.
As with preferredLayoutSize(), you can sometimes save a lot of work by returning target.size().
public void layoutContainer (Container target)
This method is called when target is first displayed and whenever it is resized. It is responsible for arranging the components within the container. Depending upon the type of LayoutManager you are creating, you will either loop through all the components in the container with the getComponent() method or use the named components that you saved in the addLayoutComponent() method. To position and size the components, call their reshape() or setBounds() methods.
7.10.2 A New LayoutManager: CornerLayout
CornerLayout is a simple but useful layout manager that is similar in many respects to BorderLayout. Like BorderLayout, it positions components in five named regions: “Northeast”, “Northwest”, “Southeast”, “Southwest”, and “Center”. These regions correspond to the four corners of the container, plus the center. The “Center” region has three modes. NORMAL, the default mode, places the “Center” component in the center of the container, with its corners at the inner corner of the other four regions. FULL_WIDTH lets the center region occupy the full width of the container. FULL_HEIGHT lets the center region occupy the full height of the container. You cannot specify both FULL_HEIGHT and FULL_WIDTH; if you did, the “Center” component would overlap the corner components and take over the container. Figure 7-14 shows a CornerLayout in each of these modes.
Not all regions are required. If a complete side is missing, the required space for the container decreases. Ordinarily, the other components would grow to fill this vacated space. However, if the container is sized to its preferred size, so are the components. Figure 7-15 shows this behavior.
Example 7-3 is the code for the CornerLayout. It shows the Java 1.0 version of the layout manager. At the end of this section, I show the simple change needed to adapt this manager to Java 1.1.
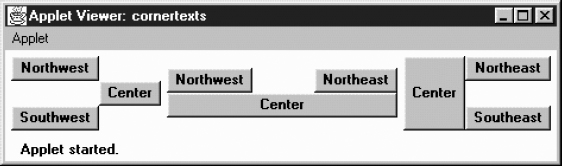
Figure 7–15: CornerLayout with missing regions
Example 7–3: The CornerLayout LayoutManager
import java.awt.*;
/**
 * An 'educational' layout. CornerLayout will layout a container
 * using members named "Northeast", "Northwest", "Southeast",
 * "Southwest", and "Center".
 *
 * The "Northeast", "Northwest", "Southeast" and "Southwest" components
 * get sized relative to the adjacent corner's components and
 * the constraints of the container's size. The "Center" component will
 * get any space left over.
 */

public class CornerLayout implements LayoutManager {
    int hgap;
    int vgap;
    int mode;
    public final static int NORMAL = 0;
    public final static int FULL_WIDTH = 1;
    public final static int FULL_HEIGHT = 2;
    Component northwest;
    Component southwest;
    Component northeast;
    Component southeast;
    Component center;
The CornerLayout class starts by defining instance variables to hold the gaps and mode and the components for each corner of the screen. It also defines three constants that control the behavior of the center region: NORMAL, FULL_WIDTH, and FULL_HEIGHT.
/**
 * Constructs a new CornerLayout.
 */
public CornerLayout() {
    this (0, 0, CornerLayout.NORMAL);
}
public CornerLayout(int mode) {
    this (0, 0, mode);
}
public CornerLayout(int hgap, int vgap) {
this (hgap, vgap, CornerLayout.NORMAL);
}
public CornerLayout(int hgap, int vgap, int mode) {
    this.hgap = hgap;
    this.vgap = vgap;
    this.mode = mode;
}
The constructors for CornerLayout are simple. The default (no arguments) constructor creates a CornerLayout with no gaps; the “Center” region is NORMAL mode. The last constructor, which is called by the other three, stores the gaps and the mode in instance variables.
public void addLayoutComponent (String name, Component comp) {
    if ("Center".equals(name)) {
        center = comp;
    } else if ("Northwest".equals(name)) {
        northwest = comp;
    } else if ("Southeast".equals(name)) {
        southeast = comp;
    } else if ("Northeast".equals(name)) {
        northeast = comp;
    } else if ("Southwest".equals(name)) {
        southwest = comp;
    }
}
addLayoutComponent() figures out which region a component has been assigned to, and saves the component in the corresponding instance variable. If the name of the component isn't “Northeast”, “Northwest”, Southeast”, “Southwest”, or “Center”, the component is ignored.
public void removeLayoutComponent (Component comp) {
    if (comp == center) {
        center = null;
    } else if (comp == northwest) {
        northwest = null;
    } else if (comp == southeast) {
        southeast = null;
    } else if (comp == northeast) {
        northeast = null;
    } else if (comp == southwest) {
        southwest = null;
    }
}
removeLayoutComponent() searches for a given component in each region; if it finds the component, removeLayoutComponent() discards it by setting the instance variable to null.
public Dimension minimumLayoutSize (Container target) {
    Dimension dim = new Dimension(0, 0);
    Dimension northeastDim = new Dimension (0,0);
    Dimension northwestDim = new Dimension (0,0);
    Dimension southeastDim = new Dimension (0,0);
    Dimension southwestDim = new Dimension (0,0);
    Dimension centerDim    = new Dimension (0,0);
    if ((northeast != null) && northeast.isVisible ()) {
        northeastDim = northeast.minimumSize ();
    }
    if ((southwest != null) && southwest.isVisible ()) {
        southwestDim = southwest.minimumSize ();
    }
    if ((center != null) && center.isVisible ()) {
        centerDim = center.minimumSize ();
    }
    if ((northwest != null) && northwest.isVisible ()) {
        northwestDim = northwest.minimumSize ();
    }
    if ((southeast != null) && southeast.isVisible ()) {
        southeastDim = southeast.minimumSize ();
    }
    dim.width = Math.max (northwestDim.width, southwestDim.width) +
                    hgap + centerDim.width + hgap +
                    Math.max (northeastDim.width, southeastDim.width);
    dim.height = Math.max (northwestDim.height, northeastDim.height) +
                    + vgap + centerDim.height + vgap +
                    Math.max (southeastDim.height, southwestDim.height);
    Insets insets = target.insets();
    dim.width += insets.left + insets.right;
    dim.height += insets.top + insets.bottom;
    return dim;
}
minimumLayoutSize() computes the minimum size of the layout by finding the minimum sizes of all components. To compute the minimum width, minimumLayoutSize() adds the width of the center, plus the greater of the widths of the western regions (northwest and southwest), plus the greater of the widths of the eastern regions (northeast and southeast), then adds the appropriate gaps and insets. The minimum height is computed similarly; the method takes the greater of the minimum heights of the northern regions, the greater of the minimum heights of the southern regions, and adds them to the minimum height of the center region, together with the appropriate gaps and insets.
public Dimension preferredLayoutSize (Container target) {
    Dimension dim = new Dimension(0, 0);
    Dimension northeastDim = new Dimension (0,0);
    Dimension northwestDim = new Dimension (0,0);
    Dimension southeastDim = new Dimension (0,0);
    Dimension southwestDim = new Dimension (0,0);
    Dimension centerDim    = new Dimension (0,0);
    if ((northeast != null) && northeast.isVisible ()) {
northeastDim = northeast.preferredSize ();
    }
    if ((southwest != null) && southwest.isVisible ()) {
        southwestDim = southwest.preferredSize ();
    }
    if ((center != null) && center.isVisible ()) {
        centerDim = center.preferredSize ();
    }
    if ((northwest != null) && northwest.isVisible ()) {
        northwestDim = northwest.preferredSize ();
    }
    if ((southeast != null) && southeast.isVisible ()) {
        southeastDim = southeast.preferredSize ();
    }
    dim.width = Math.max (northwestDim.width, southwestDim.width) +
                    hgap + centerDim.width + hgap +
                    Math.max (northeastDim.width, southeastDim.width);
    dim.height = Math.max (northwestDim.height, northeastDim.height) +
                    +vgap + centerDim.height + vgap +
                    Math.max (southeastDim.height, southwestDim.height);
    Insets insets = target.insets();
    dim.width += insets.left + insets.right;
    dim.height += insets.top + insets.bottom;
    return dim;
}
preferredLayoutSize() computes the preferred size of the layout. The method is almost identical to minimumLayoutSize(), except that it uses the preferred dimensions of each component.
public void layoutContainer (Container target) {
    Insets insets = target.insets();
    int top = insets.top;
    int bottom = target.size ().height - insets.bottom;
    int left = insets.left;
    int right = target.size ().width - insets.right;
    Dimension northeastDim = new Dimension (0,0);
    Dimension northwestDim = new Dimension (0,0);
    Dimension southeastDim = new Dimension (0,0);
    Dimension southwestDim = new Dimension (0,0);
    Dimension centerDim    = new Dimension (0,0);
    Point topLeftCorner, topRightCorner, bottomLeftCorner,
                    bottomRightCorner;
    if ((northeast != null) && northeast.isVisible ()) {
       northeastDim = northeast.preferredSize ();
    }
    if ((southwest != null) && southwest.isVisible ()) {
        southwestDim = southwest.preferredSize ();
    }
    if ((center != null) && center.isVisible ()) {
        centerDim = center.preferredSize ();
    }
    if ((northwest != null) && northwest.isVisible ()) {
        northwestDim = northwest.preferredSize ();
}
    if ((southeast != null) && southeast.isVisible ()) {
        southeastDim = southeast.preferredSize ();
    }
    topLeftCorner = new Point (left +
                      Math.max (northwestDim.width, southwestDim.width),
                      top +
                      Math.max (northwestDim.height, northeastDim.height));
    topRightCorner = new Point (right -
                      Math.max (northeastDim.width, southeastDim.width),
                      top +
                      Math.max (northwestDim.height, northeastDim.height));
    bottomLeftCorner = new Point (left +
                      Math.max (northwestDim.width, southwestDim.width),
                      bottom -
                      Math.max (southwestDim.height, southeastDim.height));
    bottomRightCorner = new Point (right   -
                      Math.max (northeastDim.width, southeastDim.width),
                      bottom -
                      Math.max (southwestDim.height, southeastDim.height));
    if ((northwest != null) && northwest.isVisible ()) {
        northwest.reshape (left, top,
                            left + topLeftCorner.x,
                            top + topLeftCorner.y);
    }
    if ((southwest != null) && southwest.isVisible ()) {
        southwest.reshape (left, bottomLeftCorner.y,
                            bottomLeftCorner.x - left,
                            bottom - bottomLeftCorner.y);
    }
    if ((southeast != null) && southeast.isVisible ()) {
        southeast.reshape (bottomRightCorner.x,
                    bottomRightCorner.y,
                    right - bottomRightCorner.x,
                    bottom - bottomRightCorner.y);
    }
    if ((northeast != null) && northeast.isVisible ()) {
        northeast.reshape (topRightCorner.x, top,
                            right - topRightCorner.x,
                            topRightCorner.y);
    }
    if ((center != null) && center.isVisible ()) {
        int x = topLeftCorner.x + hgap;
        int y = topLeftCorner.y + vgap;
        int width = bottomRightCorner.x - topLeftCorner.x - hgap * 2;
        int height = bottomRightCorner.y - topLeftCorner.y - vgap * 2;
        if (mode == CornerLayout.FULL_WIDTH) {
            x = left;
            width = right - left;
        } else if (mode == CornerLayout.FULL_HEIGHT) {
            y = top;
            height = bottom - top;
        }
        center.reshape (x, y, width, height);
}
}
layoutContainer() does the real work: it positions and sizes the components in our layout. It starts by computing the region of the target container that we have to work with, which is essentially the size of the container minus the insets. The boundaries of the working area are stored in the variables top, bottom, left, and right. Next, we get the preferred sizes of all visible components and use them to compute the corners of the “Center” region; these are stored in the variables topLeftCorner, topRightCorner, bottomLeftCorner, and bottomRightCorner.
Once we've computed the location of the “Center” region, we can start placing the components in their respective corners. To do so, we simply check whether the component is visible; if it is, we call its reshape() method. After dealing with the corner components, we place the “Center” component, taking into account any gaps (hgap and vgap) and the layout's mode. If the mode is NORMAL, the center component occupies the region between the inner corners of the other components. If the mode is FULL_HEIGHT, it occupies the full height of the screen. If it is FULL_WIDTH, it occupies the full width of the screen.
public String toString() {
    Sting str;
    switch (mode) {
        case FULL_HEIGHT: str = "tall"; break;
        case FULL_WIDTH: str = "wide"; break;
        default: str = "normal"; break;
    }
    return getClass().getName () + "[hgap=" + hgap + ",vgap=" + vgap +
        ",mode="+str+"]";
    }
}
toString() simply returns a string describing the layout.
Strictly speaking, there's no reason to update the CornerLayout for Java 1.1. Nothing about Java 1.1 says that new layout managers have to implement the LayoutManager2 interface. However, implementing LayoutManager2 isn't a bad idea, particularly since CornerLayout works with constraints; like BorderLayout, it has named regions. To extend CornerLayout so that it implements LayoutManager2, add the following code; we'll create a new CornerLayout2:
// Java 1.1 only
import java.awt.*;
public class CornerLayout2 extends CornerLayout implements LayoutManager2 {

    public void addLayoutComponent(Component comp, Object constraints) {
        if ((constraints == null) || (constraints instanceof String)) {
            addLayoutComponent((String)constraints, comp);
        } else {
throw new IllegalArgumentException(
                  "cannot add to layout: constraint must be a string (or null)");
        }
    }
    public Dimension maximumLayoutSize(Container target) {
        return new Dimension(Integer.MAX_VALUE, Integer.MAX_VALUE);
    }
    public float getLayoutAlignmentX(Container parent) {
        return Component.CENTER_ALIGNMENT;
    }
    public float getLayoutAlignmentY(Container parent) {
        return Component.CENTER_ALIGNMENT;
    }
    public void invalidateLayout(Container target) {
    }
}
7.11 The sun.awt Layout Collection
The sun.awt package defines four additional layouts. The first two, HorizBagLayout and VerticalBagLayout, are available only when used with Sun's JDK or Internet Explorer, since they are not provided with Netscape Navigator and may not be available from other vendors. Therefore, these layout managers should be used selectively within applets. The third layout manager, VariableGridLayout, is available with Netscape Navigator 2.0 or 3.0 and Internet Explorer. Usage of this layout manager is safer within applets but is still at your own risk. The final layout manager is introduced in Java 1.1, OrientableFlowLayout. Only time will tell where that one will be available. Any of these layout managers could be moved into a future version of java.awt if there is enough interest.
7.11.1 HorizBagLayout
In a HorizBagLayout, the components are all arranged in a single row, from left to right. The height of each component is the height of the container; the width of each component is its preferred width. Figure 7-16 shows HorizBagLayout in use.
Constructors
public HorizBagLayout ()
This constructor creates a HorizBagLayout with a horizontal gap of zero pixels. The gap is the space between the different components in the horizontal direction.
public HorizBagLayout (int hgap)
This constructor creates a HorizBagLayout using a horizontal gap of hgap pixels.
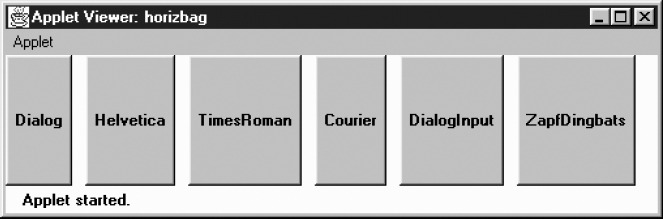
LayoutManager methods
public void addLayoutComponent (String name, Component component)
The addLayoutComponent() method of HorizBagLayout does nothing.
public void removeLayoutComponent (Component component)
The removeLayoutComponent() method of HorizBagLayout does nothing.
public Dimension preferredLayoutSize (Container target)
The preferredLayoutSize() method of HorizBagLayout sums up the preferred widths of all the components in target, along with the hgap and right and left insets to get the width of the target. The height returned will be the preferred height of the tallest component.
public Dimension minimumLayoutSize (Container target)
The minimumLayoutSize() method of HorizBagLayout sums up the minimum widths of all the components in target, along with the hgap and right and left insets to get the width of the target. The height returned will be the minimum height of the tallest component.
public void layoutContainer (Container target)
The layoutContainer() method draws target's components on the screen in one row. The height of each component is the height of the container. Each component's width is its preferred width, if enough space is available.
Miscellaneous methods
public String toString ()
The toString() method of HorizBagLayout returns a string with the current horizontal gap setting—for example:
sun.awt.HorizBagLayout[hgap=0]
7.11.2 VerticalBagLayout
The VerticalBagLayout places all the components in a single column. The width of each component is the width of the container; each component is given its preferred height. Figure 7-17 shows VerticalBagLayout in use.
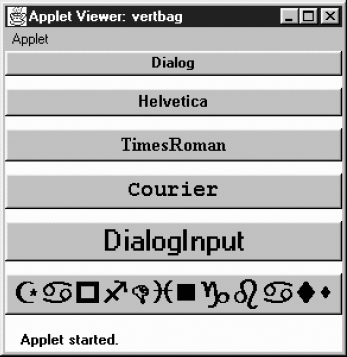
Figure 7–17: VerticalBagLayout
Constructors
public VerticalBagLayout ()
This constructor creates a VerticalBagLayout with a vertical gap of zero pixels. The gap is the space between components in the vertical direction. With a gap of 0, adjacent components will touch each other.
public VerticalBagLayout (int vgap)
This constructor creates a VerticalBagLayout with a vertical gap of vgap pixels.
LayoutManager methods
public void addLayoutComponent (String name, Component component)
The addLayoutComponent() method of VerticalBagLayout does nothing.
public void removeLayoutComponent (Component component)
The removeLayoutComponent() method of VerticalBagLayout does nothing.
public Dimension preferredLayoutSize (Container target)
To get the preferred height of the layout, the preferredLayoutSize() method sums up the preferred height of all the components in target along with the vgap and top and bottom insets. For the preferred width, preferredLayoutSize() returns the preferred width of the widest component.
public Dimension minimumLayoutSize (Container target)
To get the minimum height of the layout, the minimumLayoutSize() method sums up the minimum height of all the components in target along with the vgap and top and bottom insets. For the minimum width, minimumLayoutSize() returns the minimum width of the widest component.
public void layoutContainer (Container target)
The layoutContainer() method draws target's components on the screen in one column. The width of each component is the width of the container. Each component's height is its preferredSize() height, if available.
Miscellaneous methods
public String toString ()
The toString() method of VerticalBagLayout returns a string with the current vertical gap setting. For example:
sun.awt.VerticalBagLayout[vgap=0]
7.11.3 VariableGridLayout
The VariableGridLayout builds upon the GridLayout. It arranges components on a grid of rows and columns. However, instead of giving all components the same size, the VariableGridLayout allows you to size rows and columns fractionally. Another difference between VariableGridLayout and GridBagLayout is that a VariableGridLayout has a fixed size. If you ask for a 3×3 grid, you will get exactly that. The layout manager throws the ArrayIndexOutOfBoundsException run-time exception if you try to add too many components.
Figure 7-18 shows a VariableGridLayout in which row one takes up 50 percent of the screen, and rows two and three take up 25 percent of the screen each. Column one takes up 50 percent of the screen; columns two and three take 25 percent each.
Here is the code that creates Figure 7-18:
import java.awt.*;
java.applet.Applet;
import sun.awt.VariableGridLayout;
public class vargrid extends Applet {
    public void init () {
        VariableGridLayout vgl;
setLayout (vgl = new VariableGridLayout (3,3));
        vgl.setRowFraction (0, 1.0/2.0);
        vgl.setRowFraction (1, 1.0/4.0);
        vgl.setRowFraction (2, 1.0/4.0);
        vgl.setColFraction (0, 1.0/2.0);
        vgl.setColFraction (1, 1.0/4.0);
        vgl.setColFraction (2, 1.0/4.0);
        add (new Button ("One"));
        add (new Button ("Two"));
        add (new Button ("Three"));
        add (new Button ("Four"));
        add (new Button ("Five"));
        add (new Button ("Six"));
        add (new Button ("Seven"));
        add (new Button ("Eight"));
        add (new Button ("Nine"));
    }
}
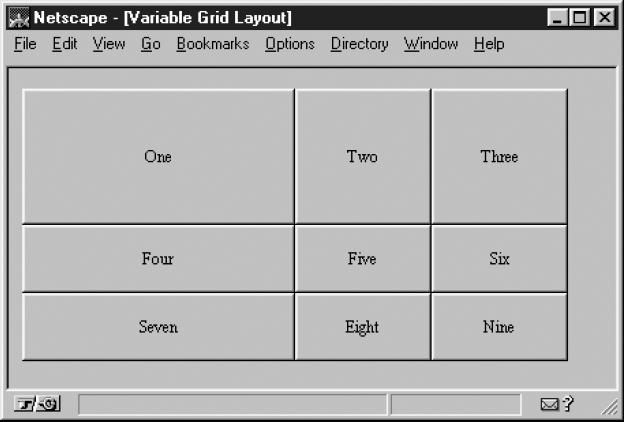
Figure 7–18: VariableGridLayout in Netscape Navigator
Constructors
public VariableGridLayout (int rows, int columns)
This constructor creates a VariableGridLayout with the specified number of rows and columns. You cannot specify zero for one dimension. If either rows or columns is zero, the constructor throws the NullPointerException run-time exception. This constructor uses the default values for horizontal and vertical gaps (zero pixels), which means that components in adjacent cells will touch each other.
public VariableGridLayout (int rows, int columns, int hgap, int vgap)
This version of the constructor is called by the previous one. It creates a VariableGridLayout with the specified number of rows and columns, a horizontal gap of hgap, and a vertical gap of vgap. The gaps specify in pixels the space between adjacent components in the horizontal and vertical directions. It is possible to have negative gaps if you want components to overlap. You cannot specify zero for the number of rows or columns. If either rows or columns is zero, the constructor throws the run-time exception NullPointerException.
Support methods
The distinguishing feature of a VariableGridLayout is that you can tell a particular row or column to take up a certain fraction of the display. By default, the horizontal space available is split evenly among the grid's columns; vertical space is split evenly among the rows. This group of methods lets you find out how much space is allotted to each row or column and lets you change that allocation. The sum of the fractional amounts for each direction should add up to one. If greater than one, part of the display will be drawn offscreen. If less than one, additional screen real estate will be unused.
public void setRowFraction (int rowNumber, double fraction)
This method sets the percentage of space available for row rowNumber to fraction.
public void setColFraction (int colNumber, double fraction)
This method sets the percentage of space available for column colNumber to fraction.
public double getRowFraction (int rowNumber)
This method returns the current fractional setting for row rowNumber.
public double getColFraction (int colNumber)
This method returns the current fractional setting for column colNumber.
LayoutManager methods
The only method from GridLayout that is overridden is the layoutContainer() method.
public void layoutContainer (Container target)
The layoutContainer() method draws target's components on the screen in a series of rows and columns. The size of each component within a VariableGridLayout is determined by the RowFraction and ColFraction settings for its row and column.
Miscellaneous methods
public String toString ()
The toString() method of VariableGridLayout returns a string with the current horizontal and vertical gap settings, the number of rows and columns, and the row and column fractional amounts. For example, the string produced by Figure 7-19 would be:
sun.awt.VariableGridLayout[hgap=0,vgap=0,rows=3,cols=3,
    rowFracs=[3]<0.50><0.25><0.25>,colFracs=[3]<0.50><0.25><0.25>]
7.11.4 OrientableFlowLayout
The OrientableFlowLayout is available for those who want something like a FlowLayout that lets you arrange components from top to bottom. Figure 7-19 shows OrientableFlowLayout in use.
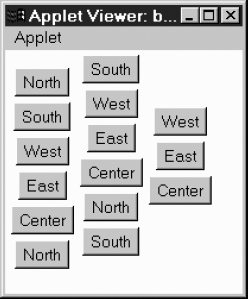
Figure 7–19: OrientableFlowLayout
Constants
Since OrientableFlowLayout subclasses FlowLayout, the FlowLayout constants of LEFT, RIGHT, and CENTER are still available.
public static final int HORIZONTAL ![]()
The HORIZONTAL constant tells the layout manager to arrange components from left to right, like the FlowLayout manager.
public static final int VERTICAL ![]()
The VERTICAL constant tells the layout manager to arrange components from top to bottom.
The TOP constant tells the layout manager to align the first component at the top of the screen (top justification).
public static final int BOTTOM ![]()
The BOTTOM constant tells the layout manager to align the first component at the bottom of the screen (bottom justification).
Constructors
public OrientableFlowLayout () ![]()
This constructor creates a OrientableFlowLayout that acts like the default FlowLayout. The objects flow from left to right and have an hgap and vgap of 5.
public OrientableFlowLayout (int direction) ![]()
This constructor creates a OrientableFlowLayout in the given direction. Valid values are OrientableFlowLayout.HORIZONTAL or OrientableFlowLayout.VERTICAL.
public OrientableFlowLayout (int direction, int horizAlignment, int vertAlignment) ![]()
This constructor creates a OrientableFlowLayout in the given direction. Valid values are OrientableFlowLayout.HORIZONTAL or OrientableFlowLayout.VERTICAL. horizAlignment provides the horizontal alignment setting. vertAlignment provides a vertical alignment setting; it may be OrientableFlowLayout.TOP, FlowLayout.CENTER, or OrientableFlowLayout.BOTTOM. If direction is HORIZONTAL, the vertical alignment is ignored. If direction is VERTICAL, the horizontal alignment is ignored.
public OrientableFlowLayout (int direction, int horizAlignment, int vertAlignment, int horizHgap, int horizVgap, int vertHgap, int vertVgap) ![]()
The final constructor adds separate horizontal and vertical gaps to the settings of OrientableFlowLayout. The horizHgap and horizVgap parameters are the gaps when horizontally aligned. The vertHgap and vertVgap parameters are the gaps when vertically aligned.
LayoutManager methods
public Dimension preferredLayoutSize (Container target) ![]()
The preferredLayoutSize() method of OrientableFlowLayout calculates the preferred dimensions for the target container. The OrientableFlowLayout computes the preferred size by placing all the components in one row or column, depending upon the current orientation, and adding their individual preferred sizes along with gaps and insets.
public Dimension minimumLayoutSize (Container target) ![]()
The minimumLayoutSize() method of OrientableFlowLayout calculates the minimum dimensions for the container by adding up the sizes of the components. The OrientableFlowLayout computes the minimum size by placing all the components in one row or column, depending upon the current orientation, and adding their individual minimum sizes along with gaps and insets.
public void layoutContainer (Container target) ![]()
The layoutContainer() method draws target's Components on the screen, starting with the first row or column of the display, and going from left to right across the screen, or from top to bottom, based on the current orientation. When it reaches the margin of the container, it skips to the next row or column and continues drawing additional components.
Miscellaneous methods
public void orientHorizontally () ![]()
The orientHorizontally() method allows you to change the orientation of the LayoutManager to horizontal. The container must be validated before you see the effect of the change.
public void orientVertically () ![]()
The orientVertically() method allows you to change the orientation of the LayoutManager to vertical. The container must be validated before you see the effect of the change.
public String toString () ![]()
The toString() method of OrientableFlowLayout returns a string with the current orientation setting, along with the entire FlowLayout.toString() results. For example:
sun.awt.OrientableFlowLayout[orientation=vertical,
sun.awt.OrientableFlowLayout[hgap=5,vgap=5,align=center]]
7.12 Other Layouts Available on the Net
Many custom layout managers are available on the Internet. Many of these duplicate the layout behavior of other environments. For example, the FractionalLayout is based on Smalltalk's positioning mechanism; it is located at http://www.mcs.net/~elunt/Java/FractionalLayoutDescription.html. The RelativeLayout allows you to position components relative to others, similar to an X Window form; you can find it at http://www-elec.enst.fr/java/RelativeLayout.java. If you like the way Tcl/Tk arranges widgets, try the PackerLayout; it is available at http://www.geom.umn.edu/~daeron/apps/ui/pack/gui.html. If none of these suit you, you can find a collection of links to custom layout managers at http://www.softbear.com/people/larry/javalm.htm. Gamelan (http://www.gamelan.com/) is always a good source for Java classes; try searching for LayoutManager.
* This is still true in Java 1.1; the new method, getPreferredSize(), just calls the deprecated method, preferredSize().
Get Java AWT Reference now with the O’Reilly learning platform.
O’Reilly members experience books, live events, courses curated by job role, and more from O’Reilly and nearly 200 top publishers.

