As you’ve seen, Pages provides a whole arsenal of tools to help spot, prevent, and correct errors in your text. In the end, though, these automated services can go only so far. No matter how cleverly programmed, a bucket-of-bolts wordbot is no substitute for the critical eye and creative mind of a living, breathing human editor. That’s especially true when you move beyond mechanical considerations of spelling or typos and into more writerly concerns of style and substance.
Even there, though, Pages can be helpful: When you’re ready to solicit feedback from others, Pages plays traffic cop to keep the edit process flowing smoothly, monitoring every change made to your document.
With change tracking, Pages quietly catalogs every edit made to your document, letting you review all additions, deletions, and replacements before accepting revisions into the final draft. While this can be handy even when you’re working on text by yourself, it becomes invaluable when you’re collaborating with an editor, co-writing a document with others, or getting comments from your boss. Change tracking builds a paper trail of a document’s edit history so that you and others can see exactly who changed what and when.
Note
Pages’ change tracking works seamlessly with Microsoft Word. When you export a Pages document to Word format—or use Pages to open a Word document—Pages preserves the edit history. Word users can review your changes and vice versa.
To turn on change tracking, choose Edit → Track Changes. Pages reveals the Change Tracking toolbar just below the Format Bar. Pages lists all edits and comments in the Comments and Changes pane, which you can reveal (or hide) by clicking the double arrow at the left side of the Change Tracking toolbar, or by choosing View → Show Comments and Changes Pane. The edits appear as a series of change bubbles, shown in Figure 4-15. When you click a change bubble, Pages highlights the corresponding text in your document.
If a page is chockablock with changes, the Comments and Changes pane may not be able to display all the change bubbles at once. When that’s the case, arrows appear at the bottom of the pane to let you move up and down through the page’s change notes.
To turn change tracking off, choose Edit → Turn Off Tracking. Be careful here: When you turn off change tracking, you not only stop tracking future changes, you also lose the current change history, too. Pages pauses to ask you if you really want to do this and, if so, lets you decide what to do with the current batch of edits, as shown in Figure 4-16.
A gentler way to shut down change tracking is to put it on pause. This puts change tracking temporarily on hold while maintaining the current edit history; Pages doesn’t track any changes that you make in paused mode. To pause change tracking, click the Paused button in the Change Tracking toolbar. To resume, click the On button.
Note
When you make changes to tables, Pages adds a change bubble like any other change, but also adds a triangle-shaped indicator in the upper-right corner of the modified table cell, color-coded according to the editor who made the change. If multiple editors make changes to a cell, Pages colors the indicator gray. For more info about tables, see Chapter 8.
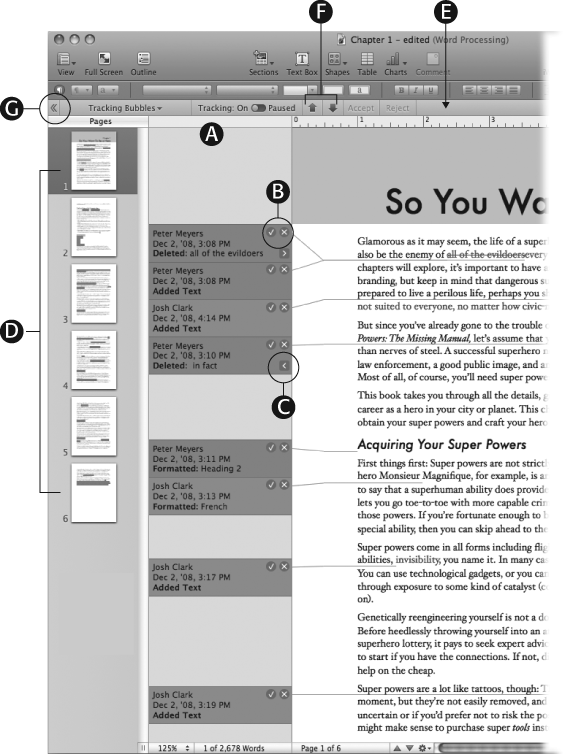
Figure 4-15. When you turn on change tracking, Pages takes note of every edit in the Comments and Changes pane (A), where change bubbles list who changed what and when, with a line pointing to the edited text. Change bubbles offer buttons to accept/reject each edit (B); for deleted text, there’s also a toggle button (C) to hide/show the original text. When the arrow points right, the deleted text is visible, when it points left, it’s hidden. Pages lists every editor’s changes in a different color, making it easy to see who’s responsible for every change at a glance. If thumbnail view is turned on (View → Show Page Thumbnails), Pages also highlights the edits in the Pages sidebar (D). The Change Tracking toolbar (E) provides controls for navigating, viewing, and accepting or rejecting edits. Move back and forth through changes with the Previous/Next buttons (F). Hide and show the Comments and Changes pane with the arrow button at the left of the toolbar (G).

Figure 4-16. When you turn off change tracking, Pages asks what it should do with the current set of changes. Clicking the Accept All Changes button keeps the current version as is. Clicking Reject All Changes throws out the edits and reverts to the original text. (If you change your mind, Edit → Undo brings it all back.)
With change tracking on, you can step through every edit one at a time and decide whether you want to accept or reject each one. When you accept an edit, it becomes a permanent part of the text. When you reject it, Pages peels back the edit, reverting to the original unedited text. In both cases, Pages removes the change from the edit history. Think of accepting or rejecting changes like checking off items on your editorial to-do list; once you’ve reviewed a change and made your decision, Pages considers the edit closed and removes it from sight.
Use any of these methods to accept a change:
Click the check-shaped Accept button in the edit’s change bubble.
Select the changed text (click its change bubble or place the insertion point inside the edited text) and then click the Accept button in the Change Tracking toolbar.
Control-click the changed text and choose Accept Change from the shortcut menu.
Pages likewise gives you three ways to reject a change:
Click the X-shaped Reject button in the change bubble.
Select the change and click the Reject button in the Change Tracking toolbar.
Control-click the changed text and choose Reject Change from the shortcut menu.
To step through the changes one at a time, use the up and down arrows in the Change Tracking toolbar to jump to the previous or next change respectively.
If you’re feeling impatient, you can accept or reject all edits at once from the gear-shaped Action menu at the right side of the Change Tracking toolbar: Choose Accept All Changes or Reject All Changes. If you prefer to accept or reject changes from just a portion of the document, highlight the text and choose the Action menu’s Accept Selected Changes or Reject Selected Changes command.
As handy as change tracking can be, all this markup sometimes makes your document too busy to let you focus on your work. When your text is thick with edits, it becomes heavy with dense patches of multi-colored text, a forest of lines, a crowded Comments and Changes pane, and a confusing hash of strikethrough text. If you find yourself squinting just to follow the plot, you can tell Pages to make some cosmetic adjustments.
The View Markup pop-up menu in the Change Tracking toolbar offers three options for dialing the markup detail up or down in the text itself:
View Markup. Pages displays both added and deleted text, color-coded by author, see Figure 4-15. Deleted text is crossed out, with the strikethrough style.
View Markup Without Deletions. Pages displays only new text, hiding deletions, although a small triangle icon indicates where deleted text used to be.
View Final. When you choose this option, Pages stops showing edits in the various author colors, returning your text to its usual (and presumably calmer) color scheme. Deleted text is hidden, although its presence is still noted by a triangle icon. The end result is that you see your document as it would look if you accepted all changes.
You can also pop a few change bubbles to make the Comments and Changes pane less crowded. Control the view in the Tracking Bubbles pop-up menu in the Change Tracking toolbar:
Show all. Pages piles all the change bubbles into the Comments and Changes pane.
Show only for selection. When you have lots of changes on a page, they can’t all fit in visible view in the Comments and Changes pane. This option lets you narrow the display to changes made only in the currently highlighted text.
Hide all. Choosing this option removes all change bubbles, leaving the comment bubbles behind (see Changing the style of new and deleted text for more about comments).
Show formatting bubbles. When you change fonts, line spacing, or any other formatting, Pages normally includes the change with the rest of the change bubbles. Choosing this option turns that display on or off (a checkbox indicates when it’s on).
Note
Pages doesn’t track all formatting changes, particularly when it comes to tables. Changes that involve adding, removing, or moving table rows or columns aren’t tracked. In addition, changes to a cell’s borders, merging and splitting cells, and autofilling aren’t tracked.
Finally, you can also hide the entire Comments and Changes pane, which also gets rid of the change bubbles and all their pointer lines, as shown in Figure 4-17. To hide this pane, click the arrow button at the left of the Change Tracking toolbar (and click it again to bring it back), or choose View → Hide Comments and Changes Pane.
If seeing your own text edits in a sickly green color is getting you down, you can choose a new author color. In the Change Tracking toolbar’s gear-shaped Action pop-up menu, choose Select Author Color and pick your new color. Alas, you can’t choose colors for other authors, so you can’t impose your creative color vision on others, but at least you have control over your own personal style.
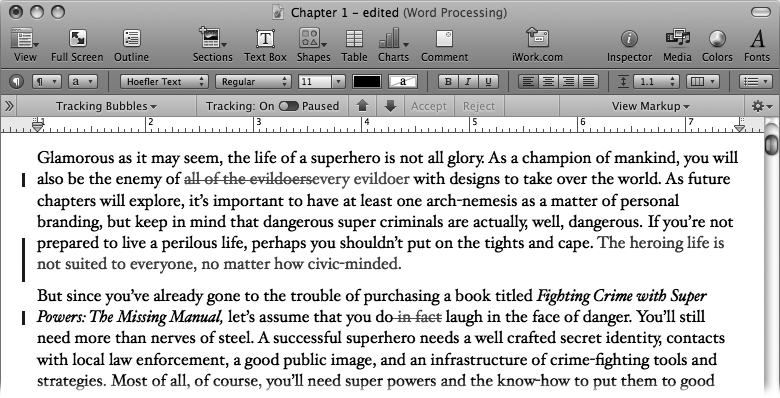
Figure 4-17. When you hide the Comments and Changes pane, the change bubbles and their pointer lines go away, too. Pages instead calls attention to changes by drawing a change bar, a vertical black bar in the left margin next to each edit. The text markup continues to display according to your settings in the View Markup pop-up menu.
While you’re busy overhauling your personal branding, you can also choose your author handle. Unless you tell it otherwise, Pages labels your changes with your name from Address Book (see the box “How Does Pages Know Where I Live?” on In Your Own Words), but you can use any name you like. Go to Pages → Preferences and click the General button, or choose Preferences from the Action pop-up menu in the Change Tracking toolbar. Enter your preferred moniker in the Author field.
Pages gives you a few minor options to change the look of new and deleted text. Go to Pages → Preferences and click the General button, or choose Preferences from the Action pop-up menu. At the bottom of the window, under Change Tracking, you’ll find the Deleted Text and Inserted Text settings. The standard settings are Strikethrough for deleted text and None for new text, but you have your choice of Strikethrough, Underline, or None for either one.
Besides keeping a record of changes to a document, Pages also lets you and other editors leave comments about the text. Comments are notes that never appear in the actual body of the text itself, but instead float in the Comments and Changes pane along with the change bubbles (if change tracking is turned off, Pages calls it simply the Comments pane). Like change bubbles, comments are tethered to a particular text selection, making them a useful way to ask questions, offer suggestions, or leave yourself a reminder about a particular passage. They’re like Post-It notes that you slap on the document—temporary messages fixed to your text while also remaining separate from it. In fact, like Post-It notes, comments always appear on a yellow background in the Comments pane.
To add a comment, select the text to annotate and click the Comment button in the toolbar, or choose Insert → Comment. Pages opens the Comments pane and adds a comment bubble, drawing a line to the original text, now highlighted in yellow (Figure 4-18). Type your comment in the comment bubble, which grows and shrinks to fit your text. To edit a comment, just click inside its text and type away—you can edit other editors’ comments as well as your own. To delete a comment, click the X-shaped Delete button in the comment, or delete the original annotated text from your document.
Tip
You can format the text in comments just as you would regular text, changing fonts or applying character, paragraph, or list styles as you wish.
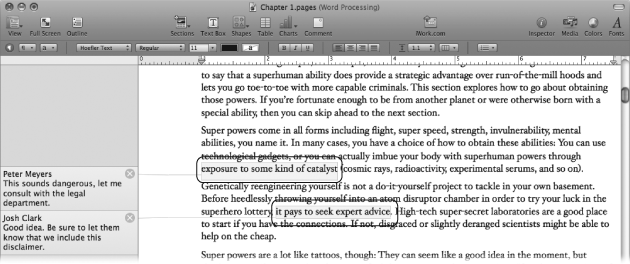
Figure 4-18. Comments let you add notes and annotations to your text, a useful way to leave yourself research notes or reminders, or to gather suggestions as you pass a document around to a group for feedback. Every comment is anchored to a specific passage of the text (outlined here, to make it easier to see).
To hide the Comments pane, click View → Hide Comments. To show it, click View → Show Comments. This also shows and hides the change bubbles if change tracking is turned on (in which case, the menu calls it the Comments and Changes pane).
Tip
When you print your document with the Comments pane (or Comments and Changes pane) visible, the comments and edits show up in the printed document, too. That’s terrific when you want a copy to edit on paper, but not so great when you’re printing the upward job review of your boss. Before you print, choose whether to hide or show the Comments pane from the View menu or the toolbar’s View pop-up button. See Printing Your Documents for more about printing your document.
Although comments share the same look and window location as change bubbles, they’re not technically part of change tracking. You can leave comments when change tracking is turned off, for example. When you accept or reject all changes, comments remain intact.
Before you email your business proposal to the client, it’s probably best to clear out the comments making fun of the ridiculous shirt he wore to the meeting last Thursday. Ditto for the change tracking that shows that you arbitrarily doubled your fee five minutes before sending the proposal. You get the idea: After you’ve gathered and reviewed all the edits and finally rounded the corner into final-draft territory, save a “clean” copy of your document, with all changes accepted, change tracking turned off, and comments removed.
To do this, choose “Save a Copy as Final” from the gear-shaped Action menu in the Change Tracking toolbar. The Save dialog box appears, prompting you to choose a name and location for the clean copy. After you click Save, Pages saves the new file and returns you to your original document.
Note
You can get a similar effect by turning off change tracking in the document (click Stop Tracking in the toolbar or choose Edit → Turn Off Tracking) and accepting all changes. However, all comments remain behind with that method. The only way to remove all comments at once is to use the “Save a Copy as Final” command to create a separate, no-comment copy of your file. Thing is, this option is available only from the Change Tracking toolbar which itself is available only when change tracking is turned on. If you’re trying to delete all comments with change tracking turned off, turn change tracking on and then choose “Save a Copy as Final” from the Change Tracking toolbar’s Action pop-up.
Now your scrubbed and typo-free document is ready to be shared with the world. But before you do that…wouldn’t your masterpiece look better with a table of contents, some numbered page footers, or perhaps a multicolumn layout? That’s the stuff of document formatting, which just happens to be the subject of the next chapter.
Get iWork '09: The Missing Manual now with the O’Reilly learning platform.
O’Reilly members experience books, live events, courses curated by job role, and more from O’Reilly and nearly 200 top publishers.

