The preceding chapters treated Pages like it was just a hot new word processing program, which, of course, it is. But now it's time for Pages to step into the spotlight and reveal its other, flashier persona. Its page-layout abilities set Pages apart from other word processors; what's causing the program's well-deserved buzz is the incredible ease with which you can produce professional-looking layouts.
Apple's software designers realized that the plain text document age is waning. Photographs, artwork, movies, and music are just a click away on your computer. Nearly everyone has a color printer. Digital media convergence is a reality and the kinds of documents people want to create now are stylishly laid out, colorful, and filled with photos (Figure 4-1).
Pages can access the pictures, songs, and movies that you already have on your computerâprobably in iPhoto, iTunes, and iMovieâand give you the freedom to include these elements within a Pages document. As for the "stylishly laid out" part, Pages provides a graphic arts department in the form of its collection of templatesâtastefully designed starting points for your next brochure, newsletter, or 'zine.
For writers and page designers, nothing is at once so exciting and so frightening as the blank page. Thanks to Pages' templates, fear of the blank page is a thing of the past. Though you can start with a blank canvas when the creative juices are raging, don't be shy about reaching for one of the templates to give you a jump-start.
The next few pages present a Reader's Digest version of creating a document, using one of the templates. The rest of this chapter flushes out the topic in depth, and Chapter 7 covers modifying templates or creating your own from scratch.
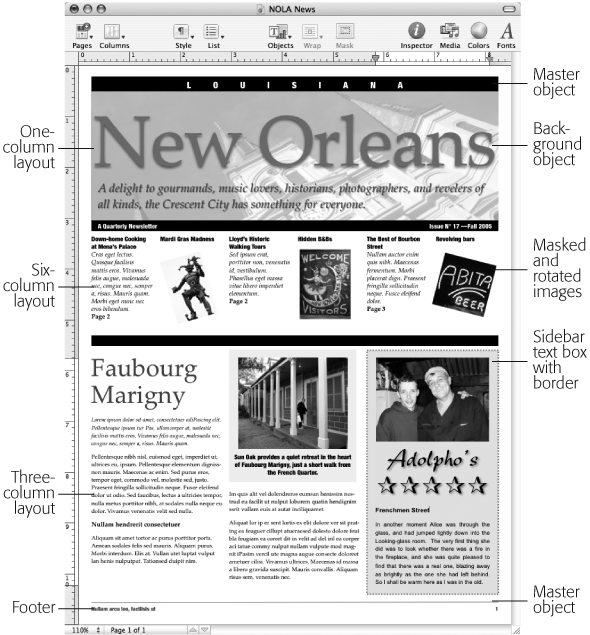
Figure 4-1. With the Non-Profit Newsletter as the starting point, this document features in-line and fixed objects, masked and rotated pictures, text boxes, a background image, and master objectsâalong with the standard word processing elements like headlines, columns, and a footer. This chapter shows how to create these and many other effects as you progress from simple word processing to sophisticated page layout.
Launch Pagesâor if it's already running, choose File â New.
The Template Chooser appears, home of the 40 predesigned templates courtesy of Appleâand soon to be the filing cabinet for your own document templates.
Note
If you see a document page at this point instead of the Template Chooser, choose Pages â Preferences, and then turn on the button for "Show Template Chooser dialog." Close the preferences window, close the document window, and then choose File â New again. This time the Template Chooser should appear.
Choose the Family Newsletter by double-clicking its image (or by clicking once to select it, and then clicking Choose).
The Template Chooser retracts and the newsletter document appears in its place (Figure 4-2).

Figure 4-2. Turn on Show Layout and Show Invisibles to deconstruct Pages' template documents. This page is divided into two layouts (Section 3.4), with one column above and three below the layout break. The two shaded sidebars are text boxes, as are two parts of the masthead. Four graphic images appear on the pageâone is a background image behind the masthead's text. The cookie is an alpha-channel graphic, which allows the text to wrap around its shape (see Section 4.3.8).
If you're used to word processing with plain text, your first glimpse of one of Pages' carefully designed page layout templates can be a shocker. Although this eye-catching layout looks to be the product of a skilled designer using a professional page layout program like InDesign or Quark, it's actually created in Pages using many of the page layout techniques already described.
Apple's designers created this document using columns, a layout break, text boxes, shapes containing text, and four graphics (Figure 4-2). To see how they did it, choose View â Show Layout, and View â Show Invisibles.
The layout outlines reveal that the upper portion of the document is one column wide and the bottom part is three columns. The red box on the left and the "cookie recipe" box across the bottom are shapes with text (see Section 4.2.4.4). Less obvious text boxes are the "the" of "the Johnson family" and the text banner immediately beneath that headline.
The pictures of the people jumping in the lake, the house, and the cookie are JPEG graphics files, as is the blue flowered background behind the headline.
With Invisibles turned on, you can see how the layout break provides for the change from one to three columns; the section break ends the flow of text in the third column; and the column breaks divide up the columns in the cookie recipe box.
Most Pages templates contain several page layouts, designed to match and work together in the particular document you're creating. If you design a newsletter, for example, you probably want a front page that shows the headlines and masthead, a variety of inner pages designed differently, and perhaps a back page that allows you to fold and mail the newsletter without an envelope. This, in fact, is exactly what Apple has done with the Family Newsletter template.
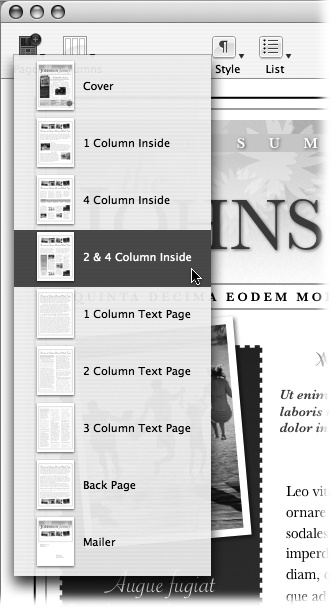
Add another page to your document by clicking the toolbar's Pages button (or choosing Insert â Pages), and then choose 2 & 4 Column Inside (Figure 4-3). Pages adds a second page to your document with this new page style. On this page the designers used three layout breaks to vary the column setup, breaking the page into four layouts: one column at the top of the page with a headline and a rule; two columns of text; a single column containing only a rule; and a four column section on the bottom.
If you want to add template pages in the same layout style, keep typing when you reach the bottom of the page. Pages adds a new page of the same typeâbut without the placeholder text and graphics.
You can remove a page you've added by placing the insertion point in the page and choosing Edit â Delete Page. If you've added enough text to a page to cause text to flow onto the next page, Pages sees those pages as a unit containing linked textâa section, in other words. In this case, the menu command reads Delete Pages. The program doesn't let you delete just one of those pagesâonly both. To delete just one of those pages, delete all its text and graphics. See Section 3.5.4 for more information about dealing with multipage sections.
With a few exceptions, the "Greek" text in the template is placeholder text, intended to show you the document's design. You can't edit this placeholder textâyou can only select one big clump of text. Once you've selected the placeholder text, start typing; the placeholder text disappears and your words begin to fill up the space. With the placeholder out of the way, now you're back in the world of normal word processing. Scroll back to the first page, click "Johnson," and then type your own name. (If your name is much longer than Johnson, it forces the headline onto two lines. Select your name, click the Font button in the toolbar to call up the Font panel, and use the font size slider to decrease the size and keep the headline on one line.)
Next, click the main body of the text and start typingâor paste in text from another document. The placeholder text disappears, replaced by your words.
Note
If you add your text to a template by copying and pasting from another document, you undoubtedly want to choose Edit â Paste and Match Style (or press Option-Shift-â-V) to make your text match the template's style. See Section 1.3.4.1 for more about this useful pasting option.
Two other types of text containers appear in this template: text boxes and shapes with text (see Section 4.2.4.4). Although they can appear identical in a document, only text boxes can be linked so that text flows from one box to another. In contrast, shapes with text are standalone entities. People often use both for sidebars, either as separate blocks of text within a column, or objects you can move around on the page, independent from the columns of normal text. You can tell text is part of a text box or shape as soon as you click itâthe box's outline appears, and with it the eight handles you can use to adjust its size (Figure 4-4). Double-click the text inside a text box or shape to edit it.
Click the red text box in the left column. The first click displays its array of handles. Double-click the text inside the box to select the placeholder. (There are three placeholders in this box: a headline, the body text, and the ornament at the bottom.) Type to replace the selected placeholder.
If you decide this document's a keeper, choose File â Save, give it a name, choose the destination, and then click Save. When you're working with templates, the document you work on is always a clone of the template. You can modify the document and save it, and still go back to the Template Chooser and find the template there, unchanged, and ready for another use.
The four pictures on this page are also placeholdersâbut unlike the Latin text, you can choose to keep pictures you like and replace the others with your own. Click the Media button in the toolbar to display the Media Browser, and then, from its pop-up menu, choose iPhoto. Pages provides this shortcut to your entire iPhoto collection. Scroll through your albums in the top of the window and scroll through your images below. Drag any image out of the Media Browser and drop it on one of the picture placeholders. Pages replaces the template's version of a family picture with your own (Figure 4-5).
If you don't use iPhoto to store your pictures, you can drag a picture file from any folder, from your desktop, or from other photo organizers, such as Photoshop's File Browser.
You can also add pictures to your document without using the picture placeholders. Drop the picture into your document at the approximate place you want it to appear. Pages inserts small pictures at full size and scales down large pictures so they don't take over the whole page. Drag one of the resizing handles to adjust the picture's size.
Replace a photo by dragging another photo on top of it; delete a picture by selecting it and pressing delete.
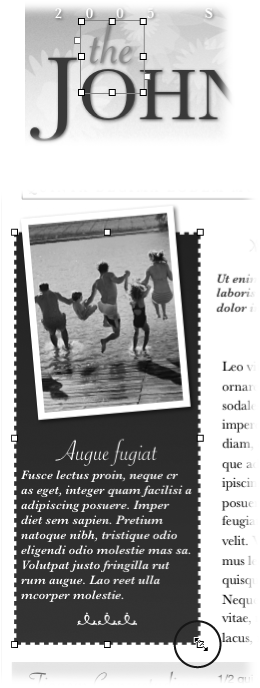
Figure 4-4. Pages' two varieties of text containers: text boxes (top) and shapes (bottom). When you click a shapeâor any objectâPages displays its eight selection handles, the hollow black squares around the object's perimeter. Your cursor becomes a double-headed arrow (circled) when it touches one of the handles, signaling its readiness to resize the object. Drag the handle in the middle of one of the four sides to move only that side; drag one of the corner handles to adjust the two adjacent sides at once.
In order to perform its page layout wizardry, Pages views the various elements you can incorporate into your textâpictures, movies, text boxes, shapes, tables, and chartsâas objects. Pages approaches objects in two ways:
In-line objects behave like a text character in a line of text. If you add more text to your document in front of this kind of object, it gets pushed along with the text, always remaining tied to the words next to it. You'll find in-line objects a good choice for text boxes containing a short quote that needs to stay connected to the surrounding text, for example (see Figure 4-6).
Fixed objects are standalone entities. Instead of being tied to the document's text, they're bolted into the page at a specific spot. Most people prefer fixed objects when they're adding pictures or charts to a page layout. Adding text to the page doesn't affect the objects' placement, and you can drag and resize these kinds of objects to precisely position them on the page (Figure 4-7).
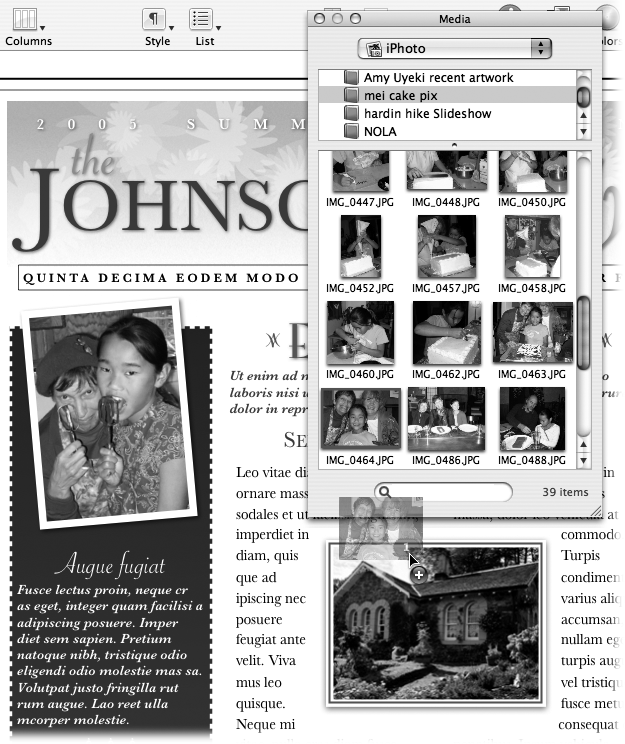
Figure 4-5. The Media Browser is the back door to your iPhoto, iTunes, and movie collections. Drag an image from the Media Browser and drop the shadowy thumbnail into any of the template's picture placeholders. Pages resizes your picture and replaces the placeholder picture. If you decide that's not the right picture, drag another one in on top of it to replace your first choice.
When you insert a fixed object on a text-filled page you can determine whether the text flows under the object, over the object, or wraps around itâflowing around the object so the text neither overlaps the picture nor is hidden by it (see Section 4.3.7).
Since fixed objects are separate items, you can stack them in layersâjust like you could arrange paper snapshots on a scrapbook page. One picture is on top, overlapping portions of other pictures beneath. Besides shifting the position of each object, you can also shift its layerâmoving it in front of or behind other objects that it overlaps.
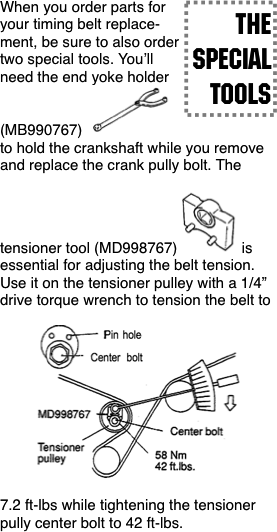
Figure 4-6. These four in-line objects stay connected to the surrounding text, even if you remove or add text earlier in the document. The in-line text box that says "The Special Tools" uses text wrapping (Section 4.3.7) to keep it at the right side of the column; the bottom picture also uses wrapping, this time set to keep it centered in the column.
In-line objects always remain on the same layer as the text in which they're embedded. When you adjust the arrangement of layers in your document, you can move fixed objects in front of or behind the text layer.
Unlike scrapbooking with paper snapshots, Pages also lets you adjust the opacity of each object, so you can see through to the objects in layers below (see Section 4.4.7).
You control an object's fixed or in-line status when you add it to the page, but you can convert it from fixed to in-line or vice versa at any time (see Section 4.2.2.3).
After you place objects on the page, you can crop, resize, rotate, and layer them on top of one another. You can add shadows, adjust their opacity, or group several objects together in order to reposition them simultaneously. For the full story on object manipulation, see Working with Objects on Section 4.3.
Pages provides a shortcut to your entire photo, music, and movie collections via the Media Browser. You can access all your photos (or other graphics) stored in iPhoto, your music (or other sound files) stored in iTunes, and the movies stored in your Movies folder. If you're just going to print out your documents, you don't need to add sounds and movies. But if you're designing documents for people to view onscreen, Pages helps you add features that let your viewers start and stop the playback of movies, narration, or music.
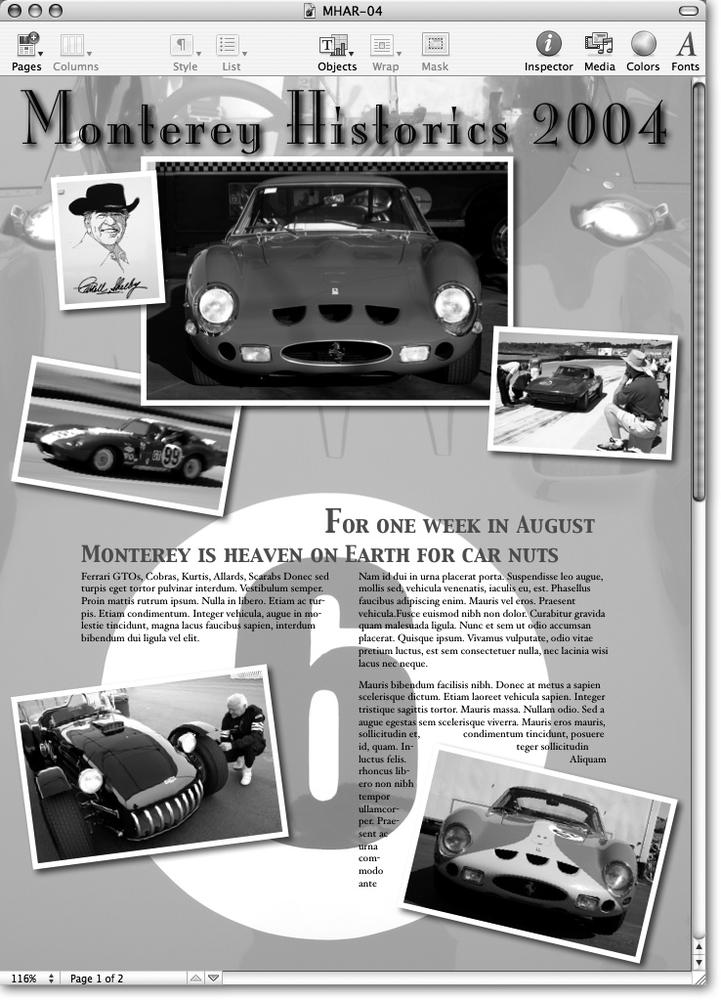
Figure 4-7. Every image in this document is a fixed object. The background picture's opacity is reduced, to make the text readable. Text wrapping is turned off for this picture so the text flows over the top of it. All the other pictures feature a white border and a shadow. Some are rotated and arranged in overlapping layers. Pages wraps the text around the two bottom pictures. The headline is a text boxâanother kind of fixed object. When you use a text box for the headline, it's easy to reposition it anywhere on the page.
In the toolbar, click the Media button or choose View â Show Media Browser to take a look at all the digital goodies stored on your Mac. The Media Browser window appears (Figure 4-8). The pop-up menu at the top of the window lets you choose between iTunes, iPhoto, and Movies. The window appears, showing whichever category you last used.
The upper pane displays playlists, albums, or folders, and the lower pane displays songs, photos, or movies.
Note
For more on how to create and store files in iPhoto, iTunes, and iMovie, check out iPhoto 5: The Missing Manual; iPod and iTunes: The Missing Manual; and iMovie HD: The Missing Manual.
Drag a photo from the Media Browser window into the document if you want to put it into the document. When you add a photo to a Pages document, Pages copies the pictureâit becomes part of the document file. That way, if you move that Pages document to another computer, Pages displays all the pictures you've added.
When you drag a sound file into your document, it shows up as a loudspeaker icon. Double-click it to play; single-click to stop.
Drag a movie into your document and it looks just like a still pictureâdisplaying the first frame of the movie. Again, double-click to play; click to stop.
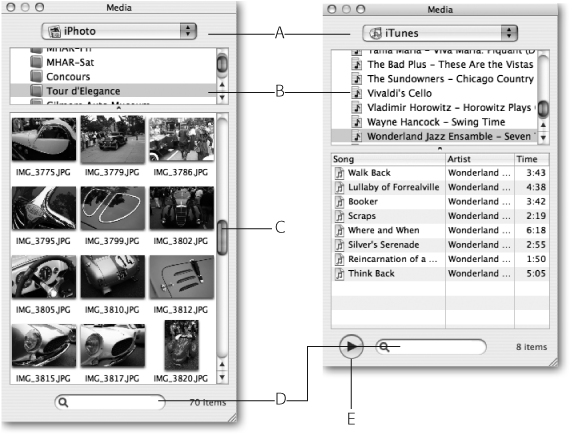
Figure 4-8. Click the Media button in the toolbar to reveal the back door to your iPhotos, iTunes, and movie collection. Use the pop-up menu to switch from one collection to the other (A) and then choose a playlist, iPhoto album, or movie folder (B). Use the scroll bar (C) to view the contents of the selected folder. You can also search for the file by name, by entering the name or part of the name in the search field at the bottom of the window (D), and then pressing Return. The iPhoto and Movie browsers contain a Play button (E), so you can preview your selection. When you locate the picture, song, or movie, drag it from the Media Browser into the document.
Tip
If you include music or movie files in a Pages document, the program normally doesn't duplicate those files in the document. Instead, due to the large size of music or movie files, Pages links to those files on your hard disk.
If you need to be able to view the document on another computer, you must either transfer copies of those linked files along with your Pages document, or, when saving the Pages document, click the flippy triangle next to the Save field and turn on the checkbox labeled "Copy audio and movies into document." This move insures that all your media files are included in the Pages documentâand it can also ensure that that Pages document file is going to be mighty big, possibly too big to email or even fit on a CD.
Once you set it, Pages retains this saving preference in the Save dialog boxâso be sure to turn off that checkbox if you normally use your documents on just your own computer.
After you decide what to insert in your document, the next question is how: as a fixed or an in-line object. Fixed objects are glued to a spot on the page (though you can move them later) while the text flows around or over them, whereas in-line objects are attached to the text and flow along with it.
Think of in-line objects like another character or word in a sentence. In-line objects enter the page at the insertion pointâjust like a typed character.
To create an in-line object, drag a picture, for example, from the Media Browser (or from a folder) into your Pages document. As you drag across the page margin, notice a blue outline that appears around the edges of the page. (If you drop the picture at this point, it becomes a fixed object.) Continue to drag into a column of text, press â and the blue outline shifts to highlight that columnâand an insertion point becomes visible near the tip of your arrow cursor, visible through the shadowed thumbnail (Figure 4-9). Position the insertion point where you want the picture to appear in the line of text, and release the mouse button.
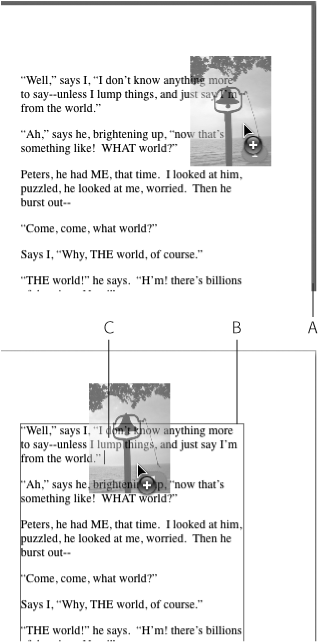
Figure 4-9. Drag a picture into a document, and Pages normally inserts it as a fixed objectâthe blue, highlighted page outline (A) shows it's supposed to be fixed on the page. Press â while dragging over the text column, and Pages highlights the column outline (B) and displays an insertion point (C), your clue that Pages is making this picture an in-line object, tied to the text at the insertion point.
Note
If you're experimenting with inserting in-line objects into a template document, you first have to replace the placeholder text with some real text. Copy some text from another document and paste it into the placeholder to give yourself something to work with.
The picture appears at the chosen point in your text, sized just wide enough to fill the column if it's a large picture. Click the image to display its selection handles. In-line objects have only three active selection handles: the black ones on the bottom, right, and bottom-right corner. Drag any of the active handles to resize the image.
You can also add an in-line object by first placing your insertion point at the spot you want it to appear, and choosing Insert â Choose. Pages displays a file-choosing window that lets you select a file from your hard drive. Click Insert to finish the job.
Fixed objects are married to a spot on the page instead of within a line of text. To add a fixed object, drag the image or file into your Pages document and drop it as soon as the blue outline appears around the edges of the pageâthen drag it into position. All eight selection handles are active on fixed objectsâdrag any of the handles to resize the picture.
Note
Pages does its best to recognize picture, movie and sound files and always adds them as fixed objects whether you drop them in a column of text or on the document border. If you'd rather see one of these as an inâline object, press âwhile dragging into a column to make Pages switch inserting styles.
Pages adds other file types that it can insertâpicture and text clippings, Web location files, and so onâas either fixed or inâline objects. Drag one into a column to make it inâline; drag it to the page margin or press âwhile dragging it to a column to make it fixed. (Pressing âreverses Pages' inserting style when you drag a file into a text column.)
You can also add fixed objects using the Insert menu. First click the margin of the document, so you no longer see a blinking insertion point, choose Insert â Choose, select your file, and then click Insert.
After you insert an object in your document, you can change it from an in-line to a fixed object, or vice versa. Choose View â Show Inspector and click the Wrap Inspector button (Figure 4-10). Select the object you want to convert by clicking it so you can see its selection handles, and then click the appropriate Object Placement button in the Wrap Inspector. "Moves with text" denotes an in-line object; "Fixed on page" a fixed object.
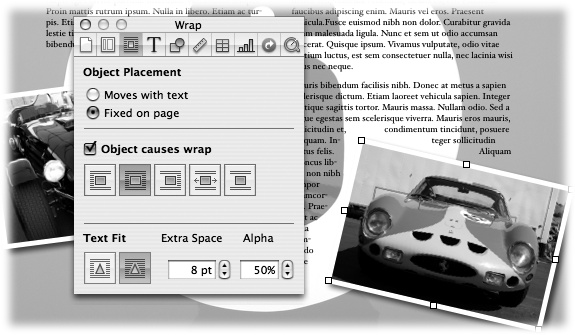
Figure 4-10. The Object Placement button determines whether an object is fixed on the page or in-line with the text. The other controls affect the object's relationship to the surrounding text. See Section 4.3.7 for all the details on text wrapping.
The Media Browser is a quick and easy way to insert pictures in your documentâbut not the only way. The Media Browser shows only those pictures stored in iPhoto. If you don't use iPhoto, you can drag photos from other photo-organizing softwareâsuch as from Extensis Portfolio or Photoshop's file browserâor directly from a folder. Pages can handle any QuickTime-supported format, including JPEG, TIF, GIF, PSD, PICT, EPS, PDF, and lots more.
Likewise, you can drag sound or movie files directly from a folder into your document. Pages can work with any QuickTime or iTunes-supported file type, including MOV, Flash, MP3, MP4, AAC, AIFF, and others. If you open a movie in iMovie, you can also drag individual clips from iMovie into your Pages document. (Incidentally, you can also drag movies from the Media Browser window into an open iMovie project's clip shelf or timeline.)
You can also use Pages' menus to insert media. Choose Insert â Choose to call up a finder-style dialog box giving you access to all the files on your computer, your iDisk, and on the network (if you're connected to one). Navigate to a picture, sound, or movie file and double-click it (or click once to select it, and then click Insert) to bring it into your document.
Pages supplies a collection of lines, arrows, and geometrical shapes you can add to your document as objects. You can use shapes as graphic elements or as containers for text.
Place your insertion point at the place you want to insert a shape as an in-line object, or click the margin of the document so the insertion point disappears, in order to insert a shape as a fixed object. Choose Insert â Shape, and then choose the shape from the submenu. Or click the Objects button in the toolbar, select Shape from the pop-up menu, and then pick a shape from the submenu (Figure 4-11).
Pages inserts your chosen shape in the document with its selection handles showing, ready for you to resize itâand if it's a fixed object, reposition it.
Tip
You can draw a shape directly in your document as a fixed object. Hold down the Option key, click the Objects button in the toolbar, select Shape from the pop-up menu, and then pick a shape from the submenu. Let go of the Option key. Your cursor changes to a crosshair shape. Drag starting at one corner of the object. Pages draws the object and displays the object's width and height measurements as you drag.
Hold the Shift key as you drag, to constrain the shape to a perfect circle, square, equilateral triangle, and so on. Hold the Option key as you drag to position the shape's center at the spot you click. Hold both keys as you drag to both center and constrain the shape.
Note
Pages makes a considerable demand on your computer's processor as you manipulate objects on screen, resulting in a significant drag lag even on fast machines. When resizing a shape, for example, drag the selection handle and be patient while Pages catches up to your cursor.

Figure 4-11. From the Objects toolbar button pop-up menu, choose a shape. Once it's in your document, you can adjust its size and placement. Pages creates shapes in a standard color based on the template you're using. See Section 4.4 for details about changing color and opacity, filling the shape with a picture, and so on. In addition to the usual set of selection handles, the large arrow shapes feature a circular handle inside the arrow (circled) that adjusts the thickness of the line and the length of the arrow head.
The first three shapes are variations on that paragon of one-dimensionality: the line. You can choose a plain line, an arrow, or a double-headed arrow. After you insert a line in your document, it sports one selection handle at each end. Drag one of the handles to change the line's length or angle. Hold the Shift key while you drag to constrain the angle to exactly 45° increments.
Open the Graphic Inspector and use the Stroke pop-up menus to adjust the line's thickness, color, and stroke (solid, dashed, or none). Use the Endpoints pop-up menus to choose various arrow and endpoint styles for the line. (The arrow and double arrow shapes in the menu are merely lines with preconfigured end points.)
Basic geometric shapes are next in the Shapes lineup. Choose from a rectangle, rounded rectangle, oval (or circle), triangle, right triangle, and diamond. Pages inserts these shapes in their most regular forms: squares, circle, equilateral triangle, right isosceles triangle, and square diamond. Hold the Shift key while you drag a selection handle to preserve these proportions while you resize.
Pages provides two big fat arrow shapesâsingle or double-headed. Instead of being lines with arrow heads, like those produced by the line tool, these are shapes that can have an outline stroke and a color, gradient, or image fill just like the other geometric shapes. You can adjust the size of the arrow head and the width of the line by using the round selection handle inside the arrow head.
The final choice in the shape menu is specially designed for comic book producers: the quote bubble. An oval with a triangle tacked on the side, the quote bubble is really made to be a text container, though you can add text inside any of the shapes (except the lines). After you insert the bubble in your document, double-click it and the insertion point appears inside. Enter text and format it using the Text Inspector, the Font panel, and the Format menu (as described in Chapter 1). If you enter more text than will fit, a plus sign (+) clipping indicator appears at the bottom of the shape. To reveal the rest of the text, resize the shape by selecting it and dragging one of its selection handles. (See Section 4.2.5.2 for more on formatting text inside a shape.)
Text boxes, callouts, pull quotes, and sidebars are common elements of page layout design. Pages' Insert â Text command helps you create these essential elements.
Text boxes are useful for highlighting or isolating some text from the rest of your document. Sidebars usually hold a paragraph or several paragraphs that are related to, but not really part of, the flow of the main text. Sidebars can stand alone as a little chapter or chunk of information. This book, for example, uses sidebars to hold these kinds of digressions.
Callouts or pull quotes highlight an important point in the main text. Since they relate directly to part of the text, they need to be placed near the relevant text. Magazine articles often have pull quotes to add visual interest to the page by breaking up the columns of plain text.
You can create text boxes with or without a frame or a background color or image. Since text boxes are objects, you can use all the object controls to rotate, layer, adjust opacity, and so on (see Section 4.3). To add a text box, follow these steps:
Click the margin of the document so the insertion point disappears. Then choose Insert â Text (or click the toolbar's Objects button and from the pop-up menu choose Text).
Pages creates a text box as a fixed object, with the insertion point blinking, ready for your text input. Begin typing.
Click outside the text box then click back inside it in order to select the boxâand then drag it into position on the page. (Alternatively, press â-Return to select the box when you're in text-entry mode.)
Drag the selection handles to resize the box. If you type more than the box can hold, a clipping indicator appears at the bottom of the box to show you that some of your text is clipped off or hidden (Figure 4-12). Resize the box to reveal the hidden text.
Although Pages creates text boxes only as fixed objects, once they exist, you can change them into in-line objects, just like you can with other kinds of objects. You might find this ability useful, for example, to keep a pull quote connected to the paragraph it's pulled from, even if you add or delete text in an earlier part of the document.
If so, select the text box so its selection handles are visible and drag it close to the position you want to appear as an in-line object. Open the Wrap Inspector and click the "Moves with text" button. Pages converts the box to an in-line object and places it into your text. Drag the box and position it exactly, watching the insertion point as you drag. Drop it when you get the insertion point in the right spot.
Usually you want your main text to wrap around a pull quote. Turn on the checkbox for "Object causes wrap" in the Wrap Inspector and choose one of the wrapping styles to position the text box in the column of text (see Section 4.3.7 for more on wrapping text). Adjust the Extra Space setting using the up and down arrow button to insert more or less white space above and below the text box. (The Text Fit and the Alpha adjustment don't apply to text box objects.)
Note
Pages can automatically create a text box from copied text. Copy some text from another document or from another place in the current document. Click the margin of the document so the insertion point disappears, then choose Edit â Paste and Match Style, or press Option-â-Shift-V. Pages inserts a new text box containing your copied text. Resize or reposition the box, and reformat the text if you need to.
POWER USERS' CLINIC: The Missing Equation Editor
Do you fret over the possibility that ![]() or do you just want to be able to write "2/3 cup of flour" in a recipe? In either case, you have to look outside of iWork for a solution. (Solving the equation, however, is up to you.)
or do you just want to be able to write "2/3 cup of flour" in a recipe? In either case, you have to look outside of iWork for a solution. (Solving the equation, however, is up to you.)
If you have AppleWorks 6, you also have a handy program for the mathematically inclined, called Equation Editor. You find it in your AppleWorks 6 folder â AppleWorks Essentials â Equation Editor â Carbon. You can use its 19 pop-up menus for operators, radicals, Greek letters, and other doodads to create anything from simple fractions to complex equationsâthen copy and paste them into Pages as fixed or inâline objects.
Since these typographically impressive equations are graphic objects instead of text, you can resize, rotate, or manipulate them in other ways like any objectâbut you can't edit them. If you discover an error in an equation, you have to copy it from Pages and paste it back into Equation Editor to modify itâor just start over in Equation Editor.
If you require more powerful equation-wrangling softwareâor if you don't have AppleWorks' Equation Editorâyou can purchase Equation Editor's smarter sibling: MathType. earn about its advanced capabilitiesâand about how to get the most out of Equation Editorâat www.mathtype.com.
If you have more text than will fit in one text box, or want to break up a sidebar into two or more portions, Pages can link the text boxes so the text flows from one to another. Magazines use this technique as a running sidebar that occupies, for example, the right column on the right page for several pages running. Linked boxes behave as one virtual text boxâif you add extra text to the first box, any displaced text flows into the next linked text box. Or, if you Select All, Pages selects the text in all the linked text boxes. You can have linked text boxes on the same page or separate them by many pages.
To make a linked text box, create the first text box and type or paste text into it. Press â-Return to select the text box. Pages displays the selection handles and the linking and clipping indicators (Figure 4-12). Click the blue link indicator on the right side of the text box to create a linked text box. If your first text box was over-flowingâindicated by the + sign clipping indicatorâthe text automatically spills into the linked text box. Reposition and resize this boxâand if you need to, click the blue linking indicator on its right side to create another linked text box. A glance at the linking indicators on a text box reveals whether it's linked to a preceding or following text box.
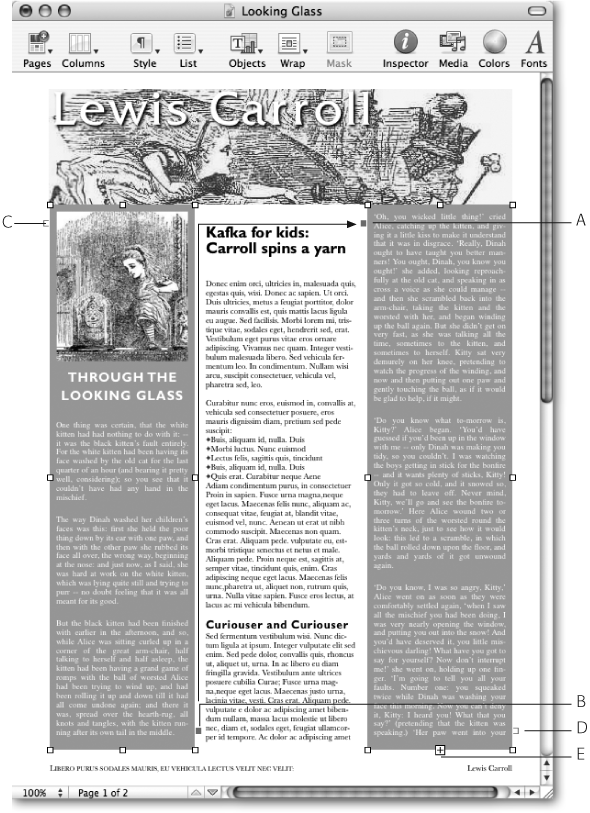
Figure 4-12. Text boxes feature a few extra ornaments around their perimeter in addition to the usual resizing handles. The filled link indicators indicate if it's linked to a previous box (A) or a following text box (B). Open link indicators show that it's the first (C) or last (D) of the set. A clipping indicator (E) shows that there's more text than fits in the box. If you click the left link indicator for the first box in a set (C), Pages creates a new first box above this one, and shifts all the text upward so it begins in the new first box. Click a filled text box to insert another linked box in the middle of the series. Pages shifts text up from the following boxes to fill the new box you've made.
You can create a chain of as many linked boxes as you require. When Pages creates a linked text box, it establishes that box's order in the chain for the flow of text. But Pages doesn't prevent you from dragging linked text boxes into any order you want within your documentâthough your readers may wish it had.
You can select all the text in a series of linked text boxes to change font formatting or to copy the text to another document, for example, by placing the insertion point in any of the text boxes and pressing â-A (or choosing Edit â Select All).
If you need to move a set of linked text boxes at once, hold down the Shift key and click the other boxes in order to select the whole set. Then you can drag them to a new location in your document. However, if you need to move them very far, you'll find it more convenient to cut and paste. Select the text boxes, and then choose Edit â Cut. Scroll to the page in your document where you'd like to relocate these boxes, click that page's margin so you don't see the insertion point, and then choose Edit â Paste. The text boxes appear with all their links intact.
If you cut or copy and paste just one box of a set of linked text boxes, the resulting text box shows the contents of the box you copied, but none of the links.
Think of text boxes as little documents within your document. And just like a word processing document, a text box can remain a modest construction of plain text, or you can dress it up and decorate it with a background color or image, borders, shadows, tables, charts, pictures, even columns (Figure 4-13).
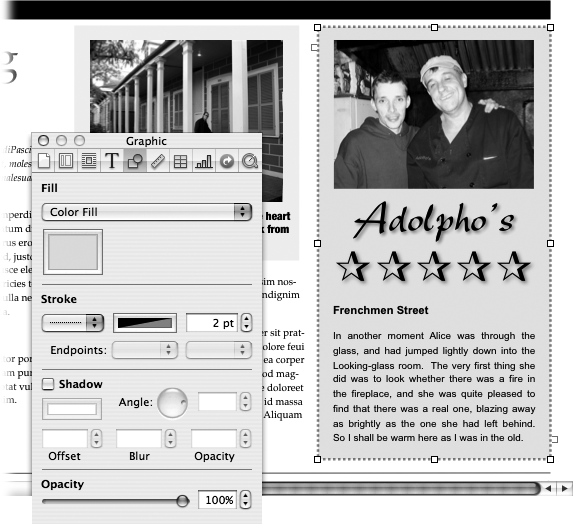
Figure 4-13. Adjust the "box" part of a text box with the Graphic Inspector, just as you would with a shape. From the Fill pop-up menu, choose Color Fill, click the color well, and then choose a color from the Color Picker to add a background color to the text box. Use the Stroke section to add a line or border around the box. You can turn on the Shadow checkbox to add a drop shadow to the text box, so it looks like its floating above the page. The Opacity slider controls opacity for the entire text box: background, border, text, and in-line graphics.
You can add a solid color, a gradient (a fill color that gradually blends one color into another), or an image to the background of a text box; you can also choose to add a border, a drop shadow, or adjust its opacity. The Graphic Inspector houses the controls for these functions, which behave as they do with other objects. Find all the details beginning on Section 4.4.
You can also apply paragraph background colors to individual paragraphs within a text box. If you've applied a fill color or image to the text box, the paragraph fill overrides it for the selected paragraph. Place your insertion point within a paragraph in the text box, and then open the Text Inspector's More tab. Turn on the checkbox for Paragraph Fill and click the color well to summon the Color Picker. Choose a color and adjust the Opacity slider to see the effect on your text box.
You can add other objectsâimages, shapes, tables, or chartsâwithin a text box as in-line objects. Place the insertion point in the text at the spot you want to insert the object, and choose the type of object from the Insert menu or from the Objects button's toolbar pop-up menu.
You can use fixed objects within a text box as well, but you're actually creating two or more layered objects on the page. To add a fixed object, click the margin of the document so the insertion point disappears, and then choose the type of object from the Insert menu or from the Objects button's pop-up menu in the toolbar. Resize the object and drag it into the text box. Open the Wrap Inspector, select the wrapping style, and adjust the Text Fit option if necessary (see Section 4.3.8). You can attach the object to the text boxâso it moves along with it if you reposition the text boxâby grouping the two objects. Select the object, hold down the Shift key, and then select the text box. With both items selected, choose Arrange â Group. Now if you move the text box, the object comes along for the ride.
Note
When you group a text box with another object, you can no longer resize the box or edit its text. To do so, select the grouped object, choose Arrange â Ungroup, and then make your changes; select both items and choose Arrange â Group to tie them together again.
Pages controls the way the surrounding text wraps around a text box as it does with other objects. See Section 4.3.7 for all the wrapping details.
The way Pages arranges the text inside the text box depends on the Text Inspector's settings. Select the text box and set text color and alignment as you normally would; use the three vertical-alignment buttons to align the text with either the top of the box, the bottom, or vertically centered (Figure 4-14).
Use the bottom control in the Inspector to adjust the Inset Margin, the space between the text box's text and inside borders. Drag the slider or enter a point value in the box to increase this interior margin, which affects all four sides equally.
Note
If you've carefully situated a text box (or any fixed object) within your page layout, you can lock it down to the page so you don't inadvertently move it while you maneuver other objects on the page. Select the text box and choose Arrange â Lock. If you need to move it later, you can unglue it from the page by choosing Arrange â Unlock.
If you design really wide sidebars, you can set their text in columns. Select the text box and open the Layout tab of the Layout Inspector. Enter the number of columns and adjust their width just as you would in the body of the document (see Section 3.4.1.3 for all the details).
Fine-tune the column, gutter, and margin setup for a text box more directly by using the ruler. Choose View â Show Rulers, select one or more paragraphs in one of the text box columns, and then use the margin and first-line indent indicators in the ruler to make the adjustments. Drag the ends of the gray bar under the ruler to adjust the gutter width (Figure 4-14).
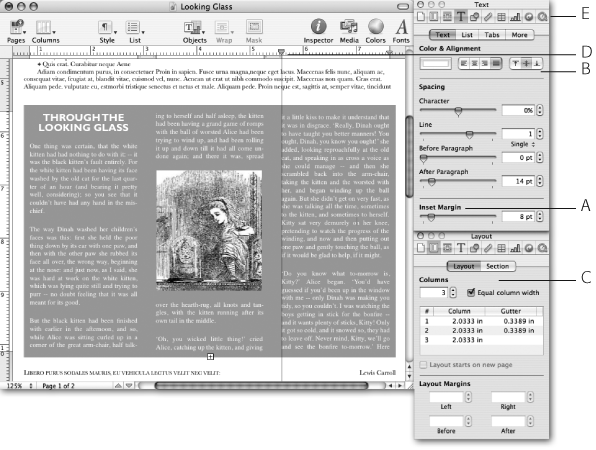
Figure 4-14. The Text Inspector controls text inside a text box just as it does body text. Additional controls let you adjust the margin inside the text box with the Inset Margin slider (A), and the vertical alignment using the three vertical alignment buttons (B). Choose to align the text against the top of the text box, vertically centered, or against the bottom. Add columns and adjust them using the Layout Inspector (C), or adjust them directly using the ruler (D). Increase your inspector efficiency by opening two or more inspectors at a time. Option-click one of the inspector buttons (E) to open a new inspector.
When you're working with pictures, text boxes, shapes, tables, and so on, Pages sees them all as objects and handles them in similar ways. Once you master resizing, rotating, and text wrapping around, say, a picture, you're ready to handle the same operations on shapes, tables, text boxes, and other objects.
Select an object by clicking it. Its selection handles appear, in effect saying, "I'm ready and waitingâmold me to your whim!" The selection handles also tell you whether the object is fixed (eight open black squares), in-line (three open black squares), a group (eight solid gray squares), locked on the page (eight X marks), or a master object (eight solid blue squares). The most basic object maneuvers are moving and resizing.
As long as an object isn't locked (see Section 4.3.9.3), you can move it by clicking inside it and dragging. You can drag fixed objects anywhere on the page or to another page in your document. When you drag in-line objects, you can only drop them into a line of text. Watch the insertion point at the tip of your arrow cursor as you drag; drop the object when your insertion point reaches the spot in the text where you want to move your object.
If you have to move an object very farâto another page or to the other end of your documentâselect the object and choose Edit â Cut. Scroll to the point in your document where you want to insert the object, and then do one of two things: to insert it as an in-line object, place the insertion point within the text and choose Edit â Paste. To insert it as a fixed object, click the margin of the document so that the insertion point disappears, choose Edit â Paste, and then drag the object into its final position.
When you place your arrow pointer over one of an object's open black selection handles, the cursor changes into a double-headed arrow, which means you can resize the object by dragging that handle. If the object in question is a picture or a movie, Pages locks its proportions to prevent you from stretching or squashing it while you resize. You're free to alter the proportions of other objectsâlike shapes and tablesâwhile you drag their selection handles. To force Pages to preserve their proportions, hold down the Shift key while you resize.
If you do want to stretch a picture, open the Metrics Inspector and turn off the checkbox for "Constrain proportions." You can always click the Original Size button to easily return to square one when you resize a picture or movie (Figure 4-15).
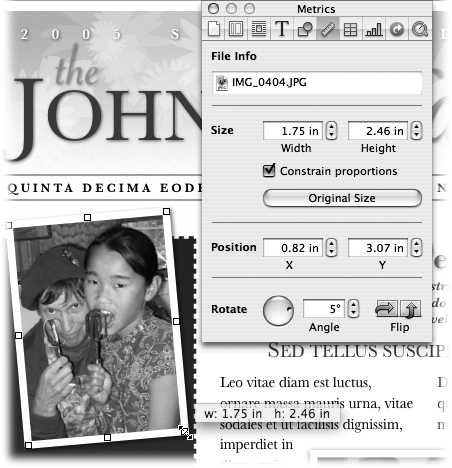
Figure 4-15. Measurement-oriented object adjustments find a home in the Metrics Inspector. You can enter size, position, and angle measurements directly in the inspector, or consult it for information about objects in your document. Create mirror image objects with the Flip buttons, return pictures or movies to their original size, and turn on or off "Constrain proportions"âwhich locks an object's proportions so you can't squash or stretch it. The File Info field displays a picture, movie, or sound's file name. It also provides a quick way to copy one of those kinds of files out of a Pages document: just drag the file icon from the File Info field onto the desktop or into a folder.
Note
The Metrics Inspector has nothing to do with the metric system. The word metric means measurementâvarieties of which you find within this window.
Pages lets you set an object's size in this window by entering measurements in the Width and Height fields instead of dragging selection handles. This ability is especially useful when you need to match the dimensions of two or more pictures. Select two or more objects and enter width and/or height measurements. Presto: All your selected objects are now the same size. If "Constrain proportions" is turned on, you can enter only one of the dimensions; turn off that checkbox in order to enter both.
You can also use the Metrics Inspector to set an object's position on the page via the X and Y Position fields. X is the distance from the left edge of the object to the left edge of the page; Y is the distance from the top of the object to the top of the page (Figure 4-15).
When you're working with lines as fixed objects, Pages changes the Metrics Inspector's window to display the starting and ending coordinates of the line, letting you position a line by setting its X and Y coordinates. Pages assigns the Start coordinates to the upper-left end point of the line when it first appears in the document, and the End coordinates to the lower-right end point. These coordinates always apply to the same end of the lineâeven if you later rotate or flip it.
Pages' virtual T-square, the alignment guides, helps you when you want to precisely align objects with text and with each other in the page layout. You can create as many non-printing vertical or horizontal alignment guides as you need. Click the document's margin so the insertion point disappears, and then drag from either ruler onto the page. Pages displays the blue alignment guide and a box showing the distance from the edge of the page to the guide. Drop the guide when you get it into the correct position.
Page alignment guides show only on one page. Reposition them by dragging (your insertion point or arrow cursor takes on the shape of a double bar between double arrows, indicating it's ready to reposition the guideline). When you're done lining things up, remove a guide by dragging it back to the ruler or off the page. A puff of smoke signals its demise.
Objects themselves also have built-in alignment guides. Choose Pages â Preferences to see if and how Pages displays them. Pages normally has the checkbox turned on for "Show guide at object center." With this option on, page alignment guides appear when you drag an object so that its center crosses the horizontal or vertical center of the page. Center alignment guides also show up between objects as you drag one object, causing its center to align vertically or horizontally with the center of another object on the same page. All this alignment guide stuff is a little difficult to conceptualize if you've never seen these kinds of guidelines in action.
But they're worth using because they can be enormously helpful if you're trying to place an object just so; Figure 4-16 shows you how these lines work and what they look like.
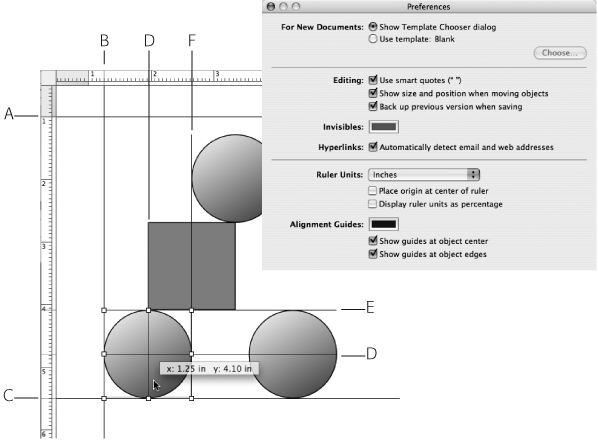
Figure 4-16. Drag from any spot on the ruler into the document to add alignment guides wherever you need them (A). In the Preferences dialog box, turn on the "Show guides at object center" and "Show guides at object edges" checkboxes to create the most alignment options. When you drag an object, the alignment guides appear whenever it aligns with another object. The selected circle's left edge is aligned with an alignment guide (B); its bottom edge is aligned with the automatic half-page guide (C); its center's aligned with the center of the circle to its right, and with the edge of the square (D); its top edge is aligned with the bottom of the square and the top of the neighboring circle (E); and its right edge is aligned with the center of the square and the left edge of the top circle (F).
If you turn on the preference checkbox for "Show guides at object edges," page alignment guides appear when you drag an object so that one of its edges crosses the horizontal or vertical center of the page. Alignment guides also show between objects as you drag one object and its edge aligns vertically or horizontally with the edge of another object on the same page. Turn on both preference checkboxes to maximize your alignment options. Alignment guides then appear between the center of one object and the edge of another, as well.
Pages' automatic "snap to guideline" feature makes it quick and easy to accurately align objects. As you drag an object and its invisible center or edge guidelines approach another guidelineâthe page center guidelines, another object's edge or center guidelines, or alignment guides you've added to the pageâthe object's alignment guides appear and the object snaps into position, perfectly aligned with the guideline.
Sometimes, however, you may need to position an object very close to, but not exactly on, a guideline. In this case, Pages' guideline magnetism thwarts your positioning efforts. Temporarily turn off this feature by pressing âwhile you drag, and you can position the object as you wish, without fear of it snapping to a nearby guideline.
Tip
The best way to carefully position fixed objects doesn't involve the mouse at all. Instead, select the object, and then use the four arrow keys to jog it one pixel at a time in any direction. Hold down the Shift key to jog objects 10 pixels for every press of an arrow key.
In Pages' preferences window, you can change the alignment guide color if you don't like the standard blueâor if your document has a blue background. Click the Alignment Guides color well to invoke the Color Picker. Click a new color in the Color Picker, and Pages adds it to the color wellâand repaints the alignment guides on the page.
Pages can automatically align two or more objects either by their edges or their center lines. To align several objects, select them, choose Arrange â Align objects, and then choose one of the commands from the submenu. The Left, Center, and Right commands align the objects vertically along their left sides, vertical centerlines, or right sides. The Top, Middle, and Bottom commands align objects horizontally along their tops, horizontal centerlines, and bottom sides. Figure 4-17 shows the effect.
Sometimes being spaced out is a good thing. Perhaps you have four objects and you want them evenly spaced across the page. Drag the objects into the approximate arrangement you want, placing the first and last objects in the series precisely. Hold the Shift key and click to select each of the objects. When they're all selected, choose Arrange â Distribute Objects â Horizontally (or Vertically). Pages adjusts the objects, equalizing the space between them. Then use the align command, described above, to straighten out the line.
If you're distributing objects horizontally (or left to right), they don't have to be aligned vertically (or up and down), and vice versa. Figure 4-17 illustrates this situation.
If you've lined up a group of objects vertically so they're directly above one another, and you choose Arrange â Distribute Objects â Horizontally, Pages moves the lower objects to the right, aligning the left edge of each object with the right edge of the object above it. Similarly, give the command to distribute objects vertically to a group of horizontally aligned objects, and Pages moves the right-hand objects downward, aligning the top of one object with the bottom of its neighbor to the left.
Tip
Shortcut menus also give you access to object alignment and distribution commands. Select the objects, Control-click (or right-click) one of them, and, from the pop-up menu, choose the alignment or distribution command.
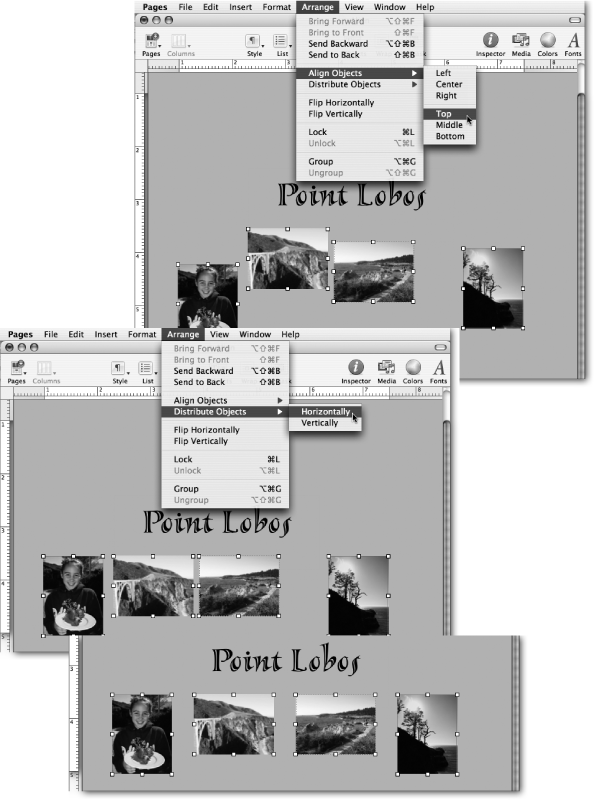
Figure 4-17. You can perfectly align and space a group of objects horizontally or vertically. Insert them into the document in their approximate positions. Place the two end objects where you want the row to begin and endâin this case, the left side and the right side. Select all the objects and choose Arrange â Align Objects â Top (top) to adjust the vertical alignment of the objects, making their tops all line up with the highest selected object. Then choose Arrange â Distribute Objects â Horizontally (middle) to space the objects equally between the two end objects (bottom). Now they're perfectly aligned and spaced. You can drag the still-selected objects or use the arrow keys to jog the row up or down the page.
Pages always adds new objects (except lines) to the page so that they're perfectly aligned with the rectangular margins of your document. If you've ever had to lay out a document the old-fashioned wayâusing paste or wax to hold pictures and columns of text in placeâthis feature alone is cause for a few hosannas. Yet there are times you'd prefer a picture, a headline, or caption to appear in your document at a jaunty angleâinstantly imparting an air of excitement, action, or even intentional sloppiness. Or perhaps you'd like to run your newsletter's headline vertically along the side or put the answer to this week's anagram upside down at the bottom of the page.
You can easily wrest your objects from the horizontal straight and narrow by pressing â while dragging an object's corner selection handle (Figure 4-18). When you drag the handle, Pages turns the arrow pointer into a curved, double-headed arrow, indicating its willingness to twist the selected object. Drag a selection handle to swivel the object clockwise or counterclockwise. Press â-Shift to rotate in 45° increments.
Pages normally rotates an object around its center point. But press the Option key while you rotate, and Pages pivots the object around the selection handle opposite the one you're dragging. And yes, press â-Option-Shift to pivot in 45° increments from the corner.
The Metrics Inspector provides another approach to rotation. Select an object and use the Metrics Inspector's Rotate knob to twist it. You can also enter an angle measurement directly, or use the up and down arrows next to the Angle field to rotate in one-degree increments. The standard or right-side-up position is zero degrees. The angle increases as you rotate counterclockwise.
The Metrics Inspector's Rotate knob also provides the only way to rotate two or more selected objects simultaneously, which is very handy when you're trying to keep multiple objects equally off-kilter.
Instead of spinning the Rotate knob with your mouse, you can also just click the knob to move its angle indicator dot to that position. Unlike a compass where zero degrees occupies the top (North) position, Pages puts the zero degree indicator at the right (East) position to indicate horizontality.
Tip
You'll find it very difficult to use the Metrics Inspector's Rotate knob precisely with your cursor right on the knob. However, you can twist the knob with tenth-of-a-degree precision if you start rotating with your cursor on the knob, and then move the cursor several inches away from the knobâin effect creating a much larger knob that you can adjust more precisely.
The final object controls you find in the Metrics Inspector are the two flip buttons in the lower-right corner. You can flip a selected object horizontally or vertically with these buttons, so you get a mirror image of the original. Or choose Arrange â Flip Horizontally or Flip Vertically to do the same thing. This tool is great when you need to write a secret message in a text box that can be read only in a mirror. (If you flip-flop frequently, consider customizing your toolbar with the Flip horizontal or Flip vertical buttons.)
When you use objectsâwhether in-line or fixedâon a page containing text, you have to determine if and how that text is going to flow or wrap around the object. You can choose to have the text run directly over the objectânot wrapping at allâor wrap tightly, loosely, just on the top and bottom, or just on one side of the object. The Wrap Inspector provides a veritable "wrapper's delight" of options for controlling this effect (Figure 4-19).

Figure 4-18. When you hold â while dragging an object's selection handle, your cursor becomes a curved double-headed arrow and you can rotate the object directly (circled). To make more precise rotation adjustments, open the Metrics Inspector and use the Rotate knob. But instead of using your cursor directly on the knob to rotate it, click the little indicator dot on the knob, and with your mouse button pressed, move the cursor a few inches away from the knob. Then you can make very fine adjustments to the rotation angle as you move your cursor around the knob's axis.
To wrap or not to wrap: that is the question Pages asks of every object in your document. Answer it by selecting an object, opening the Wrap Inspector, and turning the checkbox for "Object causes wrap" on or off. Pages handles text wrapping differently on in-line and fixed objects. If you turn wrapping off for a fixed object, the text ignores the object completely, running blithely over the top of the object. You might choose to not wrap text around a fixed object when you're using an image as a background on the page, for example. People often use this technique with an image whose opacity is set very low, so it appears as a faded-out background (see Section 4.2.1).
In contrast, if you turn off text wrapping for an in-line object, the text doesn't run over the top of it, since an in-line object acts like a character in the line of text.
If you choose to use text wrapping, your next decision is which of the wrapping styles to use. Click the Wrap Inspector's buttons in turn to see their effect on the text around your object (see Figure 4-19 for a comparison of wrapping styles).
In-line wrapping styles differ slightly from their fixed-object counterparts, but they can produce wrapping results that are visually identical. Their vital distinction, of course, is that the object is tied to the text at the anchor point indicator and stays linked to that text, no matter how much you edit it.
You can use the controls at the bottom of the Wrap Inspector to determine how tightly text wraps around an object. Use the up and down arrow buttons or enter a number in the Extra Space field to set the margin Pages creates between the object and the surrounding text.
The Text Fit buttons and the Alpha field apply only to objects that contain a transparent area known as an alpha channel (see the upcoming sidebar "Alpha Channels").
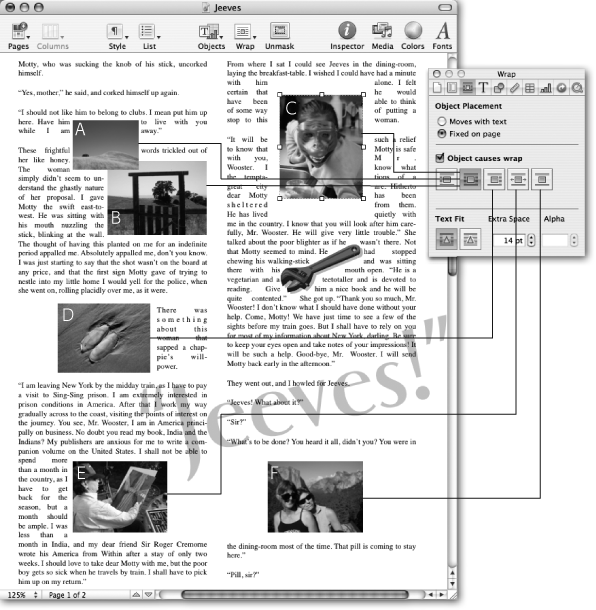
Figure 4-19. You can determine exactly how text wraps around objectsâor have your text ignore the objects completely and plow right over themâusing the Wrap Inspector. The low-opacity background text box ("Jeeves!") has its wrapping checkbox turned off. The upper three pictures use the standard wrapping style, where the text flows around all sides of the object. Use the Extra Space setting to wrap the text tightly (A, B) or loosely (C). Two of the buttons allow you to wrap text around only the left or right side of the object (D). The fourth button wraps the text to whichever side of the object has more space (E) while the last button keeps the column free of text on both sides of the object (F). If your graphic contains an alpha channel (see the sidebar "Alpha Channels"), you can select the second Text Fit button and adjust the Extra Space control to wrap text tightly to the object's contours (the wrench).
Consider this common layout problem: you prepare a picture for your brochure, cropping it to just the right size before adding it to the layout. Later, when making the final adjustments to your design, you decide the picture needs to be a quarter inch taller and half an inch narrower. So you delete the picture, go back to your photo-editing program, open the original image again, recrop it, save the new cropped version, and reinsert it into your layout. Or, even worse, you go back to open the original picture and discover you only saved the cropped version. (This heartbreaking scenario can't happen if you use iPhoto, which always saves your original. Choose Photos â Revert to Original to get it back.)
Pages prevents all this shuffling back and forth to your photo program for cropping purposes. Instead, it lets you mask your photos right in your layout, cropping them by selecting the portion of the picture to display while hiding the rest of the picture from view. If you need to adjust the cropping later, just unmask the photo to reveal its full size again, and then recrop it by adjusting the mask.
Note
The only objects you can mask in Pages are pictures, and they must be placed as fixed objects. However, once you've completed the masking process, you can convert the resulting image into an in-line object if you go to the Wrap Inspector and select "Moves with text."
Using Pages' mask feature is pretty easy; just follow these steps:
Insert a picture in your document as a fixed object, or click an existing one to select it (see Section 4.2.2.3).
Choose Format â Mask.
Pages displays a masking rectangle inside your selected picture. Adjust its size with the selection handles. As you adjust, a dimension window appears, displaying the width and height of the mask (Figure 4-20). Press Shift as you drag to constrain the masks proportions. Rotate the mask by pressing âas you drag a selection handle.
You can also use the Metrics Inspector or the optional rotation key combinations to manipulate your mask. These methods work on masks just like they do when rotating a picture, as described on Section 4.3.6.
Click inside the mask's window and drag the mask to position on your picture; or drag the dimmed part of the picture to maneuver the picture under the mask. Pages displays blue guidelines when you center the mask vertically or horizontally on the picture.
When you're happy with your cropping efforts, press Return to apply the mask.
Any time you need to recrop this picture, double-click it to display the mask again.
Pages displays the dotted mask outline; click the outline to reveal its selection handles. Resize, reposition, or rotate the mask, and then press Return to apply the mask to the picture again.
If you need to completely unmask this image, select it and choose Format â Unmask.
Pages displays the picture in its full glory once again.
If you do very much of this sort of thing, add the Mask button to the toolbar to make applying the mask easier (see Section 1.2).
After you've garnished your document with objectsâmodified, resized, positioned, and wrapped themâyou may still not be finished with object manipulations. Pages offers a few more options to control how an object relates to the page and to other objects around it.
Any time objects overlap one another, or whenever a fixed object appears within a block of text, one object has to be in front of another. Pages manages multiple objects by placing each object, and the text, on its own invisible layer. In this way, objects are free to overlap one anotherâeven obscure underlying objects completelyâwithout harming the individual objects.
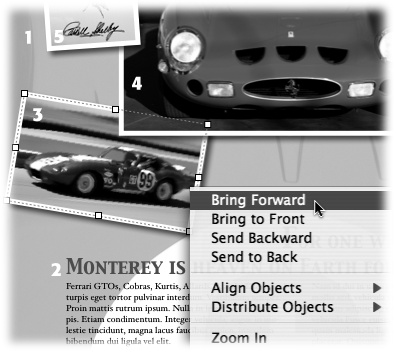
As you add objects to your document, Pages places them on the top layer; the new object covers up any portion of another object it overlaps. The text layer (which also contains any in-line objects) always starts out as the background layer. You can move objects forward or backward through the layers by choosing Arrange â Bring Forward or Send Backward (Figure 4-21). Move a selected object all the way to the front or back of the pile by choosing Arrange â Bring to Front or Send to Back. Pages provides Front, Back, Forward, and Backward buttons that you can add to the toolbar to speed up the layer adjusting process. Better yet, Control-click a selected object (or right-click if you have a two-button mouse) and, from the pop-up menu, choose the layering command.
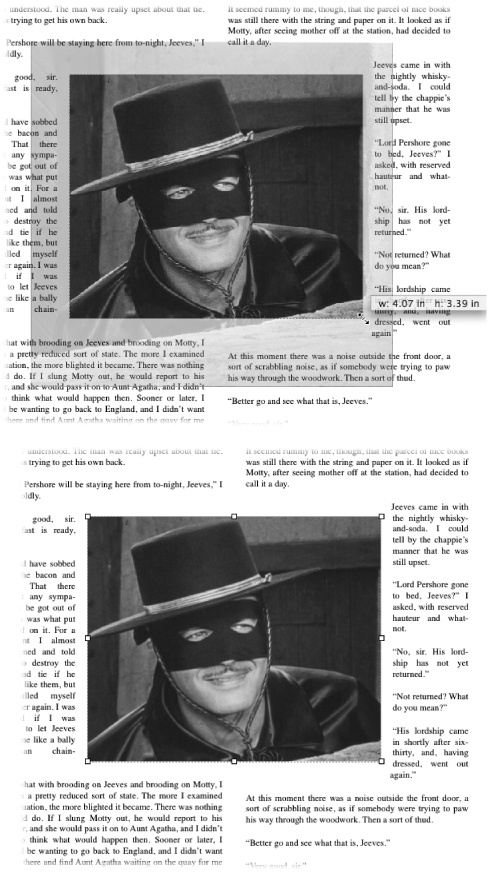
Figure 4-20. Instead of cropping pictures before you import them into Pages, use a mask. Import a picture at full size, choose Format â Mask, and then adjust the size of the mask to crop the picture (top). Finish by pressing Return to hide the masked-out part of the picture (bottom). Double-click the picture and readjust the mask any time you need to recrop it.
Although the text layer begins as the rearmost document layer, you can move objects behind the text, in order to run text over a background image, for example. But once you place an object behind the text, it's difficult to select the object in order to resize or reposition itâsince clicking it only selects the text in the layer above it. Circumvent this problem by clicking the page margin and dragging over the background image. Once the selection handles appear, you can manipulate it again.
Should you decide to make a global change to the fixed objects in your document, select one object or click the document's margin so the insertion point disappears, and then press â-A (or choose Edit â Select All). With all the objects selected you can, for example, delete them all, shift their position using the arrow keys, or simultaneously add a shadow to all of them. In fact, you can apply any object adjustmentâusing the Object Inspector, the Metrics Inspector, the Wrap Inspector, or the Arrange menuâto all the objects at once.
After going to the trouble of precisely positioning fixed objects relative to one another, you may find it useful to move, rotate, or copy them as if they were a single object. Pages gives you the power to group objects in this wayâand later, if you need to adjust them individually, ungroup them.
Hold down the Shift key as you click the objects you want to group, selecting them all (all objects must be on the same page). Choose Arrange â Group, and Pages replaces the individual selection rectangles with just one set enclosing the whole group. Grouped objects feature solid gray selection handles to differentiate them from other kinds of objects (Figure 4-22). Pages treats grouped objects like a single entity. With the exception of resizing, you can apply all the object manipulations and adjustments to a group that you can to a single object.
Select an object group and choose Arrange â Ungroup to restore the objects' individuality so you can, for example, resize or delete one of the group members.
You can lock a fixed object to the page to ensure you don't accidentally shift it out of position as you work on your layout. To lock an object, select it (or hold down the Shift key to select several objects). Choose Arrange â Lock, and Pages nails it to the page, replacing its selection handles with X marks to indicate its immutable status (Figure 4-22). Although you can still select locked objects, you can't change them in any way until you unlock them.
Unlock an object by selecting it and choosing Arrange â Unlock. Pages immediately returns the powers of adjustability, and it's a normal object once again.
Pages reserves a special, über layer for a unique class of object. Master objects appear on every page of your document, or every page of a section if you've broken your document into sections (Section 3.5.3). You'll find master objects very useful in order to do things like place a watermark or logoâusually at a very reduced opacityâon every page's background.
To create a master object, insert a fixed object on any page of the document (or section); then size, crop, position, and adjust its opacity. If the object isn't going to be in the background, set its text wrapping options. If it's going to be a background object, select Arrange â Send to Back.
Choose Format â Advanced â Move Object to Section Master to turn the selected object into a master object.
You can create more than one master object on the page, layering and arranging them just like normal objects. When you've finished arranging them to your taste, hold the Shift key while you click each of the objects to select them all. Then choose Format â Advanced â Move Object to Section Master to turn the selected objects into master objects.
Once you've transformed an object into a master object, it appears on every page of the document (or section), but you can't edit itâit's totally immune to your selection efforts. To edit a master object, Choose Format â Advanced â Make Master Objects Selectable. Now you can click a master object and its selection handles reappear, this time as blue squares signaling its master object status (Figure 4-23). Move, resize, or rotate the object; or, if you decide you don't want it as a master object, press Delete to remove it from every page.
When you've finished editing the master object, choose Format â Advanced â Make Master Objects Selectable again. This time the menu command has a checkmark in front of it to indicate that the command's active. The second time you choose the command, Pages turns off that checkmark, and returns the master objects to their non-selectable state.
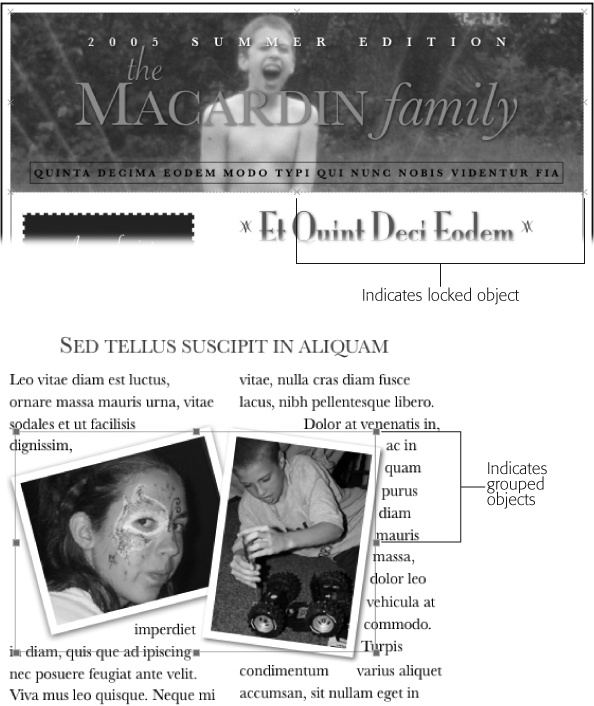
Figure 4-22. Top: Select an object, choose Arrange â Lock, and Pages fastens the object to the page to prevent you from shifting its position as you edit the document. If you select a locked object, it displays Xs instead of selection handles, and resists your efforts to change or delete it. Choose Arrange â Unlock to modify or delete it. Bottom: When you select two or more objects and choose Arrange â Group, Pages staples the two together and they become a single object you can manipulate as one. When you select grouped objects, Pages indicates their special status by surrounding them with solid gray selection handles.
You can transform a master object back into a regular fixed object by selecting it as described above, and then choosing Format â Advanced â Move Object to Page. Pages exchanges the blue handles of a master object for the hollow black handles of a regular objectâand now you can maneuver it like any other fixed object.
Note
When you change a master object back to a regular object by using the Move Object to Page command, Pages changes every occurrence of that master object in your document into regular fixed objects, all of them selected. In other words, if you have a 20-page document featuring your logo as a master object showing on every page, choosing Move Object to Page creates separate logo images on every page of the document, all selected so you can resize, rotate, reposition, or delete them together.
If you want to change an object's master status so it becomes a normal object on just one page of your document, select the master object, choose Edit â Cut, and then immediately choose Edit â Paste. Pages cuts the master object from your document and then pastes it back in as a standard fixed object.
Besides arranging objects' size and placement on the page, you can also adjust the way each object looks by adjusting its various properties. Object properties include things like fill color, line color and style, drop shadows, and object opacity. The Graphic Inspector and the Color Picker are your command center for making these adjustments.
You can add or change the color of shapes, backgrounds, shadows, table cells, and chart elements. You can fill these objects with solid colors, gradientsâin which two colors blend gradually into each otherâor images.
Any time you need to adjust the color of shapes, text, backgrounds, lines, or shadows, select the object and click one of the Inspectors' color wells to call the Color Picker to the fore. (Alternatively, you can click the toolbar's Colors button, or choose View â Show Colors.)
The Color Picker is a part of OS X, and comes into play in many different programs when you need to adjust colors. The Color Picker provides five different approaches to choosing colors through the buttons at the top of its window (Figure 4-24). But whether you choose the color wheel or the crayons for picking colors, the options in the rest of the window stay the same. Select a color using any of the five Color Picker displays and see the color in the swatch box.
Slide the Opacity slider to the left to make the color more transparent (or enter an opacity percentage directly in the % box). As you adjust opacity, the color swatch takes on a diagonally split-screen appearance, with the reduced opacity color displayed on the bottom of the swatch. The upper part of the swatch box displays shades of grayâactually the mask that Pages applies to the selected color to reduce its opacity (or increase its transparency). In other words, if you set the opacity to zero, the upper part of the swatch shows pure black, masking out all the color and resulting in no color. Increase the opacity, and that black turns into lighter and lighter gray, letting more of the color show through, resulting in more opaque colorsâuntil you reach 100 percent opacity, or pure color.
Instead of mixing up your own colors with the Color Picker, you can just find a color in any document or any object on your screen (even outside of Pages), and load it into the Color Picker's swatch. For this trick, click the magnifying glass icon next to the color swatch. Pages turns your cursor into a magnifying glass icon with a crosshair in the middle. The magnified view through this magnifying glass allows you to choose individual color pixels. Maneuver the magnifying glass over any part of your screen until the color you want appears as the central pixel in the crosshairs. Click the mouse to load that pixel's color into the Color Picker's swatch.

Figure 4-23. You can make any object appear on every page of the document or section by turning it into a master object. Select the object and choose Format â Advanced â Move Object to Section Master. People often use master objects for logos or a background image like these falling leaves. To edit master objects, choose Format â Advanced â Make Master Objects Selectable. Pages identifies selectable master objects with blue selection handles. When you're finished editing, choose Format â Advanced â Make Master Objects Selectable again. This time, Pages removes the checkmark from the menu command and returns master objects to their un-selectable, locked condition.
If you mix up a color you like or swipe one with the magnifying glass, you can save it for future use as a favorite in the color palette. Whether it's a pure color or a reduced-opacity color, drag from the swatch down to one of the squares in the color palette at the bottom of the window. By saving your favorite colors in the color palette, you can use them in different parts of your document for different types of objects, text, or backgrounds. And since the Color Picker is a system-wide feature, you can use them in other documents or other programs. This ability's especially useful if you want to maintain a consistent look across several documentsâfor example, a brochure, business card, or stationery. The color palette's standard display is one line of boxes at the bottom of the Color Picker window, but if you need more, grab the little dot on the bottom edge of the window and drag it down to reveal more storage spots. You can also widen the Color Picker window to increase the paletteâup to a maximum of 300 spots. Click a saved color in the palette to load it in the Color Picker's swatch, or drag it directly to an object.
Pages provides the Graphic Inspector to control objects' colorsâboth their fill (interior color), and their stroke (outline color). The Graphic Inspector also lets you add a shadow to an object and adjust the object's opacity.
You can add a fill color to any shape, text box, table cell, or chart element. Select one of these objects. From the Fill pop-up menu, choose Color Fill, and then click the color well that appears beneath the pop-up menu to bring up the Color Picker. Click any color in the Color Picker or any color you've saved in its color palette, and Pages applies it to the selected object. As you adjust the Color Picker's opacity slider, you can see its effect on the object's fill.
Instead of filling an object with a solid color, Pages can create a gradient fill, a fill color that gradually blends one color into another. From the Graphic Inspector's Fill pop-up menu, choose Gradient Fill, and Pages displays two color wells beneath the menu: one for the starting color and one for the ending color. Click the upper color well and choose a starting color with the Color Picker; then click the lower color well and choose an ending color. You could choose, for example, red and yellow to create a gradient that transitions from red through all the shades of orange to yellow.
A gradient starts at one side of an object and ends at the opposite side. Click the arrow buttons to set the gradient direction from top to bottom or left to right. Use the Angle knob or enter an angle directly in the angle field to set any other gradient direction. Click the double-headed arrow to invert the gradient, swapping the starting and ending colors (Figure 4-25).

Figure 4-24. Top: The many faces of the Color Picker, selected from the row of buttons at its top, offer five different ways to choose colors. Bottom: You can copy a color from anywhere on your screen in order to do things like match a text box color to a color in a picture. Click the magnifying glass (A) and Pages turns the arrow cursor into a magnifying glass. Drag the magnifying glass cursor over a color (B), and click to load that color into the swatch (C). Use the Opacity slider (D) to adjust the color's transparency, and drag from the swatch to one of the Text or Graphic Inspector's color wells to change the color of a text box or of a shape's fill, stroke, shadow, and so on. In order to use the exact same color somewhere elseâeven in another document or another programâdrag from the swatch down to one of the palette squares (E), where you can save your color for future quick access. Solid squares are opaque colors; those that are half dark and half light (F) are reduced-opacity colors.
Pages lets you use images as well as colors to fill objects. This is how you apply a background image to the text box, an assortment of images to table cells, or add a picture to a large arrow shape.
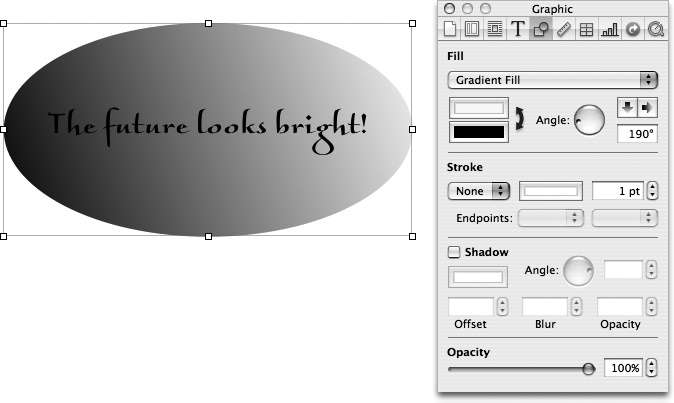
Figure 4-25. From the Graphic Inspector's pop-up menu, choose Gradient Fill to fill a shape or text box with a gradient that blends gradually from one color into another. Click each of the color wells to select a starting and ending color from the Color Picker, and then use the arrow buttons or the Angle knob to determine the gradient's direction.
Select a shape or text box, for example, and, from the Graphic Inspector's Fill popup menu, choose Image Fill. Drag an image file from the finder, or a picture from the Media Browser, into the well below the pop-up menuâor click the Choose button and select an image file from your hard drive. (The first time you use Image Fill, Pages forces you to use the Choose method by displaying the file-choosing dialog box.) Pages adds the image to your selected object and scales it according to your choice in the Scale pop-up menu (Figure 4-26):
Scale To Fit. Pages attempts to fit the entire image into the object when you choose this option. This way often results in some empty space within the object where its shape doesn't match the proportions of the image.
Scale To Fill. Choose this option and Pages resizes the image just enough to completely fill the object's shape.
Stretch. Pages stretches the image when you choose this option, distorting it a little or a lot as it transforms the image's proportions to conform to the object's shape.
Original Size. Choose this menu item and Pages places the image into the object in its exact original size. If the image is largeâlike a high-resolution photographâyou see only a tiny portion of the picture. Pages crops into the center of a large original when you choose this option; you can't choose which part of the picture to display.
If the original's smaller than the object you're filling, Pages places it in the center of the shape; you can't shift the position of a small image within the object.
Figure 4-26. You can fill a shape or text box with an image if you choose Image Fill from the Graphic Inspector's Fill pop-up menu. Choose the image you want, and then select one of the five fill variations from the Scale pop-up menu. Pages crops or stretches the image, or inserts it into the shape at full size. If the original image is smaller than the shape you're filling, the Tile option displays a repeating pattern of your image.
Tile. Choose this option and Pages fills the object with multiple copies of the image (like tiles on a countertop) only if the image is much smaller than the object. If the image is larger than the object, Pages cuts a section from the upper-right corner of the image (as if it were preparing to cut the image into mosaic tiles, perhaps?) and pastes it into the object at the original size. As you can see in Figure 4-26 (lower left), when this happens, you often end up with just a big splotch of fuzzâdepending on what's in the upper-right corner of your image.
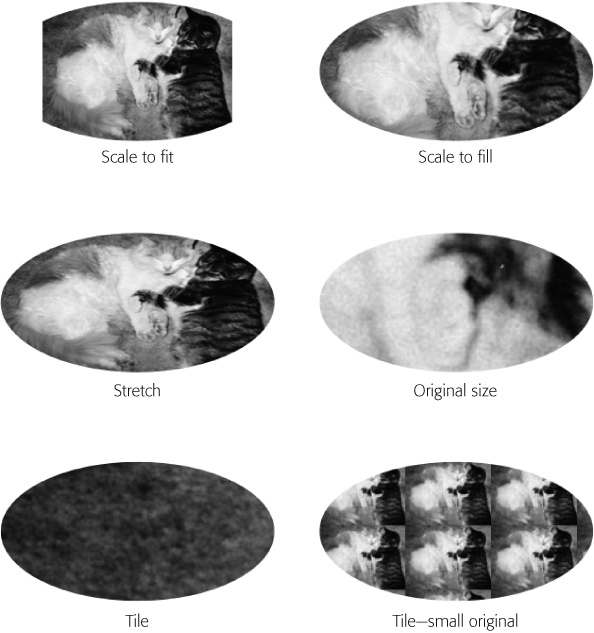
You can add a color tint to an image you use as an object fill to impart, for example, a rosy glow or a ghoulish green overcast to a picture or graphic. From the Graphic Inspector's Fill pop-up menu, choose Tinted Image Fill, select an image and a scaling style, and then click the tint color well (Figure 4-27). Pages displays the Color Picker, ready for you to choose your tint color. Select a color and adjust its opacity as Pages applies the filter to your image. If you want to tint several objects with a matching filter, drag the swatch to the color palette to use later.
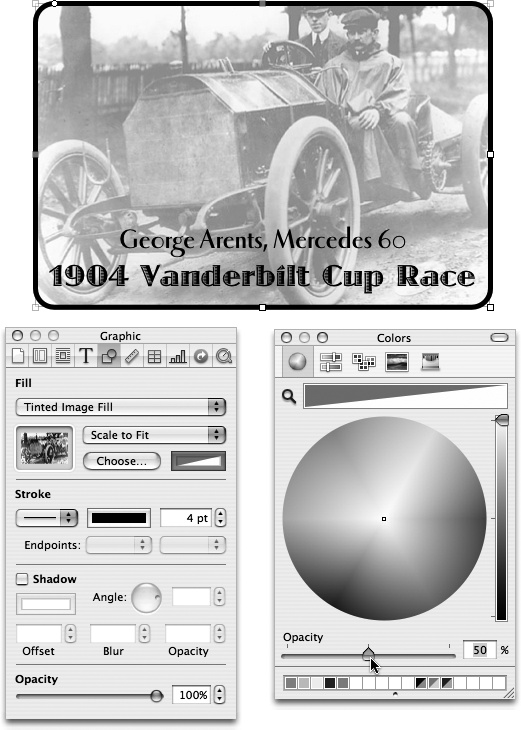
Figure 4-27. You can use a tinted image fill to add a color overlay to an image in a shape or text box. From the Fill pop-up menu, select Tinted Image Fill and click the tint color well to choose a tint color. You can also use a tinted image fill to reduce the density of a background image while keeping the shape's border and text at full opacity, as shown here. To do so, choose white as the tint color and reduce its opacity in the Color Picker.
Tip
Use tinted image fills to adjust the density of an image without affecting the opacity of the image's container. For example, decrease the density of an image you're using as a table background without affecting the opacity of the table; or reduce the density of the image you're using as a shape fill without affecting the shape's stroke or shadow opacity.
Achieve this effect by using white for the image tint color and adjusting the Color Picker's Opacity slider to produce the desired image density. Since you're adding an overlay of white, images adjusted in this way don't become transparentâthough they look the same as a reduced opacity image on a white background.
Pages uses lines (or strokes) as standard or optional components in most objects. Shapes have an outline, for example, table cells and chart elements have borders, and you can add borders to pictures or text boxes. The Graphic Inspector's Stroke section is the toolbox for making line adjustments (Figure 4-28).
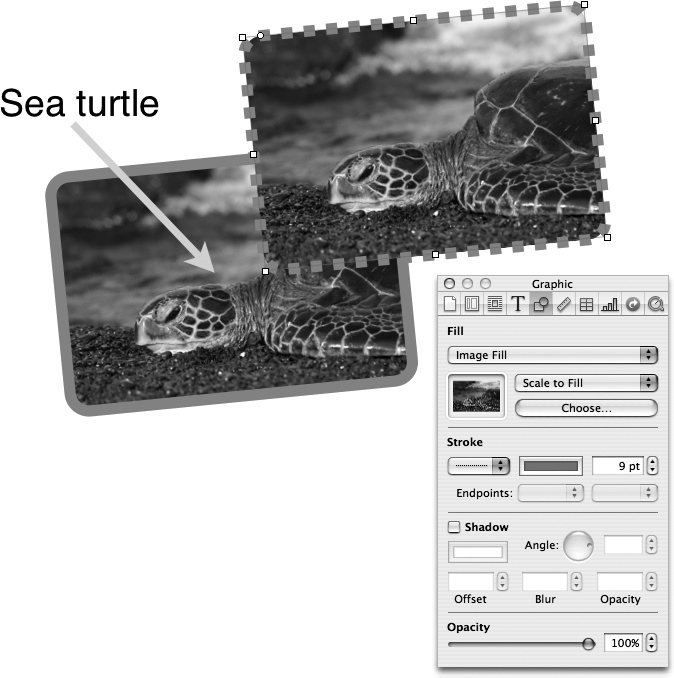
Figure 4-28. Use the Graphic Inspector's Stroke section to add, delete, or adjust lines around shapes, pictures, or text boxes; or to adjust line elements in charts and tables. You can add arrow or endpoint styles for the two line shapes with the Endpoints pop-up menus, and adjust line thickness and color. Use the Stroke pop-up menu to choose from a solid line, three dotted-line styles, or None for no lineâfor borderless shapes or pictures.
To adjust an object's line style, first select a shape, image, or text box. Open the Graphic Inspector and, from the Stroke pop-up menu, choose a line style: a solid line, three styles of dotted lines, or None for no line. Click the Stroke color well to open the Color Picker; select a stroke color and adjust its opacity. Set the line width or thickness using the up and down arrow buttons or by typing a point measurement into the width field.
Note
You can apply strokesâor borderlinesâaround an image or text box, but not around a movie or sound.
If you're formatting one of the three line shapesâthe plain line, arrow, or double-headed arrowâthe Endpoint pop-up menus come into play. The arrow-style lines are just plain lines with one or two preselected endpoint options. Use these pop-up menus to choose from various arrow or endpoint styles for each end of the line.
You can add a shadowâalso known as a drop shadowâto any object. Shadows give your document a sense of three-dimensionality: the objects appear to float above the page. Open the Graphic Inspector to get to the shadow controls.
Tip
If you add a drop shadow to a text box, you probably want to add a fill color (perhaps just white). Otherwise the text casts the shadow, not the text box. (Add text shadows using the Font Panel, as described on Section 2.1.1.1.)
Select an object and, in the Graphic Inspector, turn on the Shadow checkbox. Click the Shadow color well to open the Color Picker, and then choose the shadow's color. The standard angle for a drop shadow is to the lower right of the objectâ315° on Pages' Angle control. If you'd like the virtual light to strike your object from a different direction, adjust the Angle knob, use the up and down arrow buttons, or just type a number in the angle field.
Use the Offset, Blur, and Opacity fields to adjust the character of the shadow (Figure 4-29):
The Offset setting determines how far Pages displaces the shadow from the original object. A setting of zero offset results in the kind of shadow you'd cast at high noon on the equator. The virtual light source is directly overhead, casting an equal shadow on all sides and rendering any angle setting moot. Any number greater than zero offsets the shadow in the direction of the angle setting.
The blur setting controls how much Pages blurs the shadow behind the object. A minimum setting of one point creates a hard-edged shadow with a very slightly soft edge. Higher numbers increase the virtual cloud cover, blurring the shadow and eventually producing an indistinct haze beneath the object.
The Opacity setting determines the intensity of the shadow's color, from a nearly invisible 1 percent to a solid color at 100 percent. This opacity setting affects only the shadow. The Opacity slider at the bottom of the Graphic Inspector controls the opacity of the entire object, shadow included.
When you add objects to a Pages document, they begin life opaque, completely obscuring anything underneath them. But Pages gives you the ability to reduce the opacity of any objectâin other words, you can make it partially transparent. People often use this technique to create a pale background image on the page behind the text. You might also use reduced opacity to de-emphasize certain images, directing the reader's attention to the completely opaque one; or when layering objects in order to show the complete shape of partially obscured objects.
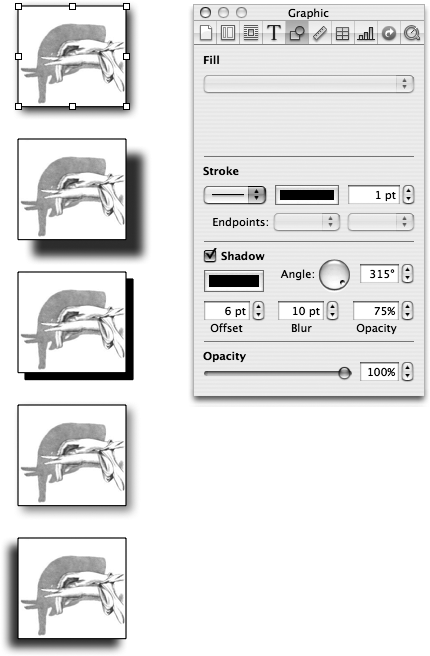
Figure 4-29. In the Graphic Inspector, turn on the Shadow checkbox to add a three-dimensional quality to your documents. Click the shadow color well to change a shadow's color, and manipulate the other controls for various effects. Top to bottom: The standard shadow, increased offset, decreased blur, decreased opacity, and a change of angle.
To adjust opacity, select an object and drag the Graphic Inspector's Opacity slider to the left to make the object less opaqueâin other words, more transparent (Figure 4-30).
Note
Pages includes three opacity controls, all with separate functions. The Graphic Inspector's Opacity slider affects entire objects. You can use the Color Picker's Opacity slider to adjust opacity of an object's fill; a line or stroke; or the text color. The Graphic Inspector's Shadow section contains an opacity control strictly for shadows.
If people are going to see your document onscreenâeither as a Pages document or a Web pageâPages lets you easily add movies and sounds. Insert them by dragging them from the Media Browser (Section 4.2.1), and then adjust their appearance and position as you would with any other object. The QuickTime Inspector holds audio-and video-specific controls for adjusting sound and movie playback options (Figure 4-31).
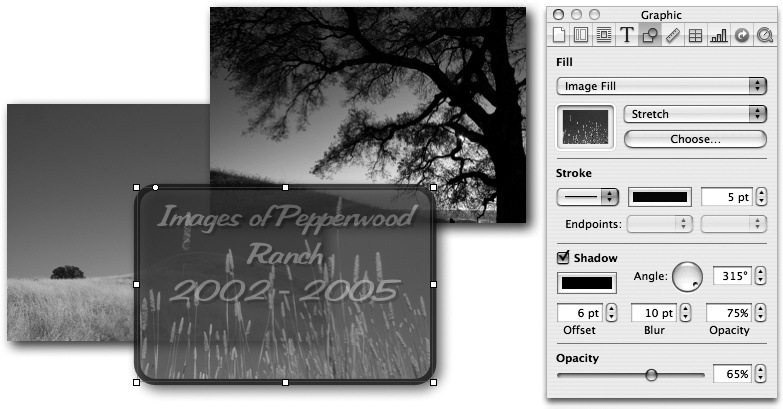
Figure 4-30. You can set the opacity independently for an object's stroke or text using the Color Picker's opacity control and for the shadow using the Graphic Inspector's shadow opacity setting. The Opacity slider in the Graphic Inspector controls the opacity for the entire object. The text box shown here features text at a reduced opacityâso the grass stalks show through slightlyâand the entire object at a reduced opacity, so the background pictures show through.
Select a sound or movie in your document and use the Volume slider to adjust its playback volume. You can use this volume control only to reduce the playback volume of a sound or movieâyou can't make it louder than normal. This volume setting affects only the selected sound or movie; you still have to adjust the computer's volume with the master volume control at the right end of the menu bar (or by choosing Apple menu â System Preferences â Sound, and, in the Output tab, adjusting the volume slider).
Use the Repeat pop-up menu to determine the playback style. Use None for normal playbackâthe sound or movie plays through to the end and then stops. Choose Loop if you want the sound or movie to play continuously over and over, starting over immediately at the beginning after it reaches the end. People often use this technique for a background video that doesn't really have a beginning or end, or for a sound loop to provide continuous background music, for example.
If you select the Loop Back and Forth option, the sound or movie reverses direction when it reaches the end, playing backwards to the beginning and then repeating. You might find this technique useful for a training film showing how to assemble parts of a machine, or how to do a magic trick.
When you add a movie to your document, Pages displays the first frame of the movie on the page as a Poster Frame. Often, however, the first frame of a movie is blackâor you prefer to show a frame from another part of the movie that's more representative of its subject. Use the Poster Frame slider to scroll through a selected movie to determine which frame Pages displays in your document. No matter which frame you select, when you double-click the movie in the document, Pages plays it from the beginning.
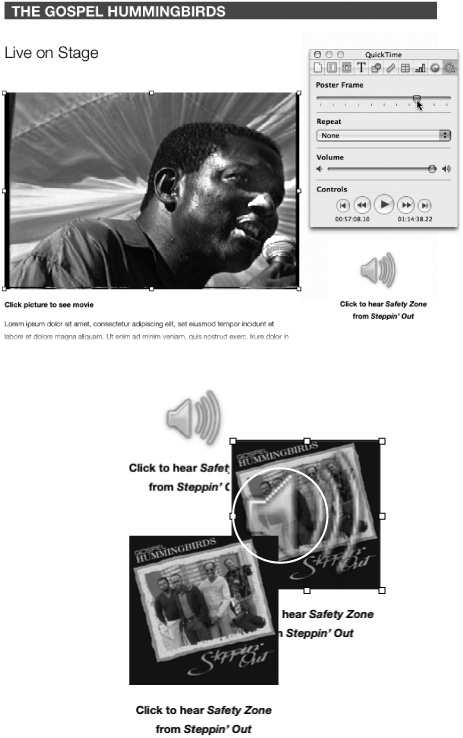
Figure 4-31. Top: When you add a movie to a document, open the QuickTime Inspector to control movie options. Drag the Poster Frame slider to select which frame of the movie shows in the document when the movie isn't playing. Use the Repeat menu if you want the movie to loop continuously, and use the Volume slider to decrease the movie's volume. When the slider's all the way to the right, the movie plays at its normal volume. Use the Controls to play the movie while you're editing in order to check the sound level or watch it loop, for example. When you've finished editing the movie, choose Arrange â Lock to keep your viewers from altering the movie size or placement when they click it to play. Bottom: The loudspeaker icon appears when you drag a song from the Media Browser. Turn a photo or object into a sound button by dragging the sound icon on top of the picture (circled). Then reduce its opacity to zero, and lock the picture and the invisible sound icon (left).
Note
You can choose whether Pages creates links to sound and movie files or actually imports them into the Pages document. Since movie and sound files are usually quite large, importing them into the document can make for a huge file size. But if you need to transfer your document to another computer, you need to include those files.
When you save the document, click the flippy triangle next to the document name to reveal the Advanced Options section. Turn off the checkbox for "Copy audio and movies into document" to create links to those files; turn on the checkbox to import them into the Pages document.
The buttons in the Controls section at the bottom of the QuickTime Inspector window allow you to play, pause, fast forward, rewind, move to the end, or move to the beginning of a selected sound or movie. Pages lets you use these controls only while you're editing in the QuickTime Inspector windowâyou can't add playback controls to your document.
Always choose Arrange â Lock when you're done editing a movie or sound, to prevent resizing or repositioning by your viewers as they click it to play or pause.
If your documents are destined to be viewed onscreen, you can make them easier to navigate by adding hyperlinks, which let you turn any word or phrase into hypertextâan automated link. Click that link to do one of three things:
Click a Bookmark hyperlink to move to another part of the current document. Whether on the same page or at the far end of a 200-page novel, Pages jumps to that location, flashing the insertion point or highlighting your chosen destination. Bookmarks are great for cross-references. You could write, for example, "As you drive south, be on the lookout for the first boojum trees and cardon cactus." Clicking those names could take you to detailed descriptions of the plants.
You can also use Bookmarks for a table of contents, where a click of a topic takes you to that part of the document.
Click a Web page hyperlink, and Pages calls up your Web browser, opening the desired page. You can use Web links to open your company's Web page, or check on the skiing conditions at Bear Valley, for example.
When you click an Email Message hyperlink, Pages summons your email program and opens a preaddressed email message. This ability is handy for communications like product orders, requests for more information, or letters to your elected officials.
The Link Inspector (Figure 4-32) is the control center for hyperlinks.
Adding bookmarks is a two-step process: first create the bookmark, and then create the hyperlink that jumps to that bookmark (Figure 4-32).
Place the insertion point or select some text in your document that you wish to bookmark. You can only bookmark textânot an object, a text box, or text inside a text box.
Choose Insert â Bookmark (or open the Link Inspector, click the Bookmark tab, and click the Add (+) button). Pages adds the bookmark to the Link Inspector.
Select the text to use for a hyperlink, and then choose Insert â Hyperlink â Bookmark.
Pages opens the Link Inspector's Hyperlink tab with the "Enable as a hyperlink" checkbox turned on, the Link To pop-up menu set to Bookmark, and the Display field showing your selected text. (You can also define a hyperlink by selecting the text you want to use for the hyperlink, opening the Link Inspector, clicking the Hyperlink tab, and turning on the checkbox for "Enable as a hyperlink." Then choose Bookmark in the Link To pop-up menu.)
Choose the bookmark you previously added from the list in the Name pop-up menu.
Now, when you click your hyperlink text, Pages displays the part of the document containing the bookmarked text, flashing the insertion point or highlighting the bookmarked text.
Note
Editing text you've defined as a hyperlink is tricky since Pages wants to jump to the bookmark, Web page, or email message any time you click a hyperlink. There are two ways to defeat this linking behavior. The sneaky way is to start dragging immediately as you click within the hypertext, selecting some or all of the text. The official way is to open the Link Inspector, click the Hyperlink tab, and turn on the checkbox for "Make all hyperlinks inactive." Then you can edit hyperlink text as you would any text, and, when you finish, turn off the checkbox to reactivate the hypertext.
If you choose View â Show Invisibles, Pages displays a blue rectangle around both bookmark and hyperlink text. But the only way you can remove a bookmark or hyperlink is in the Link Inspector. To remove a bookmark, click the Bookmark tab, highlight the bookmark in the list, and press Delete (or click the "-" button). To change a hyperlink back into regular text, select all or part of the hyperlink text (as described above), click the Link Inspector's Hyperlink tab, and then turn off the checkbox marked "Enable as a hyperlink."
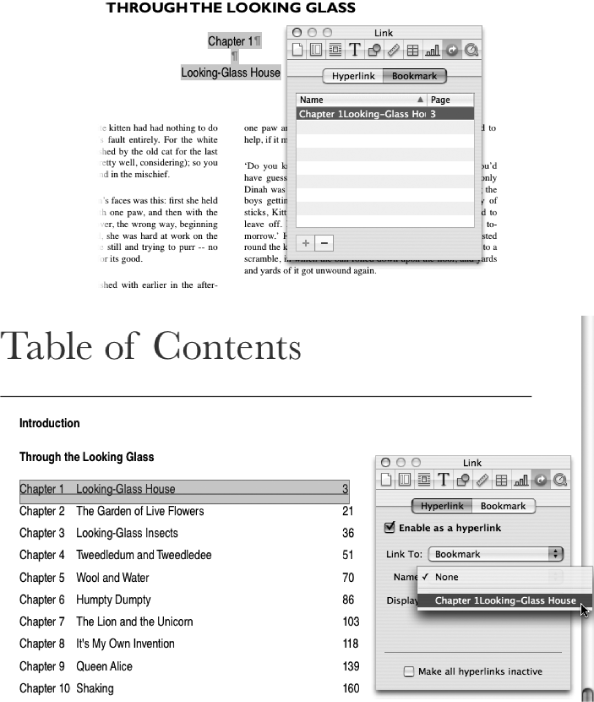
Figure 4-32. Top: You can make bookmark hyperlinks to create features like an automatic table of contents. Start by defining the bookmark. Select some text or just place the insertion point where you want the link to jump to. Open the Link Inspector, click the Bookmark tab, and then click the Add (+) button. Your selected text appears in the bookmark list. Bottom: Next, define the hyperlink that points to the bookmark. Select another chunk of text, open the Link Inspector's Hyperlink tab, and turn on the checkbox for "Enable as a hyperlink." Set the Link To pop-up menu to Bookmark, and, in the Name pop-up menu, choose the name of the bookmark to which you want to link. Pages turns the hyperlink text blue and adds an underline to show that this is a clickable link.
No document needs to be an island. To add a link from your file to anywhere out on the Web, just follow these steps:
Select some text to use for a hyperlinkâperhaps, "View the complete line of hemp seed oil car waxes on our Web site."
Choose Insert â Hyperlink â Web page (or turn on the checkbox for "Enable as a hyperlink" in the Link Inspector's Hyperlink tab and choose Webpage from the Link To pop-up menu).
The Link Inspector appears with its Hyperlink tab configured for this link, except for the URL field. Enter the URLâthe Web addressâand your Web link is complete (Figure 4-33).
Note
URL, which stands for Uniform Resource Locator, is often pronounced "earl," and means the Web page addressâfor example, http://www.missingmanuals.com. When you enter the address in the Link Inspector, begin your typing with wwwâPages is smart enough to fill in the http:// part.
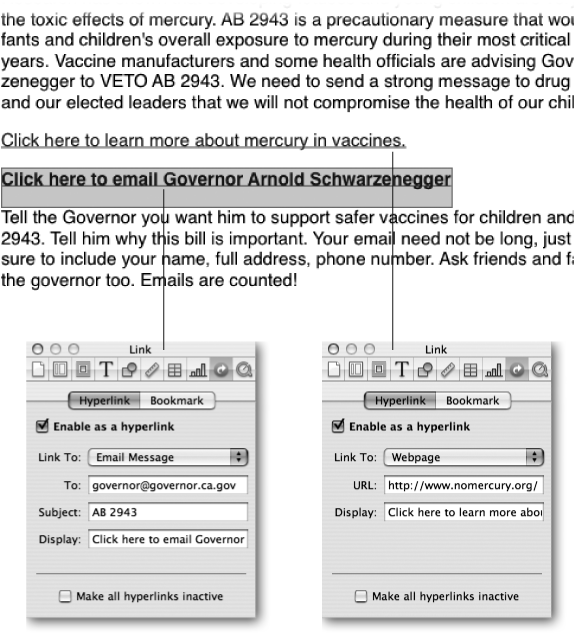
Figure 4-33. If your Pages document is going to be viewed on a computer with an Internet connection, you can create hyperlinks to open a page in your Web browser or open a new message in your email program. Select some text to use for the link in your document and open the Link Inspector's Hyperlink tab. From the Link To pop-up menu, choose Email Message or Web page and enter the email address and subject or Web page address in the appropriate boxes. The Display field shows the text you've highlighted in your document for this link. If you edit the text in the Display field it changes in your document, as well.
Select the text for an email message linkâfor example, "Let Governor Schwarzenegger know how you feel about red-light cameras in California."
Choose Insert â Hyperlink â Email Message (or turn on the checkbox for "Enable as a hyperlink" in the Link Inspector's Hyperlink tab and, from the Link To pop-up menu, choose Email Message).
The Link Inspector appears, showing the Hyperlink tab. Complete the email message setup by entering a subject for the message and an email address for the recipient (Figure 4-33).
Get iWork '05: The Missing Manual now with the O’Reilly learning platform.
O’Reilly members experience books, live events, courses curated by job role, and more from O’Reilly and nearly 200 top publishers.

