With all the talk about Pages' collection of gorgeous, colorful templates and its streamlined page-layout abilities, it's easy to forget that beneath the program's stylish veneer beats the heart of a regular word processor. One of the great things about Pages is its ability to let you produce extravagantly formatted productions or simple text documentsâthe choice is yours. Whatever the final form, the basic techniques you use to create, format, and edit those documents are the same.
When you launch Pages, the program greets you with a blank document window and an unfurling Template Chooser sheet (Figure 1-1). Apple's professional designers filled this pantry with a delicious array of templates, preformatted documents you can use to get a head start on your next writing project. Here you can choose to start your document from scratch with a blank page (by choosing the Blank template) or use one of the 40 starter documents (by choosing any of the other templates).
Pages responds by opening a new document window based on your chosen template and gives it the name "Untitled." In addition to giving you lots of design options in this document smorgasbord, these templates are built to last. When you choose a template, Pages actually opens a clone of the original. That way, you can work on your copy, safe in the knowledge that the blueprint is locked awayâunmodifiedâready for the next time you need it. (You can modify those templates if you really need to, and you can create more templates of your own. For all the ins and outs of template creation and manipulation, see Chapter 7.)
If you just need to get out a quick letter, shopping list, or note, choose the Blank template and start typing away. Then save or print and you're done. The next section covers the bare bones of word processing with Pages.
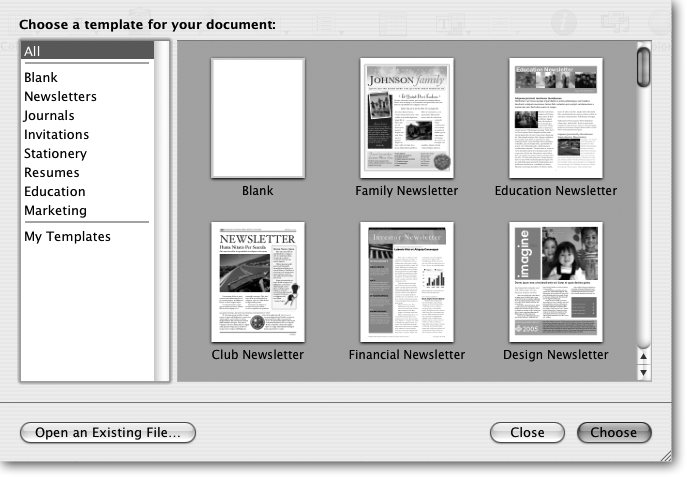
Figure 1-1. In order to view the available templates, click the categories listed on the left side of the window, or leave "All" selected to view the entire collection. Use the scroll bar on the right side of the window to see all the template images in that category. To make your selection, simply double-click the template image or its title, or, if you like to do things in a more roundabout fashion, click the template once, and then click Choose (or press Return).
If you've used a computer at all, you already know everything you need to create, save, and print a Pages document. Here's a quick run-through of what you need to do to produce a very basic document, say, a shopping list:
Launch Pages and, from the Template Chooser, choose the Blank template.
The untitled document window appears with the blinking insertion point signaling that it's OK to start typing whenever you're ready.
Type out what you need to pick up on your next trip to Costco. After each list item, press Return to move down to the next line. For example:
Leather recliner Hot roast chicken 5 gal. container of mayonnaise If you need to type a longer sentence, say, "Take the new pickup and don't forget to fill up both gas tanks with premium before heading home," just keep typing when your words reach the right margin of the page. Pages automatically takes care of the line breaks for youâthere's no need to press Return like you would on a typewriter. When you want a blank line or a new paragraph, then press Return.
Save the document so you can come back later and continue working on it, or just because you want to save this vital treatise for posterity. Choose File â Save.
The Save dialog box appears (Figure 1-2).
Figure 1-2. The most important parts of the Save dialog box are the Save As box, which is where you enter the name for your document, and the Where popup menu, which indicates where your file will be saved. In its compact view, the Save dialog box shows only those two items. The Where pop-up menu lists your computer's drives and disks, your sidebar items, and recently used folders. If you want to navigate around your entire computer, click the downward-pointing triangle to the right of the Save As box, as explained in Figure 1-3.
Type a title for the document in the Save As box. This box is already highlighted, so just start typingâthere's no need to use the mouse at all. Click the destination folder pop-up menu and choose Documents (if it doesn't already say Documents) to store this Pages document in your Documents folder.
Click Save.
The Save dialog box retracts and Pages stores your document on your computer's hard drive. At this point you can continue to work on your list, periodically choosing File â Save to add any changes.
When you're ready for a printed copy, choose File â Print.
The Print dialog box appears.
If you just want one copy, simply click Print. Otherwise, type the number of copies you need in the Copies box, and then click Print.
Your printer starts whirring and chirping and in short order delivers the hard copy.
Click the red Close button in the upper-left corner of the document window. If Pages asks if you want to save your changes, click Save.
Your document vanishes from the screen but remains safe on your hard drive, ready to be reopened when the time comes next week for more shopping.
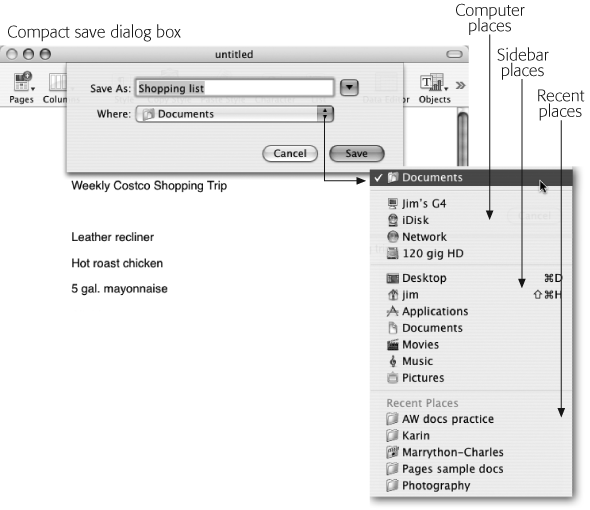
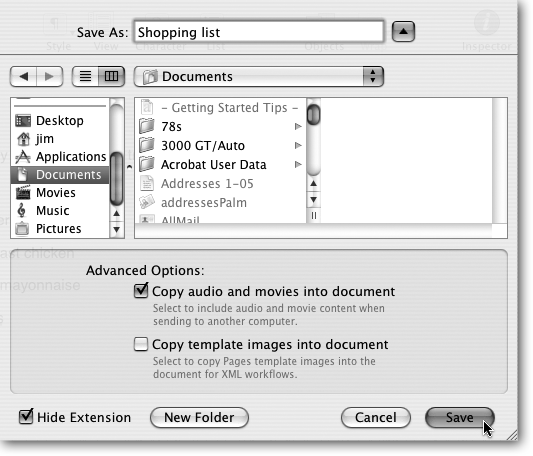
Figure 1-3. Click the downward-pointing triangle to the right of the Save As box to open the Save window to its full glory, giving you access to locations not listed in the popup menu. You can navigate through your entire computer, your iDisk, or other computers on your network to find the perfect destination. See Chapter 7 for complete information on the Advanced Options.
When the blank document window appears (Figure 1-4), your first thought might be, "Where is everything?" Apple's software designers have pared the document window down to the bone, opting for a Danish-modern starkness instead of the rococo of most word processing programs. Despite this minimalist design, Pages gives you easy access to the commands you're most likely to need by placing them at the top of each page, while keeping the ones you need less oftenâor for more esoteric tasksâhidden just below the surface.
You can choose to live with this minimalist window design, you can embellish it with more controls, or you can give the window a virtual makeover to express your own sense of style. However you wish to view your document window, mastering the placement of various tools and controls is the first step to creating and editing great Pages documents.
Gracing the top of the document window with its colorful buttons is the toolbar. The toolbar gives you one-click access to common commands, saving mileage on your mouse and strain on your memory by keeping these items right in front of you at all times. You'll learn more about each of these buttons in the coming chapters, but here's the condensed version for the standard button set:
Pages. The first button is a pop-up menu (as indicated by the tiny black triangle next to the icon) that lets you add additional pages to your document. If you're using the Blank template, clicking this button just adds another blank page. But most of the other templates provide a variety of coordinated page designs you can choose from (see Section 4.1.1.1).
Columns. Next is another pop-up menu that lets you change the number of text columns in your document. Pages can create from one to four newspaper-style columns across the page, so that the text flows from the bottom of one column to the top of the next (Section 3.4).
Style. The Style pop-up menu lets you quickly apply paragraph styles contained in the template or that you've added to the style collectionâfor example, a headline style, a subhead style, and a body style (Section 3.2).
List. Similar to the Style button, the List pop-up menu applies specialized styles useful for lists and outlines (Section 3.3).
Objects. This pop-up menu lets you add a text box, chart, or table. Or you can use it to draw lines, arrows, or simple geometric shapes (Section 4.2.4).
Wrap. The last of the pop-up menu buttons controls if and how text wraps around pictures or objectsâlike the ones created by the Objects button (Section 4.3.7).
Inspector. This button summons or dismisses the Inspector window, the command center for formatting your document and all the elements it contains. The 10 panes of this window contain controls for document and text formatting, chart and table construction, bookmark and hyperlink creation, and more (Section 3.3.1).
Media. Click this button to bring up or remove the Media Browser window, the shortcut to your entire collection of iPhotos, iTunes, and movies. Just drag from the Browser to place a photo, for example, onto your page (Section 4.2.1).
Colors. These last two buttons access tools that are actually part of OS X, though they're seamlessly integrated with Pages. The Color Picker appears when you click this button. Use this palette any time you need to change the color of text, objects, backgrounds, and so on (Section 4.4).
Fonts. The OS X Font panel comes to the fore when you click this button, giving you control of your entire font collection. You can select fonts, adjust their size, view their appearance in a preview pane, add strikethrough, text shadow, and more (Section 2.1.1).
Banish this button banner completely if you find it too distracting, by choosing View â Hide Toolbar, pressing â-Option-T, or, easiest of all, pressing the oblong button in the upper-right corner of the document window. However, you'll probably want to keep the toolbar around while you're working on most documents. If you've dismissed it, you can call it back by repeating any of the three commands just listedâexcept this time the menu reads View â Show Toolbar. In terms of word processing efficiency, you'll find it's much more valuable to customize it to show only the buttons you want.
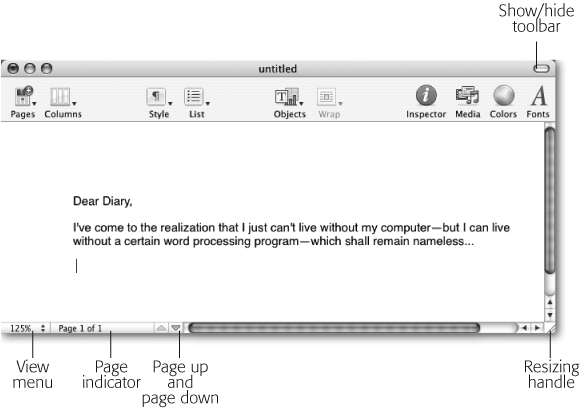
Figure 1-4. The Blank template produces a page that is exceptionally blank. Its main feature is the customizable toolbar that stretches across the top of the window. Using these buttons, you can perform various word processing tasks, access many more commands in the master toolbox known as the Inspector, and even locate music, photo, and movie files to incorporate into your document. If you find even the toolbar to be a blot upon your tabula rasa, click the Show/Hide Toolbar lozenge to hide the toolbar. Resting at the bottom of the window are the Page View menu, for adjusting the size of the page display on your screen; the page indicator, showing what page you're on; the page up and page down buttons for moving through a multipage document; and the Resizing handle, for adjusting the window size.
Choose View â Customize Toolbar (or Control-click the toolbar and choose Customize Toolbar from the pop-up menu) and Pages displays its entire collection of buttons on a sheet that drops from the toolbar (Figure 1-5). Now you can drag buttons you don't want off the toolbar and see them vanish in a puff of smoke. Add to the toolbar by dragging individual items into place on the bar; the buttons already residing there politely shift aside to make room for the newcomer. Once the buttons are in the bar, you can drag them around to change their position.
Most of the toolbar buttons perform various commands you'd otherwise have to dig through the menus to find. But you'll find three items in the bottom row of buttons designed to help you keep your newly customized toolbar organized: a separator line, a fixed space, and a flexible space.
If you're a real customization aficionado, you can even add a Customize button to the toolbar so you can quickly summon the customization sheet when the spirit moves you to modify your button collection. If you add more buttons than can fit in the windowâor if you make your window narrowerâan arrow appears at the right end of the toolbar. Click it and a mini menu appears, containing the button overflow.
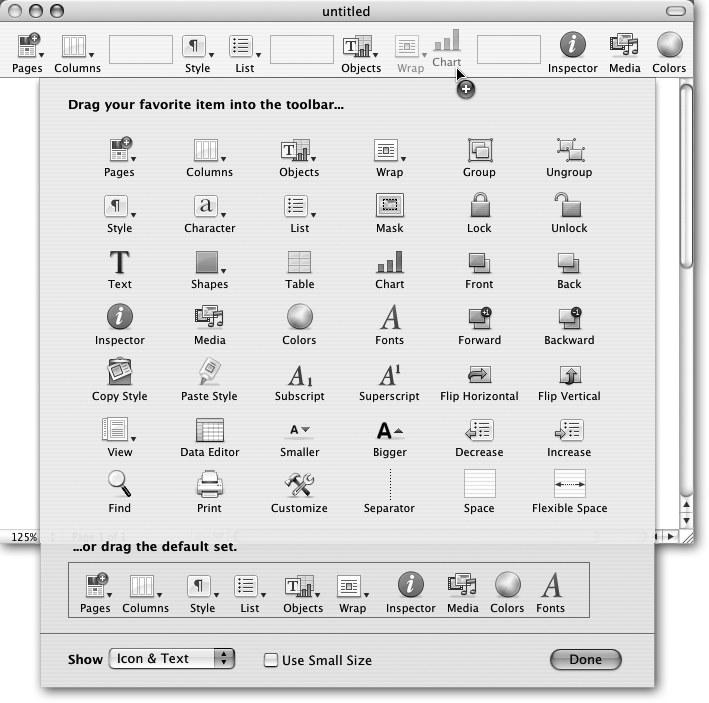
Figure 1-5. Control-click the toolbar and choose Customize Toolbar to reveal Pages' library of toolbar buttons. Drag buttons onto or off the toolbar; organize them by changing their order, adding separator lines, or spaces. Use the Show pop-up menu at the bottom to choose whether your buttons display as icons, text, or both. If you've added lots of buttons, consider turning on the "Use Small Size" checkbox to allow more buttons per inch in the toolbar.
And if, after a frenzy of toolbar transformation, you decide you liked it better the way Apple shipped it from the factory, just drag the entire default set back up to the toolbar and Pages replaces your custom arrangement with the batch of basic buttons.
The toolbar buttons at the top of the window let you add more pages to your document and control its formatting. The controls at the bottom of the window affect how you view the document onscreenâthese buttons don't alter the way it's formatted or printed.
For example, you can use the Page View menu in the lower-left corner of the document window (Figure 1-6) to adjust how large the page appears on your screen. New Pages documents appear at 125 percent, which is close to actual size on modern, high-resolution monitors. Click that percentage to choose a different magnification from a pop-up menu, from 25 to 400 percent. For the menu-centric Pages fan, similar controls are available via the View â Zoom menu.

Figure 1-6. You can quickly change the size of your document on the screen and change the view from single page to double spread with the Page View menu. You'll find this tool invaluable when laying out a brochure, for example. You can zoom out to 75 percent to scrutinize the overall effect of your layout, and then zoom back in to 150 percent to tweak the tiny type in a caption.
Along with the zoom percentages in the Page View pop-up menu, you'll find a couple of other controls. At the top of the list is a bit of pressroom jargon called n-up. This represents how many pages (the number n) Pages prints on one sheetâor in this case, displays in one window (Figure 1-7). In the Page View menu, you can choose One Up (the normal view, or one page across in the window) or Two Up (two pages across in the window). You'll want to use the two-up view when laying out something that'll end up as bound or folded pages, like a booklet or brochure. You'll find two automatic zoom settings at the bottom of the Page View pop-up menu. Fit Width adjusts the magnification so the page precisely fits the width of the document windowâwhether it's three inches or 13 inches wide. Fit Page (which should really be called Fit Height), on the other hand, adjusts the magnification so that one full page is displayed in the available height of the window. Turn on either of these settings and the magnification automatically changes as you adjust the window size with the window-resizing handle in the bottom-right corner of the window.
As in any word processor, editing in Pages involves a handful of simple techniques endlessly repeated: scroll up and down to read through the text. Click to place the insertion point where you want to insert or delete words. Type to replace characters, words, and sentences. Shift the order of passages using the Cut, Copy, and Paste commands. Use the mouse to move words and passages (see Section 1.3.4.1), and so on.
Your first editing task is just learning how to move around in your document. You won't have any difficulty with a one-page letter, but a 95-page manifesto presents more of a challenge.
Of course, you can use the vertical scroll bar at the right edge of every Pages window, as in any computer program (see Figure 1-8). And if you've replaced your one-button Apple mouse with one that has a scroll wheel (an essential upgrade, by the way, if you're into working quickly), you can use it to scroll, as well.
You can also use OS X's little-known Scroll to here option. If you think of the vertical scroll bar as a diagram of your document, from the first page to the last, you can Option-click anywhere on the scroll bar and the document jumps directly to that point. For example, Option-click three-quarters of the way down the scroll bar and Pages jumps to a point three-quarters of the way through your document.
You can also move up or down an entire page at a time by clicking the large upward-and downward-pointing arrows at the bottom of the window next to the page indicator.
True efficiency experts dismiss all this mousing around as so much wasted motion when there are perfectly good navigation keys right on the keyboard. Table 1-1 reveals all.
Table 1-1. Pages Keyboard Shortcuts
|
Press this |
To do this |
|---|---|
|
Page Up |
Scroll up a page |
|
Page Down |
Scroll down a page |
|
Home |
Scroll to the beginning of the document |
|
End |
Scroll to the end of the document |
|
Left or right arrow |
Move insertion point one character to the left or right |
|
Up or down arrow |
Move insertion point to the line above or below |
|
Option-left arrow |
Move insertion point to the beginning of the current or the previous word |
|
Option-right arrow |
Move insertion point to the end of the current or next word |
|
â-left or -right arrow |
Move insertion point to the beginning or end of the line |
|
â-up or -down arrow |
Move insertion point to the beginning or end of the document |
|
Option-up or -down arrow |
Move insertion point to the beginning or end of the paragraph |
You can also scroll by pressing the arrow keys: hold down the up or down arrow key to move the insertion point up or down through your text. (When the insertion point reaches the edge of the screen, Pages scrolls a half screen, putting the insertion point back into the middle of the newly scrolled screen.)
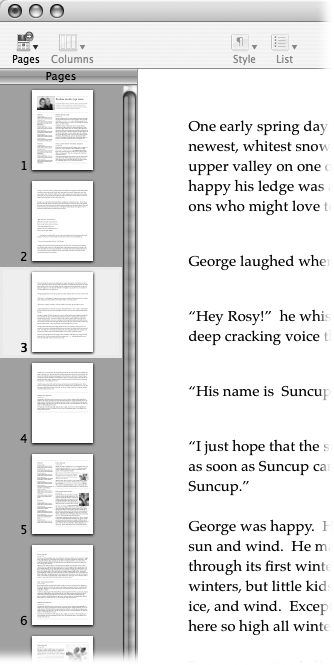
You can also use the organizer viewâwhich is normally turned off when you open a new documentâto move through your document's pages. Choose View â Show Page Thumbnails to display the Pages pane along the left side of the window (Figure 1-9). Here Pages shows numbered thumbnail images of each page in your documentâadding a scroll bar if there are too many to fit in the window. You'll find the page organizer makes it easy to find the page you're looking for in your documentâespecially if your document features illustrations or distinctive page layouts. You can recognize the page you're after at a glance, since the thumbnails are actual images of the pageâincluding headlines, columns of text, pictures, and so on.
Click a thumbnail to jump to that page in the document; reorganize pages by dragging a thumbnail to a new position in the organizer. To remove an entire page from the document, select the page in the organizer and press Delete (or choose Edit â Delete Page). Pages presents you with a confirmation dialog box asking if you're absolutely sure you want to delete that pageâif you are, click Delete. If you're having second thoughts, you can drag that page to the end of the document and decide its fate later. Move or delete a group of pages by selecting the first page of the group in the organizer, pressing the Shift key, and clicking the last page of the group. Pages highlights all the pages, ready for you to move or remove them at once.
If you try to select just one page in the organizer and Pages highlights two or more pages, then those pages are part of a section, a group of pages that the program regards as an unbreakable unit. You can move or delete them only as a group. See Section 3.5.4 to learn more about this peculiar arrangementâand about how to break up that block using section breaks.
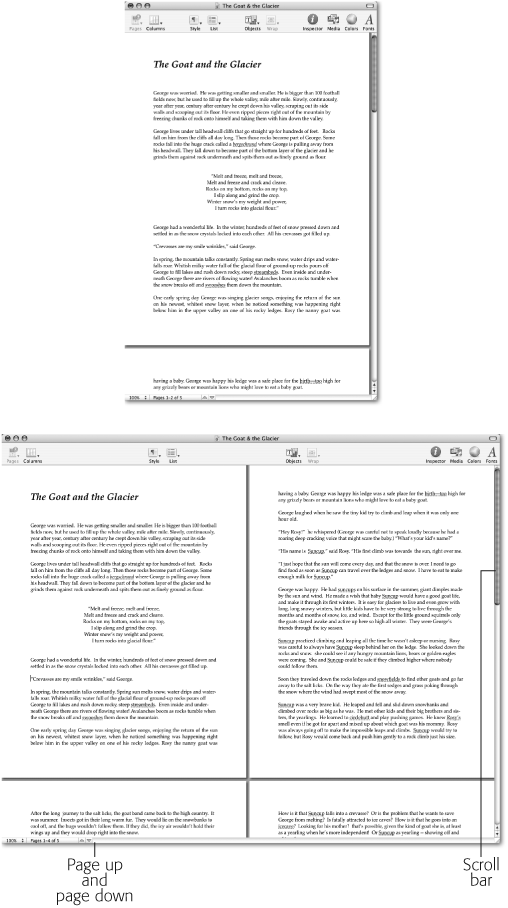
Figure 1-7. Top: The usual way to view a Pages document onscreen is in one-up view. The pages appear stacked on top of one another, like a ribbon stretching above and below your monitor. Use the scroll bar and the Page Up and Down buttons to move through the document. Bottom: When you choose Two Up in the Page View pop-up menu, Pages presents your document as if it were an open book in front of you. This is the best way to get the overall feel of the spread and make sure page elementsâheadlines, for exampleâdon't conflict.
Inserting text or spaces in a document is the most basic editing task of all. Move the I-beam cursor to wherever you want to insert text, click the mouse, and then type. Pages pushes any words that follow your insertion to the right to make room for your new text.
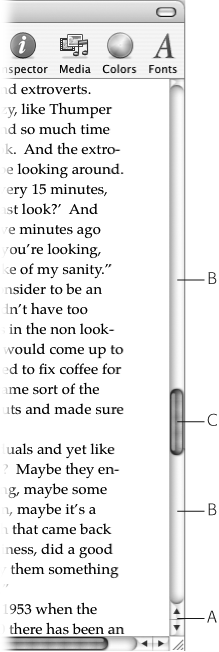
Figure 1-8. Fundamentals of scrolling: (A) First, click the up or down arrow buttons to bring earlier or later parts of your document into view. The blue jellybean moves to show the relative position of your spot in the document. (B) You can click the scroll bar above or below that jellybean to jump to the previous, or next, screenful. (C) You can also drag the jellybean straight to a different position in the document.
More word processing basics: if you've just made a typo, press Delete to backspace. If you have to jump back a couple of words to make a correction, hold down the Delete key steadily, watching the letters disappear until you get to the word you need to correct, and then retype.
But if you find an error too far back in your typing to be worth backspacing, use the mouse to correct it in one of these two ways:
Click, and then press Delete. Position the I-beam cursor to the immediate right of the error you want to delete, click the mouse, and press Delete to remove the offending letters. Type your correction. Then move the I-beam cursor back to where you left off, click, and continue typing.
Figure 1-9. Choose View â Show Page Thumbnails to expose this panel of miniaturized images of your document's pages. Click a thumbnail to jump to that page in the document, or drag a thumbnail up or down the column to reorder the page. To delete an entire pageâand its contentsâselect its thumbnail and press Delete.
Highlight text, and then retype. If the error you want to delete is more than a few letters long, use the highlight-then-retype method. Start by dragging carefully from the beginning to the end (or from the end to the beginning) of the erroneous text. Sometimes this method means dragging perfectly horizontally, carefully staying on the same line; other times it means dragging diagonally from the beginning of a passage to the end.
In either case, once you've released the mouse, anything you now type instantly replaces whatever you've highlighted. There's no need to delete it first.
To edit text, you always follow a two-step process: first select the text, and then retype (or use menu commands) to change it. You can select (or highlight) as little as a single character, or as much as the entire document.
Select a word or a passage. Position your I-beam cursor at one end of your intended selection, drag to the other end, and then release the mouse button. Everything between those two points is selected, and you see the text highlighted.
Select an individual letter. Drag across the letter.
While selecting text with a drag of the mouse works just fine, Pages offers several ways to speed up the process. You might use these techniques, for example:
Select one word. Double-click any part of the word.
Select several consecutive words. Double-click anywhere on the first wordâand on the second click, keep the mouse button pressed. Drag horizontally. As you go, Pages highlights the text in one-word chunks, which lets you be much sloppier (and quicker) in your dragging effort.
Select one whole paragraph. Triple-click anywhere in the paragraph. Triple-click and drag to select paragraph by paragraph.
Select a block of text. Click to place the insertion point at one end of the block. Then, while pressing the Shift key, click the far end of the block you want to select, even if the far end is many pages away.
Select the entire document. Choose Edit â Select All, or press â-A. Use this technique when you want to make a global change, such as changing the font or the margins for the whole document.
Keyboard experts take note: you can select text without letting your fingers stray to the mouse. Starting from the current location of the blinking insertion point, Pages gives you a bunch of shortcuts to help select text:
Table 1-2.Â
|
To select |
Press this keystroke |
|---|---|
|
Next/previous word |
Shift-Option-right arrow or -left arrow |
|
To beginning/end of paragraph |
Shift-Option-up arrow or -down arrow |
|
To beginning/end of line |
Shift-â-right arrow or -left arrow |
|
To beginning/end of document |
Shift-â-up arrow or -down arrow |
No matter which method you use to make a selection, your very next action applies to the text you've highlighted. For example, if you choose a different font, size, or style, Pages changes only that selection.
Tip
Remember that when word processing, anything you type replaces whatever text you've highlighted. This phenomenon can be useful when, for example, you want to replace one highlighted word in a sentence. On the other hand, this behavior can also be dangerous. If you've highlighted your entire document, for example, typing a single letter (or even pressing the Space bar) replaces all the text in your document. (The Edit â Undo command can save you in that event.)
Back in the BC eraâbefore computersâcutting and pasting involved real scissors and real paste. Now, thanks to the Cut, Copy, and Paste commands, you're free to be as sloppy and disorganized as you like, as your creativity pours, lava-like, over the pagesâand tidy it up later.
You'll find these three commands in the Edit menu. But you'll repeat the cut, copy, and paste routine over and over again as you use your computer. Do yourself a favor and learn to use the keyboard commands for these functions; you'll save time and feel powerful.
â-Xcuts, or removes whatever text you've first highlighted. (X, as in cross it out.) Your computer whisks a copy of the deleted material onto its invisible clipboard, ready to be re-deposited when you use the Paste command.
â-Ccopies the highlighted textâleaving it as it was, but again placing it on the invisible clipboard. (C, as in copy.)
â-Vpastes the cut or copied text back into your document at the location of the blinking insertion point or over any selected text. (V as in, voilà , there it is!)
You can't use the letter P for Paste because it's assigned to the Print command. Besides, the V's right next to the C key, making all the editing keysâUndo, Cut, Copy and Pasteâa neat row on your keyboard. And the V looks like the caret mark proofreaders use to mean "insert."
Pages includes two other editing commands you don't find in many word processors: Paste and Match Style, and Delete.
Normally when you copy text from one part of a Pages document and paste it into another, the text retains its original text style. For example, if you copy a few words out of an italicized caption and paste into a large, bold headline, the result is a headline with a few small italic words. You're better off choosing Edit â Paste and Match Style (or pressing â-Option-Shift-V). Then the pasted words assume the style of the paragraph they're landing inâin this example, they match the headline style.
Apparently Pages' designers think there are people out there who just have to do everything with the mouse. To honor these people, they've included the Edit â Delete command. It does exactly the same thing to selected text as the Delete key but takes much more effort.
Pages offers a one-step alternative to the cut and paste two-step: drag-and-drop. Figure 1-10 shows the procedure.
Tip
The drag-and-drop method is most useful when you're dragging your selection a short distance. You can drag the selection to the top or bottom edge of the window to force Pages to scroll automatically, but even that technique can be clumsy. When you can't see both the source and the destination you want to copy to, you're better off sticking with ol' reliable: Cut (or Copy) and Paste.
You can also use the drag-and-drop technique to copy a selection: hold down the Option key while dragging the text. When you release the mouse button, you see that you've duplicated the original passage.
Tip
You can even drag a selection from one program and drop it into anotherâor onto your desktop. To achieve this inter-application feat, the other program must be what programmers call "drag-and-drop aware," which most modern programs are. When you drag to the desktop, you create a text clipping that you can open and read or drag back into a document at any time.
Pages offers a few special tools designed as your personal safety net, to save you from yourselfâor from your cat walking across the keyboard just after you perform a Select All command.
Always reach first for the Edit â Undo command when you have one of those "Oh no!" moments. When you choose Edit â Undo (or press â-Z), Pages reverses whatever your last action was. (If you learn only one keyboard command, you owe it to yourself to master â-Z. It will save you from all manner of anguish.) Whether you just changed a word, deleted a page, or applied a new font color, â-Z says to Pages, "SorryâI didn't really mean to do that! Beg pardon!"

Figure 1-10. Position your pointer over a chunk of highlighted text (top). Then drag that selection to another place in the document (middle); when you release the mouse, the text you dragged appears in its new location at the insertion point (bottom).
In fact, Pages changes the wording of the Edit â Undo command to reflect the kind of action that it's prepared to undo. For example, if you just dragged a paragraph into the wrong spot, the Edit menu says Undo Drop. You also see other possibilities like Undo Format, Undo Typing, Undo Cut, and so on.
Pages features multiple Undos, which means that as you repeatedly press â-Z, you throw the time machine into reverse and watch as Pages retracts the changes you've made to your document, one after another. Even if you've saved the documentâwhich you should do frequently as you work, of courseâyou can still undo changes. But the time machine grinds to a halt when you close a document. Pages flushes all your changes out of its memory. The next time you open that document you have to start moving forward againâthere's nothing to undo.
After you perform an Undo (and breathe a sigh of relief), the Edit menu features the Redo commandâwhich you can use to undo the Undo. If you've just performed multiple Undos, you can now pop it into Forward and perform multiple Redosâuntil you end up right back where you started.
If you've really made a mess of your documentâyou've muddled it thoroughly, and you're tired of pressing â-Z over and overâPages gives you two more safety nets. Choose File â Revert to Saved to undo all the changes you've made since the last time you used the Save command. (Of course, doing so also discards any good work you've done in the meantime.) If you performed that Save after opening the document, you can then continue on with the Undo command until you've unraveled your tangled web back to where you want it.
If you care to be proactive in the face of impending disasterâand you should, since digital disasters can happen without warning, and always at the most inopportune momentâPages offers an insurance policy intended to give you one more layer of Undo. The trick is to activate it before a crisis occurs and you find yourself willing to trade your iPod for a previous version of your document.
Choose Pages â Preferences and turn on the checkbox for "Back up previous version when saving." From now on, Pages saves two copies of your documents. In addition to your normal document file, Pages creates another file in the same location and adds the words "Backup of" in front of the document name. Each time you save the document, Pages saves the previously saved version in the "Backup of" file. Save again, and the "Backup of" file is replaced with the new previously saved version, as the older one disappears into digital oblivion.
In other words, you always have the two most recent versions of your document. If you find something wrong with the one you're working on, even though you just opened it and therefore can't use Undo, open the "Backup of" file to see the earlier versionâhopefully unmolested. If you like what you see, choose File â Save As, give the document a new name, perhaps, "My Bacon is Saved," and click Save.
Get iWork '05: The Missing Manual now with the O’Reilly learning platform.
O’Reilly members experience books, live events, courses curated by job role, and more from O’Reilly and nearly 200 top publishers.

