To turn your computer into a jukebox, click the triangular Play button in the upper-left corner of the iTunes window, or press the Space bar. The computer immediately begins to play the songs whose names have checkmarks in the main list.
The central display at the top of the window shows not only the name of the song and album, but also where you are in the song, as represented by the diamond in the horizontal strip. Drag this diamond, or click elsewhere in the strip, to jump around in the song.
Or just click the tiny triangle at the left side of this display to see a pulsing VU meter, indicating the current music’s sound levels at various frequencies.
Tip
You can also control CD playback from the Mac’s Dock. Just Control-click the iTunes icon (or click and hold on it) to produce a pop-up menu offering playback commands like Pause, Next Song, and Previous Song, along with a display that identifies the song currently being played.
As music plays, you can control and manipulate the music and the visuals of your Mac or PC in all kinds of interesting ways. As a result, some people don’t move from their machines for months at a time.
Visuals is the iTunes term for an onscreen laser-light show that pulses, beats, and dances in perfect sync to the music you’re listening to. The effect is hypnotic and wild. (For real party fun, invite some people who grew up in the sixties to your house to watch.)
To summon this psychedelic display, click the flower-power icon in the lower-right corner of the window (see Figure 4-11). The show begins immediately—although it’s much more fun if you choose Visualizer→Full Screen so that the movie takes over your whole monitor. True, you won’t get a lot of work done, but when it comes to stress relief, visuals are a lot cheaper than a hot tub.

Figure 4-11. No matter what you’re listening to, the animated full-color patterns produced by the iTunes Visualizations feature can make it a more interesting experience. (This feature works really well with the original cast album from “Hair” or anything by Jimi Hendrix.)
Once the screen is alive with visuals, you can turn it into your personal biofeedback screen by experimenting with these keys:
|
Key |
Function |
|---|---|
|
? |
Displays a cheat sheet of secret keystrokes. (Press it repeatedly to see the other shortcut keys.) |
|
F |
Displays, in the upper-left corner of your screen, how many frames per second iTunes’ animation is managing—a quick, easy way to test the power of your graphics circuitry. |
|
T |
Turns frame rate capping on or off—a feature that limits the frame rate to 30 frames per second, to avoid sapping your Mac’s horsepower when you’re working in other programs (not really much of an issue in Mac OS X, of course). |
|
I |
Shows/hides info about the current song. |
|
C |
Shows/hides the current Visuals configuration (the name of the current waveform, style, and color scheme) in the upper-right corner of the screen. |
|
M |
Turns slide show mode on or off. In slide show mode, the visuals keep changing color and waveform as they play. (Otherwise, the visuals stick with one style and color.) |
|
B |
Turns on an Apple logo in the center of the Visuals screen. |
|
R |
Chooses a new waveform/style/color at random. |
|
Q or W |
Cycles through the various waveform styles stored in iTunes. |
|
A or S |
Cycles though variations on the currently selected waveform. |
|
Z or X |
Cycles through color schemes. |
|
Number keys |
Cycles through the ten different preset, preprogrammed waveform/color/style configurations. |
|
D |
Restores the default waveform settings. |
You can control iTunes’ music playback using its menus, of course, but the keyboard can be far more efficient. Here are a few of the control keystrokes worth noting (Windows fans should substitute the Control key for the Mac ![]() key, and Alt instead of Option):
key, and Alt instead of Option):
|
Function |
Keystroke |
|---|---|
|
Play, Pause |
Space bar |
|
Next song/previous song |
Right arrow, left arrow |
|
Next source/previous source |
Down arrow, up arrow |
|
Louder | |
|
Quieter | |
|
Mute | |
|
Fast-forward, rewind | |
|
Eject | |
|
Turn Visuals on | |
|
Turn Visuals off | |
|
Full-screen visuals | |
|
Exit full-screen visuals |
If you click the Graphic Equalizer button (identified in Figure 4-1), you get a handsome floating control console that lets you adjust the strength of each musical frequency independently (see Figure 4-12). (Mac fans can also press ![]() -2 or choose Window→Equalizer to get the console onscreen.
-2 or choose Window→Equalizer to get the console onscreen.
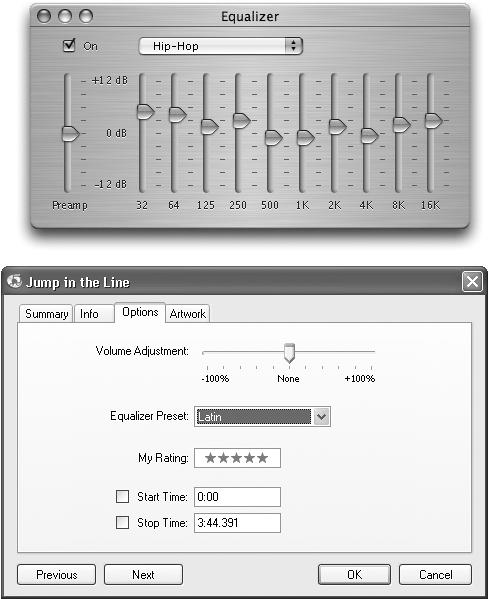
Figure 4-12. Top: Drag the sliders (bass on the left, treble on the right) to accommodate the strengths and weaknesses of your speakers or headphones (and listening tastes). Or save yourself the trouble—by using the pop-up menu above the sliders to choose a canned set of slider positions for Classical, Dance, Jazz, Latin, and so on. In iTunes 3 and later, these settings even transfer to the iPod. Bottom: You can also apply preset or customized equalizer settings to individual songs under the Options tab in the song’s Get Info box (shown here in Windows).
Tip
You can also make an Equalizer pop-up tab appear as one of the iTunes columns. Choose Edit→View Options and turn on the Equalizer checkbox.
To apply Equalizer settings to a specific selected song, press ![]() -I (Mac) or Ctrl+I (Windows) or choose File→Get Info, and click the Options tab, shown at bottom in Figure 4-12.
-I (Mac) or Ctrl+I (Windows) or choose File→Get Info, and click the Options tab, shown at bottom in Figure 4-12.
You can drag the Preamp slider (at the left side of the Equalizer) up or down to help compensate for songs that sound too loud or soft. To design your own custom preset pattern with the Preamp and the other ten sliders, click the pop-up tab at the top of the Equalizer and select Make Preset.
No longer must you strain to hear delicate Chopin piano compositions on one track, only to suffer from melted eardrums when the hyperkinetic Rachmaninoff cut kicks in right after it. The Sound Check feature attempts to bring the disparate volumes onto line, making the softer songs louder and gently lowering the level of the more bombastic numbers in the iTunes library. Audiophiles may nitpick about the Sound Check function, but it can be quite useful, especially for times, like bicycling uphill, when constantly grabbing at the iPod’s volume controls on the remote or scroll wheel are inconvenient.
The first step using Sound Check is to turn it on. First, connect your iPod and select it from the iTunes Source list when it pops up. Then click the iPod Preferences button at the lower right side of the iTunes window.
In the resulting dialog box, click the Effects icon and turn on the Sound Check dialog box. You also need to turn on Sound Check on the iPod itself: From the iPod’s main screen, choose Settings→Sound Check and click the Select button.
Then in iTunes, open the Preferences box (![]() -comma on a Mac or Ctrl+comma on a PC). Click the Effects icon or tab and turn on the box for Sound Check.
-comma on a Mac or Ctrl+comma on a PC). Click the Effects icon or tab and turn on the box for Sound Check.
Get iPod & iTunes: The Missing Manual, Second Edition now with the O’Reilly learning platform.
O’Reilly members experience books, live events, courses curated by job role, and more from O’Reilly and nearly 200 top publishers.

