Even before you extract it from its box, the iPod makes a design statement. Its shrink-wrapped cardboard cube opens like a book, revealing elegantly packaged accessories and software nestled around the iPod itself.
The first part of this book will familiarize you with the hardware portion of this parcel. This particular chapter takes a look at what’s inside the box for a full-size iPod or iPod Mini. If you’ve got your eye on an iPod Shuffle or have just popped one out of its bright green box and want to know what to do next, skip on over to Chapter 3 for a detailed discussion on Apple’s flashy little music stick.
In addition to the nicely nestled iPod itself (Figure 1-1), the package’s compartments hold all the other stuff that comes with various iPod models: earbud-style headphones and their foam covers, the connection cables for your computer, power adapter, dock, and software CD. Depending on which iPod you have and when you bought it, you may see some variations, like the belt clip that’s included with the iPod Mini or the AV cable that comes with the iPod Photo.
But while HP provides a quick-start poster to help its iPodders get rolling, mostly what you get by way of instructions in the standard Apple box is a small square folder, including the short iPod User’s Guide. Newer iPods do include some electronic documentation and short tutorials in Web page-and PDF-format (located on the iPod CD), but you have to print it out if you want to read it anywhere besides your computer screen. Good thing you have this book in your hands to fill in the gaps—and it’s always ready to flip through without having to boot up your PC.
A few other bits of paper are included in the iPod’s info folder. You’ll probably blow right past the warranty information (basically, you’re covered for one year whether you bought it from Apple or HP) and the software agreement (the usual legalese that makes most people’s eyes glaze over like fresh Krispy Kreme dough-nuts). The software agreement includes a small section about making digital copies of music, whose sentiment is echoed right on the iPod’s cellophane wrapping: Don’t steal music.
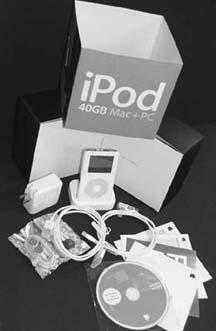
Figure 1-1. After the outer sleeve (top) is removed, the artfully designed packaging opens up to reveal the inner iPod. The 2004 iPods and the iPod Minis include both FireWire and USB 2.0 cables, and Hewlett-Packard’s edition of the iPod comes with its own set-up poster and Windows-only instructions. The iPod comes with all the hardware and software you need to get up and running, but the choice of music to put on it is up to you. Apple began to streamline the iPod box contents in 2005, so if your iPod didn’t come with all the accessories shown here, you can find them for sale at http://store.apple.com.
The LCD screen is your window into the iPod’s world. You can use it to navigate the menus, see how much of a charge the battery has left, and view the name of the current playlist or song. The display, whose resolution is 160 x 128 pixels, (138 x 110 for the Mini) also comes with a white LED backlight, so you can still use your iPod in movies, concerts, and coal mines.
Note
Like its monochrome ancestors, the iPod Photo also has a two-inch screen, but the Picture Pod adds a big splash of color (65,536 of them, to be exact) to its 220 x 176-pixel LCD display, as well as an LED backlight to brighten things up so you can see your photos in just about any lighting situation.
The concentric ring on the iPod’s face is the scroll wheel, which you use to navigate up or down lists of menu options on the screen. It lets you jump to a specific playlist, album, artist, song, or even a certain part of a song.
When a song is playing, you can also use the scroll wheel to adjust the iPod’s volume: spin the wheel counterclockwise to turn the volume down, or clockwise to increase the sound.
Of course, “spin” may not quite be the right word. The wheel on the 2001 iPods actually turned. But on the 2002-and-later iPods, including the iPod Mini, the turning wheel gave way to a stationary touchwheel, which you operate by dragging your finger around the ring. You’ve got one less moving part to go bad.
Tip
Want to personalize your Pod forever? Say it with lasers–laser engraving, that is. You can immortalize the chrome backside of your iPod with a short, two-line message of your choosing when you order an iPod at http://store.apple.com.
Just don’t make a typo.
The first generations of iPod had raised, contoured control buttons—Menu,![]() , and so on—hugging the outer edge of the wheel.
, and so on—hugging the outer edge of the wheel.
Beginning with the 2003 iPods, Apple made all the buttons nonmoving, touch-sensitive parts (Figure 1-2). This design offers two advantages: it keeps sand and dirt from derailing the iPod’s parts, and it lets a red–orange glow backlight the names of the buttons when it’s dark out. Many iPodders complained, though, that the new layout makes it more of a thumb reach to hit the ![]() and
and ![]() buttons without bringing in a second hand.
buttons without bringing in a second hand.
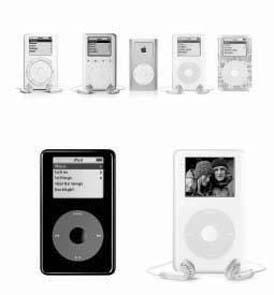
Figure 1-2. Press any button to turn on the iPod. The original iPod design (top row, left) had the control buttons around the scroll wheel. On later iPods (second from left), the control buttons are above the scroll wheel. The iPod Mini (third from left) puts the controls on a springy “click wheel” that combines the tactile response of the original iPods with the smooth surface of the wheel. The 2004 iPod (fourth from left) uses the click wheel as does the Apple iPod from HP (right), enthusiastically decorated here with HP’s printable tattoo sticker. On the bottom row, the U2 Special Edition shows off its stylish black exterior and red click wheel, while the iPod Photo shows off your digital pictures on its color screen.
Owners of the iPod Mini, the 2004 iPod, or the iPod Photo don’t have to worry about that; their buttons are actual, clickable spots on the 12, 3, 6, and 9 o’clock positions on the scroll wheel. If you’re old enough to own an iPod, your thumb can probably reach them.
In any case, no matter which model you have, no matter where the control buttons have migrated, they all work the same way once you find them.
Starting from the center, here are the controls:
Select. The big round button in the center of any iPod is the Select button. Like clicking a mouse on a desktop computer, you press Select to choose a highlighted menu item. When a song title is highlighted, the Select button begins playback.
Menu. On early-model iPods, the Mini, and the current group of 2004 click wheel models, the Menu button is at 12 o’clock, up at the top of the circle. On 2003 iPods, Menu is the second button in the row of controls.
Pressing the Menu button once takes you to the iPod’s main screen. The 2004 iPods and Minis that have been updated with the latest iPod software give you five options: Music, Extras, Settings, Shuffle Songs, and Backlight, and the iPod Photo screen includes a Photos item right under Music. (Earlier versions of the iPod’s software offered the following variation: Playlists, Browse, Extras, Settings, and Backlight. All these choices are described in more detail later in this chapter. (If you haven’t updated your iPod’s system software in a while, have already modified your default settings, or have an older model—see page 17—you may see a slightly different list. See Chapter 16 for more on software updates.)
The Menu button is also your ticket home: if you’ve burrowed deep into the iPod’s menu system, pressing the Menu button repeatedly takes you back one screen at a time until you’re back where you started.
Tip
The Menu button also controls the white backlight for the iPod’s display screen. Hold it down for a few seconds to turn the backlight on or off. Of course, you can also scroll to the Backlight item on the iPod’s main menu (as found in iPod system software 1.3 and later) and select Backlight there, too.
 You press the Next/Fast-forward button once to advance to the next song in the playlist. You can also hold it down to fast-forward through the current song to get to the good parts.
 The Previous/Rewind button, of course, does the opposite: press it once quickly to play the current song from the beginning; press it repeatedly to cycle back through the songs on the playlist. Hold it down to rewind through the current song, just like the Rewind button on your old tape deck.
 The Play/Pause button, marked by a black triangle
  and the universal Pause
symbol
and the universal Pause
symbol  , plays or stops the selected song, album, playlist, or library. It’s also the iPod’s Off switch if you press it for three seconds. (The iPod also turns itself off automatically after two minutes of inactivity.)
Tip
These buttons, used in combination, also let you reset a locked-up iPod. Details in Chapter 16.
Here are the various switches and connectors you’ll find on the top and bottom of your iPod, as shown in Figure 1-3.
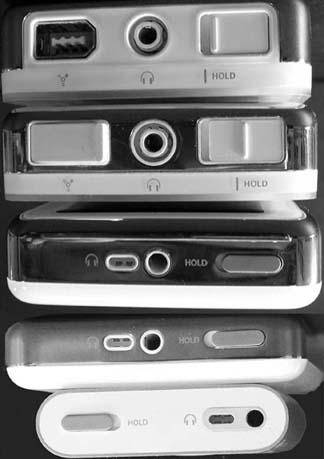
Figure 1-3. The headphone jack in the center and the Hold switch on the right side have remained up top in all generations of the iPod, but the FireWire port has roamed.The original 2001 iPod (top) is wider than later models and has no plastic cover for the FireWire port like the 2002 iPod (second from top) does.The 2003 iPod (middle), 2004 iPod (second from bottom), and the iPod Mini (bottom) all have a remote jack closely aligned with the headphone port in the center. The Hold switch is still off to the right, but the FireWire port has changed shape and migrated to the bottom of the device.
FireWire/USB 2.0 port. The 2003-and-later iPods, including the iPod Mini, have a flat, nonstandard connector for supplying power to the iPod. While the 2003 iPods required a separately purchased USB cable if you couldn’t, or didn’t want to, use FireWire, just about every iPod released in 2004 or later now provides both. Some models now sell the FireWire cable separately.
FireWire and USB 2.0 cables come right in the box, so you can choose the connection that works best for you and your computer. The flat connector can plug right into the bottom of the iPod or into the spiffy dock that comes with certain models.
Older iPods just came with a FireWire port on top of the iPod to plug in the FireWire cable that came with your player. In most cases, you can connect the iPod directly to the computer’s FireWire connector both to charge the battery and to download music and data. (Some iPod models come with a white plastic cap that covers the FireWire port.)
You’ll find much more detail on this syncing business in Chapter 2.
Headphone port. On the iPod’s top, you’ll find the jack where you plug in the earbud-style headphones that come with your iPod.
Fortunately, this is a standard 3.5mm stereo plug. In other words, you’re free to substitute any other Walkman-style headphones, or even to play the music on the iPod through your home sound system (see Chapter 13).
Remote control jack. On the 2003-and-later iPods, including the Mini, there’s an extra little port right next to the headphone jack. This small oval notch is for the remote control, which is a two-pronged affair. (Apple stopped including the remote with the 2004 iPods, so if you want one of those cute little clickers, you need to pony up $39 at your favorite Apple accessories outlet.)
Hold switch. With all the control buttons on the front of the iPod, it’s easy to hit one accidentally while you’re taking it in or out of your pocket or purse. To prevent such unintended button activity, slide the iPod’s Hold switch over to reveal a bright orange bar. You’ve just disabled all the buttons on the front of the unit, preventing accidental bumps. (A small lock icon appears on the iPod’s screen when the Hold button is on.) Slide the switch back to turn off the Hold function.
Get iPod and iTunes: The Missing Manual, Third Edition now with the O’Reilly learning platform.
O’Reilly members experience books, live events, courses curated by job role, and more from O’Reilly and nearly 200 top publishers.

