Sometimes an electrical outlet is not available. This hack contains all the information you’ll need to build your own battery-based iPod External Charger.
The iPod External Charger allows iPod users to run their iPods off (and charge their iPods’ internal batteries with) eight standard and easily replaceable AA batteries. One of the best aspects of the charger is that it’s really cheap to build!
Table 1-5 lists the parts you need. RadioShack parts can be found at your local RadioShack or at http://www.radioshack.com.
Table 1-5. The parts you will need
Part | What the part does | How many you need | Part # | Cost |
|---|---|---|---|---|
RadioShack AA battery holder | Holds four AA batteries | Two | RadioShack Part #270-383 | $1.59 each |
RadioShack fully insulated 9V connectors | Attaches the battery holders | Two | RadioShack Part #270-325 | $1.99 each |
RadioShack heat-shrink tubing | Shrinks when heated to seal connections | One packet | RadioShack Part #278-1627 | $2.39 each |
FireWire Cable | Gets the power from the batteries to the iPod | Only half of cable is used | Any computer supply store | About $10 |
In addition to the parts in Table 1-5, you will need some electrical tape and a case. The case must be one that will be safe even if the batteries used in it should become warm or even hot. The iPod External Charger was originally designed for the G1 and G2 nondocking iPods. Because of this, a workaround is needed to make the charger compatible with all G3 and later docking iPods. One compact and reasonably inexpensive way to make the charger compatible with newer docking models is to use the PocketDock, by SendStation. This product is essentially a FireWire-to-dock adapter and costs $18.
You’ll also need the following items to put the charger together:
A knife capable of cutting wire, stripping wire insulation, and cutting cables
Scissors, a soldering iron, and solder (although the project can be done without a soldering iron and solder)
A hair dryer
Before we get to building, here are a couple things to keep in mind:
Always cut a larger section of the heat-shrink tubing than it looks like you’ll need. This leaves you with enough tubing to go over the top and below the bottom of the connection after the tube has shrunk. Never give the heat-shrink tubing too much heat from the hair dryer, as it can overshrink and damage what could be crucial connections.
If you choose not to solder your connections, I recommend that you make sure your connections are good and that they won’t disconnect with the wear-and-tear your charger may be put through (especially when you remove your charger from its case to change the batteries).
Cut around your FireWire cable’s plastic/rubber insulation, and then cut through the outer layer of metal shielding. Make your incision about halfway along the cable, leaving enough cable on one end to reach from your charger to your iPod, as shown in Figure 1-52.
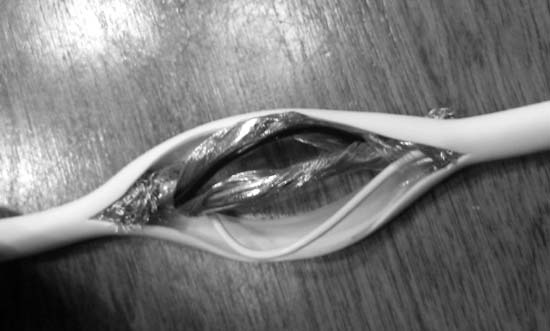
There will be six wires total within the FireWire cable: four data wires and two power wires. Identify the data and power wires within the FireWire cable. There are four data wires in total, but they can be easily spotted as they are wrapped in two sets of two by yet more metal shielding. The data wires need to be isolated, cut, and insulated. Do this by stripping the metal shielding off all the data wires, cutting through the data wires, and then insulating the naked data wire ends that you exposed when you cut them. Insulate each of these wires using electrical tape, then heat-shrink tubing. Now identify the two remaining wires inside the FireWire cable. These remaining wires are your power wires; they carry the electrical current through the FireWire cable. If you’re using the cable I specified earlier, the wires will be white and black. Strip the insulation from these power wires.
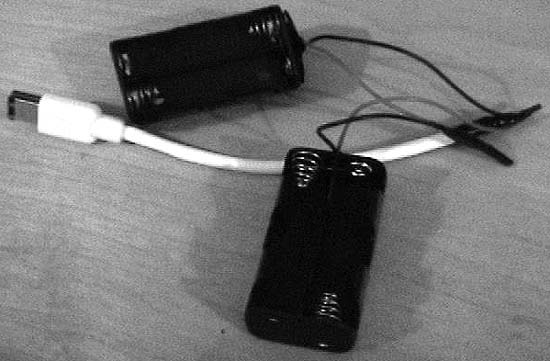
You’ll be attaching the power wires to different parts of the RadioShack battery snap connectors, so strip both wires on both of the connectors now. Next, you’ll make the connections. Twist together the red wire from battery snap connector A and the black wire from battery snap connector B, and then solder them together (I label one A and one B to avoid confusion, but as long as you keep track of which is which it doesn’t matter which you call A and which you call B). Insulate this connection using electrical tape, then heat-shrink tubing.
Connect the FireWire cable to the battery snap connectors. Do this by connecting the only loose black wire from the (now attached) battery snap connectors to the black wire coming from your FireWire cable. Insulate this connection using electrical tape, then heat-shrink tubing. You’ve just connected the negative (electrically speaking) side of things.
Now, it’s time to connect the positive side of things. Twist, solder, and insulate the positive wires by connecting the positive battery snap connector wire to the positive FireWire wire. You’ll be connecting the only loose red wire (from the snap connectors) to the only loose white wire (from the FireWire cable). Your battery-charger-to-be should look like Figure 1-53.
Use a larger-diameter piece of heat-shrink tubing to cover over all your connections, to keep them secure and in place. Wrap electrical tape around the base of this larger piece of heat-shrink tubing to keep it in place at the end of the FireWire cable.
Add batteries to your two battery holders (four AA batteries in each). Connect a battery snap connector to each of the battery holders.
Tip
The snap connectors are designed to connect only one way, so you can’t flip the positive and negative currents of the batteries to the connectors.
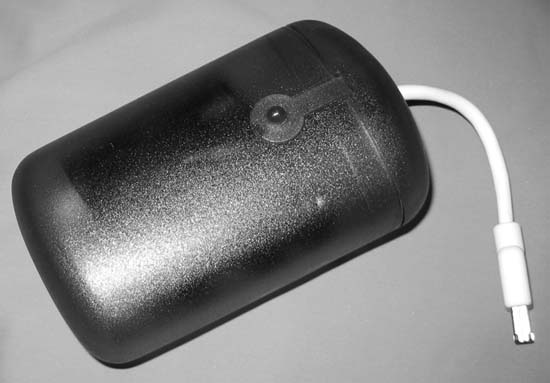
I recommend using standard AA batteries and replacing all eight of them at the same time. I do not recommend using rechargeable batteries in the iPod External Charger, because they might not have consistent charges or might be too powerful; even though they say they supply the same 1.5V as standard AA batteries, some don’t. Figure 1-54 shows the completed External Charger.
Now, you can charge your iPod on the road, in the sky, on the sea, or anywhere. You won’t need any sort of power adapters for travel in other countries, because standard AA batteries are available almost everywhere!
—Allen Evans
Get iPod and iTunes Hacks now with the O’Reilly learning platform.
O’Reilly members experience books, live events, courses curated by job role, and more from O’Reilly and nearly 200 top publishers.

