Breathe some new life into your generation 1 or 2 iPod by replacing its battery.
Much hoopla has been raised about the life, or lack thereof, of the iPod’s battery. And while many users of the first 5 GB iPod model are still using the battery with no problem whatsoever, the fact is that batteries do eventually run out of juice. You won’t wake up one day to find your battery dead; rather, expect a long, slow descent that involves shorter and shorter battery life between recharges. Eventually, you’re going to have to replace the battery.
Tip
This hack shows how to replace the battery for a G1 or G2 iPod. If you have a G3 iPod, see “Replace Your Generation 3 iPod’s Battery” [Hack #16] . If you have an iPod mini, see “Replace Your iPod Mini’s Battery” [Hack #17] .
Replacing the battery yourself is a pretty easy task, but if you’re the kind of person who frets about dings or if you have no mechanical ability whatsoever, your best bet is to send your iPod to Apple or a quality third-party shop to get the battery replaced. Apple’s iPod Battery Replacement Program (http://www.apple.com/support/ipod/service/battery.html) will cost you $99.00, plus $6.95 for shipping. Apple will take a week or two to put a new battery in your iPod and return it to you. If you’re adventurous, or too impatient to go two weeks without your magical music box, then read on.
Before you get started, you’ll need to acquire a new battery for your iPod and one of the following tools:
A thin, flathead screwdriver; I use a 2.5-mm flat blade made by Wiha of Germany (http://www.wihatools.com)
The PDA Smart plastic disassembly tools
A guitar pick (the hard plastic kind, not the newer rubberized kind)
Far and away, the best tool for the job is the one supplied by PDA Smart, because it’s plastic and won’t scratch or mar the original case. Since I’m of the school that a ding here and there adds character to an item, I just use a screwdriver. A guitar pick is easy to get hold of and will get the job done, but it’s a pain to work with.
The iPod batteries are all standard off-the-shelf units, so it doesn’t matter where you buy them. PDASmart.com ( http://www.pdasmart.com) and ipodbattery.com (http://www.ipodbattery.com) are both good sources. PDASmart.com provides both detailed instructions and the plastic disassembly tools noted previously.
Turn off the iPod and place the hold button on (so orange is showing).
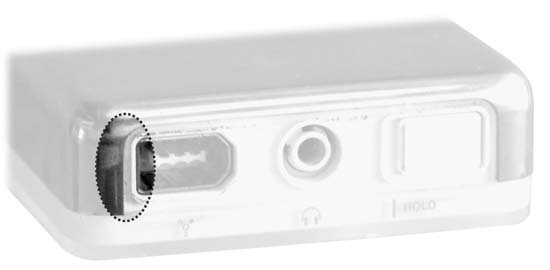
Insert the edge of your tool of choice vertically between the plastic and the metal, next to the FireWire port (as indicated in Figure 1-45, which shows a G1 iPod top). Insert the tool as far as you can, and then slide it up and around the sharp metal upper-left corner of the iPod until it’s about 10 mm from the edge. At this point, pry up and release the first of the five clips (on the left side) holding the two case halves together.
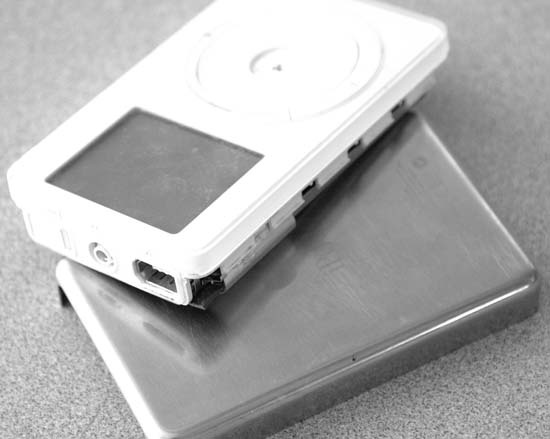
Once you’ve released the first clip, continue to slide the blade down the side of the iPod and the remaining four clips will come apart fairly easily. Check out Figure 1-46 (a G1 iPod) for a view of the clips. With one side of the iPod case released, you can now lift the plastic case half away from the metal portion. With it will come all the electronic components, in one unit. Congratulations; your iPod is now open!
G1 and G2 iPods have the battery attached directly to the hard drive by two strips of rubber featuring some sort of evil adhesive. This stuff sticks! Use your screwdriver or other thin, flat implement of choice to loosen the battery from the hard drive. Try to keep the rubber strips attached to the hard drive and not to the battery.
When it’s free of the sticky death grip, disconnect the battery and throw it away.
Get iPod and iTunes Hacks now with the O’Reilly learning platform.
O’Reilly members experience books, live events, courses curated by job role, and more from O’Reilly and nearly 200 top publishers.


