Upgrade your car’s console to house the iPod and integrate the iPod with your car’s audio and electrical systems.
Sure, you can easily listen to your iPod in your car [Hack #5] . However, if you want to take your hacking skills to the next level, this hack gives you the knowledge you need to give your iPod the props it deserves by integrating it into your car’s interior. Once you’ve completed this hack, your iPod will have a permanent place in your car, integrated with the car’s electrical systems. Take a look at Figure 1-23 and get pumped up!
Warning
This hack involves some dangerous chemicals and materials. Make sure you observe extreme caution and care when handling them.

Here’s a list of the materials you will need and where you can purchase them. Materials should cost you $400–$500:
Monster iCable for iPod (with stereo mini-jack to RCA jacks)
Belkin car charger
Alcone Theatrical Supply(http://www.alconeco.com/frame_popular.html)
Klean Klay (at least 10–12 1-lb bars)
Ultracal 30 plaster (25 pounds)
Loose-weave burlap (2–3 yards)
Burman Industries(http://www.burmanfoam.com)
Sculpting tools
One-gallon mixing tub or one-gallon bucket
X-acto knife
Dental acrylic (polymer and monomer)
Large bristle brushes
Plastic eyedroppers
Rubber mold bands
Smooth-On ( http://www.smooth-on.com/default.htm)
Universal mold release spray
Smoothcast 305 two-part plastic (one-gallon kit)
Oomoo 25 two-part silicone (one-gallon kit)
URE-FIL plastic filler (one pound)
Fiber Optic Products(http://www.fiberopticproducts.com)
Bright white 3-mm LED
4 feet of 1-mm unjacketed fiber-optic cable
Local hardware store
Large piece of particle board (slightly larger than your console)
Masking tape
Blue painters tape
Black weather-stripping (if your car uses it on your existing console)
Flat black spray paint
Soldering gun
Roll of solder
Screwdriver
Black electrical tape
Dremel tool with various sanding and cutting bits
Sandpaper (various grits)
Electric drill
Silicone caulk and caulk gun
Four 1” x 12” boards, about 3 feet long each (will be cut later)
2” screws
Rubber gloves
Dust masks
1-mm drill bit
Grocery store
Vaseline
Rolling pin
Plastic mixing spoons
Popsicle sticks
Wax paper cups
Rubber spatula
plastic wrap
Pep Boys Automotive (or a similar auto supply store)
Automotive plasticoat spray paint to match your interior
Dual-outlet cigarette-lighter adapter
Dual LEDs with cigarette-lighter plug
Fabric store
1/8” foam rubber pad (gray)
Other
Apple sticker (if you plan to add a backlit logo). Apple gives you a couple free stickers when you buy a computer; if you threw them out or already used them else where, check out eBay (http://www.ebay.com) or Redlightrunner (http://www.redlightrunner.com).
The first step in this process is a simple one. Look for the spot in your car that will best house your iPod, and then come up with a design.
Tip
Take into consideration that you will have a few wires to run, so make sure there will be room somewhere underneath.
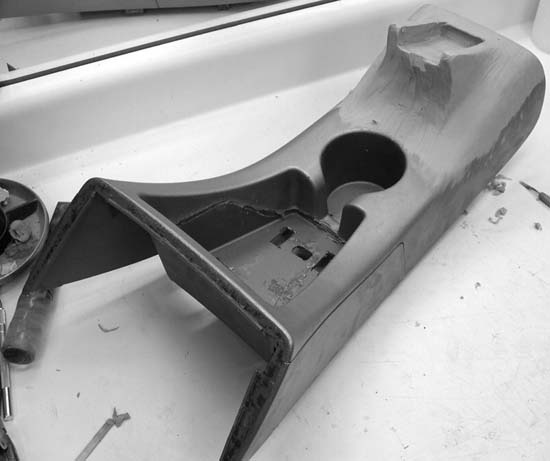
I chose my center console, shown in Figure 1-24, simply because it was a large area with unused space and could be removed rather easily.
You can sketch out your concept, or simply dive right in with clay and start sculpting until you have the shape you want. I prefer to sketch first, but that’s not necessary. Begin roughing out your design in clay. Concentrate on the position of the iPod, and what will be most comfortable for you when operating it.
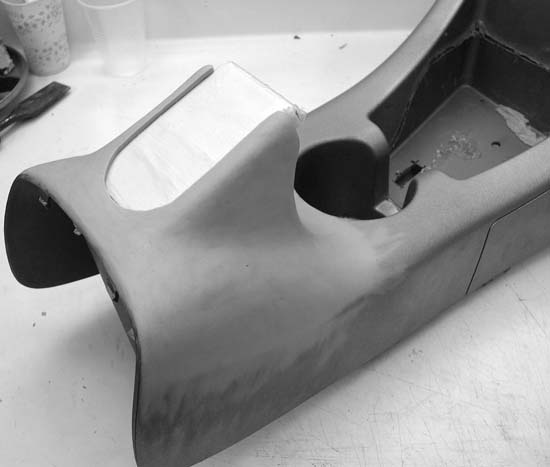
Once you have your basic shape in clay, you need to create a place for the iPod to sit (or lie), where it will connect to the charger. For this, you will need your actual iPod or iPod mini. Wrap your iPod with plastic wrap, completely covering it, and then tape it shut. Wrap tape around it a few more times, until you have about a 1/16” thickness. You need to do this to ensure that your iPod can slide freely in and out of whatever space you create for it in your final piece. Once you have cut out an area for the iPod to fit into, slide the iPod into the space, pushing gently to make an indentation in the clay.
Make sure the walls around your iPod are fairly snug, but not so tight that it can’t be pulled out, as shown in Figure 1-25. Once you are satisfied, you can pull the iPod out of the clay, taking care not to destroy the enclosure you created.
Tip
The iPod is encased in plastic wrap and masking tape to ensure its protection, while at the same time creating a slightly larger space for easier insertion and removal of the iPod in the final casting.
Continue to fine-tune your sculpture, smoothing out and shaping the clay to fit your design. To ensure that your iPod fits in your final piece, slide the iPod into your enclosure every so often while you continue to sculpt. When you are satisfied with your creation, place your console on a large, flat board, making sure there is at least 5” from the edge of the console to the edge of the board on all sides. Rest the console on something flat to raise it up about half an inch from the board. You will need to build a wall completely surrounding it, and block off any sections that allow access underneath your sculpture to hold the silicone needed to take the mold of your sculpture.
Next, take a lump of clay and, using a rolling pin, roll out a large piece, keeping it about 1/4” thick. Cut this into strips, trimming off the ends. Repeat this until you have about 12 strips. Place the strips around the bottom of your console, pressing them firmly to lock the clay in place. The weight of the silicone will press against the clay, and any silicone that is able to leak around the clay and under your console will make it very hard to de-mold. Once all the sections on your console are blocked off with clay, cut your boards and place them around your console, leaving at least 1” around the perimeter of your console. The height of the boards must be at least 1” above the highest point of your sculpture or console. Lock the boards in place using the 2” screws, then take your silicone caulk and seal all the gaps and edges along the outside of your wall. Allow it to dry for 30 minutes.
You are now ready to take a mold of your creation. Using the mold release, spray your console and sculpture, making sure to cover every square inch. Now spray the insides of your walls and the board on which your console is sitting. Mix up the silicone using a one part A–to–one part B ratio. Don’t worry if you don’t make enough the first time; silicone will stick to itself, and you can always add another layer to fill up the mold if you need to. Pour in the silicone at the lowest point of your sculpture and let it rise on its own. This will help to fill in the small crevices and push out any trapped air. When the silicone is covering your sculpture by at least 1”, you can stop and let it cure. The cure time for the Oomoo 25 silicone is 75 minutes, but cure times vary, so check the directions that came with yours if you did not purchase this type.
Now, you must build a two-part plaster support shell to hold the shape of your silicone mold. Begin by removing the screws holding the boards together. Pull gently but firmly to release the boards from the silicone. Coat the silicone with a thin layer of Vaseline, continuing down to the board on which your sculpture is lying. Now, take your burlap and cut it into strips. Make about 25 12” x 5” strips, 12 8” x 5” strips, and 6 6” x 3” strips. Fill your bucket with approximately four cups of lukewarm water, and begin adding your plaster. Add a little at a time, sifting it with your hands.
When you begin getting small white areas, or islands, you have added just about enough plaster. Add a little more, and then mix it up. You should have a pancake batter-like consistency. To make the first half of your shell, take one of the larger burlap strips and dip it into the plaster, fully submerging it. Pull it out and wring off some of the excess plaster. Now, fold it in half lengthwise and lay it on top of your silicone mold directly in the center, dividing the mold in half lengthwise, as shown in Figure 1-26.
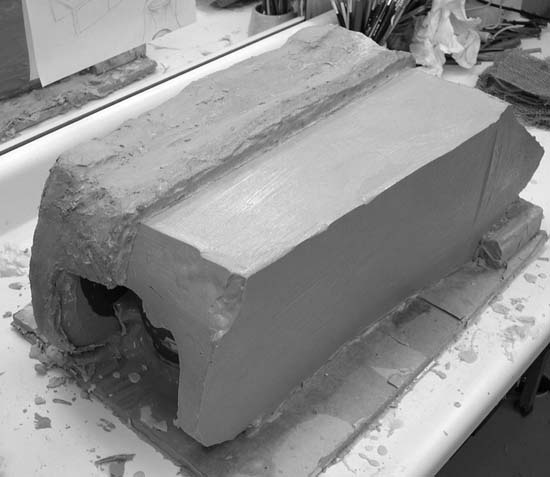
Continue laying the strips down, going from one side of the mold to the other, until you have built a wall about 1” high. Then, begin laying more strips without folding them, until the left side of your mold is completely covered in about 2” of burlap strips. Let the plaster set up and dry. It will become very warm when it sets, so be careful not to touch it.
Once the plaster cools, begin brushing a thick coat of Vaseline all over the inside edge of your plaster shell, as shown in Figure 1-27. This prevents the next coat of plaster from sticking to the first, making the two halves easier to separate.
Now, repeat the burlap layering process, this time covering the right side to make the second half. Let the plaster set up and dry.
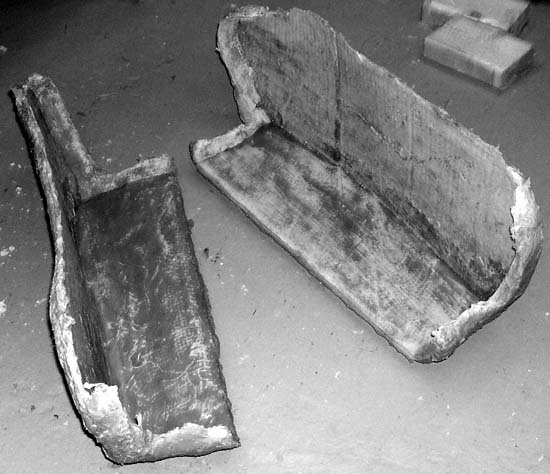
When the second half is cool to the touch, you can separate the two halves. Use a screwdriver to pry apart the plaster until it becomes loose enough to remove by hand. Be careful not to pull too hard and crack the shell. Set the two halves aside for now, as shown in Figure 1-28.

It is time to de-mold your sculpture. With the plaster shell removed, work your fingers carefully under the edges of the silicone until it comes loose from the bottom board. If necessary, use an X-acto knife to cut the silicone free from the board. Pick up the entire silicone mold and flip it upside down. Now you must peel the strips of clay from the silicone until you have access to your original console. Again, work your fingers around the edges of the silicone, prying it gently from your console. It should release very easily. Carefully pull the console from the silicone. You now have a perfect negative of your piece!
Cleaning out the mold is almost always necessary. You can simply take the mold outside and spray it down with a garden hose, but use a gentle setting, because a hard stream could damage the silicone. When the mold is completely dry, you need to place it back into its plaster shell. Place the silicone mold into one half of the plaster shell, making sure it is the correct half. Bring the other plaster half together with the first, closing it around the silicone. Strap the halves together with two large rubber mold bands. Your mold should look like Figure 1-29.
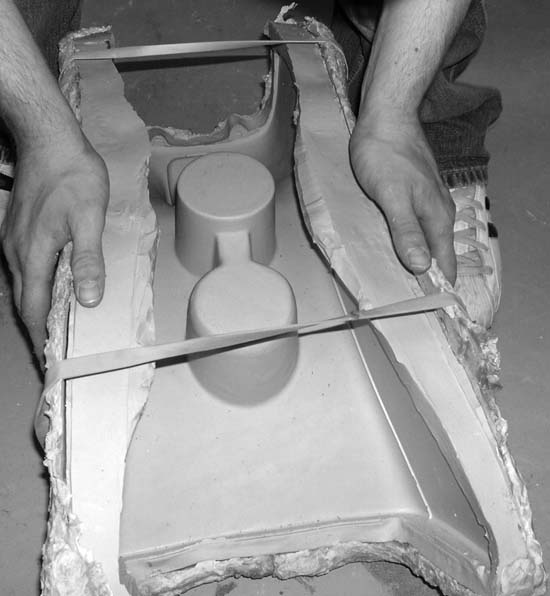
Figure 1-29. The silicone mold after it has been encased in its plaster support shell and bound with rubber mold bands
Spray the inside of the mold thoroughly with the universal mold release. Repeat to ensure proper coverage.
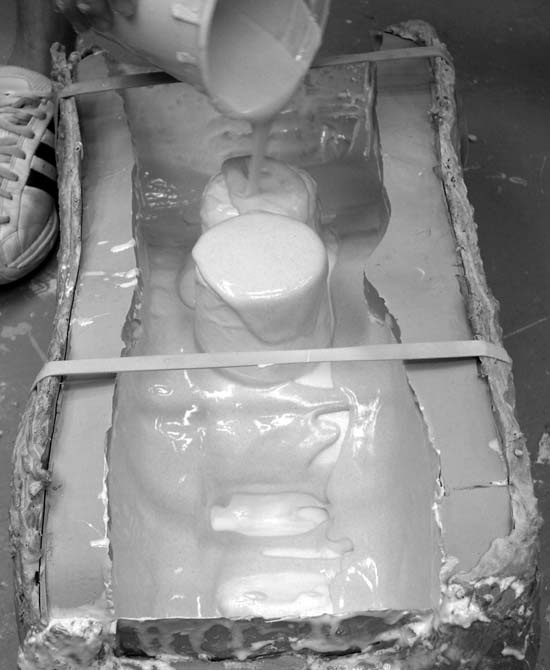
Now, it’s time to pour in your first coat of plastic. The amount of plastic to mix depends on the size of your mold. The console I made took approximately 1 1/2 cups of plastic to cover the entire surface area with a thin layer.
Mix the plastic according to the directions, using equal parts of the A and B chemicals. Mix thoroughly and pour it in the mold. Pick up your mold and tilt it slowly from side to side, turning it around as you do to cover the entire surface area of the mold. Dump the excess into your mixing container, wait about 30 seconds, then pour it back in, repeating the process until the plastic begins to set up.
Wait about 30 minutes for the plastic to cure. Mix up about two more batches of plastic, repeating the last process and waiting 30 minutes between each coat. When the third coat is cured, mix up another batch of plastic, this time adding a filler to thicken it up, as shown in Figure 1-30. The filler helps to lighten the weight while adding density to the final casting.
Pour a cup of part A into your mixing container. Add a few spoonfuls of the URE-FIL filler, until the mixture becomes pasty. Add a cup of part B, and mix thoroughly. Pour it into your mold, turning and tilting it to fill in all the gaps and crevices until the mixture begins to harden. Wait 30 minutes.
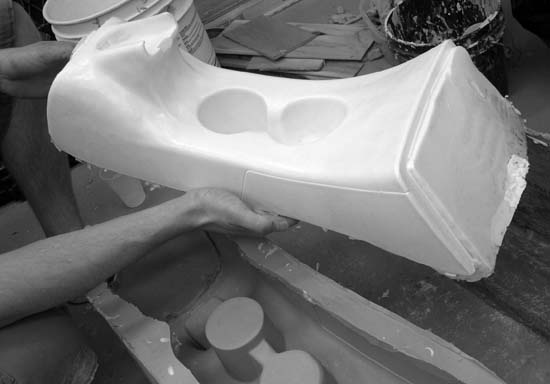
Repeat this process two more times, waiting 30 minutes between each layer. You can add as many layers as you want, depending on the thickness you desire. After the last coat is cured, you can remove the piece from the silicone mold. Remove it gently, because silicone can tear if stretched too far. Your console should resemble Figure 1-31.
You must now trim and clean the edges of your piece, using a Dremel tool and sandpaper, as shown in Figure 1-32. A clean edge is important for a matching fit back into your car.
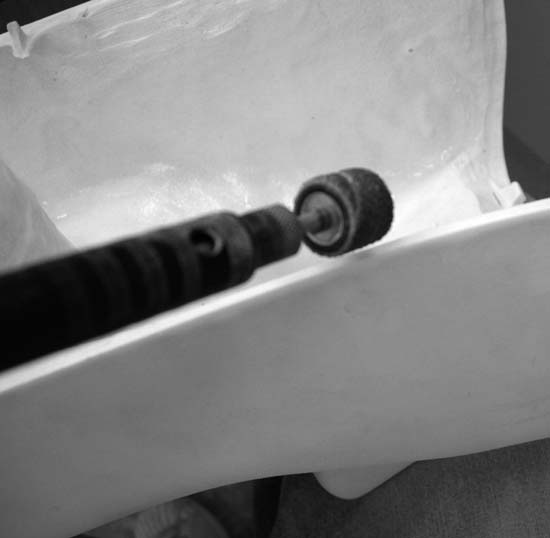
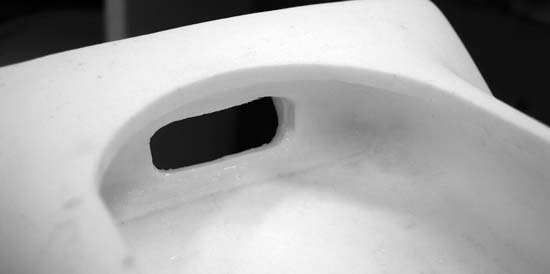
After the edges are clean, sand the piece until you achieve a smooth surface. Start with a coarse sandpaper, 80–100 grit, and work your way up to 300–400 grit. If you are planning to backlight a logo in your piece, you will need to sand down the area on the inside of your piece where your logo will be placed. This will allow the light to shine through. Be careful not to sand down too far! Use the Dremel tool to cut out a space for the dock connector to fit into where it will connect with your iPod, as shown in Figure 1-33.
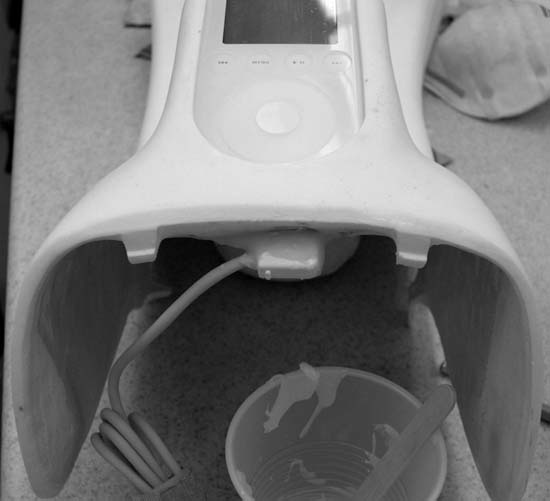
Place the iPod where it will sit or lie, push the dock connector through the hole you made, and connect it to your iPod. Mix some dental acrylic and cover the back side of the connector to hold it in place. When it is hard, remove the iPod and mix up another small amount of the dental acrylic, using slightly more of the monomer for a thinned-down mix. Use an eye-dropper to fill in the gap around the connector, as shown in Figure 1-34.
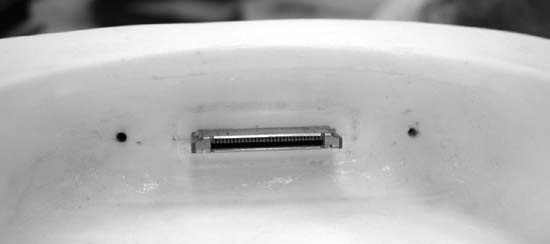
Let it harden, and then sand as needed. On either side of the connector, drill two small holes the size of the fiber-optic cable you will insert for lighting up that space, as shown in Figure 1-35.
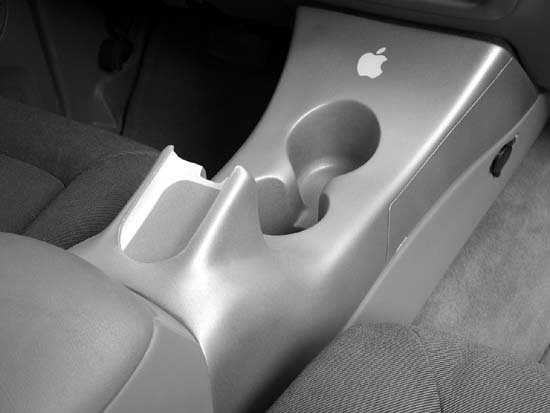
Wipe down the piece with a damp cloth to remove excess dust. Before you start painting, you need to tape off the areas you don’t want to be painted. I chose to paint the enclosure where the iPod lies a glossy off-white. Tape up the connector if you choose to paint this area. After putting a few coats on that section and letting them dry completely, I taped off that whole section and applied the Apple logo sticker (to be removed later) so I could begin painting the rest of the console a light silver-gray to match my interior. Light-colored metallic car paint is slightly translucent, unless applied in numerous, heavy coats. I chose to use a darker metallic charcoal gray as a base color, and then paint over that with the lighter color. This also helped to block any light from coming through the area around the outside of the backlit Apple logo that I added.
After you’ve applied a few coats of paint, let it dry for about two hours, and then remove the tape and the Apple sticker. Cut a section of the foam rubber padding to fit the surface of the enclosure, so the iPod has a soft base to slide in and out on. Use spray adhesive to attach it. You can now add the lighting.
Cut off one of the cigarette-lighter adapter’s blue LEDs, and solder on a bright white LED in its place. The white LED is for the Apple logo, while the remaining blue one will be used to light the interior of the iPod’s enclosure. Make a separate enclosure for the white LED out of a spray paint can lid, to block any light from escaping through the sides of the console and at the same time direct it toward the Apple logo. Drill a hole in the center of the lid, and then use dental acrylic to hold it in place behind the logo. Insert the light into the hole in the center and tape it up. Then, take the fiber-optic cable and cut two pieces about two feet long. Push the minto the small holes drilled next to the dock connector, and glue them in place. Turn them into the blue LED and tape them to it.
The final step in this process is to hook up all your electronics and install the console. Take all of your materials, the console, and any tools you will need into the car with you. First, you need to connect your dual-outlet cigarette-lighter adapter, which can be purchased from your local auto supply store. This can be done a few different ways, but the easiest way for me was to just disconnect the wires from the existing dashboard lighter outlet and reconnect them to the outlet I’d purchased. Since I don’t smoke and I don’t use a cell phone, I really didn’t have any use for that outlet. Besides, many cars have an extra one on the passenger-side panel, down by the floor. If you find that you do need your outlet, you can purchase a separate lighter with a wiring kit to run off of the existing outlet. Connect the dual lighter adapter to the new outlet. You can now connect the car charger to one of them and your LED lighting to the other.
Connecting the iPod to your car stereo might pose a problem for some. Not all car stereos accept auxiliary input from an external source. Unfortunately, there is no way around this. You simply must have the correct type of stereo. Quite a few stereos now feature front-mounted RCA inputs, but you may have to purchase a separate adapter, as I did. If so, you’ll need an IP-Bus interconnector with left and right RCA inputs. The IP-Bus connects to the rear of the stereo and features two RCA jacks that protrude from the unit, allowing an external audio source (such as a CD changer or an iPod) to be connected. I chose to use the iCable, which is basically a stereo mini-jack that converts to dual RCA jacks. I plugged the stereo mini-jack into the Belkin car charger and ran the two RCAs to the adapter on the car stereo. The iPod is now connected directly to your car stereo (some car stereos require manually changing the menu to accept an auxiliary input). After double-checking that everything is connected and functioning properly, attach the console and put the interior back together.
Now that your new console is connected and functioning, enjoy it, but be very careful when driving! As beautiful as this installation might look (see Figures 1-36 and 1-37, don’t give your iPod more attention than the road
—Jesse Melchior
Get iPod and iTunes Hacks now with the O’Reilly learning platform.
O’Reilly members experience books, live events, courses curated by job role, and more from O’Reilly and nearly 200 top publishers.

