The Ansel Adams part of your job is over. Your digital camera is brimming with photos. You’ve snapped the perfect graduation portrait, captured that jaw-dropping sunset over the Pacific, or compiled an unforgettable photo essay of your two-year-old attempting to eat a bowl of spaghetti. It’s time to use your Mac to gather, organize, and tweak all these photos so you can share them with the rest of the world.
This is the core of this book—compiling, organizing, and adjusting your pictures using iPhoto and then transforming this random collection of digital photos into a professional-looking slideshow, set of prints, movie, Web page, poster, email, desktop picture set, or bound book.
But before you start organizing and publishing these pictures using iPhoto, they have to find their way from your camera to the Mac. This chapter explains how to get pictures from camera to computer and introduces you to iPhoto.
iPhoto approaches digital photo management as a four-step process:
Import. Working with iPhoto begins with feeding your digital pictures into the program. During the import process, iPhoto duplicates your pictures and stores them in its Photo Library folder on the Mac’s hard drive.
In general, importing is literally a one-click process. This is the part of iPhoto covered in this chapter.
Organize. This step is about sorting and categorizing your chaotic jumble of pictures so you can easily find them and arrange them into logical groups. You can add searchable keywords like Vacation or Kids to make pictures easier to find. You can change the order of images, and group them into “folders” called albums. As a result, instead of having 4,300 randomly named digital photos scattered about on your three hard drives, you end up with a set of neatly categorized and immediately accessible photo collections. Chapter 5 covers all of iPhoto’s organization tools.
Edit. This is where you fine-tune your photos to make them look as good as possible. iPhoto provides everything you need for rotating, retouching, resizing, cropping, color-balancing, straightening, and brightening your pictures. More significant image adjustments—like editing out an ex-spouse—require another image-editing program. Editing your photos is the focus of Chapter 6.
Share. iPhoto’s best features have to do with sharing your photos, either onscreen or on paper. In fact, iPhoto offers nine different ways of publishing your pictures. In addition to printing pictures on your own printer (in a variety of interesting layouts and book styles), you can display images as an onscreen slideshow, turn the slideshow into a QuickTime movie, order professional quality prints or a professionally bound book, email them, apply one to your desktop as a desktop backdrop, select a batch to become your Mac OS X screen saver, or post them online as a Web page.
Chapters 7 through 12 explain how to undertake these self-publishing tasks.
Note
Although much of this book is focused on using digital cameras, remember this: You don’t have to shoot digital photos to use iPhoto. You can just as easily use it to organize and publish pictures you’ve shot with a traditional film camera and then digitized using a scanner (or had Kodak convert them to a Photo CD). Importing scanned photos is covered later in this chapter on page 89.
According to Apple, iPhoto 5 requires a Mac that has a USB (Universal Serial Bus) port, a G3 chip or better, 256 MB of memory or more, and Mac OS X 10.3.4 or later. (A faster chip is required for some editing functions and burning slideshows to DVD.)
Tip
The USB port makes it possible to connect a camera or memory card reader for directly importing the photos. But technically, you don’t need a USB port, since you can always import photos from the hard drive or a CD, as described later in this chapter.
The truth is, iPhoto may be among the most memory-dependent programs on your Mac. It just loves memory. Memory is even more important to iPhoto than your Mac’s processor speed. It makes the difference between tolerable speed and sluggishness, or between a 5,000 photo collection and a 25,000-photo collection. So the more memory and horsepower your Mac has, the happier you’ll be.
Finally, take a look at how much free hard drive space you have. You need at least 250 MB if you’re installing only iPhoto, iMovie, and iTunes. If you want iDVD and GarageBand too, iLife will eat up 4.3 GB of disk space—not including the room you’ll need for all your photos.
A free version of iPhoto has been included on every Mac sold since January 2002. If your Mac falls into that category, you’ll find iPhoto in your Applications folder. (You can tell which version you have by single-clicking its icon and then choosing File → Get Info. In the resulting info window, you’ll see the version number clear as day.)
If you bought your Mac after January 2005, you probably have iPhoto 5 installed. Otherwise, it’s available only as part of Apple’s iLife ’05 software suite—an $80 DVD that includes GarageBand, iTunes, iMovie HD, iPhoto, and iDVD. You can get the iLife box from http://www.apple.com/store, from mail-order Web sites, or at local computer stores.
When you run the iLife installer, you’re offered a choice of programs to install. Install all five programs, if you like (4.3 GB of hard drive space required), or just iPhoto.
When the installation process is over, you’ll find the iPhoto icon in your Applications folder. (In the Finder, choose Go → Applications, or press Shift-⌘-A, to open this folder.) If you’re wise, you’ll take a moment to drag the iPhoto icon—the little camera superimposed on the palm tree—onto your Dock, so you’ll be able to open it more conveniently from now on.
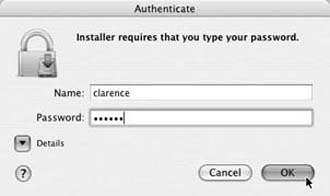
UP TO SPEEDThe Installer Password
When you run the iLife installer, your efforts are almost immediately interrupted by a message telling you that you need an “Administrator password” to install the program. Not to worry. Like all Mac OS X software installers, this one is just checking to make sure that you, as the administrator of your Mac, truly have permission to load new software on it. Well-written programs always ask you to establish your authority before installing them.
If you have an Administrator account on this Mac, just type your password into the lower box. If not, click the lock icon in the lower-left corner of the Authorization screen of the installer. You’ll be prompted for the name and password of an Administrator account for your Mac.
If you’re not sure which user account is the administrator’s, choose ![]() → System Preferences. Click the Accounts icon to view a list of people with accounts on your Mac. Those who have been designated as administrators are clearly marked.
→ System Preferences. Click the Accounts icon to view a list of people with accounts on your Mac. Those who have been designated as administrators are clearly marked.
Bear in mind, you don’t actually have to log in as an administrator to install the software; you just need to know an administrator’s name and password. In other words, if you’re not an administrator, you can call one over to the machine and ask him to type in his information so you can proceed with the installation.
If you’ve used an earlier version of iPhoto, you’d be wise to make a backup of your iPhoto Library folder—your database of photos—before running iPhoto 5. That’s because iPhoto 5’s first bit of business is converting that library into a new, more efficient format that’s incompatible with earlier iPhotos (see Figure 4-1, bottom).
Ordinarily, the upgrade process is seamless: iPhoto smoothly converts and displays your existing photos, comments, titles, and albums. But lightning does strike, fuses do blow, and the technology gods have a cruel sense of humor—so making a backup copy before iPhoto 5 converts your old library is very, very smart.
To perform this safety measure, open your Home → Pictures folder, and then copy or duplicate the iPhoto Library folder. (This folder may be huge, since it contains copies of all the photos you’ve imported into iPhoto. This is a solid argument for copying it onto a second hard drive, like an iPod, or a burnable DVD.) Now, if anything should go wrong with the conversion process, you’ll still have a clean, uncorrupted copy of your iPhoto Library files.

Figure 4-1. Top: This message appears to get you all excited about your voyage into the not-so unknown. It acknowledges that you’re about to use iPhoto for the first time, and is therefore a clue that you’ll probably arrive at an empty iPhoto library window (Figure 4-2).Bottom: If you’re upgrading from an earlier version of iPhoto, this warning is the first thing you see when you launch iPhoto. Once you click the Upgrade button, there’s no going back–your photo library will no longer be readable with iPhoto 1, 2, or 4.
Double-click the iPhoto icon to open the program. After you dismiss the “Welcome to iPhoto” dialog box (Figure 4-1, top), iPhoto checks to see if you have an older version and, if so, offers to convert its photo library (Figure 4-1, bottom).
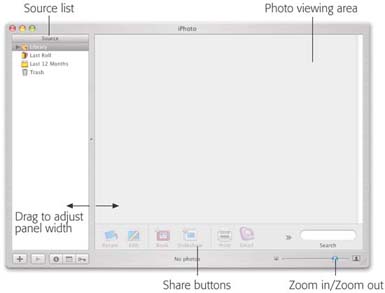
Finally, you arrive at the program’s main window, the basic elements of which are shown in Figure 4-2.
Get iPhoto 5: The Missing Manual, Fourth Edition now with the O’Reilly learning platform.
O’Reilly members experience books, live events, courses curated by job role, and more from O’Reilly and nearly 200 top publishers.

