Chapter 4. Phone Calls & FaceTime
With each successive iPhone model, Apple improves the iPhone’s antennas, circuitry, speakers, microphone, and software. And features like Siri, auto-reply, and Do Not Disturb have turned Apple’s phone from an also-ran into one of the most useful gadgets ever to hop onto a cellular network.
Dialing from the Phone App
Suppose you’re in luck. Suppose the bars at the top of the iPhone’s screen tell you that you’ve got cellular reception. You’re ready to start a conversation. To make a phone call, open the Phone app like this:
Go Home, if you’re not already there. Press the home button (or, on the iPhone X, swipe up from the bottom).
Tap the Phone icon. It’s usually at the bottom of the Home screen. (The tiny circled number in the corner of the Phone icon tells you how many missed calls and voicemail messages you have.)
TIP
Using Siri is often faster. You get good results saying things like, “Call Casey Robin’s cell” or “Dial 866-2331.”
Now you’ve arrived in the Phone app. A new row of icons appears at the bottom, representing your voicemail (“Visual Voicemail”) and the four ways of dialing from here:
Favorites. Here’s the iPhone’s version of speed dial: It lists up to 50 people you think you call most frequently. Tap a name to make the call. (Details on building and editing this list begin in “The Favorites List”.)
Recents. Every call you’ve recently made, answered, missed, or even just dialed appears in this list. Missed callers’ names appear in red lettering, which makes it easy to spot them—and to call them back.
Tap a name or a number to dial. Or tap the
 button to view the details of a call—when, where, how long—and, if you like, to add this number to your Contacts list.
Contacts. This program also has an icon of its own on the Home screen; you don’t have to drill down to it through the Phone button. It’s your phone book; tap somebody’s name or number to dial it.
Keypad. This dialing pad’s big, fat buttons are easy to hit even with big, fat fingers. You can punch in any number and then tap
 to place the call.
Once you’ve dialed, no matter which method you used, either hold the iPhone up to your head, put in the earbuds, turn on the speakerphone, or put on your Bluetooth earpiece—and start talking!
This, however, is only the Quick Start Guide. Here’s a more detailed look at each of the Phone-app modules.
The Favorites List
You may not wind up dialing much from Contacts. That’s the master list, all right, but it’s too unwieldy when you just want to call your spouse, your boss, or your lawyer. Dialing by voice (Chapter 5) is almost always faster. But when silence is golden, at the very least use the Favorites list—a short, easy-to-scan list of the people you call most often (facing page, left).
Actually, calling is only the beginning. A favorite can be any kind of “address”: for triggering an email, a text message, a video call, or even an Internet voice call in an app like WhatsApp, Skype, or Cisco Spark. In other words, you can set things up so that one tap on a favorite opens an outgoing text to your beloved, and a different tap triggers a Skype call to your boss.
TIP
Once you’ve set up these favorites, you can add them to the Today screen (“The Today Screen (Widgets)”), so that placing one of these calls or text communications is only a swipe and a tap away.
You can add names to this list in any of three ways:
From the Favorites list itself. Tap + to view your Contacts list. Tap the person you want. If there’s more than one phone number or email address on the info screen, then tap the one you want to add to Favorites.
TIP
Each favorite doesn’t represent a person; it represents a number or address. So if your best friend Chris has both a home number and a cell number, then add two items to the Favorites list. Gray lettering in the list lets you know whether each number or address is mobile, home, Skype, Messages, FaceTime, or whatever.
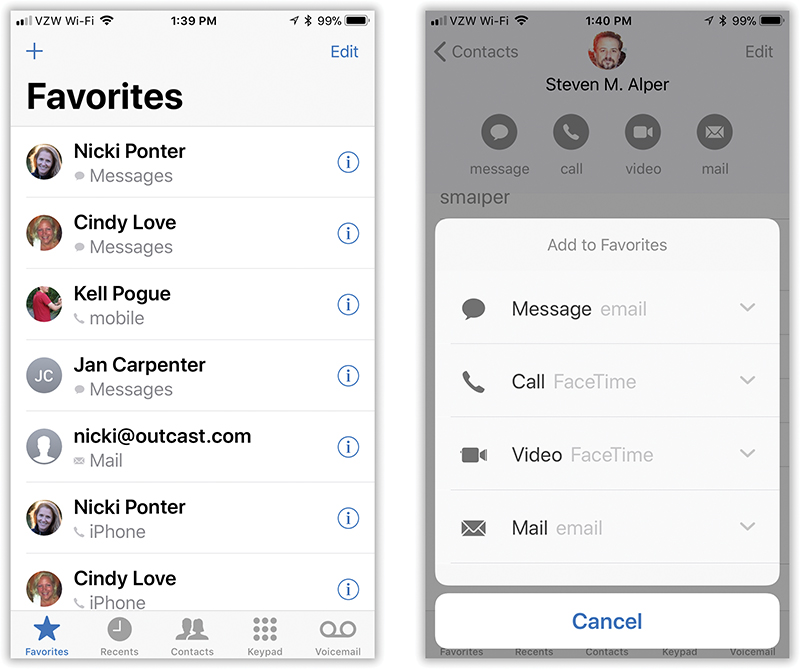
From the Contacts list. Tap a name to open the info screen, where you’ll find a button called Add to Favorites. It opens the Add to Favorites panel shown above at right. For each of its four communication methods—Message, Call, Video, Mail—you get a pop-up menu that lists your available apps for performing that sort of human contact.
Tap the one you want to add to Favorites.
From the Recents list. Tap
next to any name or number in the Recents list. If it’s somebody who’s already in your Contacts list, then you arrive at the Call Details screen, where one tap on Add to Favorites does what it says.If it’s somebody who’s not in Contacts yet, then you’ll have to put her there first. Tap Create New Contact, and then proceed as described in “Adding to the Contacts List”. After you hit Save, you return to the Call Details screen so you can tap Add to Favorites.
TIP
To help you remember that a certain phone number or email address is already in your Favorites list, a gray star appears next to it in certain spots, like the Call Details screen and the Contact Info screen.
The Favorites list holds 50 numbers. Once you’ve added 50, the Add to Favorites and + buttons disappear.
NOTE
The face of each favorite peeks out of a round frame next to the name, and if your Contact card for that person doesn’t have a photo, the circle shows the person’s initials instead.
Reordering Favorites
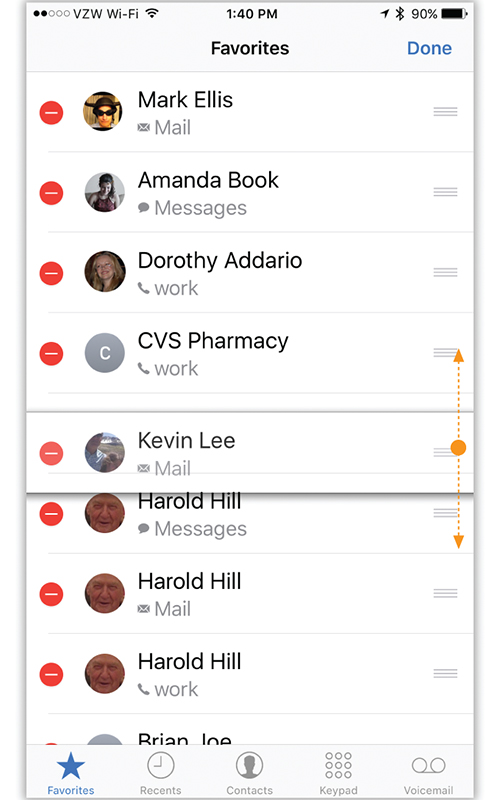
Tapping that Edit button at the top of the Favorites list offers another handy feature, too: It lets you drag names up and down, so the most important people appear at the top of the list. Just use the grip strip (![]() ) as a handle to move entire names up or down the list.
) as a handle to move entire names up or down the list.
Deleting from Favorites
To delete somebody from your Favorites—the morning after a nasty political argument, for example—use the iPhone’s standard swipe-to-delete shortcut: Swipe leftward across the undesired name. Tap the Delete button that appears.
(If you’re paid by the hour, you can use the slow method, too. Tap Edit. Now tap the ![]() button next to the unwanted entry and tap Delete to confirm.)
button next to the unwanted entry and tap Delete to confirm.)
The Recents List
Like any self-respecting cellphone, the iPhone maintains a list of everybody you’ve called or who’s called you recently. The idea, of course, is to provide you with a quick way to call someone you’ve been talking to lately.
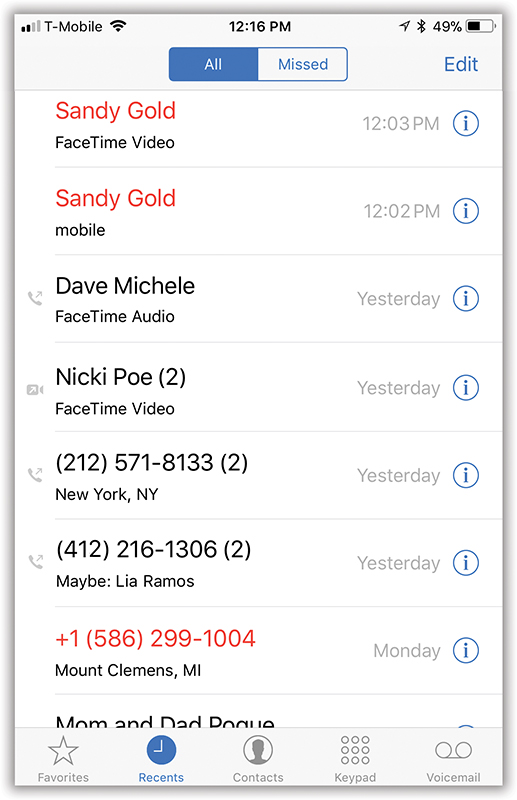
To see the list, tap Recents at the bottom of the Phone app. You see a list of the last 75 calls that you’ve received or placed, along with each person’s name or number (depending on whether that name is in Contacts or not), city of the caller’s home area code (for callers not in your Contacts), time or date of the call, and what kind of call it was—mobile, home, work, FaceTime, FaceTime Audio, Skype, or whatever.
Here’s what you need to know about the Recents list:
Calls that you missed (or sent to voicemail) appear in red type. If you tap Missed at the top of the screen, you see only your missed calls. The color-coding and separate listings are designed to make it easy for you to return calls you missed, or to try again to reach someone who didn’t answer when you called.
A tiny
 icon lets you know which calls you made (to differentiate them from calls you received).
To call someone back—regardless of whether you answered or dialed the call—tap that name or number in the list.
Tap
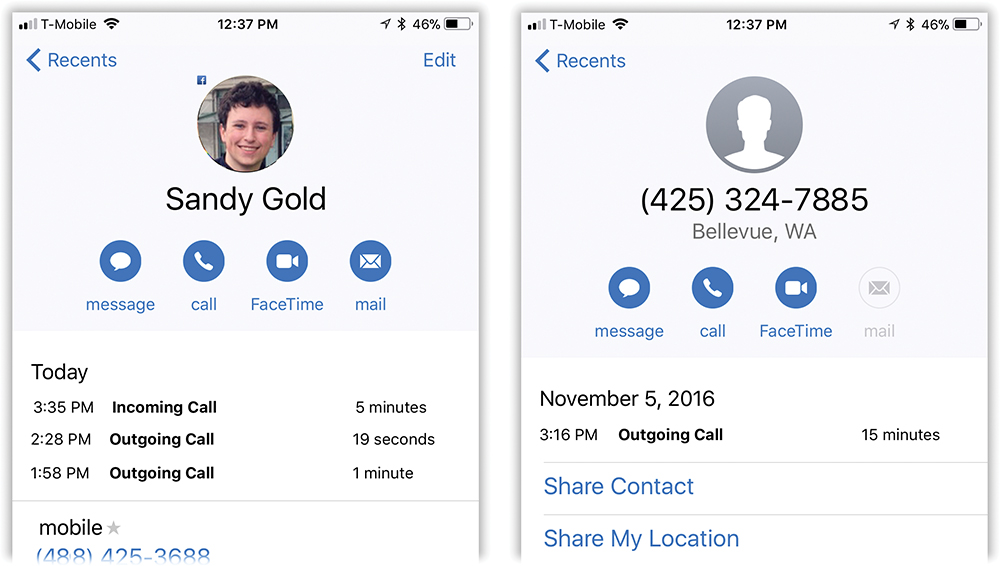
next to any call to open the info screen. At the top of the screen, you can see whether this was an outgoing call, an incoming call, a missed call, or a canceled call (in which you chickened out and hung up before your callee answered).What else you see here depends on whether the other person is in your Contacts list.
If so, the info screen displays the person’s whole information card (below, left). A little table displays all the incoming and outgoing calls to or from this person that day. A small gray star denotes a phone number that’s also in your Favorites list, and a Recent label indicates a recent call from that number.
If the call isn’t from someone in your Contacts, then you get to see a handy notation at the top of the info screen: the city and state where the calling phone is registered (below, right).
TIP
If someone who isn’t in Contacts has called you, iOS takes a guess at that person’s name—by looking for a matching phone number in the signature portion of your email! For example, if Frank Smythe has called you from 213-292-3344, and there’s also an email from him with his phone number as part of his signature, then the Recents list will say: Maybe: Frank Smythe. Clever!
To save you scrolling, the Recents list thoughtfully combines consecutive calls to or from the same person. If some obsessed ex-lover has been calling you every 10 minutes for four hours, you’ll see “Chris Meyerson (24)” in the Recents list. (Tap
to see the exact times of the calls.)You can erase one call from this list exactly the same way you’d delete a favorite: Swipe leftward across the undesired name. Tap the Delete button that appears. (Once again, there’s also a long way: Tap Edit, tap
 next to the unwanted entry, and then tap Delete.)
You can also erase the entire list, thus preventing a coworker or significant other from discovering your illicit activities: Tap Edit, and then tap Clear at the top of the screen. You’re asked to confirm your decision.
Contacts
The Phone app may offer four ways to dial—Favorites, Recents, Contacts, and Keypad—but the Contacts list is the source from which all other lists spring. That’s probably why it’s listed three times: once with its own icon on the Home screen, again at the bottom of the Phone app, and also in the FaceTime app.
Contacts is your address book—your master phone book.
NOTE
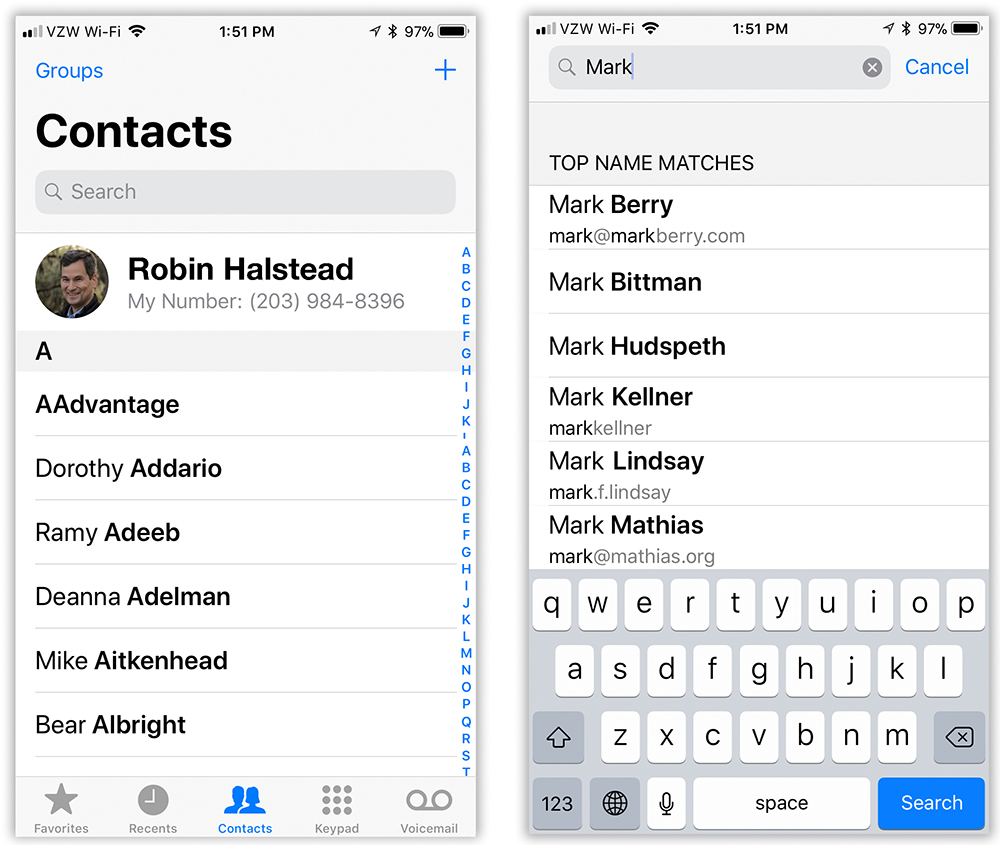
Your iPhone’s own phone number appears at the top of the Contacts list. That’s a much better place for it than deep at the end of a menu labyrinth, where it is on most phones.
If your social circle is longer than one screenful, you can navigate this list in any of three ways:
First, you can savor the distinct pleasure of flicking through it.
Second, if you’re in a hurry to get to the T’s, use the A-to-Z index down the right edge of the screen. Just tap the first letter of the last name you’re looking for. Or slide your finger up or down the index. The list scrolls with it.
Third, you can use the search box at the very top of the list, above the A’s.
Tap to make the keyboard appear. As you type, Contacts pares down the list, hiding everyone whose first, last, or company name doesn’t match what you’ve typed so far. It’s a really fast way to pluck one name out of a haystack.
(You can clear the search box by tapping the
 at its right end or restore the full list by tapping Cancel.)
In any case, when you see the name you want, tap it to open its information card. Tap the number you want to dial.
Groups
Many computer address book programs, including the Mac’s Contacts app, let you place your contacts into groups—subsets like Book Club or Fantasy League Guys. You can’t create or delete groups on the iPhone without a special app, but at least the groups from your Mac, PC, Exchange server, or iCloud account get synced over to it. To see them, and to switch them all on or off at once, tap Groups at the top of the Contacts list.
Here’s where groups come into play:
If you can’t seem to find someone in the list, you may be looking in the wrong list. Tap Groups at the top-left corner to return to the list of accounts. Tap All Contacts to view a single, unified list of everyone your phone knows about.
If you’ve allowed your iPhone to display your contacts from Facebook or Twitter, then each of those lists is a group, too. (If your Contacts list seems hideously bloated with hundreds of people you never actually call, it’s probably your Facebook list. Pop into Groups and touch All Facebook, removing the checkmark, to hide them all at once.)
If you do use the Groups feature, remember to tap the group name you want before you create a new contact. That’s how you put someone into an existing group. (If not, tap All Contacts instead.)
Adding to the Contacts List
Every cellphone has a Contacts list, of course, but the beauty of the iPhone is that you don’t have to type in the phone numbers one at a time. Instead, the iPhone sucks in the entire phone book from your Mac or PC, iCloud, and/or an Exchange server at work.
It’s infinitely easier to edit your address book on the computer, where you have an actual keyboard and mouse. The iPhone also makes it easy to add someone’s contact information when she calls, emails, or text messages you, thanks to a prominent Add to Contacts button.
But if, in a pinch, on the road, at gunpoint, you have to add, edit, or remove a contact manually, here’s how to do it:
Make sure you’ve selected the right group or account, as described already. Now, on the Contacts screen, tap +. You arrive at the New Contact screen, which teems with empty boxes.
It shouldn’t take you long to figure out how to fill in this form: You tap in a box and type. But here are a few tips and tricks for data entry:
The keyboard opens automatically when you tap in a box. And the iPhone capitalizes the first letter of each word for you.
Phone numbers are special. When you enter a phone number, the iPhone adds parentheses and hyphens for you. (You can even enter text phone numbers, like 1-800-GO-BROWNS; the iPhone converts the letters to digits when it dials.)
If you need to insert a pause—for dialing access numbers, extension numbers, or voicemail passwords—type #, which introduces a two-second pause in the dialing. You can type several of them to create longer pauses.
To change the label for a number (“mobile,” “home,” “work,” and so on), tap the label that’s there now. The Label screen shows you your choices. There’s even a label called “iPhone,” so you and your buddy can gloat together.
TIP
If you scroll down the Label screen, you’ll see that you can also create custom labels. You might prefer someone’s cellphone number to be identified as “cell” instead of “mobile,” for example. Or you might want to create a label that says “Skype,” “Google Voice,” “Line 2,” “Yacht Phone,” or “Bat Phone.” The secret: Tap Add Custom Label. (Once you’ve created a custom label, it’s there in the list of options for your use later.)
The Custom option, by the way, is brought to you by iCloud. If your default group is any other mail account, the Custom option doesn’t appear. To check, open Settings → Contacts → Default Accounts, and choose iCloud.
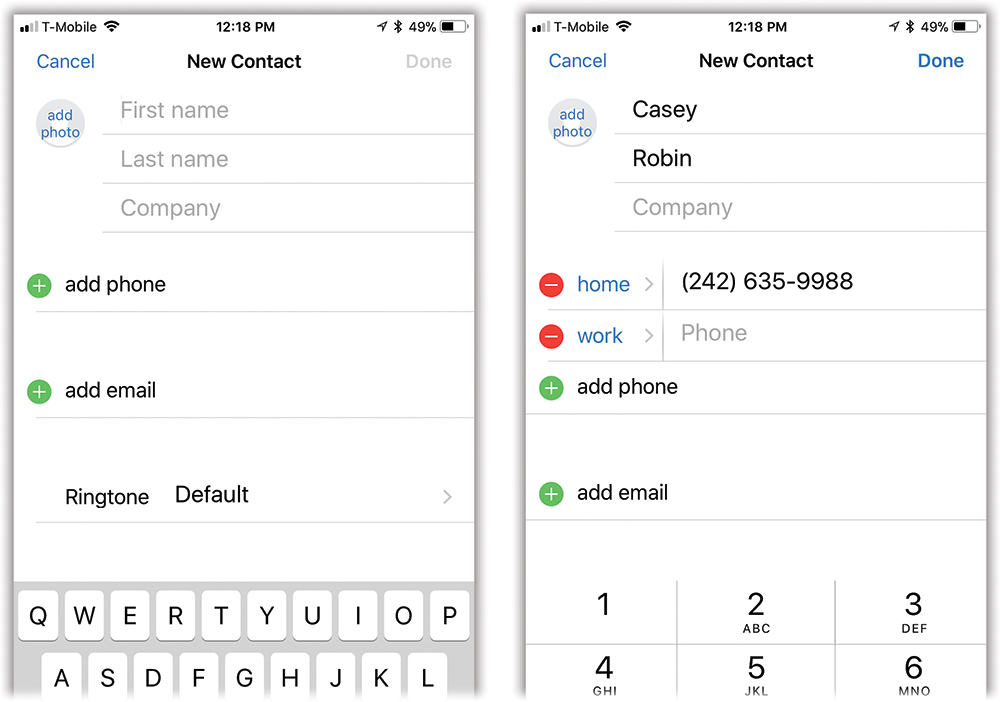
Expand-O-Fields mean you’ll never run out of room. Almost every field (empty box) on a Contacts card is infinitely expanding. That is, the instant you start filling in a field, another empty box (labeled
 add phone or whatever) appears right below it, so you can immediately add another phone number, email address, URL, or street address. (The only nonexpanding fields are First name, Last name, Company, Ringtone, Text Tone, Notes, and whatever oddball fields you add yourself.)
For example, when you first tap add phone, the phone-number box you get is labeled “home.” (If that’s not the right label, you can tap it to choose from one of nine others—or add a custom label.) A new add phone button appears so you’ll have a place to enter a second phone number for this person. When you do that, a third add phone button appears. And so on.
In other words, you can never run out of places to add more phone numbers, addresses, URLs, and social media profiles.
NOTE
Tapping add field at the bottom of this screen lets you add a new miscellaneous field, like Nickname or Department.
Relatives are here. In iCloud accounts, there’s also the social profile field, where you can list somebody’s Twitter, LinkedIn, Flickr, Facebook, and even Myspace addresses. There’s an instant message field, too, where you can record addresses for chat networks like Yahoo Messenger.
And there’s add related name. Here’s where you can list this person’s mother, father, spouse, partner, child, manager, sibling, and so on—or even specify a different type of relationship (tap the existing label and then Add Custom Label).
NOTE
As you may discover in Chapter 5, Siri knows about your relationships. You can tell her to “Call my mom” or “Text my boss.” Does the add related name feature mean that you can now ask Siri to “Call Chris Robin’s manager”?
Alas, no. These fields are for your reference only.
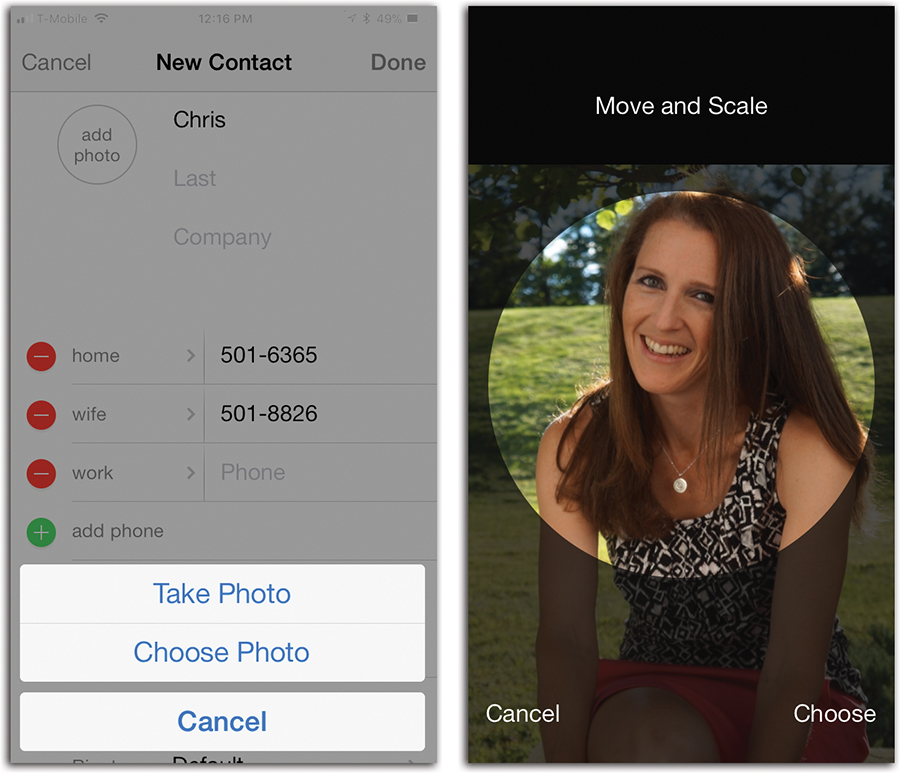
You can add a photo of the person, if you like. Tap add photo. If you have a photo of the person on your phone already, tap Choose Photo. You’re taken to your photo collection, where you can find a good headshot (Chapter 9).
Alternatively, tap Take Photo to activate the iPhone’s built-in camera. Frame the person, and then tap the white camera button to snap the shot.
In any case, you wind up at the Move and Scale screen. Here you can frame up the photo so the person’s face is nicely sized and centered. Spread two fingers to enlarge the photo; drag your finger to move the image within the frame. Tap Choose to commit the photo to the address book’s memory. (Back on the info screen where you started, a miniature version of the photo now appears. Tap edit if you want to change the photo, take a new one, adjust the Move and Scale screen, or get rid of the photo altogether.)
From now on, this photo will pop up whenever the person calls. It also appears next to the person’s name in your Favorites list.
You can import photos from Facebook. Here’s a wild guess: Most of the photo boxes in your Contacts list are empty. After all, who’s going to go to the trouble of hunting down headshots of 500 acquaintances, just for a fully illustrated Contacts app?
Fortunately, with one click, the iPhone can harvest headshots from the world’s largest database of faces: Facebook.
Visit Settings → Facebook to see the magical button: Update All Contacts. When you click it, the iPhone goes online for a massive research mission. Using your contacts’ names and phone numbers as matching criteria, it ventures off to Facebook, finds the profile photos of everyone who’s also in your Contacts list, and installs them into Contacts automatically. (If you already have a photo for somebody, don’t worry; it doesn’t get replaced.)
As a handy bonus, this operation also adds the @facebook.com email addresses for the people you already had in Contacts.
TIP
Actually, there’s another side effect of this operation: It adds all your Facebook friends’ names to your main Contacts list.
Now, you may not be crazy about this. Most of these Facebook folk you’ll never call on the phone—yet here they are, cluttering up the Contacts list within the Phone app.
Fortunately, the Update All Contacts button doesn’t really mix your Facebook friends in with your local Contacts list. It just subscribes to your Facebook address book—adds a new group, which you can turn off with one quick click; see “Groups”.
Even if you do choose to hide all their entries, you still get the benefit of the imported headshots and Facebook email addresses for the people you do want to see in Contacts.
You can import Twitter addresses. In Settings → Twitter, the Update Contacts button awaits. Its purpose is to fill in the Twitter handles for everyone who’s already in your Contacts, matching them by phone number or email address.
You can choose a ringtone. You can choose a different ringtone for each person in your address book. The idea is that you’ll know by the sound of the ring who’s calling you.
NOTE
It’s one tone per person, not per phone number. Of course, if you really want one ringtone for your buddy’s cellphone and another for his home phone, you can always create a different Contacts card for each one.
To choose a ringtone, tap Default. On the next screen, tap any sound in the Ringtones or Alert Tones lists to sample them. (Despite the separate lists, in this context, these sounds are all being offered as ringtones.) When you’ve settled on a good one, tap Done to return to the info screen where you started.
TIP
Here, on the ringtone selection screen, you’re offered an Emergency Bypass switch. Turn it on to say, “Whenever this person calls or texts, I want my phone to ring or vibrate even if I’ve turned on Do Not Disturb” (“Do Not Disturb”).
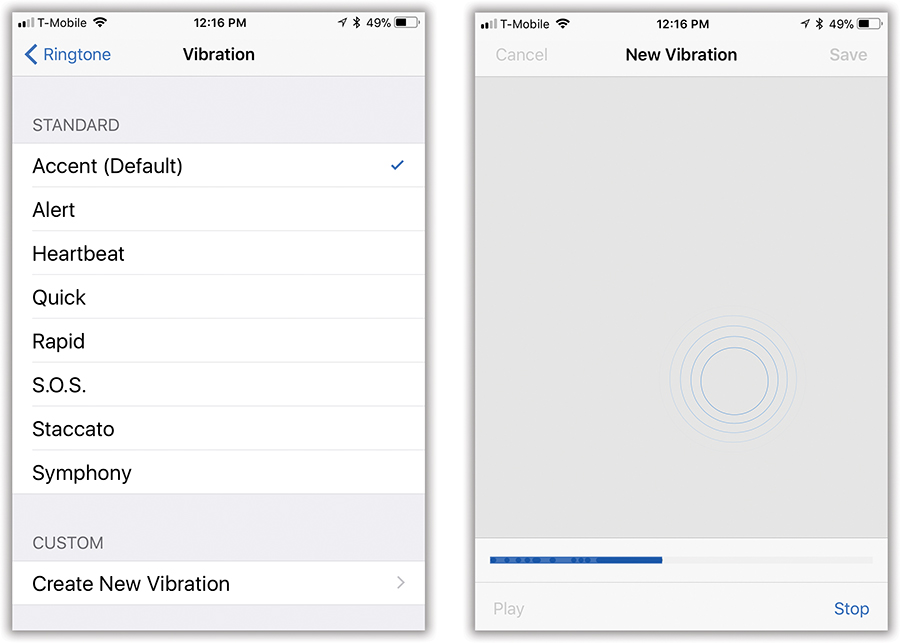
You can specify a vibration pattern for incoming calls. This unsung feature lets you assign a custom vibration pattern to each person in your Contacts, so you know by feel who’s calling—without even removing the phone from your pocket, even if your ringer is off. It’s a surprisingly useful option.
To set it up, start on the Ringtone screen described already; tap Default next to the word Vibration. You’re offered a choice of canned patterns (Alert, Heartbeat, Quick, Rapid, and so on). But if you tap Create New Vibration, you can then tap the screen in whatever rhythm you like. It can be diddle diddle dee…or the opening notes to the Hallelujah Chorus…or the actual syllables of the person’s name. (“Maryanna Beckleheimer.” Can you feel it?)
The phone records your pattern, which you can prove to yourself by tapping Play. If you tap Save and name that pattern, then it becomes one of the choices when you choose a vibration pattern for someone in your Contacts. It’s what you’ll feel whenever this person calls you. Yes, it’s tactile caller ID. Wild.
You can also pick a text-message sound (and vibration). Just as you can choose sounds and vibrations for incoming phone calls, you can tap Text Tone to choose sounds and vibrations for incoming text messages and FaceTime invitations.
You can add new fields of your own. Very cool: If you tap add field at the bottom of the screen, then you go down the rabbit hole into Field Land, where you can add any of 13 additional info bits about the person whose card you’re editing: a prefix (like Mr. or Mrs.), a suffix (like M.D. or Esq.), a nickname, a job title, a phonetic pronunciation for people with weird names, and so on.
When you tap one of these labels, you return to the info screen, where you’ll see that the iPhone has inserted the new, empty field in the most intelligent spot. For example, if you add a phonetic first name, that box appears just below the First Name box. The keyboard opens so you can fill in the blank.
You can link and unlink Unified Contacts. As noted earlier, your phone can sync up with different accounts. Your Contacts app might list four sets of names and numbers: one stored on your phone, one from an iCloud account, one from Facebook, and a fourth from your corporate Exchange server at work. In the old days, therefore, certain names might have shown up in the All Contacts list two or three times—not an optimal situation.
Now, as a favor to you, the iPhone displays each person’s name only once in that master All Contacts list. If you tap that name, you open up a unified information screen for that person. It includes all the details from all the underlying contact cards.
NOTE
The iPhone combines cards in the All Contacts list only if the first and last names are exactly the same. If there’s a difference in name, suffix, prefix, or middle name, then no unifying takes place. Remember, too, that you see the unification only if you view the All Contacts list.
To see which cards the iPhone is combining for you, scroll to the bottom of the card. There the Linked Contacts section shows you which cards have been unified.
You can tap a listing to open the card in the corresponding account. For that matter, you can manually link a card, too; tap Edit, tap link contacts, and then choose a contact to link to this unified card—even if the name isn’t a perfect match.
NOTE
It’s OK to link Joe Carnelia’s card with Joseph Carnelia’s card—they’re probably the same person. But don’t link up different people’s cards. Remember, the whole point is to make the iPhone combine all the phone numbers, email addresses, and so on onto a single card—and seeing two sets on one card could get confusing fast.
This stuff gets complex. But, in general, the iPhone tries to do the right thing. For example, if you edit the information on the unified card, you’re changing that information only on the card in the corresponding account. (Unless you add information to the unified card. In that case, the new data tidbit is added to all the underlying source-account cards.)
NOTE
To delete any info bit from a Contacts card, tap the ![]() next to it, and then tap the Delete button to confirm.
next to it, and then tap the Delete button to confirm.
Adding a Contact on the Fly
There’s actually another way to add someone to your Contacts list—a faster, on-the-fly method that’s more typical of cellphones. Start by bringing the phone number up on the screen:
In the Phone app, open the Keypad. Dial the number, and then tap
 .
.You can also add a number that’s in your Recents (recent calls) list, storing it in Contacts for future use. Tap the
 button next to the name.
In both cases, finish up by tapping Create New Contact (to enter this person’s name for the first time) or Add to Existing Contact (to add a new phone number to the card of someone who’s already in your list). Off you go to the Contacts editing screen shown in ???.
Editing Someone
To make corrections or changes, tap the person’s name in the Contacts list. In the upper-right corner of the info card, tap Edit.
You return to the screens already described, where you can make whatever changes you like. After you tap Done (or Cancel), you can return to the Contacts list by swiping to the right.
Deleting Someone
Truth is, you’ll probably add people to your address book far more often than you’ll delete them. After all, you meet new people all the time—but you delete them primarily when they die, move away, or dump you.
To zap someone, tap the name in the Contacts list and then tap Edit. Scroll down, tap Delete Contact, and confirm by tapping Delete Contact again. (Weirdly, the Delete Contact option doesn’t appear if you open someone’s info card from the Recents or Favorites lists—only from the main Contacts list.)
Sharing a Contact
There’s a lot of work involved in entering someone’s contact information. It’s a nice touch, therefore, that you can spare the next guy all that effort—by sending a fully formed electronic business card to him. It can be yours or that of anyone in your Contacts list.
To do that, open the contact’s card, scroll to the bottom, and tap Share Contact. On the Share sheet, you’re offered a choice of AirDrop, Message, Mail, and More. (“Message” means an iMessage—“iMessages”—if it’s a fellow Apple fan, or a text message otherwise. AirDrop is described in “AirDrop”. And More is a place for new apps to install their sharing options.)
Tap your choice, address the message (to an email address or, for a message, a cellphone number), and send it. The recipient, assuming he has a half-decent smartphone or address-book program on the receiving end, can install that person’s information with a single tap on the attachment.
The Keypad
The fourth way to place a call is to tap Keypad at the bottom of the screen. The standard iPhone dialing pad appears. It’s just like the number pad on a normal cellphone, except that the “keys” are much bigger and you can’t feel them.
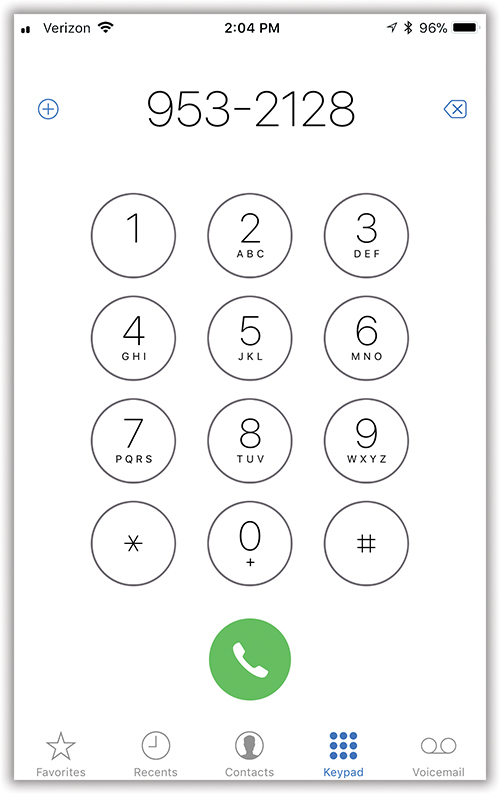
To make a call, tap out (or paste) the phone number—use the ![]() key to backspace if you make a mistake—and then tap the
key to backspace if you make a mistake—and then tap the ![]() button.
button.
You can also use the keypad to enter a phone number into your Contacts list, thanks to the ![]() button, as described earlier.
button, as described earlier.
TIP
If you tap the ![]() button before touching any digits, you call up the most recent number you dialed, ready to call again.
button before touching any digits, you call up the most recent number you dialed, ready to call again.
Visual Voicemail
On the iPhone, you don’t dial in to check for answering-machine messages people have left for you. You don’t enter a password. You don’t sit through some Ambien-addled recorded voice saying, “You have…17…messages. To hear your messages, press 1. When you have finished, you may hang up….”
Instead, whenever somebody leaves you a message, the phone wakes up, and a notification lets you know who it’s from. You also hear a sound (unless you’ve turned on the silencer switch).
That’s your cue to open Phone → Voicemail. There you see all your messages in a tidy chronological list. (The list shows the callers’ names if they’re in your Contacts list; otherwise it shows their numbers.) You can listen to them in any order—you’re not forced to listen to three long-winded friends before discovering that there’s an urgent message from your boss. It’s a game-changer.
iOS even makes an attempt to transcribe your voicemails—to understand them and type out what they say. It’s pretty crude, with lots of wrong and missing words. But it’s usually enough to get the gist.
Setup
To access your voicemail, open the Phone app; tap Voicemail.
The very first time you visit this screen, the iPhone prompts you to make up a numeric password for your voicemail account—don’t worry, you’ll never have to enter it again, unless you plan to actually dial in for messages (“Dialing in for Messages”). Record a “Leave me a message” greeting.
You have two options for the outgoing greeting:
Default. If you’re microphone-shy, or if you’re famous and don’t want stalkers calling just to hear your famous voice, then use this option. It’s a prerecorded, somewhat uptight female voice that says, “Your call has been forwarded to an automatic voice message system. 212-661-7837 is not available.” Beep!
Custom. This option lets you record your own voice saying, for example, “You’ve reached my iPhone X. You may begin drooling at the tone.” Tap Record, hold the iPhone to your head, say your line, and then tap Stop.
Check how it sounds by tapping Play.
Then just wait for your fans to start leaving you messages!
Using Visual Voicemail
In the voicemail list, a blue dot (![]() ) indicates a message you haven’t yet played.
) indicates a message you haven’t yet played.
TIP
You can work through your messages even when you’re out of cellular range—on a plane, for example—because the recordings are stored on the iPhone itself.
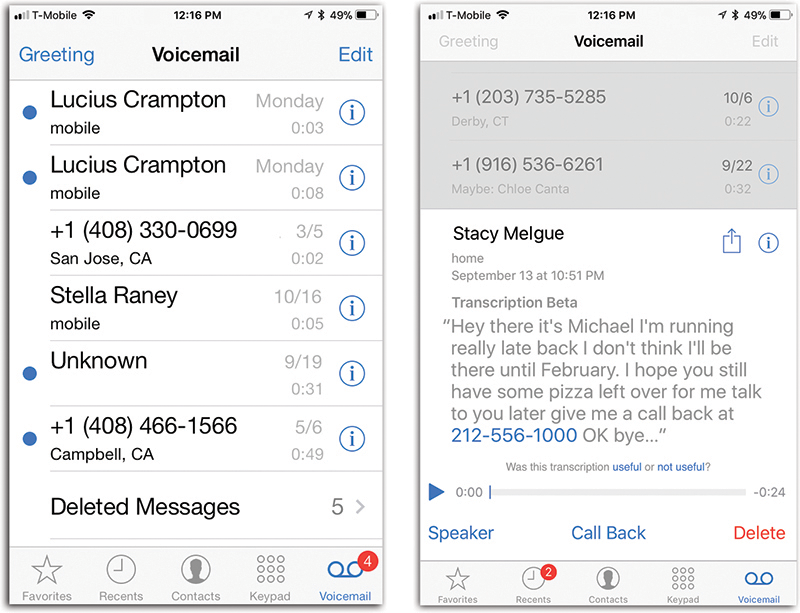
When you tap the name of a message, you instantly see the date and time it came in, the person’s name (if it’s in your Contacts) or the cellphone’s registered city and state (if not), and a rough transcription. The Play slider tells you how many seconds long the message is.
And all the controls you need are right there, surrounding the message you tapped:
Share (
 ). Yes, you can send a voicemail recording to someone else—by email, text message, or whatever (“Dialing in for Messages”). That’s a handy bit of record-keeping that could be very useful in, say, a criminal trial.
The transcript. Yes, this is a crude transcript (Apple labels it beta, after all). There’s no punctuation. There may be missing ____ and phrases. Some words might be completely wrong. But it’s usually good enough that you can tell if a message is some robocall asking for money, or a message from the school nurse saying that your kid has a broken rib.
▸. Tap to listen to the message.
Speaker. As the name “Visual Voicemail” suggests, you’re looking at your voicemail list—which means you’re not holding the phone up to your head. The first time people try using Visual Voicemail, therefore, they generally hear nothing!
But if you hit Speaker before you tap ▸, you can hear the playback and continue looking over the list.
NOTE
If you’re listening through the earbuds, a Bluetooth earpiece, or a car kit, of course, then you hear the message playing back through that. If you really want to listen through the iPhone’s speaker instead, tap Audio and then Speaker. (You switch back the same way.)
Call Back. Tap Call Back to return the call. Very cool—you never even encounter the person’s phone number.
Delete. You might want to keep the list manageable by deleting old messages. To do that, tap a message’s Delete button.
If you have a lot of messages to delete, here’s a faster way: Swipe across the first one’s name right to left, and then tap Delete. The message disappears instantly. You can work down the list quickly this way.
If you didn’t know that trick, you could also do it the slow way: Tap Edit (upper right of the screen). Tap the
button next to a message’s name and then tap Delete to confirm. Tap the next button and continue.
TIP
To listen to deleted messages that are still on the phone, scroll to the bottom of the list and then tap Deleted Messages.
On the Deleted screen, you can undelete a message that you actually don’t want to lose yet (that is, move it back to the Voicemail screen—tap it and then tap Undelete) or tap Clear All to erase these messages for good.
Rewind, Fast Forward. Drag the little vertical line in the scrubber bar (beneath the message) to skip backward or forward in the message. It’s a great way to replay something you didn’t catch the first time.
To collapse the expanded message, tap another message in the list, if it’s visible, or just tap the caller’s name.
Even before you’ve expanded a message’s row to view the Play, Speaker, Call Back, and Delete buttons, a few other Visual Voicemail buttons are awaiting your inspection:
Greeting. Tap Greeting (upper-left corner) to record your voicemail greeting.
Call Details. Tap
to open the info screen—the Contacts card—for the message that was left for you.If it was left by somebody who’s in your Contacts list, you can see which of that person’s phone numbers the call came from (indicated in blue type), plus a
 if that number is in your Favorites list. Oh, and you can add this person to your Favorites list at this point by tapping Add to Favorites (at the bottom of the screen).
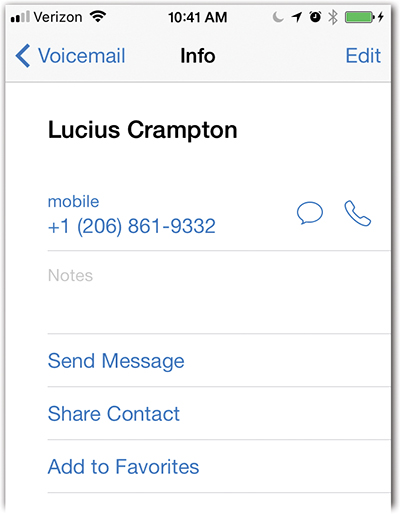
If the caller’s number isn’t in Contacts, then you’re offered a Create New Contact button and an Add to Existing Contact button, so you can store it for future reference.
In both cases, you also have the option to return the call (right from the info screen), fire off a text message, or place a FaceTime audio or video call.
Dialing in for Messages
Gross and pre-iPhonish though it may sound, you can also dial in for your messages from another phone.
To do that, dial your iPhone’s number. Wait for the voicemail system to answer. As your own voicemail greeting plays, dial * (or # if you have Verizon), your voicemail password, and then #.
You hear the Uptight Carrier Lady announce how many messages you have, and then she’ll start playing them for you. After you hear each message, she’ll offer you the following options (but you don’t have to wait for her to announce them):
To delete the message, press 7.
To save it, press 9.
To replay it, press 4. (On T-Mobile, it’s 1.)
Conveniently enough, these keystrokes are the same on Verizon, Sprint, and AT&T.
TIP
If this whole Visual Voicemail thing freaks you out, you can also dial in for messages right from the iPhone. Open the keypad and hold down the 1 key, just as though it were a speed-dial key on any normal phone.
After a moment, the phone connects; you’re asked for your password, and then the messages begin to play back, just as described already.
Answering Calls
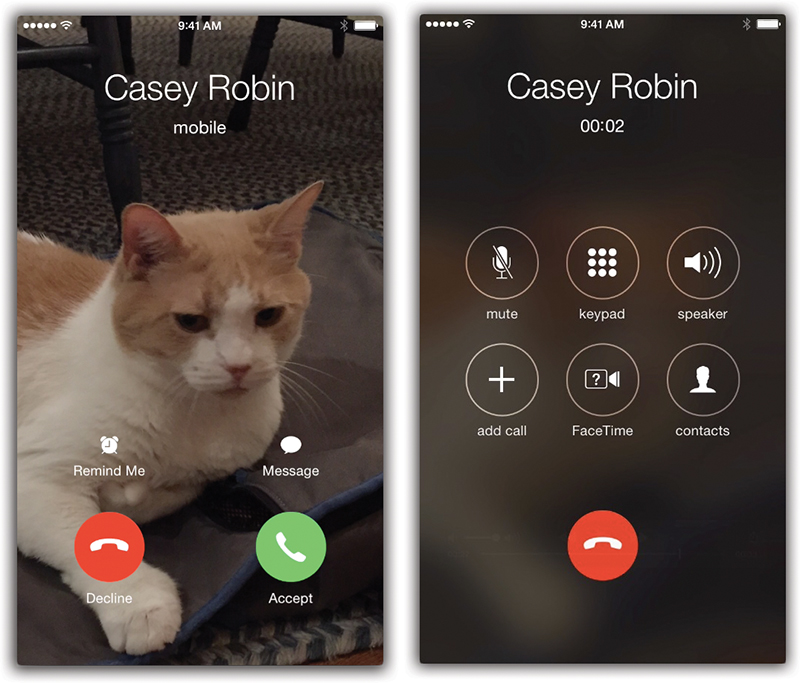
When someone calls your iPhone, you’ll know it; three out of your five senses are alerted. Depending on how you’ve set up your iPhone, you’ll hear a ring, feel a vibration, and see the caller’s name and photo fill the screen. (Smell and taste will have to wait until iOS 12.)
NOTE
For details on Vibrate mode and on choosing a ringtone, see “Sounds (or Sounds & Haptics)”.
How you answer depends on what’s happening at the time:
If you’re using the iPhone, tap the green Accept button. Tap the red hang-up button when you’ve both said enough.
If the iPhone is asleep or locked, the screen lights up and says slide to answer. If you slide your finger as indicated by the arrow, you simultaneously unlock the phone and answer the call.
If you’re wearing earbuds, the music fades out and then pauses; you hear the ring both through the phone’s speaker and through your earbuds. Answer by squeezing the clicker on the earbud cord or by using either of the methods already described.
When the call is over, you can click again to hang up—or just wait until the other guy hangs up. Either way, the music fades in again and resumes from the spot where you were so rudely interrupted.
Same thing if you were watching a video or listening to a podcast; it pauses for the duration of the call and resumes when you hang up.
TIP
If the caller is not in your Contacts, iOS makes an educated guess as to the name. Instead of no name at all, you’ll see something like “Maybe: Casey Robin.”
How does the iPhone do it? When a call comes in, iOS searches your email in hopes of finding a matching phone number in somebody’s email signature. If it finds one, it extracts that person’s name and proposes it. Apple should call it “Likely Caller ID.”
Online and on the Phone, Together
Don’t forget that the iPhone is a multitasking master. Once you’re on the phone, you can dive into any other program—to check your calendar, for example—without interrupting your call.
You may even be able to use the phone’s Internet functions (web, email, apps, and so on) without interrupting the call. To be precise, you can be online and on the phone simultaneously if any of these things is true:
You’re in a Wi-Fi hotspot.
You have AT&T or T-Mobile.
You have an iPhone 6 or later, and you’ve turned on VoLTE calling (see “A Word About VoLTE”).
In other words, if you have Verizon (non-VoLTE) or Sprint, and if you’re not in a Wi-Fi hotspot, then you can’t get online until the call is complete.
Not Answering Calls
Maybe you’re in a meeting. Maybe you’re driving. Maybe the call is coming from someone you really don’t want to deal with right now. Fortunately, you have all kinds of ways to slam the cellular door in somebody’s face.
Silencing the Ring
You might need a moment before you can answer the call, or you need to exit a meeting or put in the earbuds. In those cases, you can stop the ringing and vibrating by pressing one of the physical buttons on the edges (the side button or either volume key). The caller still hears the phone ringing, and you can still answer it within the first four rings, but at least the sound won’t be annoying those around you.
(This assumes, of course, that you haven’t just flipped the silencer switch.)
Ignore It—or Dump It to Voicemail
If you wait long enough (four rings), the call goes to voicemail (even if you silence the ringing as described already).
Or you can dump it to voicemail immediately (instead of waiting for the four rings). How you do that depends on the setup:
If the iPhone is asleep or locked, tap the side button twice fast.
If you’re using the iPhone, tap the Decline button on the screen.
If you’re wearing the earbuds, squeeze the microphone clicker for two seconds. You hear two low beeps, meaning: “OK, Master; dumped.”
Of course, if your callers know you have an iPhone, they’ll also know that you’ve deliberately dumped them into voicemail—because they won’t hear all four rings.
Respond with a Text Message
Whenever your phone rings, the screen bears a small white Message button (shown in ???). If you tap it, you get a choice of three canned text messages. Tapping one immediately dumps the caller to voicemail and sends the corresponding text message to the phone that’s calling you. If you’re driving or in a meeting, this feature is a lot more polite and responsive than just dumping the poor slob to voicemail.
TIP
You can edit any of these three canned messages; they don’t have to say, “Sorry, I can’t talk right now,” “I’m on my way,” and “Can I call you later?” forever. To do that, open Settings → Phone, tap Respond with Text, and replace the text in the three placeholder boxes.
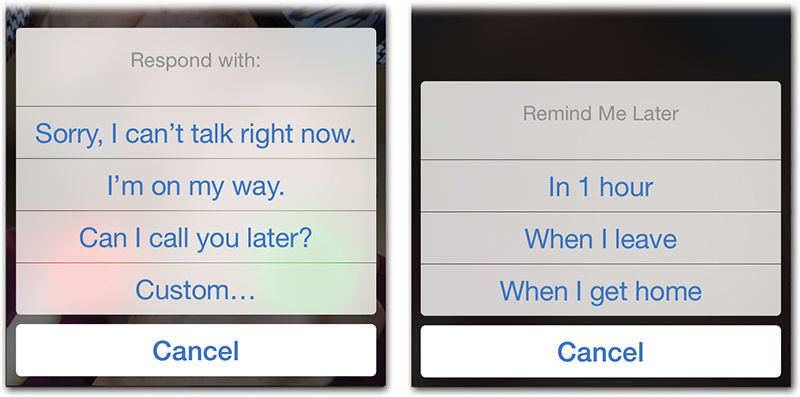
The fourth button, Custom, lets you type or dictate a new message on the spot. (“I’m in a meeting and, frankly, your call isn’t worth getting fired for” comes to mind.)
Remind Me Later
The trouble with Respond with Text, of course, is that it sends a text message. What if the caller is using a landline that can’t receive text messages? Fortunately, you have another option: Remind Me.
Tapping this button offers you one time-based option, In 1 Hour (which sets up a reminder to return the call an hour from now), and up to three location-based options (previous page, right): When I leave, When I get home, and When I get to work. (The home and work options appear only if the iPhone knows your home and work addresses—because you’ve entered them in your own card in Contacts.)
These options use the phone’s GPS circuitry to detect when you’ve left your current inconvenient-to-take-the-call location, whether it’s a job interview, a first date, or an outhouse.
Do Not Disturb
When you turn on Do Not Disturb, the phone is quiet and dark. It doesn’t ring, chirp, vibrate, light up, or display messages. A ![]() appears on the status bar to remind you why it seems to be so uncharacteristically depressed.
appears on the status bar to remind you why it seems to be so uncharacteristically depressed.
Yes, airplane mode does the same thing, but there’s a big difference: In Do Not Disturb, the phone is still online. Calls, texts, emails, and other communications continue to chug happily away; they just don’t draw attention to themselves.
Do Not Disturb is what you want when you’re in bed each night. You don’t really want to be bothered with chirps for Facebook status updates and Twitter posts, but it’s fine for the phone to collect them for the morning.
Bedtime is why Do Not Disturb comes with two fantastic additional settings: one that turns it on and off automatically on a schedule, so that the phone goes dark each night at the same time you do, and another that lets you designate important people whose calls and texts are allowed to get through. You know—for emergencies.
Turning on Do Not Disturb
To turn on Do Not Disturb manually, you have three options:
Tell Siri, “Turn on Do Not Disturb.”
Swipe upward to open the Control Center (or on the iPhone X, swipe down from the right ear), and tap the
 icon so that it turns blue (facing page, right).
Open Settings, tap Do Not Disturb, and turn on Do Not Disturb (facing page, left).

To set it up on a schedule, open Settings → Do Not Disturb. Turn on Scheduled, and then tap the From/To block to specify starting and ending hours. (There’s no separate setting for weekends; Do Not Disturb will turn on and off for the same hours every day of the week.)
Locked or Unlocked
The Silence option on the settings screen works like this: If you choose Always, then Do Not Disturb works exactly as described.
But if you choose Only while iPhone is locked, then the phone does ring and vibrate when you’re using it. Because, obviously, if the phone is awake, so are you. It’s a great way to ensure that you don’t miss important calls if you happened to have awakened early today and started working.
Allowing Special Callers Through
What if your child, your boss, or your elderly parent needs you urgently in the middle of the night? Turning the phone off completely, or putting it into airplane mode, would leave you unreachable in an emergency.
Fortunately, you can create wormholes through your Do Not Disturb blockade for specified callers and texters:
Allow Calls From. When you open Settings → Do Not Disturb and then tap Allow Calls From, you’re offered options like Everyone (all calls and texts come through), No One (the phone is still online, but totally silent), or Favorites, which may be the most useful option of all.
That setting permits calls and texts from anybody you’ve designated as a favorite in the Phone app (“The Favorites List”). Since those are the people you call most often, it’s fairly likely that they’re the most important people in your life.
You can also create an arbitrary group of people—just your mom and sister, just your boss and nephew, whatever. You have to create these address-book groups on your computer (“Groups”)—for example, in Contacts on the Mac. Once you’ve done that, their names appear on the Allow Calls From screen under Groups. You can designate any one of them as the lucky exception to Do Not Disturb.
NOTE
Actually, there are apps that let you create groups right on your iPhone. Groups by Qbix is a free one, for example.
Emergency Bypass. This feature lets you designate any random person in your Contacts list as an “It’s OK to Disturb” person. That person’s calls and texts will always go through. See the Tip in ???.
One More Safety Measure
The Do Not Disturb settings screen also offers something called Repeated Calls. If you turn this on, then if anybody tries to call you more than once within three minutes, he’ll ring through.
The idea here is that nobody would call you multiple times unless he needed to reach you urgently. You certainly wouldn’t want Do Not Disturb to block somebody who’s trying to tell you that there’s been an accident, that you’ve overslept, or that you’ve just won the lottery.
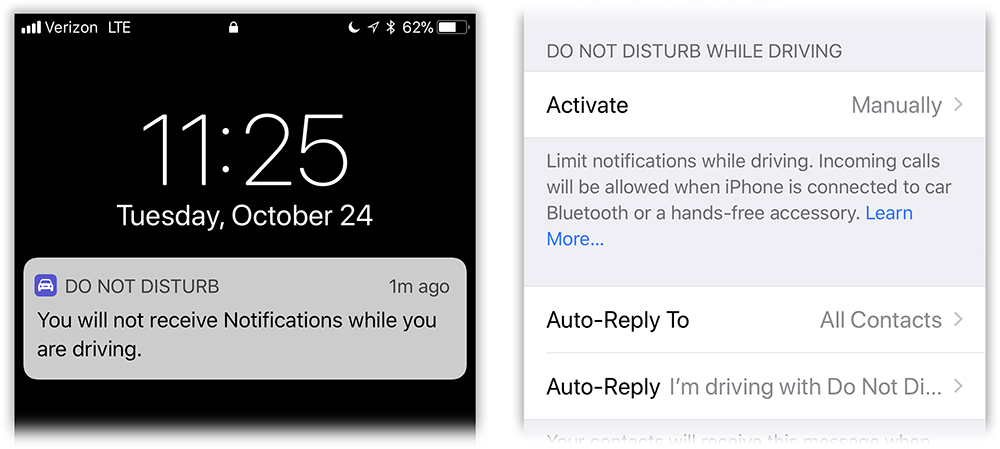
Do Not Disturb While Driving
According to the latest statistics, 100 percent of all car accidents are caused by people. Human beings are the worst drivers.
One of our chief idiocies is attempting to handle text messages and calls while we’re driving. In iOS 11, Apple has tried to do something about it.
If you turn on the Do Not Disturb While Driving feature, then whenever you’re driving, notifications from your apps don’t show up to distract you. Your phone remains dark and silent. (Alarms and timers still ring, and you still see and hear Maps navigation instructions. Incoming phone calls follow whatever Do Not Disturb exceptions you’ve set up as described on the previous pages.)
You can set it up so that if someone texts you, they get an auto-response like, “I’m driving. I’ll see your message when I get where I’m going.”
A second text from you then says, “(I’m not receiving notifications. If this is urgent, reply “urgent” to send a notification through with your original message.)”
Isn’t that smart? Now senders know that if this really is an emergency, they can send an “urgent” text. Now you’ll see that and the original text, and you can pull over to see what the issue is.
How to Turn On Do Not Disturb While Driving
The first time you drive with your iOS 11 phone, an introductory screen appears. “Your iPhone can detect when you may be driving and automatically silence your incoming alerts and notifications.” Tap the big fat Turn On While Driving button to make sure that this feature is always on when you’re behind the wheel.
If you missed that opportunity (by tapping Not Now), then here’s how you set up DND While Driving: Open Settings → Do Not Disturb → Activate. Here you have three options:
Automatically. This is by far the best option. Let Do Not Disturb turn itself on automatically, every time you’re driving. The phone will use its motion sensors and its network sensors to figure out when it’s in motion.
TIP
This setting engages DND even when you’re on a bus or a train, or in the passenger seat of a car. In those situations, wake the phone. Hard-press the DO NOT DISTURB bubble on the Lock screen (or swipe left on it and then tap View) to view the I’m Not Driving button. Tap it to let messages through. This feature was intended to prevent you from being distracted behind the wheel, not to ruin your life.
When Connected to Car Bluetooth. If your car has Bluetooth—if, for example, you make calls and play music wirelessly through its sound system—this is a better option. It means that the phone will know it’s in your car by recognizing its Bluetooth. As a bonus, you’ll still be able to make and receive phone calls through the car’s audio, using the car’s buttons.
Manually. This option means that you intend to turn DND While Driving on and off manually, using the Control Center. See “Customizing the Control Center” for instructions on adding the DND While Driving button to the Control Center.
But you know what? Don’t use this option. It’s much easier and safer to let DND While Driving switch on automatically. If you have to do it manually, you’ll forget. You’ll fall out of the habit. You won’t enjoy its life-saving safeguards.
Auto-Reply Settings
Who should receive those “I’m driving; I’ll get back to you later” text messages? That’s up to you.
Open Settings → Do Not Disturb → Auto-Reply To. Here you can choose No One (nobody gets an auto-reply), Recents, Favorites (“The Favorites List”), or All Contacts. In other words, total strangers (people not in your Contacts, people you’ve never communicated with before) never get the auto-reply, no matter what you choose here.
You can also tap Auto-Reply on this screen to edit the actual message. You can make it say, for example, “I’m sorry, my car can’t talk right now.” Or “Your text is very important to us…”
Note, however, that you can’t edit the second text reply, the one that says “I’m not receiving notifications. If this is urgent, reply ‘urgent’ to send a notification through with your original message.” That one always goes out as you see it here.
Making DND Mandatory
If you’re the parent of a teenager, you might wish that DND While Driving weren’t quite so optional. You might wish you could require that it’s turned on when your newbie driver is behind the wheel.
You can. Do Not Disturb While Driving is now one of the options in Settings → General → Restrictions, which means your offspring won’t be able to turn off DND without your special password (see “Software Updates to Come”).
Fun with Phone Calls
The iPhone makes it pitifully easy to perform stunts like turning on the speakerphone, putting someone on hold, taking a second call, and so on. Here are the options you get when you’re on a call.

Mute
Tap this button to mute your own microphone, so the other guy can’t hear you. (You can still hear him, though.) Now you have a chance to yell upstairs, to clear the phlegm from your throat, or to do anything else you’d rather the other party not hear. Tap again to unmute.
Keypad
Sometimes you have to input touchtones, which used to be a perk only of phones with physical dialing keys. For example, that’s usually how you operate home answering machines when you call in for messages, and it’s often required by automated banking, reservations, and conference-call systems.
Tap this button to produce the traditional iPhone dialing pad. Each digit you touch generates the proper touchtone for the computer on the other end to hear.
When you’re finished, tap Hide to return to the dialing-functions screen, or tap End if your conversation is complete.
Speaker
Tap this button to turn on the iPhone’s built-in speakerphone—a great hands-free option when you’re caught without your earbuds or Bluetooth headset (“Bluetooth Accessories”). (In fact, the speakerphone doesn’t work if the earbuds are plugged in or if a Bluetooth headset is connected.)
When you tap the button, it turns white to indicate that the speaker is activated. Now you can put the iPhone down on a table or a counter and have a conversation with both hands free. Tap speaker again to channel the sound back into the built-in earpiece.
TIP
On iPhones before the 7, the speaker is on the bottom edge of the phone. If you’re having trouble hearing it, and the volume is all the way up, consider pointing the speaker toward you, or even cupping one hand around the bottom to direct the sound. (That works on later models, too, although there’s a second speaker in the earpiece.)
Add Call (Conference Calling)
The iPhone is all about software, baby, and that’s nowhere more apparent than in its facility at handling multiple calls at once.
The simplicity and reliability of this feature put other cellphones to shame. Never again, in attempting to answer a second call, will you have to tell the first person, “If I lose you, I’ll call you back.”
As you’ll read, however, this feature is much better on a GSM phone (AT&T or T-Mobile) than on a CDMA phone (Verizon or Sprint).
Suppose you’re on a call. Here are some of the tricks you can do:
Make an outgoing call. Tap add call. The iPhone puts the first person on hold—neither of you can hear the other—and returns you to the Phone app and its various phone-number lists. You can now make a second call in any way you want. The top of the screen makes clear that the first person is still on hold as you talk to the second.
Receive an incoming call. What happens when a second call comes in while you’re already on a call?
To answer on a GSM phone, tap End Call + Answer. On a CDMA phone, tap End Current Call; the new call makes the phone ring again, at which point you can answer it normally. Weird but true.
You can also tap End Current Call (answer the incoming call, hang up on the first) or Decline Incoming Call (send it to voicemail).
When you’re on two calls at once, the top of the screen identifies both other parties. Two new buttons appear, too:
Swap (GSM phones only) lets you flip between the two calls. At the top of the screen, you see the names or numbers of your callers. One says Hold (the one who’s on hold, of course) and the other bears a time counter, which lets you know whom you’re actually speaking to.
Think how many TV and movie comedies have relied on the old “Whoops, I hit the wrong button and now I’m bad-mouthing somebody directly instead of behind his back!” gag. That can’t happen on the iPhone.
You can swap calls by tapping swap or by tapping the Hold person’s name or number.
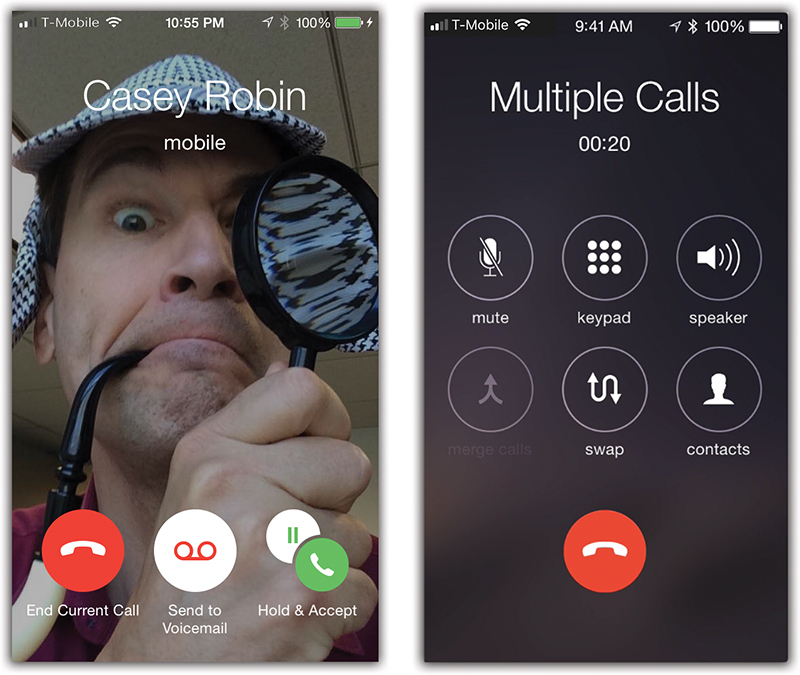
Merge Calls combines your two calls so all three of you can converse at once. Now the top of the screen announces the names of your callers. Note that on a CDMA phone, you can merge calls only if you placed the second call—not if it was incoming.
TIP
On a GSM phone, you can tap ![]() next to someone’s name; at this point, you can drop someone from the call by tapping End, or talk privately with someone by tapping Private. Tap Merge Calls to return to the group call.
next to someone’s name; at this point, you can drop someone from the call by tapping End, or talk privately with someone by tapping Private. Tap Merge Calls to return to the group call.
This business of combining calls doesn’t have to stop at two. At any time, you can tap Add Call, dial a third number, and then tap Merge to combine it with your first two. And then a fourth call, and a fifth. With you, that makes six people on the call.
Then your problem isn’t technological; it’s social, as you try to conduct a meaningful conversation without interrupting one another.
FaceTime
Tap this button to switch from your current phone call into a face-to-face video call, using the FaceTime app described starting in “FaceTime Video Calls”.
(This feature requires that both you and the other guy have iPhones, iPads, iPod Touches, or Macs.)
Hold
The FaceTime button appears in place of what, on earlier iPhones, was the Hold button. But you can still trigger the Hold function—by holding down the Mute button for a couple of seconds. Now neither you nor the other guy can hear anything. Tap again to resume the conversation.
Contacts
This button opens the address book program so you can look up a number or place another call.
Call Waiting
Call waiting has been around for years. With a call-waiting feature, when you’re on one phone call, you hear a beep indicating that someone else is calling. You can tap the Flash key on your phone to answer the second call while you put the first one on hold.
Some people don’t use call waiting because it’s rude to both callers. Others don’t use it because they have no idea what the Flash key is.
On the iPhone, when a second call comes in, the phone rings (and/or vibrates) as usual, and the screen displays the name or number of the caller, just as it always does. Buttons on the screen offer you three choices:
End Current Call. Hangs up on the first call and takes the second one.
Answer (Hold Current Call). This is the traditional call-waiting effect. You say, “Can you hold on a sec? I’ve got another call,” to the first caller. The iPhone puts her on hold, and you connect to the second caller.
At this point, you can jump back and forth between the two calls, or you can merge them into a conference call.
Decline Incoming Call. The incoming call goes straight to voicemail. Your first caller has no idea that anything has happened.
If call waiting seems a bit disruptive, you can turn it off, at least on the AT&T iPhone (the switch is in Settings → Phone → Call Waiting). When call waiting is turned off, incoming calls go straight to voicemail when you’re on the phone.
If you have T-Mobile, Sprint, or Verizon, then you can turn off call waiting only one call at a time; just dial *70 before you dial the number. You won’t be disturbed by call-waiting beeps while you’re on that important call.
Call Forwarding
Here’s a pretty cool feature you may not have known you had. It lets you route all calls made to your iPhone number to a different number. How is this useful? Let us count the ways:
When you’re home. You can have your cellphone’s calls ring your home number so you can use any extension in the house, and so you don’t miss any calls while the iPhone is turned off or charging.
When you send your iPhone to Apple for battery replacement. You can forward the calls you would have missed to your home or work phone number.
When you’re overseas. You can forward the number to one of the web-based services that answers your voicemail and sends it to you as an email attachment (like Google Voice).
When you’re going to be in a place with little or no cell coverage. Let’s say you’re in Alaska. You can have your calls forwarded to your hotel or to a friend’s cellphone. (Forwarded calls eat up your allotment of minutes, though.)
You have to turn on call forwarding while you’re still in an area with cell coverage. Here’s how:
AT&T. Tap Settings → Phone → Call Forwarding, turn call forwarding on, and then tap in the new phone number. That’s all there is to it—your iPhone will no longer ring. At least not until you turn the same switch off again.
Verizon, Sprint, T-Mobile. On the dialing pad, dial *72, plus the number you’re forwarding calls to. Then tap
. (To turn off call forwarding, dial *73, and then tap .)
Caller ID
Caller ID is another classic cellphone feature. It’s the one that displays the phone number of the incoming call (and sometimes the name of the caller).
The only thing worth noting about the iPhone’s own implementation of caller ID is that you can prevent your number from appearing when you call other people’s phones:
AT&T. Tap Settings → Phone → Show My Caller ID, and then tap the on/off switch.
Verizon, Sprint, T-Mobile. You can disable caller ID only for individual calls. For example, if you’re calling your ex, you might not want your number to show up on his phone. Just dial *67 before you dial the number. (Caller ID turns on again for subsequent calls.)
Custom Ringtones
The iPhone comes with more than 50 creative and intriguing ringing sounds, from an old car horn to a peppy marimba lick. “Sounds (or Sounds & Haptics)” shows you how to choose the one you want to hear when your phone rings. You can also buy ready-made pop-music ringtones from Apple for $1.29 each. (On your iPhone, open the iTunes Store app. Tap More and then Tones).
But where’s the fun in that? Surely you don’t want to walk around listening to the same ringtones as the millions of other iPhone owners.
Fortunately, you can also make up custom ring sounds, either to use as your main iPhone ring or to assign to individual callers in your Contacts list. All kinds of free or cheap apps are available for doing that, with names like Ringtone Designer Pro and Ringtones for iPhone; they let you make ringtones out of songs you already own, or even sounds you record yourself.
You can also use GarageBand, a free Apple program available for iOS or Mac. For instructions, see this chapter’s free online appendix, “Making Custom Ringtones.” It’s a PDF available on this book’s “Missing CD” page at missingmanuals.com.
Because apps aren’t allowed to manipulate the iPhone’s ringtones list directly, the process isn’t altogether automatic; it involves syncing the ringtone to iTunes on your computer and then syncing it again to your phone. But the app’s instructions will guide you. (iPhone ringtones must be in the .m4r file format.)
TIP
One feature that’s blatantly missing on the iPhone is a “vibrate, then ring” option for incoming calls. That’s where the phone first vibrates silently to get your attention—and begins to ring only if you haven’t responded after, say, 10 seconds.
GarageBand offers the solution: Create a ringtone that’s silent for the first 10 seconds and only then plays a sound. Then set your iPhone to vibrate and ring. When a call comes in, the phone plays the ringtone immediately as it vibrates—but you won’t hear anything until after the silent portion of the ringtone has been “played.”
Get Your Ringtones Back
If you used to have custom ringtones, but they no longer show up in iOS 11, you have two options:
If they came from the iTunes store, re-download them. (On the phone, open Settings → Sounds & Haptics, and tap Download All Purchased Tones.)
If they’re on your computer, reinstall them. Connect your phone to your computer, open iTunes, and drag the ringtone files (which are in your computer’s iTunes → iTunes → Media Tones folder) into the left-side sidebar, where your phone’s name appears. Details are at support.apple.com/en-us/HT201593.
FaceTime Video Calls
Your iPhone, as you’re probably aware, has two cameras—one on the back and one on the front. And that can mean only one thing: Video calling has arrived.
The picture and audio are generally rock-solid, with very little delay. Now Grandma can see the baby, or you can help someone shop from afar, or you can supervise brain surgery from thousands of miles away (some medical training recommended).

You can enjoy these Jetsons fantasies not just when calling other iPhones; you can also make video calls between iPhones and iPads, iPod Touches, and Macs. You can even place these calls when you’re not in a Wi-Fi hotspot, over the cellular airwaves, when you’re out and about.
FaceTime couldn’t be easier to fire up—in many different ways:
From Siri. The quickest way to start a video call may be simply to say, “FaceTime Mom,” “FaceTime Chris Taylor,” or whatever.
From Favorites. Whenever you designate someone’s FaceTime contact info as a favorite, a new entry appears in the Phone app’s Favorites list (“The Favorites List”).
When you’re already on a phone call with someone. This is a good technique when you want to ask first if the other guy wants to do video, or when you’ve been chatting and suddenly there’s some reason to do video. In any case, there’s nothing to it: Just tap the FaceTime button that’s right on the screen when you pull the phone away from your face. (Your buddy can either accept or, if he just got out of the shower, decline.)
From the FaceTime app. You can also start up a videochat without placing a phone call first. That’s handy when you have Wi-Fi but no cell signal; FaceTime can make the call even when Verizon can’t.
Of course, if you’re not already on a call, the iPhone doesn’t yet know whom you want to call. So you have to tell it. Open the FaceTime app. It presents a list of your recent FaceTime calls. Tap a name to place a new call to that person, or tap
to view a history of your calls with that person (and buttons for placing new ones).Or, to find your callee from your own Contacts list, tap the + button. Find a name, tap it, and then tap
 to place the call.
If your future conversation partner isn’t in Contacts yet, then tap where it says Enter name, email, or number, and do just that.
From Contacts. In the Contacts app, if you tap a person’s name, you’ll find buttons that place FaceTime calls. Or, in the Phone app, call up your Favorites or Recents list. Tap
next to a name to open the contact’s card; tap FaceTime.From Messages. If you’re chatting away with somebody by text and you realize that typing is no longer appropriate for the conversation, tap
at the top of the screen. Tap  .
.
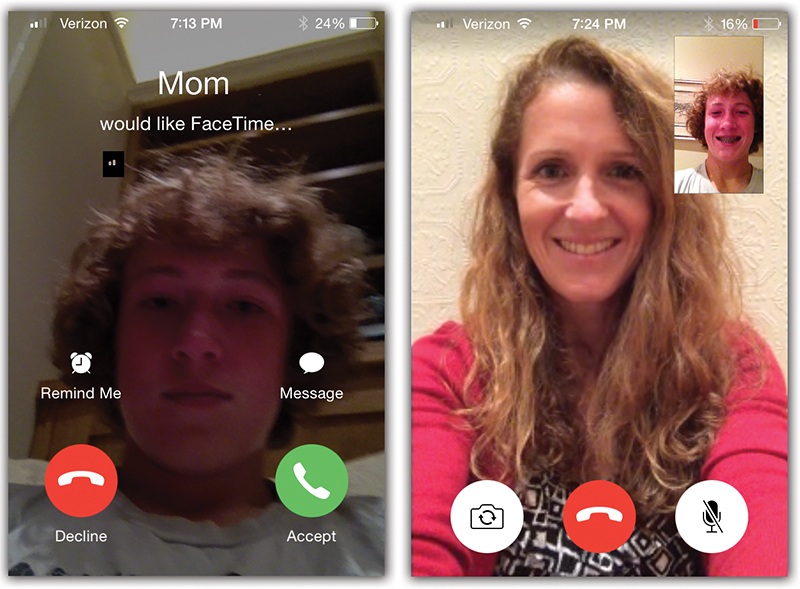
At this point, the other guy receives an audio and video message inviting him to a chat. If he taps Accept, you’re on. You’re on each other’s screens, seeing and hearing each other in real time. (You appear on your own screen, too, in a little inset window. It’s spinach-in-your-teeth protection.)
Once the chat has begun, here’s some of the fun you can have:
Show what’s in front of you. Sometimes you’ll want to show your friend what you’re looking at. That is, you’ll want to turn on the camera on the back of the iPhone, the one pointing away from you, to show off the baby, the artwork, or the broken engine part.
Just tap
 . Now you and your callee can both see what you’re seeing. Tap again to return to the front camera.
Snap a commemorative photo. You can immortalize a chat by using the screenshot keystroke (sleep + home on most iPhones; see “Capturing the Screen”). You wind up with a still photo of your videochat in progress, safely nestled in the Camera Roll of your Photos app.
Rotate the screen. FaceTime works in either portrait (upright) or landscape (widescreen) view; just turn your phone 90 degrees. Of course, if your calling partner doesn’t also turn her gadget, she’ll see your picture all squished and tiny, with big black areas filling the rest of the screen. (On the Mac, the picture rotates automatically when your partner’s gadget rotates. You don’t have to turn the monitor 90 degrees.)
TIP
The ![]() (rotation lock) button described in ??? works in FaceTime, too. That is, you can stop the picture from rotating when you turn the phone—as long as you’re happy with full-time upright (portrait) orientation.
(rotation lock) button described in ??? works in FaceTime, too. That is, you can stop the picture from rotating when you turn the phone—as long as you’re happy with full-time upright (portrait) orientation.
Mute the audio. Tap
 to silence the audio you’re sending. Great when you need to yell at the kids.
Mute the video. When you leave the FaceTime app for any reason (open a different app), the other guy’s screen goes black. He can’t see what you’re doing when you leave the FaceTime screen. He can still hear you, though.
This feature was designed to let you check your calendar, look something up on the web, or whatever, while you’re still chatting. But it’s also a great trick when you need to adjust your clothing, pick at your teeth, or otherwise shield your activity from the person on the other end.
In the meantime, the call is technically still in progress—and a green banner at the top of the Home screen reminds you of that. Tap there, on the green bar, to return to the video call.
When you and your buddy have had quite enough, tap the End button to terminate the call. (Although it’s easy to jump from phone call to videochat, there’s no way to go the other direction.)
And marvel that you were alive to see the day.
FaceTime Audio Calls
Video calling is neat and all, but be honest: Don’t you find yourself making phone calls more often? Video calling forces us to be “on,” neatly dressed and well behaved, because we’re on camera. Most of the time, we’re perfectly content (in fact, more content) with audio only.
And FaceTime audio calls don’t eat into your cellphone minutes and aren’t transmitted over your cell carrier’s voice network; instead, these are Internet calls. (They use data, not minutes.)
When you’re in a Wi-Fi hotspot, they’re free. When you’re not, your carrier’s data network carries your voice.
You start out exactly as you would when making a video call, as described already. That is, you can start from the FaceTime app, the Contacts app, the Phone app, Messages, and so on.
In each spot where FaceTime is available, you get a choice of two types of calls: Video (![]() ) and Audio (
) and Audio (![]() ). (In Messages, if you tap the
). (In Messages, if you tap the ![]() , you get a choice of two voice options: Voice Call and FaceTime Audio.)
, you get a choice of two voice options: Voice Call and FaceTime Audio.)
When you place an audio FaceTime call, the other person’s phone rings exactly as though you’d placed a regular call. All the usual buttons and options are available: Remind Me, Message, Decline, Accept, and so on.
Once you accept the call, it’s just like being on a phone call, too: You have the options Mute, Speaker, FaceTime (that is, “Switch to video”), and Contacts. (What’s missing? The Keypad button and the Merge Calls button. You can’t combine FaceTime audio calls with each other, or with regular cellphone calls. If a cellphone call comes in, you’ll be offered the chance to take it—but you’ll have to hang up on FaceTime.)
You’ll find that the audio quality is amazing—more like FM radio than cellular. It sounds like the other person is right next to your head; you hear every breath, sniff, and sweater rustle.
Try out FaceTime audio calls. Whenever you’re calling another iPhone, iPad, iPod Touch, or Mac owner, you’ll save money and minutes by placing these better-sounding free calls.
TIP
iOS even offers FaceTime Call Waiting. If you’re on a FaceTime audio or video call, and someone else FaceTime calls you, your phone rings—and you can either tap Decline or End & Accept.
Bluetooth Accessories
Bluetooth is a short-range cable elimination technology. It’s designed to untether you from equipment that would ordinarily require a cord.
Most people use Bluetooth for two purposes: communicating with a smartwatch or fitness band, or transmitting audio to a wireless speaker, car stereo, or Bluetooth earpiece.
NOTE
This discussion covers monaural Bluetooth earpieces intended for phone calls. But the iPhone can also handle Bluetooth stereo headphones, intended for music, as well as Bluetooth speakers. Details are in “Speakers and Headphones”.
Pairing with a Bluetooth Earpiece or Speaker
Pairing means “marrying” a phone to a Bluetooth accessory so that each works only with the other. If you didn’t do this one-time pairing, then some other guy passing on the sidewalk might hear your conversation through his earpiece. And neither of you would be happy.
The pairing process is different for every cellphone and every Bluetooth earpiece. Usually it involves a sequence like this:

On the earpiece, turn on Bluetooth. Make the earpiece or speaker discoverable. Discoverable just means that your phone can “see” it. You’ll have to consult the gadget’s instructions to learn how to do so; it’s usually a matter of holding down some button or combination of buttons until the earpiece blinks.
On the iPhone, tap Settings → Bluetooth. Turn Bluetooth on. The iPhone immediately begins searching for nearby Bluetooth equipment. If all goes well, you’ll see the name of your earpiece or speaker show up on the screen.
Tap the gadget’s name. Type in the passcode, if necessary. The passcode is a number, usually four or six digits, that must be typed into the phone within about a minute. You have to enter this only once, during the initial pairing. The idea is to prevent some evildoer sitting nearby in the airport lounge, for example, to secretly pair his earpiece with your iPhone.
The user’s manual for your earpiece should tell you what the passcode is (if one is even required).
To make calls using a Bluetooth earpiece (or speaker as a speakerphone), you dial using the iPhone itself. You usually use the iPhone’s own volume controls, too. You generally press a button on the earpiece or speaker to answer an incoming call, to swap call-waiting calls, or to end a call.
NOTE
When Bluetooth is turned on but the earpiece isn’t, or when the earpiece isn’t nearby, the ![]() icon on your iPhone’s status bar appears in gray. And when it’s connected and working right, the earpiece’s battery gauge appears on the iPhone’s status bar.
icon on your iPhone’s status bar appears in gray. And when it’s connected and working right, the earpiece’s battery gauge appears on the iPhone’s status bar.
If you’re having problems making a particular gadget work, Google it. Type “iphone jambox mini,” for example. Chances are good that you’ll find a write-up by somebody who’s successfully worked through the setup.
Bluetooth Car Systems
The iPhone works beautifully with Bluetooth car systems, too. The pairing procedure generally goes exactly as described previously: You make the car discoverable, enter the passcode on the iPhone, and then make the connection.
Once you’re paired up, you can answer an incoming call by pressing a button on your steering wheel, for example. You hear the caller through the car’s speakers, and a microphone for your own voice is hidden in the rearview mirror or dashboard. You make calls either from the iPhone or, in some cars, by dialing the number on the car’s own touchscreen.
Of course, studies show that it’s the act of driving while conversing that causes accidents—not actually holding a cellphone. So the hands-free system is less for safety than for convenience and compliance with laws.
Pairing with a Smartwatch or Fitness Band
The latest Bluetooth technology, called Bluetooth LE (for “low energy”), Bluetooth Smart, or Bluetooth 4.0 (or 5.0), turns on only when necessary and then turns off again to save power.
When you’ve paired your phone with a Bluetooth LE gadget, you see the Bluetooth logo on your status bar (![]() ) light up only when it’s actually exchanging data. Bluetooth LE has made possible a lot of smartwatches and fitness trackers.
) light up only when it’s actually exchanging data. Bluetooth LE has made possible a lot of smartwatches and fitness trackers.
As a handy bonus, you usually do the pairing right in the gadget’s companion app, rather than fumbling around in Settings. That setup makes a lot more sense. For example, when you’re setting up an Apple Watch, you use the Watch app to pair the watch; when you’re setting up an Up band or Fitbit, you connect your band wirelessly in the Up app or Fitbit app.
Get iPhone: The Missing Manual, 11th Edition now with the O’Reilly learning platform.
O’Reilly members experience books, live events, courses curated by job role, and more from O’Reilly and nearly 200 top publishers.

