If you’d never seen all the videos and photos of the iPhone, and you found it lying on someone’s desk, you might not guess it was a phone (let alone an iPod/Web browser/alarm clock/stopwatch/voice recorder/musical instrument/compass). You can’t see any antenna, mouthpiece, or earpiece—and goodness knows there are no number keys for dialing.
It’s all there, though, hidden inside this sleek, thin slab.
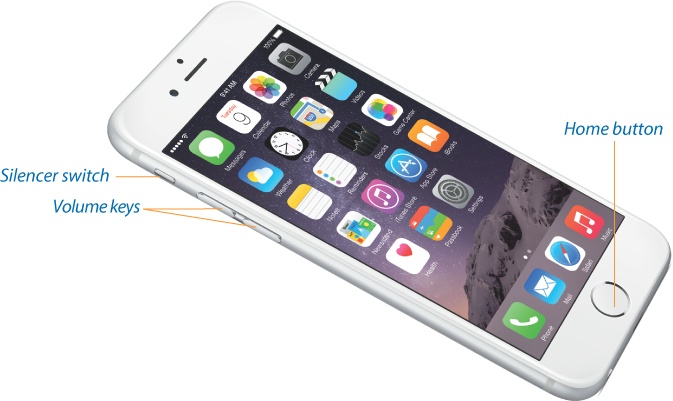
For the rest of this book, and for the rest of your life with the iPhone, you’ll be expected to know what’s meant by, for example, “the Home button” and “the Sleep switch.” A guided tour, therefore, is in order.
You could argue that knowing how to turn on your phone might be a useful skill.
For that, you need the Sleep switch. It’s a metal button shaped like a dash.
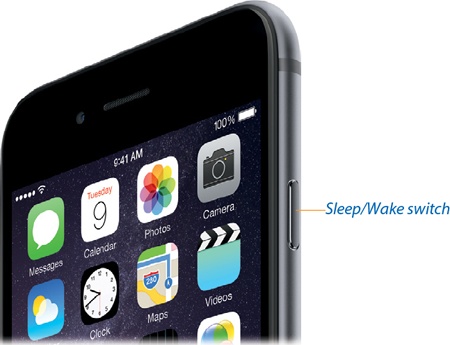
On the iPhone 6 models, it’s on the right edge; on earlier models, it’s on the top edge.
It has several functions:
Sleep/Wake. Tapping it once puts the iPhone to sleep—into Standby mode, ready for incoming calls but consuming very little power. Tapping it again turns on the screen so it’s ready for action.
On/Off. The same switch can also turn the iPhone off completely so it consumes no power at all; incoming calls get dumped into voicemail. You might turn the iPhone off whenever you’re not going to use it for a few days.
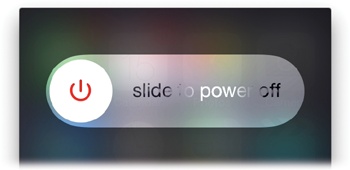
To turn the iPhone off, press the Sleep switch for 3 seconds. The screen changes to say slide to power off.
Confirm your decision by placing a fingertip on the
 and sliding to the right. The device shuts off completely.
Tip
If you change your mind about turning the iPhone off, tap the Cancel button or do nothing; after a moment, the iPhone backs out of the slide to power off screen automatically.
To turn the iPhone back on, press the switch again for 1 second. The Apple logo appears as the phone boots up. (The Apple logo is black if your iPhone is white and white if your iPhone is black. Nice touch.)
Answer call/Dump to voicemail. When a call comes in, you can tap the Sleep button once to silence the ringing or vibrating. After four rings, the call goes to your voicemail.
You can also tap it twice to dump the call to voicemail immediately. (Of course, because they didn’t hear four rings, iPhone veterans will know you’ve blown them off. Bruised egos may result. Welcome to the world of iPhone etiquette.)
Force restart. The Sleep switch has one more function. If your iPhone is frozen, and no buttons work, and you can’t even turn the thing off, this button is also involved in force-restarting the whole machine. Steps for this last-ditch procedure are on Seven Ways to Reset the Phone.
When you don’t touch the screen for 1 minute (or another interval you choose), or when you put the iPhone to sleep, the phone locks itself. When it’s locked, the screen is dark and doesn’t respond to touch. If you’re on a call, the call continues; if music is playing, it keeps going; if you’re recording audio, the recording proceeds.
But when the phone is locked, you don’t have to worry about accidental button pushes. You wouldn’t want to discover that your iPhone has been calling people or taking photos from the depths of your pocket or purse. Nor would you want it to dial a random number from your back pocket, a phenomenon that’s earned the unfortunate name butt dialing.
To wake the phone when it’s locked, press either the Sleep switch or the Home button.
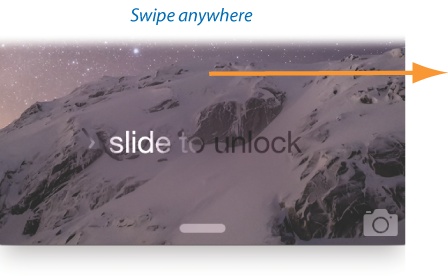
That gesture alone doesn’t fire up the full iPhone world, though. Instead, it presents the Lock screen.
From here, slide your finger rightward across the screen (anywhere—you don’t have to aim for the slide to unlock area!) to unlock the phone with your password or fingerprint. (See Setting Up a Password or Fingerprint Security (Touch ID).)
Note
You can adjust how quickly the phone locks itself, or make it stop locking itself altogether; see General.
These days, though, the Lock screen is more than just a big Do Not Disturb sign. It’s a lively bulletin board for up-to-date information about your life—information you can scan or work with right here at the Lock screen.
For starters, you can use the iPhone as a watch—millions of people do. Just tap the Sleep switch to consult the Lock screen’s time and date display, and then shove the phone right back into your pocket. The iPhone relocks after a few seconds.
If you’re driving, using the Maps app to guide you, the Lock screen shows the standard GPS navigation screen. Handy, really—the less fumbling you have to do while driving, the safer you are.
Better yet, the Lock screen is a handy status screen. Here you see a record of everything that happened while you weren’t paying attention. It’s a list of missed calls, text messages received, notifications from your apps, and other essential information.
Now, each of these notices has come from a different app (software program). To call somebody back, for example, you’d want to open the Phone app; to reply to a text message, you’d want the Messages app, and so on.
So here’s a handy shortcut: You can dive directly into the relevant app by swiping your finger across the notification itself, like this:
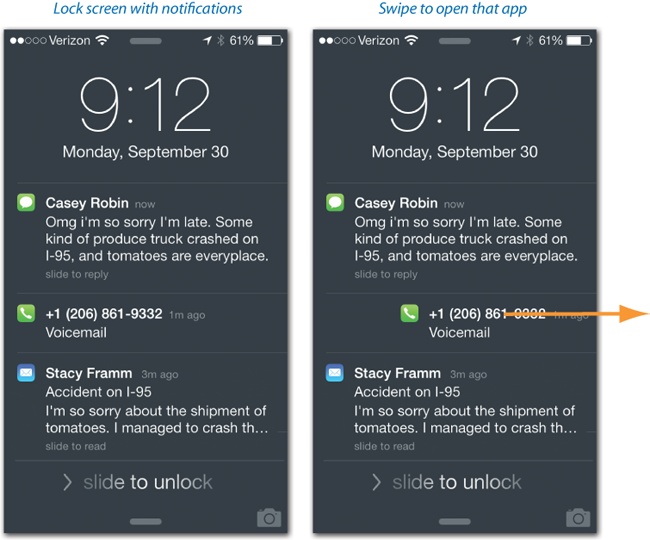
That shortcut saves you the trouble of unlocking the phone and trying to find the corresponding app.
Tip
If you’d rather not have all these details show up on the Lock screen, you can turn them off. (Privacy is the main reason you might want to do so—remember that the bad guys don’t need a password to view your Lock screen. They just have to tap the Sleep switch or the Home button.)
You can hide these items from your Lock screen on an app-by-app basis. For example, you might want missed calls to show up here but not missed text messages. To set this up, choose Settings→Notifications. Tap the app in question; scroll to the bottom, and then turn off Show on Lock Screen.
More ways to accomplish things on the Lock screen:
Swipe down from the top of the screen to view your Notification Center—a detailed one-stop screen that shows your missed calls, texts, and emails; upcoming appointments; stock and weather alerts; and so on. (See The Notification Center.)
Swipe up from the bottom edge to open the Control Center, with all the important settings (volume, brightness, play/pause music, Airplane mode, flashlight, and more) in one place. See Control Center.
Swipe up on the camera (
 ) icon to open the Camera app (The Camera App).
Swipe up on the app icon at lower left, if you see one. This feature, new in iOS 8, is supposed to let you know when there’s an app you might find useful based on your location right now.
If you’re entering a Starbucks, the Starbucks app icon appears there, so that you can pay wirelessly. If you’re at a train station, your phone might use this opportunity to let you know about a schedule app for that train line. You may also see this little icon as you enter a bank, store, hospital, college, and so on.
In each case, the suggested app opens when you swipe up on this icon. Or, if you don’t have the app already, the App Store opens to the right page, so that you can download the app.

Now, remember: You can enjoy any of the activities described above even before you’ve entered your password or used your fingerprint.
In other words, some stranger picking up your phone can do all of these things. If that bothers you, don’t worry; you can turn all of those features off on the corresponding Settings screens. For example, to block Lock-screen access to your Control Center, open Settings→Control Center. Turn off Access on Lock Screen. To turn off individual apps’ presence on the Lock screen, open Settings→Control Center; tap the app’s name, and then turn off Show on Lock Screen.
Here it is: the one and only button on the front of this phone. Push it to summon the Home screen, which is your gateway to everything the iPhone can do. (You can read more about the Home screen at the end of this chapter.)

The Home button is a wonderful thing. It means you can never get lost. No matter how deeply you burrow into the iPhone software, no matter how far off track you find yourself, one push of the Home button takes you back to the beginning.
On the iPhone 5s and 6 models, of course, the Home button is also a fingerprint scanner—the first one on a cellphone that actually works.
But, as time goes on, Apple keeps saddling the Home button with more and more functions. It’s become Apple’s only way to provide shortcuts for common features; that’s what you get when you design a phone that has only one button. In iPhone Land, you can press the Home button one, two, or three times for different functions—or even hold it down. Here’s the rundown.
Pressing the Home button once wakes the phone if it’s in locked mode. That’s sometimes easier than finding the Sleep switch on the edge. It gives you a quick glance at your missed calls and texts—or the time and date.
If you’ve taught the iPhone 5s or 6 to recognize your fingerprint, then just resting your finger on the Home button is enough to unlock the phone, bypassing the password screen. In other words, you should get into the habit of pressing the Home button (to wake the phone) and then leaving your finger on it for about a half-second to unlock it. Miscellaneous Weirdness has more on fingerprints.
If you hold down the Home button for about 3 seconds, you wake up Siri, your virtual voice-controlled assistant. Details are in Chapter 4.
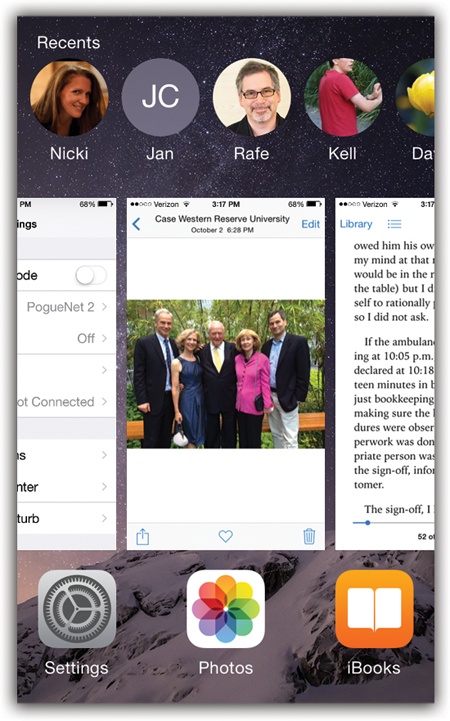
If, once the phone is awake, you press the Home button twice quickly, the current image fades away—to reveal the app switcher screen, the key to the iPhone’s multitasking feature.
What you see here are icons and currently open screens of the programs you’ve used most recently (older ones are to the right), as shown on the facing page. Swipe horizontally to bring more apps into view; the Home screen is always at the far left.
With a single tap (on either the icon or the screen miniature), you can jump right back into a program you had open, without waiting for it to start up, show its welcome screen, and so on—and without having to scroll through 11 Home screens trying to find the icon of a favorite app.
In short, the app switcher gives you a way to jump directly to another app, without a layover at the Home screen first.
Tip
On this screen, you can also quit a program by flicking it upward. In fact, you can quit several programs at once, using two or three fingers. Fun for the whole family!
This app switcher is the only visible element of the iPhone’s multitasking feature. Once you get used to it, that double-press of the Home button will become second nature—and your first choice for jumping among apps.
In iOS 8, the app switcher screen offers another new feature that you may eventually rank as one of iOS 8’s finest: the VIP list.
That’s not what Apple calls it, but that’s what it is: a row of headshots, at the top of the screen, that represent the people you’ve contacted most recently and most often. See Force Quitting an App for details on this extraordinarily handy feature.
The iPhone 6 is bigger than any previous iPhone, and the iPhone 6 Plus is even biggerer. Their screens are so big, in fact, that your dinky human thumb may be too small to reach the top portion of the screen (if you’re gripping the phone near the bottom).
For that reason, Apple has built in a new feature into those phones called Reachability. When you tap the Home button twice (don’t click it—just touch it), the entire screen image slides halfway down the glass, so that you can reach the upper parts of it with your thumb!
As soon as you touch anything on the screen—a link, a button, an empty area, anything—the screen snaps back to its usual, full-height position. (The on/off switch for the Reachability feature is in Settings→General→Accessibility.)
In Settings→General→Accessibility, you can set up a triple-press of the Home button to turn one of several accessibility features on or off: VoiceOver (the phone speaks whatever you touch), Invert Colors (white-on-black type, which is sometimes easier to see), Grayscale (a new mode that makes the whole iPhone black-and-white); Zoom (magnifies the screen), Switch Control (accommodates external gadgets like sip-and-puff straws), and AssistiveTouch (help for people who have trouble with physical switches).
All of these features are described beginning on Bluetooth Car Systems.
Tip
The Home button is also part of the force quit sequence—a good troubleshooting technique when a particular program seems to be acting up. See Force Quitting an App.
Praise be to the gods of technology—this phone has a silencer switch! This tiny flipper, on the left edge at the top, means that no ringer or alert sound will humiliate you in a meeting, at a movie, or in church. To turn off the ringer, push the flipper toward the back of the phone (see the photo on Locked Mode).
No menus, no holding down keys, just instant silence. All cellphones should have this feature.
Note
Even when silenced, the iPhone still makes noise in certain circumstances: when an alarm goes off; when you’re playing music; when you’re using Find My iPhone (Photo Stream, Photo Sharing); when you’re using VoiceOver; or, sometimes, when a game is playing. Also, the phone still vibrates when the silencer is engaged, although you can turn this feature off in Settings→Sounds.
Below the silencer, still on the left edge, are the volume controls. There are no longer ![]() and
and ![]() labels on the iPhone 6’s volume buttons, as on all previous iPhones. But the two buttons still work in the same five ways:
labels on the iPhone 6’s volume buttons, as on all previous iPhones. But the two buttons still work in the same five ways:
On a call, these buttons adjust the speaker or earbud volume.
When you’re listening to music, they adjust the playback volume—even when the phone is locked and dark.
When you’re taking a picture, either one serves as a shutter button or a camcorder start/stop button.
At all other times, they adjust the volume of sound effects like the ringer, alarms, and Siri.
When a call comes in, they silence the ringing or vibrating.
In each case, if the screen is on, a corresponding volume graphic appears on the screen to show you where you are on the volume scale.
The touchscreen is your mouse, keyboard, dialing pad, and notepad. You might expect it to get fingerprinty and streaky.
But the modern iPhone has an oleophobic screen. That may sound like an irrational fear of yodeling, but it’s actually a coating that repels grease. A single light wipe on your clothes restores the screen to its right-out-of-the-box crystal sheen.
You can also use the screen as a mirror when the iPhone is off.
The iPhone’s Retina screen has crazy high resolution (the number of tiny pixels per inch). It’s really, really sharp, as you’ll discover when you try to read text or make out the details of a map or a photo. The iPhone 5 family manages 1136 x 640 pixels; the iPhone 6 packs in 1334 x 750; the iPhone 6 Plus, 1920 x 1080 (the same number of dots as a high-definition TV).
The front of the iPhone is made of Gorilla Glass, a special formulation made by Corning. It’s unbelievably resistant to scratching. (You can still shatter it if you drop it just the wrong way.) The back of the 4s is Gorilla Glass, too.
Note
This is how Corning’s Web site says this glass is made: “The glass is placed in a hot bath of molten salt at a temperature of approximately 400°C. Smaller sodium ions leave the glass, and larger potassium ions from the salt bath replace them. These larger ions take up more room and are pressed together when the glass cools, producing a layer of compressive stress on the surface of the glass. This layer of compression creates a surface that is more resistant to damage from everyday use.”
But you probably guessed as much.
If you’re nervous about protecting your iPhone, you can always get a case for it (or a “bumper” for the iPhone 4s—a silicone band that wraps around the metal edges). But if you’re worried about scratching the glass, you’re probably worrying too much. Even many Apple employees carry the iPhone in their pockets without carrying cases.
Radio signals can’t pass through metal. That’s why there are strips of glass on the back of the iPhone 5 and 5s, strips of plastic on the iPhone 6 models, and all plastic on the back of the 5c.
And there are a lot of radio signals in this phone. All told, there are 20 different radio transceivers inside the iPhone 6. They tune in to the LTE and 3G (high-speed Internet) signals used in various countries around the world, plus the three CDMA signals used in the U.S.; and one each for WiFi, Bluetooth, American GPS, and Russian GPS.
Here’s a roundup of the icons you may see in the status bar at the top of the iPhone screen, from left to right:
 Cell signal. As on any cellphone, the number of bars—or dots, in iOS 8’s case—indicates the strength of your cell signal, and thus the quality of your call audio and the likelihood of losing the connection. If there are no dots, then the dreaded words “No service” appear here.
Network name and type. These days, different parts of the country—and even your street—are blanketed by cellular Internet signals of different speeds, types, and ages. Your status bar always shows you the kind of signal it has right now. From slowest to fastest:
 or
or  means your iPhone is connected to your carrier’s slowest, oldest Internet system. You might be able to check email, but you’ll lose your mind waiting for a Web page to load.
If you see the
 logo, you’re in a city where your cell company has installed a 3G network—meaning fairly decent Internet speed. A
  logo is better yet; you have speed in between 3G and LTE.
And if you see
 up there—well, then, get psyched. You have an iPhone 5 or 6 model, and you’re in a city with a 4G LTE cellular network. And that means very fast Internet (maybe even faster than you have at home), fast Web browsing, fast app downloading—just fast.
Note
You may also see a notation like “T-Mobile WiFi” up there. The iPhone 6 models, it turns out, can make free phone calls over a WiFi network—if your cellphone carrier has permitted it, and if you’ve turned the feature on (A Word about VoLTE). If everything is indeed set up right, then the phone replaces the signal-bar indicator with that “T-Mobile WiFi” notation (or whatever your carrier is). At the dawn of the iPhone 6, T-Mobile and Verizon are the only companies that permit WiFi calling.
 Airplane Mode. If you see the airplane instead of signal and WiFi bars, then the iPhone is in Airplane mode (Airplane Mode and WiFi Off Mode).
 Do Not Disturb. When the phone is in Do Not Disturb mode, nothing can make it ring, buzz, or light up except calls from the most important people. Details on Remind Me Later.
 WiFi signal. When you’re connected to a wireless Internet hotspot, this indicator appears. The more “sound waves,” the stronger the signal.
9:50 AM. When the iPhone is unlocked, a digital clock appears on the status bar.
 Alarm. You’ve got an alarm set. This reminder, too, can be valuable, especially when you intend to sleep late and don’t want an alarm to go off.
 Bluetooth. The iPhone is connected wirelessly to a Bluetooth earpiece, speaker, or car system. (If this symbol is gray, then it means Bluetooth is turned on but not connected to any other gear—and not sucking down battery power.)
 TTY symbol. You’ve turned on Teletype mode, meaning that the iPhone can communicate with a Teletype machine. (That’s a special machine that lets deaf people make phone calls by typing and reading text. It hooks up to the iPhone with a special cable that Apple sells from its Web site.)
 Call forwarding. You’ve told your iPhone to auto-forward any incoming calls to a different number. This icon is awfully handy—it explains at a glance why your iPhone never seems to get calls anymore.
 VPN. You corporate stud, you! You’ve managed to connect to your corporate network over a secure Internet connection, probably with the assistance of a systems administrator—or by consulting A Word on Troubleshooting.
 Syncing. The iPhone is currently syncing with some Internet service—iCloud, for example (Chapter 15).
 Battery meter. When the iPhone is charging, the lightning bolt appears. Otherwise, the battery logo “empties out” from right to left to indicate how much charge remains. (You can even add a “% full” indicator to this gauge; see General.)
 Navigation active. You’re running a GPS navigation program in the background (yay, multitasking!). Why is a special icon necessary? Because those GPS apps slurp down battery power like a thirsty golden retriever. Apple wants to make sure you don’t forget you’re running it.
 Rotation lock. This icon reminds you that you’ve deliberately turned off the screen-rotation feature, where the screen image turns 90 degrees when you rotate the phone. Why would you want to? And how do you turn the rotation lock on or off? See Control Center.
At the top of the phone, above the screen, there’s a horizontal slot. That’s the earpiece. Just above it (iPhone 5 series) or beside it (iPhone 6 or 4s), the tiny pinhole is the front-facing camera. It’s more visible on the white-faced iPhones than on the black ones.
Its primary purpose is to let you conduct video chats using the FaceTime feature, but it’s also handy for taking self-portraits or just checking to see if you have spinach in your teeth.
It’s not nearly as good a camera as the one on the back, though. The front camera has no flash, isn’t as good in low light, and takes much lower-resolution shots (1.2 megapixels on the iPhone 5 and 6 series; only 0.3 megapixels on earlier models).
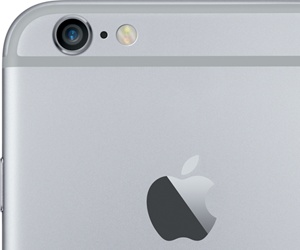
The camera on the back of the iPhone, meanwhile, takes very good photos indeed—8 megapixels.
A tiny LED lamp appears next to this lens—two lamps on the 5s and 6 actually. That’s the flash for the camera, the video light when you’re shooting movies, and a darned good flashlight for reading restaurant menus and theater programs in low light. (Swipe up from the bottom of the screen and tap the flashlight icon ![]() to turn the light on and off.)
to turn the light on and off.)
On iPhone 5 and 6 models, the tiny pinhole between the flash and the lens is a microphone. It’s used for recording clearer sound with video, for better noise cancellation on phone calls, and for better directional sound pickup.
There’s more on the iPhone’s cameras in Chapter 8.
Behind the glass, above or beside the earpiece, are two sensors. (On the black iPhones, they’re camouflaged; you can’t see them except with a flashlight.) First, there’s an ambient-light sensor that brightens the display when you’re in sunlight and dims it in darker places.
Second, there’s a proximity sensor. When something (like your head) is close to the sensor, it shuts off the screen and touch sensitivity. (It works only in the Phone app.) You save power and avoid dialing with your cheekbone when you’re on a call.
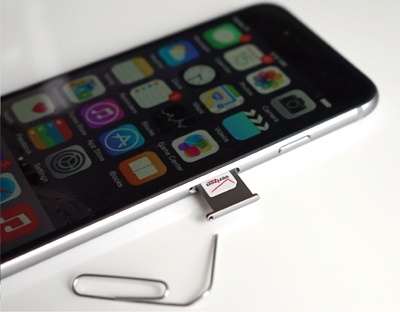
On the right edge of the iPhone, there’s a pinhole next to what looks like a very thin slot cover. If you push an unfolded paper clip straight into the hole, the SIM card tray pops out.
So what’s a SIM card?
It turns out that there are two major cellphone network types: CDMA, used by Verizon and Sprint, and GSM, used by AT&T, T-Mobile, and most other countries around the world.
Every GSM phone stores your phone account info—things like your phone number and calling-plan details—on a tiny memory card known as a SIM (subscriber identity module) card.
What’s cool is that, by removing the card and putting it into another GSM phone, you can transplant a GSM phone’s brain. The other phone now knows your number and account details, which can be handy when your iPhone goes in for repair or battery replacement. For example, you can turn a Verizon iPhone 6 into a T-Mobile iPhone 6 just by swapping in a T-Mobile SIM card.
AT&T is a GSM network, so AT&T iPhones have always had SIM cards. But intriguingly enough, every iPhone 4s and later model has a SIM card, too—even the Verizon and Sprint models. That’s odd, because most CDMA cellphones don’t have SIM cards.
These iPhones contain antennas for both GSM and CDMA. It’s the same phone, no matter which cell company you buy it from. Only the SIM card teaches it which phone company it “belongs” to.
Even then, however, you can still use any company’s phone in any country. (That’s why the latest iPhones are said to be “world phones.”) When you use the Verizon or Sprint iPhone in the United States, it uses only the CDMA antenna. But if you travel to Europe or another GSM part of the world, you can still use your Verizon or Sprint phone; it just hooks into that country’s GSM network.
If you decide to try that, you have two ways to go. First, you can contact your phone carrier and ask to have international roaming turned on. You’ll keep your same phone number overseas, but you’ll pay through the nose for calls and, especially, Internet use. (One exception: On T-Mobile, international texting and Internet use are free.)
Second, you can rent a temporary SIM card when you get to the destination country. That’s less expensive, but you’ll have a different phone number while you’re there.
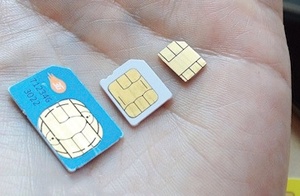
The iPhone 4s uses a smallish card type known as a micro-SIM card. And for the iPhone 5 and 6 models, Apple has developed even newer, tinier cards called nano-SIMs. (You can see all three cards at left.)
At this rate, you won’t be able to see the iPhone 7’s SIM card without an electron microscope.
Apple thinks SIM cards are geeky and intimidating and that they should be invisible. That’s why, unlike most GSM phones, your iPhone came with the card preinstalled and ready to go. Most people never have any reason to open this tray.
If you were curious enough to open it up, you can close the tray simply by pushing it back into the phone until it clicks.
On the top of the iPhone 4s, or the bottom of the iPhone 5 and 6 series, you can see the miniplug where you plug in the white earbuds that came with it—or any other earbuds or headphones.
It’s more than an ordinary 3.5-millimeter audio jack, however. It contains a secret fourth pin that conducts sound into the phone from the microphone on the earbuds’ cord. Now you, too, can be one of those executives who walk down the street barking orders, apparently to nobody. The iPhone can stay in your pocket as you walk or drive. You hear the other person through your earbuds, and the mike on the cord picks up your voice.
Note
Next to the headphone jack, inside the pinhole (iPhone 4s) or the perforated grille (iPhone 5 and 6 series), a tiny second microphone lurks. It’s the key to the iPhone’s noise-cancellation feature. It listens to the sound of the world around you and pumps in the opposite sound waves to cancel out all that ambient noise. It doesn’t do anything for you—the noise cancellation affects only what the other guy on the phone hears.
That’s why, on the iPhone 5 and 6 models, there’s also a third microphone at the top back (between the camera and flash); it’s designed to supply noise cancellation for you so that the other guy sounds better when you’re in a noisy place.
On the bottom of the iPhone, Apple has parked two important audio components: the speaker and the microphone.
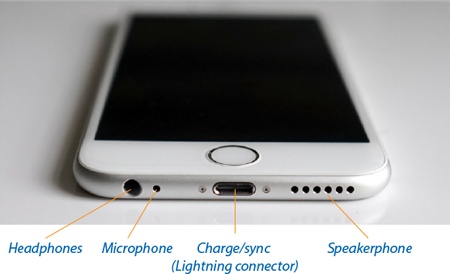
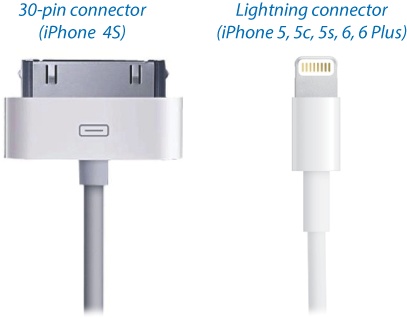
Directly below the Home button, on the bottom edge of the phone, you’ll find the connector that charges and syncs the iPhone with your computer.
For nearly 10 years, the charge/sync connector was identical on every iPhone, iPod, and iPad—the famous 30-pin connector. But on the iPhone 5 and later, Apple replaced that inch-wide connector with a new, far smaller one it calls Lightning.
The Lightning connector is a great design: It clicks nicely into place (you can even dangle the iPhone from it), yet you can yank it right out. You can insert the Lightning into the phone either way—there’s no “right-side up” anymore. It’s much sturdier than the old connector. And it’s tiny, which was Apple’s primary goal—only 0.3 inches wide (the old one was almost 0.9 inches wide).
Unfortunately, as a result, the latest iPhones don’t fit a lot of existing charging cables, docks, chargers, car adapters, hotel-room alarm clocks, speakers, or accessories.
The makers of those accessories will happily sell you new models that have Lightning connectors. Or you can buy an adapter from Apple:
Additional USB charging cables, like the one that came with your iPhone, cost $20.
A white adapter plug costs $30. It connects the modern iPhone to any accessory that was built for the old 30-pin connector.
If the iPhone doesn’t quite fit the older accessory, sometimes the solution is the $40 adapter plug with an 8-inch cable “tail.”
Even with the adapter, the Lightning connector doesn’t work with every older accessory, and it doesn’t offer all the same features. For example, it can’t send video out to your TV; for that, you need Apple’s Lightning-to-HDMI or Lightning-to-VGA cable.
In time, as the Lightning connectors come on all new iPhones, iPods, and iPads, a new ecosystem of accessories will arise. We’ll arrive at a new era of standardization—until Apple changes jacks again in another 10 years.
That metal band around the edge of the iPhone 4s, 5, and 5s is part of the iPhone’s antenna. (Remember the controversy that erupted after the iPhone 4 debuted in the summer of 2010? If you held the iPhone 4 so that the lower-left corner was pressed into your palm, the signal strength sometimes dropped.)
The problem went away on the 4s and later models; you can hold these phones any way you like. On the iPhone 6 models, of course, the edges are no longer part of the antenna system; instead, the plastic seams on the back serve as the escape hatch for the radio waves.
Inside the minimalist box, you get the iPhone and these items:
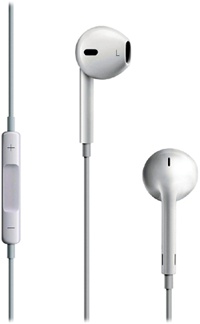
The earbuds. Apple shipped 600 million of the iconic white earbuds that, for years, announced to the world, “I have an iPhone!” or “I have an iPod!” But for the iPhone 5 and later, Apple updated them. Now you get what Apple calls EarPods. They sound better, although their bulbous shape may get uncomfortable in smaller ears. As before, a volume control/clicker is right on the cord, so you can answer calls and pause the music without taking the phone out of your pocket.
The USB charging/syncing cable. When you connect your iPhone to your computer using this white USB cable, it simultaneously syncs and charges. See Chapter 14.
The AC adapter. When you’re traveling without a computer, you can plug the dock’s USB cable into the included two-prong outlet adapter, so you can charge the iPhone directly from a wall socket.
Decals and info card. iPhone essentials.
You don’t need a copy of the iTunes software, or even a computer, to use the iPhone—but it makes loading up the phone a lot easier, as described in Chapter 14.
If you don’t have iTunes on your computer, then you can download it from www.apple.com/itunes.
The iPhone isn’t quite like any machine that came before it. You do everything on the touchscreen instead of with physical buttons, like this:
The iPhone’s onscreen buttons are nice and big, giving your fleshy fingertip a fat target.
You can’t use a fingernail or a pen tip; only skin contact works. (You can also buy an iPhone stylus. But a fingertip is cheaper and much harder to misplace.)
In some situations, you’ll be asked to confirm an action by swiping your finger across the screen. That’s how you unlock the phone after it’s been in your pocket, for example. It’s ingenious, really; you may bump the touchscreen when you reach into your pocket for something, but it’s extremely unlikely that your knuckles will randomly swipe it in just the right way.
You also have to swipe to confirm that you want to turn off the iPhone, to answer a call on a locked iPhone, or to shut off an alarm. Swiping like this is also a great shortcut for deleting an email or a text message.
When you’re zoomed into a map, Web page, email, or photo, you can scroll around just by sliding your finger across the glass in any direction—like a flick (described later), but slower and more controlled. It’s a huge improvement over scroll bars, especially when you want to scroll diagonally.
A flick is a faster, less-controlled slide. You flick vertically to scroll lists on the iPhone. The faster you flick, the faster the list spins downward or upward. But lists have a real-world sort of momentum; they slow down after a second or two, so you can see where you wound up.
At any point during the scrolling of a list, you can flick again (if you didn’t go far enough) or tap to stop the scrolling (if you see the item you want to choose).

In apps like Photos, Mail, Safari, and Maps, you can zoom in on a photo, message, Web page, or map by spreading.
That’s when you place two fingers (usually thumb and forefinger) on the glass and spread them. The image magically grows, as though it’s printed on a sheet of rubber.
Note
The English language has failed Apple here. Moving your thumb and forefinger closer together has a perfect verb: pinching. But there’s no word to describe moving them the opposite direction.
Apple uses the oxymoronic expression pinch out to describe that move (along with the redundant-sounding pinch in). In this book, the opposite of “pinching” is “spreading.”
Once you’ve zoomed in like this, you can zoom out again by putting two fingers on the glass and pinching them together.

Double-tapping is pretty rare on the iPhone, at least among the programs supplied by Apple. It’s generally reserved for two functions:
In the Safari Web browser, Photos, and Maps apps, double-tapping zooms in on whatever you tap, magnifying it. (At that point, double-tapping means “Restore to original size.”) Double-tapping also zooms into formatted email messages, PDF files, Microsoft Office files, and others.
When you’re watching a video (or recording one), double-tapping switches the aspect ratio (video screen shape).
Swiping your finger inward from outside the screen has a few variations:
From the top edge. Opens the Notification Center, which lists all your missed calls and texts, shows your appointments, and so on.
From the bottom edge. Opens the Control Center, a unified miniature control panel for brightness, volume, WiFi, and so on.
From the left edge. In many apps, this means “go back to the previous screen.” It works in Mail, Settings, Notes, Messages, Safari, Facebook and some other apps.
It sometimes makes a big difference whether you begin your swipe within the screen or outside it. At the Home screen, for example, starting your downward swipe within the screen area doesn’t open the Notification Center—it opens Spotlight, the iPhone’s search function.
The iPhone has a built-in, rechargeable battery that fills up most of its interior. How long a charge lasts depends on what you’re doing—music playback saps the battery the least, GPS navigation saps it the most. But one thing is for sure: You’ll have to recharge the iPhone regularly. For most people, it’s every night.
Note
The iPhone’s battery isn’t user-replaceable. It’s rechargeable, but after 400 or 500 charges, it starts to hold less juice. Eventually, you’ll have to pay Apple to install a new battery. (Apple says the added bulk of a protective plastic battery compartment, a removable door and latch, and battery-retaining springs would have meant a much smaller battery—or a much thicker iPhone.)
You recharge the iPhone by connecting the white USB cable that came with it. You can plug the far end into either of two places to supply power:
Your computer’s USB jack. In general, the iPhone charges even if your computer is asleep. (If it’s a laptop that itself is not plugged in, though, the phone charges only if the laptop is awake. Otherwise, you’d come home to a depleted laptop.)
The AC adapter. The little white two-prong cube that came with the iPhone connects to the end of the cradle’s USB cable.
Unless the charge is really low, you can use the iPhone while it charges. The battery icon in the upper-right corner displays a lightning bolt to let you know that it’s charging.
The battery life of the iPhone is either terrific or terrible, depending on your point of view—and which model you have.
If you were an optimist, you’d point out that the iPhone gets longer battery life than most rival touchscreen phones. If you were a pessimist, you’d observe that you sometimes can’t even make it through a single day without needing a recharge.
So knowing how to scale back your iPhone’s power appetite could come in extremely handy.
The biggest wolfers of electricity on your iPhone are its screen and its wireless features. Therefore, these ideas will help you squeeze more life out of each charge:
Dim the screen. Turning down your screen saves a lot of battery power. The quickest way is to swipe up from the bottom of the screen to open the Control Center (Control Center), and then drag the brightness slider.
On a new iPhone, Auto Brightness is turned on, too. In bright light, the screen brightens automatically; in dim light, it darkens. That’s because when you unlock the phone after waking it, it samples the ambient light and adjusts the brightness.
Note
This works because of the ambient-light sensor near the earpiece. Apple says it experimented with having the light sensor active all the time, but it was weird to have the screen constantly dimming and brightening as you used it.
You can use this information to your advantage. By covering up the sensor as you unlock the phone, you force it into a low-power, dim-screen setting (because the phone believes it’s in a dark room). Or by holding it up to a light as you wake it, you get full brightness. In either case, you’ve saved all the taps and navigation it would have taken you to find the manual brightness slider in Settings. (Or you can turn this auto-brightness feature off altogether in Settings→Display & Brightness.)
Turn off WiFi. If you’re not in a wireless hotspot, you may as well stop the thing from using its radio. Swipe up from the bottom of the screen to open the Control Center, and tap the
 icon to turn it off.
Or at the very least tell the iPhone to stop searching for WiFi networks it can connect to. Carrier has the details.
Turn off “push” data. This is a big one. If your email, calendar, and address book are kept constantly synced with your Macs or PCs, then you’ve probably gotten yourself involved with Yahoo Mail, Microsoft Exchange (Chapter 17), or iCloud (Chapter 15). It’s pretty amazing to know that your iPhone is constantly kept current with the mother ship.
Unfortunately, all that continual sniffing of the airwaves, looking for updates, costs you battery power. If you can do without the immediacy, then visit Settings→Mail, Contacts, Calendars→Fetch New Data. If you turn off the Push feature and set it to Manually instead, then your iPhone checks for email and new appointments only when you actually open the Mail or Calendar apps. Your battery goes a lot further.
Turn off background updating. Non-Apple apps check for frequent updates, too: Facebook, Twitter, stock-reporting apps, and so on. Not all of them need to be busily toiling in the background. Your best bet on battery life, then, involves visiting Settings→General→Background App Refresh and turning the switch Off for each app whose background activity isn’t strictly necessary.
Turn off automatic app updates. As you’ll soon discover, app companies update their wares far more often than PC or Mac apps. Some apps get updated many times a year.
Your phone comes set to download them automatically when they become available. But that constant checking and downloading costs you battery life.
To shut that feature down, open Settings→iTunes & App Store. Scroll down to the Automatic Downloads section. Turn off Updates. (The other switches—Music, Apps, Books—are responsible for auto-downloading things that you or your brood have downloaded on other iOS gadgets. You might want to make sure they’re off, too, if battery life is a concern.)
Consider Airplane mode. In Airplane mode, you shut off all the iPhone’s power-hungry radios. Even a nearly dead iPhone can hobble on for a few hours in Airplane mode—something to remember when you’re desperate. To enter Airplane mode, swipe up from the bottom of the screen to open the Control Center, and tap the
 icon.
icon.Tip
For sure, turn on Airplane mode if you’ll be someplace where you know an Internet signal won’t be present—like on a plane, a ship at sea, or Montana. Your iPhone never burns through a battery charge faster than when it’s hunting for a signal it can’t find; your battery will be dead within a couple of hours.
Turn off Cellular Data. This option (in Settings→Cellular) turns off the cellular Internet features of your phone. You can still make calls, and you can still get online in a WiFi hotspot.
This feature is designed for people who have a capped data plan—a limited amount of Internet use per month—which is almost everybody. If you discover that you’ve used up almost all your data allotment for the month, and you don’t want to go over your limit (and thereby trigger an overage charge), you can use this option to shut off all data. Now your phone is just a phone—and it uses less power.
Turn off GPS checks. In Settings→Privacy→Location Services, there’s a list of all the apps on your phone that are using your phone’s location feature to know where you are. (It’s a combination of GPS, cell-tower triangulation, and WiFi hotspot triangulation.) All that checking uses battery power, too.
Some apps, like Maps, Find My Friends, and Yelp, don’t do you much good unless they know your location. But plenty of apps don’t really need to know where you are. Facebook and Twitter, for example, want that information only so that they can location-stamp your posts. In any case, the point is to turn off Location Services for each app that doesn’t really need to know where you are.
Turn off Bluetooth. If you’re not using a Bluetooth headset, then for heaven’s sake shut down that Bluetooth radio. Open the Control Center and tap the
 icon to turn it off.
Turn off the screen. You can actually turn off the screen, rendering it totally black and saving incredible amounts of battery power. Music playback and Maps navigation continue to work just fine.
Of course, if you want to actually interact with the phone while the screen is off, you’ll have to learn the VoiceOver talking-buttons technology; see VoiceOver.
By the way, beware of 3-D games and other graphically intensive apps, which can be serious power hogs. And turn off EQ when playing your music (see Familiar iPod Features).
If your battery still seems to be draining faster than it should, a new iOS 8 feature awaits you. It’s this amazing table, which shows you exactly which apps are using the most power:
To see it, open Settings→General→Usage→Battery Usage. You can switch between battery readouts for the past 24 hours, or for the past 4 days. Keep special watch for labels like these:
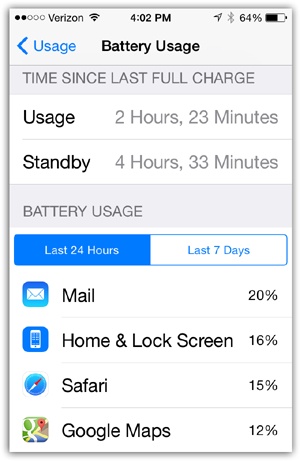
Low signal. A phone uses the most power of all when it’s hunting for a cellular signal, because the phone amplifies its radios in hopes of finding one. If your battery seems to be running down faster than usual, the “Low Signal” notation is a great clue—and a suggestion that maybe you should use Airplane mode when you’re on the fringes of cellular coverage.
Background activity. As hinted on the previous pages, background Internet connections are especially insidious. These are apps that do online work invisibly, without your awareness—and drain the battery in the process. Now, for the first time, you can clearly see which apps are doing it.
Once you know the culprit app, it’s easy to shut its background work down. Open Settings→General→Background App Refresh and switch Off each app whose background activity isn’t strictly necessary.
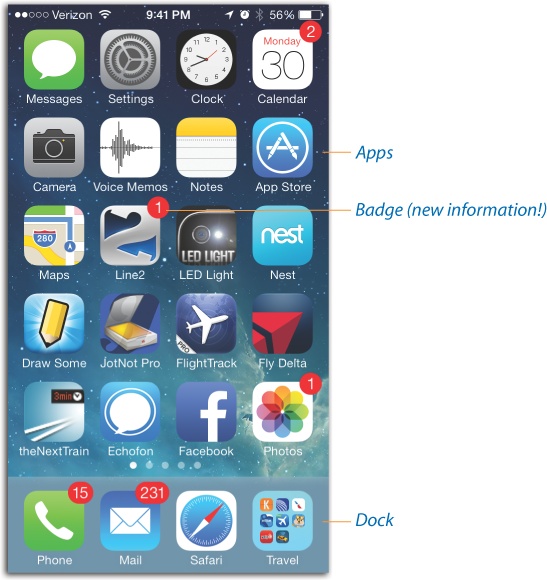
The Home screen is the launching pad for every iPhone activity. It’s what appears when you press the Home button. It’s the immortal grid of colorful icons.
It’s such an essential software landmark, in fact, that a quick tour might be helpful.
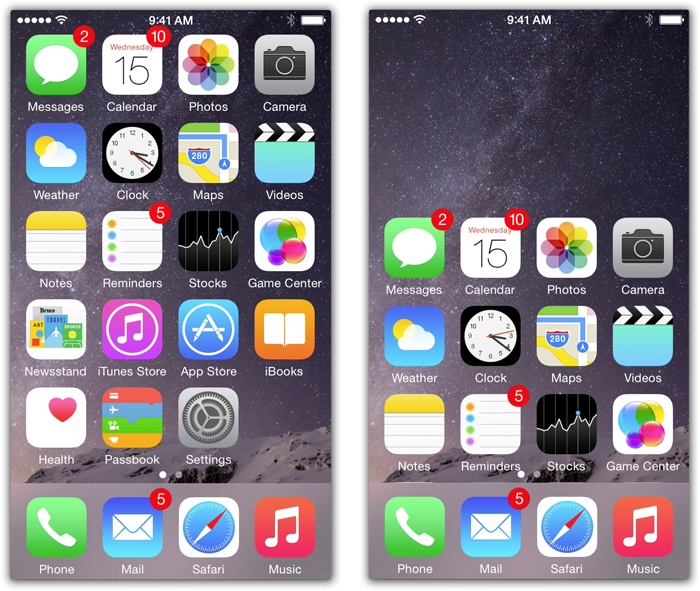
Icons. Each icon represents one of your iPhone apps (programs)—Mail, Maps, Camera, and so on—or a folder that you’ve made to contain some apps. Tap one to open that program or folder.
Your iPhone comes with about 25 apps preinstalled by Apple; you can’t remove them. The real fun, of course, comes when you download more apps from the App Store (Chapter 9).
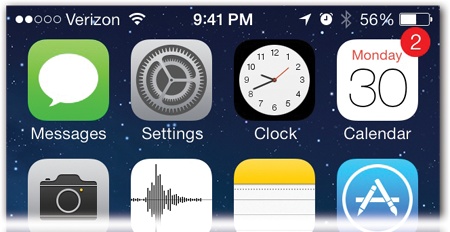
Badges. Every now and then, you’ll see a tiny, red number “badge” (like
 ) on one of your app icons. It’s telling you that something new awaits: new email, new text messages, new chat entries, new updates for the apps on your iPhone. It’s saying, “Hey, you! Tap me!”
Home page dots. The standard Home screen can’t hold more than 20 or 24 icons. As you install more and more programs on your iPhone, you’ll need more and more room for their icons. Fortunately, the iPhone makes room for them by creating additional Home screens automatically. You can spread your new programs’ icons across 11 such launch screens.
The little white dots are your map. Each represents one Home screen. If the third one is “lit up,” then you’re on the third Home screen.
To move among the screens, swipe horizontally—or tap to the right or left of the little dots to change screens.
And if you ever scroll too far away from the first Home screen, here’s a handy shortcut: Press the Home button (yes, even though you’re technically already home). That takes you back to the first Home screen.
Tip
Note to upgraders: The very first “page,” at the far left, used to be the Spotlight (search) screen. But in iOS 7 and iOS 8, you open Spotlight by dragging down anywhere on any Home screen; there’s nothing to the left of the Home screens anymore. You can tug down on any “page” of the Home screens—you don’t have to scroll all the way to the left of them anymore.
The Dock. At the bottom of the Home screen, four exalted icons sit in a row on a tinted panel. This is the Dock—a place to park the most important icons on your iPhone. These, presumably, are the ones you use most often. Apple starts you off with the Phone, Mail, Safari, and Music icons.
What’s so special about this row? As you flip among Home screens, the Dock never changes. You can never lose one of your four most cherished icons by straying from the first page; they’re always handy.
The background. You can replace the background image (behind your app icons) with a photo. A complicated, busy picture won’t do you any favors—it will just make the icon names harder to read—so Apple provides a selection of handsome, relatively subdued wallpaper photos. But you can also choose one of your own photos.
For instructions on changing the wallpaper, see Use as Wallpaper.
It’s easy (and fun!) to rearrange the icons on your Home screens. Put the most frequently used icons on the first page, put similar apps into folders, and reorganize your Dock. Full details are on Setting Up Folders on the iPhone.
Tip
In iOS 8, you can set up a completely empty first Home screen by moving all of its app icons onto other Home “pages.” (In previous versions of iOS, the phone automatically deleted the first Home screen if it was empty.) That’s a weird little arrangement for anyone with a really great wallpaper photo.
For such a tiny device, there are an awful lot of settings you can change—hundreds of them. Trouble is, some of them need changing (volume, brightness) a lot more often than others (language preference, voicemail greeting).
That’s why Apple invented the Control Center: a panel that offers quick access to the controls you need the most.
To open the Control Center, no matter what app you’re using, swipe upward from beneath the screen.
Tip
You can even open the Control Center from the Lock screen, unless you’ve turned off that feature (Locking Down the Lock Screen).
The Control Center is a translucent gray panel filled with one-touch icons for the settings most people change most often on their iPhones.
Tip
Truth be told, the Control Center is easier to use when it’s not translucent. Visit Settings→General→Accessibility and turn on Increase Contrast. Now the Control Center’s background is solid gray instead of see-through gray.
Now, many of these settings are even faster to change using Siri, the voice-command feature described in Chapter 4. When it’s not socially awkward to speak to your phone (like at the symphony or during a golf game), you can use spoken commands—listed below under each button description—to adjust settings without even touching the screen.
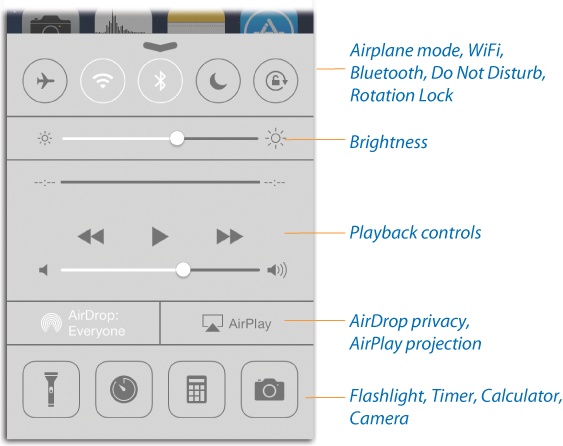
Here’s what’s in the Control Center:
Airplane Mode (
). Tap to turn the icon white. Now you’re in Airplane mode; the phone’s wireless features are all turned off. You’re saving the battery and obeying flight attendant instructions. Tap again to turn off Airplane mode.Sample Siri command: “Turn Airplane mode on.” (Siri warns you that if you turn Airplane mode on, Siri herself will stop working. Say “OK.”)
WiFi (
). Tap to turn your phone’s WiFi off (black) or on (white).Sample Siri commands: “Turn off WiFi.” “Turn WiFi back on.”
Bluetooth (
). Tap to turn your Bluetooth transmitter off (black) or on (white). That feature alone is a godsend to anyone who uses the iPhone with a car’s Bluetooth audio system. Bluetooth isn’t the battery drain it once was, but it’s still nice to be able to flick it on so easily when you get into the car.Sample Siri commands: “Turn Bluetooth on.” “Turn off Bluetooth.”
Do Not Disturb (
 ). Do Not Disturb mode, described in Chapter 3, means that the phone won’t ring or buzz when people call—except a few handpicked people whose communiqués ring through. Perfect for sleeping hours; in fact, you can set up an automated schedule for Do Not Disturb (say, midnight to 7 a.m.).
But what if you wake up early or want to stay up late? Now you can tap to turn Do Not Disturb on (white) or off (black).
Sample Siri commands: “Turn on Do Not Disturb.” “Turn Do Not Disturb off.”
Rotation Lock (
 ). When Rotation Lock is turned on (white), the screen no longer rotates when you turn the phone 90 degrees. The idea is that sometimes, like when you’re reading an ebook on your side in bed, you don’t want the screen picture to turn; you want it to stay upright relative to your eyes, even though you’re lying down. (A little icon appears at the top of the screen to remind you why the usual rotating isn’t happening.)
The whole thing isn’t quite as earth-shattering as it sounds—first, because it locks the image in only one way: upright, in portrait orientation. You can’t make it lock into widescreen mode. Furthermore, many apps don’t rotate with the phone to begin with. But when that day comes when you want to read in bed on your side with your head on the pillow, your iPhone will be ready. (Tap the button again to turn rotating back on.)
Brightness. Hallelujah! Here’s a screen-brightness slider. Drag the little white ball to change the screen brightness.
Sample Siri commands: “Make the screen brighter.” “Decrease the brightness.” “Dim the screen.” “Brighten up!”
Playback controls (
 ,
,  ,
,  ). These controls govern playback in whatever app is playing music or podcasts in the background: the Music app, Pandora, Spotify, whatever it is. You can skip a horrible song quickly and efficiently without having to interrupt what you’re doing, or pause the music to chat with a colleague. (Tap the song name to open whatever app is playing.)
You also get a scrubber bar that shows where you are in the song, the name of the song and the performer, and the album name. And, of course, there’s a volume slider. It lets you make big volume jumps faster than you would by pressing the volume buttons on the side of the phone.
Sample Siri commands: “Pause the music.” “Skip to the next song.” “Play some Billy Joel.”
AirDrop (
 ). AirDrop gives you a quick, effortless way to shoot photos, maps, Web pages, and other stuff to nearby iPhones, iPads, iPod Touches, and even Macs. (See AirDrop for details.)
On the Control Center, the AirDrop button isn’t an on/off switch like most of the other icons here. Instead it produces a pop-up menu of options that control whose i-gadgets can “see” your iPhone: Contacts Only (people in your address book), Everyone, or Off (nobody).
AirPlay (
 ). The AirPlay button lets you send your iPhone’s video and audio to a wireless speaker system or TV—if you have an AirPlay receiver, of which the most famous is the Apple TV. Details are on AirPlay.
Flashlight (
 ). Tap to turn on the iPhone’s “flashlight”—actually the LED lamp on the back that usually serves as the camera flash. Knowing that a source of good, clean light is two touches away makes a huge difference if you’re trying to read in the dark, find your way along a path at night, or fiddle with wires behind your desk.
Timer (
 ). Tap to open the Clock app—specifically, the Timer mode, which counts down to zero. Apple figures you might appreciate having direct access to it when you’re cooking, for example, or waiting for your hair color to set.
Sample Siri commands: “Open the Timer.” Or, better yet, bypass the Clock and Timer apps altogether: “Start the timer for three minutes.” “Count down from six minutes.” (Siri counts down right there on the Siri screen.)
Calculator (
 ). Tap to open the Calculator app—a handy shortcut if it’s your turn to figure out how to divide up the restaurant bill.
Sample Siri commands: “Open the calculator.” Or, better yet, without opening any app: “What’s a hundred and six divided by five?”
Camera (
 ). Tap to jump directly into the Camera app. Because photo ops don’t wait around.
Sample Siri commands: “Take a picture.” “Open the camera.”
The Control Center closes when any of these things happen:
Note
In some apps, swiping up doesn’t open the Control Center on the first try, much to your probable bafflement. Instead, swiping up just makes a tiny ![]() tab appear at the edge of the screen. (You’ll see this behavior whenever the status bar—the strip at the top that shows the time and battery gauge—is hidden, as can happen in the full-screen modes of iBooks, Maps, Videos, and so on. It also happens in the Camera.)
tab appear at the edge of the screen. (You’ll see this behavior whenever the status bar—the strip at the top that shows the time and battery gauge—is hidden, as can happen in the full-screen modes of iBooks, Maps, Videos, and so on. It also happens in the Camera.)
In those situations, Apple is trying to protect you from opening the Control Center accidentally—for example, when what you really wanted to do was scroll the image up. No big deal; once the ![]() appears, swipe up a second time to open the Control Center panel.
appears, swipe up a second time to open the Control Center panel.
If you find yourself opening the Control Center accidentally—when playing games, for example—you can turn it off. Open Settings→Control Center. Turn off Access Within Apps. Now swiping up opens the Control Center only at the Home screen. (You can also turn off Access on Lock Screen here, to make sure the Control Center never appears when the phone is asleep.)
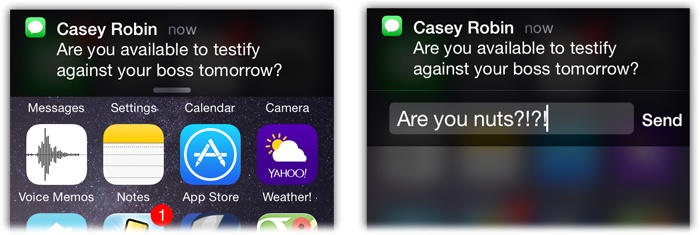
A notification is an important status message. You get one every time a text message comes in, an alarm goes off, a calendar appointment is imminent, or your battery is running low.
These days, there’s a lot more you can do with a notification than just read it and nod your head OK. Apple has gone to a lot of effort to ensure that notifications disrupt your important phone activities as rarely as possible. So:
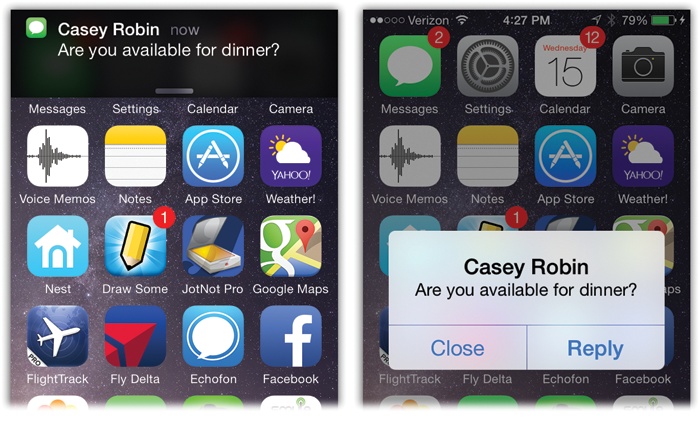
Flick it away. When a notification appears at the top of the screen, it’s sometimes covering up whatever you were doing. If you wait a couple of seconds, the little message goes away by itself. But you don’t have to wait. You can just flick it upward with your finger to make it disappear.
Answer it. Often, a notification appears to display an incoming text message, email, or calendar invitation. In iOS 8, you can swipe down on it to reveal buttons that let you take action: Reply, for example, or Decline and Accept (for an invitation). And you never have to leave the app you were using, which is deliciously efficient.
Open it. Finally, here’s the obvious one: You can tap a notification to open the app it came from. Tap an email notification to open the message in Mail; tap a text-message notification to open it in Messages; and so on. That’s handy when you want to dig in and see the full context of the notification.
No matter what kind of notification pops up, you still see only one alert at a time. And once it’s gone, you can’t get it back. Or can you?
Meet the Notification Center screen. It lists every notification you’ve recently received, in a tidy, scrolling list.
You can check it out right now: Swipe your finger down from above the iPhone’s screen. The Notification Center pulls down like a classy window shade, printed in white with every recent item of interest.
Here you’ll find all your apps’ notifications, as well as your missed calls, recent text messages, reminders, and upcoming calendar appointments.
You can inspect two different lists here (a redesign in iOS 8):
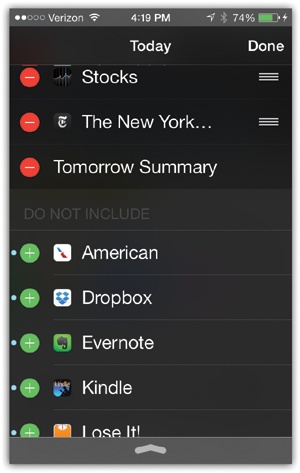
Today. The Today screen presents an executive summary of everything you need to know today, in plain English: your upcoming appointments (“ ‘Salary meeting’ is next up on your calendar, at 2 PM”); reminders coming due; weather and stock information; and a preview of your schedule tomorrow. If you’re away from your home or office, you’ll even see an estimated commuting time, based on current traffic conditions. Pretty slick.
In iOS 8, the Today screen has become a much bigger deal. Apple now allows apps to add their own sections to the Today list.
For example, Dropbox can show a list of files that have been added to your Dropbox folder; Evernote can add buttons for creating new notes or reminders; The New York Times, Yahoo Digest, and Huffington Post apps can add headlines; Yahoo Weather can add weather information, including a photo of current conditions; the Kindle app offers links to the books you’re reading right now; and so on.
To manage all of this, scroll down to the bottom of the Today list and tap Edit. In the resulting list, you can tap
 to remove a module from the Today list, drag the
  up or down to move it higher or lower in the list, or tap
  to add a module. Then tap Done.
Notifications. On this tab, you see every notification you’ve received, sorted by app: all the calls, texts, and other notifications that came in while your phone was asleep or turned off. (They disappear after a day.) It can be a very long list.
Tap a line in the Notification Center to open the relevant app for more details—for example, to see more information about that appointment, or to read the whole text message in context.
Tap the
 next to an app’s name, and then tap Clear to remove that app’s current listings from the Notification Center—for now. That app’s heading will reappear here the next time it has anything to tell you.

Tip
To switch between the Today and Notification views, you can either tap the little tabs or just swipe across the screen.
To close the Notification Center, drag the bottom handle (![]() ) upward. (Actually, you don’t have to aim for the handle. You can just swipe upward from beneath the screen, quickly and sloppily.)
) upward. (Actually, you don’t have to aim for the handle. You can just swipe upward from beneath the screen, quickly and sloppily.)
You can (and should) specify which apps are allowed to junk up your Notification Center. Open Settings→Notifications to see the master list (shown on the next page), with one entry for every app that might ever want your attention. (Or just tell Siri, “Open notification settings.”)
Under Notifications View, you can specify the order of the various apps’ notifications in the center. If you tap Sort By Time, then the apps with the newest alerts appear at the top. But if you tap Sort Manually and then Edit, you can drag the ![]() handles up or down to specify the order of your apps’ notifications on the Notification Center screen.
handles up or down to specify the order of your apps’ notifications on the Notification Center screen.
The most important work you can do in Notifications settings, though, is to control the behavior of each individual app. You’ll quickly discover that every app thinks it’s important; every app wants its notifications to blast into your face when you’re working.
You, however, may differ. You may not consider it essential to know when your kid’s Plants vs. Zombies game score has changed, for example.
So: Tap an app’s name to open its individual Notifications screen (at right on the next page—the Reminders app, in this example). Here you’ll find settings that vary by app, but they generally run along these lines:
Allow Notifications. If you don’t want this app to make any notifications pop up at all, turn this off.
Show in Notification Center. How many recent notifications from this app are allowed to appear in your Notification Center? You can choose anything from No Recent Items (the app can still get your attention with banners or alert bubbles—but it won’t appear in the Notification Center) to 10 Recent Items (for really important things like missed calls).
Sounds. Some apps try to get your attention with a sound effect when a notification appears. Turn this off if you think your phone makes too many beeps and burbles as it is.
Notification Sound. Some apps offer this control. It lets you choose which sound effect plays to get your attention. You can change the sound or choose None.
Badge App Icon. A badge is a little red circled number (
, for example). It appears right on an app’s icon to indicate how many updates are waiting for you. Turn it off if you really don’t need that reminder.Show on Lock Screen. The Lock screen (Locked Mode) is another place to see what’s been trying to get your attention while the phone was in your pocket: missed calls and texts, new messages and email, and so on.
The Lock screen may seem just like the Notification Center—but there are differences. For example, each time you wake the phone, whatever notifications are on the Lock screen are wiped clear. They don’t stay put, as they do on the Notification Center.
You might want a different set of apps to list their nags on the Lock screen. Maybe you want the Lock screen to show only missed calls, new text messages, and new mail—but you’d like the Notification Center to be fully stocked with Twitter and Facebook updates, for example. Or maybe you’d rather not permit passing evildoers to pick up your phone and see your notifications without even having to unlock it.
That’s why you have this switch. It governs your ability to see this app’s updates on the Lock screen (and the Notification Center when you open it while at the Lock screen).
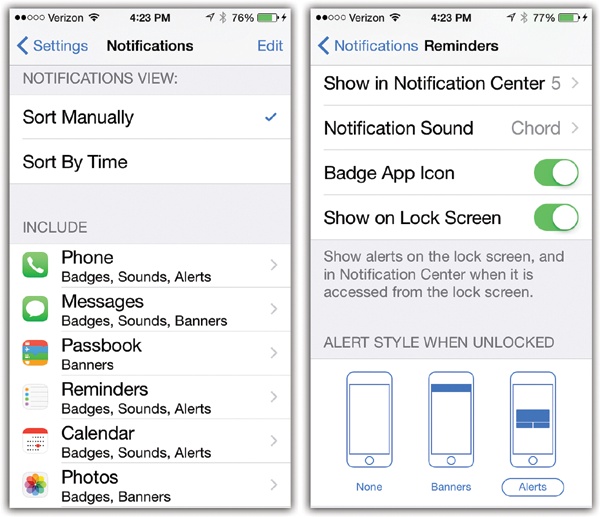
Notifications can appear in any of three styles—and you get to choose which you prefer, for each individual app.
On the same screen described above (open Settings→Notifications and tap the app’s name), you can choose one of these three styles:
None. If a certain app bugs you with news you really don’t care about, you can shut it up forever. Tap None.
Banners are incoming notifications that appear quietly and briefly at the top of the screen (below, left). The message holds still long enough for you to read it, but it doesn’t interrupt your work and goes away after a few seconds. Banners are a good option for things like Facebook and Twitter updates and incoming email messages.
Alerts. A white alert box appears to get your attention (above, right). You might use this option for apps whose messages are too important to miss, like alarms, flight updates, and text messages.
Tip
You can also use the Include setting to specify how much of the Notification Center this app is allowed to use up—that is, how many lines of information. Maybe you need only the most recent alert about your upcoming flight (1 Item), but you want to see a lot more of your upcoming appointments (10 Items).
Like any smartphone, the iPhone offers a first line of defense for a phone that winds up in the wrong hands. It’s designed to keep your stuff private from other people in the house or the office, or to protect your information in case you lose the iPhone. If you don’t know the password or don’t have the right fingerprint, you can’t use the iPhone (except for limited tasks like taking a photo or using Siri).
About half of iPhone owners don’t bother setting up a password to protect the phone. Maybe they never set the thing down in public, so they don’t worry about thieves. Or maybe there’s just not that much personal information on the phone—and meanwhile, having to enter a password every single time you wake the phone can get to be a profound hassle.
Tip
Besides—if you ever do lose your phone, you can put a password on it by remote control; see Find My iPhone.
The other half of people reason that the inconvenience of entering a password many times a day is a small price to pay for the knowledge that nobody can get into your stuff if you lose it.
If you think your phone is worth protecting, here’s how to set up a password—and, if you have an iPhone 5s or 6 model, how to use the fingerprint reader instead.
If you didn’t already create a phone password the first time you turned your iPhone on, here’s how to do it. (And just because you’re an iPhone 5s or 6 owner, don’t be smug; you have to create a password even if you plan to use the fingerprint reader. As a backup.)
Open Settings→Touch ID & Passcode. (On the iPhone 4s and 5c, it’s just called Passcode Lock.)
You can set up either a four-digit number—convenient, but not so impossible to guess—or a full-blown alphanumeric password of any length. You decide, using the Simple Passcode on/off switch.
Now tap Turn Passcode On. You’re asked to type the password you want, either on the number keypad (for Simple Passcodes) or the alphabet keyboard. You’re asked to do it again to make sure you didn’t make a typo.
Note
Don’t kid around with this passcode. If you forget the iPhone code, you’ll have to restore your iPhone (Software Updates), which wipes out everything on it. You’ve still got most of the data on your computer, of course (music, video, contacts, calendar), but you may lose text messages, mail, and so on.

Once you confirm your password, you return to the Passcode Lock screen. Here you have a few more options.
For example, the Require Passcode option lets you specify how quickly the password is requested before locking somebody out: immediately after the iPhone wakes or 1, 15, 30, 60, or 240 minutes later. (Those options are a convenience to you, so you can quickly check your calendar or missed messages without having to enter the passcode—while still protecting your data from, for example, evildoers who pick up your iPhone while you’re out getting coffee.)
Certain features are accessible on the Lock screen even before you’ve entered your password: the Today and Notifications tabs of the Notification Center; Siri, Passbook, and Reply with Message. These are huge conveniences, but also, technically, a security risk. Somebody who finds your phone on your desk could, for example, blindly voice-dial your colleagues or use Siri to send a text. If you turn these switches off, then nobody can use these features until after entering the password (or using your fingerprint).
Finally, here is Erase Data—an option that’s scary and reassuring at the same time. When this option is on, then if someone makes 10 incorrect guesses at your passcode, your iPhone erases itself. It’s assuming that some lowlife burglar is trying to crack into it to have a look at all your personal data.
This option, a pertinent one for professional people, presents potent protection from patient password prospectors.
Note
Even when the phone is locked and the password unguessable, a tiny blue Emergency Call button still appears on the Unlock screen. It’s there just in case you’ve been conked on the head by a vase, you can’t remember your own password, and you need to call 911.
And that is all. From now on, each time you wake your iPhone (if it’s not within the window of repeat visits you established), you’re asked for your password.
If you have an iPhone 5s, 6, or 6 Plus—you lucky thing—you have the option of using a more secure and much more convenient kind of “password”: your fingertip.
The lens built right into the Home button (clever!) is the first cellphone fingerprint reader ever that actually works—every time. It’s not fussy, it’s not balky. It reads your finger at any angle. It can’t be faked out by a plastic finger or even a chopped-off finger. You can teach it to recognize up to five fingerprints; they can all be yours, or some can belong to other people you trust.
Before you can use your fingertip as a password, though, you have to teach the phone to recognize it. Here’s how that goes:
Create a passcode. That’s right: You can’t use a fingerprint instead of a password; you can only use a fingerprint in addition to one. You’ll still need a password from time to time to keep the phone’s security tight. For example, you need to enter your password if you can’t make your fingerprint work (maybe it got encased in acrylic in a hideous crafts accident), or if you restart the phone, or if you haven’t used the phone in 48 hours or more.
So open Settings→Touch ID & Passcode and create a password, as described on the previous pages.
Teach a fingerprint. At the top of the Touch ID & Passcode screen, you see the on/off switches for the three things your fingerprint can do: It can unlock the phone (iPhone Unlock), pay for things (Apple Pay), and it can serve as your password when you buy books, music, apps, and videos from Apple’s online stores (iTunes & App Store).
But what you really want to tap here, of course, is Add a fingerprint.
Now comes the cool part. Place the finger you want to train onto the Home button—your thumb or index finger are the most logical candidates. Touch it to the Home button over and over, maybe six times. Each time, the gray lines of the onscreen fingerprint darken a little more.
Once you’ve filled in the fingerprint, you see the Adjust Your Grip screen. Tap Continue. Now, the iPhone wants you to touch the Home button another few times, this time tipping the finger a little each time so the sensor gets a better view of your finger’s edges.
Once that’s done, the screen says “Success!”

You are now ready to start using the fingerprint. Try it: Switch the phone off. Then wake it (press the Sleep switch or press the Home button), and then leave your finger on the Home button for about a second. The phone reads your fingerprint and instantly unlocks itself.
And now, a few notes about using your fingerprint as a password:
Yes, you can touch your finger to the Home button at the Lock screen. But you can also touch it at any Enter Passcode screen.
Suppose, for example, that your Lock screen shows that you missed a text message. And you want to reply. Well, you can swipe across that notification to open it in its native habitat—the Messages app—but first you’re shown the Enter Passcode screen. Ignore that. Just touch the Home button with the finger whose print you recorded.
Apple says the image of your fingerprint is encrypted and stored in the iPhone’s processor chip. It’s never transmitted anywhere, it never goes online, and it’s never collected by Apple.
If you return to the Touch ID & Passcode screens, you can tap Add a Fingerprint again to teach your phone to recognize a second finger. And a third, fourth, and fifth.
The five “registered” fingerprints don’t all have to belong to you. If you share the phone with a spouse or a child, for example, that special somebody can use up some of the fingerprint slots.
To rename a fingerprint, tap its current name (“Finger 1” or whatever). To delete one, tap its name and then tap Delete Fingerprint. (You can figure out which finger label is which by touching the Home button; the corresponding label blinks. Sweet!)
You can register your toes instead of fingers, if that’s helpful. Or even patches of your wrist or arm, if you’re patient (and weird).
The Touch ID scanner may have trouble recognizing your finger if it (your finger) is wet, greasy, or scarred.
The iPhone’s finger reader isn’t just a camera; it doesn’t just look for the image of your fingerprint. It’s actually measuring the tiny differences in electrical conductivity between the raised parts of your fingerprint (which aren’t conductive) and the skin just beneath the surface (which is). That’s why a plastic finger won’t work—and even your own finger won’t work if it’s been chopped off (or if you’ve passed away).
So if your fingerprint is such a great solution to password overload, how come it works only to unlock the phone and to buy stuff from Apple’s online stores? Wouldn’t it be great if your fingerprint could also log you into secure Web sites? Or serve as your ID when you buy stuff online?
In iOS 8, that dream has become a reality. Software companies can now use your Touch ID fingerprint to log into their apps. Mint (for checking your personal finances), Evernote (for storing notes, pictures, and to-do lists), Amazon (for buying stuff), and other apps now permit you to substitute a fingerprint touch for typing a password.
What’s really wild is that password-storing apps like 1Password and LastPass have been updated, too. Those apps are designed to memorize your passwords for all sites on the Web, of every type—and now you can use your fingerprint to unlock them.
Moreover, your fingerprint is now the key to the magical door of Apple Pay, the wireless pay-with-your-iPhone 6 technology described on The Price of Free.
All of this is great news. Most of us would be happy if we never, ever had to type in another password.
Get iPhone: The Missing Manual, 8th Edition now with the O’Reilly learning platform.
O’Reilly members experience books, live events, courses curated by job role, and more from O’Reilly and nearly 200 top publishers.

