Chapter 1. Getting Started with the iPhone SDK
If you’re new to the Macintosh world, you might be surprised to find that applications don’t come in the form of .exe files. The excellent design for which Apple is known in its hardware and graphics extends to its software architecture as well, and includes the way applications are laid out in the file system. The same strategy used in Apple desktop systems has been carried over into the iPhone.
Apple has adopted the practice of creating modular, self-contained applications with their own internal file resources. As a result, installing an application is as easy as simply dragging it into your applications folder; deleting it as easy as dragging it into the trash. In this chapter, we’ll look at the structure of iPhone applications. You’ll also get up and running with the iPhone SDK, explore the Apple IDE known as Xcode, and learn how to install applications on your iPhone. Finally, we’ll introduce you to the Objective-C language and enough of its idiosyncrasies to make an easy transition from C or C++.
Anatomy of an Application
Apple came up with an elegant way to contain applications in their operating system. As OS X is a Unix-based platform, Apple wanted to make it adhere to basic Unix file conventions, and so the resource forks of olde were no longer sufficient (or efficient, for that matter). The challenge was to design a structure that would allow an application to remain self-contained while surviving on a file system that didn’t believe in cheapening its architecture with proprietary workarounds. The answer came from an older ancestor of Mac OS X named NeXT, which treated an application as a bundle represented within a directory. The bundle concept introduces an approach to group application resources, binaries, and other related files.
If you look at any Mac application, you’ll find that the
.app extension denotes not a file, but a directory. This is the
application’s program directory. Inside it is an organized structure containing resources
the application needs to run, property lists containing information
about the application, and the application’s executable binaries. The
iPhone SDK builds the binary executable for your program and deposits
files it needs into this program directory structure. So to build a
complete application, it’s up to the developer to tell the Xcode IDE
which supporting files should be installed. Applications are executed
from within a sandbox on the iPhone. A
sandbox is a restricted environment that prevents applications from
accessing unauthorized resources. One of its functions is to prohibit
any read or write operations outside of the application’s designated
home directory. Everything your application needs to run must be self-contained within this directory
structure. In addition to this, your application won’t know where it is
installed, as a unique identifier is added to your application’s path at
each installation. You’ll only be able to find your path by using
functions like NSHomeDirectory and classes like NSBundle,
which you’ll learn about in the coming chapters.
Each iPhone application has its own home directory containing Library and Documents folders, and a tmp directory for storing temporary files. The program directory for an iPhone application is much less structured than desktop Mac applications, and all of the application’s resources are stored in the root of the .app program folder. The following is an example of a single application’s complete home directory, as it might appear on the iPhone’s file system:
drwxr-xr-x    mobile  mobile   Documents/
drwxr-xr-x    mobile  mobile   Library/
drwxr-xr-x        mobile  mobile    Preferences/
drwxr-xr-x    mobile  mobile   MyApp.app/
    drw-r--r--    mobile  mobile    _CodeSignature
    -rw-r--r--    mobile  mobile    Default.png
    -rw-r--r--    mobile  mobile    icon.png
    -rw-r--r--    mobile  mobile    Info.plist
    -rwxr-xr-x    mobile  mobile    MyApp
    -rw-r--r--    mobile  mobile    pie.png
    -rw-r--r--    mobile  mobile    PkgInfo
    -rw-r--r--    mobile  mobile    ResourceRules.plist
drwxr-xr-x    mobile  mobile   tmp/
This list reflects a very basic simple iPhone application named MyApp:
- Documents
A special folder in which your application may store documents created by the user. It will not be shared with any other applications’ documents.
- Library
A folder in which your application may store settings and other resources created after installation. Inside this folder is another folder named Preferences, which will store your application’s preferences. You’ll learn how to access them in Chapter 11.
- MyApp.app
The application folder, this represents the actual application. This directory will contain your executable binary and all supporting resources your application relies on.
- _CodeSignature
A directory containing code signatures for each file bundled with your application. These ensure that the application has not been modified from its original form. All applications must be signed in order to run on the iPhone.
- Default.png
A PNG (portable network graphics) image file containing the application’s default title screen. When the user runs your application, the iPhone animates it to give the appearance that it’s zooming to the front of the screen. The application’s Default.png file is loaded and scaled up until it fills the entire screen. This 320×480 image zooms to the front and remains on the screen until the application finishes launching. Applications generally use a solid black or white background, a logo, or a background resembling the title screen that an application will display after initializing.
- icon.png
A PNG image containing the application’s icon. The icon is displayed on the iPhone’s home screen. Apple recommends that icons be 57×57 pixels. This file can be named anything you like, as long as it’s specified in the Info.plist manifest, explained below. Icons are automatically given a “shine” when displayed, so you won’t need to worry about drawing rounded edges or lighting effects on your icon.
- Info.plist
A property list containing information about the application. This includes the name of its binary executable and a bundle identifier, which is read when the application is launched. You’ll see an example property list later in this chapter.
- MyApp
The actual binary executable that is called when the application is launched. This is what Xcode outputs when it builds your application. Xcode will automatically place the binary in the application folder when performing a Build and Go.
- pie.png
An example image resource used by this sample application. The iPhone framework provides many methods to fetch resources, so you don’t need to access them directly by path. This is consistent with Apple’s effort to keep applications self-contained. The Xcode IDE will take any files you’ve dragged into your project’s Resources folder (on the desktop) and will place them into the application’s program folder (on the iPhone) when the project is installed.
- PkgInfo
This file contains the eight-byte filetype descriptor for the application. The first four bytes should read
APPL, followed by the bundle signature identifier. This is explained in the next section.
Underneath Xcode
Before delving into the many great benefits provided to you by Xcode, it would be healthy to understand the basics of how an application is assembled. In the old world of iPhone hacking, this meant rolling your own application by hand. In Xcode, this is done for you. Here’s what’s going on behind the scenes.
If you were building an application by hand, you’d put together a skeleton .app directory to contain it. The skeleton provides all of the information necessary for the iPhone to acknowledge the existence of your application as a bundle so it can be run from the iPhone’s home screen.
This book presents many fully functional code examples whose skeleton is built automatically by Xcode. After compiling the example, Xcode creates the example’s directory structure inside the project’s build directory and places its binary and resources into the application folder. If you were doing this by hand, creating the directory would be easy enough:
$ mkdir MyExample.appNext, Xcode copies a property list into the application folder to describe the application and how to launch it. The Info.plist file expresses this information in XML format and looks like this:
<?xml version="1.0" encoding="UTF-8"?>
<!DOCTYPE plist PUBLIC "-//Apple//DTD PLIST 1.0//EN" "http://www.apple.com
/DTDs/PropertyList-1.0.dtd">
<plist version="1.0">
<dict>
        <key>CFBundleDevelopmentRegion</key>
        <string>en</string>
        <key>CFBundleDisplayName</key>
        <string>${PRODUCT_NAME}</string>
        <key>CFBundleExecutable</key>
        <string>${EXECUTABLE_NAME}</string>
        <key>CFBundleIconFile</key>
        <string>icon.png</string>
        <key>CFBundleIdentifier</key>
        <string>com.yourcompany.${PRODUCT_NAME:identifier}</string>
        <key>CFBundleInfoDictionaryVersion</key>
        <string>6.0</string>
        <key>CFBundleName</key>
        <string>${PRODUCT_NAME}</string>
        <key>CFBundlePackageType</key>
        <string>APPL</string>
        <key>CFBundleResourceSpecification</key>
        <string>ResourceRules.plist</string>
        <key>CFBundleSignature</key>
        <string>????</string>
        <key>CFBundleVersion</key>
        <string>1.0</string>
        <key>LSRequiresIPhoneOS</key>
        <true/>
</dict>
</plist>
The most important keys are CFBundleDisplayName,
CFBundleExecutable, CFBundleIconFile, CFBundleIdentifier, and CFBundleName. The CFBundleExecutable property is of particular
importance, as it specifies the filename of the binary executable
within the folder. This is the file that is executed when your
application is launched—the output from your compiler. Xcode normally
sets this automatically, but you can override this behavior.
The iPhone’s home screen runs as an application, called Springboard, which is
similar to the Finder on a Mac desktop. The Springboard application,
as well as much of the iPhone’s application layer, likes to refer to
applications using a special identifier instead of its display name;
for example com.yourcompany.tictactoe. The value
assigned to the CFBundleIdentifier
key specifies the unique identifier you’d like to give to your
application. Whenever your application is launched, it will be
referenced using this identifier. Because the name must be unique
among all other applications on the iPhone, it’s common practice to
incorporate the URL of your website.
The application’s icon.png and Default.png files are also copied into the program folder, if they exist. If you leave these out, the iPhone will use the worst-looking images possible to serve as default images for both. Make sure to create and include images with these names when you publish your own applications to make them look professional.
Were this application signed by Xcode, it would be good enough to run. In the next section, you’ll install the iPhone SDK on your desktop, which will perform all of these steps for you when you build an application—and sign the build with your developer key.
You’ll get started compiling example applications as early as Chapter 3. In the coming chapters, you’ll build many examples. The examples provided in this book generally do not need any additional resources, however a few will use your Internet connection to download sample images or other files.
Note
You can download the code examples in this book from the book’s online repository at http://www.oreilly.com/catalog/9780596154059.
Installing the iPhone SDK
The iPhone began life as a closed platform. Preceding the release of Apple’s iPhone SDK, the open source community successfully hacked into the device and wrote a home-brew compiler to build applications. Later, Apple hired some of the developers of this open source tool chain to design the iPhone SDK. As a result, the two behave in a similar fashion: as cross-compilers. A cross-compiler is a compiler that builds executables for a different architecture than the one it’s running on. Here, the iPhone SDK compiler runs on a Mac OS X desktop machine, but builds executables for the iPhone’s ARM architecture.
Note
The open source iPhone tool chain can run on many different platforms, including natively right on the iPhone, but is not supported by Apple. You’ll need to use the SDK to design applications suitable for distribution on the AppStore, which means your developers will all needs Macs.
The commands and pathnames provided throughout this book assume that you’ve used the procedures from this chapter to install the iPhone SDK in the recommended way. Apple releases new versions of the SDK periodically, so its setup can sometimes change. Newer versions are available on the Apple Developer Connection website at http://developer.apple.com/iphone.
What You’ll Need
The iPhone SDK requires an Intel-based Mac running Mac OS X Leopard. Each version of the SDK has its own particular operating system version requirements. You’ll need about 3.5GB of disk space for the SDK, along with extra disk space for your projects.
While the following aren’t required, they will certainly make developing iPhone applications easier.
Apple developer key
You use Apple developer keys to sign applications so that you can install them on development iPhones. Apple gives developer keys to those accepted into Apple’s developer program. To sign up, visit the Apple Developer Connection website at http://developer.apple.com/iphone. Apple offers two tracks for developers: a standard track and an enterprise track. The standard track provides a basic developer key, allowing you to install applications on your iPhone from Xcode. As a developer, you’ll be able to submit your applications for distribution in the AppStore. The enterprise track, which is more expensive, is designed for enterprises that will be using applications internally or with selected partners instead of distributing them through the AppStore. This track includes additional provisioning keys for large enterprises.
An iPhone
You will need an iPhone, of course, if you want to test applications on an actual iPhone device, as opposed to using the iPhone simulator platform. This is strongly recommended. The iPhone needs to be running a version of firmware supported by your particular version of the SDK.
The iPhone Simulator
Without an Apple developer key or an iPhone, you’ll have to test your applications using the iPhone simulator. The iPhone simulator is a target platform that you can use to deploy and test iPhone applications on the desktop. The simulator provides an iPhone-like environment with menu options to simulate locks, screen rotations, and other basic iPhone events. It is greatly limited, however, because your desktop machine lacks the necessary hardware to perform certain tasks. Using the simulator, you will get a general “feel” for how your application might function, but you will also miss some important functionality:
The Core Location API will not be able to provide your GPS coordinates, but may provide you with sample data or broad location-based information, as available for your network.
The accelerometer API will not be available to the application.
The simulator is limited to only some gestures, such as pinch, and will not support more than two fingers or indiscriminate multi-touch.
The application may not initiate phone calls.
The EDGE/3G network will be inaccessible, but network queries will use your Internet connection as available.
The camera and microphone APIs may not function. If your application enables these features, it may suffer from a fatal exception.
Only certain preloaded iPhone applications will be available. These include Contacts, Safari, Photos, and Settings applications.
You won’t be able to see whether any parts of your application might tax the iPhone’s CPU or memory, because your desktop machine will have greater resources to run your application. Slow graphics or other issues might not be noticed until it is tested on an actual iPhone.
Downloading and Installing the iPhone SDK
Download the iPhone SDK from the Apple Developer Connection website at http://developer.apple.com/iphone. You will be required to create an account if you don’t already have one. This is free. The entire distribution runs about 2 GB, so you will want to download it over a high speed Internet connection. The SDK itself comes in the form of a disk image file, which will be placed in your Downloads folder by default.
Double-click the disk image to mount it. You should now see the volume iPhone SDK mounted. This will appear on both the sidebar of your Finder and on the desktop. Open the volume and a window will appear.
Inside this window, you will see a package labeled iPhone SDK. Double-click this package to begin the installation process. After agreeing to the various licensing provisions, you will be presented with the installation screen shown in Figure 1-1.

Ensure that the iPhone SDK option is checked and click Continue. The installer will then install Xcode and the iPhone SDK into /Developer on your desktop machine.
That’s it! You’ve now installed the SDK for iPhone and are ready to start compiling iPhone applications. We’ll explain how to use it in the next section.
Provisioning an iPhone
If you want to install your applications on the iPhone, you’ll need a developer certificate and a mobile provisioning profile from Apple. You can create these through the iPhone Developer Program portal. You’ll need to pay a fee to join one of the program tracks before you can create a profile. You may sign up by registering at http://developer.apple.com. Once you’ve been accepted into the developer program, you’ll be provided instructions to access the developer’s portal.
To get set up, you’ll perform the following basic steps. Because the program portal’s interface is subject to change, use the following only as a guide and be sure to follow the portal’s online instructions:
Log into the program portal. The first thing to do is create a developer certificate. Xcode uses this certificate to sign your applications. Click the Certificates tab and follow the instructions to add a new certificate. Once created, download the certificate and the WWDR Intermediate Certificate as instructed. The WWDR Intermediate Certificate is Apple’s key, which you’ll also need. Once downloaded, double-click each of these certificates to add them to your keychain.
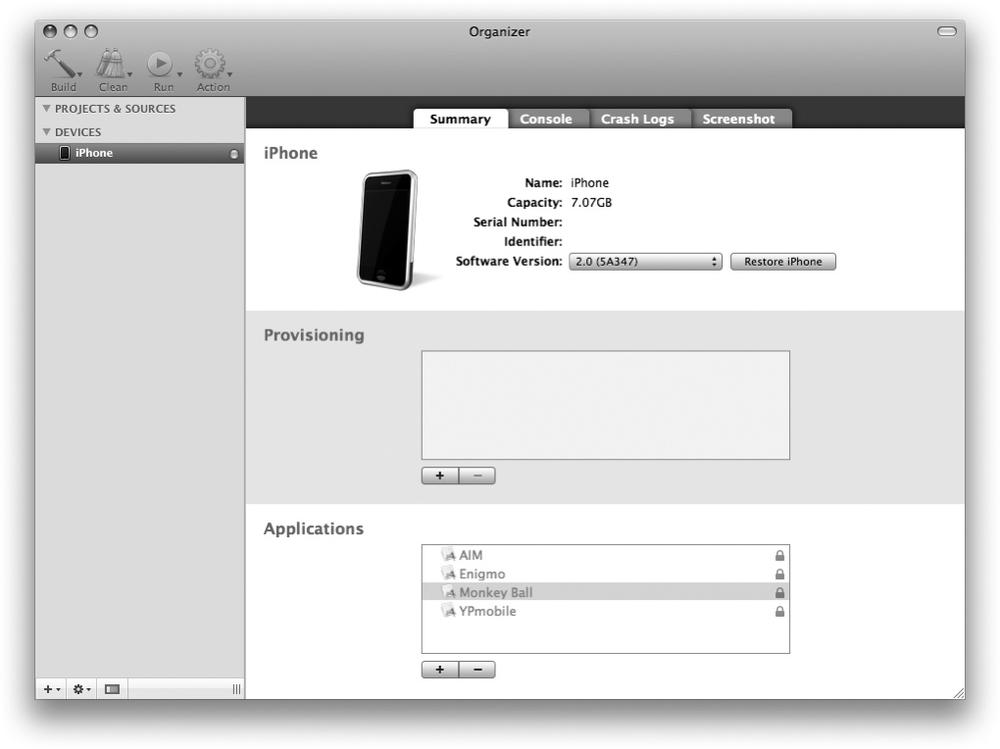
Now register your iPhone in the portal by clicking the Devices tab. Registering your iPhone is necessary because you can only install your test applications on registered devices. You’ll need your iPhone’s unique device ID, which you can obtain from Xcode’s device organizer. Launch Xcode, then go to the Windows menu and select Organizer. This will cause a window, shown in Figure 1-2, to appear with a list of devices. Connect your iPhone, and you will be prompted to use the device for development. Click the device in the left pane of the organizer. An information window will appear containing the device ID of the iPhone. Use this to register your iPhone in the program portal.
Next, click the App IDs tab to create an application bundle identifier. This identifies the application (or group of applications) you’ll be developing. This identifier can be wildcarded, allowing you to install any application using a given bundle prefix. To run this book’s examples on your iPhone, create a wildcard using com.yourcompany.* as a bundle identifier. You can name the application “Examples,” or whatever you like.
Next, create a provisioning profile for your mobile device. The provisioning profile allows you to install applications compiled with the identifier you’ve just created on your iPhone. Select the application ID to associate with the profile, as well as the developer certificates and devices to use with the profile. After you’ve created the profile, download it to your desktop.
To add the provisioning profile to your iPhone, click the plus sign (+) in the organizer underneath the box labeled Provisioning and navigate to your provisioning certificate. Once installed, you’ll be able to install applications onto this device from Xcode.
Note
The organizer window also allows you to view the console and crash logs from your device, and take screenshots.
Building and Installing Applications
Now that you’ve installed the iPhone SDK, the next step is to learn how to use it. The iPhone SDK functions as a component of the Xcode IDE. To launch Xcode, navigate to the newly created /Developer directory on your hard drive. Open a finder window and then click the disk icon in the sidebar. Now double-click the Developer folder, followed by Applications. Drag the Xcode application onto your dock to make launching it easier.
Note
The /Developer/Applications folder is separate from Mac OS’s default Applications folder. You can drag the folder onto the dock as a stack to have all developer applications easily accessible, or drag it onto the sidebar to click through to it using the Finder. You’ll be accessing this folder a lot as you continue to develop software, so you’ll want to make it easy to get to.
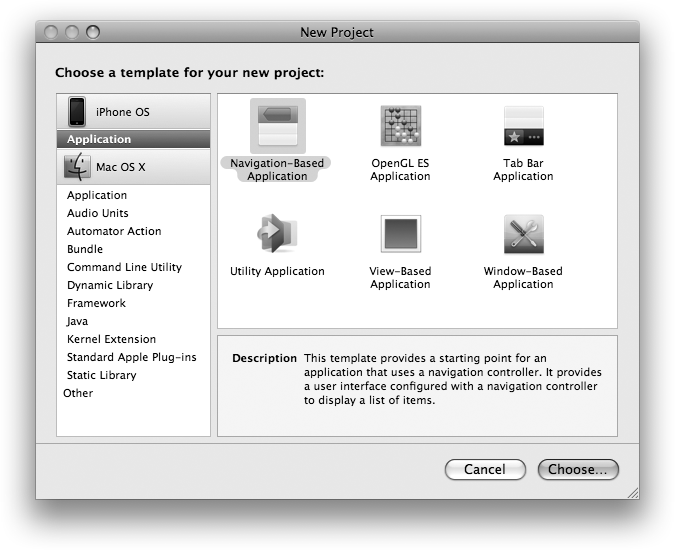
After launching Xcode, select New Project from the File menu. A window will appear, prompting you to select a template for your new project. Underneath the iPhone OS heading, click the Application category. You’ll see several different types of application templates to choose from, as shown in Figure 1-3.
Model-View-Controller
Software development on the iPhone follows the model-view-controller (MVC) paradigm. The goal of this architecture is to abstract business logic, such as your application’s data and the rules that govern it, from the user interface (UI) components displayed to the end user. Three key pieces are needed to implement MVC. The model represents the data and business logic for your application. The view represents the UI elements that present the data to the user and allow them to act on it. The controller provides the interaction between the UI elements and the data, such as responding to multi-touch gestures, interaction events, and transitioning between different portions of the logic.
You’ll see these concepts reflected in the names given to many iPhone classes. In many cases, controllers will also encapsulate a view, making it easy to control the view without having to write very much code to connect them.
Application Templates
Xcode provides several skeletons for implementing the MVC architecture in your application. The following templates are most commonly used:
- View-based application
Applications using only one view should use this template. A simple view controller manages the application’s primary view, using an interface-builder template for layout (although we’ll show you how to remove this and build your own if you like). Simple applications without any navigation should use this template. If your application requires navigation through multiple views, consider using the navigation-based template.
- Navigation-based application
The navigation-based template is ideal for applications that traverse multiple views and require a means of navigation between them. If you can envision your application having screens with “Back” buttons in them, chances are you should use this template. A navigation controller handles all of the internal work in setting up navigation buttons and transitioning between “stacks” of views. This template provides a basic navigation controller and a root (base-tier) view controller to display information.
- Utility application
Ideal for widget-type applications, where an application has a main view that you can “flip” around like a widget in Leopard. You may also be familiar with these from Konfabulator (the third-party predecessor to Apple’s Dashboard). The iPhone’s Weather and Stocks applications are good examples of utility applications. This template also includes an information button that causes the view to flip around to display the application’s flipside, which is commonly used to change settings or the information displayed.
- OpenGL ES application
If you’re creating 3D games or graphics, use this template. It creates a view configured to render a GL scene and provides a sample timer to animate it. OpenGL programming is not covered in this book.
- Tab bar application
Provides a special controller displaying a button bar along the bottom of the screen. This template is ideal for applications such as the iPod or Mobile Phone applications, where a row of tabs along the bottom provides a series of shortcuts to the core functionality of the application.
- Window-based application
If none of the other five templates suits your needs, this very basic template provides a simple application with a window. This is the bare minimum framework you’ll need in order to start your own application.
Xcode Project Layout
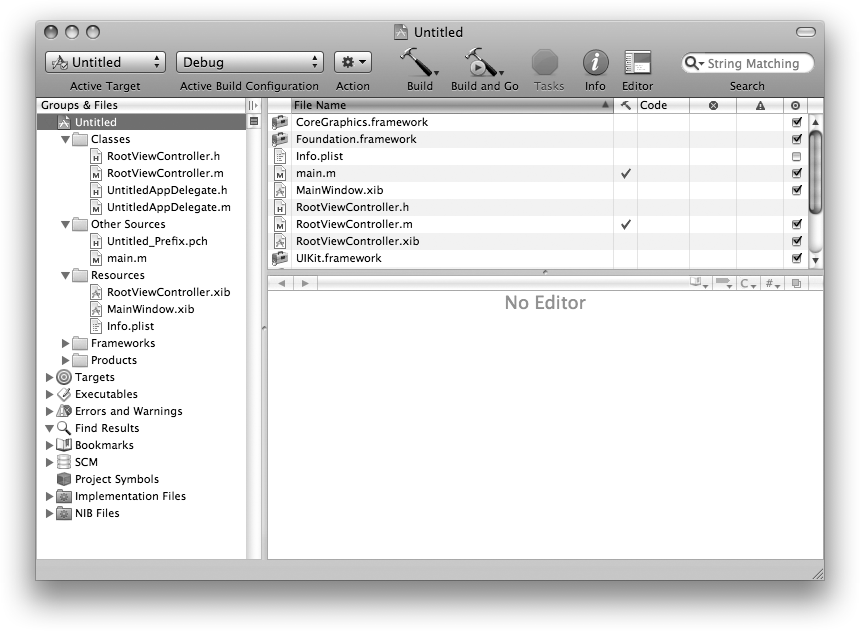
After creating a new project, its contents will be laid out in a self-contained window like Figure 1-4. The project encapsulates the sources, frameworks, and resources for the application.
The following groups can help organize your project:
- Classes
The files containing the Objective-C classes that your applications use. These include the application delegate object, view controllers, and other objects you create. As you add new class files to your application, they will appear in this group.
- Other sources
Other sources compiled into your application. By default, this includes precompiled headers and your application’s
mainfunction, which instantiates the Cocoa application object. If your application incorporates additional C functions or C++ classes, add the files here.- Resources
Application resources that are not compiled in with your application’s source code, but are copied into the program folder when the application is built. These can include images or sounds, game levels, or other important files.
- Frameworks
The frameworks that your application links with. These are shared libraries linked at build time to add functionality. For example, a 3D game will link with the OpenGLES framework, which contains the routines to render 3G graphics. Sound-intensive applications will likely take advantage of the Audio Toolbox or AVFoundation frameworks, which contain routines for playing and mixing different types of sound.
- Products
The build target for your application.
Prototypes
Throughout this book, you’ll be given a list of prototypes to check out at the end of most sections. Prototypes are header files that contain a list of all supported methods and properties that are available to you as a developer. While this book covers a majority of the methods and properties available, reading the prototypes on your own might reveal additional, and sometimes obscure interfaces that may have either gone undocumented or been added since this book’s release. They’ll also show you what arguments a method expects, and what data types will be returned.
You can find header files within a framework folder’s Headers subfolder. Because there are different versions of the SDK, the exact path these can be found differs slightly. The standard format for the path to these prototypes is:
/Developer/Platforms/ |
The full path relies on two variables, PLATFORM and VERSION. There are two primary platforms in the SDK: iPhoneOS.platform and iPhoneSimulator.platform. You use the
former when building an application for an iPhone or iPod Touch
device, and the simulator platform when you build an application for
the iPhone simulator. Each platform contains its own set of
frameworks, shared libraries, and prototypes.
The VERSION variable
refers to the version of the iPhone SDK for that platform. The version
is prefixed by the platform name and suffixed with an .sdk
extension.
The full path for an iPhone platform running the version 2.2 SDK would look like the example below:
/Developer/Platforms/iPhoneOS.platform/Developer/SDKs/iPhoneOS2.2.sdk/System/Library/Frameworks/ |
To make it easy to find this directory, add the following to
your .profile script, so that the
SDK environment variable is set every time a new shell is created:
export PLATFORM=iPhoneOS
export VERSION=2.2
export SDK=/Developer/Platforms/${PLATFORM}.platform/Developer/SDKs\
/${PLATFORM}${VERSION}.sdk/System/Library/Frameworks
You’ll then be able to change directory using the
environment variable SDK:
$ cd ${SDK}Within the folder at this path, you will find the individual frameworks available in the SDK, each with a Headers directory containing the prototypes for that framework. Be sure to check these out when prompted, as they contain a great wealth of verbose information about what’s available to developers. The general rule of thumb is this: if you find a class, property, or method in the SDK headers, it should be sanctioned for use in your application.
Note
While a framework’s headers will tell you which APIs you can use, they will not necessarily tell you in what way they can be used. Apple maintains a set of human interface guidelines and other policies that govern AppStore software. You’ll need to be sure your application doesn’t violate any of Apple’s nontechnical restrictions, such as duplicating functionality of an existing preloaded application. Consult the latest version of your SDK agreement and other supporting documents from Apple to learn about design restrictions.
Adding Frameworks
For a given type of functionality, all of the classes and methods needed to provide it are grouped into a framework. For example, the Core Location framework provides all of the functionality needed to perform global positioning. The UI Kit framework provides all of the functionality needed to implement user interfaces. You’ll need to link to a framework in order to use the functionality it provides. This design logically separates the different pieces of the iPhone’s operating system for developers, and allows your application to link only to the components it needs.
Note
When you link a framework with your application, its classes, functions, and symbols are made available to your application as if you wrote them yourself. Static linking compiles the objects directly into your application. Dynamic linking loads the objects at runtime. Adding a framework in the following fashion uses the dynamic method of linking.
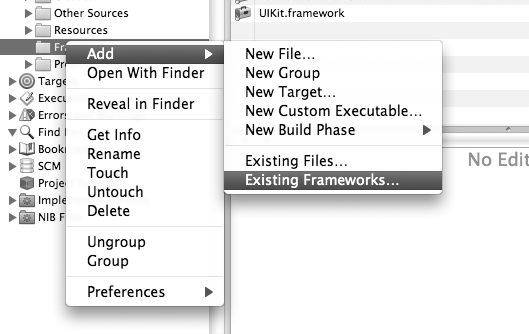
Throughout this book, you may be prompted to add one or two frameworks to your example in order to add support for a particular type of functionality. To do this, Right-click the Frameworks folder in your Xcode project and select Add→Existing Frameworks, as shown in Figure 1-5. Navigate to the iPhone SDK’s Frameworks directory and choose the correct framework folder. Upon clicking the Add button, you should see the new framework appear in the Frameworks folder of your project. This will link the framework with your application.
Note
It may be necessary to navigate to the Frameworks folder within your SDK. Use the pathnames you’ve just learned about for prototypes to find them.
Setting the Active SDK
Xcode allows you to build your application for either a physical iPhone device or for the integrated iPhone simulator. Different versions of the SDK may also be used to accommodate a specific version of the iPhone firmware. To switch between device and simulator builds, or to change the SDK version, click the Project menu in Xcode. Scroll down to the menu item labeled Set Active SDK and choose the SDK you want to build for. You can also choose whether to build with or without debugging support by choosing from the menu labeled Set Active Build Configuration. Building for the Debug configuration will allow you to trace your application’s program execution to identify potential problems.
Building an Application
There are two ways to build an application using Xcode: the GUI and the command line. The easiest way, of course, is to simply click the Build button at the top of the project window or to click Build and Go to build and run the application. This will invoke the compiler and output the results of the build into the status bar. If the build fails or has warnings, you’ll be able to click the appropriate icons on the status bar to get more information.
If you come from a Unix background, or just have an affinity for
pain, you may be more comfortable building on the command line,
especially if you use a command-line text editor in lieu of the Xcode
IDE. To build from the command line, use the xcodebuild
command:
$xcodebuild -targetProject_Name
Installing an Application
Once you have built an application, you can install it on your iPhone directly through Xcode. As mentioned earlier, this requires a valid developer key from Apple. When the application is installed, it will immediately appear on the iPhone’s home screen, then be launched by the debugger.
To install from within Xcode, use the Build and Go toolbar button. This will recompile any changes made since the last build and install it onto the iPhone. If you don’t have a developer key, and are building for the iPhone simulator platform, the application will be installed in the iPhone simulator and then run.
To install from the command line, use the xcodebuild command with the install build
option:
$xcodebuild install -targetProject_Name
Transitioning to Objective-C
Objective-C was written by scientist and software engineer Brad Cox in the early 1980s. It was designed as a way of introducing the capabilities of the Smalltalk language into a C programming environment. A majority of the iPhone’s framework libraries are written in Objective-C, but because the language was designed to accommodate the C language, you can use both C and C++ in your application as well. Objective-C is used primarily on Mac OS X and GNUstep (a free OpenStep environment). Many languages, such as Java and C#, have borrowed from the Objective-C language. The Cocoa framework makes heavy use of Objective-C on the Mac desktop, which also carried over onto the iPhone.
If you’ve developed on the Mac OS X desktop before, you’re already familiar with Objective-C, but if the iPhone is your first Apple platform, you may be transitioning from C, C++, or another similar language. This section will cover some of the more significant differences between these languages. If you have a prior background in C or C++, this should be enough to get you up and writing code using the examples in this book as a guide.
Messaging
The first thing you’ll notice in Objective-C is the heavy use of brackets. In Objective-C, methods are not called in a traditional sense; their objects are sent messages. Likewise, a method doesn’t return, but rather responds to the message.
Much of this can be chalked up to semantics, however, at least in terms of what the developer experiences. Your application’s program flow is nothing alien to a C or C++ program: when you invoke a method, your program waits for a response before continuing, allowing you to assign the return value or invoke methods as part of conditional statements.
Unlike C, where function calls must be predefined, Objective-C’s messaging style allows the developer to dynamically create new methods and messages at runtime, or test to see whether an object responds to a particular message. The downside to this is that it’s entirely possible to send an object a message to which it isn’t programmed to respond, causing an exception and likely program termination. For example, you can compile code that will send the following message to an object:
[ myObject heyWhatsUpHowYouDoin ];
At runtime, the application will raise an exception unless a
method exists named heyWhatsUpHowYouDoin to respond to the
message. Of course, the advantage to this is that a method might exist
for the object, but be undocumented in the class’s prototypes. We’ll
show you just a few examples of undocumented methods like this in
Chapter 3.
Given an object named myWidget, a message can be sent to its
powerOn method this way:
returnValue = [ myWidget powerOn ];
The C++ equivalent of this might look like the following:
returnValue = myWidget->powerOn();
The C equivalent might declare a function inside of its flat namespace:
returnValue = widget_powerOn(myWidget);
Arguments can also be passed with messages, provided that an
object can receive them. The following example invokes a method named
setSpeed and passes two
arguments:
returnValue = [ myWidget setSpeed: 10.0 withMass: 33.0 ];
Notice the second argument is explicitly named in the message. This allows multiple methods with the same name and argument data types to be declared—polymorphism on steroids:
returnValue = [ myWidget setSpeed: 10.0 withMass: 33.0 ];
returnValue = [ myWidget setSpeed: 10.0 withGyroscope: 10.0 ];
Class and Method Declarations
While you can define C++ classes in Objective-C, the whole point of using the language is to take
advantage of Objective-C’s own objects and features. This extends to
its use of interfaces. In standard C++, classes are structures, and their variables and methods are
contained inside the structure. Objective-C, on the other hand, keeps
its variables in one part of the class and methods in another. The
language also requires that you specifically declare the interface
declaration in its own code block (called @interface)
separate from the block containing the implementation (called @implementation). You construct and name
methods in a Smalltalk-esque fashion, and they somewhat resemble
regular C functions.
The interface for our widget example might look like Example 1-1, which is a file named MyWidget.h.
#import <Foundation/Foundation.h>

@interface MyWidget : BaseWidget
{
    BOOL isPoweredOn;
    @private float speed;
    @protected float mass;
    @protected float gyroscope;
}
+ (id)alloc;
+ (BOOL)needsBatteries;
- (BOOL)powerOn;
- (void)setSpeed:(float)_speed;
- (void)setSpeed:(float)_speed withMass:(float)_mass;
- (void)setSpeed:(float)_speed withGyroscope:(float)_gyroscope;
@end
The important semantic elements in this file are explained in the following sections.
The “id” data type
In the example just shown, the id data type
is defined as the return type by the alloc method. This data type is a generic type used to reference
any arbitrary object. Think of the id data type as the Objective-C version of
a void pointer. Wherever specified, any object can be used. You’ll
see this data type used throughout the book, especially in cases
where a delegate is assigned to an object to receive special
notifications of events.
Imports
The preprocessor directive #import replaces the traditional #include directive (although #include may still be used). One advantage
to using #import is that it has
built-in logic to ensure that the same resource is never included
more than once. This replaces the roundabout use of macro
flags found routinely in C code:
#ifndef _MYWIDGET_H
#define _MYWIDGET_H
...
#endif
Interface declaration
The interface for a class is declared with the @interface
statement followed by the interface’s name and the base class (if
any) it is derived from. At the end of your class declaration,
you’ll end the block with the @end statement. Within this block, you’ll
declare all class variables and methods for the class.
Methods
Methods should be declared outside of the braces structure. A plus sign (+) identifies the method as a static method, while a minus sign (−) declares the method as an instance method. Static methods don’t need to be invoked for any particular object; they are methods that represent the entire class in general—for example, “the Widget class”. Instance methods are invoked for a named instance of a class—for example, “my Widget” and “his Widget”.
The alloc method is a good example of a static method. It is
responsible for allocating and returning a new instance of the given
class. In your code, you’ll call this method whenever you create a
new object by referencing the class directly, for example MyWidget. Instance methods that are
specific to an instance of the MyWidget class, such as setSpeed and powerOn, should be invoked by referencing
the named object. Many Cocoa classes provide static and instance
methods for initializing objects.
Every declared parameter for a method specifies a data type, a
local variable name, and an optional external variable name. Examples of external variable
names in Example 1-2
are withMass and withGyroscope. The notifier (calling
method) that invokes the method refers to method’s external
(public) variable names, but inside the method the arguments are
referenced using their local variable names. Thus, the setSpeed method uses the local _mass variable to retrieve the value
passed as withMass.
If no external variable name is supplied in the declaration,
the variable is referenced only with a colon, for example :10.0.
Implementation
The suffix for an Objective-C source code file is .m. A skeleton implementation of the widget class from the last section might look like Example 1-2, which is named MyWidget.m.
#import "MyWidget.h"

@implementation MyWidget

+ (BOOL)needsBatteries {
    return YES;
}

- (BOOL)powerOn {
    isPoweredOn = YES;
    return YES;
}

- (void)setSpeed:(float)_speed {
    speed = _speed;
}

- (void)setSpeed:(float)_speed withMass:(float)_mass {
    speed = _speed;
    mass = _mass;
}

- (void)setSpeed:(float)_speed withGyroscope:(float)_gyroscope {
    speed = _speed;
    gyroscope = _gyroscope;
}
@end
Just as the interface was contained within a single code block,
the implementation begins with an @implementation statement and ends with
@end.
In C++, it is common practice to prefix member variables so that
public methods can accept the actual name of the variable. This makes
it easy to reuse someone else’s code because you can deduce a
variable’s purpose by its name. Since Objective-C allows you to use
both an internal and external variable name, a method is able to
provide a sensible name for the developer to use, while internally
using some proprietary name. The true name can then be referenced as a
parameter of the method, while the method’s local variable name is
prefixed with an underscore; e.g., _speed.
Consider the example setSpeed
method just shown. When invoked, its external argument name, withMass, is used:
[ myWidget setSpeed: 1.0 withMass: 2.0 ];
Inside the method’s code block, the internal variable name,
_mass, is used:
- (void)setSpeed:(float)_speed withMass:(float)_mass {
    speed = _speed;
    mass = _mass;
}
Properties
Objective-C 2.0 introduced the concept of properties. Properties are an intermediary between instance variables and methods; they add a syntactic convenience by allowing the developer to address variables directly, rather than through separate setter/getter methods. Properties are similar to public variables, but allow the behavior of their access to be defined. Additionally, properties invoke methods that can be overridden when the property is read from or written to.
To work with an instance variable in earlier versions of Objective-C, you would typically write two methods—one to read the variable (a getter) and one to write (a setter):
BOOL myVariable = [ myClass variable ];     /* getter */
[ myClass.setVariable ] = YES;       /* setter */
Properties allow the developer to change his syntax to address the property’s name for both operations. This changes the code to look more “C-ish”:
BOOL myVariable = myClass.variable;
myClass.variable = YES;
You can define properties with a number of different storage
semantics. These include assign,
retain, and copy. You can also define properties as readonly. Define a property for a variable
named size in the class definition
as follows:
@interface MyClass : BaseClass
{
    int size;
}
@property(copy) int size;
In the class’s implementation, use the @synthesize statement to implement the
property:
@implementation MyClass
@synthesize size;
...
@end
When the @synthesize
statement is used, a getter and setter method are automatically
generated internally if they don’t exist in your code. These methods
are transparently called whenever the property is accessed:
myClass.size = 3;
You can also define custom setter and getter methods without
using @synthesize:
-(int)myGetter;
-(void)setSize:(int)size;

@property(copy,getter=myGetter) int size;
Many methods you may have seen in previous versions of Objective-C code have been replaced with properties in the iPhone SDK.
Protocols
A protocol is a set of methods that an object agrees to implement in order to communicate with another object. You’ll use many protocols throughout this book known as delegate protocols. Delegate protocols are protocols that notify an object about events occurring in another object. To implement a protocol, your interface declaration simply declares that it supports the given protocol. This way, other classes requiring a certain protocol can expect that your class will respond to the methods used in the protocol. A class can implement any number of protocols. You’ll receive a compiler warning if your implementation is incomplete.
As an example, presume that a BaseWidgetDelegate protocol is a protocol
you’ve designed to alert an object of events occurring within a given
widget, such as a powering on event or the event of its power settings
changing.
Use the protocol statement to
define the methods used in the protocol. You can specify the methods that are
mandatory to implement the protocol using the required statement:
@protocol BaseWidgetDelegate

- (void)baseWidgetDidChangePowerSettings:(float)newPowerLevel;

@required
- (void)baseWidgetDidGetTurnedOn:(id)widget; /* This method is required */

@end
A class looking to send these types of notifications might define a variable containing the pointer to an object to receive notifications:
@interface MyWidget : BaseWidget {
    id delegate;
}
They can define a property for its delegate and require that the
object assigned to it implement the BaseWidgetDelegate protocol:
@property(assign) id<BaseWidgetDelegate> delegate;
The class desiring to receive notifications must now implement
the BaseWidgetDelegate protocol to
be assigned as the widget’s delegate. The example to follow declares a
WidgetManager class and specifies
the protocol be implemented within the class:
@protocol BaseWidgetDelegate;
@interface WidgetManager : NSObject <BaseWidgetDelegate>
...
@end
The only thing remaining is to implement the actual protocol methods in the class’s implementation.
Once implemented, your application code can assign the widget
manager class to the widget’s delegate property without generating a
compiler warning, because it implements the BaseWidgetDelegate protocol:
myWidget.delegate = myWidgetManager;
Categories
Objective-C adds a new element to object oriented programming called categories. Categories were designed to solve the problem where base classes are treated as fragile to prevent seemingly innocuous changes from breaking the more complex derived classes. When a program grows to a certain size, the developer can often become afraid to touch a smaller base class because it’s too difficult by then to determine which changes are safe without auditing the entire application. Categories provide a mechanism to add functionality to smaller classes without exposing your changes to legacy code.
You can place a category class “on top” of a smaller class, adding to or replacing methods within the base class. This can be done without recompiling or even having access to the base class’ source code. Categories allow you to expand base classes within a limited scope so that any objects using the base class (and not the category) will continue to see the original version. From a development perspective, this makes it much easier to improve on a class written by a different developer. At runtime, portions of code using the category will see the new version of the class, and legacy code using the base class directly will see only the original version.
You might be thinking about inheritance as an equally viable solution. The difference between categories and inheritance is the difference between performance-tuning your car versus dressing it up as a parade float. When you tune up your sports car, you add new components to the internals of the vehicle, which cause it to perform differently. You may even pull out some components and replace them with new ones. The act of adding a new component to the engine, such as a turbo, affects the function of the entire vehicle. This is how inheritance works.
Categories, on the other hand, are more like a parade float in that the vehicle remains completely intact, but cardboard cutouts and papier-mâché are affixed to the outside of the vehicle so that it only appears different. In the context of a parade, the vehicle is a completely different animal to spectators, but when you take it to the mechanic, it’s the same old stock car you’ve been driving around.
As an example, the widget factory is coming out with a new type
of widget that can fly through space, but is concerned that making
changes to the base class might break existing applications. By
building a category, the developers ensure that applications using the
MyWidget base class will continue
to see the original class, while the newer space applications will use
a category instead. The following example builds a new category named
MySpaceWidget on top of the
existing MyWidget base class.
Because we need the ability to blow things up in space, a method named
selfDestruct is added. This
category also replaces the existing powerOn method with its own. Contrast the
use of parentheses here to hold the MySpaceWidget contained class with the use
of a colon in Example 1-1 to
carry out inheritance:
#import "MyWidget.h"

@interface MyWidget (MySpaceWidget)
- (void)selfDestruct;
- (BOOL)powerOn;
@end
A complete source file implementing the category is shown in Example 1-3.
#import "MySpaceWidget.h"

@implementation MyWidget (MySpaceWidget)

- (void)selfDestruct {
    isPoweredOn = 0;
    speed = 1000.0;
    mass = 0;
}

- (BOOL)powerOn {
    if (speed == 0) {
        isPoweredOn = YES;
        return YES;
    }

    /* Don't power on if the spaceship is moving */
    return NO;
}
@end
Posing
In Objective-C, a subclass can pose as one of its super-classes, virtually replacing it as the recipient of all messages. This is similar to overriding; only an entire class is being overridden instead of a single method. A posing class is not permitted to declare any new variables, although it may override or replace existing methods. Posing is similar to categories in that it allows a developer to augment an existing class at runtime.
In past examples, you created some mechanical widget classes.
Well, at some point after designing all of these widgets, you
developed a need to perform advanced diagnostics. Rather than rip out
functions in the original class, you’ve decided to create a new
subclass named MyDiagnosticsWidget.
See Examples 1-4 and 1-5.
#import <Foundation/Foundation.h>
#import "MyWidget.h"

@interface MyDiagnosticsWidget : MyWidget
{

}

- (void)debug;
@end#import "MyDiagnosticsWidget.h"
@implementation MyDiagnosticsWidget
- (void)debug {
/* Generate debugging information */
}
@endInstead of changing all of the existing code to use this class,
the autonomous class can simply pose as the widget class. The class_poseAs method is called from the main
program or another high-level method to invoke this behavior:
MyDiagnosticsWidget *myDiagWidget = [ MyDiagnosticsWidget alloc ];
    MyWidget *myWidget = [ MyWidget alloc ];
    class_poseAs(myDiagWidget, myWidget);
Now, any other methods you’ve replaced in the posing class would pose as if they were from the original base class.
Additional Resources
As you read many examples in this book, you’ll see references to
objects used in Apple’s Cocoa environment. Most of these objects will begin with the
prefix NS, such as NSError or NSString. The Cocoa environment provides a
number of standard objects like this to handle arrays, strings, and
other such objects; many are available both with the iPhone and the
Mac OS X desktop environments. We’ll show you how to work with some of
these objects in relation to the example at hand, however entire books
have been written just to document Cocoa classes. If you run into a
class you’re not familiar with, Apple’s online documentation can
provide you with a complete explanation. The Apple Developer
Connection website hosts a Cocoa reference available at http://developer.apple.com/reference/Cocoa/. From here,
you can read a reference for a particular topic or enter the class’s
name into the search window to be taken directly to the class’s
documentation.
To learn more about Cocoa and Objective-C programming, you may also check out the following great resources from O’Reilly:
- Learning Cocoa with Objective-C, Second Edition, by James Duncan Davidson and Apple Computer, Inc.[1]
- Objective-C Pocket Reference by Andrew M. Duncan
[1] Learning Cocoa 3.0 with Objective-C, by Greg Winton and Michael Beam, will be available from O’Reilly in the summer of 2009.
Get iPhone SDK Application Development now with the O’Reilly learning platform.
O’Reilly members experience books, live events, courses curated by job role, and more from O’Reilly and nearly 200 top publishers.

