Chapter 4. Core Location and Maps
4.0. Introduction
The Core Location and Map Kit frameworks can be used to create location-aware and map-based applications. The Core Location framework uses the internal device’s hardware to determine the current location of the device. The Map Kit framework enables your application to display maps to your users, put custom annotations on the maps, and so on. The availability of location services depends on the availability of hardware on the device; if the hardware is there, it must be enabled and switched on for the Map Kit framework to work.
To use the Core Location and Map Kit frameworks, you need to first add them to your project and make sure appropriate header files are imported. Follow these steps to add these two frameworks to your project:
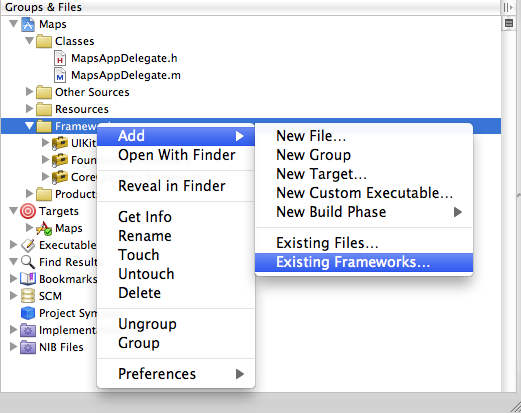
Right-click on the Frameworks item in Xcode’s project explorer (on the lefthand side of the main Xcode window).
Select Add→Existing Frameworks, as shown in Figure 4-1.
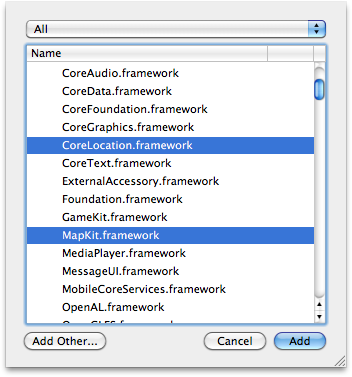
To select both frameworks in one go, hold down the Command key on your keyboard and select CoreLocation.framework and MapKit.framework, as shown in Figure 4-2.
Click Add.
After adding these two frameworks, you will need to add two header files to your .m or .h file (in your .h file if you are referring to any entity that is included in either of the two aforementioned frameworks):
#import <CoreLocation/CoreLocation.h>
#import <MapKit/MapKit.h>
4.1. Creating a Map Using Interface Builder
Solution
Use Interface Builder to add a map view to one of your
application’s objects (usually a view). By adding it to an XIB file, you
create an MKMapView object that can be accessed by your program.
Choose an XIB file to host the map. Normally, we use a View XIB file, which comes with a view attached to the XIB file by default. If you already have an XIB file, skip to step 2. To create a new XIB file, in Xcode choose File→New File. In the New File dialog, on the left side, choose User Interface and then, based on your need, select whichever type of XIB file you would like.
Once Interface Builder has opened the XIB file, select Tools→Library to open the Library pane.
In the Library pane, find the map view and drag and drop it into your XIB file.
Discussion
Now that you have an instance of the MKMapView object in your XIB file (as shown in this recipe’s Solution), you can navigate to the
Connections Inspector pane in Interface Builder by selecting
Tools→Connections Inspector. Select your
map object and you will see that the Connections Inspector allows you to
see the delegate and the new referencing outlet
connections of your map view. You need to drop the new
referencing outlet to an IBOutlet of type MKMapView in
your header files and drop the
delegate connection to an object in your XIB file that
implements the MKMapViewDelegate protocol.
See Also
4.2. Creating a Map Using Code
Solution
Create an instance of the MKMapView class and add it to a view or assign it as a subview of your
view controller. Here is the sample .h file of a view controller that creates an
instance of MKMapView and displays it
full-screen on its view:
#import <UIKit/UIKit.h>
#import <MapKit/MapKit.h>

@interface RootViewController : UIViewController{
@public
  MKMapView         *myMapView;
}

@property (nonatomic, retain) MKMapView   *myMapView;

@end
This is a simple root view controller with a variable of type MKMapView. Later in the implementation of this
view controller (.m file), we will
initialize the map and set its type to Satellite, like so:
#import "RootViewController.h"

@implementation RootViewController

@synthesize myMapView;

- (void)viewDidLoad {
  [super viewDidLoad];

  /* Create a map as big as our view */

  MKMapView *mapView = [[MKMapView alloc]
                        initWithFrame:self.view.bounds];
  self.myMapView = mapView;
  [mapView release];

  /* Set the map type to Satellite */
  self.myMapView.mapType = MKMapTypeSatellite;

  self.myMapView.autoresizingMask =
    UIViewAutoresizingFlexibleWidth |
    UIViewAutoresizingFlexibleHeight;

  /* Add it to our view */
  [self.view addSubview:self.myMapView];

}

- (void) viewDidUnload{
  [super viewDidUnload];

  self.myMapView = nil;

}

- (BOOL)shouldAutorotateToInterfaceOrientation:
  (UIInterfaceOrientation)interfaceOrientation {
  /* Support all orientations */
  return YES;
}

- (void)dealloc {

  [myMapView release];
  [super dealloc];
}

@end
Discussion
Creating an instance of the MKMapView class is quite straightforward. We
can simply assign a frame to it using its constructor, and after the map
is created, we will add it as a subview of the view on the screen just
so that we can see it.
Note
MKMapView is a subclass of
UIView, so you can manipulate any
map view the way you manipulate an instance of UIView.
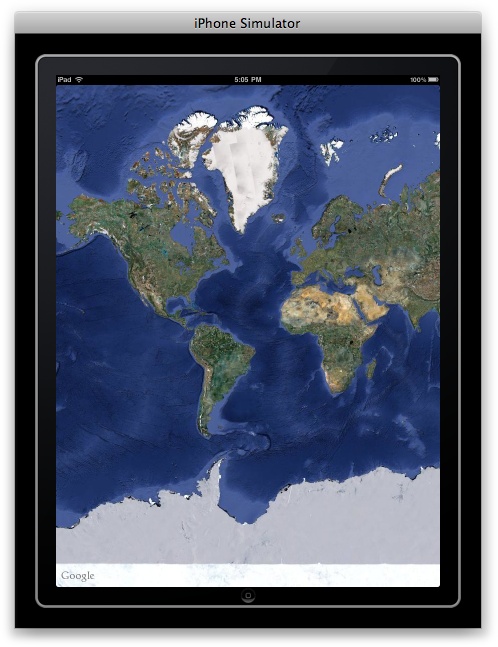
If you haven’t already noticed, the MKMapView class has a property called mapType that can be set to satellite,
standard, or hybrid. In this example, we are using the satellite map
type (see Figure 4-3).
We can change the visual representation type of a map view using
the mapType property of an instance
of MKMapView. Here are the different
values we can use for this property:
MKMapTypeStandardUse this map type to display a standard map (this is the default).
MKMapTypeSatelliteUse this map type to display a satellite image map (as depicted in Figure 4-3).
MKMapTypeHybridUse this map type to display a standard map overlaid on a satellite image map.
See Also
4.3. Handling the Events of a Map
Solution
Assign a delegate object, which conforms to the MKMapViewDelegate protocol, to the delegate
property of an instance of the MKMapView class:
  /* Create a map as big as our view */
  MKMapView *mapView = [[MKMapView alloc]
                        initWithFrame:self.view.bounds];
  self.myMapView = mapView;
  [mapView release];

  /* Set the map type to Satellite */
  self.myMapView.mapType = MKMapTypeSatellite;

  self.myMapView.delegate = self;

  self.myMapView.autoresizingMask =
    UIViewAutoresizingFlexibleWidth |
    UIViewAutoresizingFlexibleHeight;

  /* Add it to our view */
  [self.view addSubview:self.myMapView];
This code can easily run in the viewDidLoad method of a view controller object
that has a property named MapView of
type MKMapView:
#import <UIKit/UIKit.h>
#import <MapKit/MapKit.h>

@interface RootViewController : UIViewController
                                <MKMapViewDelegate>{
@public
  MKMapView         *myMapView;
}

@property (nonatomic, retain) MKMapView   *myMapView;

@end
Discussion
The delegate object of an instance of the MKMapView class must implement the methods
defined in the MKMapViewDelegate
protocol in order to receive various messages from the map view and, as
we will see later, to be able to provide information to the map view.
Various methods are defined in the MKMapViewDelegate protocol, such as the
mapViewWillStartLoadingMap: method
that will get called in the delegate object whenever the map loading
process starts. Bear in mind that a delegate for a map view is not a
required object, meaning that you can create map views without assigning
delegates to them; these views simply won’t respond to user
manipulation.
Here is a list of some of the methods declared in the MKMapViewDelegate protocol and what they are
meant to report to the delegate object of an instance of MKMapView:
mapViewWillStartLoadingMap:This method is called on the delegate object whenever the map view starts to load the data that visually represents the map to the user.
mapView:viewForAnnotation:This method is called on the delegate object whenever the map view is asking for an instance of
MKAnnotationViewto visually represent an annotation on the map. For more information about this, please refer to Recipe 4.5.mapViewWillStartLocatingUser:This method, as its name implies, gets called on the delegate object whenever the map view starts to detect the user’s location. For information about finding a user’s location, please refer to Recipe 4.4.
mapView:regionDidChangeAnimated:This method gets called on the delegate object whenever the region displayed by the map is changed.
4.4. Pinpointing a Device’s Location
Solution
Use the CLLocationManager
class:
  CLLocationManager *newLocationManager =
  [[CLLocationManager alloc] init];

  self.locationManager = newLocationManager;

  [newLocationManager release];

  self.locationManager.delegate = self;

  self.locationManager.purpose =
  NSLocalizedString(@"To provide functionality based on\
                    user's current location.", nil);

  [self.locationManager startUpdatingLocation];
In this code, locationManager
is a property of type CLLocationManager. The current class is also
the delegate of the location manager in this sample code.
Discussion
The Core Location framework in the SDK provides functionality for
programmers to be able to detect the current spatial location of an iOS
device. Because in iOS, the user is allowed to disable location services
using the Settings, before instantiating an object of type CLLocationManager, it is best to first
determine whether the location services are enabled on the
device.
Note
The delegate object of an instance of CLLocationManager must conform to the
CLLocationManagerDelegate
protocol.
This is how we will declare our location manager object in the
.h file of a view controller (the
object creating an instance of CLLocationManager does not necessarily have to
be a view controller):
#import <UIKit/UIKit.h>
#import <CoreLocation/CoreLocation.h>

@interface RootViewController : UIViewController
                                <CLLocationManagerDelegate>{
@public
  CLLocationManager   *locationManager;
}

@property (nonatomic, retain) CLLocationManager *locationManager;

@end
The implementation of our view controller is as follows:
#import "RootViewController.h"
#import <objc/runtime.h>

@implementation RootViewController

@synthesize locationManager;

- (void)locationManager:(CLLocationManager *)manager
    didUpdateToLocation:(CLLocation *)newLocation
           fromLocation:(CLLocation *)oldLocation{

  /* We received the new location */

  NSLog(@"Latitude = %f", newLocation.coordinate.latitude);
  NSLog(@"Longitude = %f", newLocation.coordinate.longitude);

}

- (void)locationManager:(CLLocationManager *)manager
       didFailWithError:(NSError *)error{

  /* Failed to receive user's location */

}

- (void)viewDidLoad {
  [super viewDidLoad];

  BOOL locationServicesAreEnabled = NO;

  Method requiredClassMethod =
  class_getClassMethod([CLLocationManager class],
                       @selector(locationServicesEnabled));

  if (requiredClassMethod != nil){

    locationServicesAreEnabled =
    [CLLocationManager locationServicesEnabled];

  } else {

    CLLocationManager *DummyManager =
    [[CLLocationManager alloc] init];

    locationServicesAreEnabled = [DummyManager locationServicesEnabled];
    [DummyManager release];

  }

  if (locationServicesAreEnabled == YES){

    CLLocationManager *newLocationManager =
    [[CLLocationManager alloc] init];

    self.locationManager = newLocationManager;

    [newLocationManager release];

    self.locationManager.delegate = self;

    self.locationManager.purpose =
      NSLocalizedString(@"To provide functionality based on\
                        user's current location.", nil);

    [self.locationManager startUpdatingLocation];

  } else {

    /* Location services are not enabled.
     Take appropriate action: for instance, prompt the
     user to enable the location services */
    NSLog(@"Location services are not enabled");

  }

}

- (void) viewDidUnload{
  [super viewDidUnload];

  if (self.locationManager != nil){
    [self.locationManager stopUpdatingLocation];
  }

  self.locationManager = nil;
}

- (BOOL)shouldAutorotateToInterfaceOrientation:
  (UIInterfaceOrientation)interfaceOrientation {
  /* Support all orientations */
  return YES;
}

- (void)dealloc {
  [locationManager stopUpdatingLocation];
  [locationManager release];
  [super dealloc];
}

@end
The startUpdateLocation
instance method of CLLocationManager
reports the success or failure of retrieving the user’s
location to its delegate through the locationManager:didUpdateToLocation:fromLocation:
and locationManager:didFailWithError:
methods of its delegate object, in that
order.
Note
The locationServicesEnabled
class method of CLLocationManager
is available in SDK 4.0 and later. For this reason, we must detect the
availability of this class method before invoking it if we are
targeting devices with earlier versions of iOS installed.
The CLLocationManager class
implements a property named purpose. This property allows us to customize the message that is
shown to the users of our application, asking for their permission to
allow location services for our application using Core Location
functionalities. A good practice is to use localized strings for the
value of this property.
4.5. Displaying Built-in Pins on a Map View
Solution
Use built-in map view annotations.
Follow these steps:
Create a new class and call it
MyAnnotation.Make sure this class conforms to the
MKAnnotationprotocol.Define a property for this class of type
CLLocationCoordinate2Dand name itcoordinate. Also make sure you set it as areadonlyproperty since thecoordinateproperty is defined asreadonlyin theMKAnnotationprotocol.Optionally, define two properties of type
NSString, namelytitleandsubtitle, which will be able to carry the title and the subtitle information for your annotation view.Create an initializer method for your class that will accept a parameter of type
CLLocationCoordinate2D. In this method, assign the passed location parameter to the property that we defined in step 3. Since this property isreadonly, it cannot be assigned by code outside the scope of this class. Therefore, the initializer of this class acts as a bridge here and allows us to indirectly assign a value to this property.Instantiate the
MyAnnotationclass and add it to your map using theaddAnnotation:method of theMKMapViewclass.
Discussion
As explained in this recipe’s Solution, we must create an object that
conforms to the MKAnnotation protocol
and later instantiate this object and pass it to the map to be
displayed. We will write the .h
file of this object like so:
#import <Foundation/Foundation.h>
#import <MapKit/MapKit.h>

@interface MyAnnotation : NSObject <MKAnnotation> {
@private
  CLLocationCoordinate2D coordinate;
  NSString *title;
  NSString *subtitle;
}

@property (nonatomic, assign, readonly) CLLocationCoordinate2D coordinate;
@property (nonatomic, copy) NSString *title;
@property (nonatomic, copy) NSString *subtitle;

- (id) initWithCoordinates:(CLLocationCoordinate2D)paramCoordinates
                     title:(NSString *)paramTitle
                  subTitle:(NSString *)paramSubTitle;

@end
The .m file of the MyAnnotation class sets up the class to
display location information as follows:
#import "MyAnnotation.h"

@implementation MyAnnotation

@synthesize coordinate, title, subtitle;

- (id) initWithCoordinates:(CLLocationCoordinate2D)paramCoordinates
                     title:(NSString *)paramTitle
                  subTitle:(NSString *)paramSubTitle{

  self = [super init];

  if (self != nil){
    coordinate = paramCoordinates;
    title = [paramTitle copy];
    subtitle = [paramSubTitle copy];
  }

  return(self);

}

- (void) dealloc {
  [title release];
  [subtitle release];
  [super dealloc];
}

@end
Later we will instantiate this class and add it to our map, for instance, in the .m file of a view controller that creates and displays a map view:
#import "RootViewController.h"
#import "MyAnnotation.h"
@implementation RootViewController
@synthesize myMapView;
- (void)viewDidLoad {
[super viewDidLoad];
/* Create a map as big as our view */
MKMapView *newMapView = [[MKMapView alloc]
initWithFrame:self.view.bounds];
self.myMapView = newMapView;
[newMapView release];
self.myMapView.delegate = self;
/* Set the map type to Standard */
self.myMapView.mapType = MKMapTypeStandard;
self.myMapView.autoresizingMask =
UIViewAutoresizingFlexibleWidth |
UIViewAutoresizingFlexibleHeight;
/* Add it to our view */
[self.view addSubview:self.myMapView];
/* This is just a sample location */
CLLocationCoordinate2D location;
location.latitude = 50.82191692907181;
location.longitude = -0.13811767101287842;
/* Create the annotation using the location */
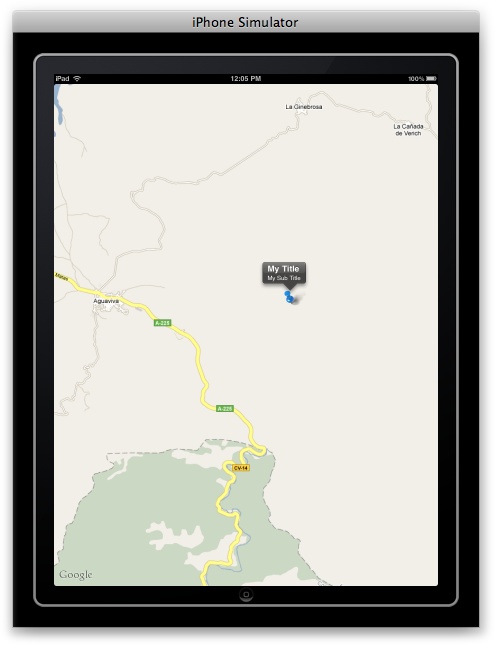
MyAnnotation *annotation =
[[MyAnnotation alloc] initWithCoordinates:location
title:@"My Title"
subTitle:@"My Sub Title"];
/* And eventually add it to the map */
[self.myMapView addAnnotation:annotation];
[annotation release];
}
- (void) viewDidUnload{
[super viewDidUnload];
self.myMapView = nil;
}
- (BOOL)shouldAutorotateToInterfaceOrientation:
(UIInterfaceOrientation)interfaceOrientation {
/* Support all orientations */
return YES;
}
- (void)dealloc {
[myMapView release];
[super dealloc];
}
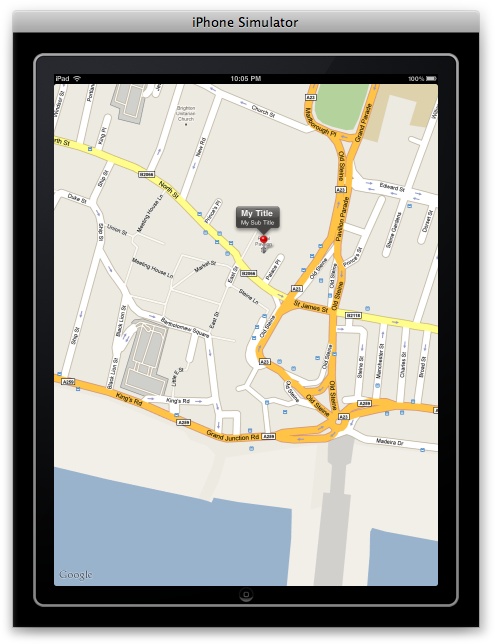
@endFigure 4-4 depicts the output of the program when run in iPhone Simulator.
See Also
4.6. Displaying Pins with Different Colors on a Map View
Problem
The default color for pins dropped on a map view is red. You want to be able to display pins in different colors in addition to the default red pin.
Solution
Return instances of MKPinAnnotationView to your map view through the mapView:viewForAnnotation: delegate
method.
Every annotation that is added to an instance of MKMapView has a corresponding view that gets
displayed on the map view. These views are called annotation
views. An annotation view is an object of type MKAnnotationView, which is a subclass of
UIView. If the delegate object of a
map view implements the mapView:viewForAnnotation: delegate method,
the delegate object will have to return instances of the MKAnnotationView class to
represent and, optionally, customize the annotation views to be
displayed on a map view.
Discussion
To set up our program so that we can customize the color (choosing
from the default SDK pin colors) of the annotation view that gets
dropped on a map view, representing an annotation, we must return an
instance of the MKPinAnnotationView
class instead of an instance of MKAnnotationView in the mapView:viewForAnnotation: delegate method.
Bear in mind that the MKPinAnnotationView class is a subclass of the
MKAnnotationView class.
- (MKAnnotationView *)mapView:(MKMapView *)mapView
            viewForAnnotation:(id <MKAnnotation>)annotation{

  MKAnnotationView *result = nil;

  if ([annotation isKindOfClass:[MyAnnotation class]] == NO){
    return(result);
  }

  if ([mapView isEqual:self.myMapView] == NO){
    /* We want to process this event only for the Map View
     that we have created previously */
    return(result);
  }

  /* First typecast the annotation for which the Map View has
   fired this delegate message */
  MyAnnotation *senderAnnotation = (MyAnnotation *)annotation;

  /* Using the class method we have defined in our custom
   annotation class, we will attempt to get a reusable
   identifier for the pin we are about to create */
  NSString *pinReusableIdentifier =
    [MyAnnotation
     reusableIdentifierforPinColor:senderAnnotation.pinColor];

  /* Using the identifier we retrieved above, we will
   attempt to reuse a pin in the sender Map View */
  MKPinAnnotationView *annotationView = (MKPinAnnotationView *)
    [mapView
     dequeueReusableAnnotationViewWithIdentifier:
     pinReusableIdentifier];

  if (annotationView == nil){
    /* If we fail to reuse a pin, then we will create one */
    annotationView =
    [[[MKPinAnnotationView alloc]
      initWithAnnotation:senderAnnotation
      reuseIdentifier:pinReusableIdentifier] autorelease];

    /* Make sure we can see the callouts on top of
     each pin in case we have assigned title and/or
     subtitle to each pin */
    [annotationView setCanShowCallout:YES];
  }

  /* Now make sure, whether we have reused a pin or not, that
   the color of the pin matches the color of the annotation */
  annotationView.pinColor = senderAnnotation.pinColor;

  result = annotationView;

  return(result);
}
An annotation view must be reused by giving it an identifier (an
NSString). By determining which type
of pin you would like to display on a map view and setting a unique
identifier for each type of pin (e.g., blue pins can be treated as one
type of pin and red pins as another), you must
reuse the proper type of pin using the dequeueReusableAnnotationViewWithIdentifier:
instance method of MKMapView as demonstrated in the
code.
We have set the mechanism of retrieving the unique identifiers of
each pin in our custom MyAnnotation
class. Here is the .h file of the
MyAnnotation class:
#import <Foundation/Foundation.h>
#import <MapKit/MapKit.h>

/* These are the standard SDK pin colors. We are setting
 unique identifiers per color for each pin so that later we
 can reuse the pins that have already been created with the same
 color */

#define REUSABLE_PIN_RED    @"Red"
#define REUSABLE_PIN_GREEN  @"Green"
#define REUSABLE_PIN_PURPLE @"Purple"

@interface MyAnnotation : NSObject <MKAnnotation> {
@private
  CLLocationCoordinate2D  coordinate;
  NSString                *title;
  NSString                *subtitle;
  MKPinAnnotationColor    pinColor;
}

@property (nonatomic, assign, readonly) CLLocationCoordinate2D coordinate;
@property (nonatomic, copy) NSString  *title;
@property (nonatomic, copy) NSString  *subtitle;
@property (nonatomic, assign) MKPinAnnotationColor  pinColor;

- (id) initWithCoordinates:(CLLocationCoordinate2D)paramCoordinates
                     title:(NSString*)paramTitle
                  subTitle:(NSString*)paramSubTitle;

+ (NSString *)   reusableIdentifierforPinColor
                 :(MKPinAnnotationColor)paramColor;

@end
Annotations are not the same as annotation views. An
annotation is the location that you want to show on a map and an
annotation view is the view that represents that annotation on the map. The MyAnnotation class is the annotation, not the annotation view. When we create
an annotation by instantiating the MyAnnotation class, we can assign a color
to it using the pinColor property that we have defined and
implemented. When the time comes for a map view to display an
annotation, the map view will call the mapView:viewForAnnotation: delegate method and
ask its delegate for an annotation view. The forAnnotation parameter of this method passes
the annotation that needs to be displayed. By getting a reference to the
annotation, we can type-case the annotation to an instance of MyAnnotation, retrieve its pinColor property, and based on that, create
an instance of MKPinAnnotationView
with the given pin color and return it to the map view.
This is the .m file of
MyAnnotation:
#import "MyAnnotation.h"

@implementation MyAnnotation

@synthesize coordinate, title, subtitle, pinColor;

+ (NSString *)   reusableIdentifierforPinColor
                 :(MKPinAnnotationColor)paramColor{

  NSString *result = nil;

  switch (paramColor){
    case MKPinAnnotationColorRed:{
      result = REUSABLE_PIN_RED;
      break;
    }
    case MKPinAnnotationColorGreen:{
      result = REUSABLE_PIN_GREEN;
      break;
    }
    case MKPinAnnotationColorPurple:{
      result = REUSABLE_PIN_PURPLE;
      break;
    }
  }

  return(result);
}

- (id) initWithCoordinates:(CLLocationCoordinate2D)paramCoordinates
                     title:(NSString*)paramTitle
                  subTitle:(NSString*)paramSubTitle{

  self = [super init];

  if (self != nil){
    coordinate = paramCoordinates;
    title = [paramTitle copy];
    subtitle = [paramSubTitle copy];
    pinColor = MKPinAnnotationColorGreen;
  }

  return(self);

}

- (void) dealloc {
  [title release];
  [subtitle release];
  [super dealloc];

}

@end
After implementing the MyAnnotation class, it’s time to use it in our
application (in this example, we will use it in a view controller). Here
is the .h file of the view
controller:
#import <UIKit/UIKit.h>
#import <MapKit/MapKit.h>
#import <CoreLocation/CoreLocation.h>

@interface RootViewController : UIViewController <MKMapViewDelegate> {
@public
  MKMapView         *myMapView;
}

@property (nonatomic, retain) MKMapView   *myMapView;

@end
The implementation is in the .m file like so:
#import "RootViewController.h"
#import "MyAnnotation.h"

@implementation RootViewController

@synthesize myMapView;

- (MKAnnotationView *)mapView:(MKMapView *)mapView
            viewForAnnotation:(id <MKAnnotation>)annotation{

  MKAnnotationView *result = nil;

  if ([annotation isKindOfClass:[MyAnnotation class]] == NO){
    return(result);
  }

  if ([mapView isEqual:self.myMapView] == NO){
    /* We want to process this event only for the Map View
     that we have created previously */
    return(result);
  }

  /* First typecast the annotation for which the Map View has
   fired this delegate message */
  MyAnnotation *senderAnnotation = (MyAnnotation *)annotation;

  /* Using the class method we have defined in our custom
   annotation class, we will attempt to get a reusable
   identifier for the pin we are about to create */
  NSString *pinReusableIdentifier =
    [MyAnnotation
     reusableIdentifierforPinColor:senderAnnotation.pinColor];

  /* Using the identifier we retrieved above, we will
   attempt to reuse a pin in the sender Map View */
  MKPinAnnotationView *annotationView = (MKPinAnnotationView *)
    [mapView
     dequeueReusableAnnotationViewWithIdentifier:
     pinReusableIdentifier];

  if (annotationView == nil){
    /* If we fail to reuse a pin, then we will create one */
    annotationView =
    [[[MKPinAnnotationView alloc]
      initWithAnnotation:senderAnnotation
      reuseIdentifier:pinReusableIdentifier] autorelease];

    /* Make sure we can see the callouts on top of
     each pin in case we have assigned title and/or
     subtitle to each pin */
    [annotationView setCanShowCallout:YES];
  }

  /* Now make sure, whether we have reused a pin or not, that
   the color of the pin matches the color of the annotation */
  annotationView.pinColor = senderAnnotation.pinColor;

  result = annotationView;

  return(result);
}

- (void)viewDidLoad {
  [super viewDidLoad];

  /* Create a map as big as our view */
  MKMapView *mapView = [[MKMapView alloc]
                        initWithFrame:self.view.bounds];
  self.myMapView = mapView;
  [mapView release];

  self.myMapView.delegate = self;

  /* Set the map type to Standard */
  self.myMapView.mapType = MKMapTypeStandard;

  self.myMapView.autoresizingMask =
    UIViewAutoresizingFlexibleWidth |
    UIViewAutoresizingFlexibleHeight;

  /* Add it to our view */
  [self.view addSubview:self.myMapView];

  /* This is just a sample location */
  CLLocationCoordinate2D location;
  location.latitude = 50.82191692907181;
  location.longitude = -0.13811767101287842;

  /* Create the annotation using the location */
  MyAnnotation *annotation =
  [[MyAnnotation alloc] initWithCoordinates:location
                                      title:@"My Title"
                                   subTitle:@"My Sub Title"];

  annotation.pinColor = MKPinAnnotationColorPurple;

  /* And eventually add it to the map */
  [self.myMapView addAnnotation:annotation];

  [annotation release];
}


- (void) viewDidUnload{
  [super viewDidUnload];
  self.myMapView = nil;
}

- (BOOL)shouldAutorotateToInterfaceOrientation:
  (UIInterfaceOrientation)interfaceOrientation {
  /* Support all orientations */
  return YES;
}

- (void) didReceiveMemoryWarning{
  [super didReceiveMemoryWarning];
}

- (void)dealloc {
  /* Deallocate the map */
  [myMapView release];
  [super dealloc];
}

@end
4.7. Creating and Displaying Custom Pins on a Map View
Problem
Instead of the default iOS SDK pins, you would like to display your own images as pins on a map view.
Solution
Load an arbitrary image into an instance of the UIImage class and assign it to the image property of the MKAnnotationView
instance that you return to your map view as a pin:
- (MKAnnotationView *)mapView:(MKMapView *)mapView
            viewForAnnotation:(id <MKAnnotation>)annotation{

  MKAnnotationView *result = nil;

  if ([annotation isKindOfClass:[MyAnnotation class]] == NO){
    return(result);
  }

  if ([mapView isEqual:self.myMapView] == NO){
    /* We want to process this event only for the Map View
     that we have created previously */
    return(result);
  }

  /* First typecast the annotation for which the Map View has
   fired this delegate message */
  MyAnnotation *senderAnnotation = (MyAnnotation *)annotation;

  /* Using the class method we have defined in our custom
   annotation class, we will attempt to get a reusable
   identifier for the pin we are about to create */
  NSString *pinReusableIdentifier =
  [MyAnnotation
   reusableIdentifierforPinColor:senderAnnotation.pinColor];

  /* Using the identifier we retrieved above, we will
   attempt to reuse a pin in the sender Map View */
  MKPinAnnotationView *annotationView = (MKPinAnnotationView *)
  [mapView
   dequeueReusableAnnotationViewWithIdentifier:
   pinReusableIdentifier];

  if (annotationView == nil){
    /* If we fail to reuse a pin, then we will create one */
    annotationView =
    [[[MKPinAnnotationView alloc]
      initWithAnnotation:senderAnnotation
      reuseIdentifier:pinReusableIdentifier] autorelease];

    /* Make sure we can see the callouts on top of
     each pin in case we have assigned title and/or
     subtitle to each pin */
    annotationView.canShowCallout = YES;

  }

  /* Now make sure, whether we have reused a pin or not, that
   the color of the pin matches the color of the annotation */
  annotationView.pinColor = senderAnnotation.pinColor;

  UIImage *pinImage = [UIImage imageNamed:@"BluePin.png"];
  if (pinImage != nil){
    annotationView.image = pinImage;
  }

  result = annotationView;

  return(result);
}
In this code, we are displaying an image named BluePin.png (in our application bundle) for
any pin that is dropped on the map. For the definition and the
implementation of the MyAnnotation
class, refer to Recipe 4.6.
Discussion
The delegate object of an instance of the MKMapView class must conform to the
MKMapViewDelegate protocol and implement
the mapView:viewForAnnotation:
method. The return value of this method is an instance of the MKAnnotationView class.
Any object that subclasses the aforementioned class, by default,
inherits a property called image. Assigning a value to this property
will replace the default image provided by the Map Kit framework, as
shown in Figure 4-5.
4.8. Retrieving Meaningful Addresses Using Spatial Coordinates
Problem
You have the latitude and longitude of a spatial location and you want to retrieve the address of this location.
Solution
The process of retrieving a meaningful address using spatial
coordinates, x and y, is
called reverse geocoding. Create and use an instance of the MKReverseGeocoder class and provide a delegate to this instance, making sure that
the delegate object conforms to the MKReverseGeocoderDelegate protocol.
The .h file of a simple view controller for this purpose is defined like so:
#import <UIKit/UIKit.h> #import <MapKit/MapKit.h> @interface RootViewController : UIViewController <MKReverseGeocoderDelegate> { @publicMKReverseGeocoder*myReverseGeocoder; } @property (nonatomic, retain) MKReverseGeocoder *myReverseGeocoder; @end
The .m file of this view controller is as follows:
#import "RootViewController.h"
@implementation RootViewController
@synthesize myReverseGeocoder;
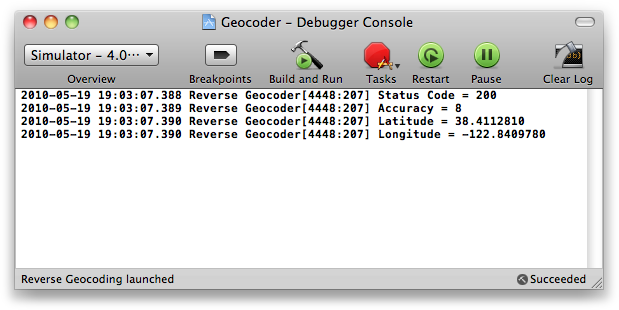
- (void)reverseGeocoder:(MKReverseGeocoder *)geocoder
didFindPlacemark:(MKPlacemark *)placemark{
/* We received the results */
NSLog(@"%@", placemark.country);
NSLog(@"%@", placemark.postalCode);
NSLog(@"%@", placemark.locality);
}
- (void)reverseGeocoder:(MKReverseGeocoder *)geocoder
didFailWithError:(NSError *)error{
/* An error has occurred. Use the [error] parameter to
determine the cause of the issue */
NSLog(@"An error occurred in the reverse geocoder");
}
- (void)viewDidLoad {
[super viewDidLoad];
CLLocationCoordinate2D location;
location.latitude = +38.4112810;
location.longitude = -122.8409780f;
MKReverseGeocoder *reverseGeocoder =
[[MKReverseGeocoder alloc] initWithCoordinate:location];
self.myReverseGeocoder = reverseGeocoder;
[reverseGeocoder release];
self.myReverseGeocoder.delegate = self;
[self.myReverseGeocoder start];
}
- (void) viewDidUnload{
[super viewDidUnload];
[self.myReverseGeocoder cancel];
self.myReverseGeocoder = nil;
}
- (BOOL)shouldAutorotateToInterfaceOrientation:
(UIInterfaceOrientation)interfaceOrientation {
/* Support all orientations */
return YES;
}
- (void)dealloc {
[myReverseGeocoder cancel];
[myReverseGeocoder release];
[super dealloc];
}
@endThe NSLog methods in the
preceding code write the results shown in Figure 4-6 in the console window for
the given spatial location.

Discussion
Each application has a limit on the amount of reverse geocoding
requests that it can make every day. To perform a reverse geocoding
request, you must create an instance of the MKReverseGeocoder class. This class requires
an active network connection in order to process requests successfully.
The reverse geocoded values are reported to the delegate object of this
class. The delegate object assigned to an instance of the MKReverseGeocoder must
conform to the MKReverseGeocoderDelegate
protocol.
See Also
4.9. Retrieving Spatial Coordinates Using Meaningful Addresses
Problem
You have an address of a location and you want to find the spatial location (x,y) of that address.
Solution
Use Google’s publicly available Geocoder API available at http://maps.google.com/maps/geo.
Before using this API, please make sure you read the terms of use for iPhone applications, at http://code.google.com/apis/maps/iphone/terms.html.
You can then call the Geocoder API in this way:
- (void)viewDidLoad {
  [super viewDidLoad];

  /* We have our address */
  NSString *oreillyAddress =
    @"1005 Gravenstein Highway North, Sebastopol, CA 95472, USA";

  /* We will later insert the address and the format that we want
   our output in, into this API's URL */
  NSString *geocodingURL =
  @"http://maps.google.com/maps/geo?q=%@&output=%@";

  /* Insert the address and the output format into the URL */
  NSString *finalURL =
  [NSString stringWithFormat:geocodingURL,
   oreillyAddress,
   GOOGLE_OUTPUT_FORMAT_CSV];

  /* Now escape the URL using appropriate percentage marks */
  finalURL =
    [finalURL
     stringByAddingPercentEscapesUsingEncoding:
     NSUTF8StringEncoding];

  /* Create our URL */
  NSURL *urlToCall = [NSURL URLWithString:finalURL];

  /* And a request for the connection using the URL */
  NSURLRequest *request = [NSURLRequest requestWithURL:urlToCall];

  /* We will put all the connection's received data into this
   instance of the NSMutableData class */
  NSMutableData *newMutableData = [[NSMutableData alloc] init];
  self.connectionData = newMutableData;
  [newMutableData release];

  NSURLConnection *newConnection =
  [[NSURLConnection alloc] initWithRequest:request
                                  delegate:self];

  /* Create the connection and start the downloading
   of geocoding results */
  self.myConnection = newConnection;

  [newConnection release];

}

- (void) viewDidUnload{
  [super viewDidUnload];

  [self.myConnection cancel];

  self.myConnection = nil;
  self.connectionData = nil;
}
The formats required for this API are defined in this way:
#defineGOOGLE_OUTPUT_FORMAT_CSV@"csv" #define GOOGLE_OUTPUT_FORMAT_XML @"xml"
This code is further explained in this recipe’s Discussion.
Discussion
The reverse geocoding capabilities discussed in Recipe 4.8 are built into the iOS SDK’s Map Kit framework. Reverse geocoding is the process of retrieving a meaningful address, city and country, and so on, using spatial locations (x,y). Geocoding, on the other hand, is the process of finding the spatial locations of a given address. Geocoding is not supported in the Map Kit framework and we need to call a third-party API, such as Google, for this. There are limitations on the number of geocoding requests that any client can send per day, so make sure you read the terms and conditions and the FAQs of Google’s geocoding APIs before you begin using them:
The Google Maps API Family FAQs page is located at http://code.google.com/apis/maps/faq.html.
The Google Maps Terms of Service page for the iPhone is located at http://code.google.com/apis/maps/iphone/terms.html.
The main URL of Google’s Geocoder API is http://maps.google.com/maps/geo.
We can attach query and format parameters to this URL and call it
as an API, synchronously or asynchronously. The query parameter can be provided using the q key and the format parameter using the output key. You can choose to have the output
in CSV format or in XML by providing the value csv or xml,
respectively, to the output
parameter.
For instance, to find the spatial coordinates of Times Square in New York, we can construct the API URL in this way:
http://maps.google.com/maps/geo?q=Times%20Square&output=csvNote
The value %20 in this URL
represents a URL-encoded space character.
The output of this API call returns a value similar to this:
200,4,40.7590110,-73.9844722
where 200 is the status code,
4 is the accuracy, 40.7590110 is the latitude, and -73.9844722 is the longitude.
If you retrieve this value in a
variable of type NSString, you can
use the componentsSeparatedByString: method
of the NSString class to split this
string into four components separated with a comma character, as we will
see shortly.
Now let’s find the spatial location of O’Reilly’s headquarters, located at this address:
| 1005 Gravenstein Highway North, Sebastopol, CA 95472, USA |
The process through which we will find the spatial coordinates of this address is as follows:
Use the aforementioned Google Geocoder API URL, http://maps.google.com/maps/geo, and attach the
qparameter for the address to be queried and theoutputparameter for the required output. Here we will use the CSV output format.Create an instance of
NSURLfrom the string representing the URL constructed in step 1.Create an instance of the
NSURLRequestclass using theNSURLinstance created in step 2.Instantiate a variable of type
NSURLConnectionand feed it with theNSURLRequestobject created in step 3. Make sure you set the delegate property of the instance of theNSURLConnectionclass so that you get notified when the data is downloaded from the API.
In this example, we implement this functionality in a view
controller and output the results into the console window using NSLog. The .h file of the view controller is defined in
this way:
#import <UIKit/UIKit.h>
#import <MapKit/MapKit.h>

#define GOOGLE_OUTPUT_FORMAT_CSV  @"csv"
#define GOOGLE_OUTPUT_FORMAT_XML  @"xml"

@interface RootViewController : UIViewController {
@public
  NSURLConnection *myConnection;
  NSMutableData   *connectionData;
}

@property (nonatomic, retain) NSURLConnection *myConnection;
@property (nonatomic, retain) NSMutableData   *connectionData;

@end
We implement the view controller in this way in its .m file:
#import "RootViewController.h"

@implementation RootViewController

@synthesize myConnection, connectionData;

- (void)connection:(NSURLConnection *)connection
  didFailWithError:(NSError *)error{

  /* Handle the error here */
  NSLog(@"Connection error happened");

}

- (void) connection:(NSURLConnection *)connection
 didReceiveResponse:(NSURLResponse *)response{

  [self.connectionData setLength:0];

}

- (void)connection:(NSURLConnection *)connection
    didReceiveData:(NSData *)data{

  /* We received some data, let's append it to the end of the
   current mutable data that we have */
  [self.connectionData appendData:data];

}

- (void)connectionDidFinishLoading:(NSURLConnection *)connection{

  NSString *connectionString =
    [[NSString alloc] initWithData:self.connectionData
                          encoding:NSUTF8StringEncoding];

  if ([connectionString length] > 0){

    NSArray *components =
    [connectionString
     componentsSeparatedByString:@","];

    NSString *statusCode = nil,
             *accuracy = nil,
             *latitude = nil,
             *longitude = nil;

    if ([components count] == 4){

      statusCode = [components objectAtIndex:0];
      accuracy = [components objectAtIndex:1];
      latitude = [components objectAtIndex:2];
      longitude = [components objectAtIndex:3];

      NSLog(@"Status Code = %@", statusCode);
      NSLog(@"Accuracy = %@", accuracy);
      NSLog(@"Latitude = %@", latitude);
      NSLog(@"Longitude = %@", longitude);

    } else {
      /* Handle other situation where we have more or less
       than 4 values which we expect from this API */
    }

  } else {
    /* The string is empty, handle this problem here */
  }

  [connectionString release];
  connectionString = nil;

}

- (void)viewDidLoad {
  [super viewDidLoad];

  /* We have our address */
  NSString *oreillyAddress =
    @"1005 Gravenstein Highway North, Sebastopol, CA 95472, USA";

  /* We will later insert the address and the format that we want
   our output in, into this API's URL */
  NSString *geocodingURL =
  @"http://maps.google.com/maps/geo?q=%@&output=%@";

  /* Insert the address and the output format into the URL */
  NSString *finalURL =
  [NSString stringWithFormat:geocodingURL,
   oreillyAddress,
   GOOGLE_OUTPUT_FORMAT_CSV];

  /* Now escape the URL using appropriate percentage marks */
  finalURL =
    [finalURL
     stringByAddingPercentEscapesUsingEncoding:
     NSUTF8StringEncoding];

  /* Create our URL */
  NSURL *urlToCall = [NSURL URLWithString:finalURL];

  /* And a request for the connection using the URL */
  NSURLRequest *request = [NSURLRequest requestWithURL:urlToCall];

  /* We will put all the connection's received data into this
   instance of the NSMutableData class */
  NSMutableData *newMutableData = [[NSMutableData alloc] init];
  self.connectionData = newMutableData;
  [newMutableData release];

  NSURLConnection *newConnection =
  [[NSURLConnection alloc] initWithRequest:request
                                  delegate:self];

  /* Create the connection and start the downloading
   of geocoding results */
  self.myConnection = newConnection;

  [newConnection release];

}

- (void) viewDidUnload{
  [super viewDidUnload];

  [self.myConnection cancel];

  self.myConnection = nil;
  self.connectionData = nil;
}

- (BOOL)shouldAutorotateToInterfaceOrientation:
  (UIInterfaceOrientation)interfaceOrientation {
  /* Support all orientations */
  return YES;
}

- (void)dealloc {

  [myConnection cancel];
  [myConnection release];
  [connectionData release];

  [super dealloc];
}

@end
The output will get printed to the console, as shown in Figure 4-7.
See Also
Get iOS 4 Programming Cookbook now with the O’Reilly learning platform.
O’Reilly members experience books, live events, courses curated by job role, and more from O’Reilly and nearly 200 top publishers.

