Chapter 1. Continuous Integration and Delivery
Continuous integration, or CI as it will be referred to from here on, is an ecosystem of software, usually more than one package, that allows you to test and deploy your iOS apps with minimal manual involvement, sometimes even none. Once you commit your code to a source control repository, such as Git, your code will automatically be built and run by a CI server and then perhaps deployed to TestFlight, eventually reaching the point where you can send it to Apple for review.
Every iOS developer needs to know about CI to some extent. You might not need to be very involved with CI on a day-to-day basis, but should you wish to find work in a company where you have to work with other iOS engineers, chances are that you will have to work with a CI system of some sort, whether that be Xcode Bots or Travis mixed with fastlane.
In this chapter we will talk about two CI systems:
- Xcode Bots running on macOS
- Travis plus fastlane
Note
Xcode Bots, Travis, and fastlane are not the only CI and CD systems out there. You have a choice from many service providers, some easier than others to implement, and each with its own advantages and disadvantages. The three systems I have chosen to cover in this chapter are very popular, and are the ones you are most likely to encounter if you decide to work in a larger team of developers.
Xcode Bots are tiny integration points that are installed on macOS running Xcode. They use Xcode’s capabilities on that server to check out your code from Git (or SVN), build that code for you, and test it on your behalf. They may even create an Xcode archive for you, ready to be sent to the App Store.
Travis is a distributed public service that easily integrates with GitHub and can access your source code (should you grant access to it) and build and distribute your products on your behalf, without you having to press a single button.
These are the systems most often used for iOS CI. Granted, you might sometimes stumble on a company using another popular CI, such as Jenkins, and there are many references online where you can learn about those systems. Should you go through this chapter to learn about Xcode Bots and Travis, you will already have learned how CI works and will be able to work with Jenkins without a problem. The purpose of all CI systems is the same, although their interfaces and functionalities differ. As we’ll see, Xcode Bots and Travis/fastlane show several differences.
1.1 Setting Up Xcode Server
Solution
Follow these steps:
- Designate a computer that runs macOS in your network to become the server that runs your Xcode Bots. This machine has to have quite a lot of disk space to dedicate to builds, and also quite good processing power to run concurrent builds.
- Open Xcode on this server machine.
- On the server machine, in Xcode, press Cmd-, on your keyboard to open Xcode’s preferences screen.
- In the Server & Bots tab, enable Xcode Server.
- You will then be asked to provide a username on the server machine under which Xcode builds run, using that user’s credentials. It’s best to use an administrator account, as recommended by Xcode.
- Follow the steps on screen to enable Xcode Server.
Discussion
Xcode Bots run on a server that you will connect your local Xcode to (as you will later see). On that server machine, which needs to run macOS, you will need to install Xcode and enable Xcode Server. There is no special Xcode Server application! Xcode Server merely means an instance of Xcode that you designate as your server.
You should also register some development devices with Xcode Server in case you want to run some UI tests on it. You can do that by simply connecting an iOS device with a cable to the computer that is your designated server machine running macOS. (That could be your current computer, if you are just testing things out!)
You might be wondering whether you even need a server machine to host your Xcode Bots. The answer depends on the scale of your development. If you are working alone as the sole iOS developer, and have no QA members dedicated to testing your apps, you can simply live with setting up and running the Bots locally on your own computer. More complex development environments need a dedicated server to run the Bots: a server that is accessible by all your designated team members. This could occur in a company where you would like Bots to be distributed across the team and run remotely and on a schedule, perhaps every night, typically running your unit and UI tests, building your app, and submitting it to TestFlight.
1.2 Connecting Local Xcode to Xcode Server
Solution
Follow these steps in order to connect each development machine to your Xcode Server:
- On the server, ensure that the Xcode service is turned on.
- Open Xcode on the developer machine, ensuring that the machine is on the same network as the server hosting your Xcode Server.
- Press Cmd-, on your keyboard when Xcode opens to go to Xcode’s preferences.
- Click the Accounts tab.
- Press the + button on the bottom of the screen and in the little menu that appears, choose Add Server....
-
In the Choose Server dialog that appears, choose the server that hosts your Xcode Server and press the Next button (see Figure 1-1).
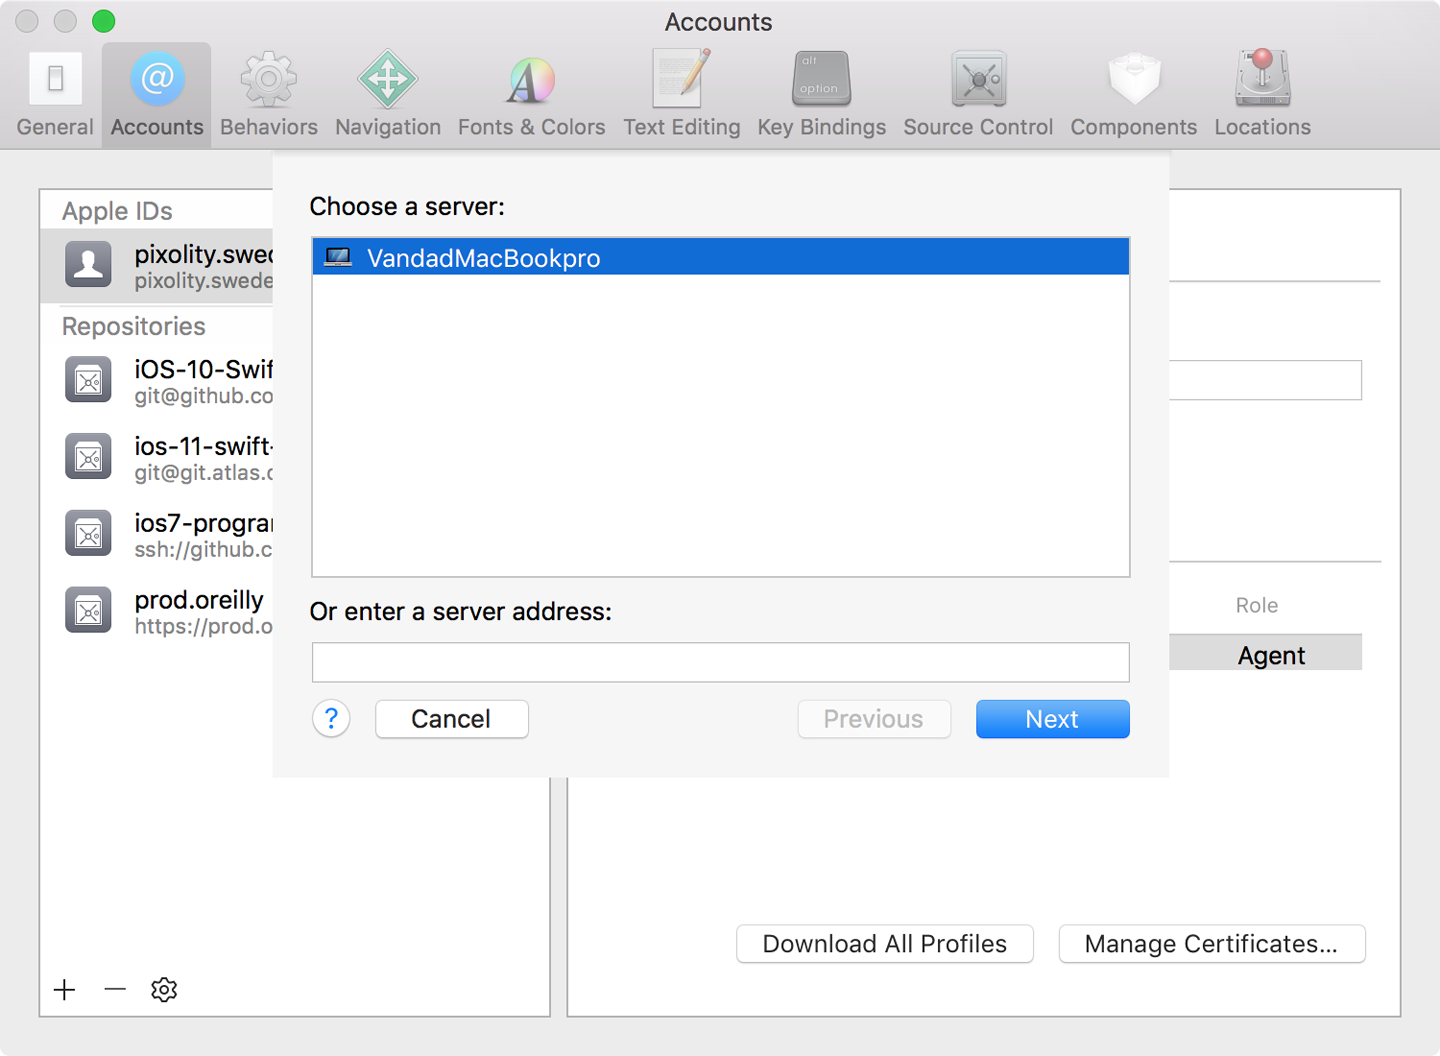
Figure 1-1. Choosing your server
Note
If you don’t see your server in the list, it might not have the Xcode Server service enabled, or it might not be accessible to your local development machine. If you are setting all this up at work, contact your network administrator.
- On the next screen, you will be asked for the account to use to log in to the server. You know this account information better than I do, so provide that information here and continue to the next step.
If everything went as expected, you should now see your Xcode Server in the list of accounts on your local development machine (see Figure 1-2).
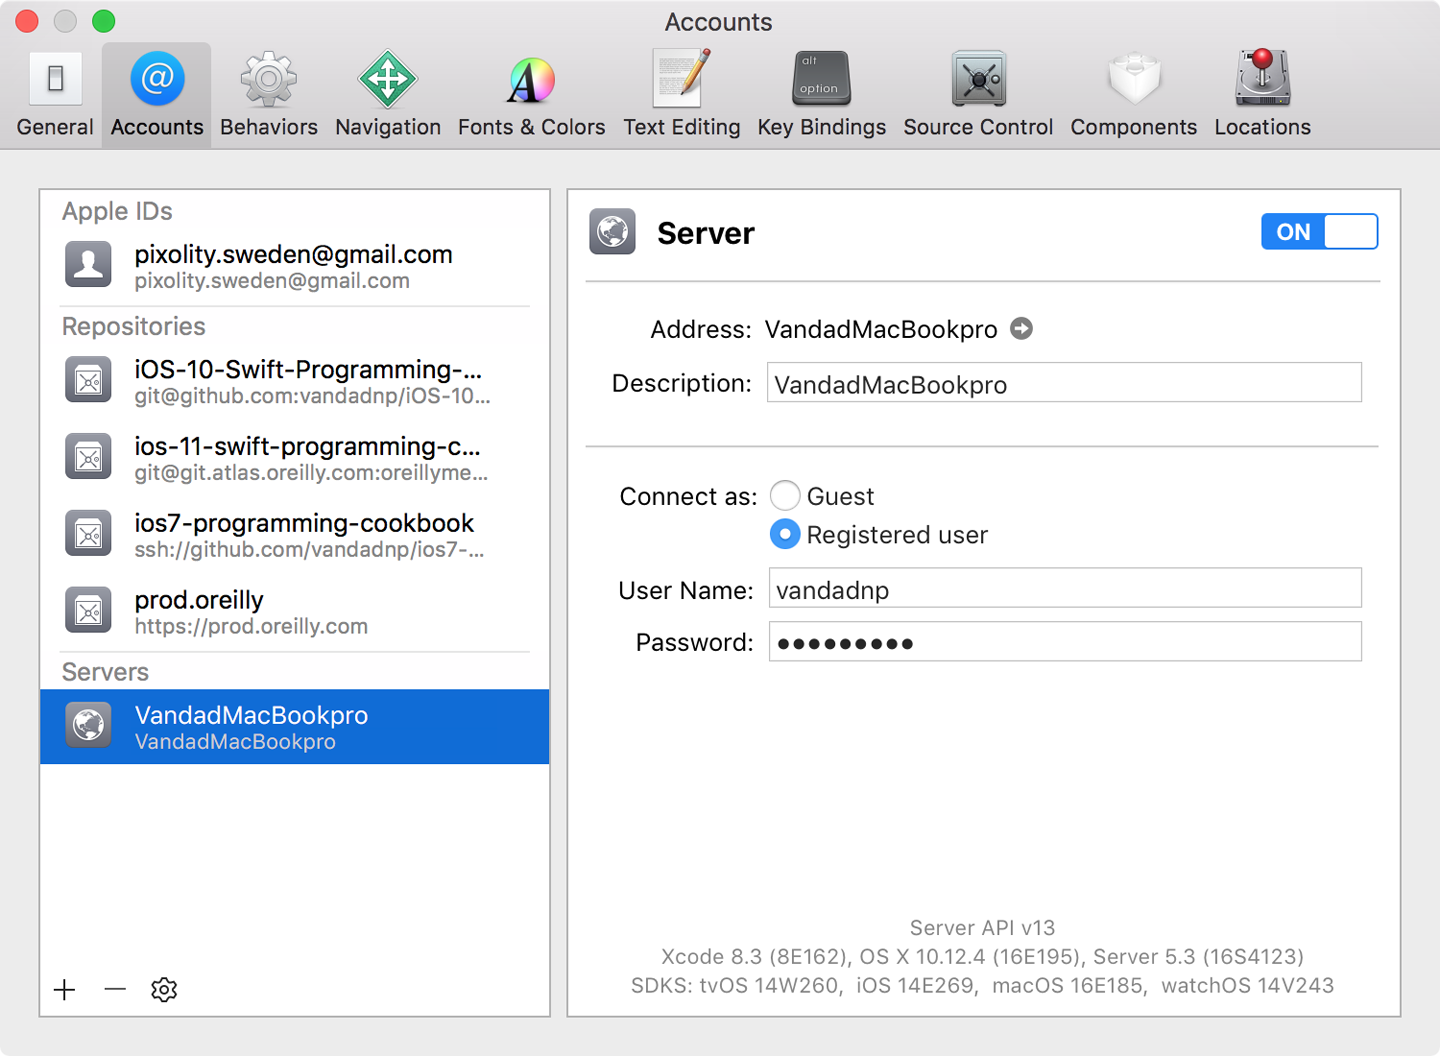
Figure 1-2. The Xcode Server successfully added to the development machine
Discussion
Every development machine that wants to run Xcode Bots on your Xcode Server needs to have direct access, through Xcode, to your Xcode Server. This brings you many advantages, including direct integration of Xcode Bots into your local Xcode IDE.
If you have followed the steps in the Solution section of this recipe, you should have now created the bridge between your local machine and the remote server hosting your Xcode Server. The next step is to start creating and running (integrating) Xcode Bots to do your work on your behalf.
See Also
1.3 Archiving Your Apps with Xcode Bots
Solution
Follow these steps:
- Ensure that your Xcode project is hosted in a version control system such as Git, perhaps on GitHub.
- Make sure that your Xcode Server has credentials to also check out (clone) the application’s repository. (This requires setting up your SSH keys and related administrative tasks on a server, a topic that is outside the scope of this book. If you are on GitHub for version control, you can read about the tasks using the GitHub website.)
- While you have your project open in Xcode, from the Product menu, choose Create Bot.
-
A new dialog appears on the screen asking you to specify a name for your Bot (Figure 1-3). Call it archive-my-app. When you are done, press the Next button.
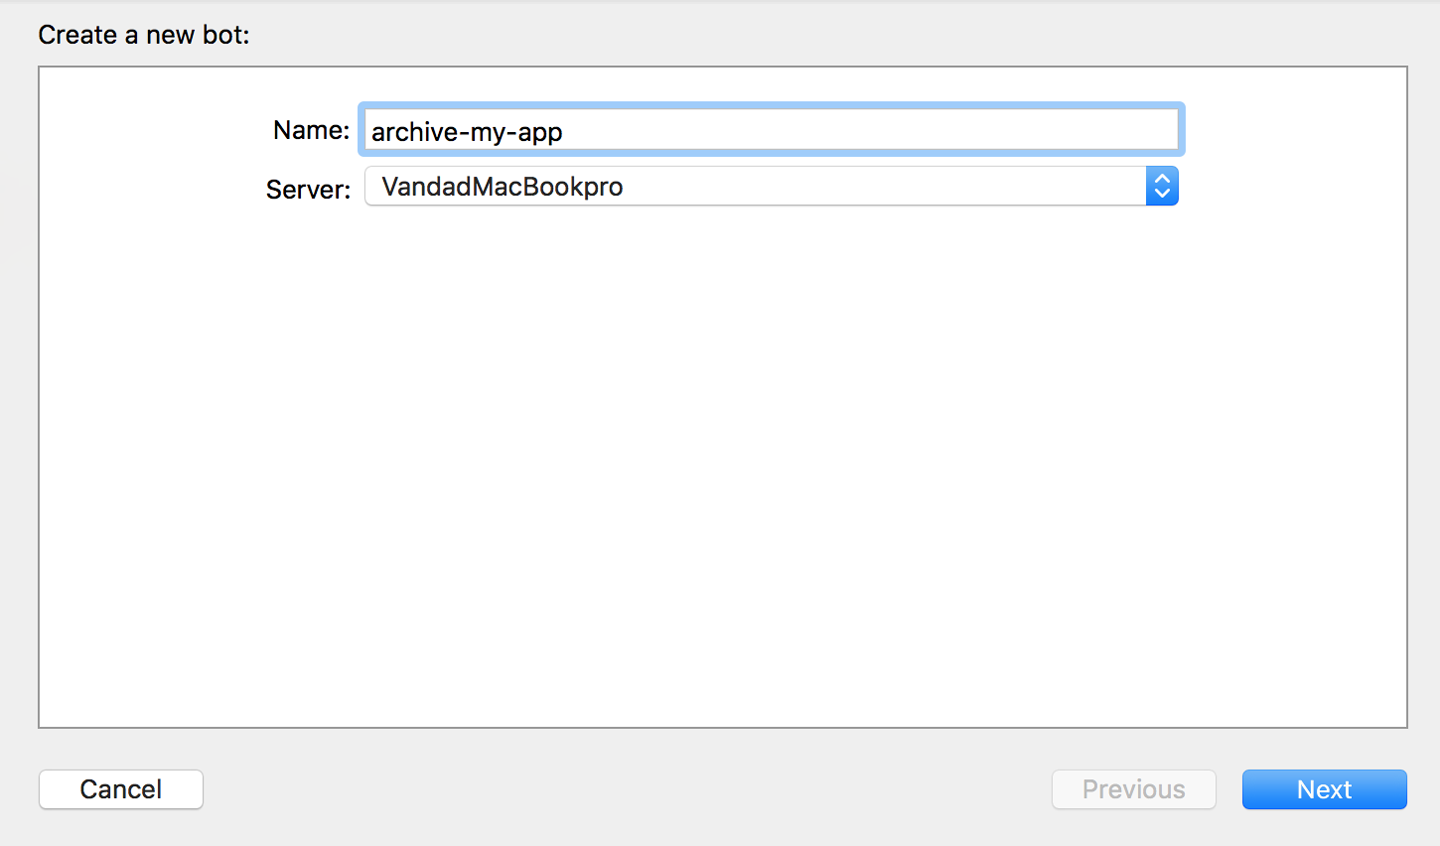
Figure 1-3. Provide a name for the Xcode Bot that will be responsible for archiving your application
- If this is the first Xcode Bot you are setting up, you will have to provide a way for your Xcode Server to connect to GitHub on your behalf, either using your own account (if you are developing privately at home) or using Xcode Server’s own dedicated account that has access to clone your repository (perhaps an Active Directory account, if you are in an organization).
-
At this stage, you will see a screen similar to Figure 1-4. On this screen, press the Sign In... button.
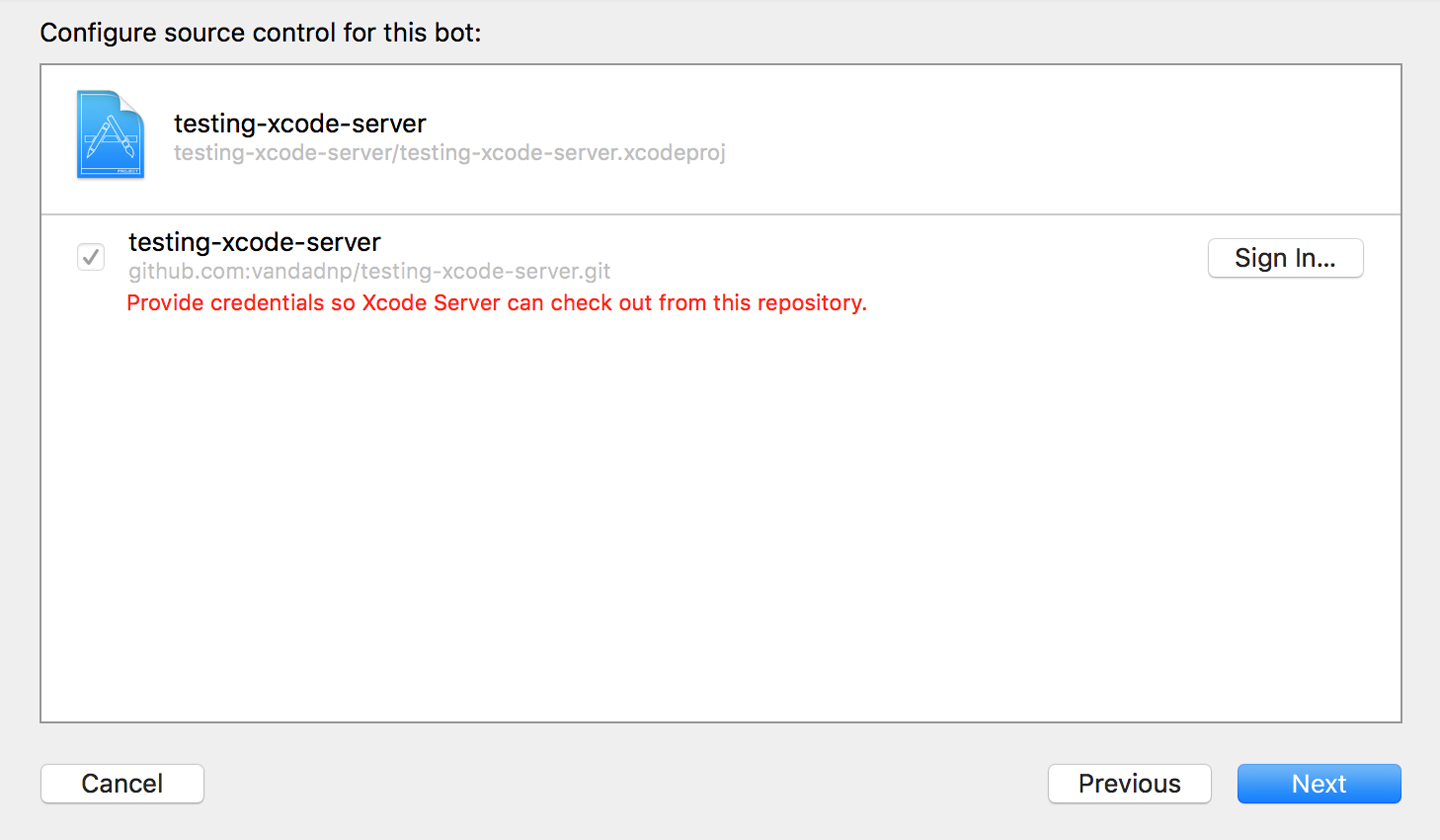
Figure 1-4. Xcode Server reports that it has problems cloning the repository and communicating with GitHub in general
-
In the dialog that appears (Figure 1-5), choose the way that suits you best for your Xcode Server to connect to GitHub on your behalf and clone your repository in order to be able to build the app. I have Xcode Server locally, so I can simply share my SSH keys with this local installation of the server. If you are setting up macOS and Xcode Server in an organization, you probably have a separate account through which your server can connect to GitHub. In this dialog, therefore, choose an appropriate method of connection to GitHub based on your situation. Once you are done, press the OK button.
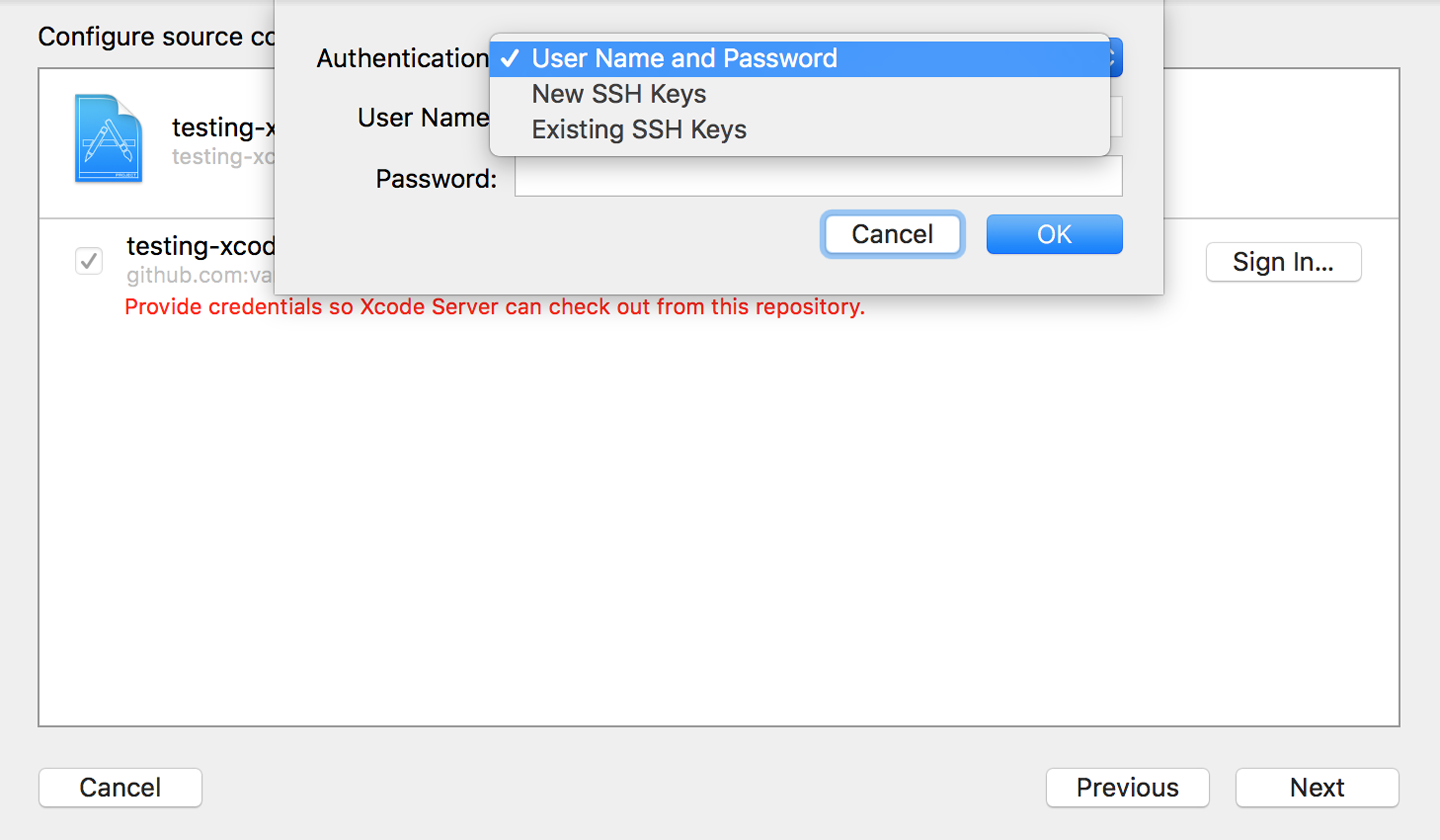
Figure 1-5. Specify a way for Xcode Server to connect to GitHub on your behalf and clone your repository
-
If your Xcode Server now succeeds in connecting to GitHub, you should be able to press the Next button on the dialog where you had previously landed (see Figure 1-6).
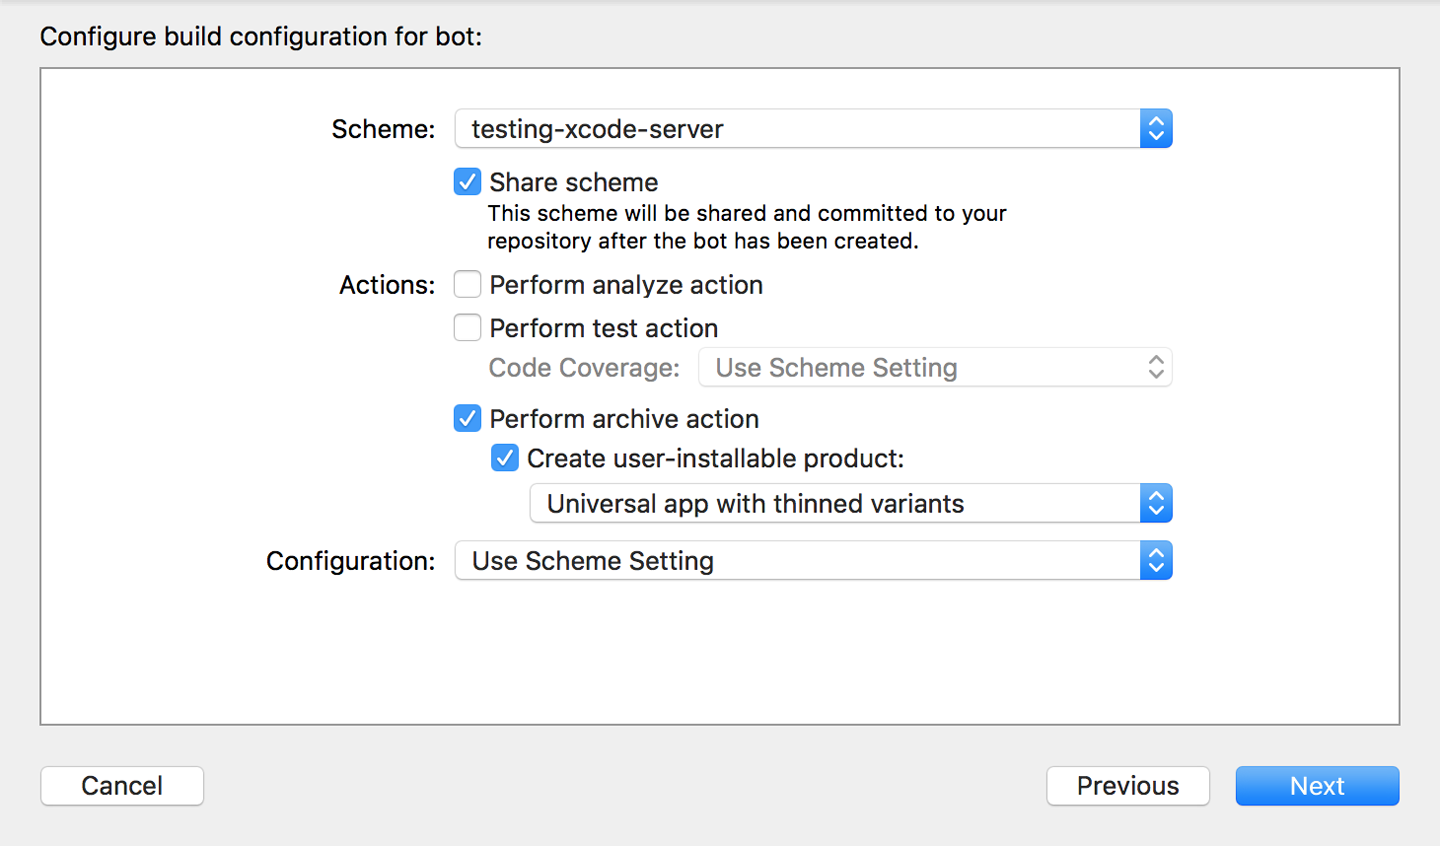
Figure 1-6. Configure the Xcode Bot to archive your application
- In this dialog shown in Figure 1-6, you will see the main settings related to your Xcode Bot. Here you can specify that your Xcode Bot has to build, analyze, or even test and archive your application. For now, choose only to archive the application. Once you are done in this dialog, press the Next button.
-
In the next step (see Figure 1-7), you can choose to integrate (run) your Xcode Bot when specific events happen, such as at a specific time of the day or when new commits are available. For now, choose to manually integrate the Bot whenever it is requested, so that I can show you how to integrate an Xcode Bot whenever you need it instead of having to wait for a certain event to occur. Then, in the Clean drop-down, choose Always. This ensures that the project artifacts from the previous archiving action get deleted before the new build is created. Once you are done, press the Next button.
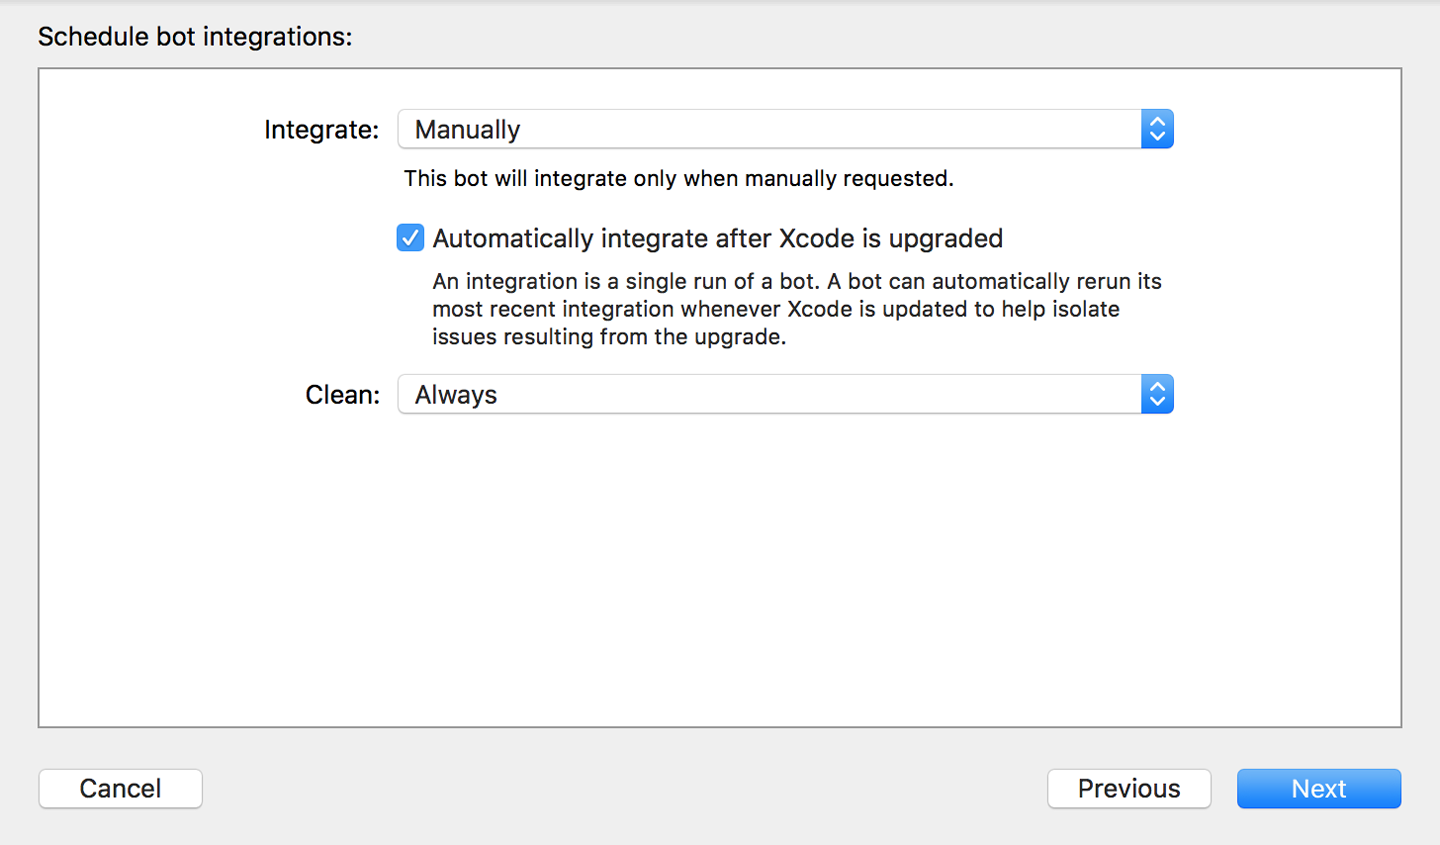
Figure 1-7. Configure the Xcode Bot so that you can integrate (run) it whenever you need to
- In the next dialog, you will be able to pass environment variables to your Xcode build if you want. Leave this page empty for now and press the Next button.
- On the next page, you can create triggers for your build. Triggers occur when an event happens during the Bot’s life, such as success in creating an archive or a failure to run all UI or unit tests. You can also add pre- and post-integration scripts to your Xcode Bot so that the Bot runs your scripts before and after every integration. Leave this page empty as well for now, and press the Create button.
Discussion
Once you are back in Xcode, after the creation of your first Xcode Bot, press the Cmd-8 keys on your keyboard to go to the Report Navigator. On this page, you can see the events that your Xcode Bots have triggered. You have one Xcode Bot right now that is supposed to archive your application whenever you integrate the Bot, so let’s go to that page and see what has happened (Figure 1-8).
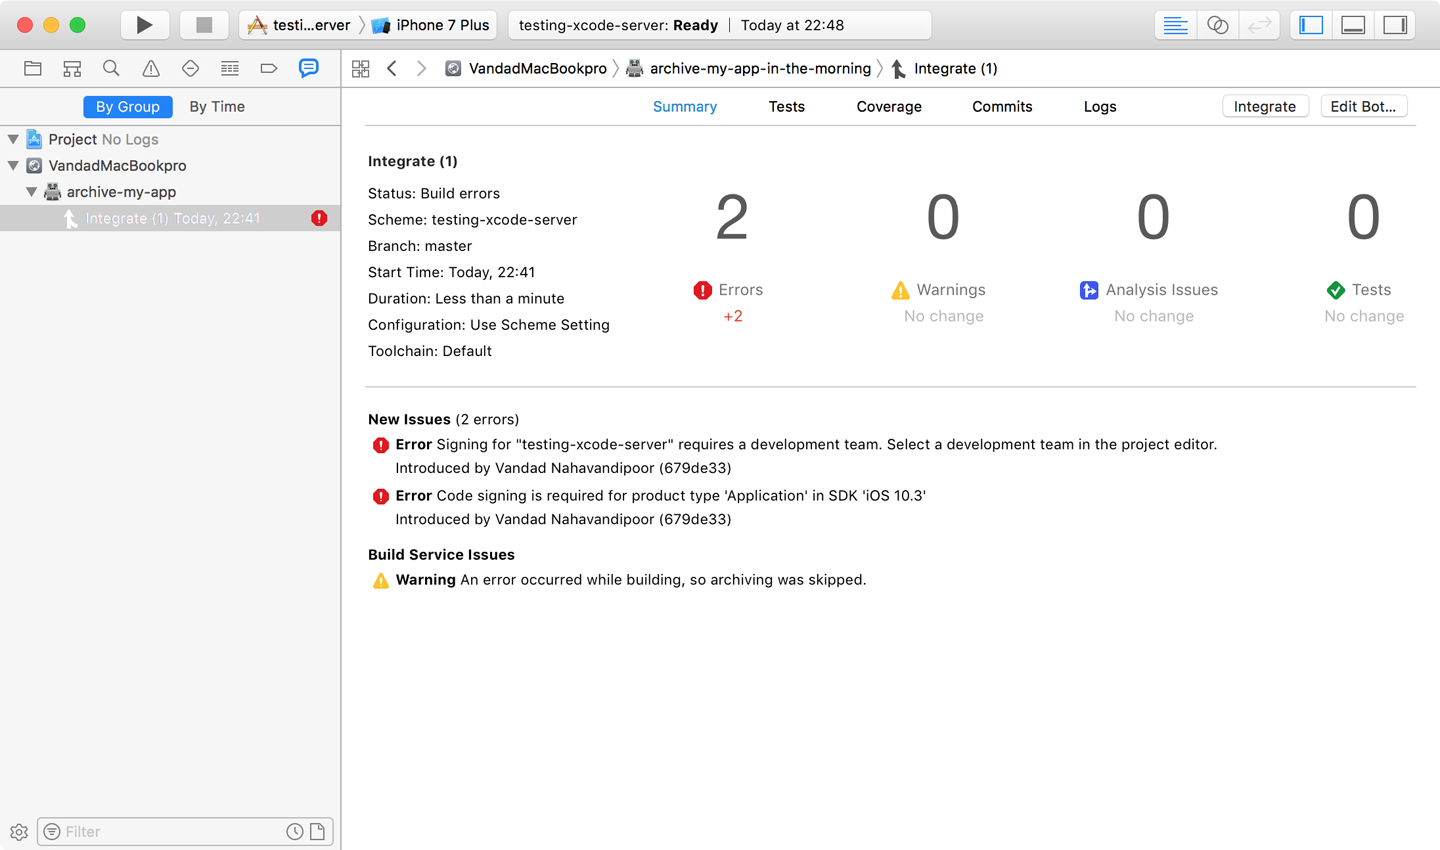
Figure 1-8. The first Xcode Bot failed to integrate due to code-signing issues
This is a typical error that you might get when starting to work with Xcode Bots, and that’s why I wanted to show you this particular error. The way to solve this problem is to go to your project settings in the General tab and ensure that Xcode is set up to automatically handle your signing certificates, by choosing a development team for it.
Note
After you have solved your code-signing issues, ensure that you have checked in your fixes and pushed them to GitHub (or any other service that you might use for version control). Otherwise, your Xcode Bot will not be able to access the fresh changes that you have just made to the project.
Once you have fixed your code-signing issues in Xcode for your project, go back to the Report Navigator by pressing the Cmd-8 keys on your keyboard. On the lefthand side, choose the archive-my-app Xcode Bot, and press the Integrate button in the top-right corner of the screen to run the Bot again (see Figure 1-9).
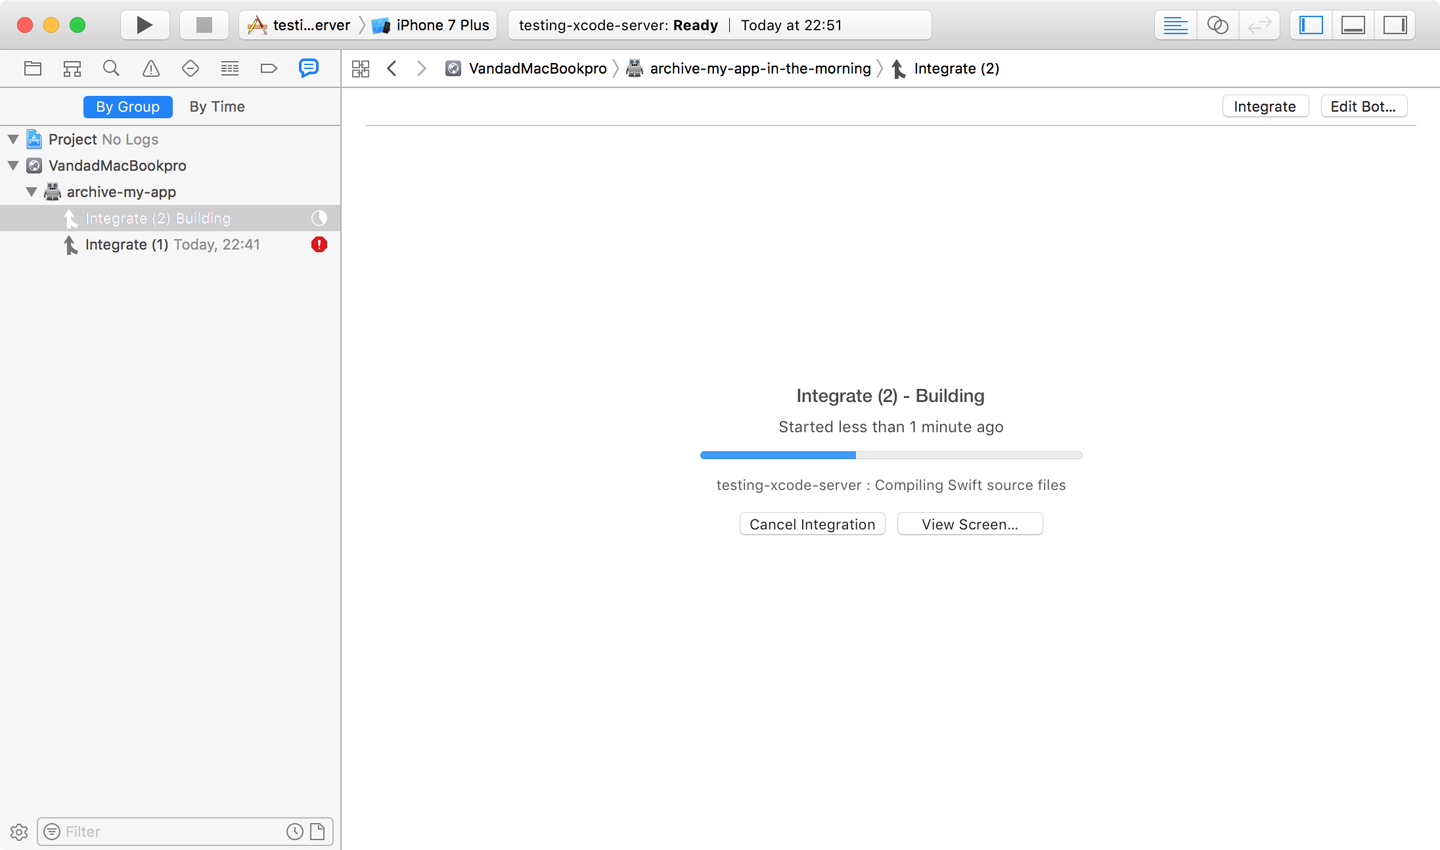
Figure 1-9. The second integration of the Bot, after fixing the code-signing issues, appears to be running as expected
If everything went according to plan (see Figure 1-10), you should have your second integration of the Xcode Bot returning successfully with your archived application.
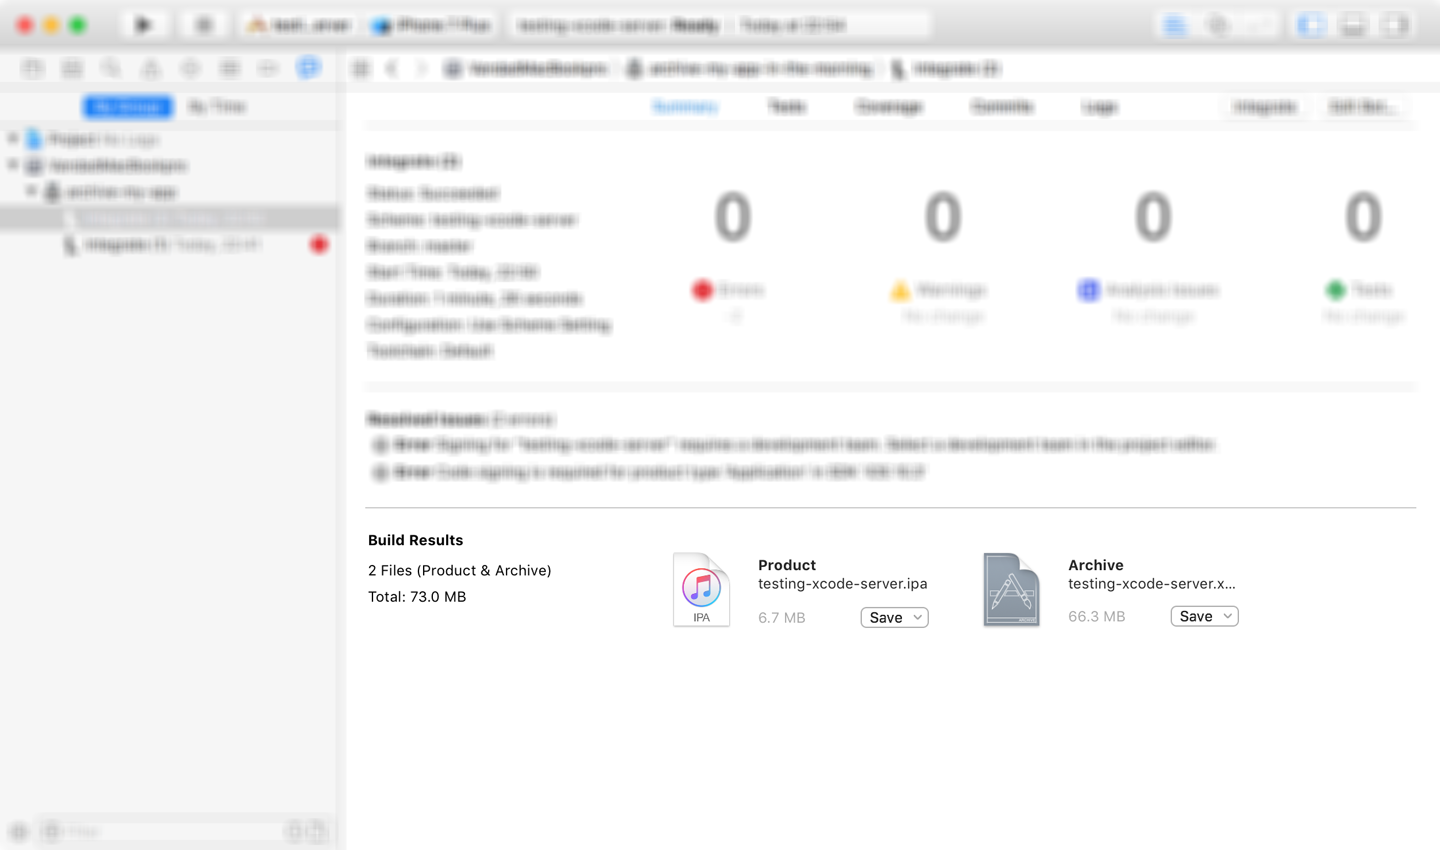
Figure 1-10. The Xcode Bot successfully archived the application!
See Also
1.4 Running Your Tests Automatically with Xcode Bots
Solution
Follow these steps:
- While you have your project (with unit tests previously written for it) open in your own Xcode instance, select the Product menu and under that choose Create Bot.
- In the dialog that appears, for the name of the Bot, provide the name of running-tests. Ensure you are connected to the right server, and press the Next button.
-
On the next screen (see Figure 1-11), ensure that your Xcode Server can log in to your application by following the same steps that we talked about in the previous recipe (Recipe 1.3). When you are done, press the Next button.
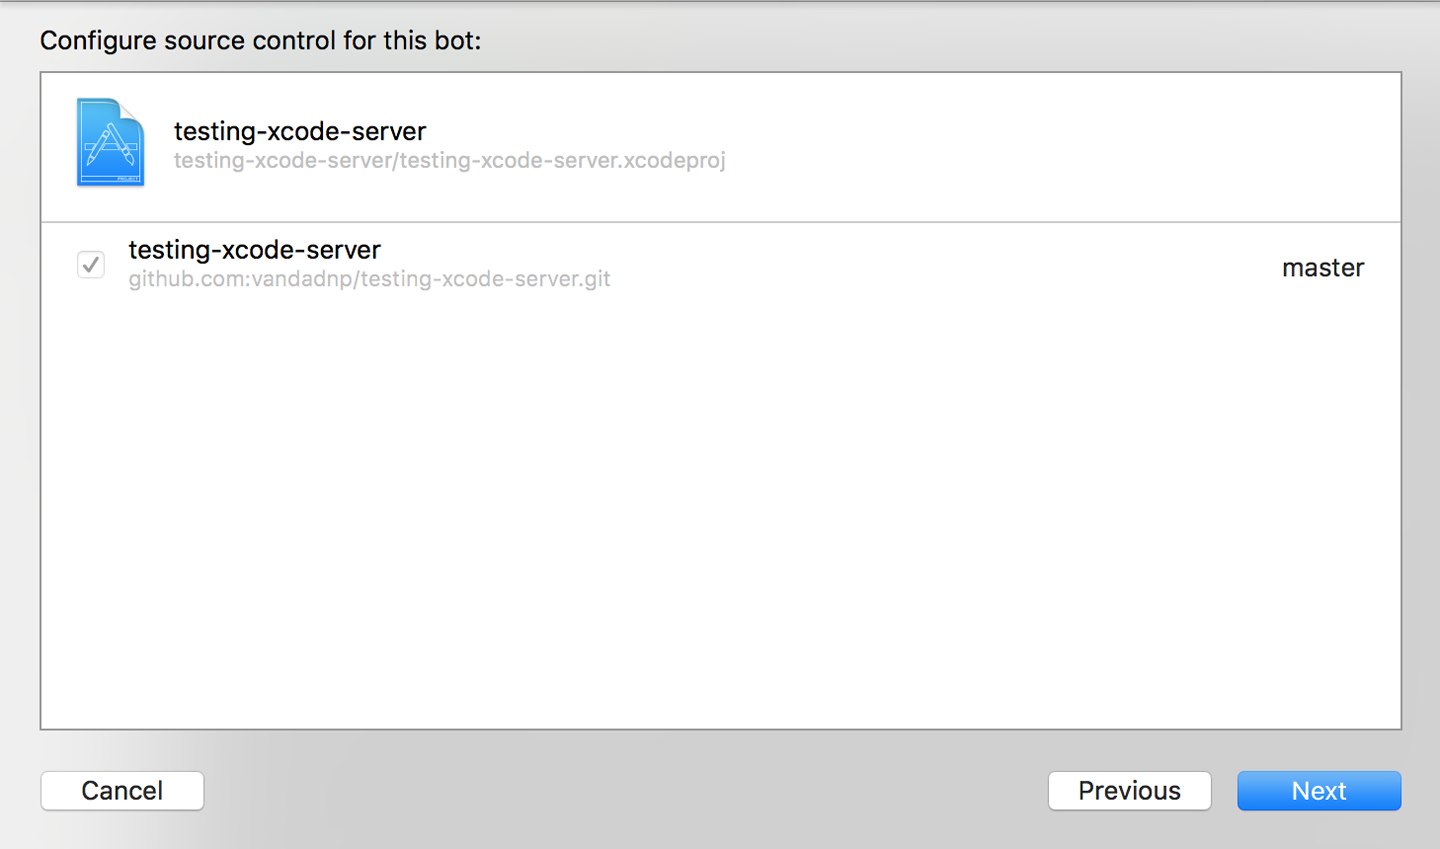
Figure 1-11. Now your Xcode Server can connect to your repository
-
In the next dialog (see Figure 1-12), ensure that your Xcode Bot tests only your target, and does nothing else. After you are done, press the Next button.
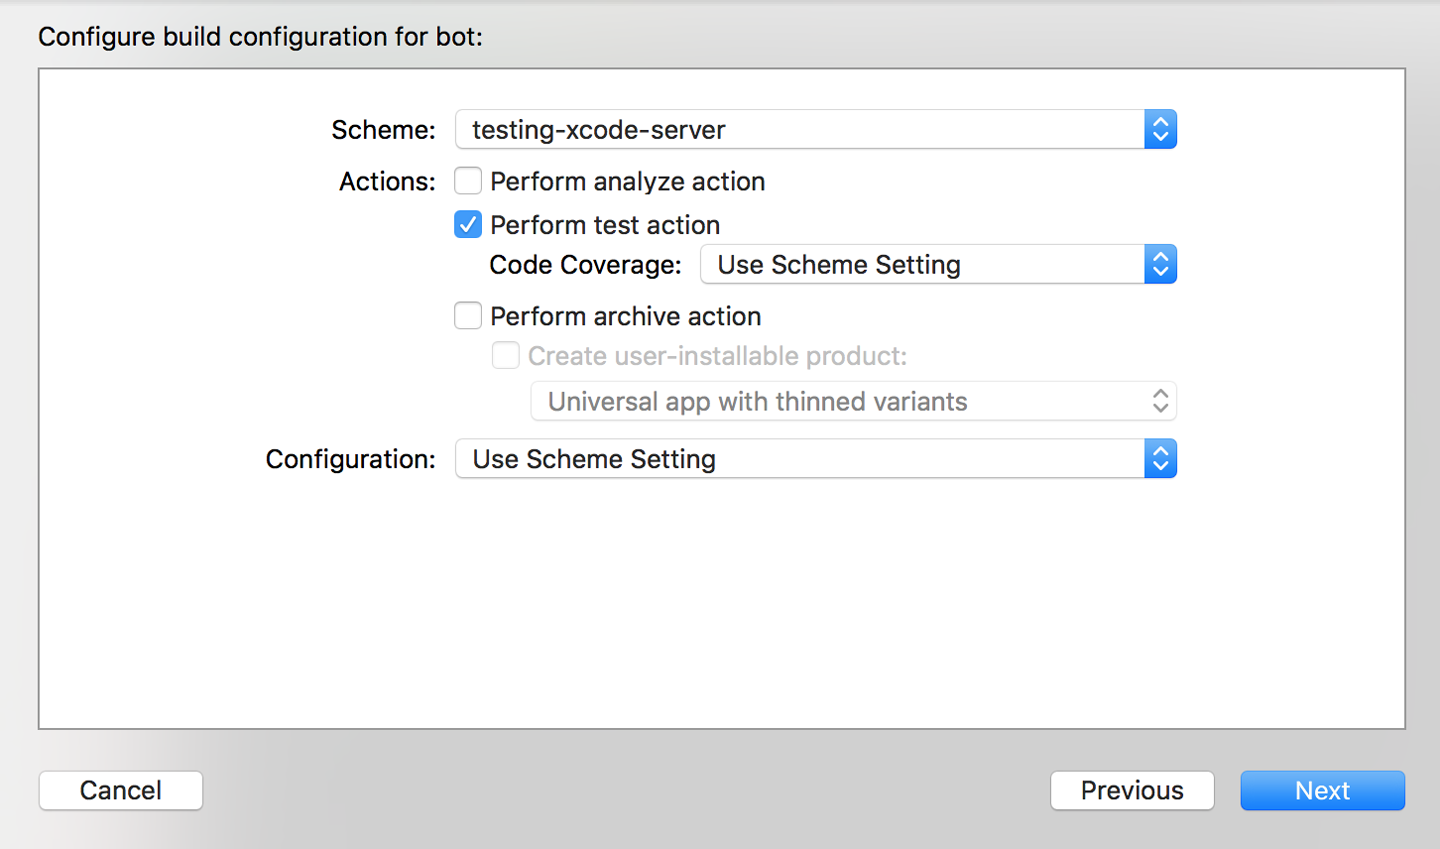
Figure 1-12. Set up this new Xcode Bot so that it only tests your project, nothing else
-
On the next screen (see Figure 1-13), in the Integrate field, choose Manually so that you can trigger this Bot manually whenever you need to. For the Clean field, choose “Once a day.” This makes sure that Xcode performs a clean build (by cleaning up its build artifacts cache) once a day. This is good general practice because cached project resources can sometimes cause issues where old resource files creep into the new binary and cause undesirable effects. Once you are done, press the Next button. You can leave in place the default option that automatically integrates this Bot as soon as it is created, in order to ensure that it works as expected.
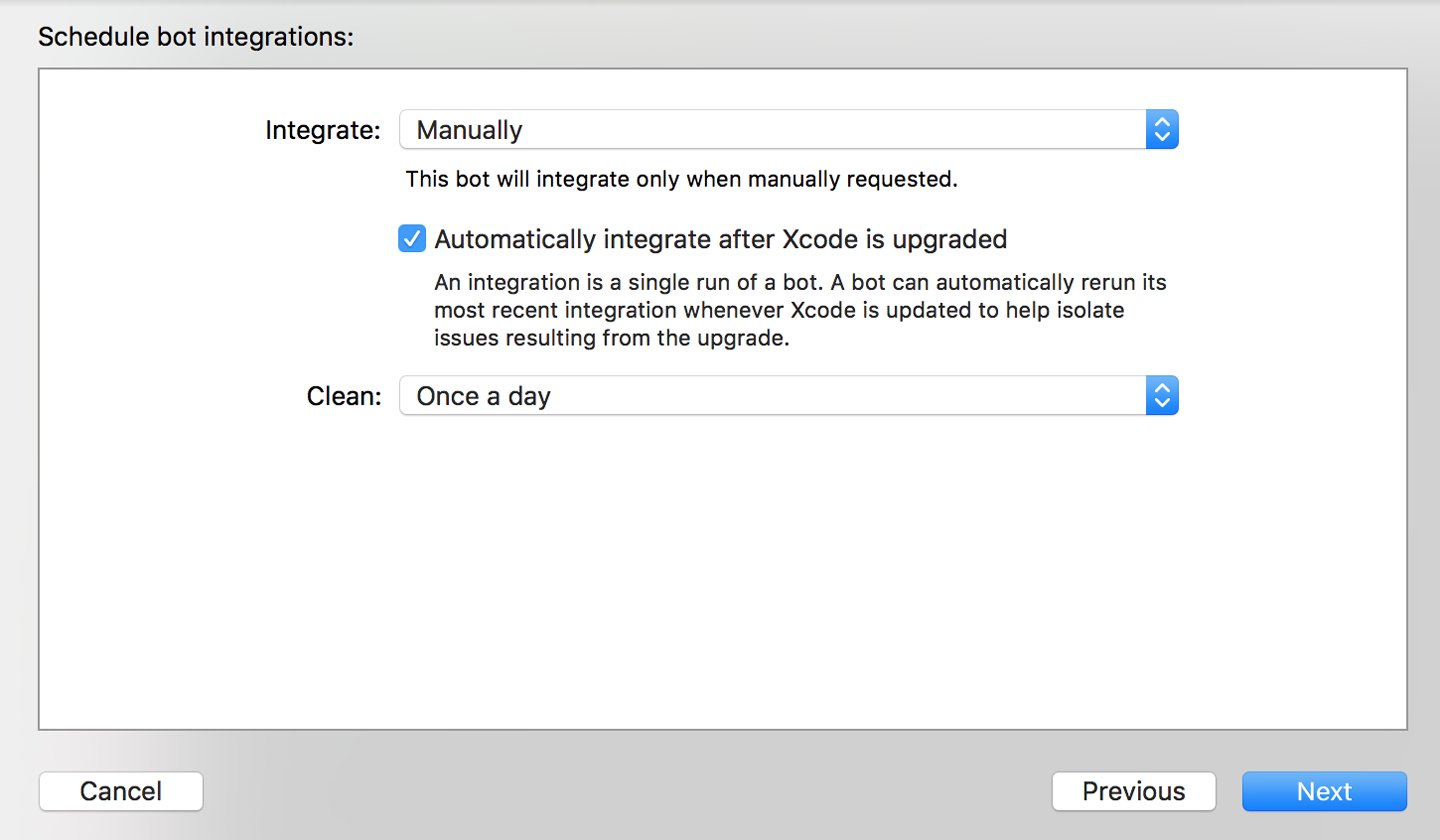
Figure 1-13. You will run your testing Xcode Bot manually and ensure that it cleans up build artifacts once a day
-
On the next screen (see Figure 1-14), you can choose to test your project on all available simulators and devices, on all devices (but no simulators), on all simulators (but no actual devices), or on a specific mixture of devices and simulators that you configure. For the sake of being able to run the tests fast, I am choosing to run the tests on only one simulator. Once you are done, press the Next button.

Figure 1-14. Set up the new Xcode Bot so that it runs the tests on a specific iOS simulator
- Leave the next screen, where you can enter new environment variables, empty and press the Next button.
- On the Triggers screen, leave the screen empty and press the Create button to create your Bot.
Discussion
If you went through the steps provided in the Solution section of this recipe, you should now be able to navigate to the Report Navigator panel of Xcode by pressing Cmd-8, scroll down in the left panel to the running-tests Xcode Bot, and expand it so that you can see the integrations (runs) of this Bot that have taken place since you created it. So far, we have only one run (Figure 1-15).
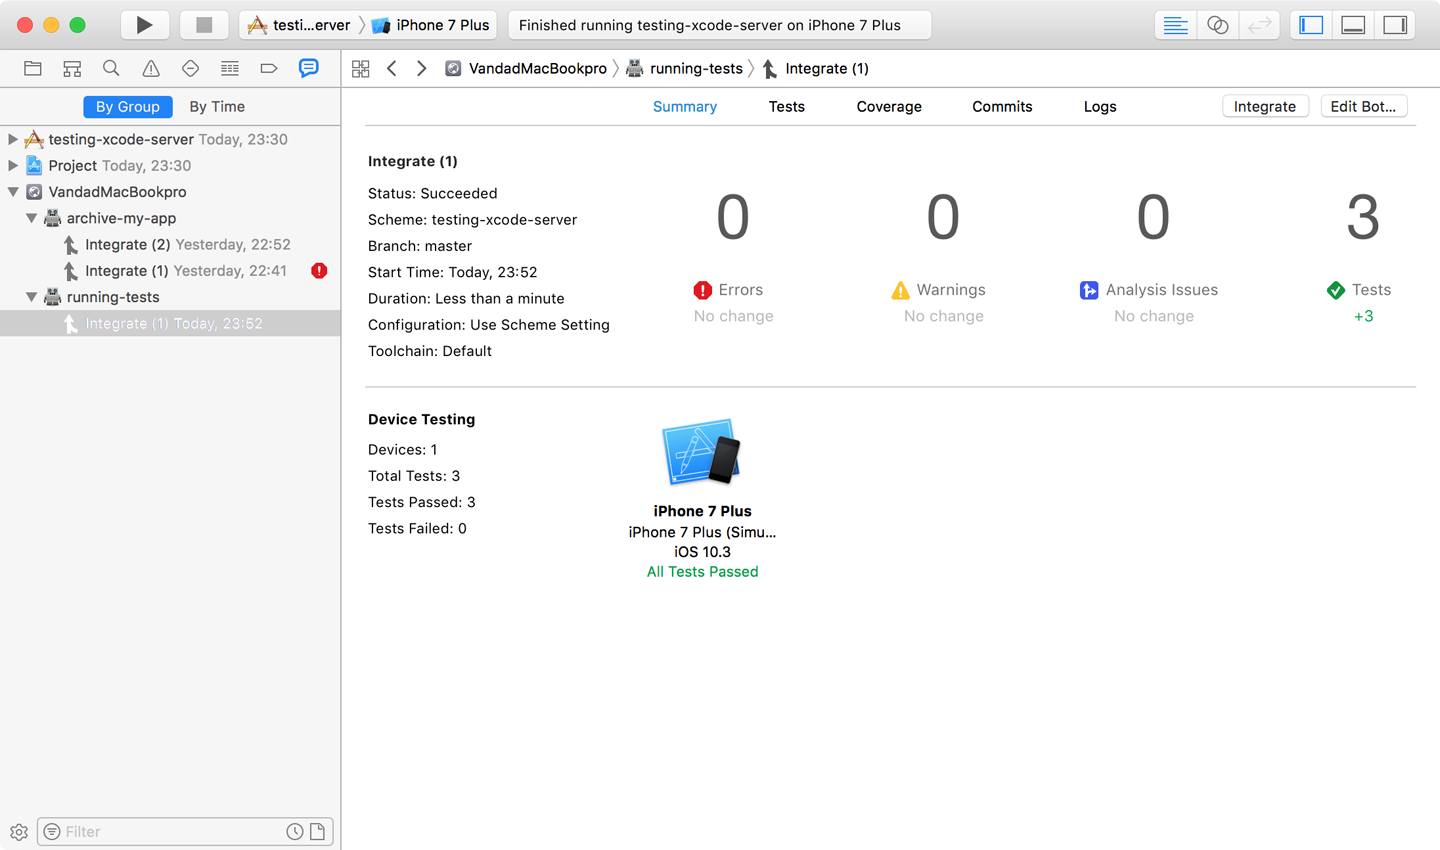
Figure 1-15. The new Xcode Bot has run our unit and UI tests together and reported the results back
You can connect physical devices to the machine that runs your Xcode Server if you can reach that machine physically. These physical devices can then be used by Xcode Server to run and test your applications on. Gaining physical access to the server may be difficult if you are in an organization with many people sharing a server.
Starting from Xcode 9, you can wirelessly debug your applications on iOS devices as well. So if you are in the mood, physically connect your iOS 11 device to your server machine, pull up the device information panel in Xcode, and choose to enable network debugging (wireless). Once you have done that, you can disconnect the device from your server machine, but ensure that it stays on the same network as your server machine. You will now have access to this remote iOS device to run your tests on it, as long as you choose to execute your tests with the help of your server.
See Also
1.5 Performing Analysis of Your Code Using Xcode Bots
Solution
Follow these steps to set up an Xcode Bot that analyzes your code:
- While in Xcode on your own machine, go to the Product menu and from there choose Create Bot.
- In the Name field, enter code-analysis-bot and press the Next button.
-
On the next screen, ensure that your Xcode Bot can access your repository. Every Bot needs its own SSH keys. If you are setting up your Xcode Bot on a server that is inside your organization but not on your own machine, you will need to create a new pair of SSH keys for your new Bot. The public key can then be copied to the server. (For instance, if you are using GitHub to host your projects, it provides a field where you can paste in the key.) If you are setting up this Bot on your machine, you can use your existing SSH keys on your machine. Once you are done, press the Next button.
Figure 1-16 demonstrates creating a new public key for the Bot. The Bot will use it to connect to your repository and clone it. When the public key is provided to you in this dialog, you need to copy it and paste it into your SSH keys section of GitHub or whatever service you are using. This public key is linked to the private key that is already on the server instance.
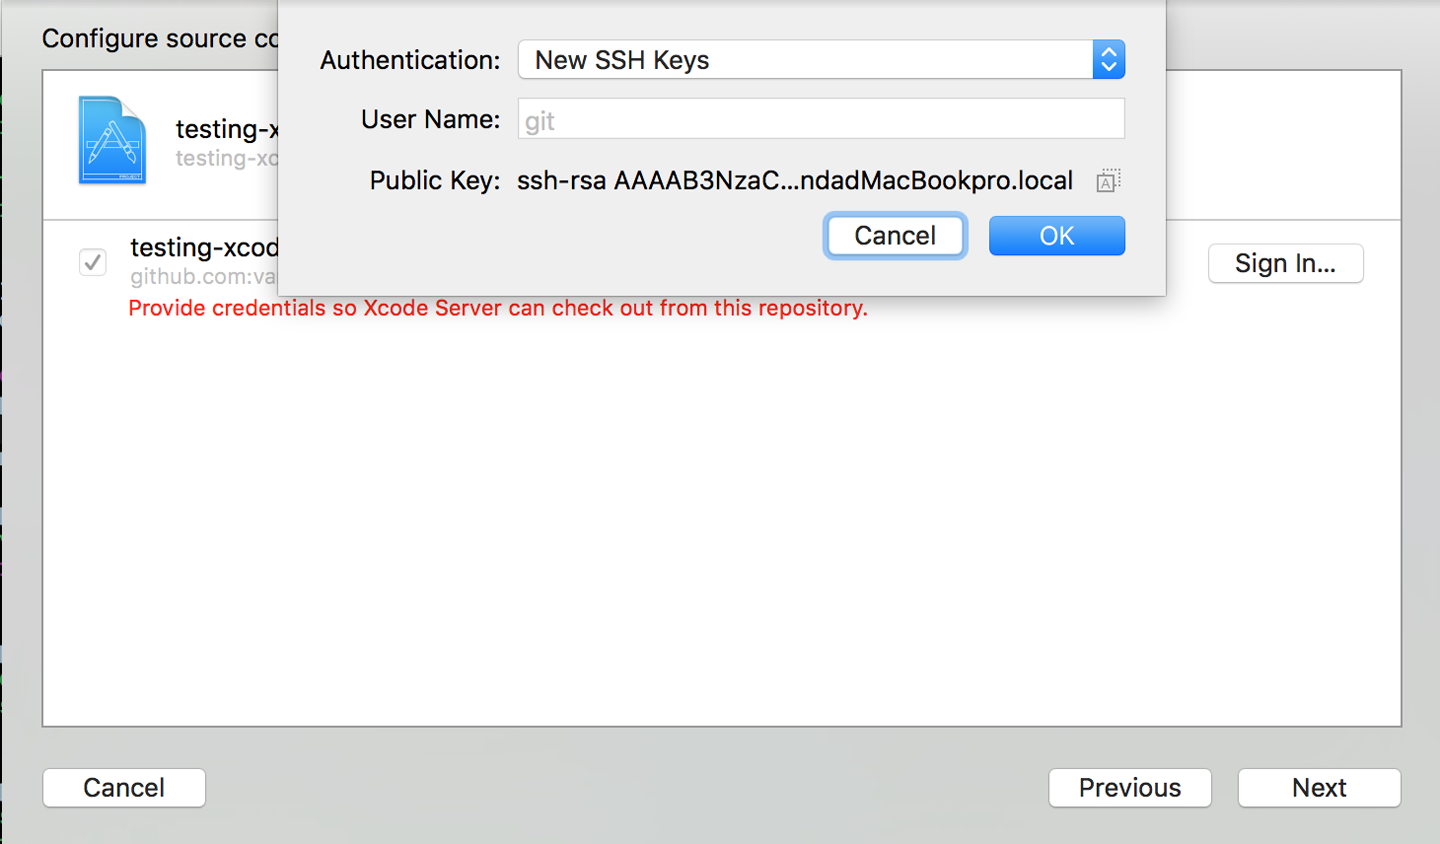
Figure 1-16. Creating a new public key for the Bot
-
On the next screen (see Figure 1-17), choose only the “Perform analyze action” option from the list and then press the Next button.
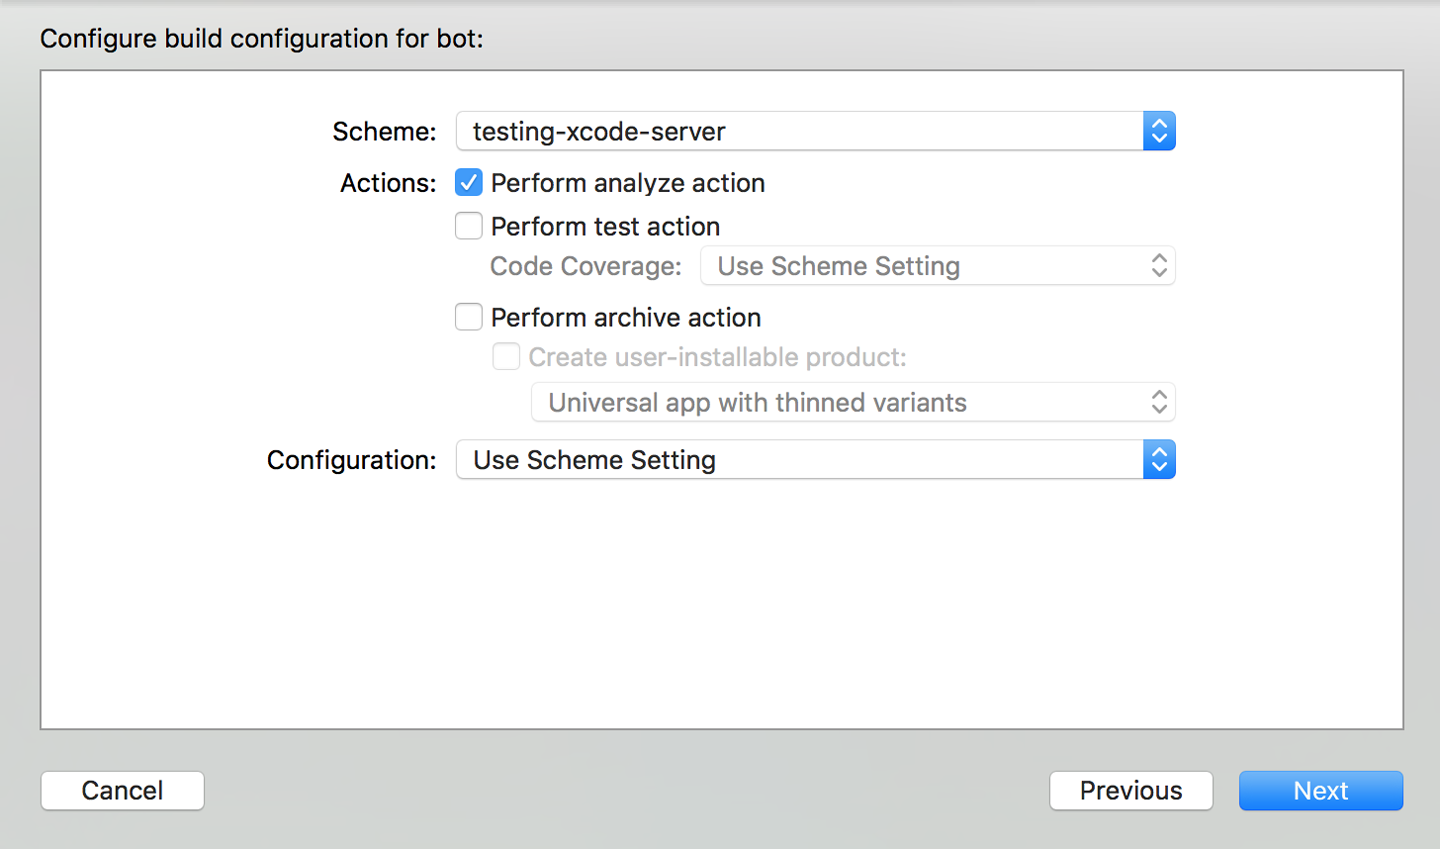
Figure 1-17. The only thing this Xcode Bot is going to have to do is to analyze your code for warnings and problems
- On the next screen, choose to integrate your Xcode Bot manually. In the Clean field, choose to always clean the project before every analysis. Once you are done, press the Next button.
- On the Environment Variables screen, do not add any variables, but simply press the Next button.
- Leave the Triggers screen empty again and simply press the Create button.
Discussion
For the sake of discussion, I’ve created a function in my AppDelegate.swift file where I return a simple integer object like this:
funcreturnSomeInteger()->Int{return10}
And then, when the application starts, I just call this function without using its return value, like so:
funcapplication(_application:UIApplication,didFinishLaunchingWithOptionslaunchOptions:[UIApplicationLaunchOptionsKey:Any]?)->Bool{returnSomeInteger()returntrue}
Calling a function and not using its return value (if the function is not marked as @discardableResult) causes Xcode’s analyzer to trigger a warning about unused function results.
Go to your own Xcode and press Cmd-8 in order to go to the Report Navigator and then integrate your code-analysis-bot. The Xcode Bot should run, analyze the project, and report its results (see Figure 1-18). You can see the warning reported by the Xcode Bot.
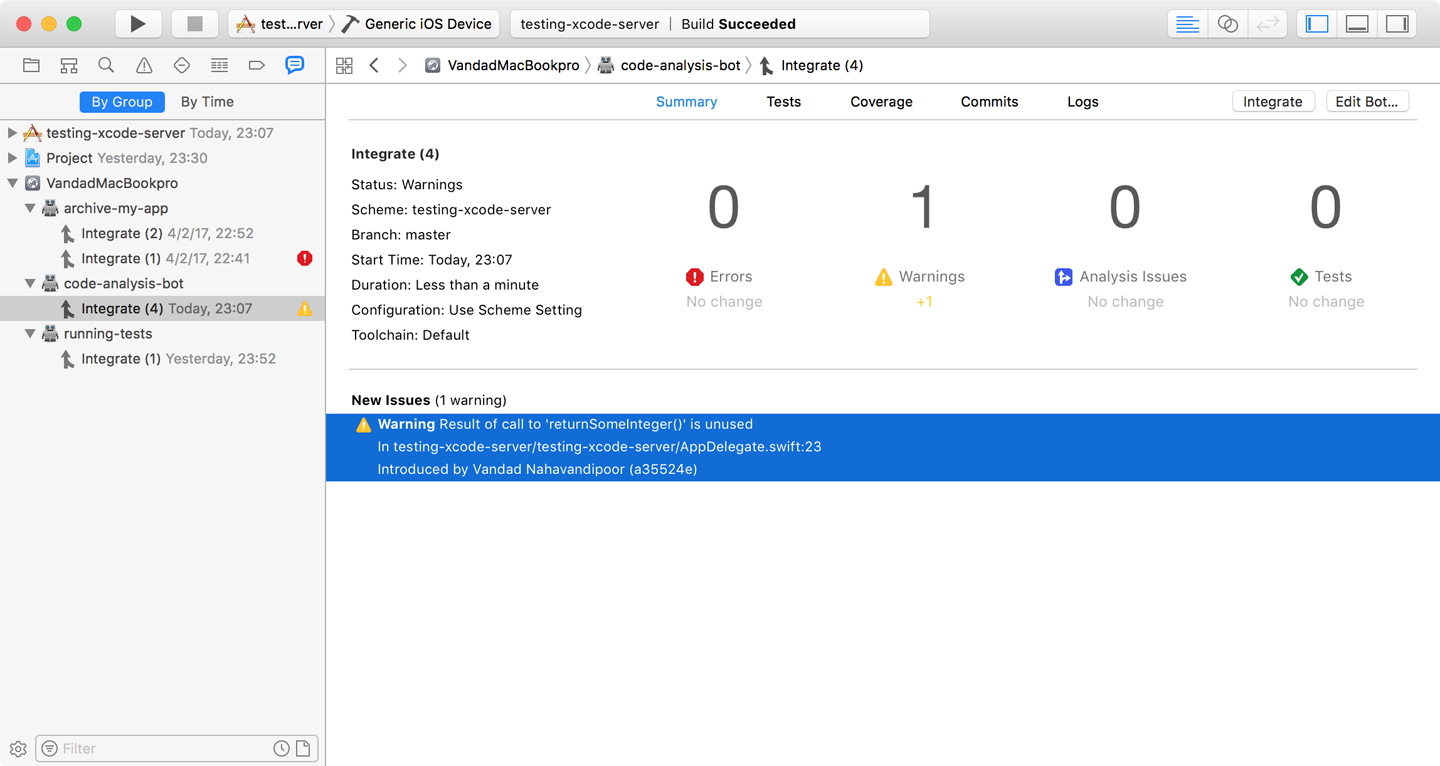
Figure 1-18. The unused function results are reported as a warning that you can read in your Xcode instance
1.6 Integrating GitHub Projects with Travis
Solution
Follow these steps:
- Go to the Travis CI website.
- Sign in to Travis CI with your GitHub credentials.
-
You will be asked for permission (see Figure 1-19) to allow Travis to access your repositories. Press the “Authorize application” button to proceed.
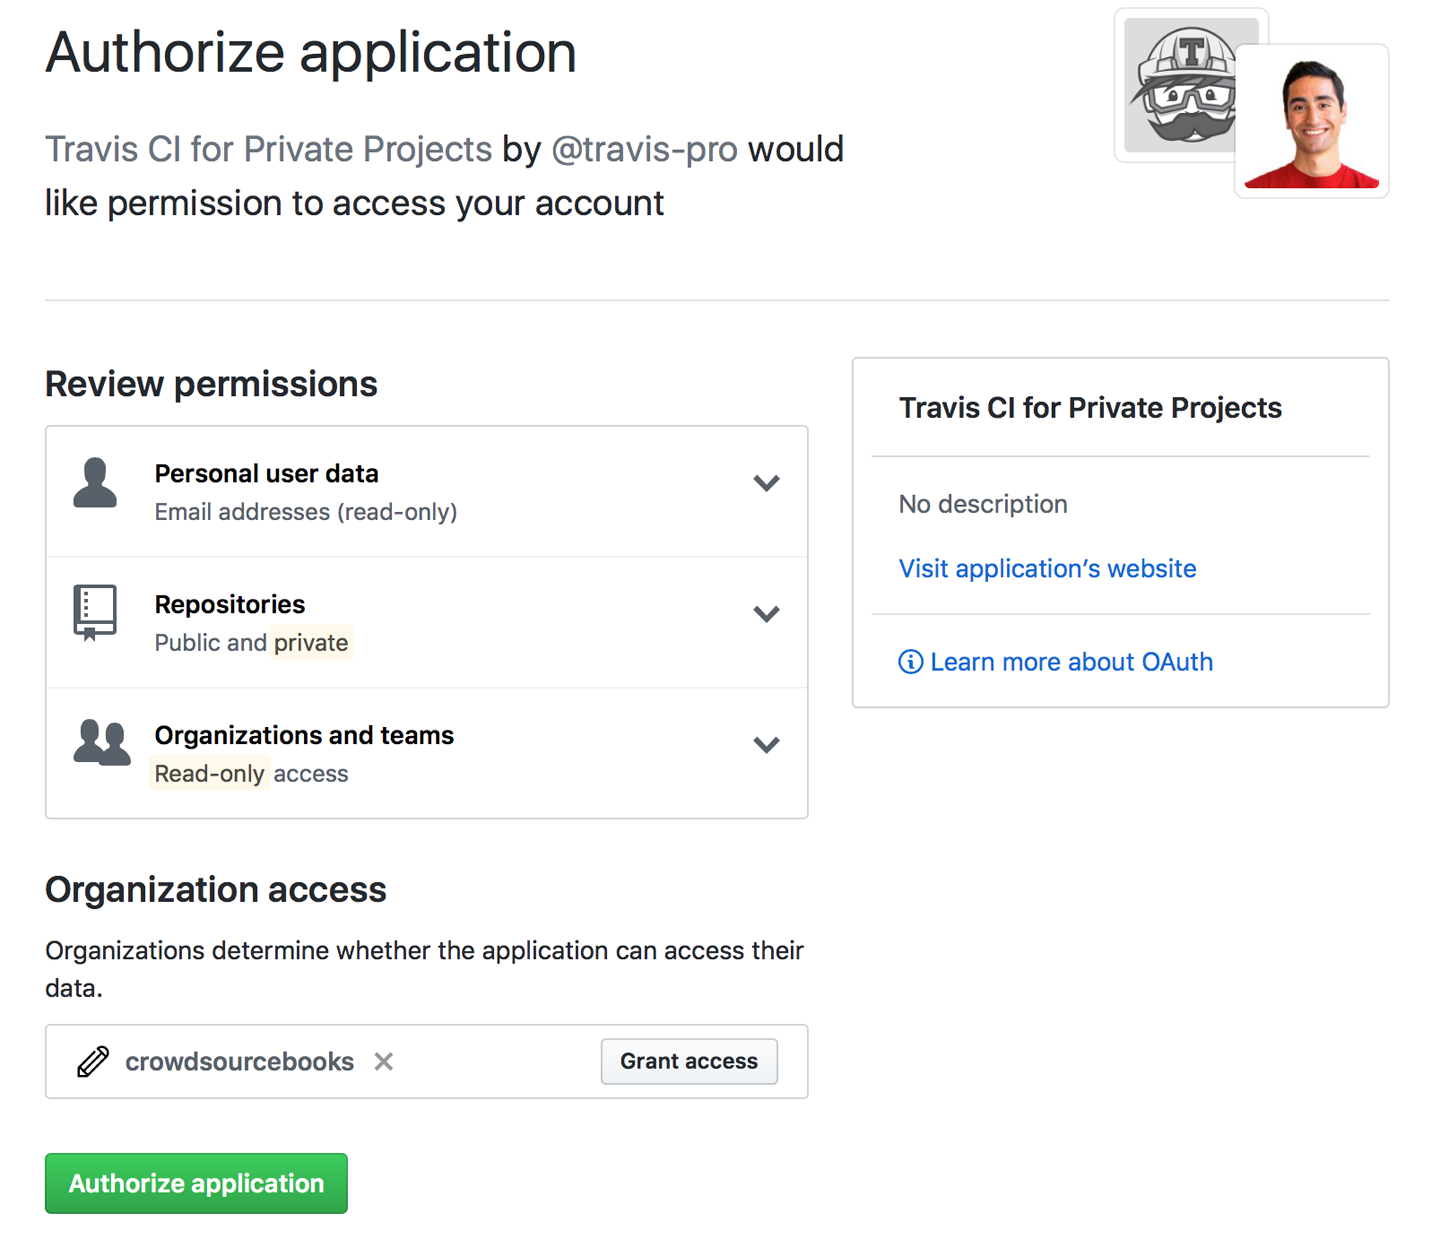
Figure 1-19. Authorizing Travis CI to access your repositories in GitHub for integration purposes
- You will now be sent to Travis CI’s landing page. On this page, click your name on the top righthand side in order to integrate Travis with your projects.
- On the page that comes up now, you should be able to see all your public repositories. If you don’t see them, click the Sync button so that Travis CI reconnects to GitHub to find all your public repositories.
- Find your iOS project’s repository name in the list of fetched repositories and then flick the little switch (see Figure 1-20) to the on state (all switches are turned off by default).
-
Right next to the switch that you just turned on, you should be able to see a gear button that sends you to the Travis settings for your project. Click that button.
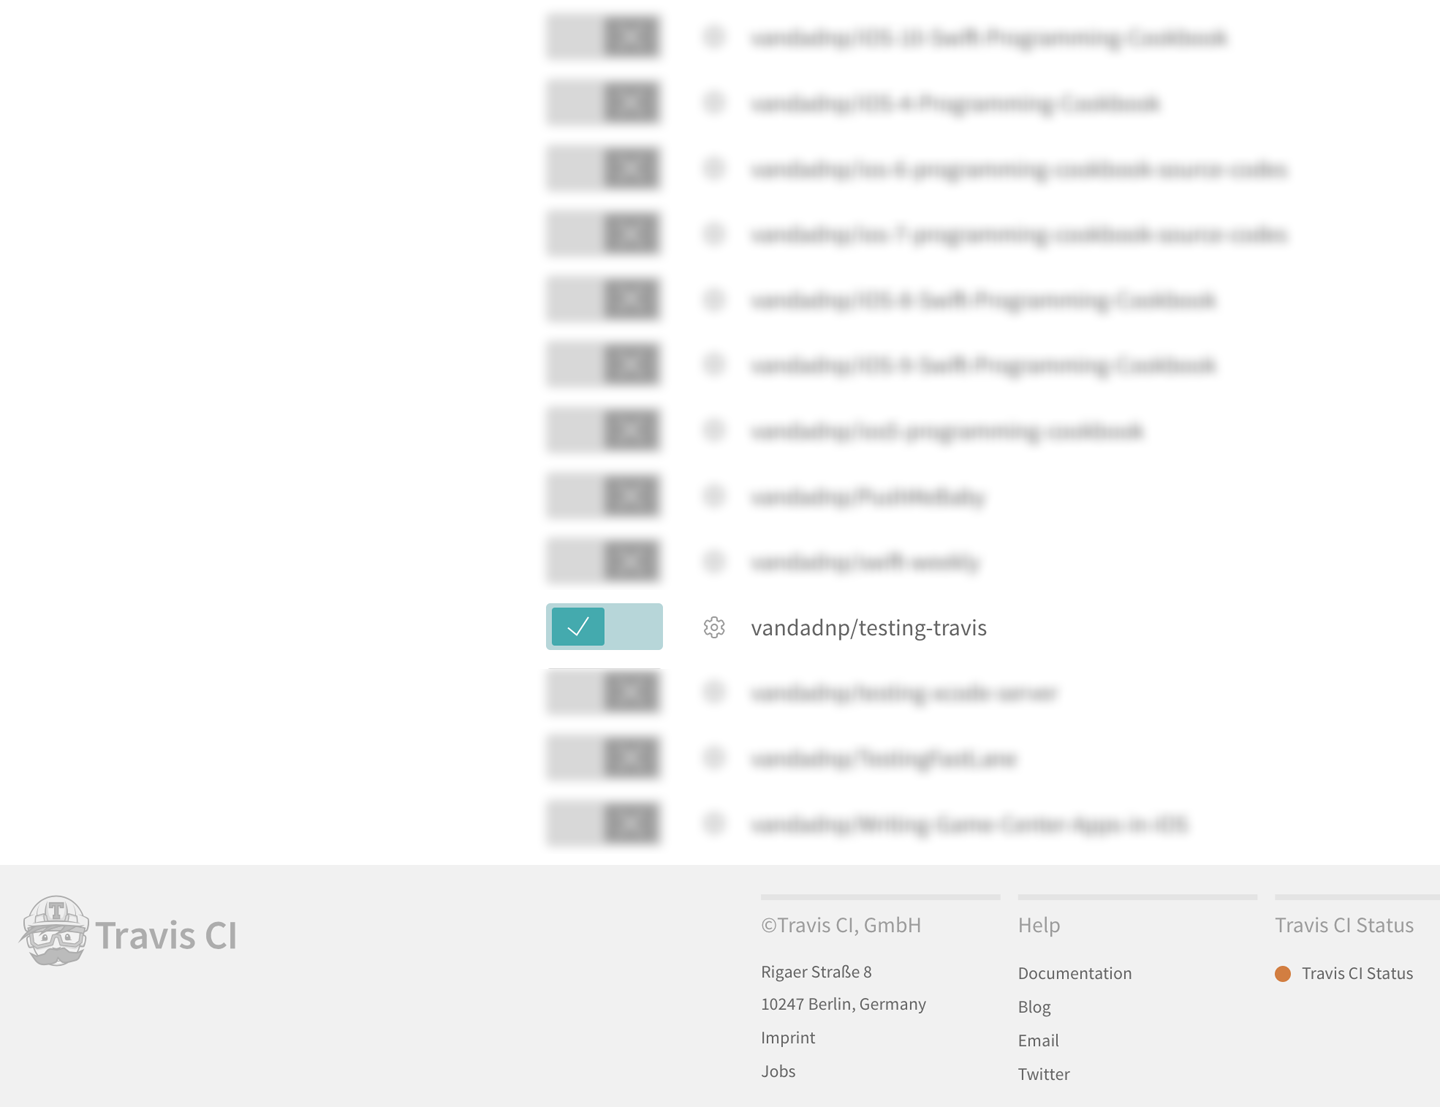
Figure 1-20. Turn Travis on for your repository
- In Travis’s settings page for your project, turn on the switch that says “Build only if .travis.yml is present.”
Discussion
After you successfully perform the steps in the Solution section, you can test that things are working as expected by going to GitHub (either the public site or your enterprise GitHub), navigating to your project’s GitHub page, and clicking Settings. Then, in the Integration & Services section (see Figure 1-21), make sure that Travis CI is present under the Services heading on the right.
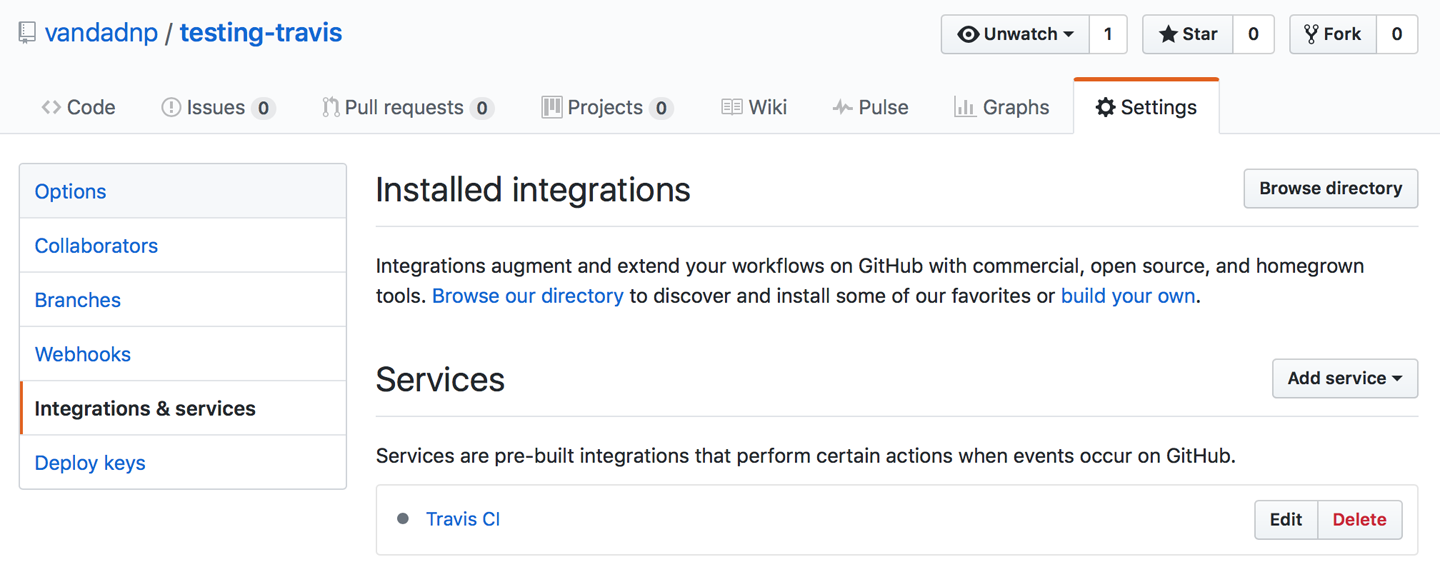
Figure 1-21. Confirming that Travis CI is successfully integrated into your GitHub project
See Also
1.7 Installing the Travis CLI
Solution
Follow the instructions provided at GitHub’s site for installing the Travis CI Client.
Discussion
Usually the status of your builds can be controlled by going to Travis’s website. However, you can also use the Travis CLI to control and manipulate the status of your builds.
After installing the Travis CLI, you need to complete the installation process using your command line, so issue the following command at your command-line prompt:
travis version
The command will then prompt you with the following question:
Shell completion not installed. Would you like to install it now?|y|
Answer Y (for yes) and then press the Enter key.
Now if you issue the same command as before (travis version), you should get a reply from the Travis CLI as expected. A few more settings have to be in place before you can fully use the Travis CLI, however. Assuming that you are currently inside a repository directory that is integrated with Travis (see Recipe 1.6), you can issue the following command to see your build history on Travis:
travis history
If this is the first time you are doing this, you will get a reply similar to that shown here:
Detected repository as vandadnp/testing-travis, is this correct?|yes|
Note
The name of the repository here is vandadnp/testing-travis. For you it may be something different but similar.
In answer to this prompt, just press the Enter key on your keyboard to continue.
Now you need to add the .travis.yml file to your project so that your builds can trigger a Travis build when they are pushed over to GitHub. This file will contain your build script and configurations. To create this file, issue the following command to the Travis CLI:
travis init
Travis will then ask you about the language you’ve chosen for your project. To this, you can reply obj-c (for Objective-C, even though your project is in Swift) and then press the Enter key. Travis will then reply to you as shown here:
travis init
Main programming language used: |Ruby| obj-c
.travis.yml file created!
not logged in, please run travis login --org
You can see that you need to give Travis the right to access your GitHub repository on your behalf in order to see your build and integration status. Travis.org is directly connected to free and public GitHub repositories, and it needs your permission to get into your repository. To do that, provide a personal access token to Travis by following these instructions:
- In your browser, navigate to your Personal access tokens page (logging in to GitHub if you are not already logged in).
- Press the “Generate new token” button.
- In the “Select scopes” section, check the repo box, which in turn checks the entire repo section for you.
- In the “Token description” field, type “Travis” or similar text that describes to you who this token belongs to.
- Once you are done, press the “Generate token” button.
You should land on a page that shows the token that was generated for you. Copy this token to your clipboard, go back to your terminal, and issue the following command:
travis login --org --github-token XXX
where XXX is the token that you just copied to your clipboard (in other words, in place of XXX just press Cmd-V on your keyboard to paste in the copied token). Once you’re done, press the Enter key. If everything goes fine, you should see a message similar to this:
SuccessfullyloggedinasABC!
where ABC is your username on GitHub. Now to ensure that everything is working as expected, issue the following command in your terminal:
travis settings
This should go to the Travis servers, fetch your repository’s settings for you, and print the results out to the console:
[+]builds_only_with_travis_yml Only run builds with a .travis.yml[+]build_pushes Build pushes[+]build_pull_requests Build pull requests0maximum_number_of_builds Maximum number of concurrent builds
See Also
1.8 Running Your Unit Tests with Travis
Solution
Follow these steps:
- Make sure that your unit tests are all written, saved inside your project, and pushed to GitHub.
- Hold the Alt key down on your keyboard and then click the Run button in Xcode.
- On the screen that pops up, press the Manage Schemes... button.
- Next to the scheme that you want Travis to run your tests on, ensure that the Shared checkbox is ticked and then press the Close button.
- In your .travis.yml file, ensure that you have specified your project name (or your workspace name if you have one), plus your scheme to run the tests on. Additionally, you will need a script to run
xcodebuildwithxcrunto run your tests, as shown here:
language: objective-c
osx_image: xcode9

xcode_project: TestingTravis.xcodeproj
xcode_scheme: TestingTravis

script: xcrun xcodebuild test -project TestingTravis.xcodeproj \
        -scheme TestingTravis -sdk iphonesimulator -destination \
        'platform=iOS Simulator,name=iPhone 7,OS=10.3'
Note
As highlighted by Apple in its Technical Note TN2339, the xcrun tool allows you to run any tool that is executable within your Xcode’s installation folder, without you having to find the path to that tool. Shortcuts for some tools are already created for you in your /user/bin folder, but other tools are hidden deep within Xcode’s installation folder. The Xcode tools that have a shortcut in the aforementioned folder are called shims, and all you need to know to run these tools is their names, not their paths. xcrun is one of these shims. This makes command-line execution of Xcode tools a pleasant experience indeed.
Warning
I am using the \ line break here to ensure that the text fits inside the page width of this book. When you are writing your scripts to run on Travis, make sure you remove these line breaks, as they are known to cause issues on Travis images.
Discussion
If you have already issued the travis init command in Terminal in your project directory (see Recipe 1.7), you should have a file called .travis.yml in your project’s root folder.
In order for Travis to run your tests, you need to satisfy three requirements:
- Specify your Xcode project’s name in your .travis.yml file using the
xcode_projectkey. - Specify the scheme that you want to be used to test your project, with the
xcode_schemekey. - Write a script in your .travis.yml file to actually run your tests.
Once you have made all these changes and committed them to your repository, ensure that you push your changes to GitHub. Also make sure to install the Travis CLI (see Recipe 1.7) on your computer. After that, you can simply monitor your build’s status on Travis with the travis history command in your terminal. The result of this command will be similar to that shown here:
#4 created: master Updated the travis file#3 failed: master Added the travis file#2 passed: master testing still#1 errored: master testing still
1.9 Building and Archiving Your Project with Travis
Solution
Follow these steps:
- Create a distribution profile, certificate, and private key for your project and export them to disk.
- Write a script that creates a keychain and saves your private key and certificate into it.
- Compile and sign your project with
xcodebuildinside a script. - Using your .travis.yml file, execute that script while your build is being executed on a Travis node.
Discussion
There are many steps involved in creating an .ipa archive. They should be done in order:
- Compile the source code and all resources.
- Produce the .app folder with the compiled source code and resources.
- Sign the .app folder with the correct profile and certificate.
- Zip up the signed .app folder plus a plist file into the .ipa archive.
Note
Follow these steps to build and archive your project with Travis. Uploading to TestFlight will be discussed in another recipe.
Xcode has an automatic code-signing setting that creates certificates and profiles for you. But because this process hides all the details of creating a certificate from you, you will not know where your private and public keys are, how certificates are created, or where profiles come into play. In this section I will focus on doing this work together with you manually so that you can see how certificates and private keys are created, in the hope of making your life easier later on when you have to export your private keys and certificates to be used on a Travis machine:
- TestFlight needs a distribution certificate, which you’ll create in your developer portal. So, head over to your Apple developer account and follow the guides that Apple provides to create your new production certificate (or distribution certificate, as it’s also called).
-
The previous step created a certificate for you. The private key for this certificate was also created for you when you created the certificate request (as outlined in the instructions by Apple). Import this certificate into your keychain to link it to its private key by double-clicking it and importing it into the login keychain (see Figure 1-22).
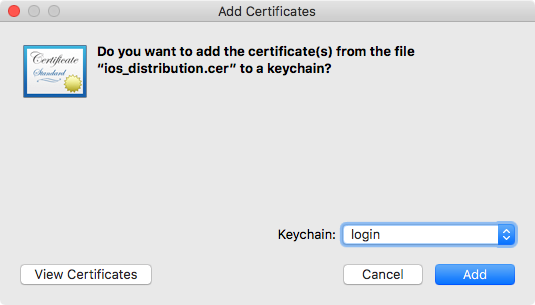
Figure 1-22. Import the certificate that you downloaded from Apple into the login keychain on your computer
- Right-click the certificate and choose to export the certificate.
-
In the dialog that appears (Figure 1-23), in the File Format drop-down, choose “Certificate (.cer).” Then set the name of the file to cert.cer and save the file in the root folder of your project. Once you are done, press the Save button.
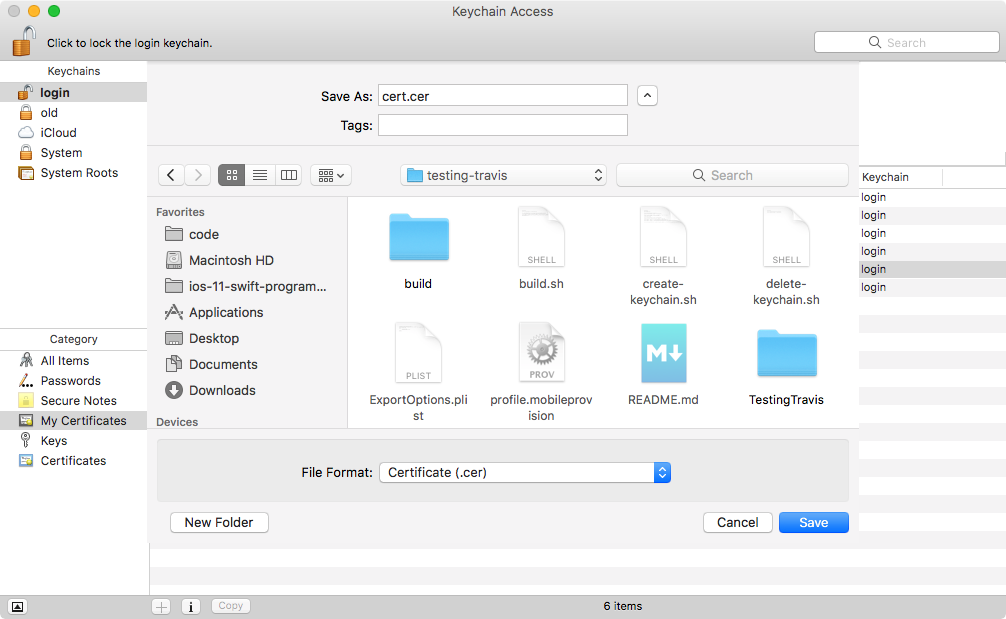
Figure 1-23. Save your distribution certificate into a file and place it in the root folder of your project
- Now expand the certificate in Keychain Access to see the private key associated with it, right-click the key, and choose the export option to export it.
-
In the dialog that appears (see Figure 1-24), navigate to the root folder of your project, choose “Personal Information Exchange (.p12)” in the File Format dropdown, and enter key.p12 as the name of the file. Once you are done, press the Save button. You are now prompted to assign a password to this private key. Enter travis as the password and then press the OK button to export the private key.
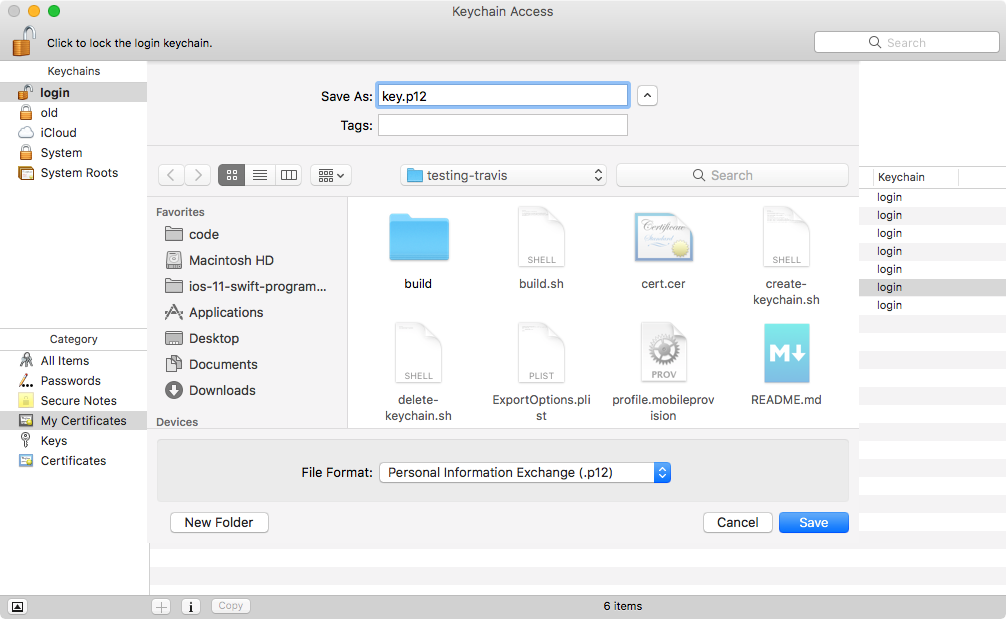
Figure 1-24. Save the private key for your certificate into a separate file in the root folder of your project
- You still need one more certificate to sign an iOS application into an .ipa file: the Worldwide Developer Relations Certificate Authority. When you are signed into your developer account, you can download this certificate from the website at the bottom of the certificate page.
-
Once you have downloaded this certificate, save it into your project’s root folder as apple.cer (see Figure 1-25).
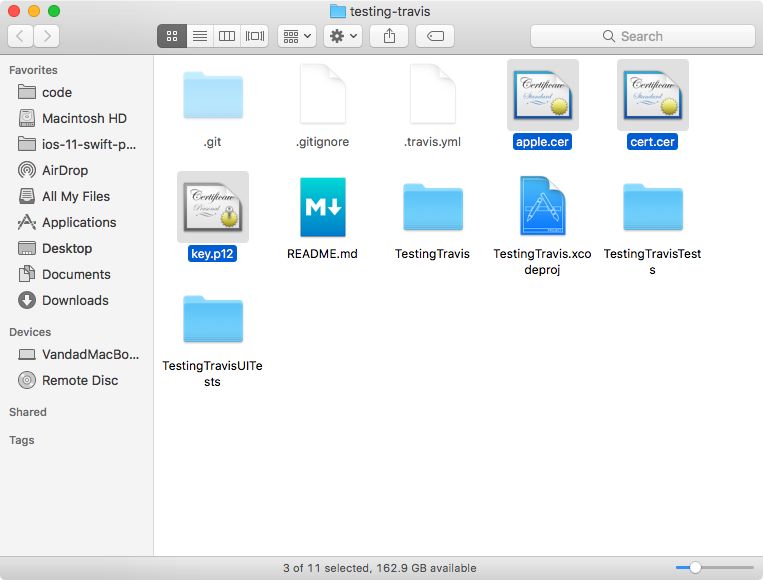
Figure 1-25. You should now have the three highlighted files in the root folder of your project under the exact same names as shown here
- Head over to the developer portal and create an application ID for your app.
- Then head over to the provisioning profiles section of the developer portal and create a new distribution profile for App Store distribution that is linked to your newly created certificate and application ID. Save the profile in the root folder of your project under the name profile.mobileprovision.
-
You then need to create a script in the root folder of your project that creates a keychain on the Travis machine on which your project is built. The script must also import your certificates into that keychain for code signing. So, create a file in the root folder of your project called create-keychain.sh with the following contents:
#!/bin/bashKEY_PASSWORD=travis# Create the keychain with a passwordsecurity create-keychain -p travis ios-build.keychain# Make the custom keychain default, so xcodebuild will use it for signingsecurity default-keychain -s ios-build.keychain# Unlock the keychainsecurity unlock-keychain -p travis ios-build.keychain# Add certificates to keychain and allow codesign to access themsecurity import ./apple.cer -k ~/Library/Keychains/ios-build.keychain -A security import ./cert.cer -k ~/Library/Keychains/ios-build.keychain -A security import ./key.p12 -k ~/Library/Keychains/ios-build.keychain -P\$KEY_PASSWORD-A securityset-key-partition-list -S apple-tool:,apple:,codesign: -s\-k travis ~/Library/Keychains/ios-build.keychain - In Terminal, give execute rights to this file with the
chmod u+x create-keychain.shcommand. -
When you create a keychain like this on the fly, it’s in your best interest to delete it once you are done, since your distribution certificate and private key are saved inside it. So, create a file called delete-keychain.sh in the root folder of your project, with the following contents:
#!/bin/bashsecurity delete-keychain ios-build.keychain security default-keychain -s login.keychain - Give this file execution rights as well, with the
chmod u+x delete-keychain.shcommand. -
Now you need a script that can actually build your project. Create a file called build.sh in the root folder of your project with the following contents:
#!/bin/bashsecurity list-keychains -s ios-build.keychain rm ~/Library/MobileDevice/Provisioning\Profiles/profile.mobileprovision mkdir -p ~/Library/MobileDevice/Provisioning\Profiles/ cp profile.mobileprovision ~/Library/MobileDevice/Provisioning\Profiles/ xcrun xcodebuild -project TestingTravis.xcodeproj -scheme TestingTravis\-archivePath TestingTravis.xcarchive archive xcrun xcodebuild -exportArchive -archivePath TestingTravis.xcarchive\-exportPath . -exportOptionsPlist ExportOptions.plist - Give this file execution rights as well with the
chmod u+x build.shcommand. -
As required by
xcodebuild, your build script uses a file called ExportOptions.plist that tells Xcode whether the project should be built as an ad hoc build, an App Store build, or a development build. We are building an App Store application now. So in the root folder of your project, create a file called ExportOptions.plist (you can use Xcode to create a plist file if you want), with the following contents:<?xml version="1.0" encoding="UTF-8"?><!DOCTYPE plist PUBLIC "-//Apple//DTD PLIST 1.0//EN""http://www.apple.com/DTDs/PropertyList-1.0.dtd"><plistversion="1.0"><dict><key>method</key><string>app-store</string></dict></plist> -
Now you need to change the contents of your .travis.yml file so that it executes your scripts properly:
language:objective-cosx_image:xcode9xcode_project:TestingTravis.xcodeprojxcode_scheme:TestingTravisbefore_script:./create-keychain.shscript:./build.shafter_script:./delete-keychain.sh
Once you are done with all of this, commit and push your changes to GitHub in order to see how Travis does with your build. Remember that you can monitor the status of your builds using the travis history command if you have installed the Travis CLI on your computer (see Recipe 1.7).
See Also
1.10 Installing and Setting Up fastlane
Problem
You want to start using fastlane to streamline your building, testing, and distribution process.
Note
If you are looking for a reason as to why you would even want to use fastlane, the answer is simple: to save time and energy and let the dedicated team of developers who work on fastlane fix any issues related to continuous delivery and integration. For instance, if you use the gym command in fastlane, you will be building your application and producing some form of a binary application that is submittable to Apple. This command is really as simple as that; just run fastlane gym and fastlane will figure out itself how to build your project. If you want to do the same thing manually, you will need a deeper knowledge of how the xcrun and xcodebuild commands work and their nightmare-like lists of parameters.
Solution
To use fastlane, you need to have a Ruby environment set up on your computer (with the Ruby installation utility gem), and you need to install fastlane. fastlane is a set of Ruby scripts maintained as an open source project on GitHub and backed by Google. In order to install fastlane, execute the following command in your Terminal:
sudo gem install fastlane -NV
You will be asked for your local computer account’s password. After providing that password, if everything goes according to plan, you should see a message similar to 49 gems installed in your Terminal. Obviously the number there depends on how many Ruby gems were installed in the process of installing fastlane.
After fastlane is installed on your computer, you will need to set it up for your project. fastlane needs to have some information about your project, such as its bundle identifier and profiles that it uses to build the project, in order to integrate with your project.
Follow these steps to set up fastlane for your project:
- Open Terminal and navigate to where your project is saved.
- Run fastlane in Terminal.
- You will be asked if you want to integrate your project with fastlane. Answer
yto this question. - You will then be asked to enter your Apple ID. Enter your Apple ID and then press the Enter key on your keyboard.
- You should now be asked to enter your Apple ID password. This is so that fastlane can log in to iTunes Connect on your behalf and access your profiles. This password will be saved to your keychain locally on your computer.
Note
When you integrate fastlane with Travis, you can pass your iTunes Connect password to fastlane using the
FASTLANE_PASSWORDenvironment variable and encrypt this password in your .travis.yml file using Travis’s own CLI. More about this later. - fastlane then presents the detected information about your project to you. If this information is correct, enter
yto continue.
If everything went according to plan, you should now have a folder in your project called fastlane with the following contents (issue the ls fastlane command in Terminal to see this folder’s contents):
ls fastlane
Appfile     Deliverfile Fastfile    metadata    screenshots
Discussion
While Travis is a tool for continuous integration, fastlane is used for continuous delivery. In other words, Travis builds your projects, while fastlane is the tool with which it builds them. fastlane can also help you upload your builds to iTunes Connect and generally makes the process of building, testing, and distributing your iOS apps easier than using shell scripts. However, it is a dependency nonetheless, which can be its weak point in that it lags behind official Xcode releases by sometimes days, if not more, and has its own set of bugs that are managed online in GitHub.
fastlane is a set of open source tools maintained by Google. This project started as a hobby project for one developer many years ago, then was bought by Twitter and then bought by Google, where it currently lives. You can read more about it at https://github.com/fastlane/.
You need to set up fastlane once for every project and then configure it as you go using the different files that get saved in the fastlane/ folder inside your project’s root folder, as you will see soon!
See Also
1.11 Building Your Apps with fastlane
Solution
Assuming that you have already followed the instructions in Recipe 1.10 to set up fastlane for your project, all you have to do to build your project with fastlane is:
-
Open the fastlane/Fastfile file in your favorite editor.
Note
Because this file doesn’t have an extension, most editors won’t be able to color code it for you. If your editor allows you to manually specify a language for the input document, choose Ruby. I personally use Visual Studio Code, a free downloadable tool, for this type of editing.
-
Find the beta lane that was created for you by default, by searching the file for its method definition:
desc"Submit a new Beta Build to Apple TestFlight"desc"This will also make sure the profile is up to date"lane:betadogym(scheme:"TestingTravis")pilotend -
Duplicate all this code and create a new lane called build that calls only the gym action, and not pilot:
lane:builddogym(scheme:"TestingTravis")endNote
The application for which I am demonstrating fastlane’s capabilities is called TestingTravis, the same app used in previous recipes in this chapter. Remember to change this name in your gym action to reflect the name of the project that you are building with fastlane.
- From Terminal, run the
fastlane buildcommand.
If you have set up your profiles and certificates correctly in your project and keychain, the result of the fastlane build command should be similar to the following:
+------+-------------------------------------+-------------+|fastlane summary|+------+-------------------------------------+-------------+|Step|Action|Time(in s)|+------+-------------------------------------+-------------+|1|Verifying required fastlane version|0||2|default_platform|0||3|gym|29|+------+-------------------------------------+-------------+[22:04:25]: fastlane.tools finished successfully
Discussion
fastlane employs the idea of a lane, a set of instructions to fastlane that indicate how it should react. For instance, when you set up fastlane for the first time for your project, you will be given a lane that is called beta. That means that if you run the fastlane beta action from Terminal while in your project’s folder, fastlane will go to the fastlane/Fastfile file, find the lane called beta, and run its instructions.
Every lane in your Fastfile is constructed of one or more actions, or instructions, that fastlane understands. These actions are well documented on the GitHub page for fastlane. One of the most important of these actions is gym, which builds your application. You can pass many parameters to the action in order to specify how your application has to be built. In order to get a better understanding of which parameters you can pass to the gym action, run the fastlane gym help action from Terminal. Here is a short list of some of the most important parameters you can pass to the gym action:
workspaceThe name of the workspace that the gym action has to use to build your project.
projectThe name of the project file itself inside the root folder of your application. If you are specifying a workspace, you should not use this parameter; use the
schemeparameter instead.schemeThe name of the Xcode scheme that will be used to build your application.
cleanA Boolean value that indicates whether your project has to be cleaned before building.
configurationThe name of the configuration that will be used to build your application.
codesigning_identityThe name of the code-signing identity that has to be used to build your scheme. This will take precedence over the code-signing identity that you have specified in Xcode for the scheme you want to use for the build. If you don’t specify a code-signing identity in gym, the code-signing identity that is specified in your project file will be used for the given scheme.
Here is our build lane again, extended to take in a few more parameters:
lane:builddogym(scheme:"TestingTravis",clean:true,configuration:"Release")end
See Also
1.12 Testing Your Apps with fastlane
Solution
Execute the scan action in your Fastfile. By default, when you set up fastlane for your project (see Recipe 1.10), you will get a lane called test in your Fastfile, which you can execute with the following command in Terminal:
fastlane test
If everything goes as expected, you should see the command’s output in Terminal as shown here:
+------+-------------------------------------+-------------+|fastlane summary|+------+-------------------------------------+-------------+|Step|Action|Time(in s)|+------+-------------------------------------+-------------+|1|Verifying required fastlane version|0||2|default_platform|0||3|scan|35|+------+-------------------------------------+-------------+[20:49:50]: fastlane.tools finished successfully
The default implementation of the test lane in your Fastfile will probably look like this:
desc"Runs all the tests"lane:testdoscanend
Discussion
We saw a couple of fastlane’s actions in Recipe 1.11; the action we use for testing is scan. As its name indicates, it allows you to scan your code for bugs, which it does by running your unit or UI tests, based on which test target you ask it to run.
The scan action makes a few assumptions about your project if it is run without any parameters (which is the default setup). It will:
- Find the first test target in the project and run it.
- Use the default simulator to run the tests.
Note
If you want to specify a new target for scan, use the scheme parameter. A scheme is bound to a target, so by specifying a scheme, you are implicitly choosing a target.
Some of the most important parameters you can pass to scan are:
workspaceThe name of the workspace in which your test target exists, if any.
projectThe name of the project under which your test target exists. You need to specify either a workspace or a project, but not both.
deviceThe name of the device to run your tests on, such as
'iPhone 7'.devicesA comma-separated array of test devices to run your tests on, such as
['iPhone 7', 'iPad Pro'].schemeThe name of the scheme under which to run your tests. Remember that your scheme has to be marked as a Shared scheme in order for fastlane to be able to use it from the command line (see Recipe 1.8).
cleanA Boolean value indicating if all existing and old build artifacts have to be cleaned and the project rebuilt before the tests are run.
configurationThe name of the configuration that will be used to build and test your project. The default value is
Debugfor the scan action, while the same parameter isReleasefor gym.
Here is an example of how you can extend the default test lane in your Fastfile with some of the aforementioned parameters to the scan action:
desc"Runs all the tests"lane:testdoscan(project:'TestingTravis.xcodeproj',scheme:'TestingTravis',clean:true,configuration:'Debug',devices:['iPhone6','iPhone7'])end
See Also
1.13 Enabling Slack Notifications in fastlane
Problem
You want to post notifications from fastlane to your Slack channel, regarding:
- Errors found by gym when building your project
- Issues found by scan while testing your project
Note
You can ask fastlane to report any errors that might occur during the execution of your lanes, using channels such as Slack or email. You do this by defining a function in your Fastfile called error do |lane, exception|.
Solution
Use the various custom Slack parameters that you can pass to the gym and scan actions, namely:
slack_urlThe URL to a private webhook into your Slack team. You will learn how to retrieve such a URL later in this recipe.
slack_channelThe name of the Slack channel where notifications will be posted.
slack_messageA custom message that will be posted alongside the standard message that fastlane posts to Slack.
slack_only_on_failureA Boolean value indicating whether you want Slack messages to be posted only when the build/testing fails.
Here is an example of a test lane that uses scan to run your unit tests and post the results to Slack:
desc"Runs all the tests"lane:testdoscan(project:'TestingTravis.xcodeproj',scheme:'TestingTravis',clean:true,configuration:'Debug',devices:['iPhone6','iPhone7'],slack_url:'https://hooks.slack.com/services/id',slack_channel:'fastlane',slack_message:'AcustommessagefromFastlane',slack_only_on_failure:false)end
Note
Your webhook URL will look similar to that provided here; the only difference will be your id, a unique string of digits.
And the results, if everything goes fine, will look like Figure 1-26 in Slack.
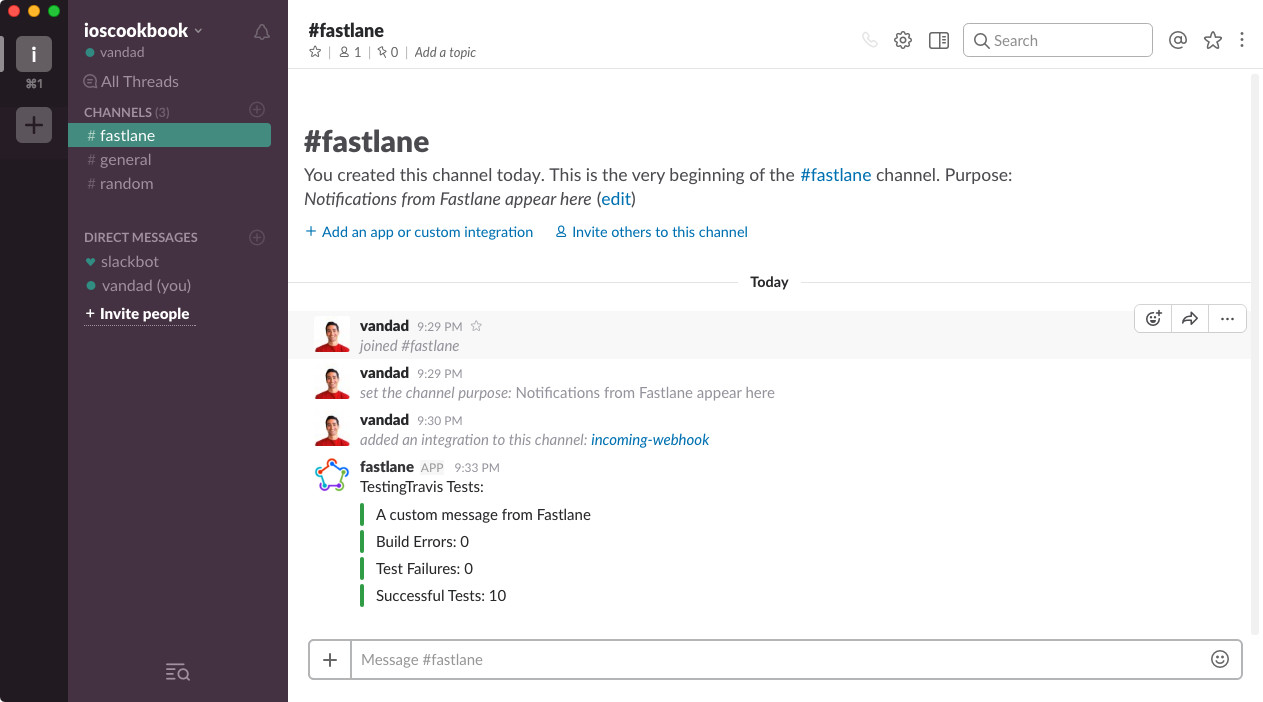
Figure 1-26. Results of the fastlane test command
Discussion
Slack provides webhook URLs that you can use to post JSON payloads. Slack will render the JSON as a nicely formatted message. To create a webhook into your Slack team, you have to have administrator privileges in your team. If you don’t have those privileges, you can ask the current administrator for temporary privileges so that you can set up incoming webhooks on Slack, then go back to your regular privileges.
To retrieve a webhook URL in your Slack team, follow these instructions:
- From the Channel Settings menu in Slack, choose the “Add an app or integration” option.
- In the search bar that gives you access to the different apps and integrations that you can add to your Slack channel, search for incoming webhooks and once it is found, click it.
-
Press the Add Configuration button shown in Figure 1-27.

Figure 1-27. Locating the incoming webhooks plug-in for Slack
-
On the next page, choose the Slack channel in which to create the webhook (see Figure 1-28). You can also create a Slack channel right there and then choose it. In the figure, I have chosen for all fastlane messages to be posted to a Slack channel that is also called fastlane. You might want to choose another name or an existing Slack channel in your team.
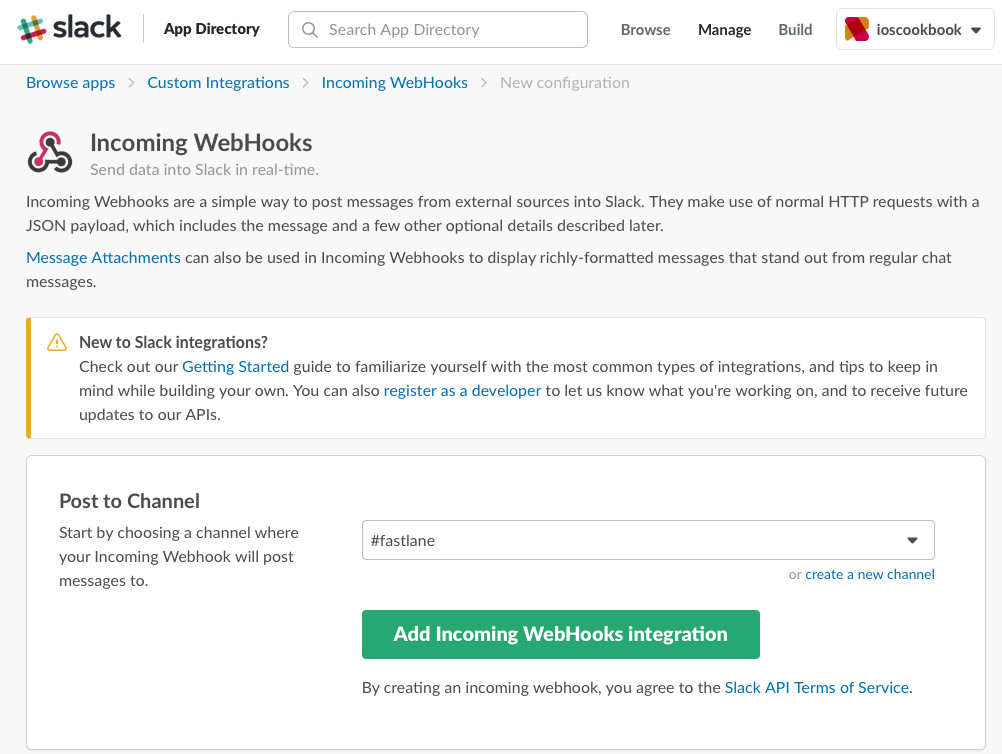
Figure 1-28. Choosing a Slack channel to which fastlane will post messages
- When you are done, press the “Add Incoming WebHooks integration” button shown in Figure 1-28.
- On the next page, you will now see your new webhook URL. Copy this value and keep it safe in your computer, because you are going to need it to configure fastlane.
- In your Fastfile, set the
slack_urlparameter of the action generating the notifications (gym or scan) to the webhook URL that you retrieved in the previous step. - In the same file, set the value of the
slack_channelparameter to the name of the Slack channel for which you created the webhook. - Optionally, set the value of the
slack_messageparameter to a message that will be posted alongside every notification from fastlane onto this hook. - And last but not least, in the same file, if you want to receive notifications even for successful builds or tests, set the
slack_only_on_failureparameter tofalse.
Now you can run your tests or make a build with fastlane and test the results in Slack.
Note
If you want to test these things out without polluting your company’s Slack channels, you can always create your own Slack team and personal channels.
1.14 Archiving Your Apps with fastlane
Solution
Use the gym fastlane action with the following parameters:
schemeProvide here the name of the shared scheme that will be used to build your app.
cleanProvide the value of
trueto this parameter to ensure no residual derived data from a previous build will contaminate your App Store archive.configurationProvide the value of
Releaseto this parameter. If you have created a custom release configuration, provide its name here.output_directoryProvide the value of
./build/to this parameter, because it’s the most common directory to place build artifacts inside your current project folder.output_nameProvide the value of
build.ipato this parameter so that your output .ipa file will be saved as build.ipa under your build folder.export_methodProvide the value of
app-storeto this parameter to ensure that your project gets built for the App Store.archive_pathProvide the value of
./build/build.xcarchiveto this parameter so that gym, in addition to creating a signed App Store .ipa file, creates an .xcarchive folder that contains your dSYM files and .app folder for archiving purposes.
Note
The gym action uses your target’s settings for the code-signing certificate and profile, so ensure that you have set those up properly before running gym.
Discussion
Edit your fastlane/Fastfile file with your favorite editor and create a new lane named archive. Inside this lane, place your gym action with the previously mentioned parameters and their corresponding values:
lane:archivedogym(scheme:"TestingTravis",clean:true,configuration:"Release",output_directory:"./build/",output_name:"build.ipa",export_method:"app-store",archive_path:"./build/build.xcarchive")end
Now from Terminal, issue the following command:
fastlane archive
If everything goes as expected, you should now see the following results printed to Terminal:
[20:20:01]: Successfully exported and compressed dSYM file[20:20:01]: Successfully exported and signed the ipa file: +------+-------------------------------------+-------------+|fastlane summary|+------+-------------------------------------+-------------+|Step|Action|Time(in s)|+------+-------------------------------------+-------------+|1|Verifying required fastlane version|0||2|default_platform|0||3|gym|23|+------+-------------------------------------+-------------+[20:20:01]: fastlane.tools finished successfully
And if you navigate to the build folder, you should see:
- dSYM files zipped up together nicely
- An Xcode Archive folder
- A signed .ipa file
➜ testing-travis git:(master)✗cdbuild ➜ build git:(master)✗ ls archive build.app.dSYM.zip build.ipa build.xcarchive
See Also
1.15 Uploading Your Apps to iTunes Connect with fastlane
Solution
Follow these steps:
- Log in to iTunes Connect and create your application template there. You don’t have to upload any screenshots or any other information.
- Ensure that your iOS app has all its necessary icons. To do so, open the asset catalogue file that hosts your icons and ensure that all the icons are present. If any icon is missing, iTunes Connect will reject your binary file.
- Open your fastlane/Fastfile and find the archive lane that has already been created for you.
-
In that lane, call the gym action that will build your application (see Recipe 1.14) followed by the deliver action that will actually deliver your app to iTunes Connect. A typical action is:
desc"Deploy a new version to the App Store"lane:releasedogym(scheme:"TestingTravis",clean:true,configuration:"Release",output_directory:"./build/",output_name:"build.ipa",export_method:"app-store",archive_path:"./build/build.xcarchive")deliver(force:true)end - From Terminal, run the
fastlane releasecommand.
If everything goes as expected, you should see the following results printed to the console:
[21:23:13]: Finished the upload to iTunes Connect +------+-------------------------------------+-------------+|fastlane summary|+------+-------------------------------------+-------------+|Step|Action|Time(in s)|+------+-------------------------------------+-------------+|1|Verifying required fastlane version|0||2|default_platform|0||3|gym|22||4|deliver|175|+------+-------------------------------------+-------------+[21:23:13]: fastlane.tools finished successfully
Discussion
fastlane has many actions, including deliver. As its name indicates, it is used to deliver your application to the user, through TestFlight and iTunes Connect.
The deliver action takes a few parameters, the most important of which are:
forceIf the value of this parameter is
true, fastlane will return immediately after uploading your binary to iTunes Connect, without waiting for your binary to finish processing on iTunes Connect. Every binary that gets uploaded to iTunes Connect goes through a processing stage where iTunes determines whether it follows most of the guidelines set out by Apple, such as including the necessary icons and avoiding the use of private APIs. This process can take a long time, sometimes up to a few hours! You probably don’t want your build system to wait until iTunes Connect has finished processing your build; in that case, provide the value oftrueto this parameter.submit_for_reviewBy default, deliver submits your app to iTunes Connect for TestFlight testing only. Submit the value of
trueto this parameter if you want deliver to also send your app to the App Review team at Apple for approval.automatic_releaseSet the value of this parameter to
trueif you want your app to be automatically released to users when it has successfully gone through the App Review team at Apple.primary_categoryThis parameter determines the primary category of your application, such as
Entertainment.secondary_categoryThis parameter determines the second category of apps to which your app belongs.
descriptionThis parameter provides information regarding the description of your application in iTunes Connect.
keywordsThe value of this parameter is an array of strings that provide the keywords in iTunes with which users can search for your app.
release_notesYou can provide your release notes for this build by providing a value to this parameter.
See Also
Get iOS 11 Swift Programming Cookbook now with the O’Reilly learning platform.
O’Reilly members experience books, live events, courses curated by job role, and more from O’Reilly and nearly 200 top publishers.

