Chapter 1. iMessage Stickers and Apps
We all use messaging capabilities on our iOS devices. This is a bold statement and I have no proof for it, but it’s difficult to imagine a person owning an iOS device without having sent or received messages. The main messaging application on iOS is iMessage, but it’s not the only messaging option for iOS. You can download and choose among a huge selection of various messaging applications.
Up until iOS 10, iMessage was fully closed. That is to say, it lived in its own sandbox (and still does), and did not allow any extensions to be attached to it. In iOS 10 that has changed, and we developers can finally write our own iMessage extensions that allow even more interactivity to be added to our conversations.
iMessage apps can be of two different types:
- Sticker packs
- This is a special, unusual kind of app that contains only images, with absolutely no code. You can create this kind of app so users can send the images to one another in iMessage. For instance, if you offer a sticker pack full of heart shapes, users can then download the app and attach those hearts to messages that they or others send. In other words, as the name implies, images can stick to messages!
- Full-fledged apps
- This is where you have full control over how your iMessage app works. You can do some really fun stuff in this mode, which we will review soon. For instance, you can change an existing sticker that was sent previously by one of your contacts, so that you and the person you’re chatting with can collaboratively send and receive messages to each other.
1.1 Setting Up a Sticker Pack Application
Solution
Follow these steps:
- Open Xcode if it’s not already open.
-
Create a new project. In the new project dialog, choose Sticker Pack Application and then click Next (Figure 1-1).
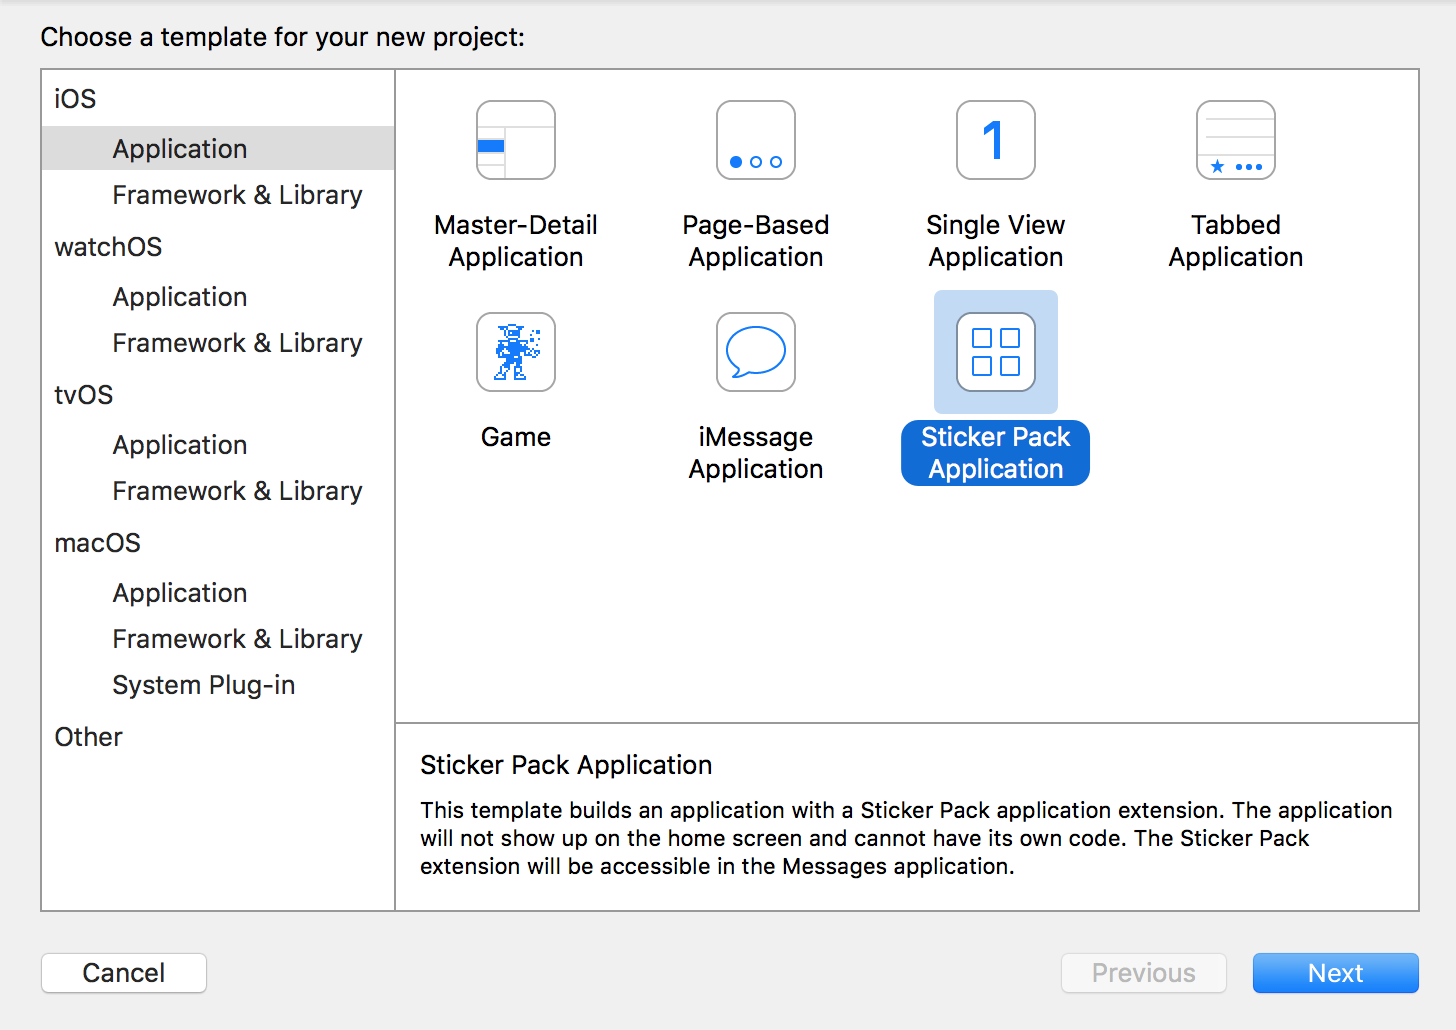
Figure 1-1. Creating a new sticker pack application for iMessage
-
Enter a product name for your project and then click Next (Figure 1-2).
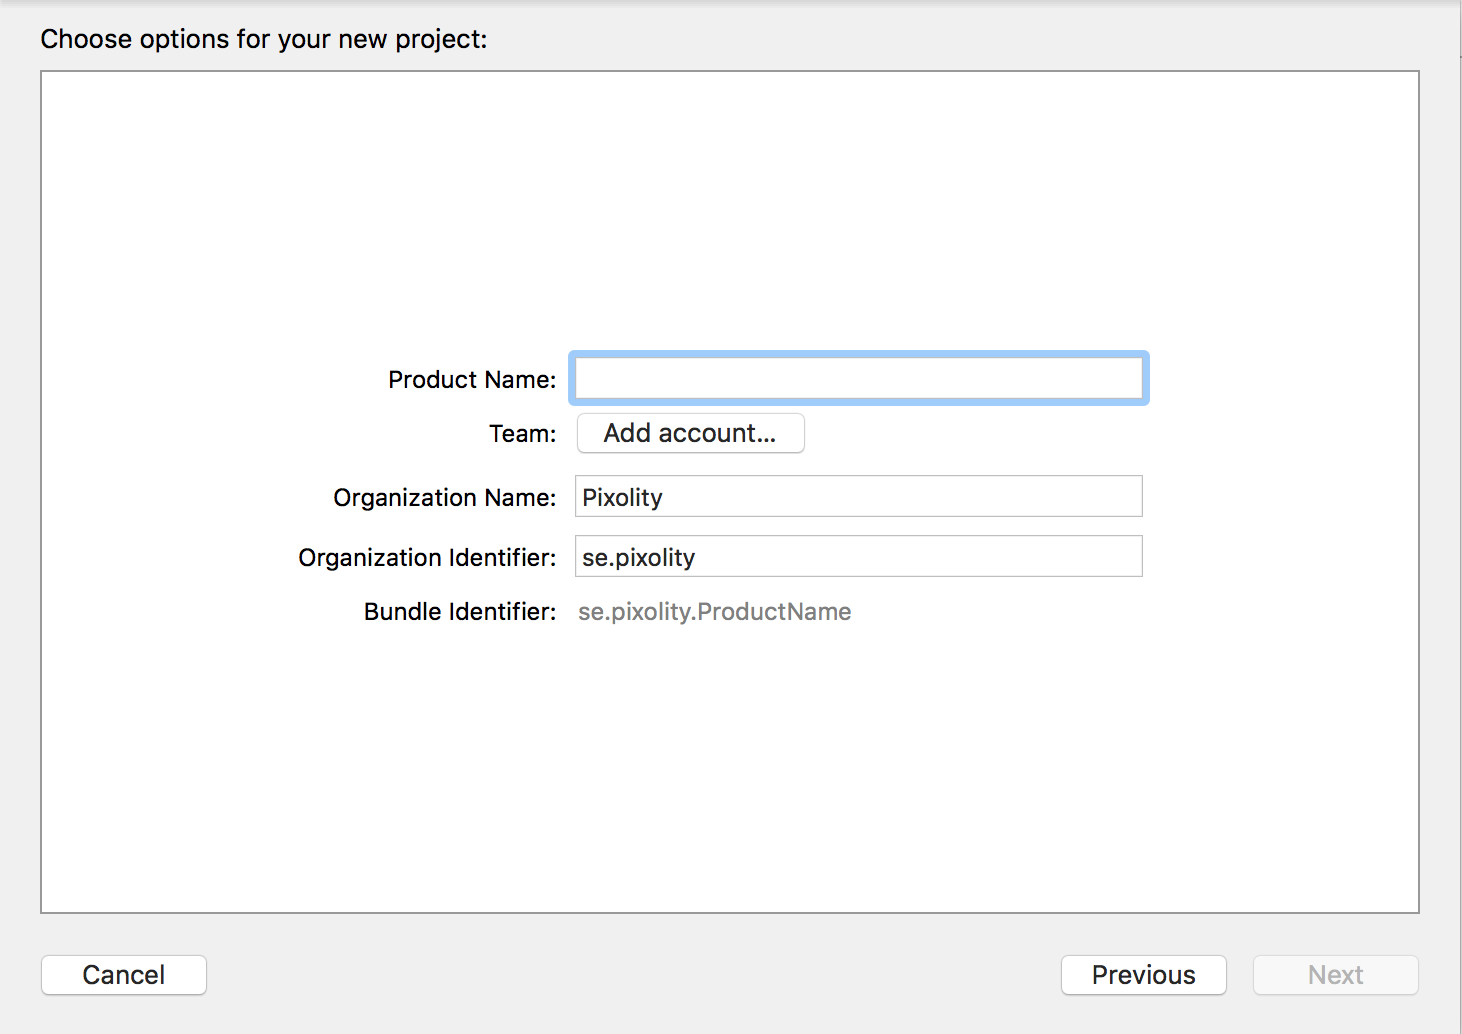
Figure 1-2. Enter your sticker pack application’s product name here
- You will then be asked to save the project somewhere. Choose an appropriate location to save the project to finish this process.
- You should now see your project opened in Xcode and then a file named Stickers.xcstickers. Click on this file and place your sticker images inside.
- After you’ve completed these steps, test your application on the simulator and then on devices as thoroughly as possible. Once you are happy, you need to code sign and then release your app to the iMessage app store.
Discussion
With the opening up of iMessage as a platform where developers can build stand-alone apps, Apple has created a new type of store called iMessage App Store, where applications that are compatible with iMessage will show up in the list and users can purchase or download them without cost.
If you create a sticker pack app with no accompanying iOS app, your app shows up only in the iMessage App Store. If you create an iOS app with an accompanying iMessage extension (stickers), your app shows up both in the iOS App Store (for the main iOS app) and also in the iMessage App Store (for your iMessage extension).
Note
Your stickers can be PDF, PNG, APNG (PNG with an alpha layer), JPEG, or even (animated) GIF, but Apple recommends using PNG files for the sake of quality. If you are desperate to create a sticker app but have no images to test with, simply open Finder at /System/Library/CoreServices/CoreTypes.bundle/Contents/Resources/, then open the ICNS files in that folder with Preview.app, export those ICNS files into PNG files, and drag and drop them into your Stickers.xcstickers file in Xcode. Then build and run your project on the simulator.
1.2 Adjusting Sticker Sizes
Solution
Follow these steps in order to change the sticker sizes:
- While in Xcode, click on the Stickers.xcstickers file that Xcode created and placed in your project.
- Open the Attributes inspector in Xcode using Command-Alt-4.
- Locate the Sticker Pack section and then Sticker Size drop-down list in the Attributes inspector and choose between Small, Medium, and Large (Figure 1-3).
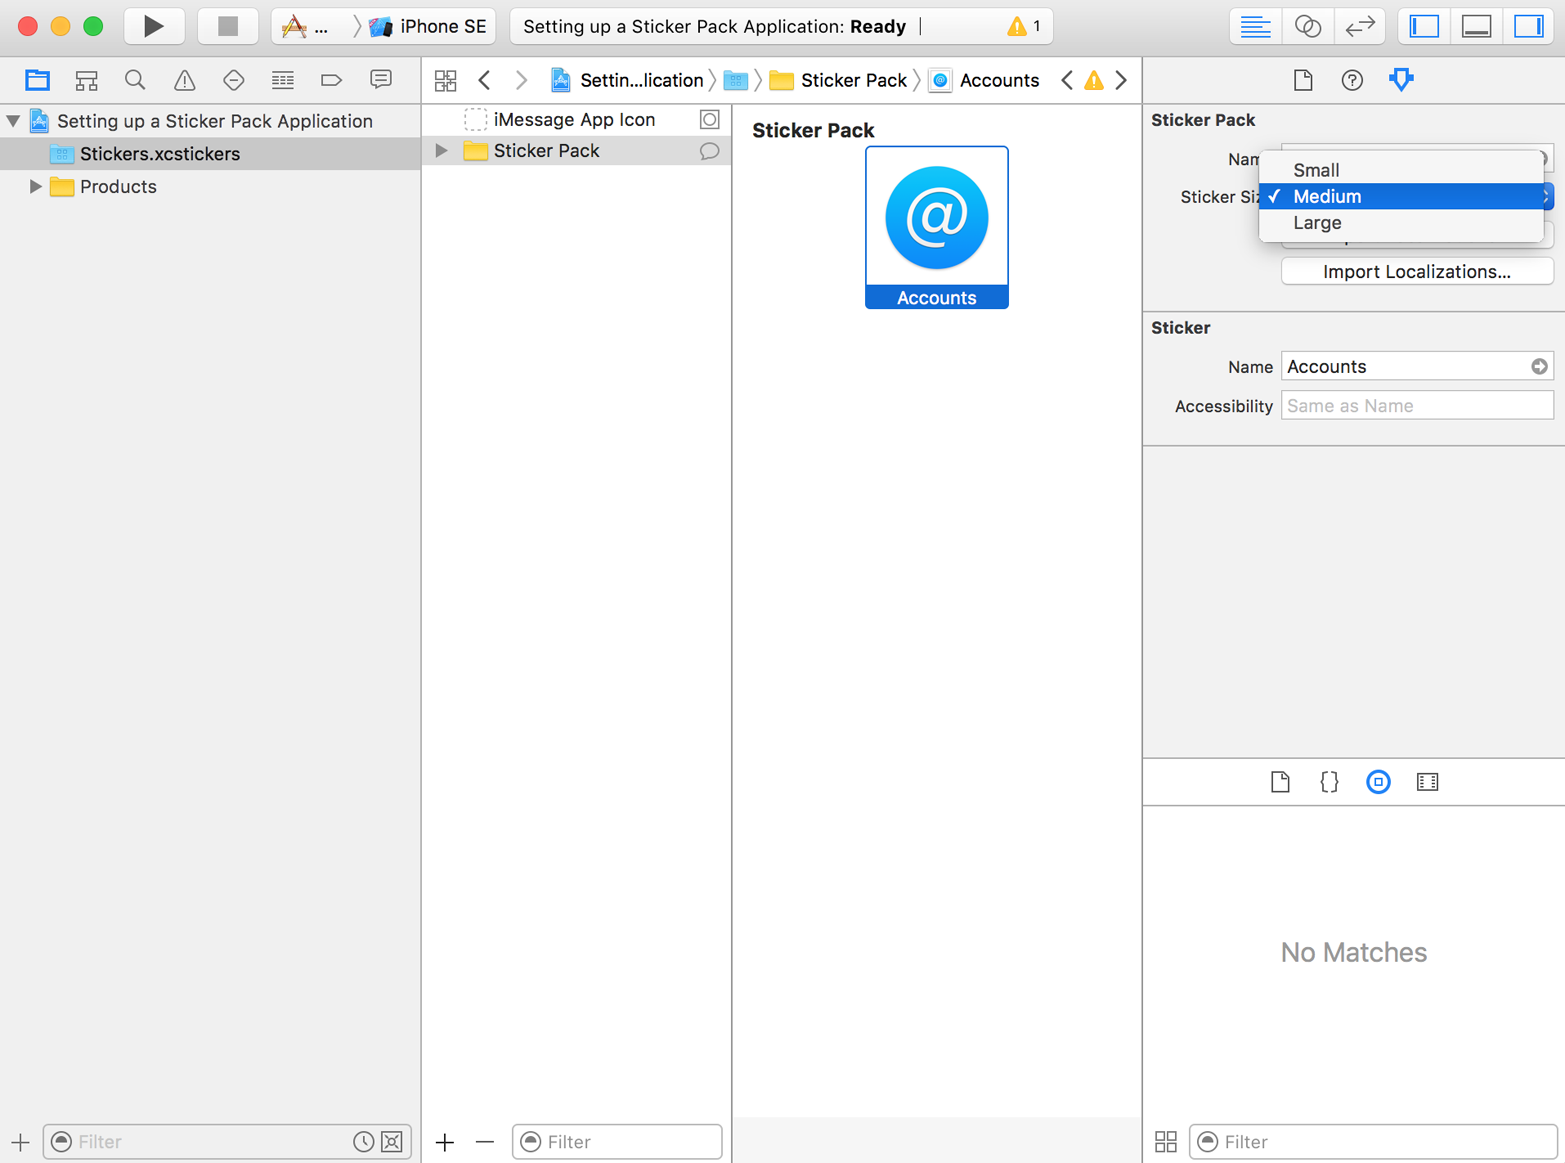
Figure 1-3. Changing the sticker size in the Attributes inspector in Xcode
Discussion
After you ship your sticker applications to the iMessage store and a user downloads them to her device, your stickers appear at a specific size both on the user’s device and when sent to the recipient. This size is adjustable—not per sticker, but for the whole sticker pack. All stickers must have the same size.
After you have changed this size, test your app thoroughly on the simulator and on the device before shipping it to the iMessage app store. Ensure that there are no fuzzy edges on your images and that curves look smooth.
See Also
1.3 Building a Full-Fledged iMessage Application
Solution
Create an iMessage application in Xcode by following these steps:
- Open Xcode if it’s not already open.
-
Create a new project. In the template window choose iMessage Application and then click Next (Figure 1-4).
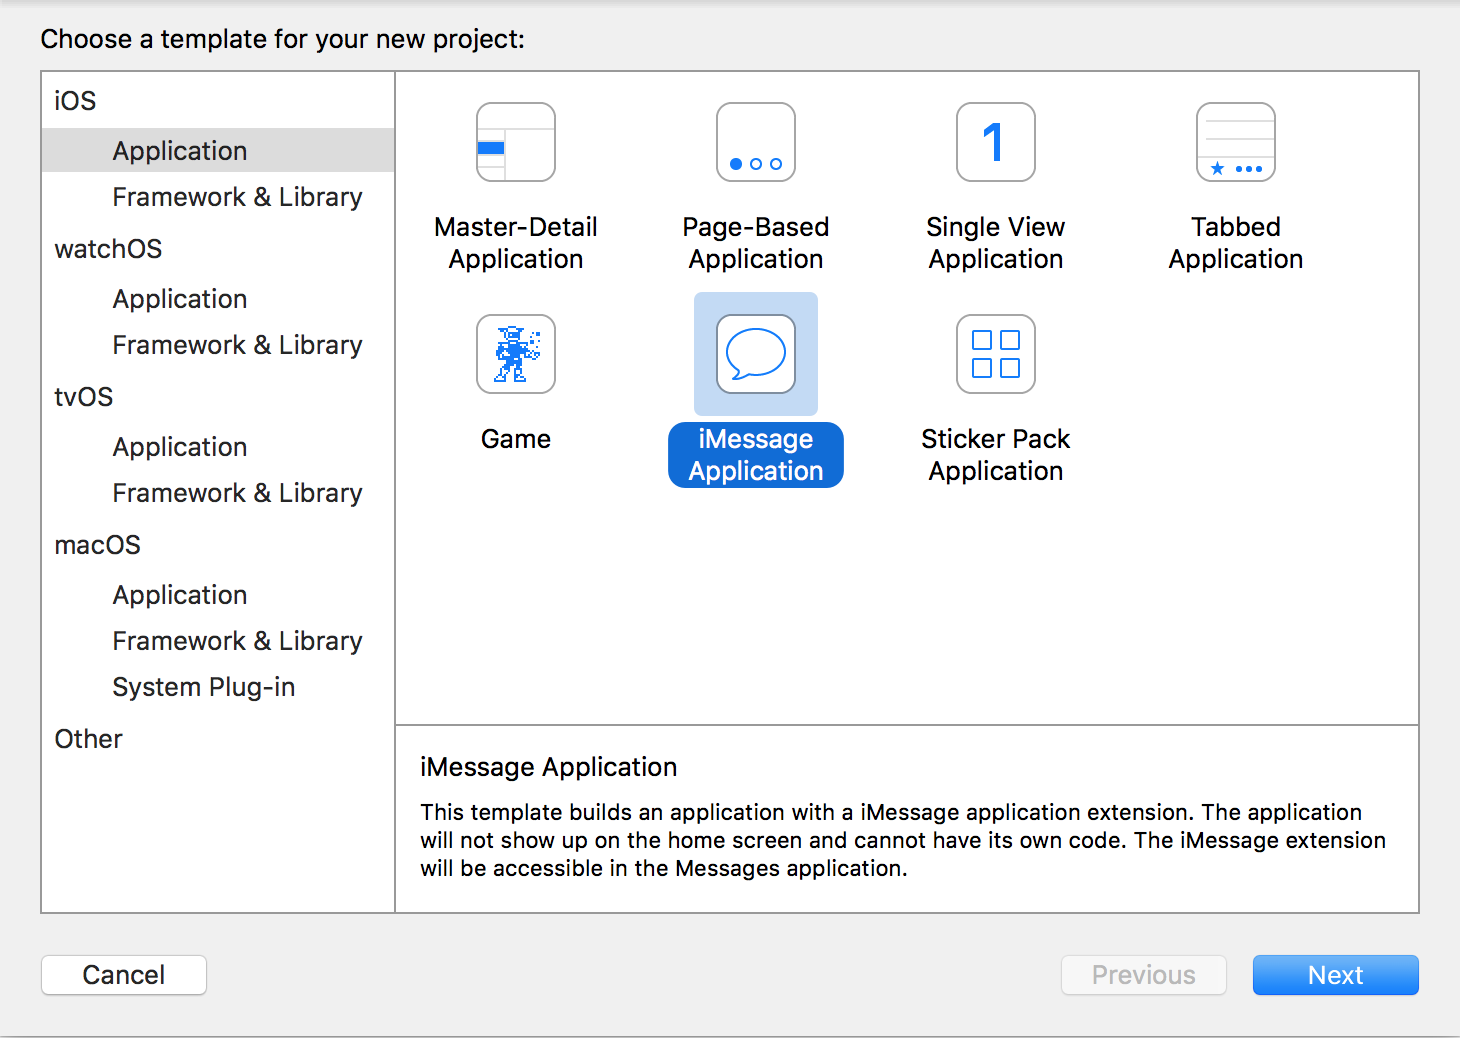
Figure 1-4. Creating a full-fledged iMessage app
-
Enter the product name for your project and then click Next (Figure 1-5). Choose Swift as the language, of course!
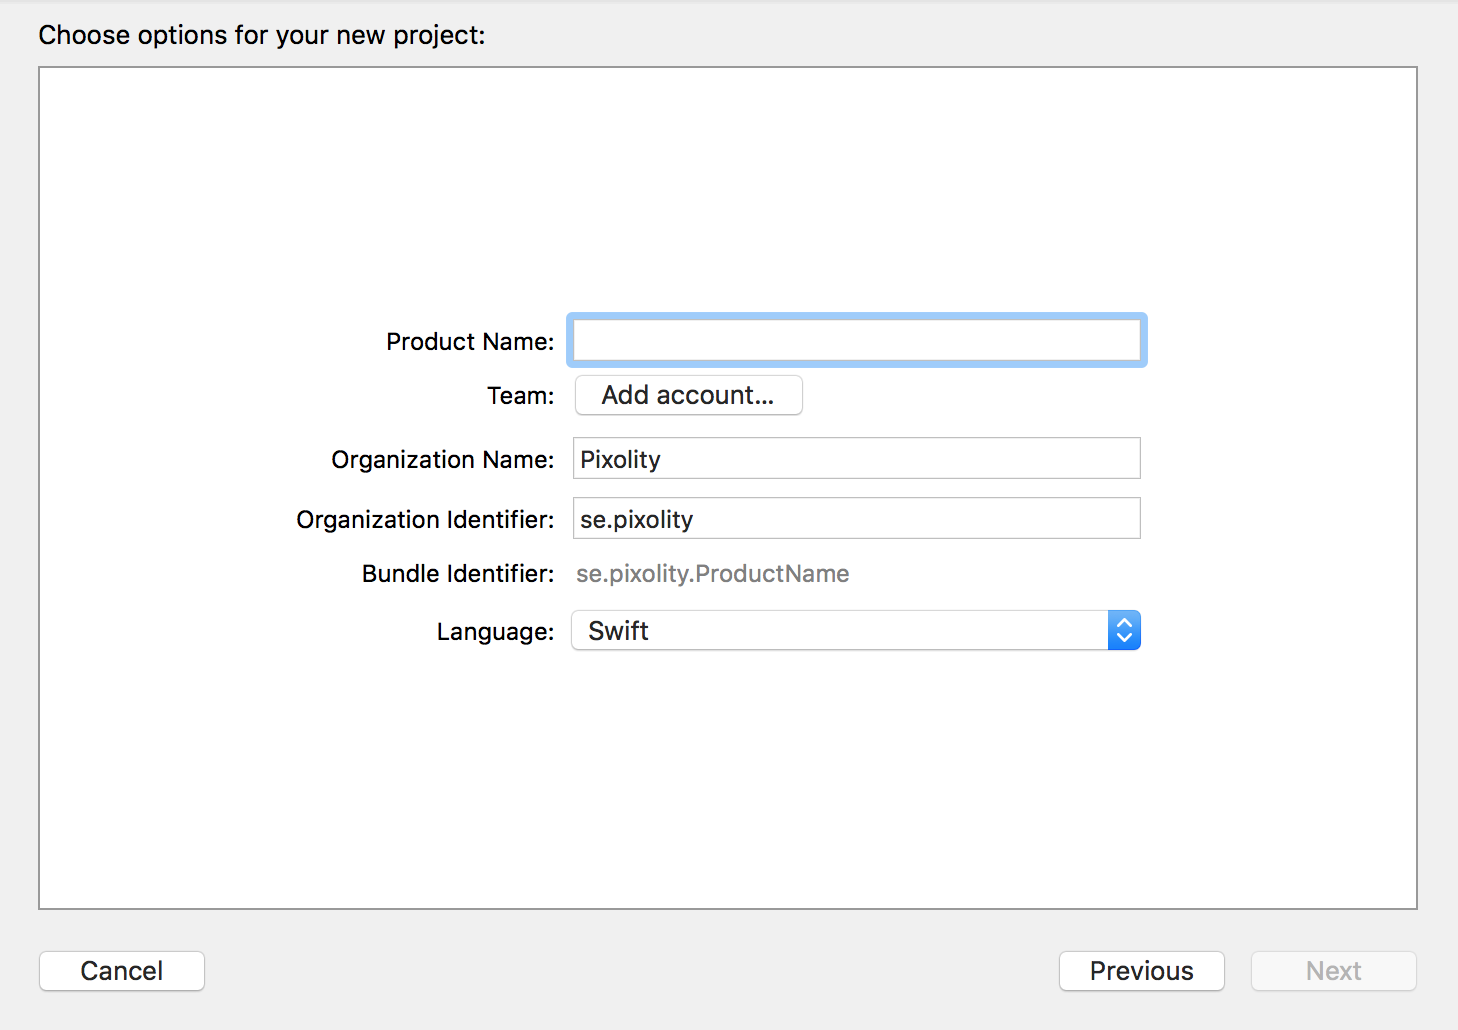
Figure 1-5. Enter your product name in this screen
- You will be asked to save your project somewhere. Do so and then you should see Xcode open up your project.
Discussion
Now that you have created your iMessage app, it’s time to learn a bit about what’s new in the Messages framework for iOS 10 SDK. This framework contains many classes, the most important of which are:
MSMessagesAppViewController- The main view controller of your extension. It gets displayed to users when they open your iMessage application.
MSStickerBrowserViewController- A view controller that gets added to the app view controller and is responsible for displaying your stickers to the user.
MSSticker- A class that encapsulates a single sticker. There is one
MSStickerfor each sticker in your pack. MSStickerView- Every sticker instance in MSSticker has to be placed inside a view to be displayed to the user in the browser view controller.
MSStickerViewis the class for that view.
For the sake of simplicity, in this recipe, I am going to hover over /System/Library/CoreServices/CoreTypes.bundle/Contents/Resources/, grab the first three ICNS files out of there, and export them, using Preview.app, into my desktop as PNG files with alpha. Then I am going to drag and drop them into the Assets.xcassets file in my Xcode project under the MessagesExtension section; not the main app’s Assets.xcassets file.
When you build an iMessage application as we have just done, your app is then separated into two entry points:
- The iOS app entry point with your app delegate and the whole shebang
- The iMessage app extension entry point
This is unlike the sticker pack app that we talked about earlier in this chapter. Sticker pack apps are iMessage apps but have no iOS apps attached to them. Therefore there is no code to be written. In full-fledged iMessage apps, your app is divided into an iOS app and an iMessage app, so you have two of some files, such as the Assets.xcassets file.
Even with custom sticker pack applications, you can build the apps in two different ways:
- Using the existing Messages classes, such as
MSStickerBrowserViewController, which do the heavy lifting for you - Using custom collection view controllers that will be attached to your main
MSMessagesAppViewControllerinstance
This recipe explores the first method, because it is much easier to explain and carry out. Once you have created the main structure of your application as described in this recipe’s Solution, follow these steps to program the actual logic of the app:
- Drag and drop your PNG stickers into your project’s structure, on their own and not in an asset catalog. The reason is that we need to find them using their URLs, so we need them to sit on the disk directly.
-
Create a new Cocoa Touch class in your project (Figure 1-6) that will be your
MSStickerBrowserViewControllerinstance.
Figure 1-6. Creating a new Cocoa Touch class
-
Give your class the name of
BrowserViewController(Figure 1-7), ensure it is of typeMSStickerBrowserViewController, and then click Next.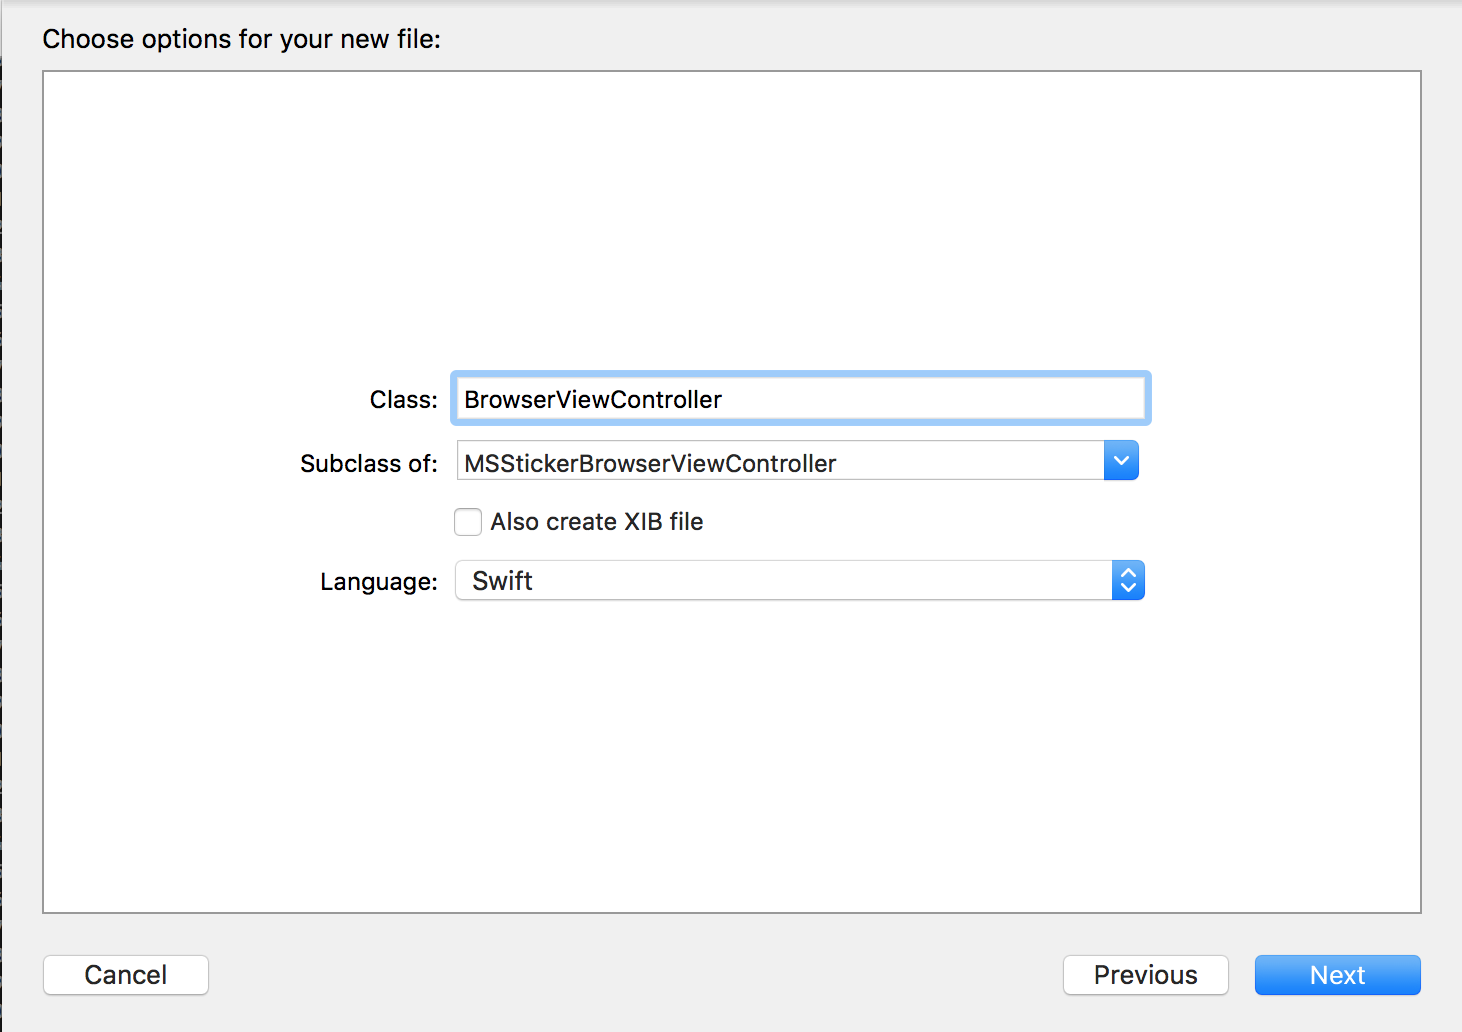
Figure 1-7. Creating your browser view controller
- Save your file inside your project in the new dialog that appears.
-
I have added three icons to my project: Burning, Alert, and Accounts. I grabbed them from /System/Library/CoreServices/CoreTypes.bundle/Contents/Resources/ as described earlier. So it would be nice if my
MSStickerclass had an initializer where I could just give it the name of the sticker, instead of the path of the image to which it relates. I accomplish this by doing a search at runtime in the resources for my app. I’ve created aMSStickerItemenumeration, whose three items match the names of the images I dropped into my project. The extended initializer for ourMSStickernow accepts an instance ofMSStickerItemand uses its name to find the path of the image to apply to the sticker.extensionMSSticker{enumMSStickerItem:String{caseBurning,Alert,Accounts}convenienceinit(item:MSStickerItem)throws{tryself.init(contentsOfFileURL:Bundle.main.url(forResource:item.rawValue,withExtension:"png")!,localizedDescription:"")}} -
In the newly created
BrowserViewController, I create an array of my stickers:class BrowserViewController: MSStickerBrowserViewController { let stickers = [ try! MSSticker(item: .Burning), try! MSSticker(item: .Alert), try! MSSticker(item: .Accounts), ] ... - Your instance of
MSStickerBrowserViewControllerhas a property calledstickerBrowserViewof typeMSStickerBrowserView, which in turn has a property nameddataSourceof typeMSStickerBrowserViewDataSource?. Your browser view controller by default will become this data source, which means that you need to implement all the non-optional methods of this protocol, such asnumberOfStickers(in:). So let’s do that now:
overridefuncnumberOfStickers(instickerBrowserView:MSStickerBrowserView)->Int{returnstickers.count}overridefuncstickerBrowserView(_stickerBrowserView:MSStickerBrowserView,stickerAtindex:Int)->MSSticker{returnstickers[index]}
Note
I’m explicitly unwrapping the optional value of the MSSticker instance here because I know that those instances exist in my code. If you are careful with optionals, like I am, in production code, try to read the values first and then unwrap them only if they exist.
Our browser view controller is done, but how do we display it to the user? Remember our MSMessagesAppViewController? Well, the answer is through that view controller. In the viewDidLoad() function of the aforementioned view controller, load your browser view controller and add it as a child view controller:
overridefuncviewDidLoad(){super.viewDidLoad()letcontroller=BrowserViewController(stickerSize:.regular)controller.willMove(toParentViewController:self)addChildViewController(controller)ifletvcView=controller.view{view.addSubview(controller.view)vcView.frame=view.boundsvcView.translatesAutoresizingMaskIntoConstraints=falsevcView.leftAnchor.constraint(equalTo:view.leftAnchor).isActive=truevcView.rightAnchor.constraint(equalTo:view.rightAnchor).isActive=truevcView.topAnchor.constraint(equalTo:view.topAnchor).isActive=truevcView.bottomAnchor.constraint(equalTo:view.bottomAnchor).isActive=true}controller.didMove(toParentViewController:self)}
Now press the Run button on Xcode to run your application on the simulator. You will see a screen similar to Figure 1-8.
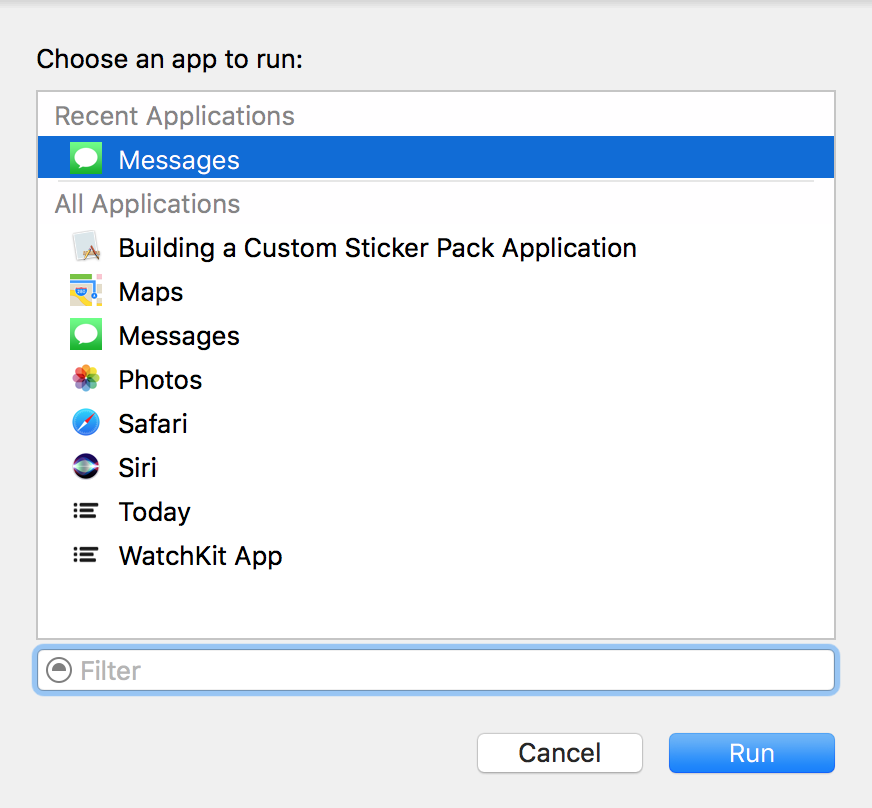
Figure 1-8. Xcode asking you which app on the simulator to attach your app to
In this list, simply choose the Messages app and continue. Once the simulator is running, you can manually open the Messages app, go to an existing conversation that is already placed for you there by the simulator, and press the Apps button on the keyboard. Then choose your app from the list and see your stickers inside the simulator (Figure 1-9).
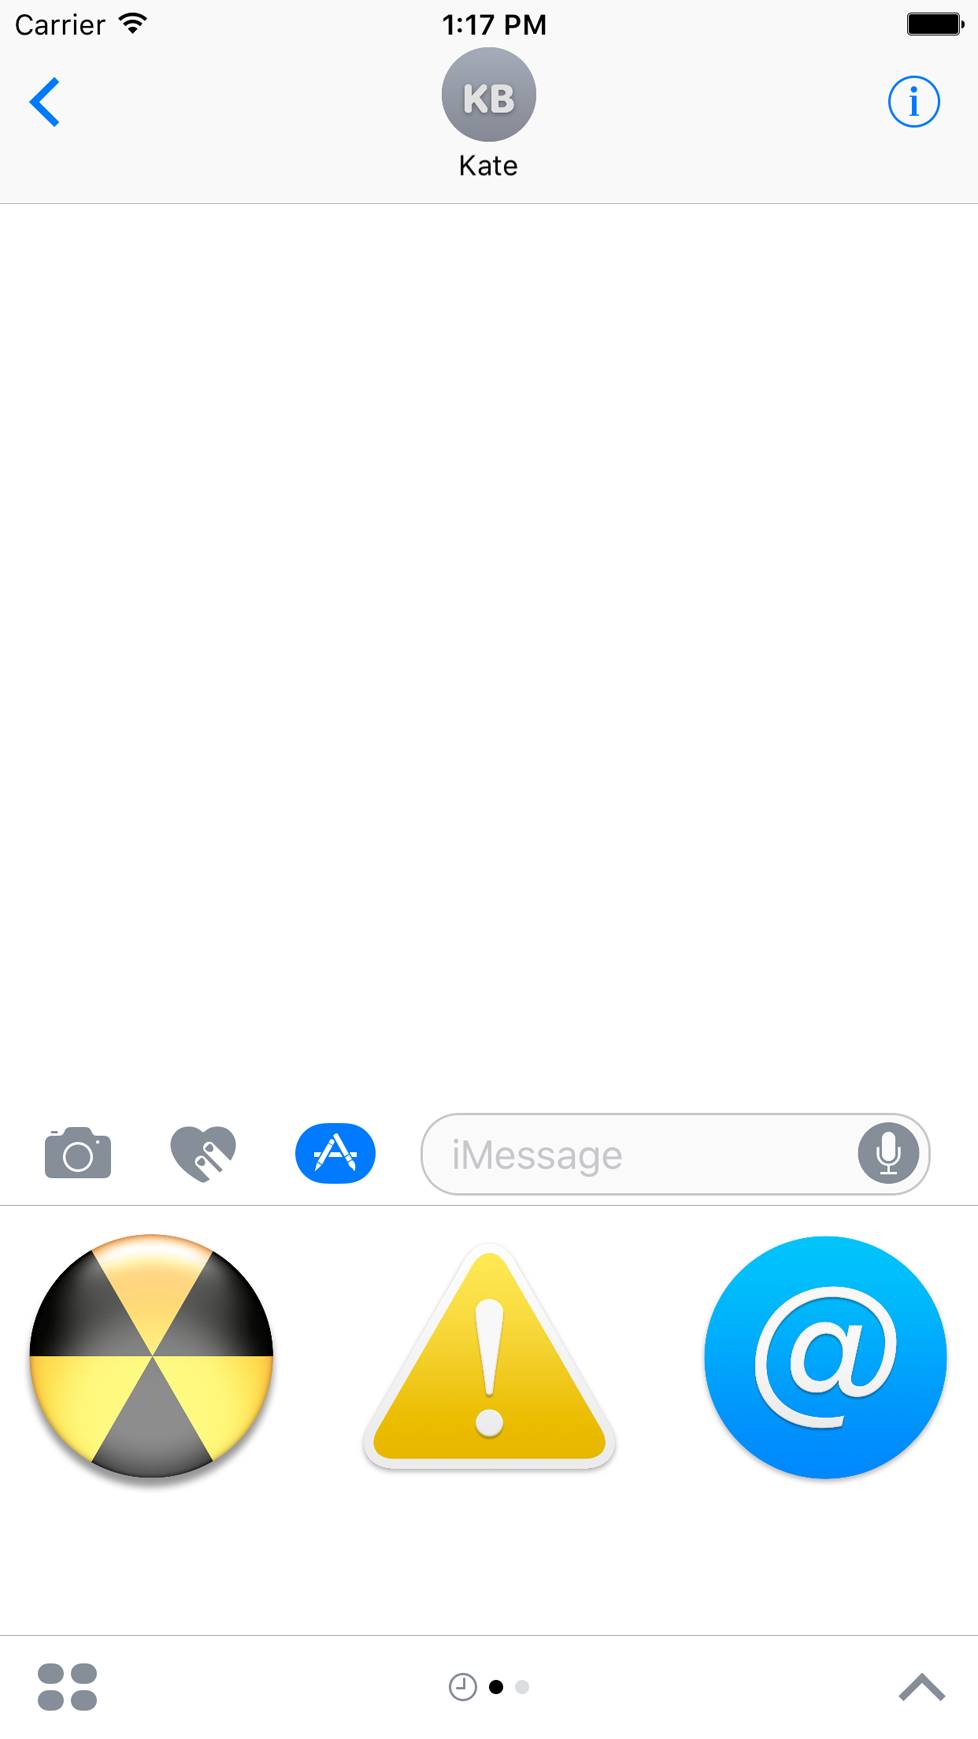
Figure 1-9. Our stickers are displayed correctly in the iMessage app and can be clicked to be sent to the recipient
1.4 Adding an iMessage App Extension to an Existing App
Problem
Fully fledged iMessage apps can either stand on their own, without a host iOS app, or be attached to a host iOS app. This recipe shows how to add a new iMessage app extension to an existing app. This in turn allows you to add an iMessage app extension to one of your existing iOS apps so that you can send custom stickers and provide extra functionality to the existing iMessage app.
Solution
Create an iMessage Extension and provide the required app icons to it. Follow these steps:
- Open your project in Xcode.
-
Add a new target of type iMessage Extension to your project (Figure 1-10).
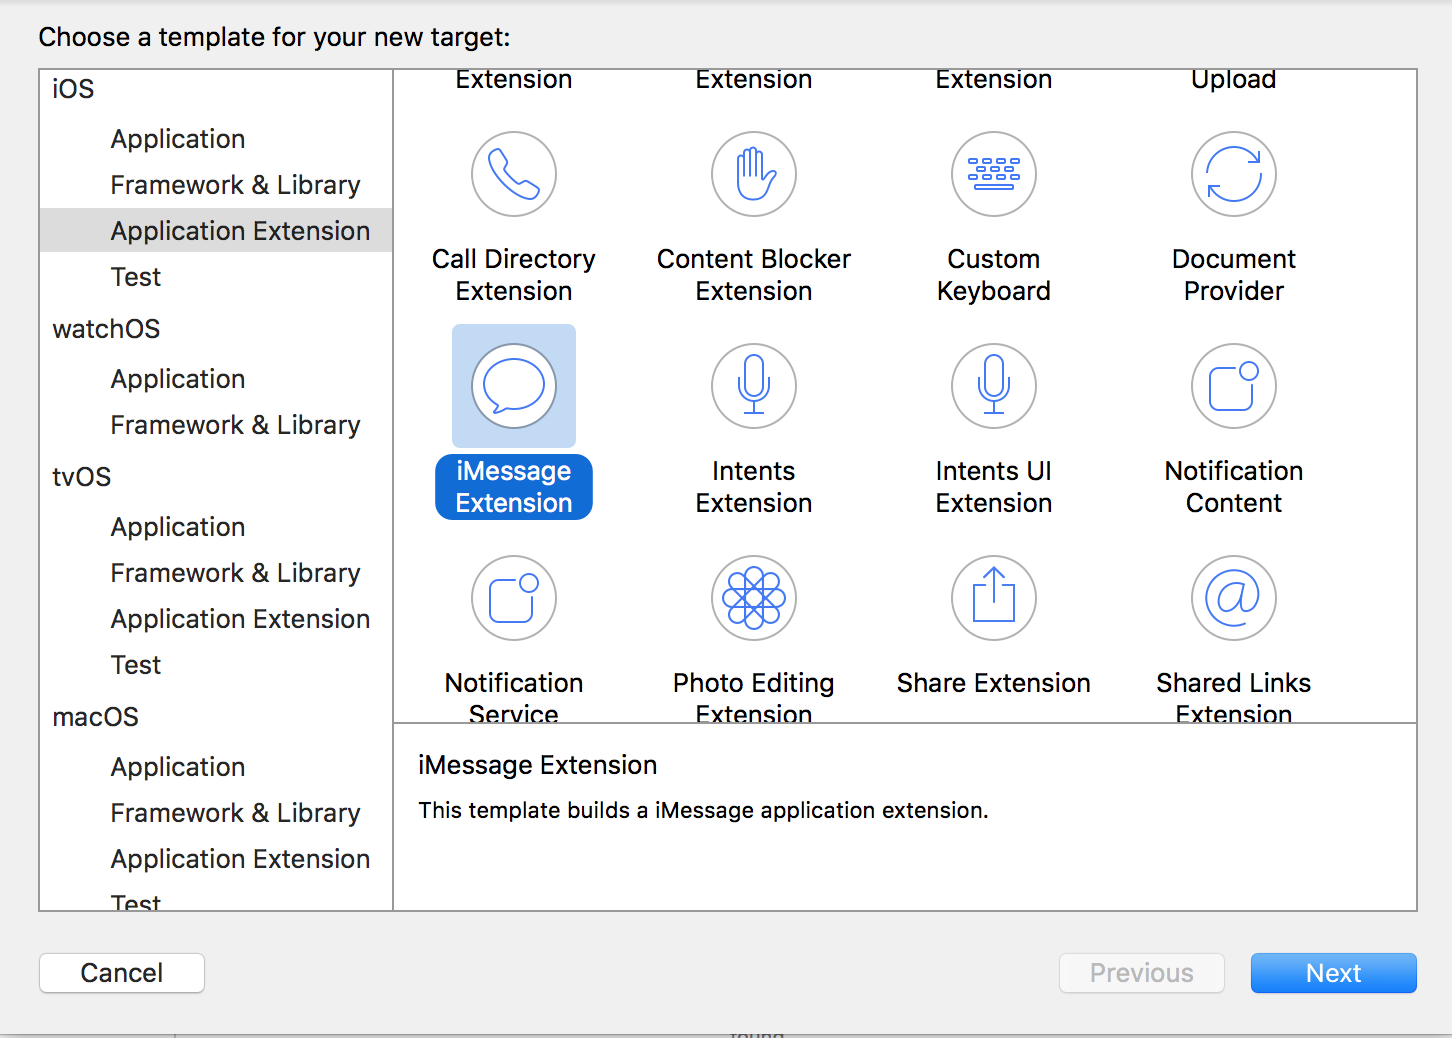
Figure 1-10. Adding an iMessage extension to your app
-
On the next screen, enter your extension’s product name and other information (Figure 1-11).
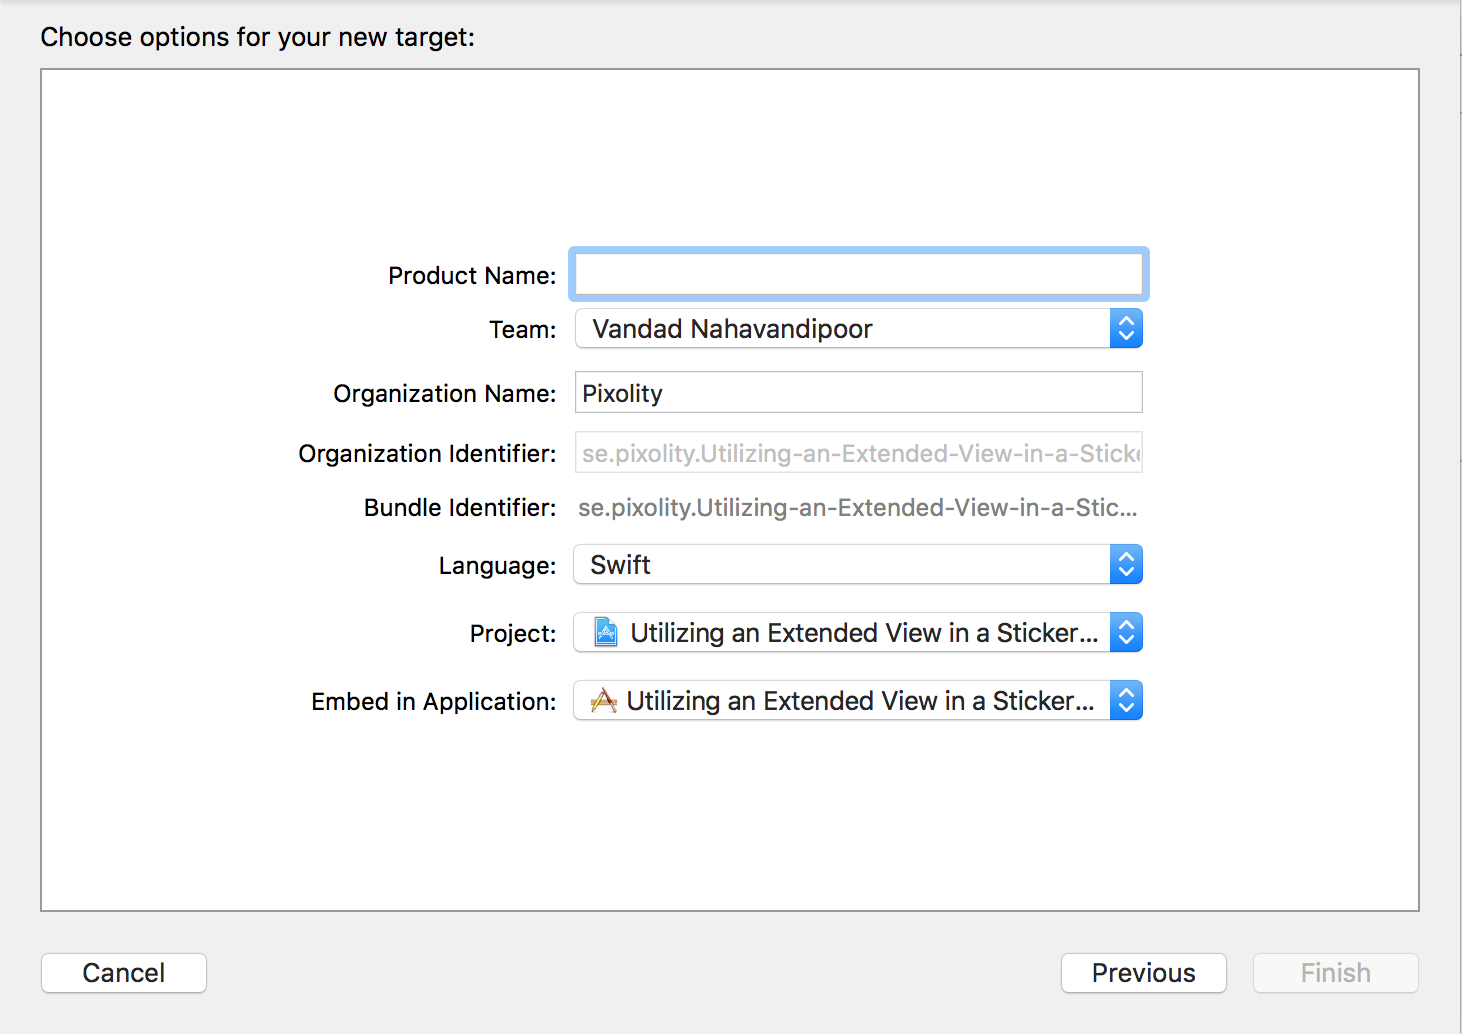
Figure 1-11. Now you need to provide a name for the new extension
- Then save your new extension to disk and add it to your project.
Discussion
One of the important steps in creating an extension is to add the required icons, so that they appear correctly in the iMessage apps list. Extensions work fine and can be tested without icons, but they will not be accepted to the iMessage app store without appropriate icons.
1.5 Utilizing an Expanded View in a Sticker Pack App
Solution
To solve this problem, use the requestPresentationStyle(_:) function of the MSMessagesAppViewController class to request an expanded view. The parameter that you pass to this function is of type MSMessagesAppPresentationStyle and can take the value of either compact (the default) or expanded.
Discussion
Let’s have a look at an example where we put all of this information together to create a functioning application that allows the user to control the size of your rendered app. The user presses a plus button on the interface to expand the extension’s view, and can then change the interface back to the compact mode. By default, all extensions launch in the compact mode and can then be changed by the user herself.
Follow these steps to create an iMessage app extension that allows the user to expand its view:
- Open Xcode and ensure that you have an application with an iMessage Extension, as explained in Recipe 1.4.
- Open your extension’s MainInterface.storyboard file and then drag a collection view controller and a normal view controller to the scene. Set the collection view controller’s class to
StickersViewControllerand the normal view controller’s class toExpandedStickersViewController. We are going to create these two classes now. - Create a new Cocoa Touch class of type
UICollectionViewControllerand set its name toStickersViewController. Ensure that you don’t create a XIB file for it, since its interface is already on our storyboard. SetStickersViewControlleras the Storyboard ID of this view controller in the identity inspector of IB. - Also create another Cocoa Touch class of type
UIViewControllerand name itExpandedStickersViewController. SetExpandedStickersViewControlleras the Storyboard ID of this view controller in the identity inspector of IB. -
Select your storyboard collection view controller. In the cell that is already created for you in IB, drag and drop an instance of
UIButton, set its text to a simple+(plus sign), and then enlarge the font so that it is visible enough for a typical user (Figure 1-12). Also set the reuse identifier of this cell toCellin IB.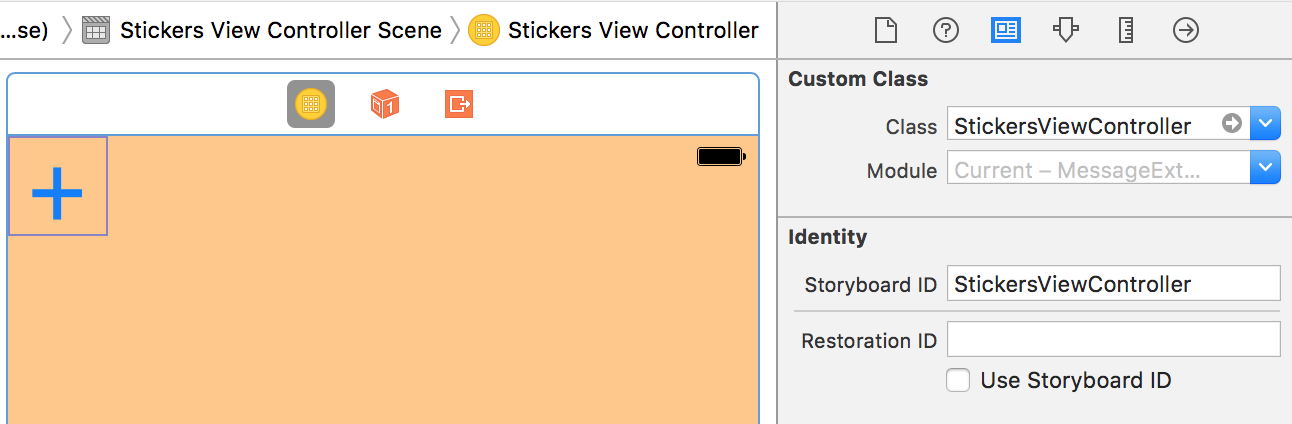
Figure 1-12. Our collection view Storyboard ID is set along with the creation of the button on our cell
- Ensure that the button that you placed on your cell has no user interactions enabled. Otherwise, it will trap all touch events. We want to trap the touch events through the parent collection view controller. So go to the Attributes inspector of IB on your button and deselect the User Interaction Enabled checkbox.
-
Open your StickersViewController.swift file and define a protocol for your collection view controller so that any other class can become its delegate. Later, when the user presses the + button on the collection view, you can report this to your delegate object:
importUIKitprotocolStickersViewControllerDelegate:class{funcplusButtonTappedOn(controller:UIViewController)}protocolHasStickersDelegate:class{weakvardelegate:StickersViewControllerDelegate?{getset}}classStickersViewController:UICollectionViewController,HasStickersDelegate{weakvardelegate:StickersViewControllerDelegate?... -
Now it’s time to provide enough information for the collection view to display our single cell:
// we set this to Cell in IB as well, remember?privateletreuseIdentifier="Cell"overridefuncnumberOfSections(incollectionView:UICollectionView)->Int{return1}overridefunccollectionView(_collectionView:UICollectionView,numberOfItemsInSectionsection:Int)->Int{return1}overridefunccollectionView(_collectionView:UICollectionView,cellForItemAtindexPath:IndexPath)->UICollectionViewCell{letcell=collectionView.dequeueReusableCell(withReuseIdentifier:reuseIdentifier,for:indexPath)returncell} -
And now we also ensure that when the + cell is tapped, we will report it to our delegate:
overridefunccollectionView(_collectionView:UICollectionView,didSelectItemAtindexPath:IndexPath){guardindexPath.row==0&&indexPath.section==0else{return}delegate?.plusButtonTappedOn(controller:self)} -
Now go to the MessagesViewController.swift file and define the storyboard identifiers of the two view controllers that we just created:
importUIKitimportMessagesstructIdentifiers{staticletStickersViewController="StickersViewController"staticletExpandedStickersViewController="ExpandedStickersViewController"} -
Let’s also extend
UIViewControllerwith a function that allows us to add any view controller to our messages app view controller:extensionUIViewController{funcaddTo(appViewControllerhost:MSMessagesAppViewController){// see if this view controller has a delagete and then set it to// the host view controller if yesifletdelegate=hostas?StickersViewControllerDelegate,letvc=selfas?HasStickersDelegate{vc.delegate=delegate}willMove(toParentViewController:host)host.addChildViewController(self)view.frame=host.view.boundsview.translatesAutoresizingMaskIntoConstraints=falsehost.view.addSubview(view)view.leftAnchor.constraint(equalTo:host.view.leftAnchor).isActive=trueview.rightAnchor.constraint(equalTo:host.view.rightAnchor).isActive=trueview.topAnchor.constraint(equalTo:host.view.topAnchor).isActive=trueview.bottomAnchor.constraint(equalTo:host.view.bottomAnchor).isActive=truedidMove(toParentViewController:host)}} -
Then let’s add a function called
loadViewController(forPresentationStyle:)to ourMessagesViewControllerclass. In this function, we take the incoming presentation style of typeMSMessagesAppPresentationStyleand then load either the collection view controller (for compact mode) or the normal view controller (for expanded mode).classMessagesViewController:MSMessagesAppViewController,StickersViewControllerDelegate{funcloadViewController(forPresentationStyle:MSMessagesAppPresentationStyle)->Bool{childViewControllers.forEach{$0.willMove(toParentViewController:nil)$0.view.removeFromSuperview()$0.removeFromParentViewController()($0as?HasStickersDelegate)?.delegate=nil}letvcId:StringswitchpresentationStyle{case.compact:vcId=Identifiers.StickersViewControllercase.expanded:vcId=Identifiers.ExpandedStickersViewController}guardletvc=storyboard?.instantiateViewController(withIdentifier:vcId)else{returnfalse}vc.addTo(appViewController:self)returntrue}... -
Because we have become the delegate of the collection view controller, we also need to implement its delegate method:
funcplusButtonTappedOn(controller:UIViewController){let_=loadViewController(forPresentationStyle:.expanded)requestPresentationStyle(.expanded)} - We can also load the appropriate view controller based on the reported presentation styles, via methods already defined on
MSMessagesAppViewController:
overridefuncwillBecomeActive(withconversation:MSConversation){// Called when the extension is about to move from the// inactive to active state.// This will happen when the extension is about to present UI.// Use this method to configure the extension and restore previously// stored state.let_=loadViewController(forPresentationStyle:.compact)}overridefuncwillTransition(topresentationStyle:MSMessagesAppPresentationStyle){// Called before the extension transitions to a new presentation style.// Use this method to prepare for the change in presentation style.let_=loadViewController(forPresentationStyle:presentationStyle)}overridefuncdidTransition(topresentationStyle:MSMessagesAppPresentationStyle){// Called after the extension transitions to a new presentation style.// Use this method to finalize any behaviors associated with the// change in presentation style.let_=loadViewController(forPresentationStyle:presentationStyle)}
Run your project now on the simulator. You will now see a plus button in the list, as shown in Figure 1-13.
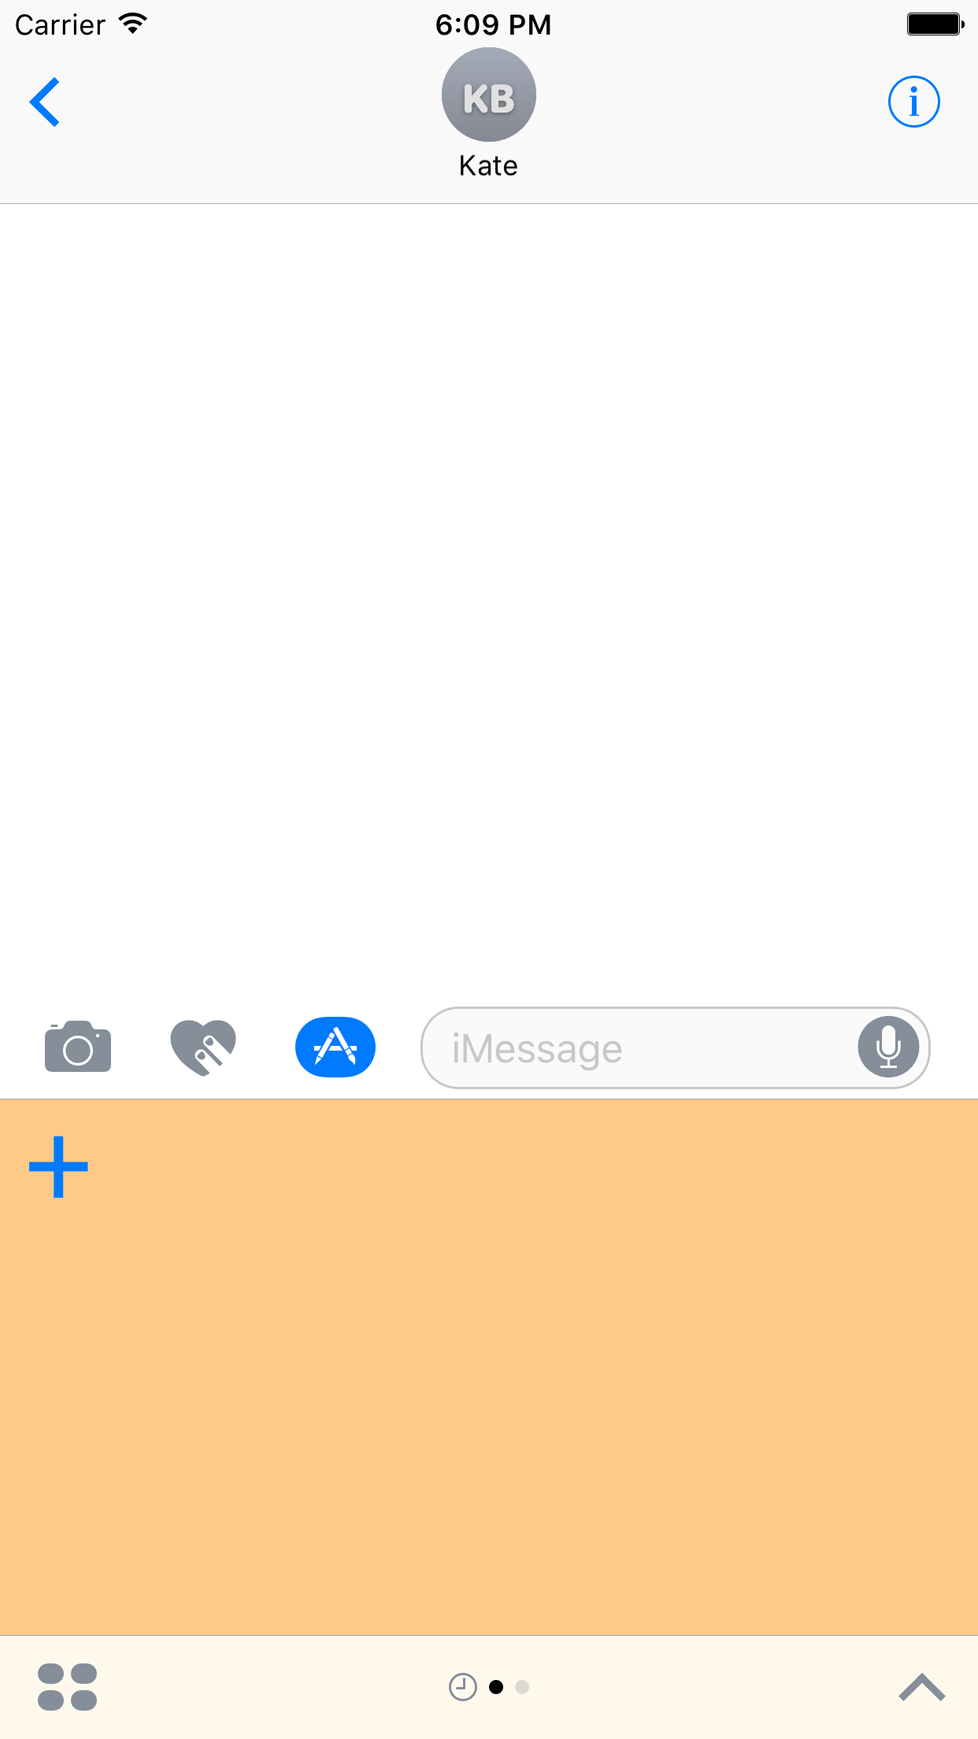
Figure 1-13. Our plus button is shown properly on the compact mode of our extension
Once the user taps this button, our extension will request the expanded presentation style (Figure 1-14).
Figure 1-14. Our iMessage extension is now expanded
You can see that the system provides a bar button item on the navigation bar, which, when tapped, will send the extension back to the compact mode.
1.6 Appending Rich Information to Stickers
Solution
- Create an instance of
MSMessage. - Create a layout object of type
MSMessageTemplateLayoutand set its properties, such asimageandcaption. - Once the template is ready, set it as the
templateproperty of the message object. - Send the message to the current conversation using the
insert(_:completionHandler:)function of the active conversation object of typeMSConversation.
Note
Your MSMessagesAppViewController instance has a property called activeConversation of type MSConversation?. You can use this optional property to get a reference to your active conversation. Ideally, this property should always be present, but officially it’s optional so you can’t assume its presence. Always check its value against nil and then handle the situation properly if it is not present.
Discussion
In this recipe we are going to build a new application based on what we discussed in Recipe 1.5. The difference in this recipe is that, when the user presses the + button on our iMessage extension, we will send a prebuilt sticker to the recipient. I have already placed an image called Accounts.png inside the image asset catalog of my iMessage extension so that I can open it using an instance of UIImage. You can also do the same thing. I grabbed this image out of the Accounts.icns file at /System/Library/CoreServices/CoreTypes.bundle/Contents/Resources/.
If you recall from Recipe 1.5, when the + button gets tapped, we call the plusButtonTappedOn(controller:) function of our delegate object, which in this case is our instance of MSMessagesAppViewController. In our current recipe, we will rewrite the code in this function so that we create an instance of MSMessage and send it to the recipient. So follow these steps to rewrite this code:
-
Retrieve the current conversation object:
funcplusButtonTappedOn(controller:UIViewController){guardletconversation=activeConversationelse{fatalError()}... -
Retrieve the existing session. If one doesn’t exist, create one:
letsession=conversation.selectedMessage?.session??MSSession() -
Instantiate your message object:
letmessage=MSMessage(session:session) -
Create your layout object and assign all its properties to your chosen values:
letlayout=MSMessageTemplateLayout()layout.image=messageImagelayout.caption="Caption"layout.imageTitle="Image title"layout.imageSubtitle="Image subtitle"layout.trailingCaption="Trailing caption"layout.subcaption="Subcaption"layout.trailingSubcaption="Trailing subcaption" - Once the layout is ready, insert the message into the conversation:
message.layout=layoutconversation.insert(message){errorin// empty for now}
When preparing the layout object, we set its image property to messageImage. This is a custom property that I have defined on our instance of MSMessagesAppViewController. All it does is call UIGraphicsImageRenderer to create an image context, set the background color of the context to black, and then draw the Accounts.png file on top of the black background so that the white text that our layout object renders will eventually be visible on the black background:
varmessageImage:UIImage?{guardletimage=UIImage(named:"Accounts")else{returnnil}letrect=image.size.rectWithZeroOriginletrenderer=UIGraphicsImageRenderer(bounds:rect)returnrenderer.image{contextinletbgColor:UIColor=.blackbgColor.setFill()context.fill(rect)image.draw(at:.zero)}}
Run your code now on the simulator and see the results for yourself (Figure 1-15).
Figure 1-15. Our message, with rich information, is ready to be sent to the recipient
The MSMessageTemplateLayout class has many useful properties, as you have just seen, so let’s explore some of them and understand what they are and what they do:
image: UIImage?- This is the actual image that will be sent as the message. This is an optional property.
caption: String?- If you look closely at Figure 1-15, you will notice that iMessage inserts a little colorful bar at the bottom of your images on which it will render the caption. This is extra information that you can add to your image, of type
String?. subcaption: String?- This gets rendered underneath the image, on the additional bar that gets displayed by default by iMessage under the caption itself.
imageTitle: String?- The title and the subtitle get rendered at the bottom of the image itself, and they are in a white color, so ensure that your image’s background is a color other than white.
imageSubtitle: String?- This is the subtitle that gets rendered underneath the title but still at the bottom-left corner of the image itself.
trailingCaption: String?- This is the trailing caption, displayed on the bottom-right corner.
trailingSubcaption: String?- This subcaption gets displayed on the bottom-right corner, underneath the trailing caption.
1.7 Creating Interactive Conversations with iMessage Apps
Solution
Inside the MSMessagesAppViewController instance of your extension, look at the activeConversation.selectedMessage property to see whether it’s set. If it is, there is a selected message that was previously sent by your iMessage app. Once you find this selected message, use its url property to create a mutable instance of the same message.
Discussion
The first message sent by user A to user B with your app will have the selectedMessage property set to nil because no previous messages were sent by your app, hence none could be selected. In this case, you can send a new message and set the url property of the message to http://app.com/. Then, when the recipient receives this message and taps on it, your extension will go into the expanded mode, and there you can find this selectedMessage and read its url property. You can then compose a new message with new data, images, etc., and set its url property to http://app.com/withnewdata. Once you send this message, iMessage realizes that you took the selected message and just changed it a little bit. Hence, iMessage will not send a new iMessage, but instead, change the selected message to the new one for both the sender and the receiver.
Let’s take what we learned in Recipe 1.6 and change the solution a little bit so that we can create such interactive conversations.
In Recipe 1.6 we have both a compact and an expanded view controller. As explained just now, when the user taps on a message that was previously sent by your app, two things will happen:
- The
willTransition(to:)function of yourMSMessagesAppViewControllerwill be called and will change your app to the expanded mode. - The
activeConversation.selectedMessageproperty of yourMSMessagesAppViewControllerwill be set to an instance ofMSMessagethat represents the selected message.
Knowing that the app is in expanded mode at this point, we are going to take the same view controller as we did in Recipe 1.6 and change its interface so that there is a button on the screen that looks like Figure 1-16.
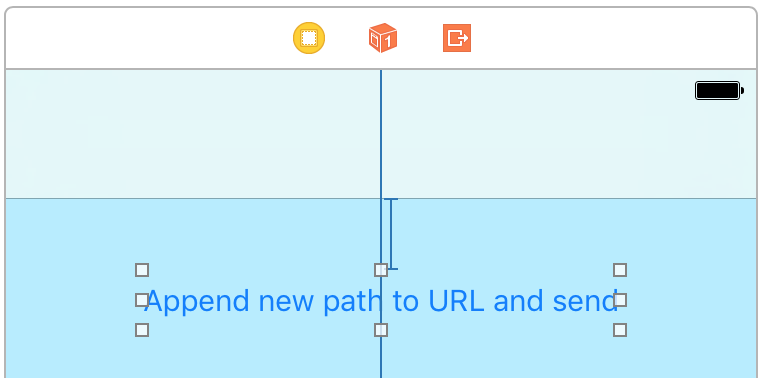
Figure 1-16. We will hook this button to our code quite soon
Also hook this button to a new function in your code:
importUIKitclassExpandedStickersViewController:UIViewController,HasStickersDelegate{weakvardelegate:StickersViewControllerDelegate?@IBActionfuncappendButtonTapped(_sender:AnyObject){delegate?.plusButtonTappedOn(self)}}
Note
I am utilizing the existing HasStickersDelegate and StickersViewControllerDelegate protocols for this view controller because our instance of MSMessagesAppViewController is concerned only with the press of the + button. When MSMessagesAppViewController traps this pressing of a button, it can read the active conversation’s selected message and hence send a new one or change the existing one if a selected message is already there.
When the button is tapped on either the compact or the expanded view controller, the plusButtonTappedOn(_:) delegate method will be called in MSMessagesAppViewController. Here, we are going to look at the selected message to see if it exists and, if it does, determine how many url components it has. So we need a property on the URL class that can count the url components for us:
extensionURL{// counts the number of path components in the URLvarpathCount:Int{letcomponents=NSURLComponents(url:self,resolvingAgainstBaseURL:false)returncomponents?.path?.components(separatedBy:"/").filter{$0.characters.count>0}.count??0}}
For instance, if the URL is http://app.com/, this property will return 0 because there is no path component after the domain name. If the URL is http://app.com/foo, the property will return 1 because foo is the single path component.
What I want to do in the plusButtonTappedOn(controller:) delegate method is send the URL of https://developer.apple.com to the conversation should there be no previously selected message in the active session. Once the first message is sent in the current session, the recipient can tap on it and then append a new path to the URL. The final path that I am going to construct is library/prerelease/ios/releasenotes/General/WhatsNewIniOS/ appended to https://developer.apple.com, so we have a total of six path components to play with. This means six bouncebacks of the same message back and forth between the sender and the recipient.
When https://developer.apple.com is sent as the first message, I would like an image to be inside the MSMessage instance with the caption “developer.apple.com/,” as shown in Figure 1-17.
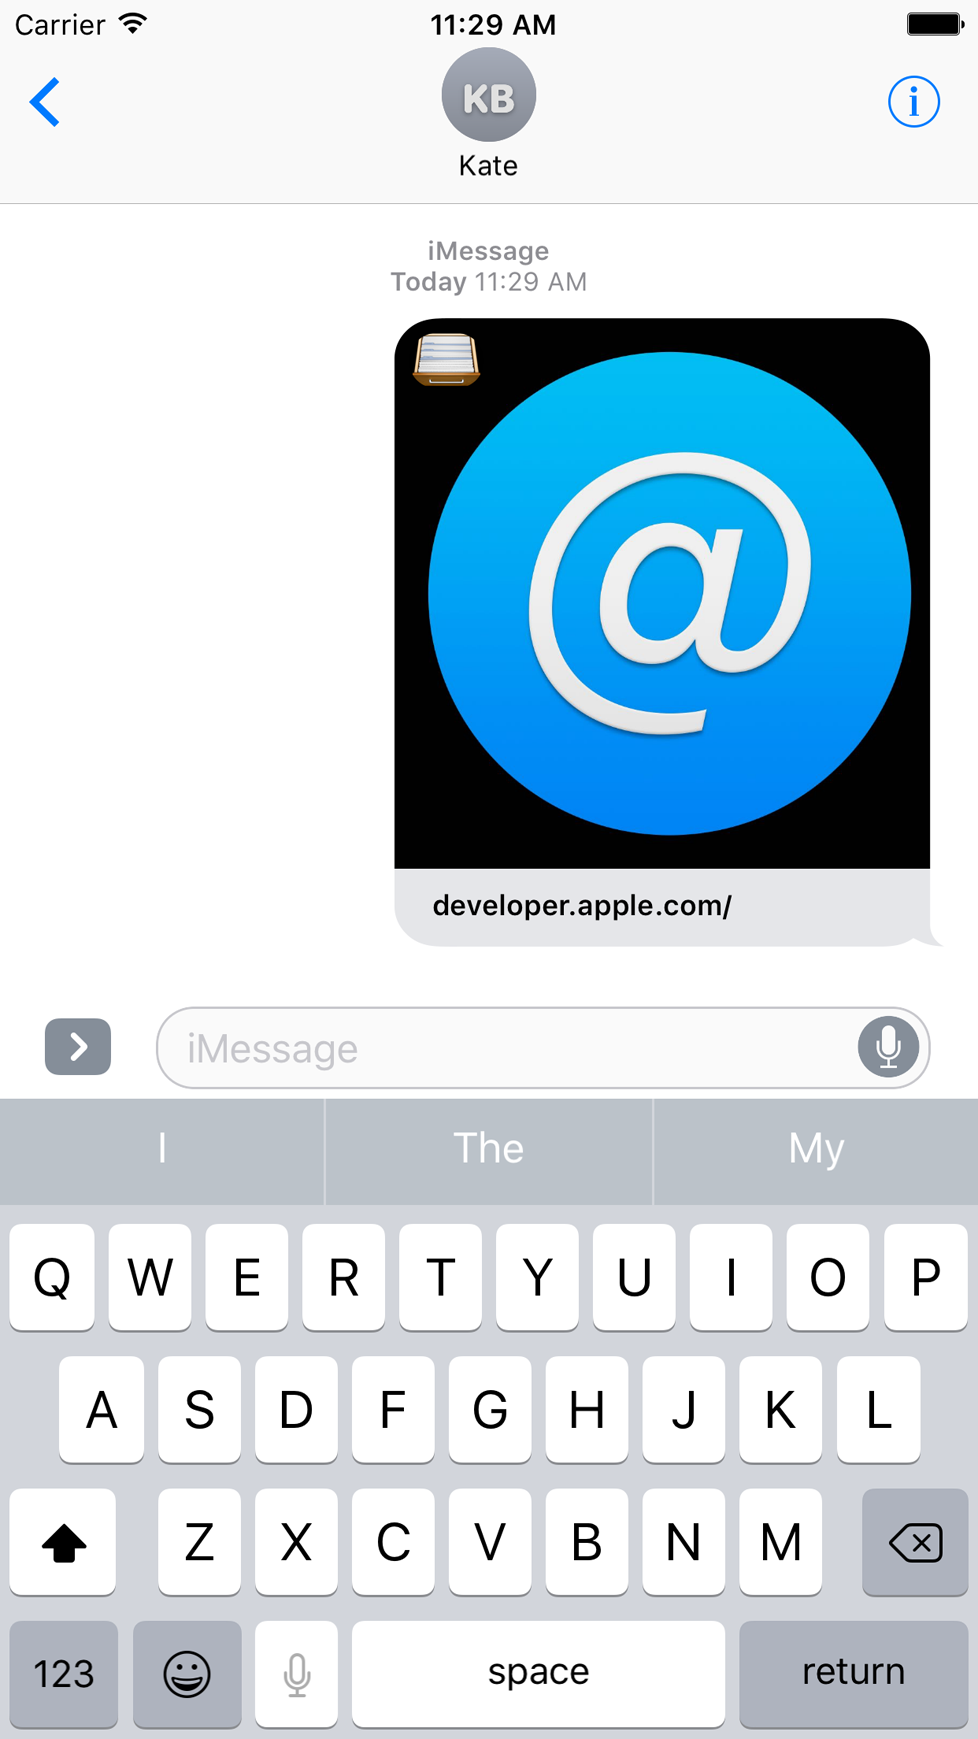
Figure 1-17. The first message in the conversation refers to developer.apple.com/
Once the recipient gets this message and taps on it, the expanded view of our app will be displayed (Figure 1-18).
Figure 1-18. The expanded view of our app is shown after the user tapped on the selected message, composed by the same app on the sender’s side
Upon tapping the button on our expanded view, we will append the next path component, “library/”, to the URL and send it over (Figure 1-19).
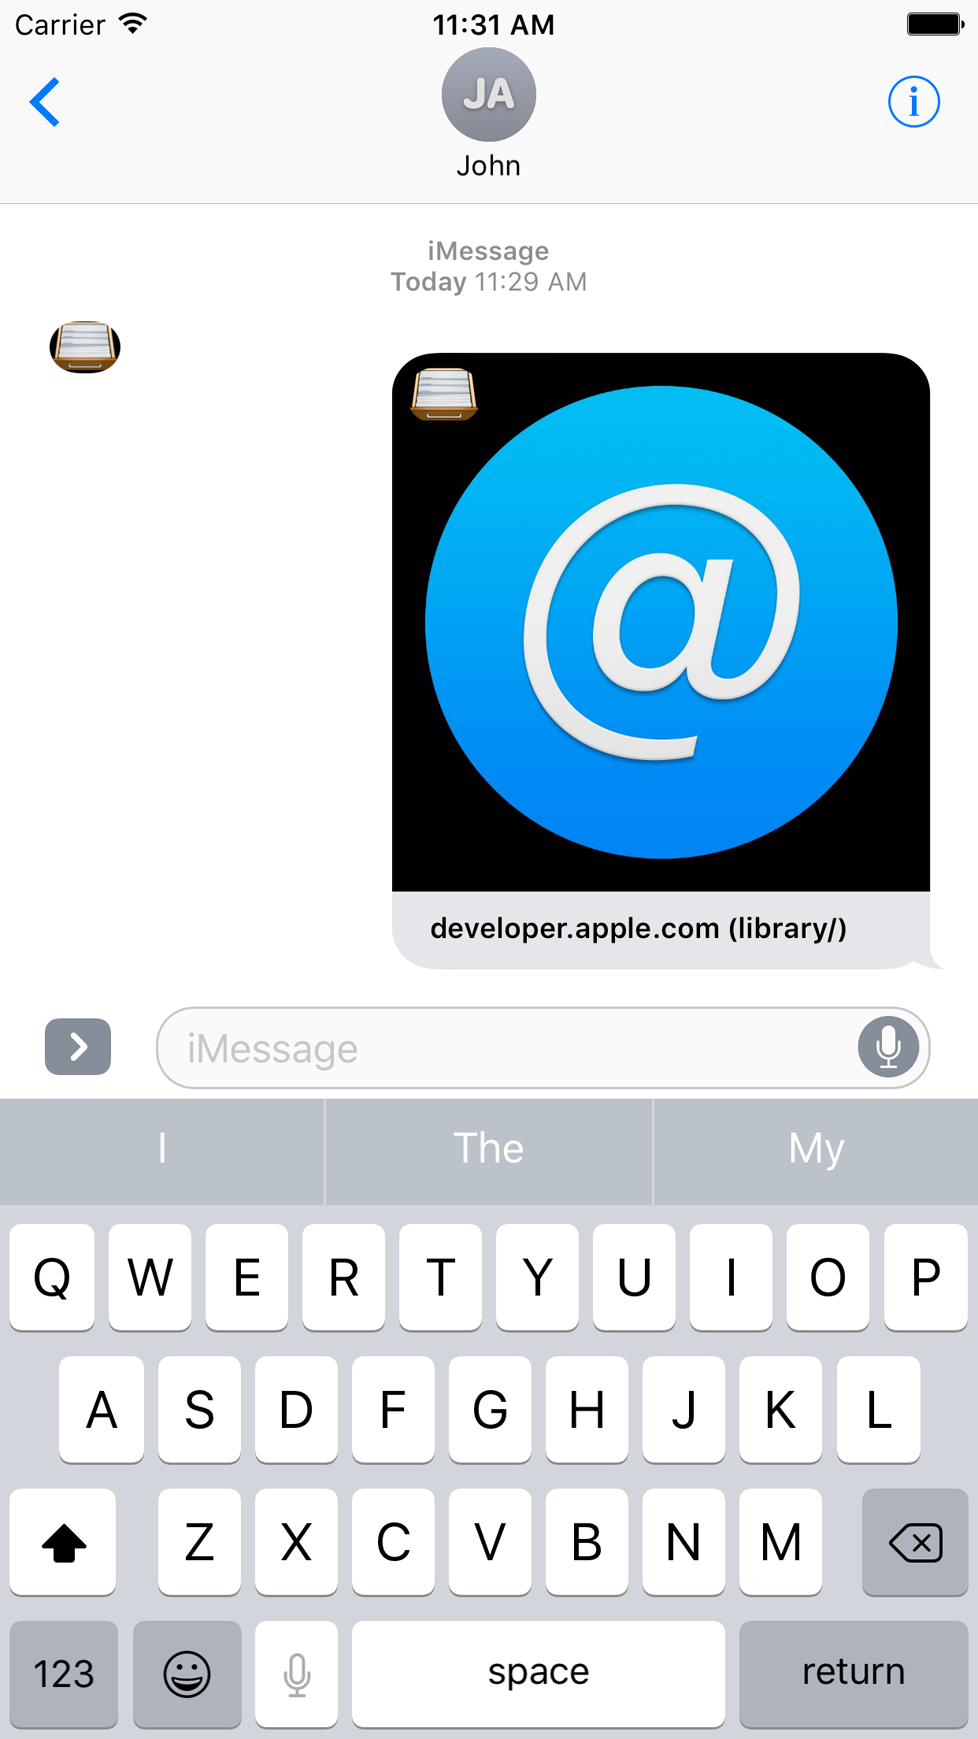
Figure 1-19. The selected message is changed to the new message with a new caption, indicating the current final path component
Once this new message is sent, the receiver will be able to select it and press the button again on the expanded view to change the message to a new one, with the next path component attached to it (Figure 1-20).
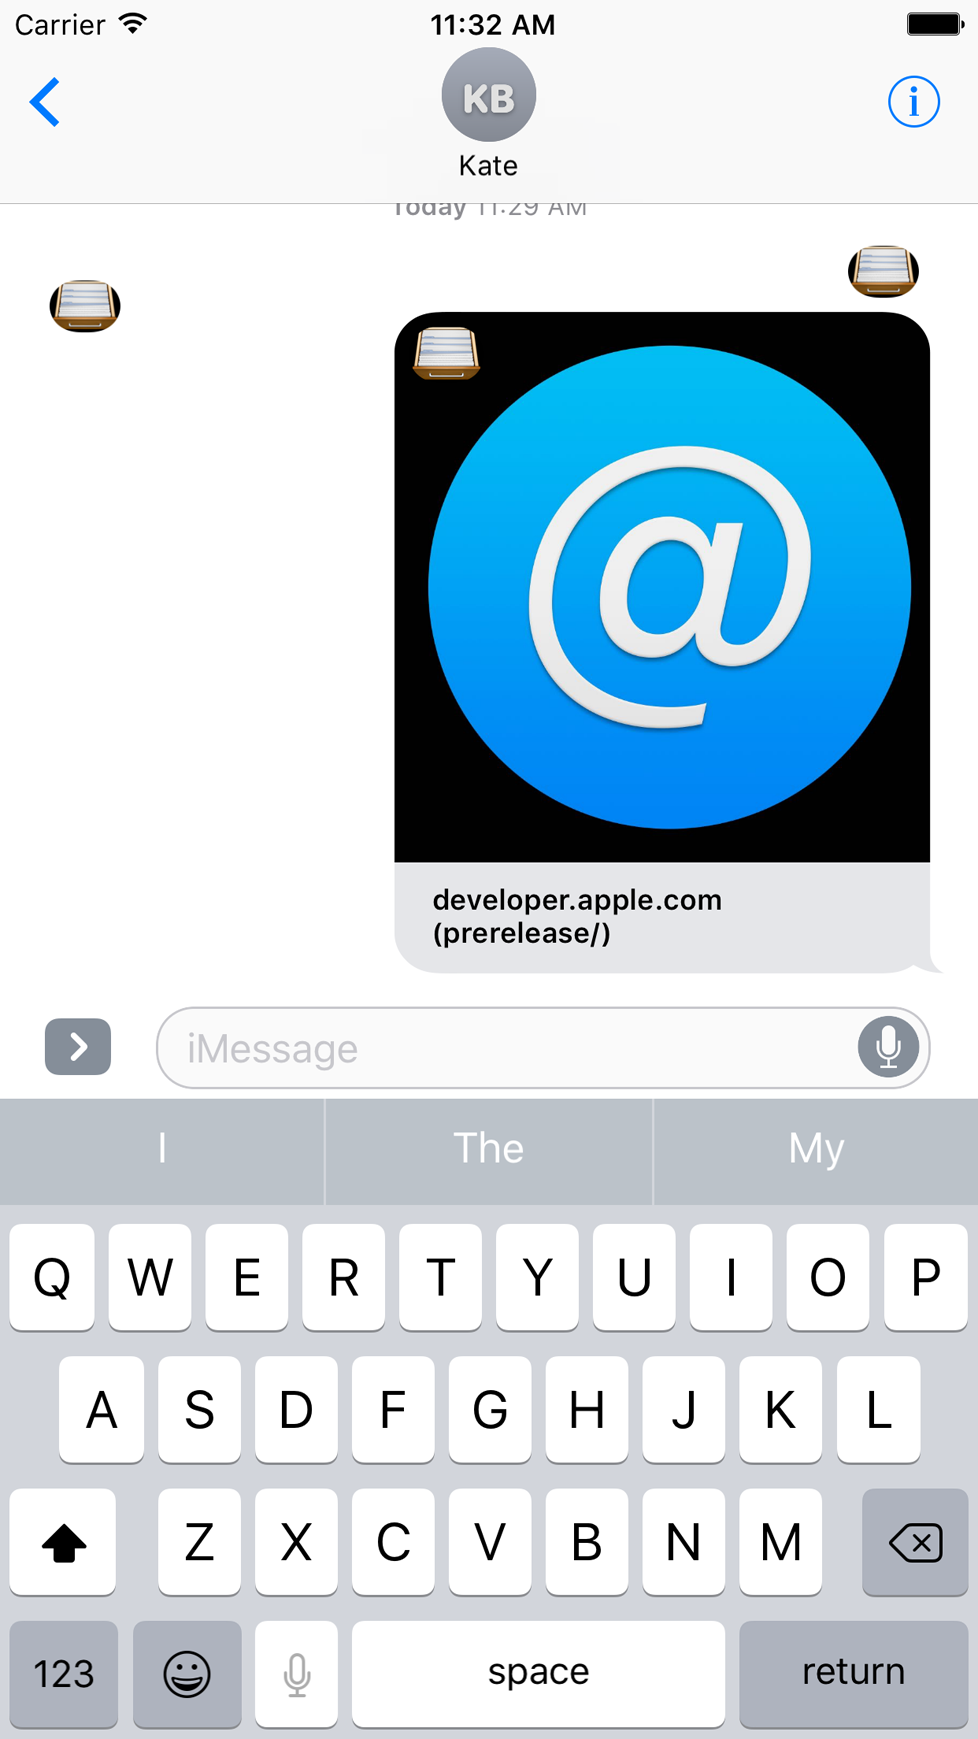
Figure 1-20. The next path component is now attached to the message
So let’s go to the plusButtonTappedOn(controller:) delegate method and define our path components:
funcplusButtonTappedOn(controller:UIViewController){letpaths=["library/","prerelease/","ios/","releasenotes/","General/","WhatsNewIniOS/"]...
We will also define the base URL:
letbase="developer.apple.com/"
We should then find the existing session (or create a new one) and find the active conversation to which we can send or append our messages:
guardletconversation=activeConversationelse{fatalError()}letsession=conversation.selectedMessage?.session??MSSession()
We will now construct our URL instance and build a caption for our image:
leturl:URLletcaption:String?ifletselectedMessageUrl=conversation.selectedMessage?.url{letpathCount=selectedMessageUrl.pathCountifpathCount<paths.count{letlastPath=paths[pathCount]// I am assuming that this will be fine, but in a production app// I will make sure not to use try!, and instead conditionally run this// code with a proper do, try, and catch statementurl=selectedMessageUrl.appendingPathComponent(lastPath)caption="\(base)(\(lastPath))"}else{url=selectedMessageUrlcaption="\(base)(\(paths.last))"}}else{url=URL(string:"https://\(base)")!caption=base}
After this is done, we will create an instance of our MSMessage with the session that we previously found and set its layout:
letmessage=MSMessage(session:session)letlayout=MSMessageTemplateLayout()layout.image=messageImagelayout.caption=captionmessage.layout=layoutmessage.url=url
Note
I explained how messageImage is implemented in Recipe 1.6.
Last but not least, we will insert this message into the conversation and, once everything is settled, call the dismiss() function of our MSMessagesAppViewController instance so that if we are in the expanded mode and the user tapped the button on the UI, we can close our expanded view so that the user can send the message:
conversation.insert(message){[weakself]erroringuardletstrongSelf=selfelse{return}strongSelf.dismiss()}
Get iOS 10 Swift Programming Cookbook now with the O’Reilly learning platform.
O’Reilly members experience books, live events, courses curated by job role, and more from O’Reilly and nearly 200 top publishers.

